英文书法
- 格式:ppt
- 大小:14.16 MB
- 文档页数:27

英文书法书写技巧第一节概述英文字母共26个,它的书写比汉字简单得多,也容易得多,但是,任何一门艺术都有自己的规律和要求。
学习任何一门艺术都是分层次、按阶段,日臻完善,渐入佳境的。
学习英文书写也是如此.初学者必须熟悉字体的形式、组合和比例,熟悉基本笔画、笔顺和运笔方法。
在此基础上,再熟悉大小写字母的配合及连写。
只有这样扎扎实实地练好书写基本功,才能写出优美、流畅的英文字。
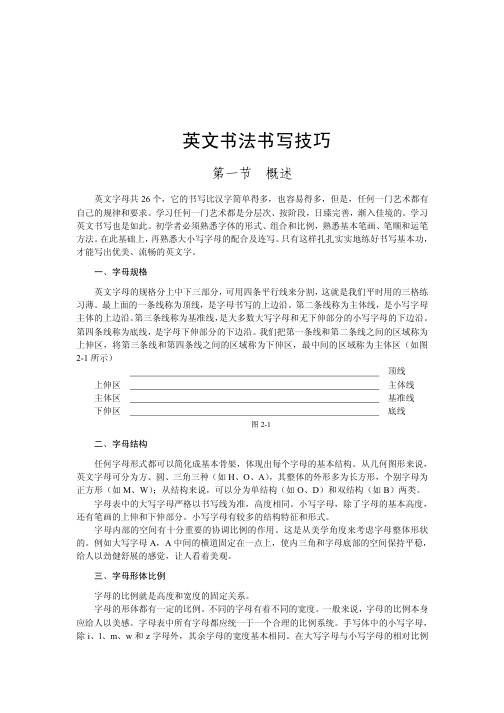
一、字母规格英文字母的规格分上中下三部分,可用四条平行线来分割,这就是我们平时用的三格练习薄。
最上面的一条线称为顶线,是字母书写的上边沿.第二条线称为主体线,是小写字母主体的上边沿。
第三条线称为基准线,是大多数大写字母和无下伸部分的小写字母的下边沿。
第四条线称为底线,是字母下伸部分的下边沿。
我们把第一条线和第二条线之间的区域称为上伸区,将第三条线和第四条线之间的区域称为下伸区,最中间的区域称为主体区(如图2—1所示)顶线上伸区主体线主体区基准线下伸区底线图2-1二、字母结构任何字母形式都可以简化成基本骨架,体现出每个字母的基本结构.从几何图形来说,英文字母可分为方、圆、三角三种(如H、O、A),其整体的外形多为长方形,个别字母为正方形(如M、W);从结构来说,可以分为单结构(如O、D)和双结构(如B)两类.字母表中的大写字母严格以书写线为准,高度相同.小写字母,除了字母的基本高度,还有笔画的上伸和下伸部分。
小写字母有较多的结构特征和形式。
字母内部的空间有十分重要的协调比例的作用。
这是从美学角度来考虑字母整体形状的.例如大写字母A,A中间的横道固定在一点上,使内三角和字母底部的空间保持平稳,给人以劲健舒展的感觉,让人看着美观。
三、字母形体比例字母的比例就是高度和宽度的固定关系.字母的形体都有一定的比例。
不同的字母有着不同的宽度。
一般来说,字母的比例本身应给人以美感。
字母表中所有字母都应统一于一个合理的比例系统.手写体中的小写字母,除i、l、m、w和z字母外,其余字母的宽度基本相同.在大写字母与小写字母的相对比例上,大写字母的全高度等于小写字母的基体高度加笔画上伸部分。

part 英语书法
"Part" 的英文书法写法可能有很多种,具体取决于您想要的风格和字体。
以下是一些例子:
1. 手写体:
英文字母 "p" 的手写体写法可以看起来像是一个倾斜的 "9","a" 可以写成小写的 "a","r" 可以写成 "r",而 "t" 可以写成 "7"。
2. 手写印刷体:
英文字母 "p" 的手写印刷体写法可以看起来像一个倾斜的 "B","a" 可以写成小写的 "a","r" 可以写成 "r",而 "t" 可以写成 "7"。
3. 印刷体:
英文字母 "P" 的印刷体写法通常是一个大写的 "P",而小写的 "a"、"r" 和 "t" 也是按照常规的印刷体写法来写。
这些只是几种可能的写法,您可以根据自己的喜好和需要选择适合的字体和风格。

书法中的英文摘要:一、引言:书法与英文的结合二、书法中英文的发展历程1.英文书法的起源2.英文书法在中国的传播3.英文书法的现代发展三、书法中英文的特点1.英文书法的字母形态2.英文书法的连笔技巧3.英文书法的装饰性四、书法中英文的融合与创新1.中英文书法的结合2.英文书法的现代化探索五、结论:书法中英文的价值与意义正文:一、引言:书法与英文的结合书法,作为中华民族的瑰宝,承载着悠久的历史文化传统。
而英文,作为全球通用的语言,同样具有丰富的文化内涵。
当书法与英文相结合,便诞生了一种独特的艺术形式——书法中的英文。
二、书法中英文的发展历程英文书法起源于罗马时代,最早的英文手写体是公元2 世纪至3 世纪的罗马碑文。
随后,英文书法在欧洲中世纪时期得到进一步发展,形成了哥特式、文艺复兴式等不同的风格。
2.英文书法在中国的传播随着近代西方文化的传入,英文书法逐渐进入中国。
清朝末年,一些有海外留学经历的学者开始将英文书法引入中国,并在国内传播。
这种新颖的书写形式很快受到了一些书法家的喜爱,他们开始尝试将英文与传统的中国书法相结合。
3.英文书法的现代发展随着现代科技的发展,英文书法逐渐摆脱了传统的束缚,开始呈现出多元化的趋势。
现代英文书法家们在继承传统书法技艺的基础上,大胆创新,使英文书法焕发出新的活力。
三、书法中英文的特点1.英文书法的字母形态英文书法的字母形态千变万化,不同的书法家和流派都有自己独特的字母形态。
一般来说,英文书法的字母可分为印刷体、手写体、装饰体等不同的类型。
2.英文书法的连笔技巧英文书法的连笔技巧是其独特魅力的体现。
书法家们通过流畅的笔触将字母连接起来,形成一种优美的视觉效果。
连笔技巧在英文书法中具有很高的审美价值。
英文书法具有很强的装饰性,书法家们常常运用丰富的装饰技巧为字母增色添彩。
这些装饰技巧包括加点、加线、加花等,使英文书法作品更具艺术价值。
四、书法中英文的融合与创新1.中英文书法的结合在书法中英文的融合过程中,一些书法家开始尝试将中英文相结合,创作出一种独特的艺术形式。

英语书法注意事项1.大写字母写在第一格和第三格内,上面不要顶格,要留有一点儿余地,下面要压齐第三条线,其书写方法同印刷体的书写法基本一样,毋庸赘述。
2.小写字母的手写体和印刷体是不完全一样的,要特别注意fgky的手写体和印刷体之间的区别。
3.不要把下列字母互相写混:d和clolel、r和v、a和u、c和e等。
4.写下列字母acemnorsuvwxz时,要灌满中间格,注意要灌满,不要写大,更不要写小。
5.写bdhk时,上面要顶格,下面压齐第三格,中间的“圈儿”的上面不要高于第二格,也不要低于这个格。
6.写gpqy时,下面要压齐第四格,上面要顶第二格。
7.i的主体在二三格之内,要灌满二三格,点儿点在一二格内靠下的位置,点圆。
8.j的主体在二四格之内,上下顶格,点儿点在一二格靠下的位置,点圆。
9.t上面不要顶格,顶部写到一二格中间的位置即可,下面压齐第三格,横线要写在第二格的横线上,要写平。
10.f是英文字母中唯一四个格全占的字母,写在四个格之内的,上下顶格,横线要写在第二格的横线上,要写平要特别注意它和印刷体区别巨大。
11.在写单词时,ij的点儿,ft的横线以及x的左撇要在写完一个单词的整体部分后再按反方向写上。
12.写的时候,该对齐的地方一定要对齐,有格的时候要写齐,没格的时候也要写齐。
13.在一个单词内所有的字母都可以连写,这样看起来每个单词都是手拉手的整体。
但是,连笔写的时候要有个原则,就是清晰不混。
字母的非主体部分,要以重复走过的笔迹为主,不能重复的时候才能带点儿痕迹,严防重复时画圈,特别是在可能引起误会的情况下更不能画圈。
14.单词内部字母可以连写,但绝对禁止粘在一起从而使读者无法区分是哪个字母。
15.切忌写单词的时候读出字母名称,应该读出字母或字母组合在该单词中的读音,字母在字母表中的名称音和在单词中的读音常常是不一样的。
16.切记,该写的时候写,不该写的时候不要写,要写就写好。
写好英语书法的技巧是什么各种字体都有不一样的美,英语也是,英语书法不同于中国书法的那种美,你感受到了吗?下面是小编为你整理的英语的书法,希望对你有用!如何写好英文书法英文要想写得漂亮,需要拿出一定的时间来练习,但学习的时间比较短,相比汉字书法更容易一些,一般四五次课的学习即可有大的改观,英文作业书写就可以达到非常漂亮的效果。
常用英文书写字体主要分意大利体、手写印刷体和圆体英文。
意大利体。
意大利体是一种基本的日常应用和教学手写体。
意大利体分楷式和行式,楷式作品书写时字母与字母间基本不做牵丝连接,书写速度稍慢,相当于汉字书法中的楷书。
楷式书写单词之间不连笔,比较庄重严肃,适合书写题目标题等。
行式作品书写时字母间有连笔关系,书写流畅,书写速度变快,相当于书法中的行书,比较日常英文书写。
手写印刷体。
手写印刷体是一种与印刷体相似的手写字体,英文字母之间一般不连写,字母线条简洁明快,线条粗细均匀,没有牵丝连笔动作,有汉字的书写节奏,单词字形及通篇作品整体较扁。
圆体英文。
圆体又称花体,圆体字母由连续的曲线组成,圆润流畅,书写时能表现出抒情舞蹈的姿态,给人以飘逸柔情的美感。
圆体字母相比较意大利体,字母部分已经变形,书写时全部采用连笔书写,一气呵成,书写速度比较快,相当于书法中的草书。
因为书写变形,所以一般义务教育阶段考试书写不能用圆体书写。
练习英文书法只要抓住以下几点,即可让你的英文工整美观。
1、英文字母要掌握正确的笔顺,用笔要清楚肯定。
英文和汉字一样,有一定的笔顺书写顺序,按照正确的笔顺书写,便可加快书写速度,笔画和笔画之间才能达到笔势连贯,气韵畅通。
2、字母的倾斜度保持一致,字母曲线弯度匀称。
即汉字中的平行线原理,按照一定的斜度将竖和竖之间平行起来,字母便可工整起来。
英文字母除了直线便是曲线,书写时线条弧度要保持匀称,线条要流畅。
3、加强字母间的笔势连贯性。
单词中字母不一定非要全部连写,要根据书写时行书的原理正确带笔,总的指导原则是,带笔书写后心情非常舒畅,感觉节奏非常好的,即为带笔正确。
英文书法24课English Calligraphy 24 LessonsCalligraphy is the art of beautiful and elegant handwriting. It has a long and rich history, dating back thousands of years to ancient civilizations in China, Egypt, and the Middle East. Over the centuries, calligraphers have developed a wide range of styles and techniques, each with its own unique aesthetic and cultural significance.In this series of 24 lessons, we will explore the fundamentals of English calligraphy, from the basic strokes and letter forms to more advanced techniques and styles. Whether you are a beginner or an experienced calligrapher, these lessons will provide you with the knowledge and skills you need to create stunning works of calligraphic art.Lesson 1: The Basics of CalligraphyIn this first lesson, we will cover the essential tools and materials needed for calligraphy, including pens, inks, and paper. We will also discuss the basic strokes and letter forms that form the foundation of all calligraphic styles.Lesson 2: Italic CalligraphyItalic calligraphy is a classic and elegant style that has been used for centuries. In this lesson, we will explore the history and characteristics of Italic calligraphy, and learn how to create the distinctive slanted letters and graceful flourishes.Lesson 3: Gothic CalligraphyGothic calligraphy is a bold and dramatic style that originated in medieval Europe. In this lesson, we will learn about the origins and development of Gothic calligraphy, and practice creating the distinctive angular letter forms and intricate decorative elements.Lesson 4: Copperplate CalligraphyCopperplate calligraphy is a flowing and elegant style that was popularized in the 18th century. In this lesson, we will explore the history and characteristics of Copperplate calligraphy, and learn how to create the smooth, rounded letter forms and delicate flourishes.Lesson 5: Blackletter CalligraphyBlackletter calligraphy is a striking and dramatic style that was widely used in medieval Europe. In this lesson, we will learn about the history and development of Blackletter calligraphy, and practice creating the distinctive Gothic letter forms and decorative elements.Lesson 6: Spencerian CalligraphySpencerian calligraphy is a graceful and flowing style that was popular in the 19th century. In this lesson, we will explore the history and characteristics of Spencerian calligraphy, and learn how to create the elegant, cursive letter forms and flourishes.Lesson 7: Uncial CalligraphyUncial calligraphy is an ancient style that originated in the 4th century AD. In this lesson, we will learn about the history and development of Uncial calligraphy, and practice creating the distinctive rounded letter forms and decorative elements.Lesson 8: Brush CalligraphyBrush calligraphy is a dynamic and expressive style that is often used in East Asian calligraphic traditions. In this lesson, we will explore the history and techniques of brush calligraphy, and learn how to create bold, fluid strokes and characters.Lesson 9: Fraktur CalligraphyFraktur calligraphy is a distinctive and ornate style that was widely used in Germany and other parts of Europe. In this lesson, we will learn about the history and characteristics of Fraktur calligraphy, and practice creating the intricate letter forms and decorative elements.Lesson 10: Rustic CalligraphyRustic calligraphy is a bold and informal style that is characterized byits rough, organic textures. In this lesson, we will explore the history and techniques of rustic calligraphy, and learn how to create the distinctive letter forms and expressive strokes.Lesson 11: Flourishing TechniquesFlourishing is the art of adding decorative elements to calligraphic letters and words. In this lesson, we will learn a variety of flourishing techniques, including swirls, curls, and embellishments, and practice incorporating them into our calligraphic work.Lesson 12: Gilding and IlluminationGilding and illumination are ancient techniques that were often used to enhance calligraphic works. In this lesson, we will learn how to apply gold leaf and create intricate decorative elements, such as initial letters and borders, to our calligraphic pieces.Lesson 13: Calligraphic Layout and DesignIn this lesson, we will explore the principles of layout and design in calligraphy. We will learn how to arrange text on the page, create balanced compositions, and incorporate decorative elements to enhance the overall aesthetic of our calligraphic works.Lesson 14: Calligraphic LetteringLettering is the art of creating unique and expressive letterforms. In this lesson, we will learn how to design our own calligraphic letteringstyles, incorporating elements of different calligraphic traditions and experimenting with various tools and materials.Lesson 15: Calligraphic PortraitsIn this lesson, we will explore the art of calligraphic portraiture, where we use calligraphic techniques to create expressive and dynamic representations of people. We will learn how to capture the essence of a subject through the use of calligraphic strokes and letter forms.Lesson 16: Calligraphic LandscapesCalligraphic landscapes are a unique and expressive art form that combines the beauty of calligraphy with the evocative power of landscape imagery. In this lesson, we will learn how to create calligraphic landscapes using a variety of techniques, including brush work, ink washes, and calligraphic lettering.Lesson 17: Calligraphic AbstractionsIn this lesson, we will explore the art of calligraphic abstraction, where we use calligraphic techniques to create non-representational works of art. We will experiment with different materials and techniques to create dynamic and expressive calligraphic compositions.Lesson 18: Calligraphic CalligraphyIn this meta-lesson, we will explore the concept of "calligraphic calligraphy," where we use calligraphic techniques to create calligraphic works of art. We will experiment with different styles and techniques to create layered and intricate calligraphic compositions.Lesson 19: Calligraphic Calligraphy ExperimentsBuilding on the previous lesson, in this lesson we will dive deeper into the world of calligraphic calligraphy, experimenting with even more advanced techniques and materials to create truly unique and innovative calligraphic works of art.Lesson 20: Calligraphic CollaborationsIn this lesson, we will explore the art of calligraphic collaborations, where we work with other artists and designers to create dynamic and innovative calligraphic works. We will learn how to communicate and collaborate effectively to produce truly collaborative pieces.Lesson 21: Calligraphic InstallationsCalligraphic installations are large-scale, site-specific works of art that use calligraphic techniques and elements to create immersive and transformative experiences. In this lesson, we will learn how to conceptualize, design, and execute calligraphic installations.Lesson 22: Calligraphic AnimationsIn this lesson, we will explore the world of calligraphic animations,where we use calligraphic techniques and elements to create dynamic and expressive animated works. We will learn how to incorporate calligraphy into digital media and experiment with different animation techniques.Lesson 23: Calligraphic PerformancesCalligraphic performances are live, interactive events where calligraphers use their skills and techniques to create works of art in real-time. In this lesson, we will learn how to conceptualize and execute calligraphic performances, engaging with audiences and exploring the performative aspects of calligraphy.Lesson 24: The Future of CalligraphyIn this final lesson, we will look to the future of calligraphy, exploring how the art form is evolving and adapting to new technologies, materials, and cultural contexts. We will discuss the potential of calligraphy to continue to inspire and captivate audiences, and how we can contribute to its ongoing evolution.Throughout this series of 24 lessons, we have explored the rich and diverse world of English calligraphy, from its historical roots to its contemporary manifestations. We have learned a wide range of techniques and styles, and have had the opportunity to experiment with different materials and approaches. By the end of this journey, you will have a deep understanding and appreciation for the art ofcalligraphy, and the skills to create your own stunning works of calligraphic art.。