康派克气体流量计Red-y Compact
- 格式:pdf
- 大小:559.38 KB
- 文档页数:6


样本信息未使用本文所述之产品及相关项目选择不当或使用不当可能会造成人员死亡、警告样本布局除一般信息和基本技术数据外,该样本还对L90LS 可配置的选配功能做了描述。
我们可据此对L90LS 进行定制配置,以便以更佳的方式控制您的机器。
除一般信息和基本技术数据外,该样本还对阀门功能片中可配置的选配功能做了描述。
阀门的每个功能区域都有一个副标题,标题后面附有简短的描述。
如果某个功能区有多个不同的位置,则会在副标题的方括号内标注项目编号,例如[P16]溢流阀。
再接下来是一系列带有代号的选项,例如PA1、PS 、Y 以及每个代号的简短描述。
或者是一个或多个压力、流量或电压选项。
第8页的一般液压原理图中展示了L90LS 阀的基本功能区、以及代表这些功能区的条目编号。
有关L90LS 所有选项的信息,请参见样本MSG17-8504。
文档和订购L90LS 可在派克的在线产品配置器中根据客户的需求定制,定制规格通常在派克销售公司与客户协商后确定。
每个阀门配置都有唯一的ID 号、详细的代号报告、3D 模型、2D 图纸、备件清单、液压原理图、材料清单和装配说明。
除了前面提到的文档外,还登录XXXXX 观看每个选件的装配说明视频。
阀部件订购可使用物料清单通过派克销售公司进行。
尽早咨询,以节约时间和成本我们的工程师经验丰富,他们对不同类型的液压系统及其工作原理都有深入的了解。
他们可以帮助您选择符合要求的阀门。
我们建议在项目规划阶段尽早咨询派克。
派克保留修改产品的权利,恕不另行通知。
本样本中使用了典型的曲线和图表。
即使样本不断修订和更新,也不可避免存在出错的可能。
请联系派克汉尼汾,了解更多有关产品的详细信息。
概述 (4)技术数据 (5)压力 (5)内部先导压力 (5)通流流量 (5)重量 (5)过滤 (5)液压油 (5)温度 (5)[P03] 泵调节器设置 (6)油口 (6)[P04] 接口螺纹 (6)进口片 (6)工作片 (6)出口片 (6)液压原理图 (7)进口片 (8)[P15-P29] 进口片 (8)[P15] 进口片 (8)用于[P15] CFC、LS1进口片 (9)[P16] 溢流阀 (9)[P17] 压力设定 (9)用于[P15] LS2进口片 (9)[P16] 泄压阀 (9)[P17] 压力设定 (9)[P20] 负载信号系统 (10)[P25] 回油口T1 (10)[P26] 进油口P1 (10)出口片 (11)[P30 - P44] 出口片 (11)[P30] 出口片 (11)用于出口片[P30] US (12)[P31] LS油口 (12)[P32] 进油口P2 (12)[P33] 背压阀/回油口T2 (12)[P34] 回油口T3 (12)[P37] 内部先导压力供油 (12)[P39] 先导过滤器 (12)[P40] 回油口,用于先导回路..............................................12工作片.. (13)[P45-P89] 工作片 (13)[P47] 工作片的基本变型 (13)[P50] 阀芯执行器 (14)比例远程控制阀芯执行器,带封闭阀芯端 (14)比例远程控制阀芯执行器,带封闭阀芯端 (15)比例远程控制阀芯执行器,带封闭阀芯端 (16)手动控制阀芯执行器,带封闭阀芯端 (17)[P51] 手柄支架 (17)[P55A,B] 先导节流器 (18)[P56] 插头类型 (18)[P60] 阀芯功能 (19)[P64A, B] 力反馈 (20)[P66]压力补偿器/负载保持单向阀 (20)[P69] 阀芯名称 (21)[P71A,B] 工作油口公称流量 (21)[P72] 流量设定 (21)[P72A] 所需的设定流量 (21)[P72B] 所需的设定流量 (21)[P75] 进给减压阀 (21)[P75A] A油口的进给减压设定 (21)[P75B] B油口的进给减压设定 (21)[P76A,B] 油口溢流阀和/或防气穴阀 (22)信息 (23)[P50] EC2手动越权 (23)尺寸图 (24)备件 (25)L90LS具有四个工作段。

Air Saver UnitAn environmentally friendly solution to reducing air consumption.Contents PageFeatures ..................................................................................................... 3-4Specifi cations ................................................................................................ 5Dimensions - ASV-200-AA-M5 ...................................................................... 6Dimensions - ASV-2000-AA ........................................................................... 7Dimensions - ASV-5000-AA ........................................................................... 8Dimensions - ASV-13000-AA .......................................................................... 9Dimensions - ASV-15000-AA ........................................................................ 10Dimensions - ASC500-1W / ASO500-1W ..................................................... 11Applications ............................................................................................. 12-13Selection of Air Saver Unit ........................................................................... 14Other Parker Energy Saving Products (15)For more information and videos visit: /pneu/airsaverImportant !Before carrying out any service work, ensure that the Air Saver Unit has been vented.Remove the primary supply air hose to ensure total disconnection of the air supply before dismantling valves or blank connection blocks.NB !All technical data in this catalog is typical only.The air quality is decisive for the valve life:see ISO 8573.WARNING FAILURE OR IMPROPER SELECTION OR IMPROPER USE OF T HE PRODUCTS AND/OR SYSTEMS DESCRIBED HEREINOR RELATED ITEMS CAN CAUSE DEA TH, PERSONAL INJURY AND PROPERTY DAMAGE.This document and other information from Parker Hannifi n Corporation, its subsidiaries and authorized distributors provide product and/or system options for further investigation by users having technical expertise. It is important that you analyze all aspects of your application including consequences of any failure, and review the information concerning the product or system in the current product catalog. Due to the variety of operating conditions and applications for these products or systems, the user, through its own analysis and testing, is solely responsible for making the fi nal selection of the products and systems and assuring that all performance, safety and warning requirements of the application are met.The products described herein, including without limitation, product features, specifi cations, designs, availability and pricing, are subject to change by Parker Hannifi n Corporation and its subsidiaries at any time without notice.Offer of SaleThe items described in this document are available for sale by Parker Hannifi n Corporation, its subsidiaries or its authorized distributors. Any sale contract entered into by Parker will be governed by the provisions stated in Parker’s standard terms and conditions of sale (copy available upon request).© Copyright 2016 Parker Hannifi n Corporation. All Rights Reserved!!!An easy solution to your environmental protection efforts!The Air Saver Unit contributes to power savings and CO 2 reduction.ASV2000 Series ASV5000 SeriesWhen using an Air Saver Unit several significant benefits can be achieved. Air blowing accounts for almost 50% of all compressed air used in plants. By using switching valve technology the Air Saver Unit can reduce air consumption by up to 50%!ASV200 SeriesASC/ASO500 Series • Large reductions in air consumption.• Savings in compressor power consumption.• Reduction in plant CO 2 emissions.• Big contribution to energy-saving activities.• Improved effi ciency.VALUE IMPACT SUMMARYReduced Total Annual Air Discharge Per Blowing Nozzle (scfm) by:3,232,005Reduced Annual CO2 Emissions Generated (Per Blowing Nozzle - in Tons) by: 5.77 tons Reduced Annual Air Generating Costs Per Blowing Nozzle by:$ 892.03Quantity of Air Blowing Nozzles With Same Application Specifications 4Reduced Annual Air Generating Costs For All Nozzles by:$ 3,568.13Reduced Annual CO 2 Emissions Generated (For All Blowing Nozzles) by:23.07there is no air consumption.Energy/cost savingTry our fast and easy online savings calculator! /airsaverSampleApplication4nozzels 6mm dia.$0.10 / kWh1 min blow per 4 min cycle3 shifts 5 days /weekPrepared forPrepared byAir Saver Unit Valve CalculatorSummary Sheet✶ To achieve the benefi ts of pulsed air, the Air Saver Unit should be installed no more than 3 meters away from the air blow orifi ce. For optimal results install within 1 meter.Installation is simple and reduction in air consumption can be realized immediately.• W hen using an electrically operated solenoid valve to control the air blow, an Air Saver Unitcan quickly and easily be retrofi tted providing an immediate reduction in air consumption withno changes to the PLC program.Before introduction of the unit Before introduction of the unit After introduction of the unit• Easy to install. Change the current solenoid valve to Air Saver Unit. (ASC500 or ASO500)• Program change of controller is not necessary.• W hen using manual valves such as ball valves, simply install either ASV200, ASV500 orASV2000 units which do not need electrical power. Installing the unit brings immediate reduction in air consumption and improved compressor efficiency.[Company A] Food & Beverage manufacturer“When we tested ASV5000, we achieved about 55% reduction of our air consumption. Because air blow effi ciency was improved, we plan to use more Air Saver Units in other areas in the plant”.[Company B] Manufacturer of offi ce document machines “We are working on energy-saving activities. In those activities,we decided to use an Air Saver Unit. We have more than 100points of air blow and we reduced our air consumption by 42% using this unit”.ts of ce. For optimal To achieve the benefi ts ofpulsed air, install no more than 3 meters away from the air blow orifi ce. For optimal results install within 1 meter.Specifi cationParker PneumaticSpecifi cationsASV200ASV2000ASV5000ASV13000ASC500ASO500Normally closedNon lubricated air459.1Notes:* External pilot of 43.5 - 116 is required, to ensure proper operation.†For maximum life of the unit we recommend 5 micron, but 40 micron fi ltration is acceptable and will not void warranty.To achieve the benefi ts of pulsed air, the Air Saver Unit should be installed no more than 3 meters away from the air blow orifi ce. For optimal results install within 1 meter.Parker PneumaticPipingPort 1: Supply port (Compressor side)Port 2: Output port (Blow nozzle side)Port 3: Exhaust port** In order to keep out dust, the air muffl er is recommended for exhaust port.ASV200-AA-M5Ordering Information ASV200-AA-M5Flow @ Port Operating Pressure Pilot air Dimensions: ASV200-AA-M5Notes:A. When temperature of valve goes below 5°C (41°F), complete dry air shall be supplied to prevent from freezing.B. Air Saver Units with WP prefix are suitable for mostpainting applications. Test before use if in direct contact with painted surface.C. If test in painting application fails, try cycling Air Saver Unit for 48 hours and repeat test.D. DO NOT use “WP” Air Saver Unit in ‘clear coat’ applications.E. Adjustable to maximum frequency of 5Hz.Port 2 - 3/8 PluggedPort 4 - 3/8Pilot air supply port M5Mounting holeOFF timeadjustment needle ON timeadjustment needlePort R2 - 3/8 PluggedThreshold elementPort 3 -3/8 pluggedPort 1 - 3/8 supply3 x ø 0.280.980.981.181.181.893.192.541.180.590.79Max 0.610.202.132.683.230.040.59PipingPort 1: Supply port (Compressor side)Port 2: PluggedPort 3: PluggedPort 4: Output port (Blow nozzle side)Port R2: PluggedPort X: M5 pilot air supply>43.5 psi is requiredOrdering Information ASV2000-AA-xxFlow @ Port Operating Pressure Pilot air PortDimensions: ASV2000-AA-97 (NPT model)Notes:A. When temperature of valve goes below 5°C (41°F), complete dry air shall be supplied to prevent from freezing.B. Air Saver Units with WP prefix are suitable for most painting applications. Test before use if in direct contact with painted surface.C. If test in painting application fails, try cycling Air Saver Unit for 48 hours and repeat test.D. DO NOT use “WP” Air Saver Unit in ‘clear coat’ applications.E. Adjustable to maximum frequency of 5Hz.(E)PipingPort 1: Supply port (Compressor side)Port 2: Plugged Port 3: PluggedPort 4: Output port (Blow nozzle side)Port 5: PluggedPort X: M5 pilot air supply >43.5 psi is requiredOFF timeOrdering Information ASV5000-AA-xxFlow @ Port Operating Pressure Pilot air Port Dimensions: ASV5000-AA-91 (NPT model)(E)Notes:A. When temperature of valve goes below 5°C (41°F), complete dry air shall be supplied to prevent from freezing.B. Air Saver Units with WP prefix are suitable for most painting applications. Test before use if in direct contact with painted surface.C. If test in painting application fails, try cycling Air Saver Unit for 48 hours and repeat test.D. DO NOT use “WP” Air Saver Unit in ‘clear coat’ applications.E. Adjustable to maximum frequency of 5Hz.PipingPort 1: Supply port (Compressor side)Port 2: Output port (Blow nozzle side)Port 3: PluggedPort X: 1/8 NPT pilot air supply >43.5 psi is requiredONX PortPilot air port 1/8 NPTOFF timeadjustment needle ON timeadjustment needle4 x ø 0.43(Mounting hole)1A33.863.034.412OFF 2.321.633.720.355.164.653.940.678.272.682.322.010.310.790.791.165.87Port 1, 2, 3 (3 x 1 NPT)AOrdering Information ASV13000-AA-xxFlow @ Port Operating Pressure Pilot air Blow PortDimensions: ASV13000-AA-94 (NPT model)(E)Notes:A. When temperature of valve goes below 5°C (41°F), complete dry air shall be supplied to prevent from freezing.B. Air Saver Units with WP prefix are suitable for most painting applications. Test before use if in direct contact with painted surface.C. If test in painting application fails, try cycling Air Saver Unit for 48 hours and repeat test.D. DO NOT use “WP” Air Saver Unit in ‘clear coat’ applicationsE. Adjustable to maximum frequency of 1Hz.PipingPort 1: Supply port (Compressor side)Port 2: Plug (1-1/4) Port 3: Plug (1-1/4)Port 4: Output port (Blow nozzle side)Port 5: Plug (1-1/4)Port X: 1/8 NPT pilot air supply >43.5 psi is requiredONPort 4 -1-1/4 NPTOFF timeadjustment needleON timeadjustment needle4 x ø 0.43 (Mounting hole)Port 1 -1-1/4 NPT0.792.288.03OFF 4.210.432.403.665.676.61X PortPilot Air supply 1/8 NPT2.952.28Port 2Plug8.981.141.14Port 3PlugPort 5Plug 3.905.671.180.982.28Ordering Information ASV15000-AA-xxFlow @ Port Operating Pressure Pilot air Port Dimensions: ASV15000-AA-92 (NPT model)(E)Notes:A. When temperature of valve goes below 5°C (41°F), complete dry air shall be supplied to prevent from freezing.B. Air Saver Units with WP prefix are suitable for most painting applications. Test before use if in direct contact with painted surface.C. If test in painting application fails, try cycling Air Saver Unit for 48 hours and repeat test.D. DO NOT use “WP” Air Saver Unit in ‘clear coat’ applications.E. Adjustable to maximum frequency of 1Hz.Parker PneumaticPipingPort 1: Supply port (Compressor side)Port 2: Output port (Blow nozzle side)Y port: Pilot exhaust port** In order to avoid dust, it is recommended to attach an air muffl er.ASC500-1W / ASO500-1WOrdering Information ASC500-1W / ASO500-1WFlow @ Port Operating Pressure Pilot air Dimensions: ASC500-1W-90 / ASO500-1W-90 (NPT model)Port 21/8 NPTASC Version OnlyASO Version Only 2 x Ø7.57.51515Wiring Specifications1: Continuous blow ON (−)15.5Port Y: M5ASC OnlyPort 11/8 NPTPort Y: M5ASO Only7.57.515.5(B)Notes:A. When temperature of valve goes below 5°C(41°F), complete dry air shall be supplied to prevent from freezing.B. Adjustable to maximum frequency of 22Hz.Cleaning blow before assemblySwarf removalAssist blow for PET bottle transferLiquid removal after the manufacturing processCan be used in many applications where air blow is a requirementDrying ApplicationsSwarf RemovalCooling ApplicationIonizer Dust RemovalPET Bottle TransferCar PaintingProcessPaint spraying *Electrical parts* Air Saver Units with WP prefi x are suitable for most painting applications. Test before use if in direct contact with painted surface. If test in painting application fails, try cycling Air Saver Unit for 48 hours and repeat test. DO NOT use “WP” Air Saver Unit in ‘clear coat’ applications.Air Saver UnitPneumatic Solutions for Beverage and Bottle Plants molded PET bottles.Escape blow for PET bottles when the line is stopped.date on them.Selection of Air Saver UnitGuide data for the correct selection of an Air Saver Unit for blow applications.Please take into account the two variables:• System operation pressure (PSI)• Required air consumption of nozzle or set of nozzles (scfm) to be controlled with one Air Saver Unit Color coding indicates correct Air Saver UnitReduced performance flow capacity of 10% is applied Consider min. operating pressure (see tech specs on page 5)Consider min. pilot air pressure (see tech specs on page 5)Nozzle area (mm2)0.00.00.10.20.81.83.17.112.619.628.335.850.263.678.595.0113.0132.7153.9176.6201.0226.9254.3283.4314.0346.2379.9415.3452.2490.6ASV200ASC500/ASO500ASV2000ASV5000ASV13000ASV15000Other ParkerEnergy Saving Productsand Tools PortfolioWear CompensatedSeals• Air valve spools that havewear compensation• Air pressure forces the sealsout to the valve bore.• Very little air leakage acrossthese spools through outit’s life.• Especially better than lappedspool valves.Pressure DifferentialSensors• Monitor pressure dropon fi lters.• Provide electrical signalsor visual indicators whenpressure drop is high andfi lter elements need replaced.• Can assist you in loweringcompressed air costs byreducing pressure drops.Straight Fittings,Pre-Sealed• Factory applied threadsealant perform better thanoperator applied sealant.• Where ever possible,use straight fi ttings inplace of 45 or 90 degreeelbow fi ttings to minimizepressure drop and save oncompressed air costs.Zero Loss Air Drains• Many Compressors and AirTanks use Timer Drains topurge water and moisturefrom the tanks.• Timer Drains wastecompressed air becausethey blow too long, and blowwhen no water is present.• Zero Loss Drains use fl oatsto actuate the drain to openand blow out moisture andshut off once moisture isgone, saving compressedair costs.Pneumatic Sizing Tools• Air Cost, Flow, and ProductSizing Calculators• Conversion tools (e.g.Pressure BAR to PSI)• Available on website,downloadable for cellphones and I Pads fromApple App Store.Air EconomizingVacuum Generators• Built-in sensors onlyapply air pressure whenvacuum is needed.• Sensor turns generatoron when vacuum dropsto a preset level.• Reduces plantcompressed air costs.Low Power Solenoids• Typical Class 8 22mmCoil Wattage 5.4W• Parker 15mm CoilWattage 1.2W• Save 4.2W whiledoing workReverse Flow Regulators• Most actuators only needwork force in one direction.• Installed between valveand actuator.• Reduces pressure on thereturn stroke of an actuatorwhere work force is notneeded.• Reduces plant compressedair costs.Catalog 0698P 06/2016Applications EngineeringPhone: 877 321 4PDN Option #2E-mail:******************Customer SupportPhone: 877 321 4PDN Option #1Parker Hannifi n Corporation Pneumatic Division 8676 E. M89P .O. Box 901Richland, MI 49083 USA。

• Integral 3/4" or 1" ports (NPT & BSPP)• High efficiency particulate element as standard • Excellent water removal efficiency• Robust but lightweight aluminium construction• Low temperature -40°C (-40°F) with combined manual /semi-auto drain as standardPortFlow ‡dm 3/s Max.bar Min temp Max temp Bowl capacity 3 Height mm Width mm Depth mm Weight †OptionsOrdering informationParticulate Filter - P3YSymbolsManual drain Auto drain† Standard part numbers shown in bold. For other models refer to Options chart above.‡ Flow with 6.3 bar (91.4 psig) inlet pressure and 0.5 (7.3 psig) pressure drop.Flow (dm 3/s)P r e s s u r e D r o p - b a r S e c o n d a r y P r e s s u r e - p s i g.05.1.15Flow - (scfm)100200300400500600Flow (dm 3/s)P r e s s u r e D r o p - b a r S e c o n d a r y P r e s s u r e - p s i g 0.05.1.15Flow - (scfm)100200300400500600(3/4") Filter(1") FilterDimensions mm (inches)Flow characteristicsMaterial specificationsBody Aluminium Sight glass PolypropyleneBody cover ABSElement Sintered P .E.Seals Nitrile NBRDrainsManual / semi-auto:AcetalAutomatic:PA / Ø 10mm brassconnection* Air supply must be dry enough to avoid ice formation at temperatures below 2°C (35.6°F).Service kitsDescription Part number 5 micron element kit P3YKA00ESE 40 micron element kitP3YKA00ESG Bowl kit with combined manual / semi auto drain P3YKA00BSC Bowl kit with auto drainP3YKA00BSASpecificationsFluidCompressed air Maximum inlet pressure* 17.5 bar (254 psig)Temperature range*:Auto drainCombined drain -10°C to 60°C (14°F to 140°F)-40°C to 60°C (-40°F to 140°F)Particle removal 5 micronAir qualityWithin ISO 8573-1: 1991 Class 3 and 5 (particulates) Within ISO 8573-1: 2001 Class 6 and 7 (particulates)Typical flow 5 micron element6.3 bar (91.4 psig) inlet pressure and 0.5 bar (.73 psig) pressure drop 119 dm 3/s (252 scfm)Manual / semi-auto drain Closed at 0.8 bar (11.6 psig)G1/8 thread maleAuto drain bowl pressure to close drain0.8 bar (11.6 psig) Operating rangemanual override facility 0.8 bar (11.6 psig) to 17.5 bar (254 psig) Bowl capacity130 cm 3 (4.4 US oz)D。

GUÍA DEL USUARIOCalibrador de corrienteModelo PRC10IntroducciónGracias por seleccionar el Modelo PRC10 de Extech. Este instrumento se embarca completamente probado y calibrado y con uso apropiado le proveerá muchos años de servicio confiable. Por favor visite el sitio web de Extech Instruments () para descargar la versión más reciente de esta Guía del Usuario. Extech Instruments es una compañía certificada ISO-9001. SeguridadSeñales internacionales de seguridadEsta señal adyacente a otra señal o terminal, indica que el usuario debe referirse al manualpara mayor información.Esta señal, adyacente a una terminal, indica que, bajo uso normal, pueden existir voltajespeligrososDoble aislanteNotas de seguridad∙No exceda la escala de entrada máxima permisible.∙ Apague la unidad cuando el dispositivo no esté en uso.∙Quite las baterías del dispositivo si lo va a guardar más de 60 días.∙Nunca deseche las baterías en el fuego. Las baterías pueden explotar o derramar.∙Nunca mezcle tipos distintos de baterías. Siempre instale baterías nuevas del mismo tipo. Precauciones∙El uso inapropiado de este medidor puede causar daños, choque, lesiones o la muerte. Lea y comprenda este manual del usuario antes de operar este medidor.∙Quite siempre los cables de prueba antes del reemplazar la batería.∙Inspeccione la condición de los cables de prueba y el medidor mismo por daños antes de su operación. Repare o reemplace cualquier daño antes de usar.∙Si el equipo es usado en una manera no especificada por el fabricante, la protección suministrada por el equipo puede ser afectada.Descripción del medidor1. Enchufe de entrada adaptador CA2. Pantalla3. Apagadoyencendido4. Botones de flechas de ajuste de la fuente de salida5. BotónSET6. Botón UNIT (mA ó %)7. Botón MODO I/O8. MEM (botón memoria STEP "paso")9. BotónRetroiluminación/CERO10. Cables de pruebas de entradaDisposición de pantalla1. Icono modo FUENTE2. Icono de estado función CERO3. Icono modo MEDICIÓN4. Icono TENSIÓN DE BUCLE5. Icono de estado de apagado automático6. Icono de estado de la batería7. Valor modo de medición8. Icono unidades modo de medición9. Ubicación en memoria del registrador de datos10. Valor modo fuente11. Icono unidades modo de FuenteTeclado Descripciones y operaciónBOTÓN DE ENCENDIDO Y FUNCIÓN DE APAGADO AUTOMÁTICO1. Use el botón POWER para encender y apagar la unidad, Cuando enciende la unidad, seejecuta una prueba autónoma corta y luego se estabilizará la pantalla.2. Cuando el símbolo de batería flashes se ve en la pantalla, reemplace la batería tan prontosea práctico. La batería débil puede causar lecturas imprecisas y operación errática delmedidor.3. Este instrumento está equipado con apagado automático para apagar el medidor despuésde 10 minutos de inactividad. Para desactivar esta función; presione y sostenga el botón(POWER) de encendido hasta que se apague el icono “ATP”.Botón UNITPresione el botón UNIT para seleccionar las unidades mA o %.Botón I/OPresione momentáneamente el botón I/O para seleccionar ya sea la fuente (SOURCE) o medición (MEASURE) (entrada).Botón MODO (Tensión de bucle)En el modo de MEDICIÓN, presione y sostenga el botón MODE(I/O durante 2 segundos para encender y apagar la tensión de bucle.Botón (Retroiluminación)Presione momentáneamente el botón retroiluminación para encender y apagar la retroiluminación.Botón CERO ()En el modo MEDICIÓN y SOURCE, presione y sostenga el botón CERO () durante 1 segundo para ajustar el medidor a cero.►◄▼ y ▲BotonesLos botones de flecha se usan para ajustar el valor de salida en modo fuente (SOURCE).1. Seleccione el modo fuente (SOURCE)2. Presione el botón ► o ◄ para seleccionar un digito para ajuste. El cursor subrayadodestella identifica el digito seleccionado.3. Presione el botón ▼ o ▲ para ajustar el valor del digito. Presione y sostenga el botón ▼ o▲ para ajustar rápidamente el valor.Botón SETEl botón SET se usa para pasar entre los 5 valores de salida guardados.1. Seleccione el modo fuente (SOURCE)2. Presione el botón SET y el valor guardado en el sitio 01 de la memoria se tomará comofuente. En la pantalla aparece "MEM.01”3. Cada vez que presione el botón SET pasa por los 5 sitios de memoria.4. Puede usar los botones de flecha para ajustar el valor en cada sitio de memoria.Botón STEP/MEMEl botón "paso" STEP/MEM se usa para pasar automáticamente por los 5 valores de salida guardados. El medidor se puede ajustar para un ciclo único de los valores guardados o para un ciclo continuo.1. Seleccione el modo fuente (SOURCE)2. Presione y SOSTENGA el botón STEP/MEM. En pantalla aparecerá de manera alterna"STEPSS" (ciclo único) "STEPSC" (ciclo continuo). Suelte el botón al ver el modo deseado.3. En modo de ciclo único el medidor producirá (Fuente) la corriente indicada en MEM01durante 5 segundos. Enseguida el medidor avanzará a MEM02 durante 5 segundos. Esto continuará hasta MEM05 y luego regresará pos los sitios de memoria. El ciclo terminará al llegar a MEM01.4. En modo continuo el ciclo continuará hasta que sea detenido a mano.5. Presione momentáneamente el botón STEP/MEM para detener el ciclo. En pantallaaparecerá brevemente el indicador “END”.GUARDAR VALORES EN LA MEMORIALos valores predeterminados guardados en los sitios de memoria son:MemoriamA %LocalizaciónM1 4.00mA 0.0%M2 8.00mA 25%M3 12.00mA 50%M4 16.00mA 75%M5 20.00mA 100%Para cambiar los valores en memoria:1. Seleccione el modo fuente (SOURCE)2. Presione el botón SET para seleccionar en la memoria el sitio a cambiar.3. Presione los botones de flecha para ajustar el valor nuevo4. Presione momentáneamente el botón MEM para guardar el valor. El icono del sito enmemoria destella mientras se evalúa el valor.Modos de operaciónModo de operación (entrada) MEDIREn este modo, la unidad medirá hasta 50mADC.1. Encienda el medidor.2. En pantalla aparecerá "MEASURE".3. Presione el botón UNIT para seleccionar mA o %4. Presione y SOSTENGA el botón “MODO-I/O” durante 2 segundos si requiere tensión debucle de 24V. En pantalla aparecerá “Lp.POWER”.5. Conecte el cable de calibración al medidor.6. Conecte el cable de calibración al dispositivo o circuito a prueba.7. Lea la medida en la pantalla LCD.Modo de Operación SOURCE (Fuente)En este modo, la unidad puede suministrar corriente hasta 24mACD a 1000 ohmios. La corriente se puede suministrar manualmente o en pasos desde la memoria como se explicó previamente.1. Encienda el medidor2. Presione el botón “I/O” para seleccionar fuente (SOURCE).3. Use el botón UNIT para seleccionar % o mA.4. Conecte el cable de calibración al medidor5. Conecte el cable de calibración al dispositivo o circuito a prueba6. Use los botones de flecha para ajustar el valor de salida deseado en el indicador inferior.El indicador superior indica el valor real de la corriente que se suministra. Si la pantallasuperior no es igual al valor establecido, ya sea las baterías necesitan ser reemplazadas ola impedancia de carga está fuera del rango especificado.Soporte inclinado / ColgadorEl soporte trasero proporciona dos métodos para comodidad en la visualización.1. Tire de la parte inferior del soporte hacia fuera para colocar la unidad sobre una superficieplana para su visualización.2. Tire hacia fuera de las partes inferior y superior del soporte, y luego gire el soporte paracolgar la unidad.Reemplazo de la bateríaCuando el icono de la batería aparece en la pantalla, debe reemplazar las seis pilas AA.El compartimiento de la batería se localiza en la parte posterior del medidor.1. Abra el soporte inclinado, afloje el tornillo cabeza Philips y quite la tapa de la batería.2. Quite y reemplace las baterías, observando la polaridad.3. Reemplace y asegure la tapa de la batería.Usted, como usuario final, está legalmente obligado (Reglamento de baterías) aregresar todas las baterías usadas; ¡el desecho en el desperdicio o basura de lacasa está prohibido! Usted puede entregar sus baterías en los centros de recolecciónde su comunidad o donde sea que se venden las baterías.Desecho: Cumpla las estipulaciones legales vigentes respecto al desecho del dispositivoal final de su vida útil.Recordatorios de seguridad de baterías∙Por favor deseche las baterías responsablemente; siempre observe las normas locales, estatales y federales referentes al desecho de baterías.∙Nunca deseche las baterías en el fuego. Las baterías pueden explotar o derramar.∙Nunca mezcle diferentes tipos de baterías o nuevas y usadas. Siempre instale baterías nuevas del mismo tipo.EspecificacionesEspecificaciones generalesPantalla LCD matriz de puntosCarga Máxima 1000 ohmios @ 24mATensión del medidor 6 baterías AA o adaptador CAApagado automático El medidor automáticamente se apaga después de 10 minutos deinactividadCapacidad de suministro de corriente 24mACD a 1000 ohmiosTemperatura de operación 5ºC a 40ºC (41ºF a 104ºF)Temperatura de almacenamiento -20o C a 60o C (-4o F a 140o F)Humedad de operación 80% máx. hasta 31°C (87°F) con disminución linear hasta 50% a40°C (104°F)Humedad de almacenamiento < 80%Altitud de operación 2000 metros (7000ft.) máximaDimensiones 159 x 80 x 44mm (6.3 x 3.2 x 1.7")Peso 232 g (8.2 oz.) no bateríasEspecificaciones de escalaModo Función Escala (resolución) Precisión (% de lalectura)MedirCorriente 0 a 50mA (0.01mA)Porcentaje (%) -25 a 230%0.1%)± (0.01% + 1 dígito) FuenteCorriente 0 a 24mA (0.01mA)Porcentaje (%) -25 a 125%0.1%)deTensión Tensión24-30VDC, <50mAbucleCopyright © 2013 Extech Instruments Corporación (una empresa FLIR) Reservados todos los derechos, incluyendo el derecho de reproducción total o parcial en cualquier medio.ISO-9001 certified。
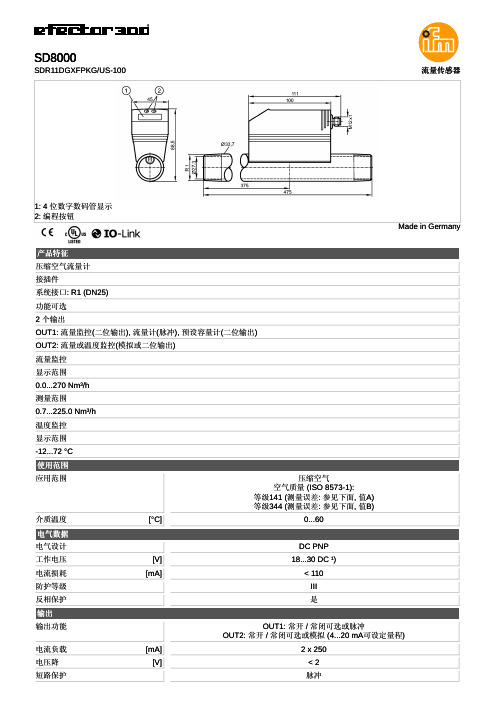
GFC系列热式气体质量流量控制器是用来测量显示和控制设定的流量。
GFC系列气体质量流量控制器结构紧凑,提供了精确的流量控制,是一款物美价廉的流量控制产品。
对于非腐蚀性介质可选用铝或铜的结构材质,腐蚀性介质可选用316不锈钢材质。
无需打开外壳,可方便的调整零点和满量程。
坚固的金属结构最大压力1000psig(70bar)泄漏率小于1×10⁻⁷sml/s 经过NIST校准嵌入可倾斜LCD显示仪0-5VDC和4-20mA信号回路保护可作便携设备使用工程单位或者百分比显示累积器可选设计特点:概述:GFC系列用于测量和控制气体质量流量。
本品外壳坚固耐用,精确度高,是一款多功能而且经济实用的流量控制产品。
可选铝或不锈钢外壳,可选显示工程单位(标准)或百分比。
自带的电磁比例阀可以控制设定的流量,该阀是常闭阀,当意外停电时,阀门将自动关闭。
设定点可以本地控制或外部给定控制。
自带置于传感器顶部的LCD显示模块,这个显示模块可倾斜90度以上以方便读数。
它用一个标准的插头与传感器连接,也可以分开独立安装。
OEM的应用可提供无LCD显示的产品。
GFM质量流量计的测量范围是10sccm到1000sL/min (N2);用1/4",1/8"和1/2"卡套螺纹或3/4"FNPT连接,可选其他连接方式。
该仪表可以作为台式设备或者用螺丝固定在平板上。
电源电路采用保险丝和极性保护设计。
操作原理:被测气体分别流经两个层流区,一路通过主流量管道,另一路通过毛细测量管。
两个管路的设计保证流体处于层流状态,因此两个管路流量比是恒定的。
两个精密的温度感应绕组在测量管上被加热,当有流量产生时,被加热的气体从上游带走热量到下游的感应绕组上。
产生温差和感应圈电阻的变化是成比例的。
测量绕组的电阻值与瞬时流量成线性比例关系,采用惠斯顿电桥来检测测量绕组的电阻变化。
根据被测气体的质量流量,输出0…5VDC或者4…20mA信号。
便携式5合1气体检测仪Gas-ProGas-pro以保护受限空间内作业人员和船上人员安全为设计理念,可同时检测5种气体,外形小巧新颖、坚固耐用,满足各种恶劣工况环境和日常使用。
独有的受限空间使用优点· 一目了然的顶部显示· 内置电动泵(可选)· 具有内置泵运行状态自检功能· 独有的预进入模式· 拥有+ve Safety TM 认证,搭配三色状态指示灯· 整体的防撞击外壳· 简捷的单键操作· 随身携带,墙面和平台安装三种形式进行气体检测使用灵活· 独特的+ve Safety TM 满足任何需要· 同时检测5种不同的气体· 有泵吸式和扩散式满足多种用途使用。
Gas-ProUK: 2 Blacklands Way, Abingdon Business Park, Abingdon, OXON, OX14 1DY+44 (0) 1235 557700 sales@US: 21 Kenton Lands Road, Erlanger, Kentucky 41018-1845+1 859 957 1039 salesusa@ NL: V lambloem 129, 3068JG, Rotterdam+31 10 421 1232 eu@SG: B lock 194 Pandan Loop, #06-20 Pantech Industrial Complex, Singapore, 128383+65 6745 2936 sales@.sgCN: Unit 316, Area 1, Tower B, Chuangxin Building, 12 Hongda North Road, Beijing Economic & Technological Development Area, Beijing, PRC 100176 +86 10 6787 0335saleschina@Crowcon reserves the right to change the design or specification of the product without notice.P08013/ENG Issue 1 Sept 2011*由配置的传感器决定,详情请咨询科尔康。