Keyshot( ProE-creo)接口安装方法
- 格式:docx
- 大小:203.78 KB
- 文档页数:7

keyshot用法KeyShot是一款强大的渲染和动画软件,它以其快速、高效和高质量的渲染能力而闻名。
本篇文章将详细介绍KeyShot的使用方法,包括其基本功能、安装、界面、基本操作、材质、灯光、相机、动画制作以及导出和分享等。
KeyShot是一款基于OpenGL技术的渲染软件,它能够快速创建高质量的渲染和动画。
KeyShot适用于各种行业,包括机械设计、产品设计、动画和电影制作等。
它提供了丰富的工具和功能,使您能够轻松地创建逼真的渲染和动画,以展示您的创意和设计。
二、安装和界面1. 安装:安装KeyShot非常简单,只需按照软件提示的步骤进行操作即可。
确保您的计算机满足最低系统要求,以确保最佳的性能。
2. 界面:KeyShot的界面直观且易于使用。
您将看到一个菜单栏,其中包含各种选项和命令,用于管理您的项目、导入和导出文件以及控制渲染过程。
此外,您还将看到一个工作区,其中包含您的项目文件、相机和灯光等元素。
三、基本操作1. 打开项目:使用KeyShot的“打开项目”功能,您可以导入您的设计文件并开始创建渲染。
2. 创建对象:使用KeyShot的绘图工具,您可以创建所需的物体和元素,例如模型、材质、灯光和相机等。
3. 调整属性:使用KeyShot的属性面板,您可以更改对象的属性,例如大小、颜色、透明度和光源等。
4. 渲染和动画:使用KeyShot的渲染引擎,您可以创建逼真的渲染和动画。
您可以使用动画工具来控制对象的位置、旋转和颜色变化等。
四、材质KeyShot提供了大量的材质库,您可以使用这些材质来更改对象的光泽和纹理。
您可以在材质库中选择不同的材质,并应用它们到您的工作空间中的对象上。
您还可以创建自定义材质,以便更好地匹配您的项目需求。
五、灯光KeyShot的灯光工具提供了多种不同类型的光源,包括点光源、方向灯和环境灯等。
您可以使用这些光源来模拟自然光或人工照明效果。
您还可以调整灯光的强度、颜色和衰减方式等属性,以创建逼真的照明效果。
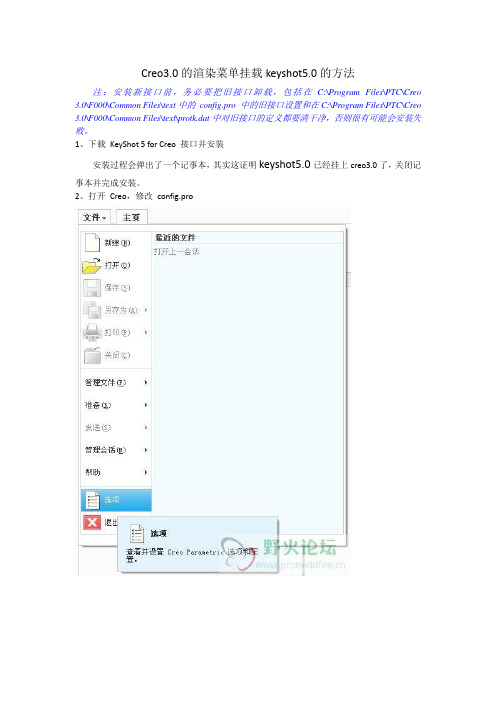
Creo3.0的渲染菜单挂载keyshot5.0的方法注:安装新接口前,务必要把旧接口卸载,包括在C:\Program Files\PTC\Creo 3.0\F000\Common Files\text中的config.pro 中的旧接口设置和在C:\Program Files\PTC\Creo 3.0\F000\Common Files\text\protk.dat中对旧接口的定义都要清干净,否则很有可能会安装失败。
1、下载KeyShot 5 for Creo 接口并安装安装过程会弹出了一个记事本,其实这证明keyshot5.0已经挂上creo3.0了,关闭记事本并完成安装。
2、打开Creo,修改config.pro点击添加,输入名称为prodevdat,值需要通过浏览找到接口安装目录下的protk.dat,例如我的值为D:\Program Files\KeyShot3\Plugins\Creo 1.0\protk.dat(这只是我的地址,具体的要看你的),点击确定并保存config.pro到启动目录C:\Program Files\PTC\Creo 3.0\F000\Common Files\text。
3、设置keyshot 3 按钮先新建一个零件,模板随便,打开渲染选项卡,右击空白的地方,选“自定义功能区”,左边选“TOOLKIT 命令”,右边选“渲染”,点击“新建组”,选择“新建组(自定义)”,点击“重命名”,名称重命名为“KeyShot 5”,把新建的组“KeyShot 5”下移到合适位置(还是看个人喜欢),把“TOOLKIT 命令”中的“Render”和“Settings”添加到新建的组“KeyShot 5”中,要注意不要加错了,我同时装了KeyShot 2 和KeyShot 3 的接口,所以才有两个“Render”和“Settings”,点击确定完成,如果要同时接入keyshot 2,也要做同样的操作。
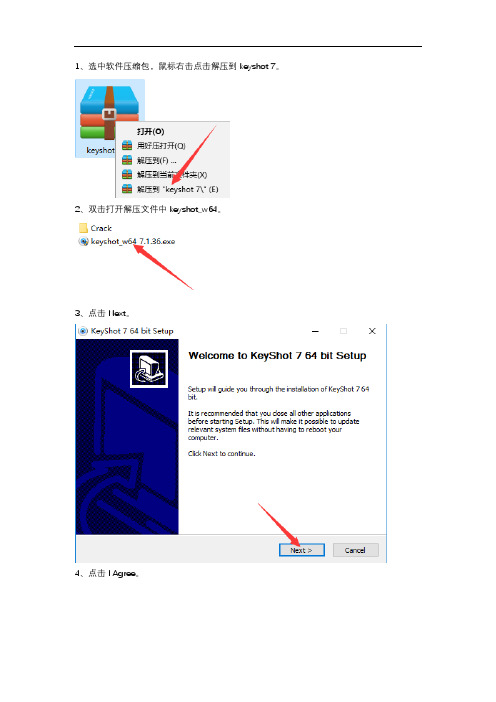
1、选中软件压缩包,鼠标右击点击解压到keyshot 7。
2、双击打开解压文件中keyshot_w64。
3、点击Next。
4、点击I Agree。
5、勾选Install for anyone,然后点击Next。
6、点击Browse更改安装路径,建议安装在除C盘以外的其它磁盘,可以在D盘或者其它磁盘创建一个KeyShot文件夹,然后点击Next。
7、点击Install。
8、安装中(等待3分钟左右)。
9、勾选Run KeyShot 7使其处于未选中状态。
然后点击Finish。
10、双击打开解压文件中的Crack。
11、在打开的文件夹中找到keyshot,鼠标右击选择复制。
12、在桌面找到KeyShot 7,鼠标右击点击打开文件所在的位置。
13、选中空白处,鼠标右击粘贴。
14、点击替换目标中的文件。
15、在crack文件中找到keygen7,鼠标右击以管理员身份运行。
16、点击Generate。
17、在弹出的界面选择软件的安装路径,然后点击保存。
18、点击确定。
19、双击打开桌面上KeyShot 7 64。
20、勾选安装许可证文件,然后点击下一步。
21、在弹出的页面中找到软件的安装位置,选择keyshot7.lic,然后点击打开。
22、点击完成。
23、安装完成。

keyshot9安装教程(附详细安装步骤教程)Keyshot9是我见过⽬前为数不多能符合⽤户要求的3D渲染软件,它是⼀个功能强⼤的⼯具,可以⾮常快速,轻松地制作出惊⼈的渲染和动画,已经发布了许多版本,现在Keyshot Torrent拥有其令⼈惊叹的新功能,凭借其惊⼈的新功能,您可以创建和修改3D动画,我发现很多⼈想要找的资源的时候很难找到,不过不要紧,我找了个,⼤家最好和我⼀致,因为版本不同有可能导致安装失败或者说教程失效!安装教程1、下载安装包此版本为9.3,解压缩并运⾏安装,点击下⼀步2、阅读软件许可协议,选择I agree即我同意3、选择使⽤者,随意勾选即可4、选择软件安装位置,点击Browse可⾃⾏更换安装路径5、选择资源存放位置,⾃⾏选择6、正在安装中,请耐⼼等待⼀会7、安装成功,将运⾏软件的勾选去掉8、先不要运⾏软件,将keyshot.exe、keyshot9.lic⽂件复制到软件安装⽬录下替换⽂件注:默认路径C:\Program Files\KeyShot9\bin9、运⾏软件即可免费使⽤了使⽤教程1、打开Keyshot9,调整好合适的构图后新增⼀个相机,储存好当前构图。
2、给所有部件赋予偏黄⾊的塑料材质,⽅便观察打光。
接下来设置好照明参数。
⾄此渲染的前期准备⼯作就完成了。
3、进⼊环境中的HDRI编辑器,把背景由图像改为颜⾊并设置成⿊⾊,开始进⾏⼿动打光。
4、⾸先⽤圆形光打出顶光,设置好⼤⼩、⾓度、亮度,打光时注意光在各个转折处的过渡效果,最后再给光源添加⼀点衰减效果,使光效柔和。
5、接下来可以先隐藏顶光,避免光线⼲扰,然后分别打出左侧和右侧光,注意光源间的强弱对⽐,分清光源的主次关系。
6、接下来由于地⾯投影较散,画⾯效果不够好,因此可以⼿动添加⼀个极⼩但亮度极⾼的光源来模拟太阳光,以制造出明显的投影效果。
之后再把所有的光显⽰出来,进⼀步调整。
7、这时由于场景过曝,进⼊图像⾯板,选择摄影模式进⾏整体调⾊,压制曝光。

PROE接口用户使用说明使用说明的主要内容有:●概述●接口安装●系统管理●数据导入●数据导出●物料引用1.概述PDM系统与ProE接口,是用友公司针对ProE系列二次开发后的产品,主要是为了使用户在ProE建模时能够根据需要,实现与用友PDM间数据的传输。
运行环境:本接口适用于ProE2.0及其以上版本。
2. 接口安装PROE接口安装步骤如下:(1)将Ufidaproe 文件夹拷贝到C 盘根目录下,并关闭Proe 软件;(2)双击C:\ Ufidaproe目录下的“卸载接口.bat”来卸载以前的接口;(3)双击C:\ Ufidaproe目录下的“注册接口.bat”进行接口注册;(4)启动Proe,点击“数据接口”,显示图2.1 所示工具栏。
图2.1 数据接口3. 系统管理系统管理包括登录和注销,在登录后,再次执行登录的菜单,则可完成注销功能。
步骤1:在图2.1所示工具栏中选择“系统登录”,弹出图3.1所示界面,完成PDM服务器的设置。
图3.1 用户登录步骤2:单击确定按钮,登录系统成功。
步骤3:工具栏选择“系统注销”,在弹出的注销确认对话框中单击“是”,注销系统。
4.数据导入4.1 设计BOM导入步骤1:在Proe中打开设计装配图,在图2.1所示界面选择“读取数据”,系统弹出装配图数据读取的界面,如图4.1所示,列表中显示该装配图的零部件明细。
图4.1 读取装配图信息若装配模型中含有族表零件,系统可以正确读取,如图4.2,4.3所示。
图4.2 PROE中创建族表零件图4.3 读取含有族表的模型信息步骤2:在图4.1界面,点击“读取BOM信息”按钮,打开如图4.4示界面,显示PDM系统中本用户有权限的设计BOM,选择装配图所要挂接的BOM,如果BOM有多层结构,还可选择BOM下部件节点;图4.4读取BOM与任务信息步骤3:读取BOM信息后,在图4.1界面,双击列表中的零部件行,弹出如图4.5示界面,可对装配图中的零件信息进行修改,应保证首零件信息与任务信息完全一致。
Creo 3.0快速安装方法Creo是整合了PTC公司的三个软件Pro/Engineer的参数化技术、CoCreate的直接建模技术和ProductView的三维可视化技术的新型CAD设计软件包,可以说是Pro/E的升级版。
本文讲述的是Creo3.0快速安装方法,直接拷贝安装后的文件,非常快速方便!比正常的安装方式(使用安装包来安装)节省了大量的时间和步骤!此方法同样适用于Creo其它版本。
步骤:1.拷贝文件:从别处复制Creo3.0安装后的所有文件到个人电脑中,别处指的是U盘、局域网电脑或者网站,存放到D盘或其他盘(不要存放在C盘)。
注意如果自己的电脑是32位系统,只能拷贝32位系统的Creo文件,如果自己的电脑是64位系统,则无要求。
Creo安装后的所有文件如下图,共4个文件夹,第三个为破解文件。
在D 盘新建文件夹Creo3.0,将4个文件夹全部复制到D:\Creo3.0文件夹下。
2.修改许可证文件ptc_licfile.dat:用记事本打开D:\Creo3.0\Creo_3.0_Patcher_SSQ下的ptc_licfile.dat文件,将其中的电脑物理地址如“9C-5C-8E-35-FC-71”全部替换为自己电脑的物理地址如“C8-60-00-A0-EF-B6”。
修改后保存,也可另存在其他位置。
两种查询自己电脑的物理地址方法:1.打开D:\Creo3.0\Creo_3.0_Patcher_SSQ文件下的批处理文件“获取网卡号”,查看物理地址2.在开始菜单-运行里输入cmd进入DOS命令窗口,再输入ipconfig /all 查看物理地址3.修改3个psf文件:1>修改路径D:\Creo3.0\Creo 3.0\M150\Direct\bin下的direct.psf文件用记事本打开direct.psf文件,找到“ENV=PTC_D_LICENSE_FILE-=X:\X\X\ptc_licfile.dat”,将“X:\X\X\ptc_licfile.dat”改为自己电脑许可证ptc_licfile.dat的路径如“D:\Creo3.0\Creo_3.0_Patcher_SSQ\ptc_licfile.dat”,保存后关闭。
proe5.0安装方法
以下是使用PTC Creo 5.0进行安装的步骤:
1. 下载Creo 5.0安装程序:您可以从PTC官方网站或其他可信的软件下载网站下载Creo 5.0的安装程序。
2. 运行安装程序:双击下载的安装程序,运行它。
3. 选择安装类型:在安装程序中,您需要选择安装类型。
您可以选择完全安装或自定义安装。
如果您选择自定义安装,您可以选择要安装的组件。
4. 阅读和接受许可协议:阅读许可协议并勾选“我接受许可协议”的选项。
5. 选择安装路径:选择您想要安装Creo 5.0的目标路径。
6. 开始安装:单击“安装”按钮,开始安装Creo 5.0。
此
过程可能需要一些时间,具体取决于您的计算机性能。
7. 完成安装:等待安装程序完成安装。
一旦安装完成,您
将收到安装完成的消息。
8. 激活Creo 5.0:打开Creo 5.0并按照激活指南激活软件。
请注意,上述步骤仅适用于Creo 5.0的安装过程。
确保在
进行安装之前检查您的系统要求,并遵循PTC提供的安装
指南。
keyshot4跟keyshot3挂在proe上略有不同,前面是一样的,到后面要找出图标,再拖到工具栏上。
经过几番周折,终于成功了!!!!1.首先,下载相关接口并安装2.打开proe,点击“工具”按钮,选择“选项”在“选项”下输入“prodevdat”值为H:\keyshot4\Plugins\Pro Engineer 5.0\protk.dat, (蓝色所填的,正是自己keyshot4的安装目录,后面红色都是一样,可复制)3.完成上面后,保存在proe的起动目录里(窗口右上角为当前目录,自己查看)关闭pore,并重新启动。
关键一步(不同之处)4.点击“工具”,选择“定制屏幕”,在“命令”选项最下方点击“外部应用程序”,kyeshot4相关的东西都出来了,看图标大家都知道哪个是“渲染”,点击拖动,拖至工具栏上这两栏都可以5.完成以后,同时也是保存在启动目录。
自己可以试一下渲染。
Bawfnhyve 2013-03-22下面是原版教程*****************************************************KEYSHOT PLUGIN v2.0 FOR Pro/ENGINEER Wildfire 3-5Luxion,Inc 2013*****************************************************_____________________WHAT'S NEW---------------------- Live linking - ability to send updates to KeyShot from ProE in a linked session (KeyShot 4 required)- Ability to export mechanisms (animations) to KeyShot via an FRA file (requires KeyShot Animation for playback and rendering)- Improvements to transformations when exporting to KeyShot- Saved views are being maintained using a perspective camera----------------------PLEASE READ THIS FIRST----------------------You have just installed the KeyShot plugin for Pro/ENGINEER. This plugin allows you to easily export your Pro/ENGINEER assemblies directly into KeyShot 3 for rendering.To finalize the installation, you will need to register the pluginwith Pro/ENGINEER and add the KeyShot 3 plugin to your ribbon.-------------------------REGISTRATION INSTRUCTIONS-------------------------To start using the KeyShot plugin, please follow the instructions below carefully.1. Open the Pro/ENGINEER "Options" dialog from the File menu.2. Under "Option", enter "protkdat" as the option name.3. For the option value, click "Browse ..." and navigate to yourKeyShot 3 Pro Engineer plugin installation. This is typicallylocated in "C:\Program Files\KeyShot 3\Plugins\Pro Engineer".Select the protk.dat file you see here and click "Open", then"Add/Change" and "Apply". Finally, close the dialog.(This option is saved in a .pro configuration file, which istypically stored in your Pro Engineer working directory)4. Restart Pro/ENGINEER. The KeyShot plugin should be loaded. Toconfirm this, run the "Auxiliary Applications" command under the Tools menu. KeyShot should appear in this list and it should beRunning. You can start and stop the application from this window.Once the KeyShot is running close the auxiliary applicationswindow.5. To add the KeyShot buttons, simply go to "Customize Screen..."under Tools. Under the "Commands" tab, locate "Foreignapplications".You can now add the "Render", "Settings", "Update" and"Mechanisms" buttons to the ProE interface by drag and dropping these buttons directly onto the toolbar or to a new menu orflyout, which also can be made under the Commands dialog.---------------Troubleshooting---------------1. If you are unable to add the option "protkdat" under the Optionsdialog, then you must save a config.pro file to your start-upworking directory. This can easily be done under the Options dialog by saving out the current config.pro. Just make sure to save it toyour start-up folder.2. If the KeyShot plugin isn't running under "Auxiliary Applications"after a restart, then you may have saved the options addition inthe wrong config.pro file or in the wrong location. Please verifythat you are saving in the correct location. It needs to be savedin the start-up folder.3. If you need to add multiple versions of KeyShot, just follow thedirections above and point to the appropriate protk.dat file whenadding the option to your config.pro file.---------------------How to Use the Plugin---------------------The plugin can be used without KeyShot installed. If you don't haveKeyShot installed, the plugin will export the geometry to a KeyShot.bip file which can be opened in any version of KeyShot. Mechanismswill also be saved in the bip file.1. Initial transfer1.1 Open your model in Pro/ENGINEER.1.2 Locate your KeyShot plug-in buttons.1.3 Select Render (or Settings, then Render).1.4 KeyShot opens and your model is imported.2. Live Linking from a live session2.1 As soon KeyShot is started from ProE through the render button,the 2 applications are linked.2.2 Assigns materials, set up animations, set up your lighting andcamera angles.2.3 Go back to ProE and continue to refine your model on the part orassembly level.2.4 When you are satisfied with your changes, select "Update". Allchanged parts (geometry / location) will be replaced insideKeyShot. All materials, animations etc will be maintained.2.5 New parts will added to the scene and may not automatically getpainted.3. Live Linking from existing an existing scene3.1 When revisiting a project after both ProE and KeyShot have beenclosed, all you need to do is open both applications and load thecorresponding model/scene into either application. The 2application are now linked.3.2 Continue to work as described under section 2.4. Mechanisms4.1. To export mechanisms created in ProE, load the assembly, and saveout the Mechanism as an FRA file.4.2 Go to the KeyShot tab, click on "Animation", and browse to the FRAfile. Click "Render Now". The assembly and the mechanism will be transferred to KeyShot.4.3 Inside KeyShot, you can play back the animation by opening theanimation timeline. You can add additional part and cameraanimations to the model to use in conjunction with the transferredmechanism. You can't modify the original mechanism insideKeyShot.--------Settings--------* Tessellation level: This controls how many polygons your model will have upon import. Default value is set to 0.5. The higher the value, the higher the quality and number of polygons. Warning: increasing the value will also increase the file size* Assembly orientation: This determines the up-vector (x, y, or z).* Use assembly-level appearances: Use appearances that have been applied on the assembly level in addition to materials applied onthe part level.* Camera options: Export camera views of the model to KeyShot. The camera views inside KeyShot will use a perspective camera.* File options: If "Save to file" is unchecked, the plugin saves to a temporary file before exporting to KeyShot. Checking it allows the user to keep the .bip file permanently. "Open in KeyShot" will open KeyShot and import the geometry automatically.* Full path to file: This is the path to the location where you'llsave your .bip file.* KeyShot executable location: This option is available if the KeyShot executable was for some reason not found. Users having issues with this can manually enter a path to where the KeyShot3.exe is saved.* Live link part selection: By default, this is set to"Automatic". This will automatically send all the parts that have changed to KeyShot. "Manual" will prompt the user to select parts, sub-assemblies, entire subassemblies. In addition to any changed parts, these selected items will be transferred as well.The plugins tracks changes per session, so this option is best used if, for instance, you have closed ProE while live linking, or if you want to increase tessellation on a single part without changing its definition.If you have any issues during set up of this plugin please send anemail to support@.。
三维CAD实用技巧:KeyShot的正确安装方法
KeyShot是一款互动性的光线追踪与全域光渲染程序。
它不需复杂的设定就可产生相片级的渲染图像。
下面,小编向大家介绍如何安装中望3D版的KeyShot程序。
第一步:下载KeyShot安装包(图1)。
图1 KeyShot安装包
第二步:双击安装程序进行安装,点击“Next”下一步,如图2所示。
图2 安装界面
第三步:点击“I Agree”,同意软件协议(图3)。
图3 软件协议
第四步:设定哪些计算机用户可以使用此程序(图4)。
图4 设定用户
第五步:设定软件安装路径(图5)。
图5 设定安装路径
第六步:设定资源文件夹的路径(图6)。
图6 设定资源文件夹路径
第七步:等待安装,安装完成后会出现图7所示界面,点击“Finish”即可。
图7 安装完成
如果想要在中望3D软件中直接启用KeyShot,要先将中望3D设置成管理员权限启动。
同时需要有KeyShot授权,并且确认KeyShot
授权已启用(图8)。
图8 许可证管理
使用中望3D绘制好3D模型后,即可直接在中望3D软件中启动KeyShot(图9)。
图9 在中望3D种直接启动KeyShot
然后如图10所示,使用KeyShot调整各种参数,即可得到图11所示的渲染效果。
图10 调整参数
图11 渲染效果
以上就是KeyShot的安装操作流程了,有兴趣的朋友可以动手体验下,渲染出你所需要的产品效果。
安装完成后效果:
Creo2.0 M080 64位如何挂载keyshot3.0方法:
安装新接口前,务必要把旧接口卸载,包括在config.pro 中的旧接口设置和在creo(pro/engineer)安装目录\text\protk.dat 中对旧接口的定义都要清干净,否则很有可能会安装失败
1、下载KeyShot 3 for Creo接口并安装。
安装过程会弹出了一个记事本,其实这证明KS已经挂上creo的方法上面已经写了。
关闭记事本并完成安装。
2、打开Creo,修改config.pro
名称为prodevdat
值为刚刚安装接口的安装目录下的protk.dat的地址,例如我的值为D:\Program Files\KeyShot3\Plugins\Creo 1.0\protk.dat(这只是我的地址,具体的要看你的)
修改后,确定并保存为config.pro到启动目录
3、设置keyshot 3 按钮,这里要注意了
先新建一个零件,模板随便
打开渲染选项卡,右击空白的地方,选“自定义功能区”
左边选“TOOLKIT 命令”,右边选“渲染”,点击“新建组”
选择“新建组(自定义)”,点击“重命名”,名称重命名为“KeyShot 3”(命名为其它也可以,看个人喜欢)
把新建的组“KeyShot 3”下移到合适位置(还是看个人喜欢)
把“TOOLKIT 命令”中的“Render”和“Settings”添加到新建的组“KeyShot 3”中,要注意不要加错了,我同时装了KeyShot 2 和KeyShot 3 的接口,所以才有两个“Render”和“Settings”
点击确定完成
在组件模式下亦做同样操作
如果要同时接入keyshot 2,也要做同样的操作
---------------------------------------------------------------------
完成后点击“Render”就可以把模型导入到keyshot 3 中渲染
点击“Settings”可以在导入keyshot 3 前进行一些设置
KeyShot for Pro/ENGINEER 安装方法
安装完成后效果:
CREO/Elements Pro 5.0:相对keyshot 3 for creo 而言,for Pro/ENGINEER 的方法要简单多了,这里就以5.0为例
方法:
安装新接口前,务必要把旧接口卸载,包括在config.pro 中的旧接口设置和在creo(pro/engineer)安装目录\text\protk.dat 中对旧接口的定义都要清干净,否则很有可能会安装失败
1、下载KeyShot 3 for Pro/ENGINEER 接口并装之弹出了一个记事本,其实KeyShot 挂上Pro/ENGINEER 的方法上面已经写了。
关闭记事本并完成安装。
2、打开Pro/ENGINEER,看菜单中没有KeyShot 这一项,如果没有则要修改config.pro
工具-->选项
选项输入prodevdat
值输入D:\Program Files\KeyShot3\Plugins\Pro Engineer 5.0\protk.dat (这只是我的地址,具体的要看你的),不确定的建议用“浏览”来找到你的文件。
点击“添加/更改”
修改完成后,保存为config.pro 到启动目录(或text 目录),确定并重启Pro/ENGINEER
--------------------------------------------------------------------------
完成后点击“KeyShot 3 --> Render”就可以把模型导入到keyshot 3 中渲染了
如果要同时挂上keyshot 2,也要做同样操作。