瑞好分水器安装说明
- 格式:pdf
- 大小:793.73 KB
- 文档页数:12
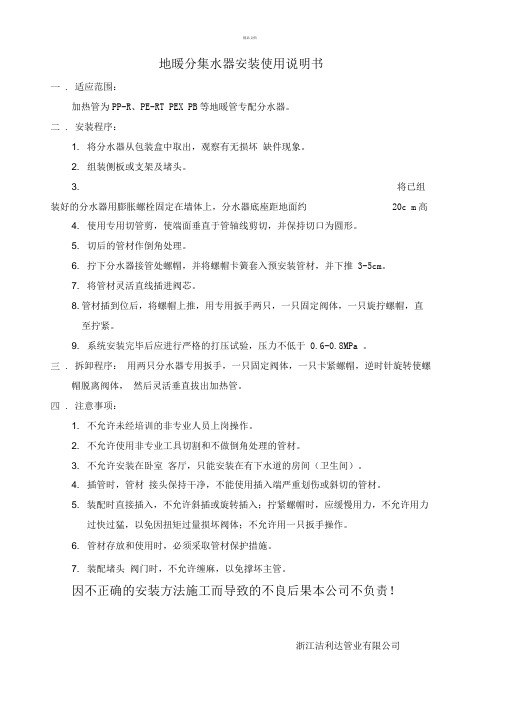
地暖分集水器安装使用说明书一 . 适应范围:加热管为PP-R、PE-RT PEX PB等地暖管专配分水器。
二 . 安装程序:1. 将分水器从包装盒中取出,观察有无损坏缺件现象。
2. 组装侧板或支架及堵头。
3. 将已组装好的分水器用膨胀螺栓固定在墙体上,分水器底座距地面约20c m高4. 使用专用切管剪,使端面垂直于管轴线剪切,并保持切口为圆形。
5. 切后的管材作倒角处理。
6. 拧下分水器接管处螺帽,并将螺帽卡簧套入预安装管材,并下推 3-5cm。
7. 将管材灵活直线插进阀芯。
8. 管材插到位后,将螺帽上推,用专用扳手两只,一只固定阀体,一只旋拧螺帽,直至拧紧。
9. 系统安装完毕后应进行严格的打压试验,压力不低于 0.6-0.8MPa 。
三 . 拆卸程序:用两只分水器专用扳手,一只固定阀体,一只卡紧螺帽,逆时针旋转使螺帽脱离阀体,然后灵活垂直拔出加热管。
四 . 注意事项:1. 不允许未经培训的非专业人员上岗操作。
2. 不允许使用非专业工具切割和不做倒角处理的管材。
3. 不允许安装在卧室客厅,只能安装在有下水道的房间(卫生间)。
4. 插管时,管材接头保持干净,不能使用插入端严重划伤或斜切的管材。
5. 装配时直接插入,不允许斜插或旋转插入;拧紧螺帽时,应缓慢用力,不允许用力过快过猛,以免因扭矩过量损坏阀体;不允许用一只扳手操作。
6. 管材存放和使用时,必须采取管材保护措施。
7. 装配堵头阀门时,不允许缠麻,以免撑坏主管。
因不正确的安装方法施工而导致的不良后果本公司不负责!浙江洁利达管业有限公司欢迎您的下载,资料仅供参考!致力为企业和个人提供合同协议,策划案计划书,学习资料等等打造全网一站式需求。

1、安装技术要求1.1集分水器安装要求;(1)集水器、分水器安装前,应按设计要求和规范偏差对设备基础的位置和尺寸进行复检,主要检查的项目:基础的坐标位置,平面的外形尺寸;不同平面的标高。
(3)对基础的外观质量要求:基础表面无裂纹、空调、缺角、露筋;基础表面的没污、碎石、泥土、积水应清除干净。
放置垫铁的基础表面应平整。
(4)集水器、分水器安装采用M16胀锚地脚螺栓固定,要求胀锚地脚螺栓中心到基础边缘距离不小于7倍胀锚地脚螺栓直径,钻孔处不得有裂纹,钻孔时应防止钻头及基础中的钢筋、埋管相碰。
(5)集水器、分水器的安装,支架或底座的尺寸、位置符合设计要求。
设备及支架接触紧密,安装平正、牢固。
平面位置偏差为15,标高允许偏差5,垂直度允许偏差为1/1000。
(6)集水器、分水器找正调平并紧固后,对设备底座和基础间进行灌浆,灌浆料采用细石混凝土。
设备底座及基础之间灌浆厚度不庆小于25。
1.2 支吊架的型式、位置、间距、标高应符合设计或有关技术标准的要求。
(1)支、吊架的安装应平整牢固,及管道接触紧密。
管道及设备连接处,应设独立支、吊架;支吊架垂直安装。
(2)冷却水管道的支、吊架间距应符合如下规定:(3)管道支、吊架型式符合设计、相关图集和规范要求,焊接应由合格持证焊工施焊,并不得有漏焊、未焊透或焊接裂纹等缺陷。
1.3阀门、自动排气阀、Y型过滤器等管道部件的安装应符合下列要求:(1)阀门安装的位置、进出口方向应正确,并便于损伤连接应牢固紧密,启闭灵活;成排阀门的排列庆整齐美观,在同一面上的允许偏差为3;(2)电动、气动等自控阀门在安装前应进行单体高度,包括开启、关闭等动作试验。
(3)Y型过滤器应安装在进机组前的管道上,方向正确且便于清污;及管道连接牢固、严密,其安装位置应全球滤网的拆装和清洗。
(4)在系统最高处及所有可能积聚空气的高点设置排气阀,在管路最低点设置排水管及排水阀。
2、管的连接方法按照设计要求以及《地源热泵系统工程技术规范》50366规定,埋地管道应采用热熔或电熔连接。

地暖分水器正确安装方法(中文英文双语版高分优质文档)地暖分水器的正确安装方法如下:1. 确定安装位置:选择合适的位置安装地暖分水器,通常选择在地暖管路进入房间的位置,如墙壁或地板下。
2. 准备安装材料:准备好地暖分水器和所需的安装配件,包括螺栓、螺母、密封垫等。
3. 安装支架:使用螺栓和螺母将地暖分水器的支架固定在安装位置上。
确保支架牢固稳定,能够承受地暖分水器的重量。
4. 连接管路:根据地暖系统的设计和布局,使用合适的连接件将地暖管路连接到地暖分水器上。
确保连接紧密并且没有漏水。
5. 安装调节阀:根据地暖系统的需要,安装调节阀以控制地暖分水器的水流量和温度。
根据厂家提供的说明书正确安装调节阀,并确保其正常工作。
6. 连接电源:如果地暖分水器需要电源供电,按照相关规定和安全标准连接电源线,并确保电源接地良好。
7. 测试和调试:安装完成后,进行必要的测试和调试工作。
检查地暖分水器的各个部件是否正常工作,确保水流畅通,无泄漏,并调试好水流量和温度。
8. 安装保护装置:为地暖分水器安装相应的保护装置,如防止水垢的过滤器、安全阀等,以延长地暖系统的使用寿命并提高安全性能。
请注意,在进行地暖分水器的安装过程中,建议寻求专业人士的帮助或咨询,以确保安装过程安全可靠,并符合相关的建筑规范和标准。
The correct installation method of the floor heating water separator (Chinese and English bilingual version with high scores and high-quality documents)The correct installation method of the floor heating water separator is as follows:1. Determine the installation location: Choose a suitable location to install the floor heating water separator, usually where the floor heating pipeline enters the room, such as the wall or under the floor.2. Prepare installation materials: Prepare the floor heating water separator and the required installation accessories, including bolts, nuts, gaskets, etc.3. Install the bracket: Use bolts and nuts to fix the bracket of the floor heating water distributor on the installation position. Make sure the bracket is strong and stable enough to bear the weight of the floor heating manifold.4. Connecting pipes: According to the design and layout of the floor heating system, use suitable connectors to connect the floor heating pipes to the floor heating water separator. Make sure the connections are tight and there are no leaks.5. Install the regulating valve: According to the needs of the floor heating system, install the regulating valve to control the water flow and temperature of the floor heating water separator. Correctly install the regulating valve according to the instructions provided by the manufacturer and ensure its normal operation.6. Connect the power supply: If the floor heating waterseparator needs power supply, connect the power line according to relevant regulations and safety standards, and ensure that the power supply is well grounded.7. Testing and debugging: After the installation is completed, carry out the necessary testing and debugging. Check whether the various parts of the floor heating water separator are working normally, ensure that the water flow is smooth and there is no leakage, and adjust the water flow and temperature.8. Install protective devices: Install corresponding protective devices for the floor heating water separator, such as filters to prevent scale, safety valves, etc., to prolong the service life of the floor heating system and improve safety performance.Please note that during the installation process of the floor heating water separator, it is recommended to seek professional help or consultation to ensure that the installation process is safe and reliable, and complies with relevant building codes and standards.。

分水器安装方法
分水器是一种常见的家用设备,用于将自来水分流到不同的水
龙头或设备中,方便生活和工作。
正确安装分水器可以确保水流顺畅,使用方便。
下面将介绍分水器的安装方法,希望对您有所帮助。
首先,准备工作。
在安装分水器之前,需要准备好所需的工具
和材料,包括螺丝刀、扳手、密封垫、螺纹密封胶等。
确保所选用
的分水器与水龙头的规格相匹配,以确保安装的顺利进行。
其次,关闭水源。
在开始安装分水器之前,务必关闭主水源,
以防止水流造成不必要的麻烦和浪费。
关闭主水源后,打开水龙头,排干水管中的余水,以确保安装过程中的安全和顺利进行。
然后,安装分水器。
将分水器安装在水龙头上,根据分水器的
安装说明书和图纸进行操作。
一般来说,首先将密封垫放在水龙头上,然后用螺丝刀或扳手将分水器固定在水龙头上,注意不要过紧
或过松。
安装时要确保所有接口都牢固密封,以防止漏水。
接下来,连接水管。
将水管连接到分水器的各个出水口上,确
保连接牢固,不漏水。
根据需要,可以使用螺纹密封胶或其他密封
材料来加固连接处,以确保安全和稳固。
最后,检查和试水。
安装完成后,打开主水源,检查分水器的各个出水口是否正常工作,是否有漏水现象。
同时,也可以试验一下各个出水口的水流量和水压,以确保分水器的正常使用。
在安装分水器的过程中,务必要注意安全,避免操作不当造成损坏或意外。
如果遇到不懂的问题,可以查阅安装说明书或咨询专业人士。
希望以上内容对您在安装分水器时有所帮助,祝您安装顺利,使用愉快!。

地暖系统中集分水器的安装及使用说明一、集分水器的选择与准备1.根据地暖系统的规模和需求,选择合适的集分水器。
一般来说,集分水器的口径应与地暖管道的口径相匹配。
2.清洁集分水器及其配件,确保没有杂质和污垢。
3.检查集分水器及其配件是否完好无损,有无缺陷或损坏。
二、集分水器的安装1.根据地暖系统的设计图纸,确定集分水器的安装位置,并在墙壁或地板上标记位置。
2.使用电钻和钻头,在标记的位置上钻孔,确保孔洞与集分水器的固定螺丝相匹配。
3.在安装位置上安装集分水器的固定螺丝。
4.将集分水器安装在固定螺丝上,确保安装牢固。
5.按照设计图纸,连接入水和出水管道至集分水器的相应接口。
6.使用扳手或扳手,适当拧紧连接螺母,确保密封。
7.检查连接部位是否漏水,如有漏水现象,及时调整连接,确保连接紧固。
三、集分水器的使用1.打开地暖系统的主控开关,使水流进入集分水器。
2.按照设计安排,将地暖管路连接到集分水器的各个出口,并使用扳手或扳手将连接螺母拧紧。
3.检查所有的管道连接部位,确保连接牢固,无漏水现象。
4.检查集分水器上的控制阀门,确保所有的阀门处于打开状态。
5.按照地暖系统的控制面板或温控器的要求,设置合适的温度和供暖时间。
6.启动地暖系统,观察集分水器的工作状态,确保水流顺畅,供应均匀。
7.定期检查集分水器的工作状态,如发现异常情况,及时调整和维修。
四、注意事项1.在安装和使用集分水器时,务必遵循安全操作规程,确保自身和他人的安全。
2.集分水器及其配件应存放在干燥、通风的地方,避免受潮和腐蚀。
3.定期清洁集分水器及其配件,确保无污垢和杂质堆积,保持良好的工作状态。
4.在使用过程中,如发现集分水器有异常现象,如漏水、密封不严等,应及时维修或更换。
5.如需对集分水器进行维修或更换,应关闭地暖系统,并请专业人员进行操作。
以上是地暖系统中集分水器的安装和使用说明,希望能够对您有所帮助。
在安装和使用过程中,请务必遵循相关规程和要求,确保地暖系统的正常运行,并保证室内温度的舒适。

分水器安装标准一、安装位置1. 分水器应安装在系统管道的最低处,以便于排空和操作。
2. 分水器应安装在距离地面一定高度的位置,以方便连接管道和维修操作。
二、阀门状态1. 分水器进水阀和出水阀应处于关闭状态。
2. 分水器排气阀应处于开启状态,以便于排气。
三、管道连接1. 采用热熔或电熔连接的方式连接分水器的配管。
2. 连接管道时应保证管道与分水器连接处密封良好,无渗漏。
3. 连接管道时应保证管道布置合理,不影响分水器的操作和维修。
四、压力试验1. 在安装完成后应对分水器进行压力试验,以确保其密封性和功能性。
2. 压力试验应采用系统工作压力进行,保压时间为10分钟以上。
3. 压力试验期间应检查分水器各连接处无渗漏,阀门启闭正常。
五、清洁与消毒1. 分水器安装完成后应进行清洁,清除内部的杂质和污染物。
2. 分水器消毒应采用合格的消毒剂,按照产品说明进行操作。
3. 消毒完成后应对分水器进行冲洗,确保无残留消毒剂对系统运行的影响。
六、外观检查1. 检查分水器的外观,应无损伤、变形和锈蚀等现象。
2. 检查分水器的阀门和附件,应完好无损、紧固可靠。
3. 对于不锈钢材质的分水器,应采用不锈钢清洁剂进行清洁,保持其外观光亮整洁。
七、功能测试1. 对分水器的各个阀门进行开关操作,应灵活自如,无卡阻现象。
2. 对分水器进行放气操作,应无残余气体影响系统的正常运行。
3. 在供暖系统运行前应对分水器进行一次全面的检查和调试,确保其正常工作。
八、安装文档1. 安装完成后应制作完整的安装文档,包括安装位置、阀门状态、管道连接、压力试验、清洁与消毒、外观检查、功能测试等内容。
2. 安装文档应妥善保存,以便于日后的维护和管理。
空气能采暖中,分集水器安装方法以及安装图解在空气能采暖中,分集水器是其中不可或缺的部分。
分集水器质量的好坏影响着空气能采暖的使用效果。
很多空气能采暖的客户被低质量分集水器所影响,不知道怎么挑选质量好的分集水器。
今天,为大家讲解一下,如何挑选质量好的分集水器,以及安装分集水器的方法。
首先,要了解分集水器在空气能采暖中的作用。
分集水器的作用是连接采暖主干供水管和回水管的装置。
分为分水器和集水器两部分。
集水器在水系统中的作用是连接各路加热管回水管的汇水装置。
分水器在水系统中的作用是连接各路加热管供水管的配水装置。
其次,挑选好的分集水器需要一定的经验,需要通过细节来判断分集水器质量的好坏1)看分集水器表面是否精致光滑,是否有划痕等;2)分集水器使用的材料越好,相对的重量会大一些;3)试用看分集水器开关的顺畅性;正旭建议:尽量选择有品牌的分集水器,无品牌的分集水器多是小作坊生产,质量无法保证。
同时避免用较低价格购买分集水器,因为质量差的分集水器存在使用寿命短、引发漏水事故和造成系统流量不够等3大风险。
在挑选完合适的分集水器后,空气能采暖中如何安装分集水器?分四步走,轻轻松松安装好分集水器。
安装分集水器第一步:熟悉分集水器每个部位的名称以及作用,分集水器的主要配件有分水器、集水器、回路控制阀、流量平衡阀、关断阀及其手柄、安装支架、地暖管接头等,要区分好进水主管和出水主管,排水阀以及排气阀等部件。
安装分集水器第二步:对照着上图指示,慢慢地安装连接好出水口和进水口,对应安装好阀门,安装时需要注意细心,不能安装错误,安装反方向。
安装分集水器第三步:设置旁通,注意在旁通设置阀门。
安装分集水器第四步:设置排气阀。
排气阀常用的有两种,一种是手动排气阀,另一种是自动排气阀,手动排气阀相对便宜点,但是使用不太方便,而自动排气阀具有自动排气功能,免去手动排气的不便和麻烦,建议使用自动排气阀。
空气能采暖分集水器注意事项:1、分集水器在第一次使用时需注入热水启动地热,需要检查分水器的接口有无漏水,然后逐步打开分水器各个支路的阀门。
分水器和地热管的安装方法1. 引言随着人们对能源利用的环保重视程度的提高,地热能作为一种可再生能源得到了广泛的关注和应用。
在地热系统中,分水器和地热管的安装是非常关键的环节。
本文将介绍分水器和地热管的安装方法和步骤。
2. 分水器的安装步骤一:准备工作首先要明确需求,确定需要安装的分水器数量和位置。
之后,准备好需要的工具和材料,例如扳手、螺丝刀、分水器、密封胶等。
步骤二:确定安装位置找到适合的安装位置,通常是在地板下或墙壁内。
应尽量避免放置在阳光直射的地方,以免分水器受到太阳曝晒而容易老化。
步骤三:安装水管将水管连接到水源,确保水源处放置有止回阀,这样可以防止逆流。
接下来将水管分别连接到分水器的进水口,使用扳手拧紧螺丝,以确保连接紧密。
步骤四:连接热水管和冷水管在分水器上安装热水管和冷水管,根据需要将管道连接到相应的接口,也可以根据实际情况决定是否需要安装调节阀。
确保管道连接紧密,使用密封胶固定连接口,以防漏水。
步骤五:测试在全部安装完成后,打开水源,检查各个连接点是否有漏水现象。
若有漏水,则需要重新检查连接点,确保安装无误。
3. 地热管的安装步骤一:准备工作首先要明确需求,确定需要安装的地热管长度和数量。
之后,准备好需要的工具和材料,例如锯子、电钻、地热管、连接件、保护管等。
步骤二:确定安装位置根据建筑结构和设计要求,确定地热管的布置方案和管道走向。
在确定位置后,使用电钻在地板上打孔,为地热管的敷设做好准备。
步骤三:敷设地热管将地热管依照设计方案敷设在地板下,根据需要可以使用固定件将地热管固定在地板上。
同时,确保地热管的连接点处于易于维护的位置,方便以后的检查和维修。
步骤四:连接管道使用连接件将地热管连接到分水器上,确保连接口紧密,使用密封胶固定连接点。
根据设计要求,还可以在地热管上设置返回阀,以实现系统的双向流动。
步骤五:安装保护管为了保护地热管和防止外部损伤,可以在地热管周围安装保护管。
保护管一般使用塑料管或泡沫管,覆盖在地热管的周围。
分水器的使用方法分水器是一种用来分配水流的设备,广泛应用于家庭、工业和农业领域。
它可以将进水管道中的水流分散到多个出水管道,实现对水流的控制和分配。
在本文中,将介绍分水器的使用方法,包括安装、操作和维护等方面的内容,以帮助读者更好地理解和使用分水器。
一、安装分水器1.选择合适的位置:首先需要选择一个合适的位置安装分水器,通常应选择在水源附近或者需要分水的地方附近。
安装位置应稳固且易于操作,同时要离地面一定距离,以便连接管道。
2.连接进水管道:将进水管道与分水器的进水口连接起来,确保连接牢固并无漏水现象。
在连接过程中可以使用合适的密封胶进行固定,以防止漏水。
3.连接出水管道:将需要分水的出水管道与分水器的出水口连接起来。
根据具体需求,可以选择连接一个或多个出水管道,以实现对水流的分配。
二、操作分水器1.打开进水阀门:在安装完毕后,首先需要打开进水阀门,使水流进入分水器。
在打开阀门时,要注意缓慢打开,避免水流过大造成压力过大而破坏分水器。
2.调节出水量:根据实际需求,可以通过调节分水器上的旋钮或开关来控制出水量。
通过适当调节,可以实现不同出水管道的水流分配比例。
3.检查水流情况:在操作分水器时,应及时检查各个出水管道的水流情况。
如果发现有水流不畅或者有漏水现象,应及时进行处理,以确保分水器的正常运行。
三、维护分水器1.定期清洗:分水器在使用一段时间后,会因为水垢、杂物等原因而导致堵塞或者水流不畅。
因此,需要定期对分水器进行清洗,可以使用专用的清洗剂或者软毛刷进行清洁。
2.检修故障:如果发现分水器出现故障或者水流不稳定的情况,应及时进行检修。
首先应检查是否有松动的管道连接,然后可以拆卸分水器进行检查和维修。
3.防冻保护:在寒冷的冬季,分水器易受冻,导致破裂和损坏。
因此,在冬季来临前,应将分水器中的水排空,并进行防冻保护措施,以避免因冻裂而损坏。
总结:分水器的使用方法主要包括安装、操作和维护三个方面。
正确安装分水器可以确保其正常运行和稳定的水流分配;在操作过程中,需要合理调节出水量并定期检查水流情况;维护方面主要包括定期清洗和检修故障,以及防冻保护等。
地暖分水器正确安装方法地暖分水器是地暖系统中非常重要的一个设备,它主要起到分流、调节和控制地暖系统中的热水流动的作用。
正确安装地暖分水器对于地暖系统的稳定运行和舒适取暖效果有着至关重要的作用。
本文将介绍地暖分水器的正确安装方法,以确保地暖系统的正常运行。
1.确定地暖分水器的安装位置,通常安装在热水供应管道进入地板之前。
安装位置应远离任何可燃物体,以防止火灾。
2.将地暖分水器与地暖系统的进水管道和回水管道相连接。
进水管道应连接到分水器的进水口,回水管道应连接到分水器的回水口。
确保连接紧固牢固并且密封完好,以防止漏水。
3.在进水管道和回水管道之间安装一个扭力流量调节阀,以便根据需要调节系统中的热水流量。
调节阀可以根据实际需要调整,以确保地暖系统的供热效果最佳。
4.安装安全阀和减压阀,用于保护地暖系统免受过高的压力和温度。
5.安装循环泵,循环泵可以帮助将热水迅速输送到地暖系统中的各个部分,并确保热水的均匀分配。
循环泵应根据地暖系统的规模和需求来选择,并且应连接到分水器的相应接口。
6.在分水器上安装温度控制器,温度控制器用于监测和调节地暖系统中的水温。
温度控制器应安装在易于访问和操作的位置,并确保与分水器正确连接。
7.连接电源,如果地暖分水器采用电动控制,需要将分水器连接到电源供应中。
确保电源连接正确并且可靠。
8.进行系统测试,安装完成后,需要进行系统测试以确保地暖分水器和整个地暖系统的正常运行。
打开供水阀和循环泵,检查水流是否顺畅,并确保温度控制器可以准确地控制地暖系统中水温的变化。
以上是地暖分水器的正确安装方法,希望能对您的地暖系统安装工作有所帮助。
在进行安装前,建议阅读并遵守地暖分水器的使用说明书,并根据具体情况进行调整和安装。
如有必要,建议请专业人士进行安装和调试,以确保地暖系统的安全和可靠性。
DINFORMATION. Anwendungstipps und wichtige Informationen.ACHTUNG! Wichtiger Hinweis zurFunktion. Nichtbeachtung kann Fehl-funktionen hervorrufen.Rechtlicher HinweisPersonelle VorraussetzungenVor Beginn der Arbeiten muss der Monteur diese Montage- und Betriebsanleitung lesen, verste-hen und beachten.Die Heizkreisverteiler HKV / HKV-D für Flächen-heizungen dürfen nur vom ausgebildeten Fach-personal montiert, eingestellt und gewartet wer-den. Anzulernendes Personal darf nur unter Auf-sicht einer erfahrenen Person am Produkt arbei-ist eine Haftung des Herstellers gemäß den ge-setzlichen Bestimmungen gegeben.Alle Hinweise dieser Montage- und Betriebsan-leitung sind bei der Verwendung der HKV /HKV-D zu beachten.Bestimmungsgemäße Verwendung Die Heizkreisverteiler HKV / HKV-D werden für die Verteilung und Einregulierung des Volumen-stroms in Niedertemperatur-Flächenheizungen bzw. Flächenkühlungen eingesetzt.Die Heizkreisverteiler HKV / HKV-D sind mitHeizungswasser gemäß VDI 2035 zu betreiben. Bei Anlagen mit Korrosionspartikeln oder Verschmutzungen im Heizungswasser sind zum Schutz der Mess- und Regeleinrichtungen des Verteilers Schmutzfänger oder Filter mit einer Maschenweite von nicht mehr als 0,8 mm in die Heizungsanlage einzubauen. Der maximal zu-lässige Dauerbetriebsdruck beträgt 6 bar bei 80 °C. Der maximal zulässige Prüfdruck beträgt 8 bar bei 20 °C. Jede andere, als in dieser Anleitung dargestellte Verwendung ist nicht bestimmungsgemäß. Für die aus missbräuchlicher Verwendung der Heiz-kreisverteiler entstehenden Schäden haftet der Hersteller nicht. Umbauten oder Veränderungen sind aus Grün-den der Sicherheit und Gewährleistung nicht zu-gelassen. Eine Gewährleistung bei Verwendung von Ver-schraubungen und Zubehörteilen anderer Her-steller kann nicht übernommen werden. Montage/ InbetriebnahmeMontage im Verteilerschrank: Die Konsolen des Heizkreisverteilers werden an den verschiebbaren C-Profilschienen, an den vorbereiteten Bolzen oder Bohrungen befestigt. Bitte die jeweiligen Montagehinweise beachten. Wandmontage: Die Heizkreisverteiler HKV / HKV-D werden mit dem beigelegten Befestigungsset (4 Stück DübelS 8 und 4 Stück Schrauben 6 x 50) durch die Bohrungen in der Verteilerkonsole befestigt.Hydraulische Anschlüsse: Der HKV / HKV-D wird mit einem 1” Kugelhahnset und einer Spül-/ Befülleinrichtung (SBE) ausgeliefert. Die Verteilerrohre besitzenjeweils ein G 1” Außengewinde zurflachdichtenden Montage der Kugelhähne und der SBE. Die Überwurfmuttern sollten mit einem Ring-/Maulschlüssel SW 38 mit ca. 35 - 45 Nm angezogen werden. Für den Anschluss derRohre an die Verschraubungsteile beachten Sie bitte die Hinweise zur Rohrmontage.Die Kennzeichnung der Heizkreise zu deneinzelnen Räumen erfolgt durch die beigelegten Selbstklebe-Etiketten. Diese können auf den Verteilerstamm aufgeklebt werden.Spülen und Befüllen der Heizkreise: Zum Befüllen des Heizkreisverteilerswerden Schläuche mit 3/4” Schlauchtüllen auf die Außengewinde der Füllhähne aufgeschraubt. Die SBE anhand der Flügelgriffe langsam öffnen und schließen.Achtung!Die 1“ Kugelhähne am Vorlauf- undRücklaufbalken müssen während des Befüll-, Spül- und Abdrückvorganges geschlossen bleiben, da sonst der hohe Wasserdruck der Heizungsanlage schaden bzw. das Sicherheitsventil ansprechen könnte.Den Verteiler nur in Flussrichtung füllen und spülen! Hohe Differenzdrücke (> 1 bar) und Druckschläge sind dabei zu vermeiden.GBINFORMATION. Instructions for use and important information.BEWARE! Important information about function. Failure to heed can impair function.Legal information.Personnel requirementsPrior to starting work, the fitter must read, under-stand and heed these installation and operating instructions.HKV / HKV-D manifolds for underfloor heating may only be installed, adjusted and maintained by trained specialists. Trainees may only work on the product under the supervision of an experi-enced person. Only if the above instructions have been adhered to will the manufacturer ac-cept any liability in line with statutory provisions. Every instruction contained in these installation and operating instructions is to be heeded when using the HKV / HKV-D manifolds.Correct useHKV / HKV-D manifolds are used for distributing and regulating the volume of flow in low tem-perature underfloor heating systems and under-floor cooling systems.HKV / HKV-D manifolds are to be operated using heating water as per VDI 2035. In the case of systems, the heating water of which contains corrosive particles or other contaminants, dirt traps or filters with a mesh size of no more than 0.8 mm are to be fitted in order to protect the measuring and control devices.The max. permissible continuous operating pres-sure is 6 bar at 80 °C. The max. permissible test pressure is 8 bar at 20 °C.Using the manifolds for any purpose other than that set out in these instructions constitutes im-proper use. The manufacturer accepts no liability for damage resulting from improper use of the manifolds.For safety and guarantee reasons, no conversion or modification is permitted.The manufacturer accepts no liability if connec-tions and accessories made by other manufac-turers are used. Installation / CommissioningInstallation in manifold cabinet:The manifold headers are fitted to the sliding C profile rails, using the supplied bolts. Please heed the relevant installation instructions.Wall installation:The HKV / HKV-D manifolds are fitted using the installation kit provided (4 x S 8 rawl plugs and 4 screws 6 x 50)Hydraulic connections:HKV / HKV-D manifolds are supplied with a 1” ball valve set plus a flush-and-fill unit (SBE).The manifold headers each have a G 1” male thread for fitting the ball valve and the flush-and-fill unit, with flat joints. The union nuts are to be tightened with an SW 38 ring spanner or open-ended spanner with approx. 35 - 45 Nm. When connecting pipes to connections, please see our pipe installation instructions.The heating circuits for the individual rooms are labelled with the self-adhesive labels provided. These can be stuck to the manifold itself.Flushing and filling the heating circuits:Hoses with 3/4” connections tubes are screwed to the hose of the feed taps to fill the heating cir-cuit manifold. Slowly open and close the valves connections to operate the flush-and-fill unit.Beware!During the filling and flushing process, the 1” ball valves on the flow and return headers must re-main closed, otherwise the high water pressure might damage the heating system or might acti-vate the safety valve.Only fill and flush the manifold in the direction of flow! Please avoid high differential pressure (> 1 bar) and pressure shocks.FINFORMATION. Conseils de mise en œuvre et informations importantesATTENTION ! Précisions importantes pour le fonctionnement. Le non respect peut entraîner un mauvais fonctionne-ment.Précisions juridiquesExigences en matière de personnelAvant de commencer le travail, le monteur doit lire, comprendre et respecter cette notice pour le montage et la mise en service. Les collecteurs HKV/HKV-D pour plancher chauffant peuvent uniquement être installés, réglés et entretenus par du personnel compétent.Les apprentis peuvent uniquement installer ses produits sous le contrôle d’une personne compé-tente . Uniquement en respectant les conditions engagée conformément aux conditions juridi-ques.Toutes les recommandations de montage et de mise en service sont à respecter lors de la mise en œuvre des collecteurs HKV/HKV-D.Domaine d’utilisationLes collecteurs HKV/HKV-D sont utilisés pour la distribution et le réglage des débits des circuits de plancher chauffant à basse température ainsi qu’en rafraîchissement.Les collecteurs HKV/HKV-D sont à utiliser avec de l’eau de chauffage conforme au VDI 2035. Pour les installations comprenant des particules corrodées ou de l’eau souillée, il faudra installer pour protéger les organes de réglage et de lec-ture du collecteur, un système pour capter ces souillures ou un filtre de maille maximale de 0.8mm.La pression de service maximale est de 6 bar à 80° pression d’épreuve maximale est de 8 bar à 20°C.Toutes autres utilisations que celle décrite dans ce document sont interdites. Les désordres en-gendrés suite à une mauvaise utilisation du col-lecteur ne pourront pas être imputés au fabri-cant.Transformer ou modifier le collecteur est interdit pour des raisons de sécurité et de bon fonction-nement .L’utilisation d’autres raccords ou accessoires d’un autre fabricant avec notre collecteur ne sera pas couverte par notre garantie. Montage/ Mise en service Montage dans une armoire d’encastrement: Les consoles du collecteur seront fixées aux pro-filés coulissants C par le biais des axes des per-çages. Respecter la notice de montage corres-pondante.Montage sur cloison verticale:Les collecteurs HKV/HKV-D seront fixés avec le set de fixation ( 4 chevilles S8 et 4 vis 6x50) au travers des consoles du collecteur.Raccordement hydraulique:Le collecteur HKV/HKV-D Der HKV / HKV-D est livré avec une vanne à bille 1’’ et un robinet de remplissage / vidange (SBE).L’alimentation principale du collecteur a un file-tage 1’’M portée plate pour recevoir, via un joint plat, la vanne à bille et le robinet de remplissage/ vidange .L’écrou prisonnier doit être serré avec une clé à tuyauter SW 38 avec un couple de ser-rage d’environ 35 à 45Nm. Pour le raccordement des tubes au collecteur , il faut se référer à la no-tice de montages des tubes.Des étiquettes autocollantes sont à coller sur le collecteur pour repérer les différents circuits.Remplissage et vidange des circuits:Pour remplir les circuits , raccorder le tuyau au robinet de remplissage / vidange en ¾’’M.Actionner doucement en ouverture et fermeture la poignée du robinet de remplissage / vidange.Attention!Les vannes à billes 1’’ départ / retour du collec-teur doivent être fermées durant les phases de remplissage, rinçage, et mise en épreuve sinon sous la forte pression la soupape de sécurité de la chaudière peut se déclencher.Le remplissage ou la vidange du collecteur doit se faire en respectant le même sens de circula-tion qu’en fonctionnement! Les différences de pression (>1 bar ) ainsi que les coups de bélier sont à éviter.IINFORMAZIONI. Consigli relativi amodalità di installazione e informazioni importanti.ATTENZIONE! Istruzioni fondamentaliai fini del funzionamento. In caso dimancato rispetto delle stesse, ilprodotto potrebbe non funzionarecorrettamente.Istruzioni di carattere giuridico-legale.Prescrizioni riguardanti il personalePrima di iniziare le operazioni di montaggio leggere attentamente il presente documento, alfine di operare in conformità a quanto prescritto. Le operazioni di montaggio, regolazione e manutenzione dei collettori per impianti di riscaldamento e raffrescamento a pavimento opportunamente addestrato.L’impiego ottimale dei collettori per impianti di riscaldamento e raffrescamento a pavimento HKV / HKV-D presume il pieno rispetto di tutte le istruzioni contenute nel presente fascicolo.Destinazione d’usoI collettori per impianti di riscaldamento e raffre-scamento a pavimento HKV / HKV-D vengono utilizzati per distribuire e bilenciare le portate nei circuiti degli impianti di riscaldamento eraffrescamento radiante.I collettori sopno idonei al solo funzionamento con acqua per riscaldamento.Negli impianti che presentano particolato dovuto a corrosione o impurità nell’acqua per riscaldamento è necessario prevedere apparati cattura-impurità o filtri con maglie di dimensione max. di 0,8 mm per proteggere i vari componenti e dispositivi di misurazione e regolazione del collettore. Sono consentite rispettivamente una pressione max. di esercizio di 6 bar a 80 °C e una pressione di prova max. di 8 bar a 20 °C. Ogni eventuale destinazione d’uso del prodotto differente da quella specificata nel presente fascicolo verrà intesa come uso improprio. SI declina ogni responsabilità per danni di qualsivoglia natura dovuti a uso errato o non conforme del collettore. Per motivi di sicurezza è vietato effettuare eventuali trasformazioni e/o modifiche di propria iniziativa.In caso di utilizzo di collegamenti a vite e/o accessori di altra marca decade il diritto alla garanzia.Montaggio/ messa in funzioneMontaggio all’interno dell’armadietto didistribuzione:Le staffe del collettore vanno fissate alle guidescorrevoli con profilo a C, sui perni o fori appositamente preparati, osservando sempre scrupolosamente le rispettive istruzioni per di montaggio.Montaggio a muro:I collettori HKV / HKV-D vanno montati utilizzando gli appositi fori con il set di fissaggio allegato al corredo di fornitura (n. 4 tasselli S 8 e n. 4 viti 6 x 50).Raccordi idraulici: Il collettore HKV / HKV-D viene fornito completo di un set composto da rubinetto a sfera da 1” ed un dispositivo di riempimento e scarico (DRR). Ciascun tubo del collettore è dotato rispettivamente di una filettatura esterna G 1” per il montaggio a tenuta in piano dei rubinetti a sfera e del DRR. I dadi a risvolto andrebbero stretti preferibilmente con una chiave combinata a forchetta e poligonale SW 38, esercitando una forza di circa 35 - 45 Nm. I tubi dei circuiti vanno applicati sul punto di collegamento a vite osservando scrupolosamente le relative istruzioni di montaggio. Per contrassegnare i vari circuiti di riscaldamento che conducono ai singoli vani applicare sul tronco di distribuzione le etichette autoadesive comprese nel corredo di fornitura. Riempimento e scarico dei circuiti per riscaldamento: Per riempire il collettore avvitare alcuni tubi flessibili con isolatore passante flessibile da 3/4” sulla filettatura esterna dei rubunetti di riempimento. Aprire e chiudere lentamente il DRR facendo presa sulle impugnature ad alette.Attenzione!Durante le operazioni di riempimento e scaricodella pressione, i rubinetti a sfera da 1“ dellecondotte di mandata e ritorno devono rimanerechiusi per evitare danni all’impianto di riscaldamento per effetto dell’alta presione raggiunta dall’acqua e/o un intervento della valvola di sicurezza. Il collettore va riempito e sciacquato solo ed esclusivamente nel senso di scorrimento del flusso, evitando sbalzi di pressione - repentini o lenti - troppo elevati (> 1 bar).EINFORMACIÓN. Consejos de aplicación e informaciones importantes.¡ATENCIÓN! Indicación importantepara la función. El incumplimientopuede causar funciones anómalas.Advertencia legalPersonal autorizadoAntes de iniciar los trabajos, el montador debeleer y haber comprendido estas instrucciones de montaje y de servicio y observarlas en todomomento.Los colectores HKV / HKV-D para la calefacción por superficies radiantes sólo pueden sermontados, regulados y mantenidos por personal especializado debidamente formado. Laspersonas en formación sólo pueden trabajar con el producto bajo la supervisión de un montador experimentado. Sólo cumpliéndose estascondiciones puede haber lugar a la responsabilidad del fabricante de acuerdo con las disposiciones legales. Las indicaciones contenidas en estas instrucciones de montaje y de servicio deben observarse en su totalidad en la utilización de los colectores HKV / HKV-D. Utilización conforme a la finalidadLos colectores HKV / HKV-D se emplean para ladistribución y el ajuste del caudal volumétrico enla calefacción o el refrescamiento a bajatemperatura por superficies radiantes.Los colectores HKV / HKV-D deben alimentarsecon agua de calefacción según VDI 2035 (ph 8,2-9,5 y <0,1 mg/l O 2). En el caso de instalaciones con partículas de corrosión o de suciedad en el agua de calefacción, deben incorporarse separadores de impurezas o filtros con una abertura de mallas de no más de 0,8 mm para proteger los mecanismos de medición y regulación del colector. La presión de servicio permanente máxima permitida es de 6 bar a 80 °C. La presión de ensayo máxima permitida es de 8 bar a 20 °C. Cualquier utilización distinta a la descrita en estas instrucciones es considerada como no conforme con la finalidad de uso. El fabricanteno responde de los daños ocasionados por la utilización indebida de los colectores. Por motivos de seguridad y de garantía, no estápermitido transformar o modificar el colector. No se asume garantía legal alguna en caso deutilizar racores y accesorios de otros fabricantes.Montaje/ Puesta en marcha Montaje en el armario de colector: Las consolas del colector se fijan en los perfiles C móviles, utilizando los pernos o taladros preparados. Observar por favor las instrucciones de montaje. Montaje sobre pared:Los colectores HKV / HKV-D se fijan a través de los taladros en la consola del colector, utilizandoel kit incluido en el suministro (4 tacos S 8 y 4tornillos 6 x 50).Conexiones hidráulicas:El colector HKV / HKV-D se suministra con un kitde válvula esférica de 1” y un dispositivo delavado/llenado (SBE). Los tubos del colectortienen una rosca macho G 1” para el montaje de junta plana de las válvulas de esfera y del dispositivo SBE. Las tuercas de la conexiónroscada deben apretarse con aprox. 35 - 45 Nm, utilizando una llave fija/inglesa SW 38. Para la conexión de los tubos a las piezas de rosca observen por favor las indicaciones para el montaje de los tubos.Para el marcado de los circuitos de calefacción de las diferentes estancias se utilizarán lasetiquetas autoadhesivas incluidas. Éstas pueden pegarse en la barra distribuidora.Lavado y llenado de los circuitos de calefacción:Para el llenado del colector se enroscanmangueras con boquillas portatubo de 3/4” en las roscas macho de los grifos de llenado. Abrir y cerrar el dispositivo de lavado/llenado (SBE) despacio mediante la válvula con accionamiento mariposa.¡Atención!Las válvulas de esfera de 1“ en la barra de impulsión y de retorno deben permanecercerradas durante el proceso de llenado, lavado y comprobación de la presión hidráulica dado que, de lo contrario, la alta presión del agua podría ser perjudicial para la instalación de calefacción o podría reaccionar la válvula de seguridad.¡Llenar y lavar el colector únicamente en dirección del caudal, evitando altas presiones diferenciales (> 1 bar) y golpes de ariete!D Das anzuschließende Rohr rechtwinklig abschneiden.GB The pipe to be connected must be cut square. F Le tube doit être coupé parfaitement d’équerreITagliare il tubo da collegare in modo che l’estremità risulti diritta. ECortar el tubo a conectar en ángulo recto.D Mutter und Klemmring über das Rohr schieben. Danach Stützkörper bis Anschlag einstecken.GB Slide nut and olive over pipe. Then push in support pipe all the way to the stop. F Glisser l’écrou et la bague fendue par dessus le tubeI Premere il dado e l’anello di bloccaggio sul tubo, quindi inserire il corpo di appoggiospingendolo fino in fondo.EMontar la tuerca y el accesorio de compresión en el tubo. Después, introducir el manguito de soporte hasta el tope.D Das vormontierte Rohr mit dem Konus bis zum Anschlag in die Konusaufnahme des Verteilers einstecken.GB Push the conical end of the pipe all the way into the connection on the manifold. F Insérer l’ensemble tube et raccord jusqu’en butée dans l’orifice conique du collec-teurI Inserire il tubo precedentemente montato con l’elemento conico nell’apposita sede del collettore, spingendo fino in fondo.EIntroducir el tubo premontado, con el cono hasta el tope, en el alojamiento del colector para el cono.D Klemmringmutter von Hand auf die Konusaufnahme des Verteilers aufschrauben. Das Rohr dabei mit der anderen Hand bis zum Anschlag gedrückt halten.GB Screw the compression nut, by hand, onto the connection on the manifold. Whilst doing so, keep the pipe pushed all the way in with the other hand.F Serrer d’une main l’écrou du raccord au collecteur. Pousser avec l’autre main le tube en butéeI Avvitare manualmente il dado dell’anello di bloccaggio sulla conica del collettore, continuando con l’altra mano a spingere il tubo fino in fondo.EEnroscar a mano la tuerca del accesorio de compresión en el alojamiento del cono,sujetando con la otra mano el tubo hasta el tope.DDie Konusaufnahme mit einem Gabel-/ Ringschlüssel SW 24/27 gegenhalten undKlemmringmutter mit Gabel-/ Ringschlüssel SW 30 festziehen.Das maximale Anzugsmoment darf die in der Montageanleitung der eingesetztenKlemmringverschraubung genannten Werte nicht überschreiten.GBHold the receptor using an SW 24/27 open-ended spanner / ring spanner whilst tightening the compression nut with an SW 30 open-ended spanner / ring spanner. Do not exceed the max. torque stated in the installation instructions for the com-pression joint used.F Tenir l’insert du collecteur avec une clé à tuyauter SW24/27 et serrer l’écrou du raccord avec une clé à tuyauter SW 30ISerrare il dado dell’anello di bloccaggio con una chiave a bocca o poligonale SW 30, tenendo ferma la sede conica ruotandola in senso opposto con una chiave a bocca o poligonale SW 24/27.La coppia di serraggio massima non deve superare i valori indicati nelle istruzioni per il montaggio del collegamento a vite impiegato.ECon una llave fija/inglesa SW 24/27, sujetar el alojamiento del cono y apretar la tuerca del accesorio de compresión mediante llave fija/inglesa SW 30.El par de apriete máximo no debe ser superior a los valores indicados en las instrucciones de montaje para la unión por compresión.Einstellung der Feinregulierung / Setting the flow control / Réglage du débit / Taratura della valvola di regolazione / Ajuste de la regulación de precisión:D Schwarze Schutzkappe am Vorlauf des jeweiligen Heizkreises entfernen und Ventildurch Rechtsdrehen mit Entlüfterschlüssel schließen (= kleinster Wert).GB Remove black protector cap from the flow of the heating circuit concerned and closethe valve by turning the ventilation key clockwise (= min. setting).F Oter les capuchons de protection noirs des circuits départs et fermer en tournant àdroite les vannes d’équilibrages avec une clé pour purgeur (= plus petite valeur)I Togliere il tappo nero di protezione dal tubo di mandata del circuito di riscaldamentoche interessa, e chiudere la valvola ruotandola in senso orario (= valore più piccolo)utilizzando la chiave del dispositivo di scarico dell’aria.E Quitar el capuchón protector negro en la impulsión del circuito correspondiente ycerrar la válvula girando la llave de purga de aire hacia la derecha (= valor máspequeño).D Der Massenstrom wird durch Linksdrehen (Öffnen) der Regulierspindel eingestellt.Die Anzahl der Umdrehungen gemäß Auslegung oder anhand Diagramm_1 vor-nehmen.GB The volume of flow is set by turning the control valve anticlockwise (opening). Thenumber of turns depends on the design or is set out in Diagram_1.F Le débit augmente en tournant le pointeau de la vanne d’équilibrage vers la gauche.Pour obtenir le débit selon l’étude, tourner le pointeau du nombre de tours néces-saire selon le diagramme 1I Regolare la portata ruotando la vite di regolazione in senso antiorario (apertura). Ilnumero di rotazioni necessarie va stabilito utilizzando la documentazione di proget-tazione oppure dal diagramma _1.E El caudal volumétrico se ajusta girando el husillo regulador hacia la izquierda (abrir).Efectuar el número de vueltas de acuerdo con el dimensionamiento o basado en eldiagrama_1.D Die schwarze Schutzkappe nach Beendigung der Einstellung wieder aufsetzen, da-mit ungewollte Fremdeinwirkung oder Verschmutzung der Ventile verhindert wird.GB Once the adjustments have been made, replace the black protective cap to preventany accidental adjustment or any soiling of the valves.F Après avoir régler tous les débits, remettre les capuchons noirs afin de protéger lesvannes d’équilibrages des corps étrangers et des salissures extérieures.I Una volta terminata la regolazione riapplicare il tappo nero di protezione.E Finalizado el ajuste, volver a colocar el capuchón protector negro para evitarinfluencias externas no deseadas en las válvulas o que éstas se ensucien.D Das Ventil im Rücklauf kann, z.B. zum Spülen und Befüllen, mit der blauen Schutz-kappe geschlossen werden. (rechts = zu / links = auf).GB The return valve can be closed using the blue protective cap (clockwise = close / an-ticlockwise = open), e.g. when flushing and filling.F Les vannes des circuits retours équipées de capuchons bleus peuvent être ferméespar exemple pour rincer et remplir l’installation.I Per eventuali operazioni di scarico o riempimento, è possibile chiudere la valvoladella tubazione di ritorno con il tappo blu di protezione (rotazione verso destra =chiusura / rotazione verso sinistra = apertura).E La válvula en el retorno puede, p. ej. para el lavado y llenado, cerrarse con elcapuchón protector azul (derecha = cerrada / izquierda = abierta).D Die blaue Schutzkappe bzw. der Stellantrieb sollte nach Beendigung von Montage-arbeiten wieder aufgeschraubt werden. Hiermit wird das Verschmutzen der Ventileverhindert.GB Once installation work is complete, the blue protective cap / actuator should bescrewed back on. This prevents the valves from getting dirty.F Les capuchons bleus ou les moteurs thermiques doivent être revissés sur les van-nes après travaux afin de les protéger .I Una volta terminate le operazioni di montaggio, riapplicare il tappo di protezione bluoppure l’azionatore elettrotermico.E Después de trabajos de montaje, el capuchón protector azul y el actuador térmico(cabezal) deben enroscarse de nuevo para evitar que las válvulas se ensucien.Diagramm_1 (HKV) / Diagram_1 (HKV) / Diagramme_1 (HKV) / Diagramma_1 (HKV) / Diagrama_1 (HKV) Gesamtdruckverlust / Total pressure drop / Perte de charge totale / Perdite di carico totali / Pérdida de carga total:Abmessungen / Dimensions / Dimensions / Dimensione / Dimensiones:Verteiler-Größe / Manifold zones / Grandeur du distributeur / numero di vie / Dimensión del colector2 3 4 5 6 7 8 9 10 11 12 13 14 Länge / length / Longeur / Lunghezza / Longitud [L = mm]190 245 300 355 410 465 520 575 630 685 740 795 850P e r d i t e d i c a r i c o / P ér d i d a d e c a r g a [m b a r ]Drehungen offen / turns open / Ouvertures /Numero rotazioni apertura / Vueltas abiertoVolumenstrom / flow rate / Volume / Portata volumetrica / Caudal volumétrico[l/h]Volumenstrom / flow rate / Volume / Portata volumetrica / Caudal volumétrico[l/h]1101001.000100 1.00010.000234567-121Abgänge / zones / Départs / vie / circuitosRücklauf / return / Retour / Ritorno / RetornoD Das Diagramm_1 (HKV) gilt für das Ventil im Vorlauf GB The Diagram_1 (HKV) is valid for the supply valve F Le Diagramme_1 (HKV) s'applique à la valve dans le depart.I Lo Diagramma_1 (HKV) è valido per la valvola nel ri-fornimento.E El Diagrama_1 (HKV) es válido para la válvula en la fuente.。