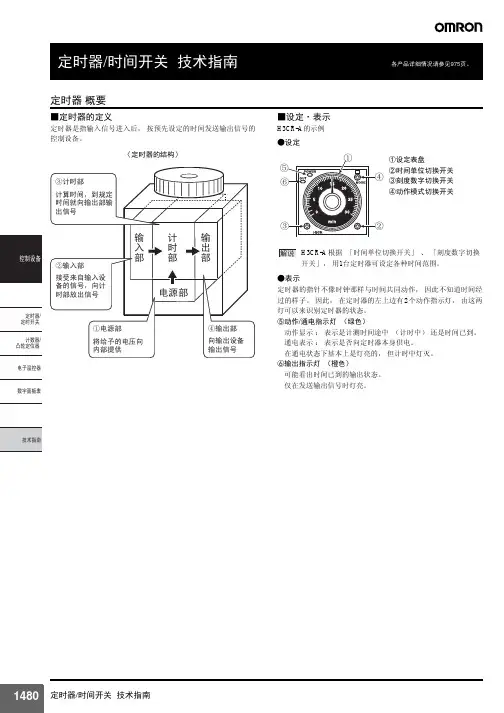
T时钟和定时选择指南
- 格式:pdf
- 大小:2.42 MB
- 文档页数:12

●时钟源选择●时钟源定义例1.设晶振工作频率fin=8MHz,要求产生主时钟频率MCLK==64MHzP 219页PLLCON|= ((MDIV<<12)| (PDIV<<4)|( SDIV<<0))●定时器定义定时器输入时钟频率=MCLK/{预分频值+1}/{再分频值}= MCLK/{ prescaler +1}/{DIV}其中预分频值为0~255再分频DIV为2,4,8,16,32例1.MCLK=64MHz,时间间隔T=5s定时器输出频率fout=1/T=1/5=0.2HzDIV= 32Prescaler=199 Prescaler:0~255Fin= MCLK/{ prescaler +1}/DIV 尽量保持整除=64MHz/200/32=10KHzTCNTBn = Fin / fout=10KHz/0.2=50K=50000 TCNTBn:0~65535ARM7的定时器配置及启动!第一步:配置定时器配置寄存器0(TCFG0)以设置定时器的预分频值prescaler第二步:配置定时器配置寄存器1(TCFG1)以设置定时器的再分频值DIV第三步:设置定时器初值TCNTn,TCNTBn及比较寄存器TCMPn,TCMPBnrTCNTB0 = 792;rTCMPB0 = 396;第四步:配置定时器控制寄存器TCON的定时器自动重载位,翻转位,手动更新位,及启动定时器位。
注:启动定时器的同时应清除手动更新位。
rTCON |= (1<<10)|(1<<9)|(1<<2)|(1<<1); // 手动更新delay(10);rTCON &= ~((1<<9)|(1<<1)); // 自动加载delay(10);rTCON |= (1<<11)|(1<<3)|(1<<8)|1; // 启动定时器,自动加载第五步:如果要产生定时器输出,则应配置GPIO端口E为功能2,rPCONE |=0x200;// set GPE[9:8]=10 :TOUT1第六步:若定时器要产生中断,则应将定时器中断屏蔽位使能pISR_TIMER0=(unsigned)timer0_int;ClearPending(BIT_TIMER0);rINTMSK &=~(BIT_GLOBAL|BIT_TIMER0);定时器控制寄存器(TCON)定时器配置寄存器0中断void init_int(void){// interrupt settingsrI_ISPC = 0x3ffffff; // clear interrupt pending registerrEXTINTPND = 0xf; // clear EXTINTPND registerrINTMOD = 0x0; // all for IRQ moderINTCON = 0x5; // nonVectored mode, IRQ disable, FIQ disable rINTMSK = ~(BIT_GLOBAL|BIT_EINT4567);// set EINT interrupt handlerpISR_EINT4567 = (int)int4567_isr; // PORT G configurationrPCONG = 0xffff; // EINT7~0rPUPG = 0x0; // pull up enablerEXTINT = rEXTINT | 0x22220020; // EINT4567 falling edge moderI_ISPC |= BIT_EINT4567;rEXTINTPND = 0xf; // clear EXTINTPND reg}IO端口使用例子rPDATB = 0xff;rPCONB = 0xffff;rPUPG = 0x0;rSPUCR = 0x7; //使能数据线上拉电阻。
KG316T微电脑时控开关定时设置
1.先检查时钟显示是否当前时间全都,如需重新校准,在按住“时钟”键的同时,分别按住“校星期”、“校时”、“校分”键,将时钟调到当前精确时间;
2.按一下“定时”键,显示屏左下方消失“1开”字样(表示第一次开启时间)。
然后按“校星期”选择六天工作制、五天工作制、三天工作制、每日相同、每日不同等工作模式,再按“校时”、“校分”键,输入所需开启的时间;
3.再按一下“定时”键,显示屏左下方消失“1关”字样(表示第一次关闭时间),再按“校星期”、“校时”、“校分”键,输入所需关闭的日期(留意:关的日期肯定要与开的日期相对应)和时间;
4.连续按动“定时”键,显示屏左下方将依次显示“2开、2关、3开、3关、........、10开、10关”,参考步聚2、3设置以后各次开关时间;
5.假如每天不需设置10组开关,则必需按“取消/恢复”键,将多余各组的时间消退,使其在显示屏上显示“— —:— —”图样(不是00:00)
6.定时设置完毕后,应按“定时”键检查各次定时设定状况是否与实际状况全都,若不全都,请按校时、校分、校星期进行调整或重新设定;
7.检查完毕后,应按“时钟”键,使显示屏显示当前时间;
8.按“自动/手动”键,将显示屏下方的“▲”符号调到“自动”位置,此时,时空开光才能依据所设定的时间自动开、关电路。
如在使用过程中需
要临开、关电路,则只需要按“自动/手动”键将“▲”符号调到相应的“开”或“关”的位置。
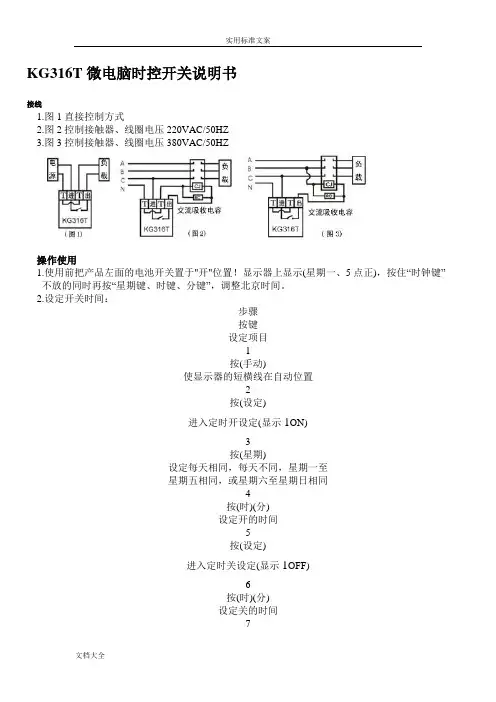
KG316T微电脑时控开关说明书接线1.图1直接控制方式2.图2控制接触器、线圈电压220VAC/50HZ3.图3控制接触器、线圈电压380VAC/50HZ操作使用1.使用前把产品左面的电池开关置于"开"位置!显示器上显示(星期一、5点正),按住“时钟键”不放的同时再按“星期键、时键、分键”,调整北京时间。
2.设定开关时间:步骤按键设定项目1按(手动)使显示器的短横线在自动位置2按(设定)进入定时开设定(显示1ON)3按(星期)设定每天相同,每天不同,星期一至星期五相同,或星期六至星期日相同4按(时)(分)设定开的时间5按(设定)进入定时关设定(显示1OFF)6按(时)(分)设定关的时间7重复2-6设定第2-12次开关的时间8按(时钟)结束时间设定*如不需12个开关定时按(时钟)键,返回实际时间*如设定错误或聚消设定按(取消)键,再按一次恢复原来的设定*无设定时显示(--:--)3.检查:按(设定)键检查所设定的时间是否正确。
4.修改:请在该设定处按(取消)键,然后重量新设定该定时开关的时间及星期5.结束检查:按(时钟)结束检查及设定,显示时钟6.手动控制:按(手动)键,即可实现随意的开关参考使用1.例如控制器每天下午6点自动打开电源,到夜里2点关闭电源,按以下操作2.调好时间后按一下“设定键”显示器上显示如图4,按住“时键”显示器显示如图5。
再按一下“设定键”显示器显示如图6,按住“时键”显示器显示如图7。
以上调整完再按一下“时钟键”显示器恢复显示北京时间。
再按“手动键”可以直接开或关闭电路,然后每天控制器按自动运行。
注意事项1.为防强电流下融点发热,接线时务必拧紧接线柱的螺钉2.控制器进线220VAC/50-60HZ电源,切勿接到380VAC3.填订单时,希望电源电压,订制:24V、110V、380VAC4.控制器红灯亮有电进入,红绿灯同时亮开关有电输出5.设定的时间,不能交叉设定,应按时间的顺序设定KG316T微电脑时控开关说明书1,打开或锁定键盘:按住“时钟键”同时按住“取消/恢复键”几秒,锁定显示标志“锁”。

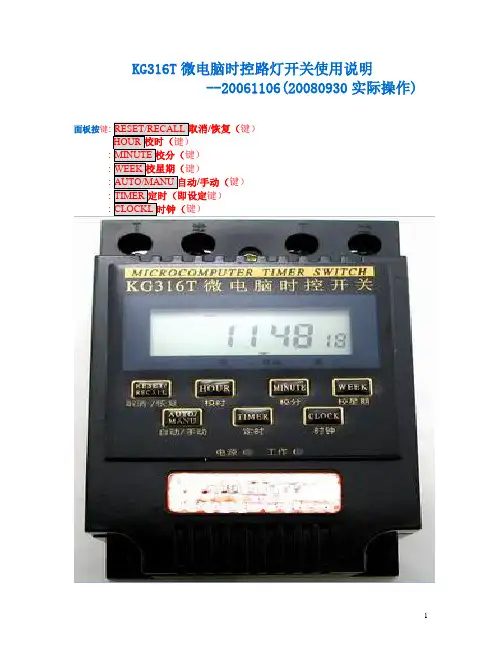
KG316T微电脑时控路灯开关使用说明--20061106(20080930实际操作) 面板按键/恢复(键)/手动(键)键): CLOCKL时钟(键)操作说明1、显示屏左下角在有一”a”符号,表示此时键盘处于锁定状态,时控开关不接受键盘上的一般性操作,,”a”符号消失,此时键盘处于开锁状态,可接受操作指令。
电脑预约开灯时间设置方法一:1、键盘开锁:,”a”符号消失,此时键盘处于开锁状态。
2在开锁状态下,按”校时”.”校分”.”校星期”键调整时钟至当前时间及星期。
3、电脑预约每天设置一次开启、关闭时间的设置方法:在开锁状态下--①设定第一次开启时间:, 液晶显示出现1ON ,, 输入第一次开启时间。
每天设置同一时MO TU WE TH FR SA SU”。
②设定第一次关闭时间: , 液晶显示出现1OFF, 再每天设置同一时间关闭, MO TU WE TH FR SA SU”。
③,④,回到时钟运行状态,显示北京时间。
4、注意事项:1)、如原来后, 将2ON、2OFF⋯⋯6ON、6OFF 的储存时间消除, 使液晶上显示图样。
如设定错误或取消定时,则按“取消恢复”键,使其显示“--:--”“00:00”),再按一次则恢复原来的设定。
2)工作模式:每日相同:显示“MO TU WE TH FR SA SU”。
每日不同:一三五、二四六、六日、一二三、四五六、一二三四五、一二三四五六。
3,,使,使4)A、单独修改开灯时间:,”a”符号消失,此时键盘处于开锁状态。
, 液晶显示出现1ON , ,结束定时设定,回到时钟运行状态,B、单独修改关灯时间:,”a”符号消失,此时键盘处于开锁状态。
,液晶显示出现1ON , , 结束定时设定,回到时钟运行状态,C、单独校正时间:,此时键盘处于开锁状态。
, 输入标结束定时设定,回到时钟运行状态,显示北京时间。
D、2ON00:00路灯误动作,如有,2ON、2OFF⋯⋯6ON、6OFF将2ON、2OFF⋯⋯6、6OFF的储存时间消除, 使液晶上显示结束定时设定,回到时钟运行状态,显示北京时间。

KG316T微电脑时控开关说明书一解锁(进入设定界面必须先解锁)按 4下“恢复/取消键”,进行解锁(显示屏左边的字母“a”消失即为解锁状态)二解锁后,可以对以下4点进行逐个设定,设定不分先后顺序1. 设定系统时间:a,设定系统的“时”。
按住“时钟”健不放,同时按下“校时”健,两个键按完后松开,再按“校时”进行24小时的数字切换,设定好准确的北京时间“时|”后,按“时钟”键完成设定。
b,设定系统的“分”。
按住“时钟”健不放,同时按下“校分”健,两个键按完后松开,再按“校分”进行0-59分的数字切换,设定好准确的北京时间“分|”后,按“时钟”键完成设定。
c,设定系统的“星期”。
按住“时钟”健不放,同时按下“校星期”健,两个键按完后松开,再按“校星期”进行星期一到星期天的切换,设定好当天的星期后,按“时钟”键完成设定。
2.设定定时器的开启和关闭时间,系统共有12个时间段可以调整,我们一般使用前面第一段,设定步骤如下:a 按一下“定时”键,出现 1 NO 00 :00 提示,再按“校时”进行24小时的数字切换,设定“时”后,按“校分”进行“分”时设定,设定好自己需要送电的时后,按“时钟”键完成第一段开启的时间设定,进入1 OFF 00 :00 界面备注: 1 NO 00 :00 代表第一段时间开 1 OFF 00 :00 代表第一段时间关b 完成第一段开的时间设定后,出现 1 OFF 00 :00 提示框,再按“校时”进行24小时的数字切换,设定好“时”后,按“校分”进行“分”时调整,设定好自己需要断电的时后,按“时钟”键完成第一段断电的时间设定,只需要一个时间段的时候,以上设定完成后,按“时钟”结束设定,如要继续多时间断,按“定时”间继续设定,依次类推。
3. 星期定时设定有固定的休息日期时,可以选择某个星期的一天或者多天,让设备全天处于断电状态,设定步骤如下:按一下“定时”键,根据显示框上面的提示,按“校星期”进行切换。

ZYT02时控开关
●采用导轨安装方式
●开关时间可按天循环或按 周循环
●适用于路灯或广告箱的时
ZYT02时控开关
●采用导轨安装方式
●开关时间可按天循环或按 周循环
●适用于路灯或广告箱的时
ZYT02时控开关
●采用导轨安装方式
●开关时间可按天循环或按 周循环
●适用于路灯或广告箱的时
ZYT02时控开关
●采用导轨安装方式
●开关时间可按天循环或按 周循环
●适用于路灯或广告箱的时
ZYT02时控开关
●采用导轨安装方式
●开关时间可按天循环或按 周循环
●适用于路灯或广告箱的时。
教你如何设定标准时间如何设定标准时间标准时间是世界各地用于统一计量时间的一套准则。
在现代社会中,标准时间对于人们的生活和工作有着重要的影响。
正确设定标准时间可以帮助我们合理安排时间,提高效率。
这里将教你如何设定标准时间。
一、了解标准时间的概念和原理标准时间是以地球自转为基准的一种时间计量方式。
目前,全球使用的标准时间是由国际计量局(BIPM)和国际地球自转事务中央局(IERS)共同制定的世界协调时(UTC)。
UTC 是以原子物理学中的秒作为基本单位,通过原子钟的精确测量来确定时间。
二、选择合适的设备设定标准时间需要使用精确的时间设备来校准。
现代科技使我们可以选择多种准确性高的设备,常见的设备包括电子钟、手机、电脑等。
选择一款准确性高、易于操作的设备是设定标准时间的第一步。
三、校准设备时间校准设备时间是设定标准时间的关键步骤。
可以采用以下几种方式来校准设备时间:1. 使用网络时间服务器:许多设备都提供了自动与网络时间服务器同步时间的功能。
可以在设备设置中找到相应选项,开启同步功能后设备会自动获取网络时间并校准。
2. 手动设置时间:如果设备没有自动同步时间的功能,可以通过手动设置时间来校准。
首先需要确定准确的时间来源,例如拨打国家授时电话获取准确的时间信息,然后按照设备说明书中的操作步骤进行时间设定。
3. 使用准确的物理计量装置:如果需要更高精度的标准时间,可以使用准确的物理计量装置来校准设备时间。
例如,可以使用GPS卫星信号来校准设备时间。
四、定期校准和检查设备时间设备时间是会有误差的,尤其是那些没有自动同步时间功能的设备。
为了保持标准时间的准确性,需要定期校准和检查设备时间。
可以采用以下方法来实现:1. 每天校准:每天特定的时间点,例如早上、中午或晚上等,校准设备时间。
可以通过相同的方式校准多个设备,确保它们的时间一致。
2. 定期比对:定期比对设备时间和准确的标准时间,例如每个月或每个季度。
可以使用授时电话、互联网时间服务器等准确时间来源来比对,发现时间误差后进行校准。
1. Initial SetupFirst Time Set UpPress the reset button (R). The screen will turn blank,then will showthe reset display.Tips: If the screen is blank, plug the timer into any outlet for 30minutes to charge the internal battery.2. Set the Digital ClockWhen in the clock mode, press the‘MODE’ button for once, the screen will show AUTO, day, hour and minute. As shown in “Figure 1”.For example, set the time as 9:30AM TuesdayWhile holding the‘CLOCK’ button downpress the ‘WEEK’ button to adjust theday to TU.While holding the ‘CLOCK’ button down press the ‘HOUR’ button to adjust the hour digits to 9 .While holding the ‘CLOCK’ button down press the ‘MlN’ button to adjust the minute digits to 30.3. Daylight Saving TimeTo switch between Standard Time and Daylight-Saving Time (DST),press and hold the ‘CLOCK’ button for 3s. An ‘S ’ will appear on the screen and the clock will increase by 1 hour when in DST. As shown in ‘Figure 2’.4. Set the TimerPress the ‘PROG’ button to enter the setting mode:You will see 1 to the left of the display as shown in ‘Figure 3’.For example, if you want to have the timer to come on at 8:30AM and go off at 22:30 Monday thru Friday, please do the following:ONStep 2: Press the ‘HOUR’button to adjust the hour.Step 3: Press the ‘MIN’ button to adjust the minute.Step 4: Press the ‘PROG’button to set 1 time.Repeat steps 1 - 3.(Note:Do not forget to press the ‘WEEK’ button to select the desired days for the off time, or the timer may not go off as you want.)Step 6: Press the‘CLOCK’ button to exit the setting mode and plug the timer into a powered outlet. The timer is ready for use.Step 5: Press the ‘PROG’button to advance to the next on/off settingposition. Repeat steps 1-4 to set more timersaccording to your needs.* Tips: To review the programs, press the ‘PROG ’ buttonrepeatedly. You can use the ‘DEL button to cancel the settings you don’t want, or press it one more time to restore.IMPORTANTOFF Figure 2Figure 3Step 1: Press the‘WEEK’button to choose the group of days you wish to switch the appliance on.The group will advance in the sequence of:MO -> TU -> WE -> TH -> FR -> SA -> SU ->MO WE FR -> TU TH SA -> SA SU -> MO TU WE -> TH FR SA -> MO TU WE TH FR -> MO TU WE TH FR SA -> MO TU WE TH FR SA SU.Figure 1At the moment the timer is plugged into an outlet, the timer may not come on immediately as per the setting if the digital clock time falls between any on-off interval you set. Instead it will stay off until the next on-off interval begins. For instance, if you plug the timer into the outlet between 8:30~22:30, the timer may not come on immediately even if you have set the timer to come on at 8:30 every morning and go off at 22:30 every evening. Instead, it will stay off until 8:30am next morning. Under this circumstance, if you want to have the timer come on the moment it is plugged in and then work as your program, please press the ‘MODE’ button repeatedly to manually turn on the timer first and then press the button one more time to put the screen back to AUTO.• Digital Timer OutletModel No.:GET06A-USQuestionsorConcerns?********************TOGOALPlease keep this manual in a safe place for future reference. DO NOT plug any appliance where the load exceeds 15Amps.Heaters, pet feeders and similar appliances should never beleft unattended during operation. The manufacturer recommends such appliances not be connected to timers.DO NOT attempt to repair, disassemble or modify under any circumstances.FAQ1. How long is the warranty for this product?We offer a 12-month limited warranty on this timer. If your timer is broken, please email your order number and describe the issue. We will immediately issue a full refund or arrange a new replacement after verification. We believe what makes us different is not just the product we offer but also our outstanding customer service. We also believe the buyer and seller can achieve a win-win outcome through mutual effective communication.2. What should I do if I am having trouble setting up the timer?Please email to tell us the schedule and days of the week you want to set up. Our technical support team will give you personal step-by-step guidance illustrated with pictures.Press and hold ‘HOUR’, ‘MIN’ or ‘PROG’ more than 3seconds to navigate quickly through the numbers.If you have multiple programs, please make sure that the on-off intervals of the programs you set do not overlap with each other, especially when using the day combination option.• • 5.Manual OperationPress the ‘MODE’can manually turn on and off the timer.OFF: Press ‘MODE’ button until unit screen shows OFF. In this status, timer always has no output. The red LED output indicator is off.ON: Press ‘MODE’ button until unit screen shows ON. In this status, timer always has output. The red LED output indicator is on.Please set timer to AUTO status if you wan to turn on and off automatically based on Programs you have set. When switched to AUTO,there are 2 situations: 6.Anti-theft Random Function7. Countdown Function (1min to 5999min)With the countdown feature, you will be able to set yourappliance to automatically come on or go off after a given period of time. For example, if you want the timer to automatically go off after 2.5 hours,please follow the steps below: Step 1: Repeatedlypress( or press and hold) the ‘PROG’ button to skip the 20 on-offprograms. The screen will show ‘ --:--’Step 4: Press the ‘CLOCK’ to exit the setting mode.Step 5: Hold the‘DEL ’ button for 3s to start the countdown, and you will see 'CD' flashing on the display. The timer will be on and automatically go off after 2.5 hours. After that, the timer will work in the auto mode according to the on-off programs you set.Tips: To cancelcountdown, hold ‘DEL’ button for 3s again.PLEASE NOTE: The Random and Countdown are not compatible with each other. When you activate one function, the other functions will stay inactive.8. Technical DataInstallation: Plug-in Type Voltage: 125V~/60HzRating: 125V~ AC / 15A /1250WOperating Temperatures: -14°F ~ +104°F Accuracy: ± 1 Minute per Month Battery:NIMH1.2V>100 Days 9. Package Contents2 X Digital Timer Switch 1 X Instruction ManualAUTO ON:Press ‘MODE’ button from ON to AUTO. In this status, red LED indicator is on, the timer will stay on until the next off setting arrives. And then it will work exactly as you programmed.AUTO OFF:Press ‘MODE’ button from OFF to AUTO. In thisstatus, red LED indicator is off,the timer will stay off until the next on setting arrives.And then it will work exactly as you programmed.When in the random mode, the timer will turn on and off with a 10~42 minutes variation based on the on and off schedules you set. It is especially useful during vacations as the home may appear to be occupied. Step 2: Press ‘MODE’ repeatedly until screen shows and AUTO. This is the countdown and turn off mode. It means the timer will be on when countdown starts, and it will automatically go off after the countdown time runs up. (Tips: If the screen shows and AUTO, the timer is in the countdown and turn on mode. It means the timer will be off whencountdown starts, and it will automatically come on after the countdown time runs up.) Step 3: Press ‘HOUR’ to set the hour digits to 2, and then the ‘MIN’ button to set the minute digits to 30.2. To temporarily override program and turn off the timer when it is ON: Press ‘MODE’ until OFF shows on screen andimmediately press once to return to AUTO. The timer will stay OFF until the next scheduled ON time. For instance, you have set the timer to come on at 8:30(8:30AM) and go off at22:30(10:30PM) every day of the week. If you manually turn off the timer and then put it back to AUTO between 8:30~22:30. The timer will stay off until 8:30 next morning.3. To make it simple, when using the MODE button to control the timer, if you want the timer to be on and in the AUTO mode,Press ‘MODE’ until ON shows on screen and immediately press ‘MODE’ once to return to AUTO; if you want the timer to be off and in the AUTO mode, Press ‘MODE ’until OFF shows on screen and immediately press ‘MODE’ once to return to AUTO.1. To temporarily override program and turn on the timerwhen it is OFF: Press ‘MODE’ until ON shows on screen and immediately press once to return to AUTO. The timer will stay ON until the next scheduled OFF time. For instance, you have set the timer to come on at 8:30(8:30AM) and go off at 22:30(10:30PM) every day of the week. If you manually turn on the timer and then put it back to AUTO between 22:30~8:30 next morning. The timer will stay on until 10:30PM.Tips for using the MODE button。
K G316T时控开关定时设置KG316T时控开关定时设置KG316T时控开关调校时钟:按住“时钟”,同时按“时、分、星期”键可调校时钟、星期。
定时设置步骤如下:步骤按键设定项目1 KG316T按“定时” 进入第1组定时开的设定(显示|开)2 KG316T按“星期、时、分” 设定开启时间(星期、时、分)3 KG316T按“定时” 进入第1组定时开关的设定(显示|关)4 KG316T按“星期、时、分” 设定关的时间(星期、时、分)5 KG316T重复“1、2、3、4”步骤可设定2-10组开关的时间6 KG316T时控开关重复按“定时” 检查各组开关时间和星期是否与要求的一样,如果不正确,还应重复步骤2、47 TKG316T时控开关按“自动/手动” 请根据当前时钟时间在设定的自控时间里处于开或关,确定开关符号从“开”调到“自动”或从“关”调到“自动”。
8 KG316T时控开关按“时钟” 结束时间设定进入时钟显示状态。
* KG316T时控开关注意:如不需要设定10组,把多余的组数用[取消/恢复]键取消,显示“--:-- ”即表示消除,若再按一次[取消/恢复]键可恢复消除前的原有时间设定。
*KG316T时控开关检查:连续按[定时]键检查每一组所设定的时间、星期是否正确。
* KG316T时控开关修改:按[定时]键至需修改的定时组,按[取消/恢复]键消除当前设置,然后可按定时设置有关步骤重新设定该组开关时间(星期、时、分)。
*KG316T时控开关手动控制:按[手动/自动]键可直接开、关电源,在“开”状态时,一直开;在“关”状态时,一直关;在“自动”状态时,自动执行已设定的时间程序。
* KG316T时控开关在非“时钟显示”状态下,按[时钟]键或30秒未按任何键,保存当前设置可恢复到时钟显示状态。
* KG316T时控开关如需日控循环,请务必将定时时间(开和关)均设置在星期全显状态。
KG316T时控开关。