EMIS使用手册
- 格式:ppt
- 大小:906.00 KB
- 文档页数:28

频谱分析仪EMI 使用手册本文档适用于以下机型:UTS5000A系列UTS3000B/T系列UTS3000A系列UTS1000B/T系列UTS1015E系列REV12023.12.18序言尊敬的用户:您好!感谢您选购全新的优利德仪器,为了正确使用本仪器,请您在本仪器使用之前仔细阅读本使用手册全文,特别有关“安全注意事项”的部分。
如果您已经阅读完本使用手册全文,建议您将此使用手册进行妥善的保管,与仪器一同放置或者放在您随时可以查阅的地方,以便在将来的使用过程中进行查阅。
版权信息UNI-T优利德科技(中国)股份有限公司版权所有。
UNI-T产品受中国或其他国家专利权的保护,包括已取得或正在申请的专利。
本公司保留更改产品规格和价格的权利。
UNI-T保留所有权利。
许可软件产品由UNI-T及其子公司或提供商所有,受国家版权法及国际条约规定的保护。
本文中的信息将取代所有以前出版的资料中的信息。
UNI-T是优利德科技(中国)股份有限公司[UNI-TREND TECHNOLOGY(CHINA)CO.,LTD]的注册商标。
如果在适用的保修期内证明产品有缺陷,UNI-T可自行决定是修复有缺陷的产品且不收部件和人工费用,或用同等产品(由UNI-T决定)更换有缺陷的产品。
UNI-T作保修用途的部件、模块和更换产品可能是全新的,或者经修理具有相当于新产品的性能。
所有更换的部件、模块和产品将成为UNI-T的财产。
以下提到的“客户”是指据声明本保证所规定权利的个人或实体。
为获得本保证承诺的服务,“客户”必须在适用的保修期内向UNI-T通报缺陷,并为服务的履行做适当安排。
客户应负责将有缺陷的产品装箱并运送到UNI-T指定的维修中心,同时预付运费并提供原购买者的购买证明副本。
如果产品要运送到UNI-T维修中心所在国范围内的地点,UNI-T应支付向客户送返产品的费用。
如果产品送返到任何其他地点,客户应负责支付所有的运费、关税、税金及任何其他费用。

EMIS系统安装流程一、系统准备:1、按照EMIS系统的要求准备硬件和相关软件;2、内部网络中建有windows2000域,并有详细的部门及用户规划;3、在每个域中每个部门都有唯一的标识码(写在描述中)。
二、在服务器上起用iis ftp 服务(以后将该服务器称为ftp服务器)。
三、在服务器上安装sql server 2000,作为数据库服务器(以后将该服务器称为sql服务器)。
Sql服务器可以和ftp服务器合并为一台服务器,不过为了获得更好安全性和性能,建议将两者分离。
四、在安装有ftp服务器上安装emisserver服务端五、ftp服务端安装完毕后,请重新启动服务器,启动完毕后,请用域管理员administrator登录ftp服务器,在做完emis用户管理之前,必须保持此帐户登录状态。
六、打开“e-MIS管理信息系统开发平台”,会弹出“连接数据库”窗口,按照帮助提示进行输入,输入完成后,点击连接,会自动在数据库中建立一些系统运行所需要的基本库。
七、如果在连接过程中提示“请用管理员帐户登陆计算机”时,将emisserver安装路径下的emis.db拷贝至SQL数据库目录下的data目录内,再重新进行升级数据库操作即可。
八、在区域设置中,设置本区域的信息。
九、在区域项目维护中,设置本区域的项目信息。
十、在“数据库维护”下使用“数据库及表维护”导入数据库结构信息。
十一、在“业务维护”下“导入业务”中导入业务信息(包括业务数据、数据信息)。
十二、在“业务维护”下使用“菜单和菜单目录维护”进行菜单维护。
十三、在“用户管理”下“从域中导入用户”中导入用户信息。
十四、用户导入完毕后,在“系统设置”下“设置身份验证模式”中设置所希望的身份验证模式。
十五、在“用户管理”下“安全性管理”中,可以对单个用户或者一个机构进行具体的身份验证或者密码复位,此功能建议在第一次安装时使用,在EMIS 使用中慎用。
十六、在将一些系统运行的基本信息附加到数据库中。

特别策划·动车组PHM 动车组故障预测与健康管理(PHM)体系架构研究思考刘彬1,邵军2,陆航2,李燕3,谢名源4(1.中国国家铁路集团有限公司机辆部,北京100844;2.中国铁道科学研究院集团有限公司机车车辆研究所,北京100081;3.中国铁道科学研究院集团有限公司电子计算技术研究所,北京100081;4.中国铁路上海局集团有限公司科技和信息化部,上海200071)摘要:从我国动车组故障预测与健康管理(PHM)技术现状出发,利用需求、功能、逻辑和物理架构(RFLP)的概念指导PHM架构设计,从不同层级、业务的需求分解,到PHM系统对动车组各业务场景的核心功能,再到各环节逻辑架构,最终形成考虑当前数据传输、信息化现状的物理架构,以便最终工程化实施落地,形成适用于我国动车组的PHM体系架构。
关键词:动车组;PHM;运维数据;系统性建模;正向设计中图分类号:U279文献标识码:A文章编号:1001-683X(2022)03-0001-09 DOI:10.19549/j.issn.1001-683x.2022.02.22.0020引言随着现代装备集成度、复杂度及智能化程度的不断提升,传统故障诊断、维修保障技术逐渐难以适应新的要求,故障预测与健康管理(Prognostics and Health Management,PHM)技术应运而生,并迅速得到各国的高度重视,当前该技术已被视为提高系统“六性”和降低全生命周期费用的关键技术。
PHM技术是指利用传感器采集系统的数据信息,借助信息技术、人工智能推理算法来评估、监控与管理系统自身的健康状态,在系统发生故障前对其故障进行预测,并结合现有资源信息提供一系列维护保障建议或决策,是一种集故障检测、隔离、健康评估与预测及维护决策于一体的综合技术[1-2]。
PHM是实现预测性维修和自主式保障的技术基础,也是基于状态维修(Condition Based Maintains,CBM)的提升,在有些场合也被称为CBM+[3]。

UNPACKINGRemove the Packing List and verify that you have received all equipment.If you have any questions about the shipment, please call the OMEGA Customer Service Department at 1-800-622-2378 or (203) 359-1660. When you receive the shipment, inspect the container and equipment for any signs of damage. Note any evidence of rough handling in transit. Immedi-ately report any damage to the shipping agent.NOTEThe carrier will not honor any claims unless all shipping material is saved for their examination. After examining and removing contents, save packaging material and carton in the event reshipment is necessary.NeutralVAC(EXIA)LoadFuse F1Non-HazardousLocation Hazardous LocationNotes1. For 120V application, only one fuse is required in the ungrounded circuit of the input line.2. Required torque on these terminals not to exceed 10 lb-inches on stranded wire - 8 lb-inches on solid wire.Fig. 1. Connection DiagramAssociated EquipmentCaution: The intrinsically safe relays must be mounted outside the hazardous location. Only the sensor's terminals provide an intrinsically safe switch circuit (Fig. 1). (Exia) means associated equipment "Appareilage connexe", located in safe area.Example : Typical values of capacitance for a twisted pair of copper wires is between 20 and 60 pF per foot. Using the maximum value of 60pF/ft, Groups A & B could have a run of 1500+feet with safety. Inductance of a typical twisted pair is between 0.10 and 0.20 µH/ft, thus making a cable run in this example essentially determined by the capacitance.The OMEGA ® SBG144600 Solid-State Relays are used as "intrinsically safe switching circuits in hazardous locations, with non-voltage- producing sensors". When installed in accordance with this manual, these field sensors are suitable for Classes I and 2 , Divisions 1 and 2, Groups A, B,C, D, E, F, and G, as defined by the National Electrical Code Handbook.DESCRIPTIONSBG144600Intrinsic Safety RelayInstruction Sheet M-2474/1096Mounting Plate#10NutIntrinsically Safe Solid-State Relays#10 Screw#10 Lockwasher *#10 Lockwasher *Notes1. Grounding Hardware to be #8 or larger and stainless steel2. *Lockwashers to be internal or external tooth-typeFig. 3. Unit Mounting DetailHot *See Note #2Sensor SwitchImportant: Read carefully and completely before installing or connecting the intrinsic safety relay.WARNING Product must be maintained and installed in strict accordance with the National Electrical Code.Failure to observe this warning could result in serious injuries or damages.GROUP A & B C & E D, F, G CAPACITANCE0.6 µF 1.9 µF 1.9 µF INDUCTANCE1.3 mH 5.4 mH 10 mHMounting and Enclosure ConsiderationField wiring of intrinsically safe circuits is to be segregated from non-intrinsically safe wiring by use of suitable barriers, separate wireways or trays (see Fig. 2). Wire insulation to be .010", minimum.Intrinsically safe and non-intrinsically safe connection points should be located sufficiently apart to prevent any possibility of bypassing or miswiring during installation or servicing of equipment.The enclosure shall contain a cautionary statement as follows: "CAUTION: ANY SUBSTITUTION OF COMPONENTS MAY IMPAIR INTRINSIC SAFETY".The mounting plate must be grounded to ensure intrinsic safety.Resistance between the plate and earth ground should be less than one ohm. (See Figs. 3 and 4 for recommended selection of grounding hardware and refer to Article 250 of the National Electrical Code for methods and practices.)Installation of Sensor Switch and Associated Field Wiring The nature of the sensor switch must be that it is a non-voltage-producing, essentially resistive termination or other device specifically examined and approved for use with the intrinsically safe solid-state relay.The conductors of the intrinsically safe circuit should be sealed in a rigid metal conduit at the point where the wiring enters the hazardous area. The wiring and sensor switch should be such that conductive dusts in the hazardous area will not close the circuit.Hazardous area field wiring will store energy due to distributed capacitance and inductance in proportion to its length. It is therefore recommended that the characteristics of the cable be known and judged against the lengthof run and atmosphere of exposure.The following chart is presented as aguideline in determining the limits of reactance for signal loops in the hazardous area wiring for theintrinsically safe solid-state relays.Earth Ground (2 Places)Common Earth-Grounded Mounting PlateIntrinsically Safe Wiring To Sensors Located inHazardous AreaNon-Intrinsically Safe WiringMul-tiple UnitsResistance to ground must be from bracket to earthing member to insure integrity of system. (Must be below one ohm.)Note: All intrinsically safe wiring must be segregated from non-intrinsically safe wiring and shall have a minimum insulation thickness of .010".Fig. 2. Multiple units (located in a non-hazardous area) grouped on a common, earth-grounded mounting plate.Fig. 4. Mounting Plate Grounding DetailFig. 5. DimensionsP/N 1696921-5/16"(33.3 mm)Mounting PlateScrewLockwasher*Lockwasher*NutLockwasher*NutTerminal LugNotes:1. *(Lockwasher to be internal or external tooth type)2. Grounding hardwre to be #8 or larger and S.S.3"(76.2 mm)MountingTab2-5/8"(66.6 mm)7/32" Dia.(5.5 mm)7/8"(22.2 mm)1-3/8"(35 mm)2-7/8"(73 mm)Line & Load VoltageRange Load Current Max Turn-On Sensitivity (Typical)Turn-OffSensitivity (Typical)VoltageLoss Operating TemperatureRangeSwitching OperationWeightSBG144600105 to125 VAC5A < 500 Ω 2 VAC-40°F to 120°F (-40°C to +48.9°C)6mA @120 VACSPST N.O.Table 1. SpecificationsSSR for Intrinsic SafetyOutput Leakage Current Max.Model Number2000 ΩDescriptionWhenever possible, the actual measured parameters should be used in making the determination of allowable length.Shielded cable is not required, but if used in the application, the shield must be returned to ground, the same point at mounting tab.Non-intrinsically safe wiring cannot be run in conduit or open raceways together with intrinsically safe wiring. (See **Note - next page.)Fusing of the solid-state relays to be in accordance with Fig. 1. Fuse F1 to be 6 amps slo-blo, 120 VAC for 120V line voltage; 250 VAC for 240 V applicatio n.****Note Note Note:: All intrinsically safe wiring to intrinsically safe solid-state relays must be segregated from non-intrinsically safe wiring.Installation of Sensor Switch and Associated Field Wiring (Cont.)198g。
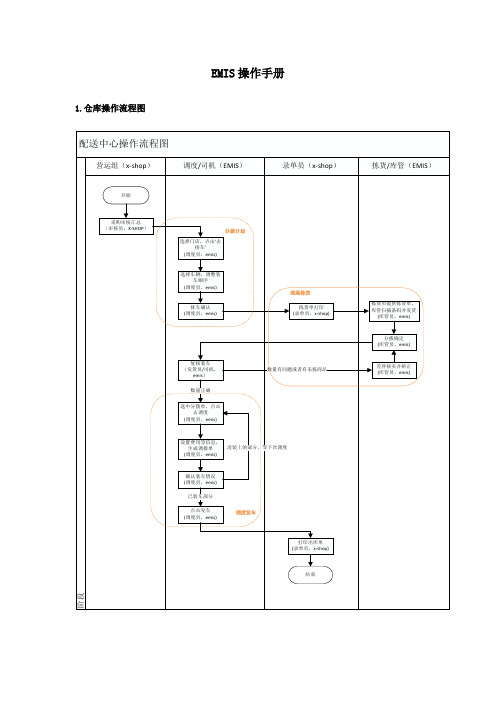
EMIS操作手册1.仓库操作流程图2.仓库操作步骤2.1分拨单生成点击分拨单生成,进入分拨单生成界面,该界面按‘码头→线路→门店’的方式展示,如下图:未选中“显示全部门店”,此时的门店数指该线路上要货的门店选中“显示全部门店”,则门店数显示的为该线路下的所有门店可选中跨线路的门店,不能跨码头选择门店,进行排车;例如选择线路3和线路9上的两家要货门店,屏幕下方显示‘已选门店信息’,点击“去排车”,进入到分拨单确认界面,选择车辆,调整装车顺序后点击排车确认。
排车确认后,进入x-shop打印出分拨单:若有拣货商品未设置库管组,会打印出‘漏货警告’,这时需要去x-shop里面设置商品的库管组,库管组的设置见文档一般问题2.2分拨单管理分拨单打印后,可以通过EMIS主界面进入分拨单管理界面,或者是排车界面,点击“排车详情”进入。
2.2.1手工选择门店分拨手工选择未完成的分拨单进行分拨;看到分拨单包含的门店:点击“分拨”,对门店商品进行分拨,输入规格、单价、周转筐等信息后,点击“分拨确定”,2.2.2扫描分拨条码进行分拨在分拨单管理界面,点击右上方的扫描图标,将扫描狂对准相应的条码,扫描条码如图:画红框所示EMIS上显示如下所示:点击“分拨确定”后,则门店分拨单创建完成,同时关闭改店分拨界面,EMIS可同时扫描多家门店进行分拨,门店信息根据扫描顺序逐一排出,点击店名进行分拨门店切换,以此满足库管同时发货的需求,见上图红框处。
2.2.3分拨操作说明1. 规格、单价、件数可以修改,若某商品不发货,或者仓库库存为0,将件数填为0即可2. 对于像菠萝密件数为个数这样的商品,输入数量即可,规格自动变成平均规格,默认规格为1。
3. 规格及配出价有变动,点击商品行后面的‘分拨’按钮,会提示‘规格或配出价已变更,是否对未分拨门店生效’,尽量减少下一家门店的分拨数据修改。
2.3 拣货复核、调度单生成通过EMIS的主界面,进入调度单生成界面,进行复核确定,可通过点击右上角的扫描图标,扫描调度分拨单上面的左上角的分拨单条码筛选调度单,也可通过筛选条件来筛选扫描调度分拨单的条码如图所示:选择复核门店后,确认商品和商品数量,件数是否正确,若没有问题,可点击“复核确认”点击复核确定后,状态为“已完成”,选中已完成的分拨单,点击“去调度”设置每家门店的运费和装卸费:点击设置费用,输入运费和装卸费,点击确定进入调度选择界面,之前在分拨单创建界面已经排过车,这里会自动带出排车的车辆和司机信息,若有变动可以修改该路线的车辆和司机,以这里的车辆和司机信息为准;选择装卸组,发货员,备注和勾选是否带回周转筐,点击“生成调度单”,2.4调度单管理从EMIS主界面进入调度单管理界面:点击单据查看调度单明细:门店,商品等,若有门店或者商品不在该张调度单的范围内,可选中圆圈,点击移除,移除的门店或者商品会在在调度单生成界面,可返回重新生成调度单确认无误后,返回调度单界面,点击圆圈选择未批准的调度单,点击发车即完成调度若是点击取消调度,则该张单据会返回调度单生成界面,可重新生成调度单3.一般问题3.1配送加单3.1.1临时加单在EMIS排车确认之前即临时加单在分拨单生成之前,可在x-shop中通过采购管理——采购汇总审核,选择按商品或是按门店铺货,再进行采购汇总审核3.1.2临时加单在生成分拨单之后且分拨确认之前(拣货中加单)在EMIS分拨管理界面,找到相应的分拨单,找到加单门店,进到该门店的现场分拨界面:点击添加商品,选择商品后,输入规格,单价,件数等(红色字体部分)点击分拨确定建议:分拨确定之后,配送应拒绝加单3.2现场分拨点击‘分拨确认’之后状态还是“分拨中”点击分拨确认之后,门店的分拨状态应该是“已完成”,若状态一直是“分拨中”则表明该门店有商品未分完;若是在现场分拨界面,所有列出来的商品均以分拨,则可能是待分拨商品的库管组未设置,需要去x-shop里面设置商品的库管组,库管组的设置见文档一般问题处理3.3复核确定界面有“未拣”字样在复核界面出现商品前面标记“未拣”字样,标记未拣的商品即没有拣货的商品,需要重新回到分拨单管理——现场分拨对商品进行分拨,如果在现场分拨界面看不到该商品,则是该商品的库管组没有设置,需要去x-shop的后台设置商品的库管组3.4如何在emis中查看未设置库管组的商品1. 未设置库管组的商品可在EMIS主界面调度单生成——调度(分拨中状态的单据)——按组织分拨(分拨中状态的门店)——拣货复核,标记未拣的商品即为没有设置库管组的商品2. 在做拣货打印时会有漏货警告,漏货警告中的商品就是未设置库管组的商品3.5设置商品的库管组库存管理——库管组商品设置1.库管组名称即仓库内商品摆放的分区名称,2.库管组负责人信息:即管理这块分区的人员,人员的所属组织一定要是仓库3.库管组所属商品:即这一块分区固定摆放的商品新增库管组:点击新增,输入库管组名称,下拉选择负责人,点击添加,最后保存新增库管组的负责人:选中库管组,点击修改,下拉选择负责人,点击添加,点击保存新增库管商品:选中库管组,点击导入商品,在导入商品界面点击查询,查询出商品选中商品,点击导入选中行,即可库管组商品的调整,也可以通过‘库管巡库’功能完成,操作如下:扫描或模糊查询商品,如下图选择商品后,可进行‘库管组归组’,如下图:3.6排车找不到车辆,出车时找不到司机排车找不到车辆,在出车时下拉找不到司机等问题一般都是仓库的基本信息没有维护好,需要在x-shop的后台新增线路,车辆,司机等信息,具体操作如下:3.6.1新增线路库存管理——仓库额外信息管理——线路管理点击新增,输入线路相关信息,点击保存给线路增加门店:选中某一条线路,点击新增门店,选择门店打钩,点击导入门店即可,注意一家门店只能在一条线路上,不可能既在线路一又在线路二上面,若是门店已经存在某条线路上,先在线路上删除门店,新线路重新添加3.6.2新增车辆库存管理——仓库额外信息管理——车辆管理点击新建,输入车辆的基本信息,点击保存即可可对车辆信息进行修改,删除操作,点击修改、删除即可。
EMIS使用配置指南欢迎使用EMIS系统。
此文档是面向江西移动广大员工,是一个对EMIS操作的基本使用配置说明,目的是引导大家配置好终端,更好的使用EMIS系统为自己日常工作服务。
内容介绍:一、网络配置二、系统软件要求三、浏览器配置1 临时文件及历史记录设置2 可信任站点设置3 IE控件的设置4 页面字体的设置5 页面弹出窗口设置四、常见问题正文:( 一 ) 网络配置使用EMIS系统前,需请按以下步骤操作:1、打开网络连接,双击[本地连接],点击[属性];2、双击[Internet 协议(TCP/IP)];3、将分配的IP地址、子网掩码、网关等设置正确;4、设置DNS服务器地址:在[首选DNS服务器]中输入“10.175.17.140”,在[备选DNS服务器]中输入“10.175.17.139”,点击[确定];( 二 ) 系统软件要求1、为正常使用EMIS系统,使用EMIS系统的终端必须安装微软windows 2000或XP乃至更高版本的操作系统,并安装IE6.0版本以上的浏览器(推荐采用IE7.0版本,IE8.0可能不能使用系统的部分功能,不推荐采用其他第三方浏览器)。
2、为正常使用EMIS系统的各项功能,终端上还必须安装微软Office 办公软件,并要求版本必须为office 2000、xp或2003,本系统不支持OFFICE 2007版本。
Office安装组件中,至少需要包括Word和Excel。
所安装的操作系统和office软件均应为正版。
( 三 ) 浏览器配置请按以下步骤操作:1.临时文件及历史记录设置1、打开IE浏览器,点击[工具]→[Internet 选项];2、在Internet 选项对话框中,点击[常规]→浏览历史记录[设置];3、在Internet 临时文件和历史记录设置对话框中,选中[每次访问网页时]→点击[确定];2.可信任站点设置1、在Internet 选项对话框中,点击选项卡[安全]→点击[可信站点]→点击[站点];2、在可信任站点框中,在“将该网站添加到区域”区域框中输入“*”→点击[添加]→点击[关闭],*确保未勾取选项[对该区域中的所有站点要求服务器验证https];设置成功后,登录EMIS系统网站,均会在网页右下角出现绿色的“”标记;3.IE控件的设置1、在Internet 选项对话框中,点击选项卡[安全]→点击[可信站点]→[自定义级别];2、在ActiveX控件和插件包含的所有设置都要选中[启动],最后点击[确认];4.页面字体设置1、设置浏览器字体大小,在IE浏览器中,点击[查看]→[文字大小]→[中(M)];5.页面弹出窗口设置1、打开IE浏览器,点击[工具]→[弹出窗口阻止程序]→[关闭弹出窗口阻止程序];设置弹出窗口,目的是解决在使用EMIS系统时,选择人员时,碰到选择人员的窗口不能正常弹出的情况。
emis数据库使用方法 2023
(原创实用版)
目录
1.emis 数据库简介
2.emis 数据库的使用方法
3.emis 数据库的优势和应用领域
正文
【emis 数据库简介】
emis 数据库是一款专门为知识管理而设计的数据库管理系统,它能够帮助用户有效地组织、存储和共享各种形式的知识。
emis 数据库具有高度的可定制性和强大的功能,可以满足不同用户的需求。
【emis 数据库的使用方法】
使用 emis 数据库,用户需要首先安装 emis 数据库软件并创建一个数据库。
然后,用户可以在数据库中创建各种类型的知识,如文档、图片、音频和视频等。
此外,emis 数据库还提供了强大的搜索和过滤功能,用户可以根据关键词、类型或其他属性快速找到所需的知识。
【emis 数据库的优势和应用领域】
emis 数据库具有许多优势,如易于使用、功能强大、安全性高等。
这些优势使得 emis 数据库成为了许多企业和组织的首选知识管理工具。
第1页共1页。
Emi User Guide1 InstallationNote: Please take a backup of your all Magento files and database before installing or updating any extension.1.Download the EMI extension .ZIP file.2.Extract the .ZIP file.3.Copy the app folder and paste it into your magento ROOT directory.4.Run upgrade command as specified : php bin/magento setup:upgrade5.Run compile command as specified : php bin/magento setup:di:compile6.Run deploy command as specified : php bin/magento setup:static-content:deploy -f7.Clear the cache either from the admin panel or command line php bin/magentocache:clean8.Now, you can see the Solwin menu in admin panel. Please go to EMI -> Configurationand select E nable t o Yes and save settings.NOTE: Make sure the installation is done from under the FTP administrator account. Otherwise make sure to set 775 permissions to the store root directory after the extension is deployed.Getting StartedA setup guide and general information to help youThis document covers the installation, set up, and use of this extension and provide answers and solutions to common problems and issues. We encourage you to read this document thoroughly if you are experiencing any difficulties.InformationThis Extension display custom EMI option in product view page in popup.This Magento 2 extension helps store owner to display custom EMI options for the products in Magento. This extension allows store owners to display EMI options like EMI tenure(months),bank interest rate(%), monthly installments and total money with specific banks on the product detail page. Store owner can set general terms and conditions that will display with EMI table. This extension comes with various configuration options to customize EMI table.Features●Allow the admin to display EMI options per product.●Admin can manage all bank details & terms and conditions from backend.●Display EMI Option link on view page with popup.●Display Bankwise Terms & Conditions.●Display General Terms & Conditions.●Auto EMI Calculation from admin.How To Use→ In frontend, Customers can see the EMI View Plans button on product view page.→ By Clicking on EMI View Plans button will display popup with EMI calculation bank wise and terms & conditions.→ By Clicking on EMI Details will display collapse with EMI calculation.Mobile View → By Clicking on EMI View Plans button will display popup with EMI calculation bank wise and terms & conditions.→ By Clicking on EMI Details will display collapse with EMI calculation.How To Configure→ In backend, Go to EMI >> Banks will display list of banks.→ Click on the Add New button to add new bank details.→ In backend, Go to EMI >> Month will display list of months.→ Click on the Add New button to add new month details.→ In backend, Go to EMI >> EMI will display list of banks ,months and interest.→ Click on the Add New button to add new interest details.Note:Once EMI records are added, Please clear the Cache .SupportIf you have any questions or requests, please contact us at info@. We are very happy to assist you!1.Website: h ttps://2.Blog: h ttps:///blog。
铁路车辆设备管理信息系统(EMIS)段级操作手册黄石邦柯科技有限公司二0一二年五月1.常用功能模块 (1)1.1.系统信息 (1)1.2.系统登录 (1)1.3.系统主页面 (2)1.4.页面模块操作功能 (3)2.固资设备管理 (5)2.1.固资设备履历 (5)2.2.附属设备及随机工具记录 (7)2.3.技术资料登记 (8)2.4.设备技术鉴定记录 (9)2.5.设备动态、状态记录 (9)2.6.设备ABC类评定记录 (10)2.7.红旗设备评比记录 (10)2.8.设备事故/故障记录 (11)2.9.年度设备检修计划 (12)2.10.年度设备大修计划申请 (12)2.11.月份设备检修计划 (13)2.12.设备检修单 (14)2.13.运转台时(公里)记录 (14)3.固资设备凭证管理 (15)3.1.固定资产卡片 (15)3.2.固定资产(互换配件)卡片 (15)3.3.固定资产卡片编号动态登记表 (16)3.4.固定资产使用状态及保管地点变更申请表 (16)3.5.新建(购置)固定资产验收交接记录 (17)3.6.固定支出接收、移交记录 (17)3.7.固定资产投资转入。
转出记录 (17)3.8.固定资产拆除、报废申请单 (18)3.9.固定资产盘盈、盘亏报告表 (18)3.10.固定资产盘盈、盘亏理由书 (19)3.10.1.功能描述 (19)3.11.固定资产出租申请表 (19)4.台账管理 (20)4.1.非固定资产设备台账 (20)4.2.传导设备台账 (20)4.3.房屋台账 (21)4.4.仪器仪表 (22)4.5.工量器具 (22)5.技术设备履历薄 (23)5.1.隶属关系及管理范围 (23)5.2.段厂历史概况及附图 (23)5.3.设备能力改进意见 (24)5.4.段厂概况/能力/设备汇总 (24)5.5.运用车间概况 (24)5.6.列检作业场概况 (25)5.7.站修作业场概况/设备汇总 (25)5.8.洗罐所概况/设备汇总 (26)5.9.客整所概况/设备汇总 (27)5.10.动车所概况/设备汇总 (27)5.11.段厂固资设备明细 (27)5.12.传导设备明细 (27)5.13.房屋明细 (28)5.14.仪器仪表、工量器具明细 (29)5.15.固资始用年限、动态汇总 (29)5.16.技术设备履历簿下载 (30)6.设备统计汇总报表 (30)6.1.设备质量鉴定汇总 (30)6.2.固资设备情况年报 (31)6.3.固资设备情况季报 (32)6.4.固资设备情况月报 (32)6.5.车辆探伤、试验、检测设备年报 (32)6.6.车辆探伤、试验、检测设备季报 (33)6.7.设备增减动态表 (33)6.8.固资设备明细汇总表 (33)6.9.大修到期设备明细表 (34)6.10.年度设备检修计划统计表 (34)6.11.年度设备检修计划与实际统计表 (35)7.系统维护 (35)7.1.组织机构管理 (35)7.2.人员管理与授权 (36)7.3.跨部门管理授权 (36)7.4.数据字典维护 (37)8.数据上报 (37)8.1.车辆段数据上报 (37)1.常用功能模块1.1.系统信息系统操作说明:登陆成功后,可以看到七大主模块车辆段数上报,固资设备管理,固资设备凭证管理,台账管理,技术设备履历簿,设备统计汇总报表,系统维护。
PhilipsMicro Music SystemBluetooth®CD, MP3-CD, USB, FM USB port for charging 18WTAM3205Ready for the sounds you love Hear more from every podcast and playlist you stream. Rediscover your CD collection or tune in to the radio. This classic looking micro system sounds great in smaller rooms, and you can connect other sources via USB or audio-in.Great sound for your music•Classic design•Bass-reflex loudspeakers. Richer low tones•3" woofer. 18 W maximum output power•Digital Sound Control. Choose a preset sound styleFrom CD classics to streaming•All your music•CD player. Digital FM radio with 10 presets. Audio-in•USB port. Connect a legacy source or charge a mobile•Bluetooth. Stream music, podcasts, and moreFill the room with tunes•At home in your home•AC-powered. Remote control•Main unit dimensions: 180x121x247 mm•Speaker dimensions: 150x238x125 mmIssue date 2023-12-02Version: 10.1.312 NC: 8670 001 67927EAN: 48 95229 10981 0© 2023 Koninklijke Philips N.V.All Rights reserved.Specifications are subject to change without notice.Trademarks are the property of Koninklijke Philips N.V.or their respective owners. SpecificationsMicro Music System Bluetooth® CD, MP3-CD, USB, FM, USB port for charging, 18WHighlights All your music This stylish micro system lets you stream playlists and more via Bluetooth, play CDs and listen to FM radio. The digital radio tuner with 10 presets delivers clear reception, and the CD player can read MP3 CDs and recorded CDs.Bass-reflex loudspeakers Bookshelf-style loudspeakers give you clear sound and good bass from 3" woofers and bass-reflex ports. An 18 W maximum output brings decent sound to smaller spaces. Perfect for a home office or bedroom.Classic design The two-tone central unit and speaker cabinets recall the design of hi-fi separates. The textured volume-control dial adds a satisfying analog feel to operation. There are buttons on the front of the unit for playback and source selection.Digital Sound Control Hip-hop or choral, symphony or rock opera? Whatever you love, this micro system's Digital Sound Control function lets you enjoy it more. Pick from preset sound styles designed to bring out the best in your music.At home in your home This AC-powered micro system looks great in any room. Bluetooth wireless range is 10 m, and you can charge a smart device via the USB port. An easy-to-use remote puts key functions at your fingertips.Sound •Maximum output power (RMS): 18W •Sound enhancement: digital sound control, bass reflex speaker system •Sound mode: Powerful, Clear, Bright, Warm, Balanced •Volume control: rotary •Frequency response: 66-20000 Hz •Speaker impedance: 6 ohmLoudspeakers •Number of sound channels: 2.0•Driver configuration: Full range •Number of full range drivers: 2•Full range driver diameter: 3"Audio playback •Playback media: CD, CD-R/RW, MP3-CD, USB flash drive •Disc playback modes: fast forward/backward, next/previous track search, repeat/shuffle/program •USB Direct playback modes: fast backward/fast forward, play/pause, previous/next, repeat, shuffle, stop •Audio supported formats: MP3•Max sample rate: 24-bit/44.1kHz Tuner/Reception/Transmission •Tuner type:Digital •Tuner bands: FM mono, FM stereo •Antenna: FM fixed pigtail antenna •Station presets: 10 (FM)•Tuner enhancement: auto digital tuning, auto scan, Easy set (plug & play)•RDS:No Connectivity •Bluetooth profiles: A2DP, AVRCP, Multipoint (Multipair) support •Bluetooth range: 10M (free space)•Bluetooth version: 4.2•USB: USB host •USB charging: 5V, 1A •Audio in: 3.5mm •Smart Home: n.a.•DLNA Standard: n.a.Convenience •Clock: On main display, 24/12 hour display •Display type: LED display •Loader type: tray •Alarms: Yes, Buzzer, FM, CD •No. of alarms: 1•Sleep timer •Remote Control Design •System components: Main control unit, Speakers •Wall mountable: No Compatibility •Smartphone/tablet APP control: No Power •Power supply: 100-240VAC, 50/60Hz Accessories •Included accessories: Remote Control (with battery), AC power cord, FM antenna, Quick start guide, Warranty Leaflet •Power cord: Length 1.5 m Dimensions•Main Unit (W x H x D): 180x121x247 mm •Main Unit Weight: 1.6 kg •No. of speaker unit: 2•Speaker Unit (W x H x D): 150x238x125 mm •Speaker Weight (per Unit): 0.96 kg •Set (W x H x D): 500x238x247 mm •Set Weight: 3.59 kg Packaging dimensions•Packaging dimensions (W x H x D): 57.7 x 31.2 x 18.5 cm •EAN: 48 95229 10981 0•Gross weight: 4.65 kg •Nett weight: 3.59 kg •Tare weight: 1.06 kg •Number of products included: 1•Packaging type: Box •Type of shelf placement: Standing。