ZBrush快捷键
- 格式:doc
- 大小:322.50 KB
- 文档页数:2

Zbrush常用快捷键以下是常用的快捷键:空格键激活鼠标指针下的菜单(按住不放再拖拉鼠标指针可定位文档)左键在空白处单击并拖动=旋转视角alt建+左键在空白处单击并拖动=平移视角alt键+左键然后放开alt键在空白处拖动并平移=缩放视角+放大文档- 缩小文档0(零)查阅文档的实际大小旋转中配合shift,捕捉在正交视点处旋转中配合ALT,以相对平滑方式旋转视图按下DEL ,可以将物体在画布中最大化显示Ctrl+0 查阅文档实际大小的一半,抗锯齿(还影响输出)ctrl+shift+拖动=未选中的部分将隐藏。
ctrl+shift+点击空白处=恢复显示ctrl+shift+拖动+释放(ctrl、shift)=选中的部分将隐藏Ctrl+f 用当前texture填充canvas当前layerCtrl遮罩功能Ctrl+d 细份一次Tab隐藏/显示浮动调控板H隐藏/显示Zscript窗口C在指针下面拾取颜色S绘图大小I RGB强度Shift+I Z强度Shift+d 绘制贴图的时候让模型上的网格线隐藏Q绘图指示器(默认为所有工具)W移动模式E缩放模式R旋转模式T编辑模式Shift+s 备份物体M标记物体点中marker ctrl+M 取消标记Ctrl+Z 撤销Shift+Ctrl+Z 重做Alt/Option 影响转换大多数工具G打开Projection MasterAlt+A Alpha调控板Alt+C Color颜色调控板Alt+T tool调控板Alt+T Transform调控板Alt+R Render调控板Alt+鼠标左绘图模式下可以删除Z求点Shift+crease--------------crease everythingShift_uncrease------------uncrease everythingA ------------------zSphere to Z meshctrl+N ----------------- clear the layer迅速了解zbrush应掌握的要点1、介绍ZB保存时是一个画面,要保持三维物体的可编辑性必须保存为笔刷。

Zbrush快捷键操作大全空格键激活鼠标指针下的菜单(按住不放再拖拉鼠标指针可定位文档)左键在空白处单击并拖动=旋转视角al t建+左键在空白处单击并拖动=平移视角alt键+左键然后放开alt键在空白处拖动并平移=缩放视角 + 放大文档 -缩小文档0(零)查阅文档的实际大小旋转中配合 shi ft ,捕捉在正交视点处旋转中配合ALT ,以相对平滑方式旋转视图按下DEL ,可以将物体在画布中最大化显示Ctrl+0 查阅文档实际大小的一半,抗锯齿(还影响输出)ctr l+shi ft+拖动=未选中的部分将隐藏。
ct rl+sh ift+点击空白处=恢复显示ctrl+shif t+拖动+释放(ct rl、sh ift)=选中的部分将隐藏Ctrl+f 用当前textu re填充c anvas当前lay erC trl 遮罩功能C trl+d细份一次Tab隐藏/显示浮动调控板H隐藏/显示Zscri pt窗口C 在指针下面拾取颜色S绘图大小I R GB强度Shif t+I Z强度S hift+d 绘制贴图的时候让模型上的网格线隐藏Q 绘图指示器(默认为所有工具)W移动模式E 缩放模式R 旋转模式T编辑模式Shif t+s 备份物体M 标记物体点中marke r ctr l+M 取消标记Ctrl+Z 撤销Shif t+Ctr l+Z 重做Al t/Opt ion 影响转换大多数工具G 打开P rojec tionMaste rAl t+A A lpha调控板A lt+CColor颜色调控板Alt+T to ol调控板Alt+T Tr ansfo rm调控板Alt+R Re nder调控板。
zbrush4 快捷键大全!zbrush4 快捷键设置:Ctrl+Alt+鼠标左键。
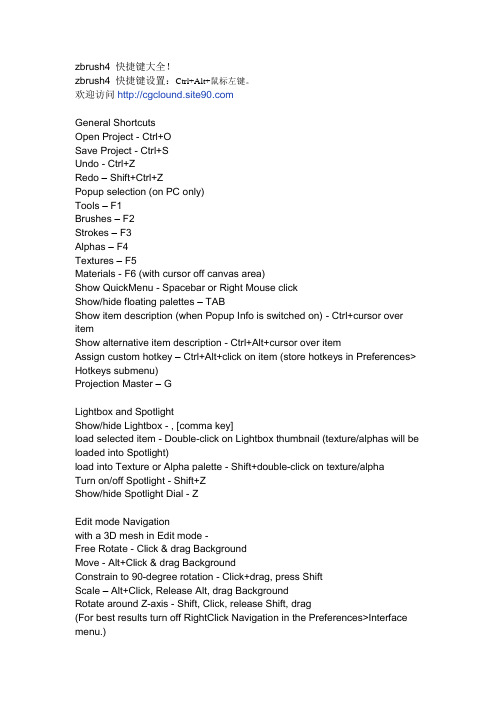
欢迎访问General ShortcutsOpen Project - Ctrl+OSave Project - Ctrl+SUndo - Ctrl+ZRedo – Shift+Ctrl+ZPopup selection (on PC only)Tools – F1Brushes – F2Strokes – F3Alphas – F4Textures – F5Materials - F6 (with cursor off canvas area)Show QuickMenu - Spacebar or Right Mouse clickShow/hide floating palettes – TABShow item description (when Popup Info is switched on) - Ctrl+cursor over itemShow alternative item description - Ctrl+Alt+cursor over itemAssign custom hotkey – Ctrl+Alt+click on item (store hotkeys in Preferences> Hotkeys submenu)Projection Master – GLightbox and SpotlightShow/hide Lightbox - , [comma key]load selected item - Double-click on Lightbox thumbnail (texture/alphas will be loaded into Spotlight)load into Texture or Alpha palette - Shift+double-click on texture/alphaTurn on/off Spotlight - Shift+ZShow/hide Spotlight Dial - ZEdit mode Navigationwith a 3D mesh in Edit mode -Free Rotate - Click & drag BackgroundMove - Alt+Click & drag BackgroundConstrain to 90-degree rotation - Click+drag, press ShiftScale – Alt+Click, Release Alt, drag BackgroundRotate around Z-axis - Shift, Click, release Shift, drag(For best results turn off RightClick Navigation in the Preferences>Interface menu.)Right-Click Navigation(Turn on RightClick Navigation in the Preferences>Interface menu.) Move - Alt+Right-click & drag (can be over the model)Scale - Ctrl+Right-click & drag (can be over the model)Rotate - Right-click & drag (can be over the model)Sculpting and PaintingDraw Size - SFocal Shift - ORGB Intensity - IZ Intensity – UIncrease Draw Size by set units - ]Decrease Draw Size by set units - [(set increment in the Zplugin>Misc Utilities>Brush Increment slider) Edit mode on/off - TDraw - QMove - WScale - ERotate - RToggle ZAdd and ZSub - Alt (hold down)Sculpting BrushesShow Brush pop-up - BStandard Brush - B - S - TSmooth Stronger - B - S - SMove Elastic - B - M - EMPolish - B - M - PClipCurve - B - C - CClayLine - B - C - LColorSelect Color under cursor - CSwitch Color - VStrokeLazy mouse - LReplay Last Stroke - 1Record Stroke - 3Replay All Recorded Strokes – 23D ModelsSave Tool - Shift+Ctrl+TFit Mesh to view - FPerspective – PFloor Grid - Shift+PActivate Symmetry - XShow/hide Polyframe & polygroups - Shift+FPoint Selection Mode - Shift+Ctrl+PSet Pivot Point – Ctrl+ PClear Pivot Point - Shift+PSnapshot a version to canvas - Shift+SSubToolsList all SubTools - NAlt+click on SubTool - select that SubToolGeometryDivide - Ctrl+DLower Res - Shift+DHigher Res - DEdge Loop – Ctrl+E (partially hidden mesh)HD GeometryToggle in/out of HD Sculpting mode – A (cursor over mesh)Render all HD Geometry – A (cursor over background)MaskingView Mask - Ctrl+HInvert Mask - Ctrl+IClear Mask - Shift+Ctrl+AMask All – Ctrl+ASelect Masking Brush - hold Ctrl while selecting brush from popupPaint mask on object (alphas/strokes can be used) - Ctrl (hold down)Delete or paint reverse mask – Ctrl+Alt (hold down)Reverse mask – Ctrl+Click BackgroundClear Mask – Ctrl+Click+ drag BackgroundConstant-intensity mask - Ctrl+Click, release Ctrl, drag (starting off mesh) Alpha-intensity mask (using MaskPen or MaskRect brush) - Ctrl+Click & drag (select alpha while holding Ctrl)Blur mask - Ctrl+Click on meshSharpen mask - Ctrl+Alt+Click on meshTopological Maskingin Move, Scale or Rotate mode - Ctrl+click+drag the action line on the modelPartial Mesh Visibility & Clip BrushesSelect Selection or Clip Brush - hold Shift+Ctrl while selecting brush from popupShow mesh portion – Shift+Ctrl+Click, release keys & drag (green selection area)Hide mesh portion - Shift+Ctrl+Click, release keys & drag - press Alt (red selection area)Move selection or clip area - 'press Spacebar without releasing mouse/pen Show entire mesh - Shift+Ctrl+Click BackgroundShow only selected Polygroup (on fully visible mesh) - Shift+Ctrl+ClickHide selected Polygroup (on fully visible mesh) - Shift+Ctrl+Click twiceHide selected Polygroup (on partially visible mesh) - Shift+Ctrl+Click Reverse visibility - Shift+Ctrl+Click & drag BackgroundClipCurve add soft direction change - click Alt onceClipCurve add sharp direction change - click Alt twicereverse clip area - Alt (hold down)StencilStencil On - Alt+HHide/Show Stencil - Ctrl+HCoin Controller – SpacebarZSpheresPreview Adaptive Skin - ADraw modeAdd a child ZSphere - drag ZSphereDelete ZSphere - Alt+Click ZSphereAdd a child ZSphere at same size – Click+drag, press ShiftAdd a child ZSphere and scale Link Spheres – Click+drag to size new ZSphere, press Ctrl+dragInsert ZSphere - Click Link-Spherewith Tool>Adaptive Skin>Use ClassicSkinning on:Sphere Define magnet/ break mesh - Alt+Click Link-SphereMove modeMove ZSphere - drag ZSpherePose (Natural-linked move) - drag Link-SphereMove Chain – Alt+drag Link-SphereScale modeScale Zsphere - drag ZSphereInflate/deflate chain – Alt+drag Link-SphereScale chain - drag Link-SphereRotate modeSpin chain - drag ZSphereControl twist - Alt+drag Link-SphereRotate chain - drag Link-SphereZSketchActivate ZSketch Edit mode - Shift+A (with a ZSphere armature in Edit mode) Preview Unified Skin - ACanvas and 2.5DReverse 2.5D brush effect - Alt (hold down)Crop And Fill - Shift+Ctrl+FGrab Texture From Document – Shift+Ctrl+GDocument LayersClear Layer - Ctrl+NFill Layer - Ctrl+FBake Layer – Ctrl+BOn Layer thumbnail, toggle all layers on/off - Shift+ClickSelect layer on which clicked pixol resides - ~+Click canvas (US) @+Click canvas (UK)Move layer contents up/down/sideways (X & Y)- ~+drag (US) @+drag (UK)MarkersPlace Marker - MRemove Marker – Ctrl+MCanvas ZoomActual Size - 0 [zero]Antialiased Half Size - Ctrl+0Zoom In - + [plus sign]Zoom Out - - [minus sign]TimelinePlace a new key frame - click on the TimelineSelect an existing key frame - click on the key frame dotZoom Timeline in/out - click on selected key frame dotMove selected key frame - click+drag dot to new position (dragging off end will delete)Store new data in existing key frame - Shift+Ctrl+click on the key frame dot Delete a key frame - click+drag dot off the TimelineCopy selected key frame - Shift+click on the Timeline at the point where you want the copyCopy multiple key frames - Shift+click on all the key frames dots to be copied, then Shift+click the Timelineat the point where you want the copiesCreate Transition key frame - Ctrl+click on an existing key frame dotCreate Rigid key frame - Alt+click on an existing key frame dotGo to Previous Camera key frame - LEFT ARROWGo to Next Camera key frame - RIGHT ARROWPlay the Timeline (will play as a loop) - Shift+click on the Timeline cursor Stop the Timeline playing - click EscRecord Timeline as a Movie - Shift+Ctrl+click on the Timeline cursor(set the cursor to the start first using the LEFT ARROW)MovieSnapshot to Movie– Ctrl+ Shift+! (US) Shift+Ctrl+PageUp (UK)RenderBest Preview Render (BPR) - Shift+RRender All - Shift+Ctrl+RCursor Selective Render – Ctrl+RCustom UI and ConfigurationMove item to custom interface position – Ctrl+Alt+drag (when Enable Customize is switched on)Remove item from custom interface position – Ctrl+Alt+drag to Canvas (when Enable Customize is on)Store Configuration File - Shift+Ctrl+ILoad User Interface Configuration File - Ctrl+LSave User Interface Configuration File - Shift+Ctrl+Alt+IZScriptsLoad ZScript - Shift+Ctrl+LReload ZScript - Ctrl+UShow/Hide ZScript window - H参考资料:/docs/index.php/ZBrush_4_Shortcuts。
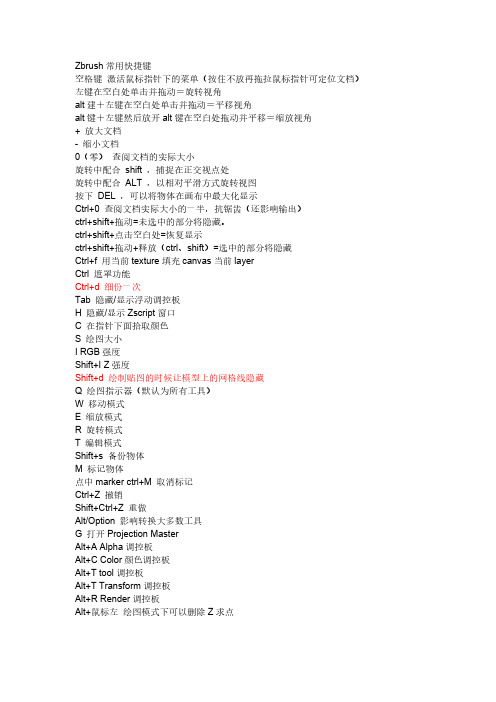
Zbrush常用快捷键空格键激活鼠标指针下的菜单(按住不放再拖拉鼠标指针可定位文档)左键在空白处单击并拖动=旋转视角alt建+左键在空白处单击并拖动=平移视角alt键+左键然后放开alt键在空白处拖动并平移=缩放视角+ 放大文档- 缩小文档0(零)查阅文档的实际大小旋转中配合shift ,捕捉在正交视点处旋转中配合ALT ,以相对平滑方式旋转视图按下DEL ,可以将物体在画布中最大化显示Ctrl+0 查阅文档实际大小的一半,抗锯齿(还影响输出)ctrl+shift+拖动=未选中的部分将隐藏。
ctrl+shift+点击空白处=恢复显示ctrl+shift+拖动+释放(ctrl、shift)=选中的部分将隐藏Ctrl+f 用当前texture填充canvas当前layerCtrl 遮罩功能Ctrl+d 细份一次Tab 隐藏/显示浮动调控板H 隐藏/显示Zscript窗口C 在指针下面拾取颜色S 绘图大小I RGB强度Shift+I Z强度Shift+d 绘制贴图的时候让模型上的网格线隐藏Q 绘图指示器(默认为所有工具)W 移动模式E 缩放模式R 旋转模式T 编辑模式Shift+s 备份物体M 标记物体点中marker ctrl+M 取消标记Ctrl+Z 撤销Shift+Ctrl+Z 重做Alt/Option 影响转换大多数工具G 打开Projection MasterAlt+A Alpha调控板Alt+C Color颜色调控板Alt+T tool调控板Alt+T Transform调控板Alt+R Render调控板Alt+鼠标左绘图模式下可以删除Z求点Shift+crease--------------crease everythingShift_uncrease------------uncrease everythingA ------------------zSphere to Z meshctrl+N ----------------- clear the layer迅速了解zbrush应掌握的要点1、介绍ZB保存时是一个画面,要保持三维物体的可编辑性必须保存为笔刷。
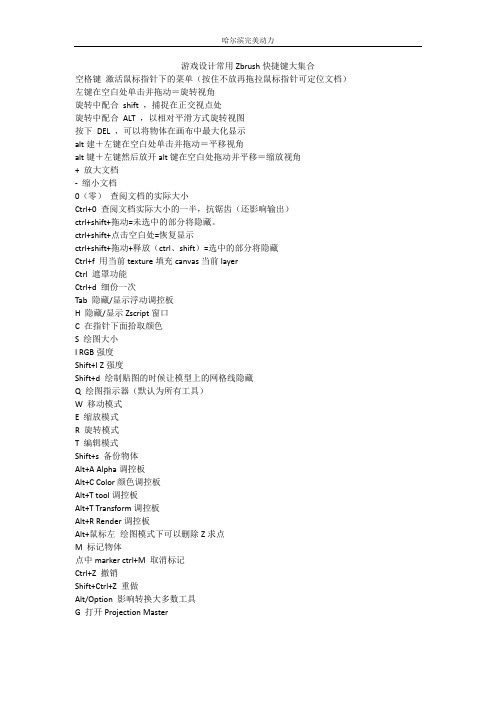
游戏设计常用Zbrush快捷键大集合空格键激活鼠标指针下的菜单(按住不放再拖拉鼠标指针可定位文档)左键在空白处单击并拖动=旋转视角旋转中配合shift ,捕捉在正交视点处旋转中配合ALT ,以相对平滑方式旋转视图按下DEL ,可以将物体在画布中最大化显示alt建+左键在空白处单击并拖动=平移视角alt键+左键然后放开alt键在空白处拖动并平移=缩放视角+ 放大文档- 缩小文档0(零)查阅文档的实际大小Ctrl+0 查阅文档实际大小的一半,抗锯齿(还影响输出)ctrl+shift+拖动=未选中的部分将隐藏。
ctrl+shift+点击空白处=恢复显示ctrl+shift+拖动+释放(ctrl、shift)=选中的部分将隐藏Ctrl+f 用当前texture填充canvas当前layerCtrl 遮罩功能Ctrl+d 细份一次Tab 隐藏/显示浮动调控板H 隐藏/显示Zscript窗口C 在指针下面拾取颜色S 绘图大小I RGB强度Shift+I Z强度Shift+d 绘制贴图的时候让模型上的网格线隐藏Q 绘图指示器(默认为所有工具)W 移动模式E 缩放模式R 旋转模式T 编辑模式Shift+s 备份物体Alt+A Alpha调控板Alt+C Color颜色调控板Alt+T tool调控板Alt+T Transform调控板Alt+R Render调控板Alt+鼠标左绘图模式下可以删除Z求点M 标记物体点中marker ctrl+M 取消标记Ctrl+Z 撤销Shift+Ctrl+Z 重做Alt/Option 影响转换大多数工具G 打开Projection MasterShift+crease--------------crease everything Shift_uncrease------------uncrease everything A ------------------zSphere to Z meshctrl+N ----------------- clear the layer。

Zbrush常用快捷键大全(彩色整理).doc ZBrush是一个数字雕刻和绘画软件,它以强大的功能和直观的工作流程彻底改变了整个三维行业。
在一个简洁的界面中,ZBrush 为当代数字艺术家提供了世界上最先进的工具。
以实用的思路开发出的功能组合,在激发艺术家创作力的同时,ZBrush产生了一种用户感受,在操作时会感到非常的顺畅。
1、界面与画布相关快捷键隐藏工具面板【Tab】工具显示说明鼠标放在工具上按【Ctrl】旋转视角【左键】在空白处单击并拖动平移视角【Alt】+【左键】在空白处单击并拖动缩放视角【Alt】+【左键】,然后放开【Alt】在空白处拖动并平移放大文档【+】缩小文档【-】画布半大【Ctrl】+【0】清空画布【Ctrl】+【N】画布适中【0】2、物体变换相关快捷键移动模式【W】缩放模式【E】旋转模式【R】编辑模式【T】3、蒙版相关快捷键蒙版不再被编辑【Ctrl】+【左键】拖动出蒙板区域,蒙板内变深灰色,不再被编辑减少蒙版区域【Ctrl】+【左键】拖动出蒙板区域,蒙板内变深灰色,再按下Alt,区域变白,减少蒙板区域蒙版反转【Ctrl】+【Click】画布空白处取消蒙版【Ctrl】+【左键】在画布空白处拖动,选择框不接触物体,取消蒙板绘制蒙版【Ctrl】+【左键】在模型上可绘制蒙板4、其他快捷键激活鼠标指针下的菜单(按住不放再拖拉鼠标指针可定位文档)【空格键】捕捉在正交视点处旋转中配合【Shift】以相对平滑方式旋转视图旋转中配合【Alt】可以将物体在画布中更大化显示按下【Del】未选中的部分将隐藏【Ctrl】+【Shift】拖动恢复显示【Ctrl】+【Shift】点击空白处选中的部分将隐藏【Ctrl】+【Shift】拖动,然后释放【Ctrl】和【Shift】填充二维图片层【Ctrl】+【F】遮罩功能【Ctrl】细份一次【Ctrl】+【D】隐藏/显示Zscript窗口【H】在指针下面拾取颜色【C】绘图大小【S】强度【IRGB】Z强度【Shift】+【I】绘制贴图的时候让模型上的网格线隐藏【Shift】+【D】绘图指示器(默认为所有工具)【Q】备份物体【Shift】+【S】标记物体【M】撤销【Ctrl】+【Z】重做【Shift】+【Ctrl】+【Z】打开Projection Master【G】Alpha调控板【Alt】+【A】Color颜色调控板【Alt】+【C】Tool调控板【Alt】+【T】Transform调控板【Alt】+【T】Render调控板【Alt】+【R】绘图模式下可以删除Z求点【Alt】+【左键】以上就是ZBrush的快捷键总结。
zbrush4 快捷键大全!General ShortcutsOpen Project - Ctrl+OSave Project - Ctrl+SUndo - Ctrl+ZRedo – Shift+Ctrl+ZPopup selection (on PC only)Tools – F1Brushes – F2Strokes – F3Alphas – F4Textures – F5Materials - F6 (with cursor off canvas area)Show QuickMenu - Spacebar or Right Mouse clickShow/hide floating palettes – TABShow item description (when Popup Info is switched on) - Ctrl+cursor over itemShow alternative item description - Ctrl+Alt+cursor over itemAssign custom hotkey – Ctrl+Alt+click on item (store hotkeys in Preferences> Hotkeys submenu)Projection Master – GLightbox and SpotlightShow/hide Lightbox - , [comma key]load selected item - Double-click on Lightbox thumbnail (texture/alphas will be loaded into Spotlight)load into Texture or Alpha palette - Shift+double-click on texture/alphaTurn on/off Spotlight - Shift+ZShow/hide Spotlight Dial - ZEdit mode Navigationwith a 3D mesh in Edit mode -Free Rotate - Click & drag BackgroundMove - Alt+Click & drag BackgroundConstrain to 90-degree rotation - Click+drag, press ShiftScale – Alt+Click, Release Alt, drag BackgroundRotate around Z-axis - Shift, Click, release Shift, drag(For best results turn off RightClick Navigation in the Preferences>Interface menu.)Right-Click Navigation(Turn on RightClick Navigation in the Preferences>Interface menu.)Move - Alt+Right-click & drag (can be over the model)Scale - Ctrl+Right-click & drag (can be over the model)Rotate - Right-click & drag (can be over the model)Sculpting and PaintingDraw Size - SFocal Shift - ORGB Intensity - IZ Intensity – UIncrease Draw Size by set units - ]Decrease Draw Size by set units - [(set increment in the Zplugin>Misc Utilities>Brush Increment slider) Edit mode on/off - TDraw - QMove - WScale - ERotate - RToggle ZAdd and ZSub - Alt (hold down)Sculpting BrushesShow Brush pop-up - BStandard Brush - B - S - TSmooth Stronger - B - S - SMove Elastic - B - M - EMPolish - B - M - PClipCurve - B - C - CClayLine - B - C - LColorSelect Color under cursor - CSwitch Color - VStrokeLazy mouse - LReplay Last Stroke - 1Record Stroke - 3Replay All Recorded Strokes – 23D ModelsSave Tool - Shift+Ctrl+TFit Mesh to view - FPerspective – PFloor Grid - Shift+PActivate Symmetry - XShow/hide Polyframe & polygroups - Shift+FPoint Selection Mode - Shift+Ctrl+PSet Pivot Point – Ctrl+ PClear Pivot Point - Shift+PSnapshot a version to canvas - Shift+SSubToolsList all SubTools - NAlt+click on SubTool - select that SubToolGeometryDivide - Ctrl+DLower Res - Shift+DHigher Res - DEdge Loop – Ctrl+E (partially hidden mesh)HD GeometryToggle in/out of HD Sculpting mode – A (cursor over mesh)Render all HD Geometry – A (cursor over background)MaskingView Mask - Ctrl+HInvert Mask - Ctrl+IClear Mask - Shift+Ctrl+AMask All – Ctrl+ASelect Masking Brush - hold Ctrl while selecting brush from popupPaint mask on object (alphas/strokes can be used) - Ctrl (hold down)Delete or paint reverse mask – Ctrl+Alt (hold down)Reverse mask – Ctrl+Click BackgroundClear Mask – Ctrl+Click+ drag BackgroundConstant-intensity mask - Ctrl+Click, release Ctrl, drag (starting off mesh) Alpha-intensity mask (using MaskPen or MaskRect brush) - Ctrl+Click & drag (select alpha while holding Ctrl)Blur mask - Ctrl+Click on meshSharpen mask - Ctrl+Alt+Click on meshTopological Maskingin Move, Scale or Rotate mode - Ctrl+click+drag the action line on the model Partial Mesh Visibility & Clip BrushesSelect Selection or Clip Brush - hold Shift+Ctrl while selecting brush from popupShow mesh portion – Shift+Ctrl+Click, release keys & drag (green selection area)Hide mesh portion - Shift+Ctrl+Click, release keys & drag - press Alt (red selection area)Move selection or clip area - 'press Spacebar without releasing mouse/pen Show entire mesh - Shift+Ctrl+Click BackgroundShow only selected Polygroup (on fully visible mesh) - Shift+Ctrl+Click Hide selected Polygroup (on fully visible mesh) - Shift+Ctrl+Click twice Hide selected Polygroup (on partially visible mesh) - Shift+Ctrl+Click Reverse visibility - Shift+Ctrl+Click & drag BackgroundClipCurve add soft direction change - click Alt onceClipCurve add sharp direction change - click Alt twicereverse clip area - Alt (hold down)StencilStencil On - Alt+HHide/Show Stencil - Ctrl+HCoin Controller – SpacebarZSpheresPreview Adaptive Skin - ADraw modeAdd a child ZSphere - drag ZSphereDelete ZSphere - Alt+Click ZSphereAdd a child ZSphere at same size – Click+drag, press ShiftAdd a child ZSphere and scale Link Spheres – Click+drag to size new ZSphere, press Ctrl+dragInsert ZSphere - Click Link-Spherewith Tool>Adaptive Skin>Use ClassicSkinning on:Sphere Define magnet/ break mesh - Alt+Click Link-SphereMove modeMove ZSphere - drag ZSpherePose (Natural-linked move) - drag Link-SphereMove Chain – Alt+drag Link-SphereScale modeScale Zsphere - drag ZSphereInflate/deflate chain – Alt+drag Link-SphereScale chain - drag Link-SphereRotate modeSpin chain - drag ZSphereControl twist - Alt+drag Link-SphereRotate chain - drag Link-SphereZSketchActivate ZSketch Edit mode - Shift+A (with a ZSphere armature in Edit mode) Preview Unified Skin - ACanvas and 2.5DReverse 2.5D brush effect - Alt (hold down)Crop And Fill - Shift+Ctrl+FGrab Texture From Document – Shift+Ctrl+GDocument LayersClear Layer - Ctrl+NFill Layer - Ctrl+FBake Layer – Ctrl+BOn Layer thumbnail, toggle all layers on/off - Shift+ClickSelect layer on which clicked pi xol resides - ~+Click canvas (US) @+Click canvas (UK)Move layer contents up/down/sideways (X & Y)- ~+drag (US) @+drag (UK)MarkersPlace Marker - MRemove Marker – Ctrl+MCanvas ZoomActual Size - 0 [zero]Antialiased Half Size - Ctrl+0Zoom In - + [plus sign]Zoom Out - - [minus sign]TimelinePlace a new key frame - click on the TimelineSelect an existing key frame - click on the key frame dotZoom Timeline in/out - click on selected key frame dotMove selected key frame - click+drag dot to new position (dragging off end will delete)Store new data in existing key frame - Shift+Ctrl+click on the key frame dotDelete a key frame - click+drag dot off the TimelineCopy selected key frame - Shift+click on the Timeline at the point where you want the copyCopy multiple key frames - Shift+click on all the key frames dots to be copied, then Shift+click the Timelineat the point where you want the copiesCreate Transition key frame - Ctrl+click on an existing key frame dotCreate Rigid key frame - Alt+click on an existing key frame dotGo to Previous Camera key frame - LEFT ARROWGo to Next Camera key frame - RIGHT ARROWPlay the Timeline (will play as a loop) - Shift+click on the Timeline cursor Stop the Timeline playing - click EscRecord Timeline as a Movie - Shift+Ctrl+click on the Timeline cursor(set the cursor to the start first using the LEFT ARROW)MovieSnapshot to Movie– Ctrl+ Shift+! (US) Shift+Ctrl+PageUp (UK)RenderBest Preview Render (BPR) - Shift+RRender All - Shift+Ctrl+RCursor Selective Render – Ctrl+RCustom UI and ConfigurationMove item to custom interface position – Ctrl+Alt+drag (when Enable Customize is switched on)Remove item from custom interface position – Ctrl+Alt+drag to Canvas (when Enable Customize is on)Store Configuration File - Shift+Ctrl+ILoad User Interface Configuration File - Ctrl+LSave User Interface Configuration File - Shift+Ctrl+Alt+IZScriptsLoad ZScript - Shift+Ctrl+LReload ZScript - Ctrl+UShow/Hide ZScript window - H。
T ——开始雕刻模型ctrl+n ——清空画布
ctrl+d ——增加网格数(网格数越多模型越精细)
ctrl+z ——撤销操作
alt+鼠标左键——移动模型
alt+鼠标左键,再放开alt ——缩放模型
画布空白处按下鼠标左键——旋转模型
shift+f ——显示模型网格
遮罩建立子物体 SUB TOOL ->EXTRENT -> accept
隐藏,显示CTRL+SHIFT + 框选
取消隐藏,空白处点击,CTRL+SHIFT
放大缩小+- ; CTRL+ 右键
视图操作{平移,缩放,旋转}
旋转--------鼠标左键
平移视图--------Alt+左键
缩放------alt+左键(后)释放alt 进行拖拉或+-号缩放
Shift+左键正视图
Shift + p 显示底部栅格栏
Shift + f 显示物体网格
对象操作
ALT+点击------------------ 物体切换
X ------------------------------切换笔刷x对称雕刻
空格键--------------------- 笔刷常用属性
S -------------------------------笔刷大小
Alt------------------------------笔刷凹凸切换
笔刷快捷键点制----------- ctrl+alt + 点击笔刷
平滑笔记---------------------shift
遮罩笔刷----------------------ctrl (反选:在空白处点击,取消:在空白拉一画框)
细分----------------------------ctrl+d
降低细分—------------------shift+d
增加细分---------------------d
隐藏---------------------Ctrl+shift+鼠标拖拉范围
隐藏--------------------ctrl+shift+alt +鼠标拖拉
显示隐藏-------------ctrl+shift +空白处
F-------------------------显示物体
常用笔刷:stand,clay,mov
01 同时按Alt+Ctrl键,不松手,单击需自定义笔刷的图标。
这时笔刷已进入自定义快捷键模式,按照自己的习惯设置快捷键,如图所示。
[小提示]:快捷键只限于字母键盘上方的1~0键。
02 设定完成后,单击Preferences[首选项]菜单>Hotkeys[热键]面板>Store[储存]按钮,将笔刷快捷键保存,
给笔刷设定好快捷键后,在雕刻的时候就会方便、快捷许多,可以省去很多找笔刷的时间,大大提高工作效率。