DMPTV并列切换装置说明书
- 格式:pdf
- 大小:436.22 KB
- 文档页数:24
使用手册五通道切换台HDS7105PVER 1.02HDS7105P安全须知如果忽视这些注意事项,可能导致人员伤害或伤亡,可能导致设备损坏、数据丢失、设备性能降低或不可预知的结果。
电器安全特性● 为避免可能的电击造成严重损害,在搬动产品之前,请先将电源线暂时从产品电源接口处移除。
● 当您需要加入新的硬件到产品中或移除产品中现有硬件时,请务必先关闭产品电源。
条件允许的情况下,建议将电源线暂时从产品接口处移除。
● 使用前应确认产品是否已接地,电源电压是否已调整到产品适用的范围内。
否则将可能导致产品以外损坏、性能降低或不可预知的结果。
● 请勿使用松动或损坏的电源插座或在手潮湿的时候接触电源插座,否则将有触电和起火的危险。
● 若听到电源线和电源接口处有噪音,请立即拔下电源线,并向您的销售代表寻求帮助,否则将有起火或触电的危险。
● 若如有异物或液体进入产品或需要清洁产品时,请从产品上移开电源线以及其他的任何电缆线,否则将有触电、起火和损坏产品的危险。
● 若电源已损坏,请不要尝试自行修复。
请联系专业技术服务人员或经销商来处理。
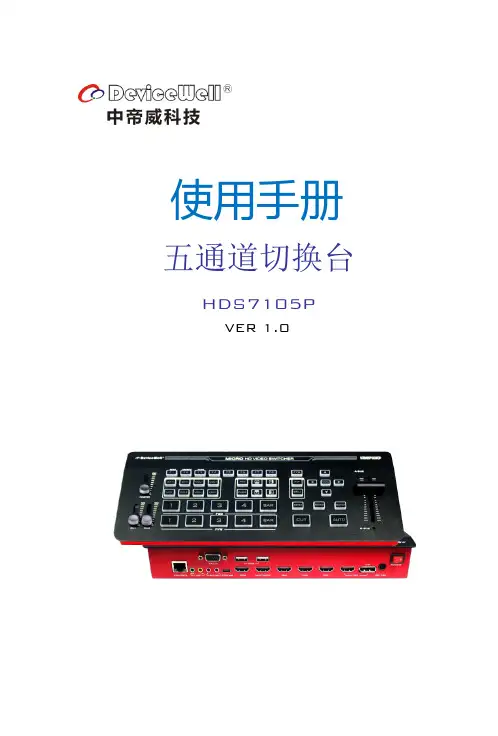
3目录1.概述………………………………………………………………………………………...04 1.1 产品介绍………………………………………………………………......042.功能特性…………………………………………………………………………….…. .052.1 设备尺寸...............................................................................06 3.接口规格说明......................................................................................07 3.1 接口介绍...............................................................................07 3.2 TALLY 接口............................................................................08 3.3 接口参数...............................................................................09 4.控制面板及接口..................................................................................10 4.1 控制面板.. (10)4.1.1 分区说明........................................................................10 4.1.2 按键说明 (11)4.1.2.1功能区.................................................................11 4.1.2.2 音频控制区.. (11)4.1.2.3 转场特效控制区................................................14 4.1.2.4 综合控制区........................................................15 4.1.2.5 PGM 与PVW 的选择. (17)5.系统菜单设置.......................................................................................20 B 接口对接OBS 软件说明.............................................................21 7.切换台软件控制...................................................................................25 8. 同步地区时间和升级固件操作说明.............................................. 29 9.故障及维修............................................................................................34 10.更多切换台选择. (35)4中帝威(DeviceWell)高清视频切换台HDS7105P ,采用便携式一体化设计,金属外壳,体积小重量轻,标准尺寸:280mm*110mm*47mm ,可适用于小型外出场景的视频特效切换需求。
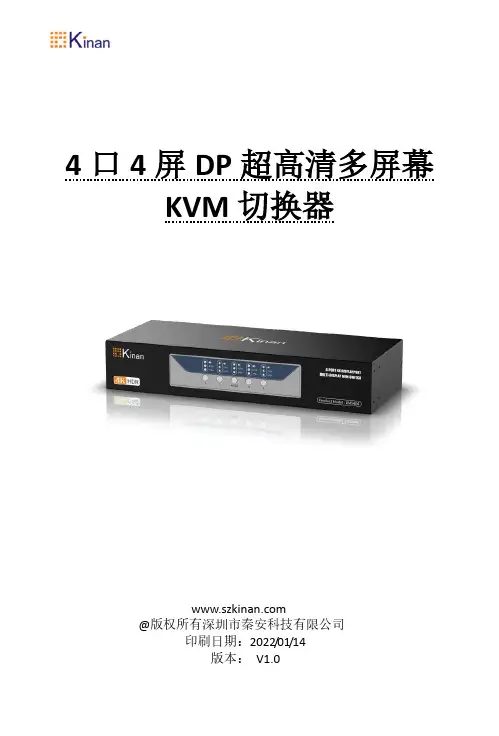
4口4屏DP超高清多屏幕KVM切换器@版权所有深圳市秦安科技有限公司印刷日期:2022/01/14版本:V1.0用户信息电话支持有关电话支持,请拨打此号码:用户通知本手册中包含的所有信息,文档和规格如有更改,恕不另行通知。
制造商对本文档的内容不作任何明示或暗示的陈述或保证,特别是对于适销性或对任何特定目的的适用性不作任何保证。
本手册中描述的任何制造商的设备均按原样出售或许可。
如果设备在购买后人为损坏,则买方(而不是制造商,其分销商或经销商)应承担全部必要的修理费用以及由于设备缺陷引起的任何附带或间接损失的全部费用。
如果在操作之前未选择正确的操作电压设置,则制造商对系统操作中造成的任何损坏概不负责。
使用前请确认电压设置正确无误。
目录用户信息 (1)电话支持 (1)用户通知 (1)第一章介绍 (3)产品描述 (3)产品特性 (4)要求 (5)组件 (6)DM系列前面板 (6)LED状态面板 (7)后面板 (8)第二章硬件设置 (9)安装 (9)DM5404连接示意图 (10)DM5404级联拓展示意图 (10)第三章热键操作 (11)产品技术规格 (13)DM系列产品选型 (14)第一章介绍产品描述DM5404切换器是一款支持四进四出超高清分辨率的KVM切换器,允许用户使用一套USB 键盘、鼠标切换访问四台四个DP显示(通过级联最多8显示)接口的计算机。
输入支持DisplayPort1.2接口,输出为HDMI接口。
提供1个USB2.0集线器和 2.1 声道音频,支持丰富的低音环绕声。
支持4K UHD @ 60 Hz 和4K DCI @ 60Hz分辨率,显示生动的高清图像,同时为音乐、电影和游戏提供优质音效。
DM5404切换器除了支持前面面板按钮、热键和鼠标端口切换功能,还可以使用串行命令以帮助切换端口和配置设备设置。
切换器内置USB 2.0集线器,可以连接USB 外围设备。
支持显示动态同步,可以优化屏幕显示分辨率、降低切换端口的时间,并确保切换不同端口时,屏幕能保持现有显示状态(切换端口时,在延伸屏幕上开启的窗口不会还原成它们在主屏幕的默认设定)。
全自动音视频切换器功能说明全自动音视频切换器提供音频、视频信号自动切换功能,有2路信号输入:1路是房间VOD或LD,另1路是公共视频(背景视频BGV),2路信号输出:1路主电视机另1路监控电视机,主信号优先输出,主信号未有或切换器的电源未开时,切换器输出公共(背景BGV)视频信号.全自动音视频切换器分两种:1、只检测视频(没有视频输入不能切换).检测视频型:主信号出现视频信号时,切换器将切换到主信号,输出主信号视频和音频.当主信号视频信号消失时,切换器自动切换输出公共视频信号.2、同时检测音、视频(只有单一输入视频或音频都能切换).检测音、视频型:当主信号无论有音频或视频信号,切换器都能切换优先输出主信号,主信号视频没有时只要有音频仍是输出主信号,只要音频信号消失约4秒左右,切换器自动切换到公共(背景)视频信号.手动音视频切换器功能说明手动音视频切换器提供音频、视频信号手动切换功能,有2路信号输入(公共视频、主信号碟机或VOD),有2路信号输出:1路信号输出到主电视机,另1路可以接到监控电视机,通过遥控键盘的配合,选择控制两路相互切换的信号切换到电视机.全自动音视频切换器不能切换的工作点调整全自动音视频切换器简称切换器,它是根据国际视频标准1V峰峰值和先锋系列输出直流电0.4V设计,它是可以在-0.2V至+0.6V直流电压下正常工作,而现在某些视频解压卡是直流输出电压高于0.6V,至使切换器无法正常工作,因此必须对切换器的工作点进行调整,调整方法如下:1、御下四粒螺丝,将盖打开。
2、正视看,右边中间有一个工作点调整元件,上面印有103字样,元件中间有一个“+”字型的槽,用螺丝刀进行调整。
3、整方法是将螺丝刀插在“+”上,然后轻轻地逆时针向左旋转弧长1-2mm,再用视频信号输入能否切换,如果不能继续调整(注意不能撬坏元件或损坏线路板)。
4、如果调整后仍不能切换,请寄回本公司进行调整.。
DMP800B说明书中文DMP800B系列微机保护控制装置操作说明甘肃·天水长成北方电网智能化2021年9月版权声明天水长成北方电网智能化保存修改本说明书的权利。
未经许可,任何单位和个人不得复制、摘抄或用于其它宣传目的!目录一.功能显示及操作 1二、常用保护对照表 8三、备字投使用说明 11四、接线原理图 12五、端子表 141.1. 主界面装置上电后,将显示主界面,如图〔1〕。
AVS-33 IN / 1 OUT HDMI SWITCHER Owner’s ManualConfirming the accessories3 Inserting the batteries5 Operating range of the remote control unit6 Part names and functions7 Front panel7 Rear panel8 Side panel9 Remote control unit10 ConnectionsConnections11 Basic connections11 Connecting an external control device14 OperationsOperations15 Operating with the HDMI control (CEC) function15 Operating with the remote control unit16 Operating with the AVR control function17 TroubleshootingTroubleshooting20AppendixTrademark information23 SpecificationsSpecifications24Thank you for purchasing this Denon product.To ensure proper operation, please read this owner’s manual carefully before using the product. After reading this manual, be sure to keep it for future reference. Confirming the accessoriesCheck that the following parts are supplied with the product.0There are 5 types of supplied AC adapter plugs. Use the plug appropriate to the region you live in.2Confirm that the direction of the battery is correct and then insert the battery.Battery (CR2032)battery. In this case, there is a risk of burn when the liquid comes in contact with skins or clothes, so a great care should be taken. If the liquid accidentally comes in contact, wash with tap water and consult a doctor.0Remove the batteries from the remote control unit if it will not be in use for long periods.Operating range of the remote control unitPoint the remote control unit at the remote sensor when operating it.Front panelA Remote control sensorThis receives signals from the remote control unit. (v p. 6)Point the remote control unit at this sensor when operating it.B HDMI input indicators (HDMI INPUT 1 - 3)The number of the HDMI input that is currently selected is lit.This is lit as follows according to the power status of this unit:0Power on: Blue 0Standby: Red0The power of this unit is linked to the power status of the HDMI devices connected to HDMI connectors 1 to 3 and automatically turns on.0When the HDMI CONTROL switch is OFF:Links to the power of the device that is connected to the currently selected HDMI input.0When the HDMI CONTROL switch is ON:Links to the power of the devices that are connected to HDMI connectors 1to 3.C Input switching button (INPUT)This selects the HDMI input.When the button is pressed, the HDMI input switches.Rear panelA Remote control jack (REMOTE CONTROL (FLASHER) IN)This jack can be used to connect and control this unit externally with a separately sold IR repeater when this unit is positioned where the remote control signal cannot reach.Refer to “Connecting an external control device” (v p. 14) for how to connect.NOTE0This will disable remote sensor reception of this unit.B HDMI input connectors (HDMI IN 1 - 3)These connect game consoles, media players, or other HDMI source devices.C HDMI output connector (HDMI OUT)This outputs the selected HDMI input signal.D DC input connector (DC IN)This connects the supplied AC adapter.Using an AC adapter other than the one supplied may cause fault.Side panelA AVR control switch (AVR CONTROL)You can use the remote control unit for your Denon AV receiver/AV amplifier to switch the HDMI input of this unit.If using the HDMI control (CEC) function or the supplied remote control unit to change the HDMI input of this unit, keep this switch turned OFF. If using the AVR control function, it is necessary to change the settings and connections from the AV receiver/AV amplifier in advance. Refer to “Operating with the AVR control function” (v p. 17) for more information.B HDMI control switch (HDMI CONTROL)If using the HDMI control (CEC) function, turn this ON. This links to devices compatible with HDMI control (CEC) and changes the HDMI input of this unit.Refer to “Operating with the HDMI control (CEC) function” (v p. 15) for how to operate using the HDMI control (CEC) function.Remote control unitA HDMI input source select buttons (1 - 3)These select the HDMI input.Basic connectionsGame console(sold separately)1Use separately sold HDMI cables to connect game consoles or other source devices to HDMI inputconnectors 1 to 3 of this unit.2Use the supplied HDMI cable to connect an 8K-compatible HDMI input connector of an AV receiver/AV amplifier to the HDMI output connector of this unit. 3Connect the supplied AC adapter.0When connecting this unit to devices that are compatible with the 8K and 4K 120Hz video, use certified Ultra High Speed HDMI cables. If you use a different HDMI cable, the video may not be displayed or other problems may occur.o When mounting this unit to a wallYou can use the supplied wall-mount bracket to mount this unit to a wall.To ensure your safety, ask a professional to mount it to the wall.0When you mount this unit to a wall, use a commercially available IR repeater (separately sold) to receive signals from the remote control. Refer to “Connecting an external control device” (v p. 14) for more information.NOTE0When you mount the wall-mount bracket to this unit, be sure to use the supplied self- tapping screws. Using screws other than those supplied may cause fault.0To prevent people from accidentally pulling or tripping over the connector cable and causing this unit to fall over, be sure to fix the cable to a wall or other location. After mounting, be sure to confirm that it is safe. Also, perform regular inspections to confirm that there is no possibility of falling.0Denon does not bear responsibility for any injuries or accidents due to inappropriate mounting locations or mounting methods.1Mount the wall-mount bracket to this unit using the supplied screws.Attach the wall-mount bracket with the side with the u mark facing outward.2Fix this unit to the wall using separately sold wall-mount screws.Connecting an external control deviceEven if you put this unit in a cabinet or another location where the remote control signal cannot reach, if you connect a commercially available IR repeater (separately sold), you can operate this unit using the remote control unit.This will disable remote sensor reception of this unit.This unitMonaural mini-plug cable (Sold separately)Universal remoteorOperate using one of the following methods.Operating with the HDMI control (CEC) function1Turn the HDMI CONTROL switch on the side panel of this unit ON.2Turn on the power of all source devices (such as game consoles) connected to this unit with HDMI cables, the AV receiver/AV amplifier, and the TV.3Enable the HDMI control (CEC) function for all devices.0For source devices that have settings to link to other devices andturn them on when the source device power is turned on, enablethose settings. Refer to the manual for each device for moreinformation about the settings.4Turn the power of the TV to standby, and then confirm that the power of this unit, the source devices, and theAV receiver/AV amplifier also turn to standby.If the power is turned off for all source devices connected to this unit, the HDMI input indicators of this unit are lit in red.5Turn on the power of the source device you want to use, and then confirm that the power of this unit, theAV receiver/AV amplifier, and the TV turn on, and thatthe HDMI input switches correctly.The indicator for the selected HDMI input is lit in blue.0If the source device has an auto standby function, it is recommended to enable the auto standby function so that the power turns off automatically when not in use.0Depending on the specifications of the source device or TV that is connected, some functions may not be available.Operating with the remote control unit 1Turn on the power of the source device you want to use.2On the supplied remote control unit, press the HDMI input source select button (1 to 3) to perform playback.The indicator for the selected HDMI input is lit in blue.0You can also select an HDMI input by pressing the INPUT buttonon the main unit.3Switch the input source for the AV receiver/AV amplifier to the HDMI input connected to this unit.4Switch the input for the TV to the HDMI input connected to the AV receiver/AV amplifier.Operating with the AVR control functionIf you have an 8K-compatible Denon AV receiver/AV amplifier, you can use the remote control unit for the AV receiver/AV amplifier to switch the HDMI input for this unit.The 8K, GAME, and MEDIA PLAYER buttons on the remote control unit for the AV receiver/AV amplifier can be used to switch the HDMI input for this unit as follows.NOTE0This function cannot be used on the AVR-X8500H, AVC-X8500H, AVR-X8500HA, or AVC-X8500HA. It is recommended to use the learning function on the remote control unit for the AV receiver/AV amplifier.If you want to use the AVR control function, change the settings and connections for the AV receiver/AV amplifier according to the following procedure.o Positioning1Turn the AVR CONTROL switch on the side panel of this unit ON.2Position this unit close to your AV receiver/AV amplifier so that the remote control sensor on this unit canreceive remote control signals from the AV receiver/AV amplifier.This unitAV receiver /o Connecting1Connect the source devices connected to the HDMI input connectors for 8K, GAME, and MEDIA PLAYER on the back of the AV receiver/AV amplifier to HDMI input connectors 1 to 3 on this unit.2Connect the HDMI output connector on this unit to an 8K-compatible HDMI input connector on the AV receiver/AV amplifier.0The number of the 8K-compatible HDMI input connector varies depending on the specifications of AV receiver/AV amplifier. Connect after referring to the manual for AV receiver/AV amplifier.0When connecting this unit to devices that are compatible with the 8K and 4K 120Hz video, use certified Ultra High Speed HDMI cables. If you use a different HDMI cable, the video may not be displayed or other problems may occur.Game consoleo Configuring the settings for an AV receiver/AV amplifier1Open the “Inputs” - “Input Assign” settings screen from the menu for the AV receiver/AV amplifier.2Configure the settings to assign 8K-compatible HDMI connectors (6(8K) or 7(8K))z to the HDMI inputconnectors of the 8K, Game, and Media Player inputsources.z The 8K-compatible HDMI connectors vary depending on the specificationsof your AV receiver/AV amplifier. Configure the settings according to the specifications of AV receiver/AV amplifier.o Operating1Press the 8K, GAME, or MEDIA PLAYER button on the remote control unit for the AV receiver/AV amplifier.The inputs for this unit and for the AV receiver/AV amplifier switchsimultaneously. The HDMI input for this unit that corresponds to the signal received from the button is selected.This unitAV receiver /If a problem should arise, first check the following:1.Are the connections correct?2.Is the set being operated as described in the owner’s manual?3.Are the other devices operating properly?0If steps 1 to 3 above do not improve the problem, restarting the device may improve the problem.Remove and re-insert the power cord of the unit.If this unit does not operate properly, check the corresponding symptoms in this section.If the symptoms do not match any of those described here, consult your dealer as it could be due to a fault in this unit. In this case, disconnect the power immediately and contact the store where you purchased this unit.o Power does not turn on / Power is turned off0Confirm that the AC adapter is plugged into the outlet.0Check all connections to HDMI connectors.0Check whether the adapter plug for the AC adapter is attached correctly to the AC adapter.0Use the AC adapter supplied with this unit.0Confirm that the power is turned on for the source device connected to the selected HDMI input. The power for this unit is linked to the power of the source device connected to the HDMI input connector, and automatically turns on or to standby.o Power automatically turns off0This unit is linked to the power of the source device connected to the HDMI input connector, and automatically turns to standby.o Operations cannot be performed through the remote control unit0The battery is used up. Replace it with a new battery (CR2032).0Operate the remote control unit within a distance of about 23 ft/7 m from this unit and at an angle of within 30°.0Remove any obstacle between this unit and the remote control unit.0The orientation of the coin type lithium battery (CR2032) is incorrect. Confirm that the q mark on the battery is facing upward.0The set’s remote control sensor is exposed to strong light (direct sunlight, inverter type fluorescent bulb light, etc.). Move the set to a place in which the remote control sensor will not be exposed to strong light.0This will disable remote sensor reception of this unit.o No video is shown on the TV0Check the connections for all devices.0Insert connection cables all the way in.0Check whether you have mistaken the HDMI input connector for the HDMI output connector or vice versa.0Confirm that the power of the source device is turned on.0Confirm that the correct inputs are selected for this unit, the AV receiver/AV amplifier, and the TV.0Confirm that the resolutions of the source device and the TV are correct.0When enjoying content that is copyright-protected with HDCP 2.2 or HDCP 2.3, use a source device and TV that are compatible with HDCP 2.2 or HDCP 2.3.0Use a certified Ultra High Speed HDMI cable to enjoy 8K or 4K 120Hz videos.o Inputs of this unit cannot be switched with the HDMI control (CEC) function0Check whether the HDMI CONTROL switch on the side panel of this unit is turned ON.0Check whether the HDMI control function settings are enabled for all devices connected to this unit. In the settings for the connected source devices, if there are settings to link to and turn on other devices when the power is turned on, enable those settings as well.0The specifications for HDMI control vary by device. If the source device has an auto standby function, it is recommended to enable the auto standby function so that the power turns off automatically when not in use.0When you make connection related changes such as connecting an additional HDMI device, the link operation settings may be initialized. Turn off this unit and devices connected via HDMI, and turn them on again.0Depending on the connected devices and settings, the HDMI control function may not work. If the problem is not fixed even after confirming the above, use the remote control unit to change the inputs for this unit directly.o The inputs for this unit change when this unit receives the signals of the remote control supplied with the AV receiver/AV amplifier0The AVR CONTROL switch on the side panel of this unit is turned ON. If you do not want to use it, turn the switch OFF.o VideoResolution:480i, 480p, 576i, 576p, 720p 50/60, 1080i 50/60, 1080p 24/25/30/50/60/100/1204K 24/25/30/50/60/100AB/120AB, 8K 24AB/25AB/30AB/50AB/60AB Color:Deep Color, x.v. Color, Adobe RGB, Adobe YCC601, sYCC601, BT.2020HDR:HDR10, HDR10+, Dynamic HDR, Hybrid Log-GammaHDMI features:HDMI control (CEC), 3D, ALLM (Auto Low Latency Mode), VRR (Variable Refresh Rate),QMS (Quick Media Switching), QFT(Quick Frame Transport) Maximum data rate:40 GbpsHDCP Compliance:HDCP 1.4/2.3o AudioAudio Format:LPCM (2ch, 7.1ch) / Dolby Digital / DTS / Dolby Atmos / Dolby TrueHD /Dolby Digital Plus / DTS:X / DTS-HD Master Audio / DTS-HD High Resolution Audio /DTS Express / DSD / MPEG-2 AAC / MPEG-4 AAC / MPEG-H(Works with all audio formats supported by the connected AV receiver/AV amplifier)o AC adapterManufacturer:CUI INCAddress:20050 SW 112th Ave. Tualatin, OR 97062 Model identifier:SMI5-5-V-I38-C9Input voltage:AC 100 - 240 VInput AC frequency:50/60 HzOutput voltage: 5.0 VOutput current: 1.0 AOutput power: 5 WAverage active efficiency:75.5 %Efficiency at low load (±10 %):74.3 %No-load power consumption:0.075 Wo GeneralOperating temperature:41 °F - 95 °F (5 °C - 35 °C)Power supply:AC 100 - 230 V, 50/60 HzPower consumption: 2.3 WPower consumption in standby mode:0.2 WFor purposes of improvement, specifications and design are subject to change without notice.o Dimensions (Unit : in. (mm))n When mounting a wall-mount bracketo Weight: 0.7 lb (300 g) (When not mounting a wall-mount bracket)3520 10816 00AD©2021 Sound United. All Rights Reserved.。

高清导播切换台系统导播、字幕、直播、视频会议产品介绍1.简介:1.1.系统简介是一套具备广电一体机功能的软件系统,可替代硬件完成切换台、字幕机、调音台、硬盘播出系统、虚拟演播厅、录像机、线性编辑系统、信息电视制作系统等的工作,适用于活动实况、广电系统、网络直播、视频会议等的现场采编录播和后期视频制作、录制,可生成MP4、TS、ASF、WMV、FLV、AVI等格式文件,为互联网、教育、广电系统、政府、企业多媒体信息化建设的首选方案。
1.2.功能简介输入--视频源多路录制 支持导播录像、各实体通道录像。
支持MP4、ASF、FLV、AVI、WMV、TS文件录像格式。
支持1920*1080、1280*720、960*540、720*408、640*360、480*272等分辨率,1~30FPS帧率、256Kbps~32Mbps码率,且可扩展。
支持录像文件自动同步到资源平台。
1.2.1.实时切换效果支持所有输入通道中任意两个切换。
带有擦除、滑行、卷页、溶解、画中画等十六种特效切换,在以后的升级中,将持续增加特效切换模式。
1.2.2.台标时间叠加:最多支持四个角标,角标大小和位置可以任意调节。
支持画面当前时间叠加,常用于部分需要时间标识的录像应用,例如审庭审、审讯、约谈应用。
1.2.3.字幕支持字幕发布、字幕位置可调。
字幕可以通过文件加载也可以手动输入。
字体可以设置,支持大量的字体效果。
1.2.4.虚拟演播厅具有易用的抠像功能,虚拟背景支持采集的实时视频、播放的视频文件、图片支持蓝、红、绿3色背景抠像及三色混合抠像,完美实现虚拟演播厅效果。
简单易用,抠像效果好。
支持透明度和阀值调节,支持抠区域排除和区域选择功能。
1.2.5.直播支持导播画面直播,支持1920*1080、1280*720、960*540、720*408、640*360、480*272等分辨率,1~30FPS帧率、256Kbps~32Mbps码率,且可扩展。

d m p3300系列变压器保护测控装置说明书精品好文档,推荐学习交流DMP3300系列微机变压器保护测控装置技术说明书(V2.02)南京磐能电力科技股份有限公司2014年3月目录1 概述 (1)1.1 环境条件 (1)1.2 额定参数 (1)1.3 技术性能 (2)1.4 测量误差 (3)1.5 过载能力 (3)1.6 绝缘性能 (3)1.7 电磁兼容性能 (3)1.8 机械性能 (4)1.9装置结构 (5)1.10 用户安装调试说明 (8)1.11 使用说明 (11)1.12装置尺寸和安装开孔图 (16)1.13 产品功能简介 (16)1.14 订货须知 (19)2 DMP-332X变压器差动保护测控装置 (19)2.1 装置的基本配置 (19)2.2 保护逻辑原理 (21)2.3 定值清单及整定说明 (24)2.4装置背面端子图,原理接线图及背面端子说明 (29)3 DMP-332X-OL变压器差动保护测控装置 (39)3.1 装置的基本配置 (39)3.2 保护逻辑原理 (40)3.3 定值清单及整定说明 (44)3.4装置背面端子图,原理接线图及背面端子说明 (51)4 DMP-3323变压器后备保护测控装置 (60)4.2 保护逻辑原理 (61)4.3 定值清单及整定说明 (71)4.4装置背面端子图,原理接线图及背面端子说明 (75)5 DMP-3324变压器后备保护测控装置 (80)5.1 装置的基本配置 (80)5.2 保护逻辑原理 (81)5.3 定值清单及整定说明 (91)5.4装置背面端子图,原理接线图及背面端子说明 (96)6 DMP-3325变压器后备保护测控装置 (101)6.1 装置的基本配置 (101)6.2 保护逻辑原理 (102)6.3 定值清单及整定说明 (110)6.4装置背面端子图,原理接线图及背面端子说明 (114)1 概述 (121)1.1 适用范围 (121)1.2 基本配置 (121)2 技术参数 (122)2.1 额定参数 (122)3装置的工作原理 (122)3.1 DMP3303-1断路器操作模件 (122)3.2 DMP3303-C非电量保护接点重动模件 (123)4装置接线原理图、端子图 (123)4.1 装置的安装开孔图 (123)5调试大纲 (128)5.1调试注意事项 (128)5.2装置通电前检查 (128)5.4继电器接点校验 (128)5.5跳合闸电流保持试验 (129)6订货须知 (129)1 概述DMP-3300系列微机保护测控装置是南京磐能电力科技股份有限公司总结了在电力行业多年研制开发经验和工程技术积累,通过采用最新软硬件技术,推出的成熟产品。
向日葵“无碟王”车载多媒体影音播放器使用说明书(型号:DMP-780)在连接、操作或是调整本产品之前,请仔细阅读下面的介绍。
请保留本手册以备将来参考。
目录1. 功能特点1.1主要特征 (2)2. 主要功能描述2.1面板定义说明 (3)2.2功能菜单说明 (4)3. 基本功能操作3.1状态切换 (5)3.2开机播放 (5)3.3快速向前/向后播放 (5)3.5选择曲目 (5)3.6选择字幕语言 (5)3.7选择音频通道 (5)3.8显示状态 (5)3.9音量控制 (6)3.10高音、低音、左右平衡和响度 (6)3.11播放WMA,MP3等格式文件 (6)4. 收音功能操作4.1选择收音功能 (8)4.2全局搜索自动存储电台 (8)4.3自动搜索电台 (8)4.4手动搜索电台 (8)4.5收听已存储的电台 (8)4.6音量和音效等控制 (8)4.7立体声单声道切换 (8)5. 外接输入操作5.1选择外接输入功能 (9)5.2音量、静音和音效控制 (9)6. 常见问题提示 (10)7. 规格参数 (11)8. 附件 (12)9. 连接图 (12)功能特点1.1主要特征:1 本播放器为标准IN-DASH 尺寸;2 本播放器无机芯,可通过USB接口接U盘,移动硬盘等,另支持SD卡;(可播放CD, MP3,WMA,MPEG-2,MPEG-4等文件格式)3 带调频/调幅收音机,FM频率范围:87.5~108MHz;AM频率范围:522~1620KHz;4 断电记忆功能:当电源突然断掉时,重新开机,机器将从上次断电前那一曲/点播放,而不是从头播放;5 2通道模拟音频输入;6 一路视频输入(可外接倒车摄像头)7 前面板上带AUX IN输入插孔;8 FM可预存30个台,AM可预存12个台;9 2.5寸TFT屏显示;9 阻抗4 Ω时,最大输出4 x 45 W ;10 无机芯设计,有效解决防尘与散热方面的问题;11 全功能面板操作,方便快捷;注意事项:使用时,请在电脑上用FAT32或FAT的格式格式化硬盘/U盘或SD卡,本机暂不支持NTFS格式的文件系统!且硬盘不要分成几个盘区,多分区硬盘可能会导致部分文件无法读到的现象!主要功能描述2.1面板定义说明:1. 上一曲键(在进入多功能菜单时为功能键)2. 播放快退键(在进入多功能菜单时为功能键)3. 播放/暂停键(在进入多功能菜单时为功能键)4. 状态切换键(在同时接上SD卡与USB设备时,按住此键可以在SD卡与USB设备之间切换)5. 下一曲键(在进入多功能菜单时为功能键)6. 播放快进键 (在进入多功能菜单时为功能键)7. 停止键(在进入多功能菜单时为功能键)8. BAND键(在播放状态时为多功能菜单键)在FM/AM状态时为选择波段;在播放USB/SD状态时为多功能菜单选择键,播放时按该键进入数字选曲菜单;再次按该键进入播放设置菜单。
DMP3300系列频率电压紧急控制装置技术说明书(V2.0)南京磐能电力科技股份有限公司1概述 (2)1.1 适用范围 (2)1.2 基本配置 (2)1.3 DMP3300系列电容器保护装置功能一览表 (3)2技术参数 (3)2.1额定参数 (3)2.2 主要技术性能 (3)2.3测量系统及遥信精度 (4)3装置的工作原理 (4)3.1三段定时限过流保护 (4)3.2过电压保护 (6)3.3母线失压保护 (6)3.4不平衡电压保护 (8)3.5不平衡电流保护 (10)3.6小电流接地选线...................................................................................... 错误!未定义书签。
3.7 PT、CT断线告警 ................................................................................... 错误!未定义书签。
3.8辅助功能 (12)4装置定值整定及接线原理图、端子图 (12)4.1装置的安装开孔图 (12)4.2 DMP3331电容器保护测控装置 (12)4.2.1装置背板端子图及原理接线图 (12)4.2.2定值清单 (13)4.3 DMP3332电容器保护测控装置 ............................................................ 错误!未定义书签。
4.3.1装置背板端子图及原理接线图........................................................... 错误!未定义书签。
4.3.2定值清单............................................................................................... 错误!未定义书签。
SUNFLOWER向日葵无碟王车载多媒体影音播放器使用说明书(型号:DMP-800)在连接、操作或是调整本产品之前,请仔细阅读下面的介绍。
请保留本手册以备将来参考。
目录1. 功能特点1.1主要特征 (2)2. 主要功能描述2.1面板定义说明................................................. . (3)2.2遥控器说明 (4)3. 基本功能操作3.1状态切换 (6)3.2开机播放 (6)3.3选择外部设备 (6)3.4选择文件类型 (6)3.5电影\音乐播放 (7)3.6图片播放 (8)3.7播放设置 (9)3.8选择音频通道 (9)3.9选择字幕 (9)3.10设置显示模式 (9)3.11显示状态 (9)3.12音量控制 (10)3.13设置音效 (10)4. 收音功能操作4.1选择收音功能 (10)4.2全局搜索自动存储电台 (10)4.3手动搜索电台 (10)4.4手动微调电台频率 (10)4.5收听已存储的电台 (10)4.6音量和音效等控制 (11)4.7立体声单声道切换 (11)5. 外接输入操作5.1选择外接输入功能 (11)5.2音量、静音和音效控制 (11)6.显示/调整时钟6.1显示时钟 (12)6.2调整时钟 (12)7. 文件管理操作7.1文件复制\拷贝操作 (12)18. 常见问题提示 (13)9. 规格参数 (14)10. 附件 (15)11. 连接图 (15)功能特点1.1主要特征:1 本播放器为标准IN-DASH 尺寸,自带3.5寸TFT显示屏。
2 支持SD/SDHC卡,高速USB2.0接口兼容各种U盘、USB读卡器、移动硬盘等。
支持热插拔。
3 视频播放支持多种文件格式:RM,RMVB,AVI、DVD(VOB文件)MPEG-1、MPEG-2,MP4、VOB、MOV、DAT等。
可以方便播放目前网络普遍存在的RM、RMVB格式的电影。
DMP3300系列电压并列装置技术说明书(V2.0)南京磐能电力科技股份有限公司目录1 概述 (1)1.1 适用范围 (1)1.2 基本配置 (1)2 技术参数 (1)2.1额定参数 (1)3装置的工作原理 (1)3.1 DMP3304电压并列模件 (1)4装置接线原理图、端子图 (2)4.1装置的安装开孔图 (2)4.2 DMP3304电压并列装置 (2)4.2.1装置背板端子图及原理接线图 (2)4.3 DMP3304A电压并列装置 (5)4.3.1装置背板端子图及原理接线图 (5)5调试大纲 (8)5.1调试注意事项 (8)5.2装置通电前检查 (9)5.3绝缘检查 (9)5.4继电器接点校验 (9)5.5跳合闸电流保持试验 (9)6订货须知 (9)DMP3300系列电压并列装置1 概述1.1 适用范围DMP3300系列电压并列装置适用于双母线或单母线分段方式中母线PT的保护电压、计量电压的并列。
1.2 基本配置根据工程需要,DMP3304装置可配置总数不多于四块的电压并列板。
1)主要功能每一块电压并列板具有两组电压并列继电器,可同时实现保护电压和测量电压并列功能。
a) PT二次电压采入本装置后,通过由PT隔离刀闸及分段断路器辅助触点组合起动的重动继电器(并列继电器)接点,实现二次电压的并列。
b) 本装置可通过外接的遥控接点实现远方遥控电压并列,遥合脉冲起动并列回路,遥跳脉冲起动复归回路。
c) 在二次电压实现并列的同时,有并列信号接点开出。
d) 二次电压并列指示灯。
2 技术参数2.1额定参数1)直流电源:220V或110V(订货注明)。
允许偏差:+15%,﹣20%2)技术性能:所有出口跳闸触点:最大允许通过电流8A,最大切断电流0.9A(DC220V,时间常数L/R为5ms±0.75的感性负载)操作回路跳合闸电流采用自适应模式,无需选择。
(0.5A以上)3)环境条件:●正常工作环境的温度正常工作温度:-10℃~55℃极限工作温度:-25℃~75℃●相对湿度:45%~90%●大气压力:80~110KPA4)绝缘耐压:直流输入对地:大于100兆欧信号及输出触点对地:大于100兆欧能承受2KV/1min的工频耐压,5KV的冲击电压。