ABB机器人权限设定.pdf
- 格式:pdf
- 大小:244.11 KB
- 文档页数:10

ABB机器人权限设定_NewABB机器人权限设定UAS介绍及设定一:在电脑上安装与ROBOT系统同样或更高的版本的ROBOT WARE 和 ROBOTSTUDIO软件,如果版本低于系统则连接不上。
二:用ABB配的网络线,连接PC 与机器人;pc上设自动获取IP;如下图F端口;三:在pc上打开ROBOTSTUDIO软件,并点击在线,如下图:四:点击:“添加控制器”—》“一线连接”——》如果接上会出现机械人的序列号——》在机器人的序列号上点击右键——》“请求写权限”——在示校器上点击“同意”五:UAS概述控制器用户授权系统(UAS),该系统规定了不同用户对机器人的操作权限。
该系统能避免控制器功能和数据的未授权使用。
用户授权由控制器管理,这意味着无论运行哪个系统控制器都可保留 UAS 设置。
这也意味着 UAS 设置可应用于所有与控制器通信的工具,如 RobotStudio 或 FlexPendant。
UAS 设置定义可访问控制器的用户和组,以及他们授予访问的动作。
用户UAS 用户是人员登录控制器所使用的帐户。
此外,可将这些用户添加到授权他们访问的组中。
每个用户都有用户名和密码。
要登录控制器,每个用户需要输入已定义的用户名和正确的密码。
在用户授权系统中,用户可以是激活或锁定状态。
若用户帐号被锁定,则用户不能使用该帐号登录控制器。
UAS管理员可以设置用户状态为激活或锁定。
默认用户所有控制器都有一个默认的用户名Default User和一个公开的密码robotics。
Default User无法删除,且该密码无法更改。
但拥有管理 UAS 设置权限的用户可修改控制器授权和Default User的应用程序授权。
用户组在用户授权系统中,根据不同的用户权限您可以定义一系列登录控制器用户组。
您可以根据用户组的权限定义,向用户组中添加新的用户。
比较好的做法是根据使用不同工作人员对机器人的不同操作情况进行分组。
例如,您可以创建管理员用户组,程序员用户组和操作员用户组。
![ABB机器人操作手册(中文版)[8]](https://uimg.taocdn.com/02be8b70c950ad02de80d4d8d15abe23482f0308.webp)
ABB机器人操作手册(中文版)ABB操作手册(中文版)一、概述ABB是一种高性能、高可靠性、高灵活性的工业,广泛应用于汽车、电子、机械、化工、食品等行业的生产和加工过程中。
ABB可以实现多种功能,如焊接、切割、装配、搬运、喷涂、打磨等。
ABB由控制柜、操作盘、机械臂和末端执行器等部件组成,通过编程和控制系统实现各种动作和任务。
二、安全在安装、调试、操作和维护ABB时,用户必须遵守ABB公司和当地法律法规的相关要求,并采取必要的安全措施,如穿戴防护服装和设备,设置安全区域和警示标志,关闭电源和气源等。
在安装、调试、操作和维护ABB时,用户必须注意观察的运行状态和周围环境,并随时准备停止或紧急停止的运行,以防止发生危险或故障。
在安装、调试、操作和维护ABB时,用户必须避免与发生碰撞或挤压,并保持一定的距离,以防止受伤或损坏设备。
在安装、调试、操作和维护ABB时,用户必须禁止未经授权或培训的人员接近或触摸或其相关部件,并对其进行监督或指导。
在安装、调试、操作和维护ABB时,用户必须按照规定的程序和步骤进行,并避免任意修改或更改设备的参数或设置。
在安装、调试、操作和维护ABB时,用户必须定期检查设备的清洁度和完好度,并及时更换或修理损坏或磨损的部件。
如果用户在使用ABB时发现任何异常或故障,请立即停止设备的运行,并连系ABB公司或其授权的服务商进行处理。
三、结构控制柜:控制柜是ABB的核心部件,负责接收和处理来自操作盘或其他外部设备的信号,控制的运动和功能,以及监测的状态和故障。
控制柜内部包含有电源模块、主控板、驱动板、通讯板、接口板等组件,以及风扇、过滤网等附件。
控制柜通常安装在的附近或远处的一个固定的位置,与通过电缆连接。
操作盘:操作盘是ABB的人机交互部件,负责向用户提供的操作界面和信息显示。
操作盘上有一个液晶显示屏,用于显示的状态、参数、程序和菜单等内容,以及一些按键和旋钮,用于输入命令、选择选项、调整数值等操作。
ABB权限设定1. 引言本文档旨在详细介绍ABB的权限设定方法,以确保只有经过授权的用户可以访问和操作该系统。
通过合理设置不同级别的权限,可以提高安全性并防止未经授权使用。
2. 权限等级及说明2.1 管理员(Admin)- 拥有最高权限,在整个系统中具备完全访问和修改所有功能、参数和配置文件的能力。
2.2 工程师(Engineer)- 可以创建、编辑或删除程序,并对各种工作站进行管理。
2.3 维护技术员(Technician)- 能够执行诊断任务、监视运行状态,并进行一些常规维护操作。
注:以上为示例角色名称,请根据实际情况自定义命名与描述。
3.分配角色与设置密码在ABB上分配不同角色给特定用户时需要遵循以下步骤:步骤一:登录到管理员账户a) 打开ABB RobotStudio软件;b) 输入管理员用户名和密码;c) 单击“登录”按钮进入主界面。
步骤二:创建新用户a) 在RobotStudio主界面左侧导航菜单中选择“用户管理”;b) 单击“创建新用户”按钮,弹出一个对话框;c) 输入用户名和密码,并选择适当的角色(管理员、工程师或维护技术员)。
步骤三:设置权限a) 在RobotStudio主界面左侧导航菜单中选择“系统配置”,然后“安全性选项卡”;b) 为每个角色分配相应的访问权限。
例如,可以限制某些功能只能由管理员操作。
4.附件本文档无涉及附件内容。
5. 法律名词及注释- 权限设定:指根据不同身份与职责划分并授权特定人员可进行哪些操作以保证系统运行稳定与安全。
6. 结束语本文详细介绍了ABB权限设定方法,在使用该时,请确保按照合理的方式设置各种级别的访问权限。
这将有助于提高系统安全性并防止未经授权者滥用其功能。
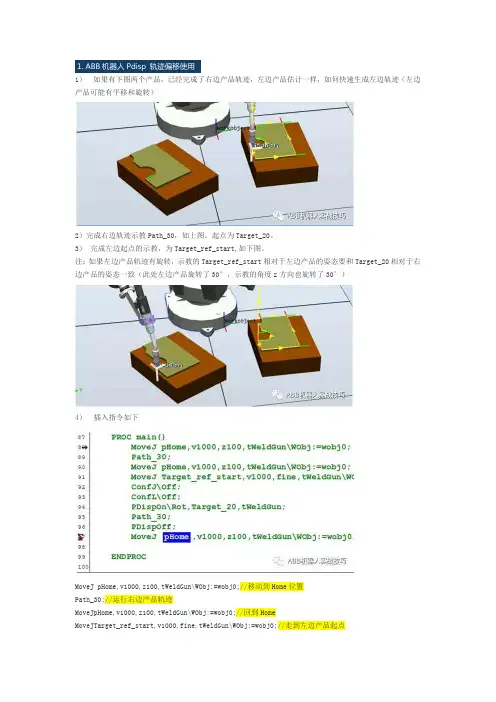
1.1)如果有下图两个产品,已经完成了右边产品轨迹,左边产品估计一样,如何快速生成左边轨迹(左边产品可能有平移和旋转)2)完成右边轨迹示教Path_30,如上图。
起点为Target_20。
3)完成左边起点的示教,为Target_ref_start,如下图。
注:如果左边产品轨迹有旋转,示教的Target_ref_start相对于左边产品的姿态要和Target_20相对于右边产品的姿态一致(此处左边产品旋转了30°,示教的角度z方向也旋转了30°)4)插入指令如下MoveJ pHome,v1000,z100,tWeldGun\WObj:=wobj0;//移动到Home位置Path_30;//运行右边产品轨迹MoveJpHome,v1000,z100,tWeldGun\WObj:=wobj0;//回到HomeMoveJTarget_ref_start,v1000,fine,tWeldGun\WObj:=wobj0;//走到左边产品起点ConfJ\Off;//因为使用偏移,关闭轴配置监控,否则有可能使用原配置参数导致位置走不到而报错ConfL\Off;//因为使用偏移,关闭轴配置监控,否则有可能使用原配置参数导致位置走不到而报错PDispOn\Rot,Target_20,tWeldGun;//设定当前位置和Target_20的偏差关系(包括平移和旋转),因为此时机器人停在Target_ref_start起点,即设定左边轨迹和右边轨迹的整体偏移关系。
使用\rot表示平移和旋转均计算。
如果不使用\rot,则只使用平移,旋转不计算Path_30;//运行原有轨迹,此时轨迹参考坐标移动关系,机器人实际走左边产品轨迹PDispOff;//轨迹完成,关闭平移关系MoveJ pHome,v1000,z100,tWeldGun\WObj:=wobj0;2.1)机器人有程序如下。
2)3)工艺过程如下:机器人在home等待。
ABB权限设定【ABB权限设定】1.目的和范围本文档旨在详细介绍ABB权限设定的流程和步骤。
权限设定是为了确保系统的安全性和操作的合规性。
本文档适用于所有与ABB权限设定相关的人员。
2.定义- ABB:指由ABB公司生产和销售的。
- 权限设定:指对ABB进行权限控制和管理的过程。
- 操作员:指被授权进行操作的人员。
- 管理员:指具有系统管理权限的人员。
3.权限设定流程3.1 确定权限级别按照需求和安全要求,确定不同操作人员的权限级别,如操作员、管理员等。
3.2 创建用户账户根据权限级别创建相应的用户账户,在用户账户中记录相关信息,例如姓名、工号等。
3.3 分配权限将不同操作人员的权限分配给相应的用户账户,确保操作人员仅能进行其权限范围内的操作。
3.4 验证权限在权限设定完成后,进行权限验证,确保权限设定的准确性和有效性。
3.5 更新和维护权限随着工作需求和人员变动,及时更新和维护权限,确保权限设定与实际情况一致。
4.权限级别说明4.1 操作员权限- 启动和停止运行。
- 执行预设的程序。
- 针对运行过程中的异常情况进行简单处理。
4.2 管理员权限- 具有操作员权限的所有功能。
- 创建、编辑和删除程序。
- 调整运行参数。
- 进行系统的维护和监控。
- 备份和恢复系统。
5.附件本文档涉及的附件包括:- 用户账户表格:记录用户账户的相关信息。
- 权限验证记录表格:记录权限验证的结果和时间。
6.法律名词及注释- 权限控制:指对特定资源进行授权和管理的过程,以确保合法和合规的资源访问。
- 合规性:指符合法律法规、行业标准和规范要求的状态。
- 安全性:指系统能够抵御未经授权的访问、破坏或泄露等安全威胁的能力。

ManualConnecting ArtiMinds RPS to an ABB RobotClient Setup InstructionsVersion 1.1Date: 21 Jan 2022ContactSupport: *********************Sales: *******************ArtiMinds Robotics GmbHAlbert-Nestler-Str. 11D-76131 KarlsruheManaging Directors: Dr.-Ing. Sven R. Schmidt-Rohr, Dr.-Ing. Rainer JäkelRegistration Court: Amtsgericht MannheimCommercial Register Number: HRB 717563VAT Number under § 27a UStG: DE290656974ContentContent (2)1Setup (3)1.1Robot (3)1.1.1Supported Controllers (3)1.1.2Required software packages (3)1.2ArtiMinds RPS (3)1.2.1Setup in ArtiMinds RPS (3)1.2.2One-Click Installation of the required components and controller settings . 4 1.2.3Update an existing ArtiMinds Installation on the ABB IRC5 controller (5)1.2.4Downgrading an existing ArtiMinds Installation on the ABB IRC5 controller5 1.2.5Uninstalling an ArtiMinds RPS Installation from the ABB IRC5 controller .. 5 2Operation (6)2.1General Communication (6)2.2Moving the robot (6)2.2.1Manual Mode (6)2.2.2Auto Mode (6)3Trouble-shooting (7)4Vision (8)5Force (9)6Error reporting (10)Notes (11)Changelog (12)1 Setup1.1 Robot1.1.1 Supported ControllersABB IRC5 Controller1.1.2 Required software packagesArtiMinds RPS requires the following software options to be installed on the IRC5 controller:∙616-1 PC Interface∙623-1 Multitasking∙661-2 Force Control Base (for +Force functionality only)The options can be isntalled using RobotStudio. To optain additional Software Options, please contact your ABB Sales representative.Minimum User GrantsArtiMinds RPS will need the user credentials of a user on the IRC5 controller, which has at least the following grants:1. Load program (UAS_RAPID_LOADPROGRAM)2. Modify current value (UAS_RAPID_CURRVALUE)3. Execute program (UAS_RAPID_EXECUTE)4. Program debug (UAS_RAPID_DEBUG)5. I/O write access (UAS_IO_WRITE)6. Modify configuration (UAS_CFG_WRITE)7. Remote warmstart (UAS_REMOTE_WARMSTART)Checking and adjusting User Grants for a specific user can be done using RobotStudio.1.2 ArtiMinds RPSIn order for ArtiMinds RPS functionality to fully work on the ABB IRC5 controller, several modules and configuration entries need to be installed on the controller.It is assumed that the required ABB software packages have been installed successfully on the IRC5 controller and a user with the correct user grants exists (See chapter 1.1.2 Required software packages).The setup of ArtiMinds RPS and the ABB IRC5 controller is devided into two parts: First, certain settings have to be defined in ArtiMinds RPS. Then, all required components and controller settings will be installed on the controller automatically using the One-Click Installation button. After this, the controller will be restarted automatically and is then ready to be used with ArtiMinds RPS.1.2.1 Setup in ArtiMinds RPSThe following settings have to be defined either in the ArtiMinds RPS Robot Configurator during robot setup, or in the ArtiMinds RPS settings page:1. IP Address – the address of your IRC5 controller in the network connected to your PC.2. User – The name of a local user on the IRC5 controller, which can be used by ArtiMinds RPS (default:“Default User”)3. Password –The password of the local user on the IRC5 controller (default: “robotics”)4. RPS Main Rapid Task – The name of the motion task used by ArtiMinds RPS for program execution(default: “T_ROB1”). The default motion task w ill be created by the ArtiMinds RPS installer if it does not exist yet.5. RPS Service Rapid Task – The name of the non-motion background task used by ArtiMinds RPS forstreaming and utility functionality (default: “T_ROB2”). The default task will be created by the ArtiMinds RPS installer if it does not exist yet.6. RPS Service Constraint Task – The name of the non-motion background task used by ArtiMinds RPSfor runtime constraint checks (default: “T_ROB3”). The default task will be created by the ArtiMinds RPS installer if it does not exist yet.1.2.2 One-Click Installation of the required components and controller settingsThe remaining installation can be done conveniently in the ArtiMinds Robot Configurator menu (“File -> Robot -> New Robot Setup”) or, in case the robot has already been configured, in the ABB settings page (“File -> Settings -> ABB”) using the button “Install RPS Configuration on Controller”.The following changes will be made on the ABB controller by the automated installation of the configuration: Installed ModulesThe following module files will be copied to the controller:∙$HOME/RPSService/RPSService.mod∙$HOME/RPSService/RPSConstraintService.mod - Since 1.14∙$HOME/RPSService/sharedTypesAndMethodsModule.mod∙$HOME/RPSService/sharedVarModule.modInstalled ConfigurationsThe following configuration entries will be added or overwritten should they already exist:1. I/O System -> Signal -> "debugWait" (Internal Signal)2. I/O System -> Signal -> "executeScript" (Internal Signal)3. I/O System -> Signal -> "forceStreaming" (Internal Signal)4. I/O System -> Signal -> "showDialog" (Internal Signal)5. Controller -> Automatic Loading of Modules -> Load sharedTypesAndMethodsModule.mod into ALLtasks6. Controller -> Automatic Loading of Modules -> Load sharedVarModule.mod as SHARED7. Controller -> Automatic Loading of Modules -> Load RPSService.mod into the RPSServiceTask(default: T_ROB2)8. Controller -> Automatic Loading of Modules -> Load RPSConstraintService.mod into theRPSConstraintTask (default: T_ROB3)9. Controller -> Task -> Main Motion Task for program execution (default: T_ROB1)10. Controller -> Task -> Background RPS Service Task for helper execution and streaming (default:T_ROB2)11. Controller -> Task -> Background RPS Constraint Task for runtime constraint checks (default: T_ROB3)1.2.3 Update an existing ArtiMinds Installation on the ABB IRC5 controllerUpdating the ArtiMinds installation can be done by performing the same steps as a fresh installation. The One-Click Installer will replace all required files and configurations automatically.Note: After updating an ArtiMinds RPS installation on the controller, all robot programs that have been compiled with previous versions of ArtiMinds RPS have to be re-compiled with the new version.1.2.4 Downgrading an existing ArtiMinds Installation on the ABB IRC5 controller Downgrading of the ArtiMinds Installation files to a previous ArtiMinds RPS version is not officially supported by the One-Click Installer and might not work depending on the used ArtiMinds RPS versions. It is recommended to remove all ArtiMinds RPS related components manually before installing an older version.1.2.5 Uninstalling an ArtiMinds RPS Installation from the ABB IRC5 controllerRemoving an existing installation can only be done manually. You can find a complete list of all installed files and configuration entries that have to be removed in chapter 1.2.2 One-Click Installation of the required components and controller settings.After uninstall, a P-Start is required to reset the RAPID modules.2 Operation2.1 General CommunicationAfter successful installation, the ABB Web Interface and the RPS Service Task will handle all communication between robot configurator and ArtiMinds RPS. If you still run into trouble, make sure that:∙The RPS User has all required grants to interact with the robot as specified in chapter 1.1.2 Required software packages. Missing grants should also be reported by ArtiMinds RPS when trying to connect to the robot for the first time. Contact your administrator to gain the required grants on the robot if necessary.∙The RPS Service Task is running on the robot. The message “RPS Service Module started” in the robot’s log after startup should confirm this. A missing RPS Service Task should also be reported by ArtiMinds RPS when trying to connect for the first time. (Re-) installing the ArtiMinds RPS Setup on the robot should solve this problem∙All required software options are installed on the robot as specified in chapter 1.1.2 Required software packages. Missing software options should be reported by ArtiMinds RPS when trying to connect for the first time. Contact your administrator to install missing options.∙The communication is not blocked by your PC’s firewall.2.2 Moving the robot2.2.1 Manual Mode1. Start your program through the red or green buttons within ArtiMinds RPS.2. A message will now pop up on the teach panel, asking for access to the controller’s functions. Press…Grant“ to allow this.3. A second message will pop up, requiring clearance to move the robot. This needs to be confirmed viaan ABB-mechanism: Toggle the clearance button 3 times within 5 seconds to confirm program start.4. Immediately afterwards, press and hold the clearance button again to enable motors and start theprogram.5. You will need to keep the clearance button pressed during the whole duration of the program in manualmode.2.2.2 Auto Mode1. Start your program through the red or green button within ArtiMinds RPS2. No further interaction is requiredThe program will start immediately in automatic mode!3 Trouble-shootingConnection to robot fails∙Possible reasons for connection problems should be reported as an error message when trying to connect.∙Otherwise, make sure to check the list in chapter 2.1 General Communication and make sure that requirements for the robot connection are met.Robot goes into error state, either the RPS Service Task or the RPS Constraint Task stopped∙This indicates an unexpected error within one of these tasks. Restarting the controller should reset them.∙In RobotWare versions earlier than v6.10.2, the controller could run into such an error when trying to connect to an IP address outside of its reachable address space. This can be caused by faulty IP addresses of the host PC or a configured camera system.4 VisionFor all currently supported +Vision systems, it is sufficient to make sure that the detector shares a network connection with the robot controller and that the detector’s IP address can be reached from the controller.To setup TCP/IP connections from the robot controller, the option 616-1 PC Interface is required.Once the detector is reachable from the robot controller, configuring the detectors IP address in the ArtiMindsRPS vision settings should be enough to get the connection to work.5 ForcePlease note that the +Force functionality in ArtiMinds RPS requires additional ABB software packages. More details can be found in chapter 1.1.2 Required software packages.Before using a Force-Torque-Sensor (FTS) with ArtiMinds RPS, follow the installation instructions by ABB to connect the sensor to the controllers voltage measurement box and load the calibration file onto the robot controller.When configuring a new ABB robot with FTS in ArtiMinds RPS, please make sure that the transformations of the sensor in the Robot Configurator (in sub-step “Mounting: Force Torque Sensor) matches the transformations defined on the robot controller. You can find the controller’s FTS transformations in “Configuration -> Topic Motion -> FC Sensor”.6 Error reportingWhen encountering an error, please provide the following information to the ArtiMinds Robotics Support (*********************):1. ArtiMinds RPS log file ( \documents\ArtiMinds RPS\inrop.log )2. Describe the actions that lead to the error3. ABB robot debug outputa. On the ABB teach pendant, press the long bar on the topb. Logging messages from the ArtiMinds RPS Communicator are printed on this screen4. .artm file of the projectNotesChangelogv1.0 initial versionv1.1 Added sub-chapters for Force and Vision。
![ABB机器人操作手册(中文版)[3]](https://uimg.taocdn.com/e134f32bcd7931b765ce0508763231126edb77d9.webp)
ABB机器人操作手册(中文版)ABB操作手册(中文版)一、概述本手册旨在介绍ABB的基本概念、功能、组成、操作方法和注意事项,以匡助用户正确地使用和维护ABB。
本手册合用于ABB的多种型号和版本,包括IRC5、IRC5M2004、RobotStudio等。
本手册假设用户已经具备了一定的编程和控制的基础知识,如果需要更深入的了解,请参考ABB官方网站或者其他相关文献。
二、ABB的基本概念2.1 系统机械臂:机械臂是系统的核心部份,它由多个关节和连杆构成,可以在空间中进行多自由度的运动。
机械臂上安装有工具坐标系,用于定义工具的位置和方向。
控制柜:控制柜是系统的控制中心,它包含了电源模块、驱动模块、通信模块、安全模块等,用于对机械臂进行电气控制和信号传输。
控制柜上安装有基坐标系,用于定义机械臂的位置和方向。
操作盘:操作盘是系统的人机交互界面,它由显示屏、按键、摇杆等组成,可以用于对进行参数设置、程序编辑、运行控制等操作。
操作盘上安装实用户坐标系,用于定义用户的视角和方向。
软件:软件是系统的逻辑部份,它包括了运行在控制柜内部的控制软件,以及运行在外部计算机上的仿真软件。
控制软件负责执行用户编写的程序,控制机械臂的运动和功能。
仿真软件负责摹拟系统的工作环境,提供虚拟的操作盘和可视化的运动轨迹。
2.2 程序主程序:主程序是程序的入口点,它由一个或者多个模块组成,每个模块包含了一段代码。
主程序可以调用其他类型的程序,并且可以被其他类型的程序调用。
子程序:子程序是一种可重复使用的程序,它由一个或者多个模块组成,每一个模块包含了一段代码。
子程序可以被主程序或者其他子程序调用,并且可以返回一个值给调用者。
任务程序:任务程序是一种特殊的子程序,它由一个或者多个模块组成,每一个模块包含了一段代码。
任务程序可以被主程序或者其他任务程序调用,并且可以并行地执行多个任务。
数据文件:数据文件是一种存储数据的文件,它由一个或者多个变量组成,每一个变量包含了一个值或者一个数组。

![ABB机器人操作手册(中文版)[2]](https://uimg.taocdn.com/984ca381fc0a79563c1ec5da50e2524de518d098.webp)
ABB机器人操作手册(中文版)MODULE ModuleNamePROC ProcedureNameStatement1;Statement2;...ENDPROC...ENDMODULE/ This is a single line comment/+ This is amulti-line comment +/num a := 10; / Assign 10 to variable aMoveL p1,v100,z10,tool0; / Assign parameters to MoveL instructionMoveL p1,v100,z10,tool0; / Move linearly to position p1 with velocity v100, zone z10 and tool tool0MoveJ p2,v50,fine,tool0; / Move joint to position p2 with velocity v50, zone fine and tool tool0MoveC p3,p4,v75,z5,tool0; / Move circularly from position p3 to position p4 with velocity v75, zone z5 and tool tool0 IF condition THEN / If condition is true, then execute statement1Statement1;ELSE / If condition is false, then execute statement2Statement2;ENDIFWHILE condition DO / While condition is true, repeat statementStatement;ENDWHILEFOR num i FROM 1 TO 10 DO / For i from 1 to 10, repeat statementStatement;ENDFORnum x := Sin(30); / Assign the sine of 30 degrees to variable xnum y := Add(10,20); / Assign the result of adding 10 and 20 to variable yABB操作手册(中文版)概述ABB是一种先进的工业,可以用于各种制造、物流、服务等领域的自动化应用。
ABB机器人【配置设定】大全 , 人手一份,建议永久收藏!功能介绍指南车机器人致力于工业机器人自动化应用服务,专注工业机器人应用工程师(电气设计与调试、机械设计、技术营销、离线仿真、视觉、项目方案、高级编程)等培训,与机友们分享技术干货及行业动态。
本公众号由杭州指南车机器人科技有限公司维护运营!限时下载|ABB、FANUC机器人的全套学习资料1一、如何配置ABB机器人Profinet从站1、机器人需要有888-2或者888-3选项(使用控制器网口),或者840-3选项(使用Anybus网口)2、此处举例888选项3、机器人控制器有如下网口,其中:X2 是服务端口,ip固定192.168.125.1X3连接了示教器X7连接了安全板X9连接了轴计算机 4、Profinet可以连接WAN口或者LAN3口,根据设置连接5、此处举例连接WAN口6、控制面板,配置,主题选择communication7、进入IPSETTING8、点击ProfinetNetwork9、修改ip并选择对应网口 10、重启11、控制面板,配置,主题I/O ,PROFINET InternalDevice12、配置输入输出字节数。
和PLC那边设置一致13、配置界面下,进入Industry Network,PROFINET14、设置station名字,这个名字要和PLC端对机器人的station设置一样15、添加signal,device选择profinetInternal device2二、ABB机器人IO接线与配置1、以DSQC652为例(16进16出)2、上部区域为输出16个点,其中9和10针脚的0v,24v需要从柜门旁边的XT31引过来3、下部区域为16个输入点,9号针脚的0v需要从XT31引过来4、左侧区域短接片为地址位,默认为10,如下图(剪掉的为1,留下的是0,高电平有效)。
如果要修改板卡地址,在这里修改,机器人里也要做对应配置5、6、控制面板,配置,找到devicenetdevice,添加(如果已经显示添加,则不需要再添加)7、模板选择652,地址根据前面短接片设置,默认为108、确定后,暂时不重启,全部配置完再一起重启9、进入Signal,点击添加10、举例,一个输出设置如下设置name,type选择digital output,assigneddevice选择刚配置好的板卡,设置mapping。
UAS介绍及设定一:在电脑上安装与ROBOT系统同样或更高的版本的ROBOT WARE 与 ROBOTSTUDIO软件,如果版本低于系统则连接不上。
二:用ABB配的网络线,连接PC 与机器人;pc上设自动获取IP;如下图F端口;三:在pc上打开ROBOTSTUDIO软件,并点击在线,如下图:四:点击:“添加控制器”—》“一线连接”——》如果接上会出现机械人的序列号——》在机器人的序列号上点击右键——》“请求写权限”——在示校器上点击“同意”五:UAS概述控制器用户授权系统(UAS),该系统规定了不同用户对机器人的操作权限。
该系统能避免控制器功能与数据的未授权使用。
用户授权由控制器管理,这意味着无论运行哪个系统控制器都可保留 UAS 设置。
这也意味着 UAS 设置可应用于所有与控制器通信的工具,如 RobotStudio 或 FlexPendant。
UAS 设置定义可访问控制器的用户与组,以及她们授予访问的动作。
用户UAS 用户就是人员登录控制器所使用的帐户。
此外,可将这些用户添加到授权她们访问的组中。
每个用户都有用户名与密码。
要登录控制器,每个用户需要输入已定义的用户名与正确的密码。
在用户授权系统中,用户可以就是激活或锁定状态。
若用户帐号被锁定,则用户不能使用该帐号登录控制器。
UAS管理员可以设置用户状态为激活或锁定。
默认用户所有控制器都有一个默认的用户名Default User与一个公开的密码robotics。
Default User无法删除,且该密码无法更改。
但拥有管理 UAS 设置权限的用户可修改控制器授权与Default User的应用程序授权。
用户组在用户授权系统中,根据不同的用户权限您可以定义一系列登录控制器用户组。
您可以根据用户组的权限定义,向用户组中添加新的用户。
比较好的做法就是根据使用不同工作人员对机器人的不同操作情况进行分组。
例如,您可以创建管理员用户组,程序员用户组与操作员用户组。
ABB机器人基本操作说明书一.认识机器人的示教器和电气柜基本按钮作用图1——机器人示教器图2——机器人电器柜电气柜的总电源开关,图示状态为开启,逆时针转就是关闭。
每次断电长时间不是用的话建议关闭此急停按钮当出现紧急状况时可按下此按钮机器人就会立刻停止,当需要恢复按钮时只需顺时针转动即可。
上电按钮及上电指示灯,当将机器人切换到自动状态时,在示教器上点击确定后还需要按下这个按钮机器人才会进入自动运行状态机器人运行状态切换旋钮,左边的为自动运行,中间的为手动限速运行,右侧为手动全速运行(此状态在不允许操作人员选用)。
图3——示教器上的使能按钮这个示教器侧面的使能按钮是在手动示教时需要机器人动作时要一直按住的。
它有三个档分别对应:不握住、适当力度握住、大力握住。
其中只有在适当力度握住时才会起作用,此时电器柜上的上电指示灯会常亮,否则会是闪烁状态。
图4——示教器的正确握法示教器界面上操作人员需要用到的几个按钮紧急停止按钮,同图 2示教器旋钮切换到线性或重定位状态(回原点必须用线性)切换到单轴运动时在1-3轴和4-6轴间来回切换增量开关按钮手动操作时一定要打开增量手动运行程序时这些按钮分别为上一步、下一步、暂停、自动运行。
图5——示教器按钮界面右下角指示的含义线性增量开1-3轴增量开4-6轴增量开重定位增量开增量开增量关图6——示教器右下角图示如何选择工具坐标工件坐标1、打开手动操作界面如下2、点击坐标系3、选择要用的坐标点击确认如何调整增量大小和手动状态下的机器人速度1、点击下图箭头标记处2、点击箭头处设置增量大小3、点击箭头处进行手动运行速度设置如何进入想要调试的程序1、打开程序编辑器2、点击调试选择pp移至例行程序3、选择需要进入的程序然后确认机器人意外停止后如何回原点1、机器人打到手动状态。
2、打开增量选择合适的增量大小(建议选择中),再打开手动运行速度选项选择25%。
3、选择工具坐标按住示教器使能按钮用示教器旋钮控制机器人沿着刀具方向退到夹具外。
U A S介绍及设定一:在电脑上安装与ROBOT系统同样或更高的版本的ROBOTWARE和ROBOTSTUDIO软件,如果版本低于系统则连接不上。
二:用ABB配的网络线,连接PC与机器人;pc上设自动获取IP;如下图F端口;三:在pc上打开ROBOTSTUDIO软件,并点击在线,如下图:四:点击:“添加控制器”—》“一线连接”——》如果接上会出现机械人的序列号——》在机器人的序列号上点击右键——》“请求写权限”——在示校器上点击“同意”五:UAS概述控制器用户授权系统(UAS),该系统规定了不同用户对机器人的操作权限。
该系统能避免控制器功能和数据的未授权使用。
用户授权由控制器管理,这意味着无论运行哪个系统控制器都可保留UAS设置。
这也意味着UAS设置可应用于所有与控制器通信的工具,如RobotStudio或FlexPendant。
UAS设置定义可访问控制器的用户和组,以及他们授予访问的动作。
用户UAS用户是人员登录控制器所使用的帐户。
此外,可将这些用户添加到授权他们访问的组中。
每个用户都有用户名和密码。
要登录控制器,每个用户需要输入已定义的用户名和正确的密码。
在用户授权系统中,用户可以是激活或锁定状态。
若用户帐号被锁定,则用户不能使用该帐号登录控制器。
UAS管理员可以设置用户状态为激活或锁定。
默认用户所有控制器都有一个默认的用户名DefaultUser和一个公开的密码robotics。
DefaultUser无法删除,且该密码无法更改。
但拥有管理UAS设置权限的用户可修改控制器授权和DefaultUser的应用程序授权。
用户组在用户授权系统中,根据不同的用户权限您可以定义一系列登录控制器用户组。
您可以根据用户组的权限定义,向用户组中添加新的用户。
比较好的做法是根据使用不同工作人员对机器人的不同操作情况进行分组。
例如,您可以创建管理员用户组,程序员用户组和操作员用户组。
默认用户组所有的控制器都会定义默认用户组,该组用户拥有所有的权限。