璇玑NC780云终端用户指南
- 格式:docx
- 大小:825.63 KB
- 文档页数:22


MR780系列非接触IC卡读写器用户手册(Revision 3.22)北京金木雨电子有限公司2011/6/9在使用本产品前请详细阅读本说明书,如果有任何疑问,请联系我们,我们会给您详尽的解答目录1 简介 (2)2 技术指标 (2)3 可读卡型 (3)3.1 ISO14443 TYPE-A (3)3.2 ISO14443 TYPE-B (3)3.3 ISO15693 (3)3.4 SAM (3)4 读卡器型号规则 (4)4.1 型号格式 (4)4.2 型号详解 (4)4.2.1 产品代码 (4)4.2.2 设备类别 (4)4.2.3 通讯接口 (4)4.2.4 读卡类型 (5)4.2.5 外壳颜色 (5)4.2.6 定制型号 (5)4.3 当前可供货型号 (5)5 USB接口读卡器驱动安装 (5)6 关于PC软件和API (5)1简介MR780系列非接触IC卡读写器是基于NXP或兼容芯片设计的桌面式读卡器,带有8位LED显示器,能够显示8位数字,全面支持ISO14443和ISO15693,能够读写多种符合不同国际标准的非接触IC卡,尤其对符合ISO14443-4的非接触CPU卡支持完善,全面支持EMV2000和PBOC2.0,能够通过多个实验室的认证,如Visa Wave和Pay Pass的认证(由FIME实验室完成)以及中国银行卡检测中心的认证;读卡器内置SAM卡插槽,对国内的一卡通应用做了优化,支持国内广泛使用的9600bps和38400bps的SAM卡。
公司引进了先进的设备严格监控产品的质量,确保该读写器具有良好的质量和稳定性。
2技术指标RC500;MF RC531;CL RC632;SL RC400;FM1722(用于支持上● 读卡芯片: MF海加密标准,非标准品,需定制)● 工作频率: 13.56MHz● 射频标准: ISO14443A,ISO14443B,ISO15693● 读写距离: 100mm (Mifare One,典型距离)● SAM:3个插槽,支持ISO7816 T=0,支持9600bps和38400bps● 接口:RS232C或USB (内置CP2102 USB to RS232 转换器)● 串口速率: 9600 ~ 115200 BPS● 电源:DC5V ± 10%● 最大功耗:0.9W● 外形尺寸:141mm * 100mm * 31mm● 重量:约100g● 工作温度:-25 ~ +85 ℃● 储存温度:-40 ~ +125 ℃● PC软件:T ransWin,通过下载● SDK:基于Windows,免费提供● 样例代码: VC、VB、C++ Builder、DELPHI、Power Builder3可读卡型3.1ISO14443 TYPE-A● Mifare One S50● Mifare One S70● Mifare Plus (全功能支持)● Mifare One Mini● Mifare Ultra Light● ISO14443-4 (T=CL) TYPE A 双界面CPU卡3.2ISO14443 TYPE-B● AT88RF020● AT88RF080● SR176● SRI512● SRIX4K● ISO14443-4 (T=CL) TYPE B 双界面CPU卡3.3ISO15693● I.CODE SLI● Tag-it HF-I● 其他的符合ISO15693标准的标签3.4SAM● 符合ISO7816的CPU(SAM)卡,支持PPSS操作● 支持T=0和T=1● 支持默认任意速率卡片(9600,19200,38400,55800,57600,115200)4读卡器型号规则4.1型号格式金木雨桌面读卡器系列产品型号格式:1 2 3 4 5 6MR XXX X X X -XXX1:产品代码;2:设备类别;3:通讯接口;4:读卡类型;6:外壳颜色;6:定制型号4.2型号详解4.2.1 产品代码金木雨桌面读卡器系列产品代码固定为字母:MR 意为:Master Reader4.2.2 设备类别600:CPU使用P89LPC936FDH的读写卡器,带有8位LED数码管显示,支持1个SAM 701:CPU使用P89LPC936FDH的读写卡器,支持2个SAM卡730:CPU使用P89LPC936FDH的读写卡器,使用网络转换模块的网络接口读卡器,支持1个SAM760:CPU使用C8051F321的USB HID接口读卡器,读卡芯片使用RC400761:CPU使用C8051F321的USB HID接口读卡器,读卡芯片使用RC522、RC523,支持2个SAM780:CPU使用C8051F340的读卡器,支持3个SAM790:CPU使用C8051F340的USB PC/SC接口读卡器,支持3个SAM800:使用ARM7处理器的USB PC/SC接口读卡器,带有128*64点阵的LCD显示器,支持2个SAM810:使用ARM7处理器的USB PC/SC接口读卡器,支持2个SAM4.2.3 通讯接口S:RS232C接口,使用USB接口取电R:RS485接口,使用外部接线方式电源U:USB接口,供电由USB接口提供E:网络接口,使用外置电源适配器,5V电压4.2.4 读卡类型A:ISO14443A、Mifare系列和ISO7816C:ISO14443A、ISO14443B、Mifare系列和ISO7816G:ISO15693和ISO7816H:ISO14443A、ISO14443B、ISO15693、Mifare系列和ISO78164.2.5 外壳颜色这部分可以为空,为空则为默认的白色外壳,如果为其他颜色,则写上相应的字头W:白色(默认,可以不写)B:黑色4.2.6 定制型号在标准产品中,这部分为空,某些客户会要求产品定制,用数字来区别不同的定制。

2019N C系统操作手册work Information Technology Company.2020YEAR江西四特酒有限责任公司用友NC集中财务管理系统操作手册2009年11月8日目录江西四特酒有限责任公司 (2)用友NC集中财务管理系统 (2)文档控制 (5)使用说明 (6)适用对象 (6)使用方法 (6)其他 (6)一.应用基础 (7)1.1系统基础 (7)1.2安全性设置 (7)1.3系统登录 (9)1.4NC界面说明 (11)1.5创建快捷菜单 (12)1.6系统功能菜单 (12)1.7口令修改 (13)1.8导出 (13)1.9打印 (14)二、客户化 (15)2.1部门档案(编码:2-2,公司集) (15)2.2人员档案(编码:4位数部门编码+6位数流水号) (16)2.3地区分类(3位数的省份编号+3位数的区号) (17)2.4客商管理档案 (17)2.5项目类型及项目管理档案 (18)2.6会计科目(编码规则:4/2/2/2/2/2/2/2) (19)2.7现金流量项目 (20)2.8用户管理(编码:6位入职日期+3位流水号) (20)2.9权限分配 (21)2.10解除在线 (21)三.财务核算 (22)3.1录入期初余额 (22)3.1.1无辅助核算的科目期初数据录入 (22)3.1.2科目设置了辅助核算的期初数据录入 (23)3.1.3期初建账 (24)3.2凭证管理 (25)3.2.1制单 (25)3.2.3凭证查询 (29)3.2.3审核/取消审核 (31)3.2.4记账/取消记账 (32)3.2.6打印凭证 (33)3.2.7自定义结转 (36)3.2.8账簿查询 (38)3.2.9 试算平衡 (42)3.2.10结账/反结账 (42)四、现金银行 (44)4.1银行对账完整流程 (44)4.2银行对账操作 (44)4.2.1对账账户初始化 (44)4.2.1.1增加初始账户 (44)4.2.1.2启用初始账户 (45)4.2.1.3 录入期初未达账项: (46)4.2.1.4 查看期初余额调节表: (46)4.2.2 银行对账单 (47)4.2.2.1手工增加银行对账单 (47)4.2.2.2引入银行对账单 (48)4.2.3 银行对账 (48)4.2.3.1进行自动勾对 (49)4.2.3.2进行手工勾对 (49)4.2.3.3取消勾对 (50)4.2.3.4检查勾对结果 (50)4.2.4 余额调节表 (50)4.2.4.1查看某一账户的余额调节表 (51)4.2.4.2查看明细调节数据 (51)4.2.5 查询勾对情况 (52)4.2.6 长期未达账审核 (52)4.2.6.1查询长期未达账 (52)4.2.7 核销银行账 (53)4.2.7.1核销银行账 (53)4.2.7.2恢复已核销的银行账 (54)五、报表管理 (54)5.1报表系统登录 (54)5.2设置当前任务和当前数据源 (55)5.3报表数据的录入 (56)5.4报表数据的查询 (57)5.5报表上报、请求取消上报 (58)5.6报送管理 (59)六、固定资产管理 (60)6.1原始卡片录入 (60)6.2增产增加 (60)6.3卡片管理 (62)6.4.1 资产变动 (63)6.4.2 资产减值 (65)6.5资产调拨 (66)6.5.1 资产调出 (66)6.5.2 资产调入 (67)6.6资产减少 (68)6.7折旧计提 (68)6.8生成固定资产凭证 (69)6.9结账 (71)文档控制文档更新记录文档审核记录文档去向记录使用说明适用对象本手册的适用对象为江西四特酒有限责任公司,系统内涉及到江西四特酒营销有限公司及江西四特酒酒业有限公司用友NC集中财务管理项目(以下简称“本系统”)所有实际操作的人员。
1.1.1.我的博客⏹操作说明:系统提供了用户开通、管理博客的功能,用户可以在自己的博客中发表文章,也可以收藏他人的文章,促进相互交流。
单击一级菜单【知识管理】,选择【我的博客】,进入博客管理界面,如图5.5.5-1。
图5.5.5-1 我的博客【发表文章】用户在自己的博客中发表文章,支持发表共享和不共享两类文章,其他用户可以查看到共享的文章,可修改自己发布的博客。
【他人博客】配置他人博客后,可访问他人博客查看对方发表的文章。
【博客收藏】进入博客文章的收藏列表,可删除不需要的收藏。
【设置个人信息】设置博客的介绍,上传个人照片。
各种具体操作⏹发表文章第一步:我的博客中点击【发表文章】按钮。
如图5.5.5-2。
图5.5.5-2 发表文章第二步:填写标题,插入本地文件,编辑正文,保存。
如图5.5.5-3。
图5.5.5-3 编辑文章⏹配置他人博客第一步:单击【他人博客—配置他人博客】,点击【选择】按钮,选择人员,确定。
如图5.5.5-4。
图5.5.5-4 配置他人博客第二步:确定后,返回他人博客界面,配置的博客显示在界面中。
如图5.5.5-5。
图5.5.5-5 他人博客⏹查看他人博客第一步:在【他人博客】界面,单击界面中已配置好的他人博客,进入该用户的博客界面。
第二步:点击博客的文章标题,查看他人的文章。
如图5.5.5-6。
图5.5.5-6 查看博客文章收藏文章第一步:在打开查看他人博客文章时,点击【收藏】按钮。
如图5.5.5-7。
图5.5.5-7 收藏文章第二步:弹出选择收藏分类的对话框,勾选分类,确定。
如图5.5.5-8。
图5.5.5-8 选择收藏分类第三步:收藏后单击【博客收藏】,可查到收藏的文章。
如图5.5.5-9。
图5.5.5-9 博客收藏第四步:单击【按分类查看】,可按照分类来查看收藏的文章。
如图5.5.5-10。
图5.5.5-10 按分类查看整理收藏分类第一步:单击【博客收藏—整理收藏夹】,进入收藏夹分类页面。
视频云-NC700 产品用户手册璇玑视频云-NC700 用户使用手册北京璇玑伟业科技有限公司第 1 页 共 37 页视频云-NC700 产品用户手册璇玑视频云-NC700 用户使用手册 .................... 1 文档声明: ....................................... 4璇玑视频云-NC700 外观及功能简介 ................ 4 机顶盒功能 ..................................... 4 网络终端机功能 ................................. 5 外观及基本参数 ................................. 5 遥控器介绍 ..................................... 7 使用前的准备 ................................... 8 璇玑视频云-NC700 机顶盒工作模式介绍 ............. 10 功能介绍 ...................................... 10 开始使用 ...................................... 10 主界面介绍及操作指南 .......................... 11常用菜单栏 ................................. 11 搜索栏 ..................................... 12 时间栏 ..................................... 12 网络状态栏 ................................. 12 图标功能及操作方法方法 ........................ 12 云电视直播 ................................. 13 云在线视频 ................................. 14 云广播音乐 ................................. 15 云媒体播放 ................................. 17 Samba ...................................... 17第 2 页 共 37 页视频云-NC700 产品用户手册多屏互动功能介绍 ........................... 19 播放本地影音文件 ........................... 22 云电脑 ..................................... 23 收藏夹 ..................................... 23 语言设置 ................................... 24 网络设置 ................................... 25 VGA选项 .................................... 26 璇玑云-NC700 搜索功能介绍 ....................... 28 切换到搜索栏 ............................... 29 璇玑视频云-NC700 的网络终端机功能 ............... 29 服务端软件的安装 .............................. 30 添加用户 ...................................... 32 连接服务端 .................................... 34 故障检查(机顶盒功能类) ........................ 36 故障检查(云终端功能类) ........................ 36 安全警告 ........................................ 37第 3 页 共 37 页视频云-NC700 产品用户手册文档声明:是北京璇玑伟业科技有限公司的注册商标。

云终端使用者使用手册深圳新创电脑制造有限公司目录1新创云终端的使用 (3)1.1服务器软件安装 (3)1.2 启动前的准备 (5)1.3 使用新创云终端 (5)1.4 模式切换 (6)2. 系统设置 (7)2.1 连接服务器 (7)2.2 IP地址设置 (8)2.3 Mac地址设置 (9)2.4“显示分辨率”设置 (9)2.5“声音设置” (10)2.6 远程桌面连接 (11)2.7 触摸屏设置 (11)2.8远程监控(VNC) (12)2.9无线网卡 (13)3常见问题解答 (13)1新创云终端的使用1.1服务器软件安装请将随机附带的数据光盘插入主计算机光驱内,在光盘根目录下点击打开“云服务器软件”文件夹,然后双击“ThinStation.exe”档,按照如下步骤进行安装:1.点击安装档后,选择“中文”单击“下一步”2.单击“下一步”按钮3.单击“下一步”按钮4.选择“是,立即重新启动计算机”单选按钮,单击“完成”按钮。
5.重新启动后,选择“开始”→“程序”→“ThinStation1.5”→“Run”菜单项,打开应用程控台,如下图。
1.2 启动前的准备在准备好所有外围设备后,您需要确认产品部件是否完整。
确认好后,即可开始安装。
安装步骤如下:1. 连接显示器:将显示器的信号线接入到新创云终端的VGA 界面。
2. 连接网线:将普通10~100M 网线接入新创云终端的网线口。
3. 连接鼠标键盘:将USB 鼠标键盘的USB 线接入到新创云终端USB 界面。
4. 连接耳机麦克风:将耳机麦克风分别接入到新创云终端的对应接口上,注意耳机接口是绿色,麦克风接口是红色。
5. 接通电源:接通新创云终端电源,接通显示器电源,按下新创云终端电源按钮,系统即可正常启动。
1.3 使用新创云终端在新创云终端上接好显示器接口线、网线、电源线、鼠标键盘线后,按下电源开关,即可启动新创云终端,显示器将显示新创云终端启动进度条,如图1-1 所示。

Quick Start Guide使用說明Manual UsuarioManual Do UsuárioGuide d'utilisationS780Disclaimer1.Please follow the set-up and usage instructions in the print material that came with this Dashboard Camera (dash cam) product.2.You should not set/install this dash cam at a place that would obstruct or reduce a driver’s view; make sure your use complies with pertinent vehicle codes of your state, province, territory or country.3.You should post the required notices of recordation to occupants inside the vehicle, if voices or other information/signal pertaining to in-vehicle activities will be recorded.4.You should not change the dash cam’s setting or mode of operation when the vehicle is in motion.5.The optional driving warning signals, including any visual or audible reminder signals, should not replace your decision-making and judgment that are needed for the proper operation of the vehicle.6.You should not leave the dash cam in a visible spot when no one is inside the vehicle, to avoid attracting break-ins to steal the unit, or other property.7.You should avoid extended exposure of the dash cam to direct sunlight or extreme temperatures (either high or low temperature) which tend to degrade or damage the unit and its normal functionality.8.You should examine, check and/or verify the dash cam at least every six (6) months, including the associated memory cards, to ensure the video reception and recording are working properly. For each use, you should verify that the dash cam unit, the visible lights and the audible sounds are working normally. If there are signs of non-operation or mal-function, you should immediately seek to replace the product and check to see if the product is covered under any applicable warranty.9.The dash cam unit may have additional functionality, such as transmission and recording of audio or GPS signal or other identification information. If you have privacy concerns about these functions, make sure you follow the instruction to disable these functions.10.You should use the dash cam unit in the way it was intended. You shouldnot use the dash cam unit in a way that would be illegal, physicallydamages the unit, or tends to cause danger to the safe operation of the vehicle and/or occupants.Attention please【About Usage】1. If your vehicle still provides power when the vehicle is off, unplug the device when you plan to have your vehicle parked for a long period of time to avoid draining your vehicle's battery.2. The embedded supercapacitors can help to save your recorded file even if the power is off.3. To avoid file corruption, don’t eject the Micro SD Card immediately after powering off.4. It is recommended to use provided adapter.5. To enable motion detection and monitor function, the unit must receive constant power.【About Micro SD Card】1. Please use Micro SD card with the size / memory of at least 16GB,Class 10 (up to 128GB).2. Format Micro SD card before using.To format card press When you get to settings ---- Format1. Product Introduction1.1 Package ContentsCheck the items in your package with the list below. If any of the items are damaged or missing, contact your retailer.● Device● Sticker Mount / Suction Cup Mount● Car Charger● Cable● Warranty Card● Quick Start Guide● 16GB MicroSD1.2 Driving Recorder Overview ① Mount Bracket ② Lens ③ Speaker ④ MicroSD Slot ⑤ Reset ⑥ Mini USB Slot ⑦ GPS Slot ⑧ Display ⑨ Buttons ⑩ Rear Camera Cable SlotRear CameraMount①②③④⑧⑨⑤⑥⑦⑩2. Installation and removal1 For better view, try to install in the center of the windshield.2 To ensure view is clear, make sure the lens is located in a place where the windshield wiper wipes the window.3 Make sure device is not installed where it will interfere with the air bag.4 Make sure the device will not be obstructed by windshield’s window tint.5 Clean the area you wish to place the dash cam before mounting the device. DO NOT move the device for a 24-hour period.2.1 LocationBest mounting locationConnect to car chargerWindshieldCaution: We are not responsible for any damage caused to, or caused by, the air bag due to incorrectly placing the device within the range of the safety bag area.LED Color Green ON Green OFF BehaviorPower ON, Recording Power OFF, not Recording3. Start and GoInsert the car charger cable into the car’s cigarette lighter and the other end into the mini USB port on the device. Make sure to install the Micro SD Card into the Micro SD Card slot on device. After turning on, the system will start recording automatically. The LED light will turn green when recording mode has started.*Reminder: Please format Micro SD card before you start recording. Please refer to page 2 for instructions.3.1 Power OnHold down the power button at least 5 seconds to turn off device. To avoid corrupting the last file recorded, do not eject SD Card immediately after powering off.If you need to turn it back on simply hold the power button for at least 3 seconds.3.2 Power Off3.3 LED3.4 ButtonsButtons BehaviorRecording mode: E nter Emergency modePlaylist: Back to previous menuReplay/Setting Menus:Back to camera modeRecording mode: E nter Playback MenuPlaylist/Setting: UpReplay mode: DeleteRecording mode: One short click leads to setting menuOne long press and device will take a snapshot Playlist/Setting:D ownReplay mode:Lock / UnlockRecording mode: One long press to turn audio recording on/offPlaylist/Setting:S electReplay mode: Play/Pause/Resume3.5 RecordingEmergency RecordingGPS (Option :GPS connection needed)Current DateTimeAudio record indicatorVideo recording timeStop & GoMotion DetectionMonitor ModeStop Sign RecognitionBattery4. SettingsPress the button to enter “Settings”.● Record Modea. Automatic Recordingb. Monitor Mode: When this mode is selected, your devicewill take snapshots every second while recording.c. Motion Detection: When this mode is selected, recordingstarts when dash cam detects movement. If there is nomovement for more than 60 seconds, recording will stop and be switched to detection mode.This function only works when the device has a continual power source after the vehicle´s engine isturned off.● Driving Safetya.Stop Sign Recognition:The device will recognize any StopSign and warn you with a beep.b.Stop & Go: After you stop for at least 10 seconds (as forred lights), the device will detect when the car in front has proceeded and it will give an audio alert to remind you to proceed driving as well.c.Driver Fatigue Alarm: When activated, the user can setupan alarm clock, periodically reminding you to rest. Options available are : 30 minutes/1 hour/2 hours/4 hours/off.d.Light Reminder : When activated, if driving in a darkenvironment (such as tunnel or parking structure), it willhave an audio alert and display the light alert icon on the screen. The alert can be turned on/off.e.Speeding Alertf .TPMS :GoSafe 780 supports the TireSafe D10E (soldseparately). The TireSafe D10E is a Tire PressureMonitoring System that allows you to view each of yourtire's pressure and temperature on your device's display.● Volu me : Set Volume.● Micropho ne : Enable or disable voice recording.● EV (Exposure Value)Adjust EV for better effect in different lighting condition. ● Resolution : Set recording resolution.● Back Camera Setup● Display Mode● Bump Recording : Set the impact sensitivity of the G-sensor.Note: This device does not support both the GPS antenna and TPMS simultaneously. Please use only one of the optional accessories at a time F.L.18psi 25°C R.L.18psi24°C F.R.18psi 25°C R.R.18psi24°C White Green Blue RedTire Pressure Tire Temperature Tire Pressure & Temperature displayFront LeftFront Right Rear Left Rear RightTemperature is normal.Warning, please check Tire. Start the carengine,no signal.Pressure isnormal.● Date/Time : Set date, time, and date format.● Time Zone : Set Time Zone.● Daylight Saving Time : Enable or disable daylight saving time.● Screen Saver : Set screen saver for stand-by .● Power on/off Sound : Set power sound on or off.● Video Stampa. Date StampEnable or disable date stamp on recordings.b. GPS StampEnable or disable coordinate stamp on recordings.● Language : Set display language. Options include简体中文, 繁體中文, English, Français, Español, Deutsch, Italiano, 日本語, Português, and Русский.● Format memory CardAll data on the MicroSD will be deleted.Data is irrecoverable after formatting.Please backup videos and photos beforeformatting the MicroSD.● Forma t Warning : Set format prompt interval. Options include 15 days, 30 days, 60 days, or OFF.● Default : Reset all values to factory default.● Version : Check the current firmware version.5. Record/Play/Delete record Snapshot function 5.1 Video Recording Circulation1 Video recording will start looping after powering on with the Micro SD Card plugged in.2 Each recorded file is 5 minutes long, with old footage being replaced when the MicroSD Card is full.5.2 Emergency Recording① Manual File BackupHold down the button , to backup file so that it will not be overwritten. You will see an icon at the top left of the LCD screen that looks like this This occurs when an emergency file is being recorded.② Auto BackupOnce the G-Sensor is activated by sudden impact, the device will automatically lock the file so that it is not overwritten.5.3 Snapshot① Hold for 3 seconds to take a snapshot while in recordingmode.② The snapshot images are located on the Micro SD Card in the PHOTOS folder. This is also where you can find the video files that are recorded.③ The icon will be shown after you take a snapshot. This will not disturb video recording mode.5.4 Copying Files with USB Connection① Connect device to your computer using a USB to mini-USB cable. It should be recognized as a removable device or show up as an icon titled “No Name” on your desktop.② There are video recording files located in folder \PAPAGO (looping video recording files) and (emergency video recording files) on the “removable device”.③ Copy the files to your computer. Please follow the copy and paste or drag and drop procedure for your computer model.5.5 Copying Files from Micro SD Card① Shut down the device and eject the Micro SD Card. (T o avoidcorrupting the last file recorded, do not eject SD Card immedia-tely after powering off.)② Insert the Micro SD Card onto adapter. Insert adapter into theMicroSD Card reader and your computer will automatically detectthe SD Card.③ There are video recording files located in folder \PAPAGO (looping video recording files) and (emergency video recording files) on the “removable device”.④ Copy the files to your computer. Please follow the copy and pasteor drag and drop procedure for your computer model.5.6 Play/Delete Video or Photo① Hold down to enter playback menu and to preview therecorded files.② Choose Type : Videos (regular recorded videos), Emergency (videos recorded in emergency mode) or Photos (snapshots taken).③ Press "up/down buttons" to browse the files. Click OK tochoose which file you want to preview.④ Click to OK to play file, or delete the file.本機使用注意事項【使用相關】①車輛熄火後,點煙器仍供電的使用者,在離開車時務必關閉電源或將點煙器插頭拔起,避免耗光電瓶內的電力,或造成其它意外狀況發生。
云想云终端配置说明书云想睿新(北京)科技有限公司V2.0一、基本介绍1.产品构造下图是该系列cloudthinks 标准的外观构造,具体的外观以您所拿到的实物为准。
2.接口及按键说明LAN灯以太网连接成功,指示灯显示绿色POWER灯电源适配器连接成功,指示灯显示绿色以太网接口连接以太网POWER键电源开关USB接口接入U盘或USB接口的鼠标键盘电源接口接入电源适配器显示器接口接入显示器耳机接口接入耳机麦克接口接入麦克3.侧面板①.麦克风插孔②.耳机插孔③.USB接口④.LAN指示灯⑤.电源指示灯⑥.电源按钮①.电源接口②. USB接口③. VGA接口④.LAN口二、基本操作1. 开机与关机按照“接口及按键说明”正确连接好各接口的外设,确保电源按钮处于关闭状态:开机当需要开机时,按下电源按钮开机。
按下电源按钮,电源指示灯显示绿色,表示连接成功,打开显示器进入系统,开机成功,如下图:此界面为服务器列表界面,用于显示云终端服务器信息如IP地址、操作系统、连接类型、主机名等,也可以添加、设置新的服务器信息。
服务器添加鼠标右键点击列表空白处,在弹出的菜单中点击“添加”,系统弹出管理密码输入框,默认管理密码为“123456”,输入密码点击“确定”后即可弹出新服务器“参数设置”窗口(如下图一所示),在“用户设置”菜单栏输入服务器IP地址、主机名、操作系统选择、登录用户名、密码信息等。
图一在“本地设置”菜单栏(如下图二)中设置“声音”输入输出模式和“USB口支持数量”。
“声音”项有两个选项,选中“声音支持”时云终端只支持声音输出模式,主要用于服务器为windows终端服务器。
选中“声音及麦克风支持”时云终端支持声音输入输出模式,同时需要在服务器安装“云想云终端服务器双向声音套件”。
如果云终端需要限制USB外设的接入,在“USB口支持数量”选项中将默认的“4”修改为“0”即可。
图二在“启动设置”菜单栏(如下图三)可以设置需要开机自动运行的窗口和本地应用程序,通常不需要修改。
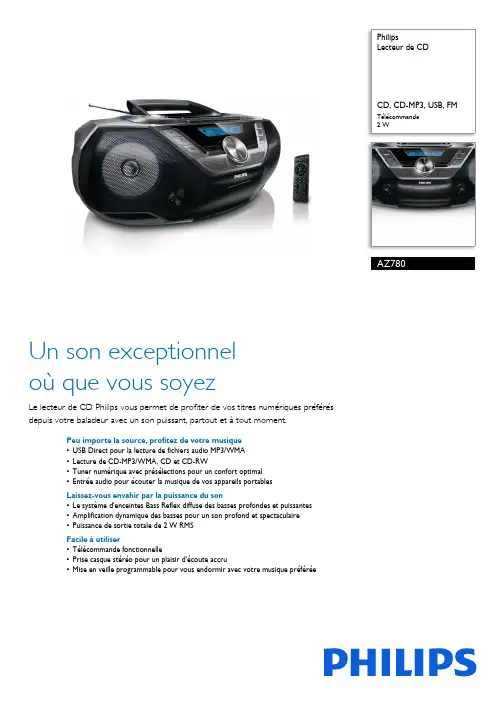
PhilipsLecteur de CDCD, CD-MP3, USB, FMTélécommande 2 WAZ780Un son exceptionnel où que vous soyezLe lecteur de CD Philips vous permet de profiter de vos titres numériques préférés depuis votre baladeur avec un son puissant, partout et à tout moment.Peu importe la source, profitez de votre musique •USB Direct pour la lecture de fichiers audio MP3/WMA •Lecture de CD-MP3/WMA, CD et CD-RW•Tuner numérique avec présélections pour un confort optimal •Entrée audio pour écouter la musique de vos appareils portablesLaissez-vous envahir par la puissance du son•Le système d'enceintes Bass Reflex diffuse des basses profondes et puissantes •Amplification dynamique des basses pour un son profond et spectaculaire •Puissance de sortie totale de 2 W RMSFacile à utiliser•Télécommande fonctionnelle•Prise casque stéréo pour un plaisir d'écoute accru•Mise en veille programmable pour vous endormir avec votre musique préféréePoints fortsUSB DirectGrâce au mode USB Direct, insérezsimplement votre périphérique USB dans le port USB de votre appareil Philips pour que ce dernier diffuse directement votre musique au format numérique.Lecture de CD-MP3/WMA, CD et CD-RWLa technologie de compression audio permet de réduire jusqu'à 10 fois la taille des fichiers audio numériques volumineux sans tropdégrader leur qualité audio. MP3 et WMA sont deux formats de compression qui vous permettent de profiter d'un maximum de musique numérique sur votre lecteur Philips. Téléchargez des chansons MP3 ou WMA sur les sites Internet autorisés ou créez vos propres fichiers musicaux MP3 ou WMA en encodant vous-même vos CD audio auformat MP3, puis en transférant votre musique sur votre lecteur.Système d'enceintes Bass ReflexCe système génère des basses profondes même pour des enceintes compactes. À la différence d'un système d'enceintes classique, il est doté d'un caisson de basses alignéacoustiquement sur le haut-parleur de graves afin d'optimiser les basses fréquences du système. Vous obtenez ainsi des basses plus profondes avec une distorsion amoindrie. Ce système est basé sur la résonance des masses d'air dans le caisson de basses pour provoquer des vibrations comme dans un haut-parleur de graves classique. Les basses fréquences sont étendues et créent une nouvelle dimension de basses.Télécommande pratiqueGrâce à la télécommande fonctionnelle, installez-vous confortablement et détendez-vous.Prise casque stéréoBranchez votre casque sur cet appareil Philips pour profiter d'une écoute individuelle lorsque vous le souhaitez. Utilisez votre casque pour apprécier la qualité sonore de vos morceauxpréférés sans déranger les personnes qui vous entourent.Amplification dynamique des bassesL'amplification dynamique des basses permet, d'une simple pression sur un bouton,d'apprécier votre musique au maximum, en accentuant les basses de l'enregistrement en fonction du volume (du plus bas au plus fort). À bas volume, il est en général difficile de percevoir les basses fréquences. Le système DBB permet d'augmenter le niveau des basses de façon à diffuser un son régulier, même à bas volume.2 W RMSCe système a une puissance de sortie totale de 2 W RMS. RMS signifie Root Mean Square, en français valeur efficace. Il s'agit d'une mesure courante, dont l'unité est le Watt, pour la puissance audio ou, plus précisément, la puissance du courant électrique transmis par un amplificateur audio à un haut-parleur. La puissance électrique fournie au haut-parleur et sa sensibilité déterminent la puissance sonore générée. Plus la puissance est élevée, meilleurest le son émis par le haut-parleur.Date de publication 2022-04-24 Version: 2.0.312 NC: 8670 000 97635 EAN: 87 12581 66776 4© 2022 Koninklijke Philips N.V.Tous droits réservés.Les caractéristiques sont sujettes à modification sans préavis. Les marques commerciales sont la propriété de Koninklijke Philips N.V. ou de leurs détenteurs respectifs.CaractéristiquesLecture audio•Supports de lecture: CD, CD-R, CD-RW, CD-MP3, CD-WMA•Modes de lecture de disques: avance/retour rapides, recherche piste suivante/précédente,répétition/lecture aléatoire/lecture programmée •Modes de lecture USB Direct: avance rapide/ retour rapide, lecture/pause, précédent/suivant, lecture programmée, répétition, lecture aléatoire, arrêtConnectivité•USB: Port USB•Sortie audio/vidéo: Casque (3,5 mm)•Entrée audio(3,5 mm)Tuner/réception/transmission •Antenne: Antenne FM•Bandes du tuner: FM•Présélections: 20•Tuner - amélioration: Réglage numérique auto Son•Accentuation du son: Ampl. dynamique des basses 2 niveaux, contrôle numérique du son•Système audio:stéréo•Réglage du volume: rotatif (numérique)•Puissance de sortie: 2 x 1 W RMS Enceintes•Nombre d'enceintes intégrées: 2•Enceintes - améliorations: Enceinte Bass Reflex 2 voies•Finition grille de l'enceinte: métalPratique•Type d'affichage: Écran LCD avec rétroéclairage •type de changeur: hautAccessoires•Câbles/Connexion: cordon d'alimentation•Télécommande•Guide de démarrage rapide: Multilingue •Garantie: Livret de garantieDimensions•Dimensions du produit (l x P x H):435 x 270 x 170 millimètre•Dimension de l'emballage (l x P x H):468 x 198 x 310 mm•Poids du produit: 3,00 kg•Poids (emballage compris): 4,06 kg Alimentation•Alimentation: 220 - 240 volt•Nombre de piles: 6 x LR20 pour le système principal (non fournies), 1 x CR2025 pour latélécommande (incluse)。

云终端X3————用户手册重要声明首先感谢您使用本公司的云终端设备。
为了让您能够轻松自由地使用本设备,在您开机使用之前,请仔细阅读我们随机提供的说明书,以便您能正确使用本机。
由于产品版本升级或其它原因,本文档内容会不定期进行更新。
除非另有约定,本文档仅作为使用指导,本文档中的所有陈述、信息和建议不构成任何明示或暗示的担保。
本说明书中的资讯资料如有变更,恕不另行通知,且不承担此手册产生的错误或者疏漏引起的任何责任。
注意事项●为保证使用安全,请用本产品专用电源适配器。
●在开机状态,切勿直接拔掉电源,避免突然断电损坏盒子。
●产品使用过程中请勿随意移动设备。
●请勿将产品放在高温、低温环境中,尽量保持工作环境的散热通风、防潮防水。
●请勿投掷、敲击或摇晃机盒,非专业人员的不得擅自拆卸机盒,不当操作可能会导致装置损毁。
●请勿使用刺激性的化学制品、清洁剂或腐蚀性的清洁剂来清洁机体。
关于云终端X3更多资讯欢迎访问华科官网/目录1 部件描述 ........................................................................... 错误!未定义书签。
2 连接 (5)2.1 连接显示器 (5)2.2 连接网线 (5)2.3 连接鼠标和键盘 (6)2.4 连接耳机和麦克风 (6)2.5 连接电源 (6)3 操作指南 (7)3.1 远程连接设置 ...................................................... 错误!未定义书签。
3.1.1 查找主机 (6)3.1.2 配置与快捷方式 (6)3.1.3关机与本机IP (7)3.2 控制面板 (7)3.2.1 网络 (7)3.2.2 显示与声音 (7)3.2.3 外设与启动................................................... 错误!未定义书签。
NC使用详解【本地运行】nc -v ip port【命令解释】扫瞄某 IP 的某个端口,返回信息详细输出。
====================================== =====================================【本地运行】nc -v -z ip port-port【命令解释】扫描某IP的端口到某端口,返回信息详细输出,但扫描速度较慢。
====================================== =====================================【本地运行】nc -v -z -u ip port-port【命令解释】扫描某 IP 的某 UDP 端口到某 UDP 端口,返回信息详细输出,但扫描速度较慢。
====================================== =====================================【本地运行】nc -l -p 80【命令解释】开启本机的 TCP 80 端口并监听。
===========================================================================【本地运行】nc -l -v -p 80【命令解释】开启本机的 TCP 80 端口并将监听到的信息输出到当前 CMD 窗口。
====================================== =====================================【本地运行】nc -l -p 80 > E:/log.dat【命令解释】开启本机的TCP 80 端口并将监听到的信息输出到E:/log.dat 下的日志文件里。
====================================== =====================================【本地运行】nc -nvv 192.168.1.101 80【命令解释】连接到192.168.1.101主机的 80 端口。
ZEISS LSCM 780 使用注意事项开机:(之前必须镜检,确保样本无误,开机后才发现样本不能实验者,取消两次实验资格)1.开三相稳压电源(注意:先开稳压电源后面的黑色扳手开关①,再按下稳压电源前面的绿色按钮②)。
如果出现报警声,请马上关闭稳压电源,并报告负责教师。
2. 两分钟以后依次打开电源控制板上的三个开关:先打开主开关MAIN SWITCH③,再依次打开SYSTEMS/PC④和COMPONENTS⑤开关。
注意:各个开关不要同时按下,开机时仪器会进行自检,每按下一个开关,请等待相应的部件自检完毕后再开下一个开关。
3. 打开电脑开关⑨。
点击图标 ,进入桌面,当看到桌面右下角图标时,方可点击桌面中央的软件图标 , 然后点击Start System开启软件。
注意:当桌面右下角显示图标 时,不可启动软件。
这时把电脑左边那台仪器的盖子掀开,按一下Reset按钮,等待显示图标。
注意:如需使用458nm或488nm或514nm激光线,则在开启软件后再打开氩离子(Ar+)激光器。
不需要使用这三种激光线,则不需要打开氩离子激光器。
氩离子激光器的打开顺序:先打开氩离子激光器正面的开关ON⑥,再顺时针旋转钥匙⑦至“—”的方向,等待绿色指示灯亮起方可开启光路(大约5-10min)。
注意:氩离子激光器在启动后,需要1h左右的预热时间才能进入稳定状态。
如果它的闲置时间在1h以上,可将激光器扳钮由“laser run”位置扳至“idle power”处⑧,保护激光器,延长使用寿命。
找细胞:※在明场下(用Transmitted light)找目标:点击①、②、③、④注意:如果实验只使用空气镜,放置样品后,建议先选择低倍物镜找细胞,再换用高倍物镜微调即可。
切记调焦和移动前后、左右的滑竿时,不要太快太猛,以免物镜顶到样品或载物台,这会严重磨损和划花镜头,甚至碰碎镜头!!切记显微镜左、右两边的粗准焦螺旋上方各有5个按钮,实验人员不要碰触,否则可能无法用眼睛找细胞。
IBM Power 780 服务器可扩展的模块化系统带来性能、可用性和 IT 效率要点⏹通过可提高利用率同时降低运营成本的灵活交付模式和动态资源管理,在企业范围内提供极高的基础架构效率。
⏹在企业范围内提供可信信息,从而确保持续的交易可用性并支持实时业务分析。
⏹提供最高等级的安全性,从而确保集成关键信息,同时降低风险和满足法规合规性要求。
⏹适用于私有云部署的理想平台。
地球每天都在变得更小、更扁平和更具智慧。
全球市场领域前所未有地密切关联。
好的和坏的经济冲击波都能在数纳秒之内波及全球。
每天都会有更新、更具智慧的技术出现。
转眼之间新的业务模型就已诞生,旧的业务模型就已消亡。
我们处在可推动增长与创新的重要技术变革当中,此变革构建于大量数据、云、移动设备和社交业务相互融合的基础上。
企业要生存,就需要灵活、有弹性地专注于其客户的成功。
这个时代为企业呈现了一个关键性世界,以重新打造他们可通过客户体验提供的价值观。
这些成功企业的最佳之处在于拥有具备以下特点的 IT 基础架构:包含高度安全的企业级系统,并且专为关键数据的终极可用性而设计。
它们具有最高的成本效率,可满足企业数据的潜在增长趋势、对新服务的需求,并将传统系统与业务数字化特性相集成。
在当今的 IT 环境中,性能已得到极大地提高,这意味着能以更快的速度交付更优质、更经济高效的服务。
IT 性能的新兴度量措施围绕基础架构效率、信息可用性和数据安全性而进行。
对 IT 的度量针对提供能应对快速增长、管理业务风险并同时满足所要求的更高服务水平的基础架构进行。
当然,大家还期望能够在更紧张的预算限制下提供新服务 - 期望 IT 能够以更少的资源完成更多的工作。
IBM® Power® 780 专为虚拟化整合业务关键型工作负载而设计,以行业独一无二的方式提供性能、可用性、效率和虚拟化。
PowerVM®虚拟化功能还可以独立于物理布局,跨所有分区和操作环境进行持续的资源动态调整,以便在最大限度降低能耗的同时优化性能。
Your quickstart guide for the MiniMed™780G systemOur goal is for your onboarding experience to be as seamless as possible.This book will guide you through the process before, during and after training.Hi! Welcome to your new MiniMed ™ 780G systemGetting started is as simple as READY (pre-training), SET (training), GO (after training).On the MiniMed TM 780G system training page, you'll find the training resources you need. Please complete all training steps, including booklets and videos, to ensure your success. Within a few days of receiving your shipment, you will be contacted by your StartRight representative who will connect you with all of the training support you need.You can also reach out to the team at *********************************. Training Steps:2. SETTrainingFind out about and access our flexible training options on thetraining website. Reach out to your StartRight representative tobe connected to a Certified Product Trainer.Completed3. GO!Post TrainingAfter training, we want to provide you with resourcesthat will continue to support you on your journey.Further training guidance is always available throughyour StartRight representative.Completed1. READYPre-TrainingGet prepared for everything you need to know before you start your product training.Please visit www.medtronicdiabetes.ca/780gtrainingto get started.Completed1. Ready Start hereDate:Time:Contact:Phone:Date:Time:Contact:Phone:********************************************Getting ready for your training Do not complete any of the following steps while connected to your new pump and until your healthcare professional has recommended you do so.Check the compatibility chart found on your local website www.medtronicdiabetes.ca/compatibility Download our new MiniMed ™ Mobile app for compatible Apple & Android devices.The app provides you with an easy to use interactive display of the information from your pump & CGM devices, right on your mobile device. Your information can be automatically uploaded to CareLink TM Personal software via the app.You can have up to five care partners following you. All you have to do is provide them with your username and accept their request within 24hrs.You will be prompted to sign-up for, or sign-in to, your CareLink TM Personal software account during the setup process. Please write down your username and password for future reference.IMPORTANT: Turning off "Automatic Updates" on your device can help ensurethat you won't be using an unverified version of the apps.CareLink TM Personal software username:Password:TIP Once you’re set up on the app turn off notifications until you’re ready to start wearing your pump.Let your care partner know about the CareLink ™ Connect app.Your care partner must download the Carelink ™ Connect app and include your username to get started.Getting connectedWhat you need for your training session Topics we will cover in your training Your pump1 box of reservoirs1 box of infusion setsThe Accu-Chek ® Guide Link meter, lancets and stripsA vial of U100 rapid acting insulin • Getting to know your device• Pump menu map• How your pump works• Programming specific settings• Inserting your first infusion set and sensor Guardian ™ Link (3) transmitter and charger 1 box of Guardian ™ Sensor (3)One-Press serter and serter for the infusion set (if required)Oval tape for the sensor (included in the sensor box)This Quickstart Guide• Routine steps to manage your insulin pump • Expectations for daily management • Potential detours—navigating and troubleshootingStop hereThe next section will be covered in your training session.Notes:Your training flow:We will start with Pump and CGM training and then cover SmartGuard ™ feature training. During training we will review these 4 topics:Get to know your device / SmartGuard ™FeatureDaily steps Stay on track Discuss important next stepsNotes: 2. Get set with trainingGet to know your menus MiniMed TM 780G system Simplified menu mapGet to know your home screensStatus iconsSuspend iconTrend arrowsSG readingActive insulin Low limit Desired range:3.9-10 mmol/LHigh limitCalibrating:After inserting a new sensor, a calibration is needed:– W ithin 2 hours after you connect the transmitter and start the warm-up period – A gain within 6 hours of inserting a new sensor – A gain every 12 hours for the remainder of use – W hen the system detects that a BG is needed for optimal performanceCalibrating 3-4 times per day is optimal. Beforemeals is a good time to calibrate.Step 3The insulin menu – probably what you'll use most frequently • Program Basal & Bolus settings • Practice Bolusing • S ee appendix for step-by-step instructions on how to program Basal & Bolus settingsPractice 1:Step 1: F rom the home screen, press the down arrow to access the Bolus Wizard ™ feature.Step 2: Enter carbsStep 3:Deliver BolusStep 1Check to make sure all devices are properly pairedStep 2Insert the sensor Check out the sensor insertion video and taping tips resources on our website.Step 5It is time to insert your infusion set.TipWhen you do future set changes, alwaysremember to disconnect from the infusion set you are wearing before you start the process.Step 6Review when to use additional menu itemsStep 4What to do if you need to enter your BG manually, when not using the linking meter.Practice 2:Step 1: Enter a BGStep 2: From the home screen, press the down arrow to access the Bolus Wizard ™ feature.Step 3: Enter carbs™ feature, the sensor glucose valueBolus –10-20 minutes before you eatCheck BG todeliver a correction bolus before meals and bedtimeObserve real-time glucose trendsEvery day:Here is an example of what a typical day could look like. You should discuss your individual needs with your healthcare professional.Have Breakfast Bolus beforeyou eatLunch Time Check BG*Bolus before you eatDinner Time Check BG*Bolus before you eatExerciseSet Temp Basal while getting ready Have snack on handBedtime Check BG*Wake-Up *These are only suggested options for BG tests. Calibrate when appropriate.Check BG*Change your infusion sets and reservoirs as indicated. Change your sensor every 7 days.Remember to charge your transmitter.Every week:Upload your personal data to CareLink ™ each week manually or automatically using the app.TipIf you receive an 'Enter BG' alert, and you cannot take a BG right away (for example, if you are driving or in a meeting)—you can set the Snooze to remind you to take action at a later time.Viewing the trendsTipDon’t forget to charge your transmitter every time you change your sensor.Notes:How can I see how I am managing my diabetes?Carelink ™SoftwareApps• CareLink ™ Personal software converts data from your pump into easy to understand insights• Blue adapter required for upload if not using MiniMed ™ Mobile app• MiniMed ™ Mobile app: secondary display for patient• CareLink ™ Connect app: available for up to 5 care partners• Automatic uploads to CareLink TM Personal softwareIt is important to understand that detours from your daily routine may happen—and knowing what to do can make the difference.Alerts & AlarmsAn alert will appear if sensor glucose reaches or falls below 3.0 mmol/L or sensor glucose is at or above 13.9 mmol/L for 3 hours.Low glucose - If BG drops below 3.9 mmol/L, use the rule of 15:High glucose - If a BG is high but lower than 13.9 mmol/L:Hypo & Hyper management5-15 grams fast-acting carbsTake correction bolus Check glucose in 15 minutesCheck glucose in 1 hourRepeat treatment if glucose still below 3.9 mmol/L Troubleshoot if BG is not trending downwardHigh glucose -If BG is higher than 13.9 mmol/L: check for ketonesIf ketone test is NEGATIVE:1. Give correction bolus with pump2. Recheck glucose in 1 hour • If glucose is decreasing, continue to monitor until within range•If glucose is the same or higher,• Give correction dose using a syringe or insulin pen • Change infusion set• Continue to check glucose every hour untilreturns to normalIf ketone test is POSITIVE:1. Take correction dose using syring or insulin pen2. Change infusion set3. Troubleshoot pump4.Check glucose every 1-2 hours. Give correction as needed5. Drink non-carb fluids6. If glucose continues to rise or if you have moderateto high ketones, nausea, vomiting, or difficulty breathing, notify physician and go to the nearest emergency room.Notes:It is important to know whom to call when you need help.Available to assist you with any technical issues or questions that you may have regarding the operation of your MiniMed ™ 780G system.Available to assist you with your initial onboarding and ongoing training options.Medical care & questions.How to know when to call your HCP vs Tech Support24-HourTech Support 1-800-284-4416Healthcare Professional (HCP)StartRight*********************************Step 1Go to the SmartGuard ™ menu,scroll down and change to On Go to SmartGuard ™ Settings, program & SaveStep 2Review SmartGuard ™ ChecklistReadyAction requiredWaitingAction required Action requiredAction requiredYour home screen will look a bit different now that you’re using the SmartGuard ™ featureSensor GraphTemp TargetSensor GlucoseSmartGuard ™ShieldAuto correctionBolusAutoBasalNotes:Bolus for carbs 10-20 minutes before mealsRespond promptly to alerts and alarmsFollow self-careguidelines for insulin pump technologyEvery day:Here is an example of what a typical day could look like. You should discuss your individual needs with your healthcare professional.* W hen bolusing in the SmartGuard ™ feature, SG will populate and you'll enter the grams of carbs that you plan to eat. Calibrate when appropriate.ExerciseSet Temp Target 60-120 minutesbefore exercise beginsMonitor for SmartGuard ™blue shield throughout Have snack on handHave Breakfast Bolus before you eat*Check for SmartGuard ™ blue shieldBolus before you eat*Dinner Time Bedtime Check for SmartGuard ™ blue shieldCheck for SmartGuard ™blue shieldWake-Up Check for SmartGuard ™ blue shieldLunch Time Bolus before you eat*View your time in range (TIR)Upload your data to CareLink each week manually, or automatically using the appBolusingBolusing when using SmartGuard ™ technology is the same. The only difference is you can’t change the calculated bolus amount. Need a reminder? Go back to page 9.Do I need to use a BG meter?Some situations will require you to use your blood glucose (BG) meter.These situations will include:2.Using the Bolus Wizard ™ feature in Manual Mode to give a correction Bolus3.When you are not sure if your SG reading is correct or when it is unavailable4.When SG readings are different from symptoms5.When you have taken medications thatcontain acetaminophen or paracetamol, as they may cause your sensor glucose values tobecome falsely elevated1.To calibrate your sensordifference.Alerts & AlarmsAn alert will appear if you need to enter your BG. The pump will stay in the SmartGuard ™ feature for a maximum of 4 hours if the issue is not resolved.If you do exit the SmartGuard ™ feature, you will go into manual mode until the required action is completed.Anytime you’re concerned about lows (e.g. exercise) you can set a temporary fixed target.Temp targetStaying in the SmartGuard TM featureTipConsider setting Temp Target 1-2 hours before you exercise.When Temp Target is set, auto correction boluses are not delivered.Notes:StartRight everydayStartRight is an exclusive program available to everyone starting a new Medtronic diabetes device. StartRight will be your first point of contact for a successful training journey.Our StartRight representatives will offer you training guidance and tipsto help you transition to your new technology more easily.Please watch for a communication from yourStartRight representative, in the days afterreceiving your new devices or reach out to***************************************.StartRight will remain yourpoint of contact for anyongoing training needs.3. GO!YOU'RE READY TO THRIVE!Where to look for answersWhere to look if you have questions?Don't ForgetTips and TricksContact usImportant Websites:Technical support .............................................................................1-800-284-4416 Supplies .............................................................................................1-800-284-4416StartRight Email ................................................................................*********************************Website: w ww.medtronicdiabetes.cawww.medtronicdiabetes.ca/780gtrainingKeys to success• Stay connected with your StartRight representative • Ask your trainer if you need more tape options • Set realistic expectations•Use the shortcut options on the pump for easy navigationPlan ahead• Always carry supplies with you to treat lows• Always pack extra pump supplies when traveling and keep in your carry-on• Check out the Medtronic loaner program before traveling• Aim to not be away from your pump or disconnected for more than one hourPractice good bolus behaviours• Count and enter carbs before meals • Dose bolus insulin 10-20 minutes before meals• Enter accurate information into the pump - say what you're doing, exactly when you’re doing it Follow CGM guidelines• Insert and tape the sensor correctly for optimal performance• Respond when an action is required, e .g.Setting the language and time format1. Turn the meter on by briefly pressing OK .appears.2.3.highlight desired format and press OK .Setting the T ime/date1. From Main Menu Settings and press OK .2.OK .3. 4. to move to the next field.5. When complete, press OK to save and returnto the previous menu.Sending your BG Result to your pump• If is not pressed there will be a delay in the display of theBG result on the pump.•Medtronic will triage technical support calls related to themeter to Roche if needed.ACCU-CHEK ®Guide linkLet’s get your meter set upLet's pair your meterAnd transmitterPair your meterBG meter ScreensThe meter is ready to pairwith the pump when themeter serial number appearson the meter screen.Select Settings Select Wireless Select YesSearch Select Device Confirm Device Pump ScreensIf the connection is successful, a "Pairing successful!" message appears on the pump.Pair your transmitterRemove transmitterfrom the charger toput it into 'searchmode'.Search Select DeviceConfirm DeviceLet's set your Basal ratesBasal rate values and set times are examples only. Consult your healthcare team to know the time slots and basal rates for you.Select Insulin from the Menu Select Delivery Settings Select Basal Pattern SetupSelect Basal 1 >Options > EditSet the different time slots When finished select Done and SaveTo view the current basal pattern in use or switch from one basal pattern to the other, from the Insulin menu select Basal> Basal patterns.Let's set your Bolus Wizard TMBolus Wizard values and set times are examples only.Consult your healthcare team to know the time segments and settings for you.Select Insulin from the Menu Select Delivery SettingsSelect Bolus Wizard Setup , Select Bolus Wizard OnRead the explanation of the Bolus Wizard then Select Nextthe g/U. Select to confirm.time slot and the mmol/L. Select to confirm.time slot and the mmol/L.Select to confirm.When finished select Save.Delivery Settings can also be accessed from the Settings menu. For more information regarding the Bolus Wizard menu refer to the User Guide for the MiniMed ™ 780G System.IMPORTANT SAFETY INFORMATIONThe MiniMed™ 780G insulin pump is indicated for use by patients age 7-80 years with Type 1 diabetes, whose total daily dose of insulin is 8 units per day or more. The MiniMed™ 780G system is intended for the continuous delivery of basal insulin at selectable rates and the administration of insulin boluses at selectable amounts. The system is also intended to continuously monitor glucose values in the fluid under the skin. The MiniMed™ 780G system includes SmartGuard™ technology, which can be programmed to provide an automatic adjustment of insulin delivery based on continuous glucose monitoring (CGM) and can suspend the delivery of insulin when the sensor glucose (SG) value falls below, or is predicted to fall below, predefined threshold values.The Medtronic MiniMed™ 780G system consists of the following devices: MiniMed™ 780G Insulin Pump, the Guardian™ Link (3) Transmitter, the Guardian™ Sensor (3), One-press Serter, and the Accu-Chek® Guide Link meter. The Guardian ™ Sensor (3) is required for CGM. The Guardian Sensor (3) glucose sensor is the only sensor compatible with the MiniMed™ 780G insulin pump and Guardian Link (3) transmitter.Always use the fingertip for blood samples intended for sensor calibration. Blood samples from other locations, such as the palm or forearm, have not been studied, and the accuracy of these samples is unknown. Pump technology is not recommended for people whose vision or hearing does not allow for the recognition of pump signals, alerts, or alarms. Pump technology is not recommended for people who are unwilling or unable to maintain contact with their healthcare professional.The safety of the MiniMed™ 780G system has not been studied in pregnant women, persons with type 2 diabetes, or in persons using other anti-hyperglycemic therapies that do not include insulin. The performance of the Guardian Sensor (3) has not been evaluated for pregnant women or persons on dialysis. For complete details of the system, including product and important safety information such as indications, contraindications, warnings and precautions associated with the system and its components, please consult the appropriate user guide.Warning: When the MiniMed™ 780G system is not using the SmartGuard™ feature, pump functions are operating in manual mode.In manual mode, the sensor glucose readings from Guardian™ Sensor (3) are not intended to be used directly for making therapy adjustments, but rather to provide an indication of when a finger stick/blood glucose (BG) meter reading may be required. All therapy adjustments should be based on measurements obtained using BG meter and not on values provid -ed by the Guardian™ Sensor (3) in manual mode.99 Hereford Street Brampton, Ontario L6Y 0R3CanadaTel: (905) 460-3800Fax: (905) 460-3998© 2022 M e d t r o n i c . A l l r i g h t s r e s e r v e d . M e d t r o n i c , M e d t r o n i c l o g o , a n d E n g i n e e r i n g t h e e x t r a o r d i n a r y a r e t r a d e m a r k s o f M e d t r o n i c . T h i r d p a r t y b r a n d s a r e t r a d e m a r k s o f t h e i r r e s p e c t i v e o w n e r s . A l l o t h e r b r a n d s a r e t r a d e m a r k s o f a M e d t r o n i c c o m p a n y .A C C U -C H E K , A C C U -C H E K G U I D E , A C C U -C H E K F A S T C L I X , a n d A C C U -C H E K S O F T C L I X a r e t r a d e m a r k s o f R o c h e D i a b e t e s C a r e . C A -D I B -0121-E R e v . 11/2022medtronic.ca。
璇玑NC780 云终端用户指南格式说明:【XXX】——菜单名称和按钮名称的表示方法〈XXX〉——窗口名称的表示方法——重要信息提示目录1 终端简介 (4)2 NC780 主机接口说明 (4)3 连接方式 (5)4 使用说明 (5)4.1 开机画面 (5)4.2 初始化网络 (6)4.3 自动连接 (7)4.4 配置中心 (7)4.5 连接设置 (9)新建D ESKPOOL 连接 (10)新建M ICROSOFT RDP 连接 (10)4.8 显示设置 (12)4.9 网络设置 (14)4.10 网络诊断 (15)4.11 系统 (16)5 恢复出厂设置 (20)6 常见问题 (20)6.1 如何解决显示器黑屏问题 (20)6.2 如何解决G OOGLE C HROME 浏览器的声音问题 (21)1 终端简介璇玑NC780 云终端是一款小巧精致的云终端设备。
它采用高性能ARM Cortex A9 四核1.6GHz 处理器,运行璇玑科技自主研发的云端操作系统。
主要特点有:● 高性能,支持1080 分辨率的显示器● 外观精致小巧,无风扇,超静音设计● 节能环保,超低功耗● 深度优化的微软RDP 桌面协议●支持RemoteFX 图形增强协议● 支持流畅的在线视频● 支持J-Player 重定向视频播放器● 支持软件在线升级● 支持USB 重定向2 NC780 主机接口说明图2-1 主机接口3 连接方式图3-1 使用NC780 云终端连接远程桌面服务器连接示意图4 使用说明NC780 主机按图3-1 虚线框内所示方式连接好显示器、键盘、鼠标、网线以及电源。
4.1 开机画面图4-1 主机的开机画面主机接通电源后,进入如图4-1 所示开机画面,开机画面中央为璇玑科技的Logo,Logo 下方动态显示了系统的加载进度,系统加载完成后,开机画面结束,进入4.2 节描述的“初始化网络”阶段。
注意,开机画面结束后,可能显示器黑屏,原因是显示器不支持主机当前的分辨率设置。
请参考6.1 节描述,恢复出厂分辨率设置。
4.2 初始化网络系统加载完成,主机进入如图4-2 所示的网络初始化阶段,网络初始化阶段主要检测网络是否可用,IP 地址配置是否正常,如果网络初始化成功,主机进入4.3 节描述的自动连接状态。
图4-2 网络初始化注意,如果网络初始化失败,主机会进入4.4 节描述的配置中心界面,网络初始失败的原因可能包括:1) 网络连接断开,需要检查主机是否插有网线和交换机是否工作正常;2) 如果是动态获取IP 地址,获取IP 失败会导致网络初始化失败,请检查DHCP 服务器是否正常;4.3 自动连接如果没有配置自动连接,主机会跳过自动连接阶段,进入4.4 节描述的配置中心。
如果配置了自动连接,主机成功初始化网络后,就会进入如图4-3a 所示远程桌面自动连接倒计时。
倒计时期间,用户可以取消自动连接。
倒计时结束后,进入如图4-3b 所示的远程桌面自动连接。
图4-3a 自动连接倒计时图4-3b 自动连接如果自动连接失败,系统进入如图4-3c 所示的自动重连状态,倒计时15 秒后,重新开始自动桌面连接,如果连接失败,再次进入4-3c 所示的自动重连倒计时。
图4-3c 自动重连注意,在自动连接阶段,用户取消自动连接或自动重连,系统会进入4.4 节所述的配置中心。
4.4 配置中心如图4-4a 所示,进入配置中心之前,需要输入管理员密码。
图4-4a 输入管理员密码注意,如果没有设置管理员密码,系统会直接进入如图4-4b 所示的配置中心。
(设置管理员密码,请参考4.12 节)图4-4b 配置中心主界面如图4-4b 所示,配置中心分为三大功能区:⏹主菜单区:配置中心的菜单列表。
⏹设置窗口:设置各项主机参数的区域。
⏹状态栏:显示主机的当前主要状态信息。
主菜单区列出了配置中心的主要功能,点击菜单区图标进入相应的设置窗口,主菜单项包括:⏹连接设置:管理远程桌面会话连接。
⏹显示设置:设置分辨率和界面语言。
⏹网络设置:配置网络IP 地址、子网掩码、网关、DNS 等。
⏹网络诊断:提供网络连接的PING 诊断操作。
⏹系统:提供系统级操作接口以及显示系统相关信息。
4.5 连接设置进入配置中心主界面,默认显示<连接设置>界面,或者点击配置中心主菜单的【连接设置】,进入如图4-5a 所示的<连接设置>界面,红色虚线内是远程桌面连接列表。
图4-5a 连接设置主界面⏹ 连接类型NC780 云终端支持两种连接类型:◆ Deskpool 连接:Deskpool 虚拟桌面管理系统的连接入口,默认使用微软RDP 远程桌面协议。
◆Microsoft RDP 连接:MS RDP 服务器连接,采用微软RDP 远程桌面协议。
⏹ 连接列表每增加一个连接配置,在连接列表中会保存一条记录,连接列表显示的字段主要包括:◆ 连接名称:增加连接时输入的全局唯一的连接名称。
◆连接类型:Deskpool、Microsoft RDP。
◆ 服务器地址:该连接的远程服务器地址。
◆ 自动连接:是否设置为开机自动连接,一台主机可以设置一个自动连接。
◆ 操作:【连接】、【编辑】、【删除】三个操作按钮。
新建Deskpool 连接点击【新增Deskpool 连接】,可以看到如图4-6 所示的对话框:图4-6 新增Deskpool 连接输入【连接名称】和【服务器地址】,点击【添加】,即可添加Deskpool 桌面会话连接。
如果勾选【记住账户信息】,用户可以输入Deskpool 桌面用户的【用户名】和【密码】,在远程连接Deskpool 服务器时,自动完成用户登陆。
新建Microsoft RDP 连接点击【新增Microsoft RDP 连接】,可以看到如图4-7a 所示对话框,输入【连接名称】、【服务器地址】、如果勾选【记住账户信息】,可以输入登录远程桌面的【用户名】、【密码】和【域名】,点击【添加】,即可增加MS RDP 桌面会话连接。
图4-7a 新增Microsoft RDP 连接设置Microsoft RDP 连接选项如图4-7b 所示,包括用户的个性化选项和远程登录桌面后,需要自动运行的程序。
图4-7b 设置Microsoft RDP 选项注意,RemoteFX 选项只能和Hyper-V 的虚拟化平台配合使用,当RemoteFX 选项有效启动时,色深选项无效,RemoteFX 缺省使用32 位色深。
设置Microsoft RDP 连接体验如图4-7c 所示,包括选择RDP 连接的色深和界面体验。
系统给出了默认设置。
图4-7c 设置Microsoft RDP 体验4.8 显示设置点击配置中心主菜单的【显示设置】,进入如图4-8a 所示的<显示设置>界面。
图4-8a 显示设置设置分辨率在【分辨率】列表中,选择适合显示器的分辨率,然后点击【保存】按钮。
系统弹出如下提示对话框。
图4-8b 修改分辨率提示对话框点击图4-8b 的【确认】按钮,系统会重新启动。
重启完成后,出现如图4-8c 所示提示对话框。
请在倒计时15 秒钟到期前点击【确认】按钮。
如果不点击【确认】,系统在倒计时完成后重启系统,恢复成到以前的分辨率。
图4-8c 修改分辨率提示对话框用户在设置主机分辨率时,如果设置了显示器不支持的分辨率,可能会导致黑屏,此时不做任何操作,系统会等待确认超时后重新启动,恢复到原来的分辨率设置。
⏹ 设置语言在语言列表中,选择需要的语言【简体中文】或者【English】,点击【保存】,系统将以新的语言重新显示界面。
4.9 网络设置点击配置中心主菜单的【网络设置】,进入如图4-9a 所示<有线网络>界面。
图4-9a 有线网络设置⏹ 设置有线网络1)配置网络为DHCP在【配置】列表中选择DHCP,然后点击【保存】。
即可把网络设置为DHCP 模式。
点击【刷新】按钮可进行DHCP 的刷新操作,重新向DHCP 服务器申请租约。
2)配置网络为静态IP在【配置】列表中选择【静态地址】,依次输入【IP 地址】、【子网掩码】、【网关】、【域名服务器1】、【域名服务器2】,点击【保存】。
注意,如果输入的IP 地址和网络上其它系统的IP 地址冲突,可能会导致网络连接不可用或者主机不能稳定连接远程桌面,在设置静态IP 前,请确保网络地址不冲突。
点击【PPPoE】,进入如图4-9b 所示<PPPoE>设置界面。
图4-9b PPPoE 连接设置PPPoE 设置在【用户名】和【密码】栏输入PPPoE 的拨号账户信息,点击【连接】按钮,即可启用PPPoE 连接。
请确保账户信息正确并连接到广域网。
点击【保存】按钮可以保存当前拨号账户信息。
勾选【是否自动连接】选项,可以在系统每次启动时自动开启PPPoE 连接,完成自动拨号。
点击【日志】按钮,可以显示最近的拨号行为信息。
拨号成功后,在【IP 地址】、【子网掩码】、【网关】、【域名服务器1】、【域名服务器2】栏目会显示当前广域网配置信息。
4.10 网络诊断点击配置中心主菜单的【网络诊断】,进入如图4-10 所示的<网络诊断>界面。
图4-10 网络诊断在地址栏中输入IP 地址或者主机名,然后点击【ping】,即可开始对指定的地址进行Ping 操作。
Ping 的结果会在下方的区域中显示。
用户可以通过修改【参数设置】,指定Ping 数据包的大小和个数。
4.11 系统点击配置中心主菜单的【系统】,进入<系统设置>界面,<系统设置>界面包五个子页面:<信息>、<声音>、<操作>和<时间>。
如图4-11a 所示的<信息>页面显示了当前主机的软硬件信息:⏹系统信息在【系统信息】一栏中,可以看到【系统名称】、【产品名称】、【产品序列号】、【硬盘容量】、【内存容量】、【CPU 信息】、【有线网卡】、【无线网卡】、【镜像发布时间】等信息。
⏹软件信息在【软件信息】一栏中,可以看到【操作系统】、【RDP 协议】、【Deskpool VDI 代理】等信息。
图4-11a 系统信息如图4-11b 所示的<声音>页面显示了当前主机耳机和麦克风的音量设置,缺省为最大音量设置:图4-11b 音量设置如图4-11c 所示的<操作>页面显示可以执行的相关系统操作功能:图4-11c 系统操作⏹重启系统点击【重启系统】,并确认,系统会自动重新启动。
⏹系统更新系统更新功能用于对系统软件进行升级操作。
请按照如下指导进行主机的软件升级:第一阶段,升级准备:1) 下载相应主机的补丁包(名称为update.jytc),下载地址:2) 准备U 盘,并且格式化为FAT32 格式,如果U 盘已经格式化,请确认U 盘为FAT 或者FAT32 格式;3) 将update.jytc 拷贝到U 盘的根目录。