电动自行车电池【天能】使用说明书
- 格式:pdf
- 大小:6.23 MB
- 文档页数:39
电动车电池管理系统的使用教程电动车电池管理系统(BMS)是一种用于监测和控制电动车电池的系统,旨在提高电池的性能和寿命。
本文将介绍电动车电池管理系统的基本功能和使用方法,帮助用户更好地了解和操作BMS。
第一部分:电动车电池管理系统的基本功能1. 电池健康监测:BMS能够实时监测电池的工作状态,包括电池的电压、温度和电流等参数。
用户可以通过监测数据来判断电池的健康状况,及时发现和解决问题。
2. 电池状态预测:BMS能够根据电池的历史数据和当前状态,预测电池的寿命、剩余容量和可用行驶里程等信息。
这些预测能够帮助用户更合理地使用电池,在需要时提前做好充电准备。
3. 充放电保护:BMS能够监控电池的充放电过程,并通过控制充电电流和放电电流,保护电池免受过充和过放的损害。
当电池达到设定的充电和放电阈值时,BMS会自动控制充放电过程。
4. 温度管理:BMS能够监测电池的温度,并根据温度变化调整充电和放电参数。
当电池温度过高时,BMS会降低充放电电流,以降低电池的热失控风险。
5. 故障诊断和保护:BMS能够识别电池系统中的故障,并通过断电或报警等方式保护电池和车辆。
一旦发现故障,BMS会及时发出警报,并提供相应的故障诊断信息,方便用户进行维修。
第二部分:电动车电池管理系统的使用方法1. 查看电池信息:使用BMS软件或显示屏,可以查看电池的电量、温度、电流和电压等信息。
用户只需将显示屏或手机连接到电池上,并打开相应的软件,即可实时获取电池信息。
2. 设置充放电参数:根据实际需求,用户可以通过BMS设置电池的充放电阈值。
充电阈值决定了何时停止充电,放电阈值决定了何时停止放电。
通过设置适当的阈值,可以提高电池的充放电效率,延长电池寿命。
3. 系统校准:在使用BMS之前,用户需要进行系统校准,以保证BMS读取到的电池数据准确无误。
校准步骤一般包括电压和温度的校准,具体操作步骤请参考产品说明书。
4. 故障排除和维护:如果电池管理系统出现故障或异常,用户可以参考产品说明书中的故障排除方法进行处理。
电动车电池维护技术手册电动车电池是电动车的重要组成部分,对其进行正确的维护和保养,可以延长电池的使用寿命,提高电动车的性能和续航能力。
本技术手册将介绍电动车电池的基本知识、维护方法和常见故障处理措施,帮助电动车用户更好地使用和保养电动车电池。
一、电动车电池的基本知识1. 电动车电池的种类和特点电动车电池主要有铅酸电池、锂离子电池和镍氢电池等种类。
其中,铅酸电池价格便宜,但重量较重,容量相对较小;锂离子电池能量密度高,轻量化,但价格较高;镍氢电池具有高温性能好,充放电效率高等特点。
2. 电动车电池的使用注意事项(1)避免过度放电:长时间不使用电动车时,应将电池存放在干燥通风的地方,并按时进行充电以避免电池过度放电。
(2)避免过度充电:应根据电动车的实际需求进行充电,避免充电时间过长或过度充电,以避免电池损坏。
(3)注意温度影响:避免将电动车置于高温或低温环境下,因为温度过高或过低都会对电池性能产生影响。
二、电动车电池的维护方法1. 充电与放电控制(1)合理充电:根据电动车电池的类型和厂商要求,选择合适的充电方式和充电时间,避免过度充电。
(2)避免过度放电:在电动车行驶过程中,应及时充电,避免电量过低导致电池过度放电。
2. 清洁与防护(1)保持电池清洁:定期检查电池表面是否有积尘,如有应及时清洁,避免灰尘对电池的影响。
(2)防止水分侵入:避免电池进水,以免造成电池内部腐蚀。
(3)防止碰撞和挤压:在安装电池时需注意避免碰撞和挤压,防止电池外壳变形或内部结构损坏。
三、电动车电池常见故障处理措施1. 电池容量下降(1)检查充电器和电源是否正常工作,确保充电效果良好。
(2)检查车辆使用过程中是否存在异常情况,如高温环境下长时间停车,可能导致电池容量下降。
2. 电池自放电(1)检查电池连接线路是否松动,需要及时紧固。
(2)检查电池是否老化,如无法修复,需更换新的电池。
3. 其他故障处理遇到电动车电池无法正常充放电、电动车无法启动等问题时,应及时联系专业维修人员进行处理。

电动车蓄电池使用常识江苏省泗阳县李口中学沈正中1.新购买的电动车在使用前要对蓄电池进行充电因为蓄电池置于车上待售,存在自放电现象(任何蓄电池均有自放电),使电压下降,电池贮存的容量不足。
购买的新电池应及时充足电后再使用,补充电方法为将随车专用充电器对您的新车充电至绿灯亮(即充足),新购买的蓄电池也同理也要充足。
2.电动车的核心装置电动车上的四大件:蓄电池、电机、控控制器、充电器是电动车的核心(主要装置部分).我们通常形象地把蓄电池比喻为电动车的心脏,控制器比喻为大脑,电机比喻为四肢,充电器比喻为外界能量输入.四者只有进行合理配合使用才能发挥电动车的最佳性能.无论哪一装置出现问题或相关参数不符合相关配置要求则反应在电动车上就出现了续行里程短,蓄电池寿命提前终止.所以说电动车里程跑不长并不全是蓄电池的问题。
3.电动车长期不用时对蓄电池的处理必须将蓄电池充足电后再贮存,并且以后每个月必须对电池进行一次补充电.以避免电池因长期亏电贮存导致电池因极板硫酸盐化而使容量下降甚至报废。
4.长期短距离骑行会使电动车电池容量下降建议您每隔一个月对蓄电池进行一次深放电(一次性完成),即长距离骑行直到欠压指示灯亮,然后立即充电恢复电池容量,这样可以激活电池、延长蓄电池使用寿命同时也让你了解到电池当前的容量状况。
5.夏季使用电动车注意事项(1)避免在高温烈日下暴晒;(2)严格禁止在高温环境下充电;(3)避免高温下行驶后立即充电,防止充电时间过长(正常8小时左右);(4)电池充电时电源箱发烫或不转绿灯,应及时到电池经营店或售后服务网点对电池或充电器进行检测维护。
6.冬季电动车电池电量会减少冬季使用电动车您会感到续行里程明显下降(北方更明显),这是正常现象。
因低温环境下一则蓄电池充电接受能力降低,再则电解液粘度增大,电化学反应阻力增加,结果导致蓄电池容量下降。
故消费者您在冬季使用时应避免将电动车放在室外过夜或低温环境下充电,一般要求充电12小时左右。
如何使用电动车的电池对于骑行电动车的朋友,特别像配置大功率电机的朋友,一般半年到一年左右要更换电池,如何让电池的使用寿命延长以延长更换电池的周期是每个购车的朋友十分关心的问题。
在这一期里我们先介绍一下铅酸电池的工作原理。
首先看下它们的反应方程式:铅酸电池它是以海绵状的铅作为负极,二氧化铅作为正极,我们把这二种物质为活性物质,用硫酸水溶液作为电解液,它们共同参与了化学反应。
从上述反应原可以看到,在放电时,正负极材料都与电解液中的硫酸反应生成硫酸铅。
在正常情下,所生成的硫酸铅结构疏松,并且其晶体非常细小,电化学活性很高。
在充电时种活性很高的硫酸铅可以在电流作用下重新生成正极的二氧化铅和负极的海绵状铅通过这种稳定的可逆过程,电池实现了储存电能和释放电能的作用。
在前一期里,我们介绍了铅酸电池的工作原理,那么在这一期里我将介绍一下导制铅酸电池寿命短的原因:第一个原因:电池本身引起的为什么这么说呢!在前一期里我们知道了铅酸电池的工作原理,铅酸蓄电池充电的过程是电化学反应的过程,充电时,硫酸铅形成氧化铅,放电时氧化铅又还原硫酸铅。
而硫酸铅是一种非常容易结晶的物质,当电池中电解溶液的硫酸铅浓度过或静态闲置时间过长时,就会“抱成”团,结成小晶体,这些小晶体再吸引周围的酸铅,就象滚雪球一样形成大的惰性结晶,结晶后的硫酸铅充电时不但不能再还原氧化铅,还会沉淀附着在电极板上,造成了电极板工作面积下降,这一现象叫硫这时电池容量会逐渐下降,直至无法使用。
当硫酸铅大量堆集时还会吸引铅微粒形铅枝,正负极板间的铅枝搭桥就造成电池短路。
如果极板表面或密封塑壳有缝隙,酸铅结晶就会在这些缝隙内堆积,并产生膨胀张力,最终使极板断裂脱落或外壳破造成电池不可修复性物理损坏。
所以,导致铅酸蓄电池失效和损坏的主要机理就是池本身无法避免硫化。
第二个原因:电池生产的原因针对电动自行车用铅酸蓄电池的特殊性,各个电池制造商采取了多种方法。
最型的方法如下:①增加极板数量。
电动车电池的正确使用方法电动车电池的正确使用方法1、不要任凭更换充电器,不要去掉掌握器的限速各个制造商的充电器一般都有共性化需求,在没有把握的时候不要随便更换充电器。
假如续行里程要求比较长,就必需为了异地充电而配备多个充电器,把白天补足充电的充电器采纳另外补充的充电器,而晚间采纳原配的充电器。
去掉掌握器的限速,虽然可以提高一些车的速度,但除了会降低车的平安性以外,也会降低电池的使用寿命。
2、爱护好充电器一般的使用说明书上面都有关于爱护充电器的说明。
许多用户没有看说明书的习惯,往往除了问题以后才想起找说明书看,常常为时已晚,所以先看说明书是特别必要的。
为了降低成本,现在的充电器基本上都没有做高耐振动的设计,这样,充电器一般不要放在电动自行车的后备箱和车筐中。
特别必需要移动的状况下,也要把充电器用泡沫塑料包装好,防止发生振动的颠簸。
许多充电器经过振动以后,其内部的电位器会漂移,使得整个参数漂移,导致充电状态不正常。
另外需要留意的就是充电的时候要保持充电器的通风,否则不但影响充电器的寿命,还可能发生热漂移而影响充电状态。
这样都会对电池形成损伤。
所以,爱护好充电器也是特别重要的。
3、每天都充电即便您的续行力量要求不长,充一次电可以使用2到3天,但是还是建议您每天都充电,这样使电池处于浅循环状态,电池的寿命会延长。
一些早期使用手机的用户,以为电池最好是基本使用完了以后再充电,这个看法是不对的,铅酸蓄电池的记忆效益没有那么剧烈。
常常放完电对电池的寿命影响比较大。
多数充电器在指示灯变灯指示布满电以后,电池充入电量可能是97%~99%。
虽然仅仅欠充电1%~3%的电量,对续行力量的影响几乎可以忽视,但是也会形成欠充电积累,所以电池布满电变灯以后还是尽可能连续进行浮充电,对抑制电池硫化也是有好处的。
4、准时充电电池放电以后就开头了硫化过程,在12小时开头,就消失了明显的硫化。
准时充电,可以清除不严峻的硫化,假如不准时充电,这些硫化结晶将要聚积而逐步形成粗大的结晶,一般的充电器对这些粗大的结晶是无能为力的,会逐步形成电池容量的下降,缩短了电池的使用寿命。
Table of ContentsImportant notice before riding 2 Service and technical support 2 Water resistance capability 2 Specifications 3 Download Giant RideLink App 3 Firmware information 3 Giant Power pro light indications 4 Charging Instructions 4 Assembly checking and pairing preparation 5 Pairing Giant Power Pro 6 Calibration/zero offset 7 Maintenance and cleaning 8 Troubleshooting 9 Giant limited warranty 10 Appendix A: Basic Operation of Giant NeosTrack computer 11 Appendix B: The pairing procedures with SmartPhone App 12 Appendix C: calibration procedures with SmartPhone App 12Import ant notice before ridingWe strongly urge you to read the Bicycle Owner’s Manual in its entirety before your first ride. Read and make sure that you understand every point in this manual, especially the “Safety” section. If you have any questions, please contact your local authorized Giant retailer.This user manual contains important safety, performance, and service information. Please read the user manual before starting to use your new Giant Power Pro and keep it for future reference.For your safety, we recommend that you to focus on your surroundings while riding. Avoid staring at the computer screen. This may compromise your traffic awareness, and possibly lead to serious accident.Service and technical supportPlease ensure that the Giant Power Pro has been paired with the cycling computer and has proceeded Calibration/zero offset before use. Please refer the pairing and calibration section.For the multi-language manuals and more information,please visit:https:///global/support/manualsIf you encounter difficulties or are uncertain aboutanything mentioned in this user manual, please contact your local authorized Giant retailer.To find one, or to learn more about Giant, go to Wa ter resistance capabilityThe water resistance level of Giant Power Pro complies to the IPX7 standard which offers a waterproof level of one meter immersion.Warning: Do NOT immerse the power meter in water for a longer time.Warning: Do NOT use the high pressure washers to clean the power meter directly.The high pressure will cause the moisture to permeate the internals ofthe power meter and damage the electronic components.Specifica tionsBattery Rechargeable lithium batteryBattery life: about 150 hoursWireless transmission 2.4GHz, ANT+™Bluetooth® Smart (BLE 4.0)Accuracy ±2% of measured power valueWeight Left side: about 18gRight side: about 27gPower measurement 0-3000WattsrangeCadence range 20-180 RPMWater resistance level IPX7Operating environment -10°C ~ 50°C / 14°F ~ 122°Ftemperature rangeStorage environment -20°C ~ 70°C / -4°F ~ 158°Ftemperature rangeAccessory Charging cableDownload Giant RideLink AppThe Giant RideLink App is available for Apple® iOS and Android system*. Please go to the App Store or Google Play to search Giant RideLink App and download it.* Android system must be Android 6.0 or higher version.Firmware informa tionGiant keeps developing and releasing the updated versions of firmware to provide the latest functions. The latest firmware for Giant Power Pro can be updated by using Giant RideLink app. For more details and information about firmware, please visithttps:///support/manuals.Giant Power pro light indica tionsThere is one indicator LED light on every Giant Power Pro. This indicator light can show various conditions. Indications of the LED light:• Indicator light blinks green 10 times: Battery capacity is more than 30% when waking the Giant Power Pro.• After waking the Giant Power Pro the indicator light blinks once every 5 seconds: Battery capacity is lower than 30% of capacity when waking the Giant Power Pro.• Indicator light is constantly red: While charging the Giant Power Pro. Indicator light switches off when charging is finished.• Indicator light does not show any green or red light: The battery may be damaged or have other problems, please contact an authorized Giant retailer for assistance.Charging InstructionsFully charge the battery of the Power Pro before using it for the first time.Step 1: Prepare the charging cable, as shown Figure 1.Step 2 Attach the charging cable to the Giant Power Pro. The indicator light will be red light constantly while charging is in progress, as shown Figure 2Caution:● Voltage: 5V±10%/Current: 1~2A● Charging time: about 2 hours for each side.● The battery should fully recharged once every two months when the Power Pro is not being used for a longer time.Figure 1Figure 2ASSEMBL Y CHECKING and pairing prepara tionCaution: Before riding on the road, please make sure and check the bottom bracketand the bolts of crank arms are tightened to the correct torque value.Please refer to the specific technical manuals from the crank manufacturerfor the correct torque values. If you encounter difficulties, please contactyour local authorized Giant retailer.Step 1: check if all bolts are tightened to the correct torque value, as shown figure 3.1-1 The standard torque value of M5 bolts left crank arm is usually 12-14 Nm. But please refer to the specific technical manuals from the crank manufacturer toverify the correct torque value.1-2 The M3 bolts are on the crank set for tightening the Giant Power Pro. The correct torque value is 3 Nm.Step 2: Wake up the Giant Power Pro, as shown Figure 4.2-1 Fully rotate the crank arms forwards or backwards two or three times to wake up the Giant Power Pro. The indicator light will blink green for 10 times.2-2 If the indicator light blinks green once every 5 seconds after waking the Giant Power Pro, the battery capacity is below 30% capacity. Please charge thebattery.Step 3: Pairing preparation.3-1 Put the bike in horizontal position.3-2 Keep the left crank arm in 6 o’clock position and the right crank in 12 o’clock position, as shown figure 5-2 and 5-3.Figure 3Figure 4Figure 5-2Figure 5-3Pairing Giant Power ProBefore pairing, please make sure the battery of Giant Power Pro is fully charged. Fully rotate the crank arms forwards or backwards two or three times to wake up the Giant Power Pro and put the bike in horizontal position as described at step 2 and 3. Please refer to the technical manuals of the cycling computer to pair it with the Giant Power Pro. The procedures may differ between various computers.Tip: Please refer to light indication and charging instruction sections for the details.The following procedure is an example with a Giant NeosTrack cycling computer.Tip: For the basic operation of Giant NeosTrack please refer to appendix A.Tip: For pairing procedures with the smartphone app please refer to appendix B.Step 1 Hold button to enter the menuStep 2 Press to choose “Setup”. Press to enter itStep 3 Press to choose “Bike Data”. Press to enter itStep 4 Press to choose “Bike 1”. Press to enter itStep 5 Press to choose “Sensors”. Press to enter itStep 1 Step 2 Step 3 Step 4 Step 5Step 6 Press to choose Power. Press to enter itStep 7 Press to enter “More” pageStep 8 Press to choose “Rescan”Step 9 Press to start “Re-scan”Step 10 When chosen device appears, pairing is finished.EN Calibra tion/zero offsetBefore the calibration, please make sure the procedure of pairing with Giant Power Proand computer is finished. Please refer to technical manuals of the cycling computer to calibrate the Giant Power Pro with cycling computer. The procedures may differ between various computers.CAUTION: Please operatethe calibration when assembling/disassembling the bottom bracket or cranks.CAUTION: Please operate the calibration before every ride.The following procedure is an example with a Giant NeosTrack cycling computer.Tip: Calibration will only display when the power meter is activated and paired.Tip: For the calibration procedures with smartphone app please refer to appendix C.Step 1 After pairing successfully. Press to enter the “More” page.Step 2 Press to choose Calibrate. Press to enter itStep 3 After calibration is completed. Press to save the setting.CAUTION: The calibration is completed when the “Calibrate” value shows 0. A calibrated value of -1 indicates the calibration has failed.Step 6 Step 7 Step 8 Step 9 Step 10 Step 1 Step 2 Step 3Maintenance and cleaningTo ensure the functionalities of Giant Power Pro and not to affect the Giant limited warranty, please make sure to comply with the WARNINGS and CAUTIONS listed below. Not complying with these recommendations may result in damage to Giant Power Pro and void your warranty.WARNING:• Only to clean the covers of the Giant Power Pro. Please do NOT disassemble the Giant Power Pro this will void your warranty.• Please only clean the cover of Giant Power Pro with a clean cloth and water. Please do NOT use corrosive detergent to clean as it may damage the cover.• Do NOT use the high pressure washers to clean the power meter directly. The high pressure will cause the moisture to permeate the internals of the power meter and damage the electronic components.• Please do NOT expose the power meter to constant high temperatures.• Please avoid that the Power Pro gets hit by any abnormal external force which may cause damage to the Power Pro.• Stop charging immediately to avoid dangerous situations if a strange smell, smoke, or any other abnormal condition occurs during charging.• Do not charge the battery in a wet environment or during a thunderstorm. It may cause damage to the battery and possible dangerous situations such as an electric shock.• Please make sure that no metal items or oily materials touch the charging connector and charging terminals.CAUTION:• The storage environment temperature range is between -20°C ~ 70°C / -4°F ~ 158°F. Damage to the electronic components may occur if the storage temperature is out of range.• The operating environment temperature range is between -10°C ~ 50°C / 14°F ~ 122°F. The functions may not be normal when the temperature is out of range.• The battery should fully recharged once every two months when the Power Pro is not being used for a longer time.• The environment temperature should be between -10°C ~ 50°C / 14°F ~ 122°F when charging the battery. The battery may get damaged when the environment temperature is out of range.• Charging time is around 2 hours. If the charging time is over 2 hours and the battery is still not fully charged, please stop charging to avoid the risk of overheating the battery. Please contact your local authorized Giant retailer for support and advice.• The battery may get damaged if it does not get charged at low battery level. Please charge it at any time.• It is a normal phenomenon that the battery level will gradually reduce when it has not being used for a period of time.• Please follow the suggested Voltage and current: 5V±10%/1~2A• Please only use the charging cable which is supplied with the Power Pro. Do not bundleTroubleshootingIf you encounter any of the following problems when using the Giant Power Pro, follow the suggestions and contact authorized Giant retailer if the problems can’t be solved. Possible problems and suggestions:Q1: I can’t charge my Giant Power Pro.A1: Please confirm if the charging cable is connected properly to the Giant Power Pro.A2: Please confirm if no metal part of the charging plug is oxidized or damaged.Q2: I can’t pair my Giant Power Pro with computer.A1: Please check if the battery level of the Giant Power Pro is sufficient, if it is not enough, please charge it.A2: Please confirm if the Giant Power Pro is awoken successfully.A3: Please confirm if your cycling computer has a pairing function.A4: Please confirm if your cycling computer is ANT+™ compatible.A5: Please enter Giant Power Pro ID manually.Q3: The power value does not shown on my computer.A1: Please check if the battery level of the Giant Power Pro is sufficient, if it is not enough, please charge itA2: Please confirm if the Giant Power Pro has been paired with your cycling computer.A3: Please confirm the functions of the computer are normal.A4: Please confirm if your computer has the functionalities to display power values. Q4: Unusual calibration values show during calibration process.A1: Please calibrate the Giant Power Pro again.A2: Please update the firmware of Giant Power ProQ5: Unusual power values show on the cycling computer display.(over high or too low value)A1: Please confirm that the bolts of the cranks/Giant Power Pro are tightened to the correct value.A2: Please calibrate the Giant Power Pro againA3: Please update the firmware of Giant Power ProQ6: Unusual light indicationA1: The light is off: Please check if the pairing and cycling computer display are normal. If it works properly, then the LED might be damaged. Please contact anauthorized Giant retailer.A2: Abnormal blinking: please contact your local authorized Giant retailer.If the suggestions can’t solve above problems, please contact your local authorized Giant retailer.Giant limited warrantyGiant warrants it’s Power Pro for a period of two (2) years from the date of purchase, this applies only for the original owner.This warranty applies only to this product when purchased new from an Authorized Giant Dealer and assembled by that dealer at the time of purchase.LIMITED REMEDYUnless otherwise provided, the sole remedy under the above warranty, or any implied warranty, is limited to the replacement of defective parts with those of equal or greater value at the sole discretion of Giant. This warranty extends from the date of purchase, applies only to the original owner, and is not transferable. In no event shall Giant be responsible for any direct, incidental or consequential damages, including, without limitation, damages for personal injury, property damage, or economic losses, whether based on contract, warranty, negligence, product liability, or any other theory.EXCLUSIONSThe above warranty, or any implied warranty, does not cover:•Normal wear and tear on parts in situations where there are no assembly or material defects.•Consumable components including bolts and charging cable.•Products serviced by other than an Authorized Giant dealer.•Modifications of the product from its original condition.•Use of this product for abnormal, competition and/or commercial activities or for purposes other than those for which this product was designed.•Damage caused by failing to follow the User’s Manual.•Paint, finish and decal damage resulting from taking part in competitions, jumping, downhill and/or training for such activities or events or as a result of exposing the product to, or operating the product in, severe conditions or climates.•Labor charges for part replacement or changeover.Except as is provided by this warranty and subject to all additional warranties, Giant and its employees and agents shall not be liable for any loss or damage whatsoever (including incidental and consequential loss or damage caused by negligence or default) arising from or concerning any Giant product.Giant makes no other warranties, express or implied. All implied warranties, including the warranties of merchantability and fitness for a particular purpose are limited in duration to that of the express warranties stated above.Any claim against this warranty must be made through an Authorized Giant Dealer or distributor. The purchase receipt or other proof of the date of purchase is required before a warranty claim may be processed.Claims made outside the country of purchase may be subject to fees and additional restrictions. Warranty duration and details may differ by country. This warranty gives you specific legal rights, and you may also have other rights which may vary from place to place. THIS WARRANTY DOES NOT AFFECT YOUR STATUTORY RIGHTS.Appendix A: Basic Opera tion of Giant NeosTrack computer 1. BACK / STOP• Press to return to the previous page or cancel an operation.• When recording, press to pause recording. Press it again to stop recording.2. OK / LAP• In Menu, press to enter or confirm a selection.• In free cycling, press to start recording.• When recording, press to mark the lap.3. ON OR OFF / BACKLIGHT• Press to turn the device on.• Press and hold to turn the device off.• Press to turn on/off backlight.4. DOWN / MENU• In Menu, press to move down to scroll through menu options.• In meter view, press to switch meter screen page.• In free cycling mode, long press to return to Main Menu.• When recording, long press to enter into Shortcut Menu.5. UP• In Menu, press to move up to scroll through menu options.• In Meter view, press to switch meter screen page.CAUTION: Please check the user manual of NeosTrack for more information.Appendix b: The pairing procedures with SmartPhone App1. Turn on the Bluetooth Smart function. Press to start scanning.2. Device ID appears.3. Choose device to pair, appears, pairing is finished.* Please check if the smartphone supports Bluetooth Smart function (BLE 4.0)Appendix c: calibra tion procedures with SmartPhone App1. Press to enter Parameter page2. Press “Calibration”3. Press “Offset”4. Calibration completed。


电动车蓄电池保养要注意的八点:有经验的用户都知道电池的费用是电动自行车最大的消耗,所以用户非常关心延长电池的使用寿命的问题。
首先要假定充电器没有问题,用户是否正确使用对电池的寿命至关重要。
使用电池的注意事项如下:1、不要随便更换充电器,不要去掉控制器的限速。
各个制造商的充电器一般都有个性化需求,在没有把握的时候不要随意更换充电器。
如果续行里程要求比较长,必须为了异地充电而配备多个充电器,就把白天补足充电的充电器采用另外补充的充电器,而晚间采用原配的充电器。
去掉控制器的限速,虽然可以提高一些车的速度,除了会降低车的安全性以外,也会降低电池的使用寿命。
2、保护好充电器。
一般的使用说明书上面都有关于保护充电器的说明。
很多用户没有看说明书的习惯,往往除了问题以后才想起找说明书看,经常为时已晚,所以先看说明书是非常必要的。
为了降低成本,现在的充电器基本上都没有做高耐振动的设计,这样,充电器一般不要放在电动自行车的后备箱和车筐中。
特殊的情况下,必须要移动,也要把充电器用泡沫塑料包装好,防止发生振动的颠簸。
很多充电器经过振动以后,其内部的电位器会漂移,使得整个参数漂移,导致充电状态不正常。
另外需要注意的就是充电的时候要保持充电器的通风,否则不但影响充电器的寿命,还可能发生热漂移而影响充电状态。
这样都会对电池形成损伤。
所以,保护好充电器也是非常重要的。
3、每天都充电。
即便您的续行能力要求不长,充一次电可以使用2到3天,但是还是建议您每天都充电,这样使电池处于浅循环状态,电池的寿命会延长。
一些早期使用手机用户以为电池最好是基本使用完了以后再充电,这个看法是不对的,铅酸蓄电池的记忆效益没有那么强烈。
经常放完电对电池的寿命影响比较大。
多数充电器在指示灯变灯指示充满电以后,电池充入电量可能是97%~99%。
虽然仅仅欠充电1%~3%的电量,对续行能力的影响几乎可以忽略,但是也会形成欠充电积累,所以电池充满电变灯以后还是尽可能继续进行浮充电,对抑制电池硫化也是有好处的。
电动车蓄电池使用必备培训资料1. 介绍电动车蓄电池是电动车的重要组成部分,它存储着电能,为电动车提供动力。
准确地了解电动车蓄电池的使用方法和维护技巧对于确保电动车的正常运行非常重要。
本培训资料将向您介绍电动车蓄电池的基本知识、使用注意事项和维护保养指南。
2. 蓄电池基本知识蓄电池是通过化学反应将化学能转化为电能,并能将电能储存起来的设备。
电动车蓄电池通常使用的是铅酸蓄电池,它有较高的能量密度和较低的成本,是目前电动车领域应用最广泛的蓄电池类型。
以下是一些电动车蓄电池的基本知识:•电压(Voltage): 电动车蓄电池的电压通常为12伏特(V),也有的型号为24V或48V。
电动车蓄电池的电压决定了电动车的运行性能和续航里程。
•容量(Capacity): 电动车蓄电池的容量表示其可存储的电能量,通常以安时(Ah)为单位。
容量越大,电动车的续航里程越长。
•循环寿命(Cycle Life): 循环寿命表示电动车蓄电池可充放电的次数。
通常情况下,电动车蓄电池的循环寿命为300-500次。
3. 蓄电池使用注意事项正确使用和维护电动车蓄电池可以延长其寿命,并确保电动车的正常运行。
以下是一些蓄电池使用的注意事项:•充电和放电: 在使用前,请确保蓄电池已充满电。
充电时,请使用原厂提供的充电器,并按照说明书上的要求进行操作。
放电时,避免将蓄电池完全放空,以减少对蓄电池的损耗。
•避免过度充放电: 避免将电动车蓄电池充放电到极限状态,这样会降低蓄电池的寿命。
建议在电量低于20%时进行充电,在电量高于80%时停止充电。
•环境温度: 避免将蓄电池暴露在极端温度下的环境中。
过高或过低的温度都会影响蓄电池的性能。
在寒冷天气中,电动车蓄电池的容量可能会减少,因此请注意保持车辆在室温下存放。
4. 蓄电池维护保养指南定期进行蓄电池的维护保养可以确保其正常工作,延长使用寿命。
以下是一些建议的维护保养措施:•清洁: 定期清洁蓄电池及其连接器,以保持表面干净,防止腐蚀和电阻。
使用标准:Q/HGY06-2007 电动自行车用铁锂电池使用说明书THE TECHNICAL MANUUAL OF IRON-LITHIUMBATTERY FOR ELECTRIC BICYCLE哈尔滨光宇电源股份有限公司HAEBIN COSLIGHT POWER CO., LTD目录1. 产品规格与结构2. 磁盘性能指标2. 产品性能2.2 技术指标2.2 安全性能3. 产品使用方法3.1 电池充电3.2 电池放电3.3 电池存贮与补充充电4. 电池使用维护及注意事项5. 质量保证企业简介哈尔滨光宇电源股份有限公司位于哈尔滨市开发区迎宾路集中区太南路 8 号,占地面积12万平方米,建筑面积10万平方米。
公司在追求与完美品质结合的同时,一贯秉承科技创新的经营理念,凭借雄厚的经济实力和专业经验,与国内多所高校和研究机构建立了长期的合作关系,依托国内电动车市场的高速发展,率先采用国际最先进技术,自主研发出铁锂动力电池,获得多项国家专利,电池各项性能指标达到世界领先水平。
光宇电源已经成为中国锂动力电池行业最具核心竞争力的企业之一。
哈尔滨光宇电源股份有限公司从日本引进全自动化锂电池生产线,主要设备包括和膏机、涂布机、辊压机、分切机、卷绕机、全自动组装一体机,充放电检测设备、激光焊接机和注夜机等相近设备。
公司先后通过ISO9001、QS9000、ISO14000和OHSA18001管理体系认证,产品通过了美国UL认证、德国T ǖ V认证,有利地保证了产品从设计、制造、服务等方面均达到国际领先水平。
1. 产品规格与结构1.1产品规格1.2产品结构2 产品性能指标2.1 产品性能光宇铁锂电池循环寿命长、体积小、重量轻。
使用寿命是铅酸电池的5倍,体积约是铅酸电池的1/2,重量约是铅酸电池的1/3,大大提升了电动自行车的综合性价比。
2.2 技术指标2.3 安全性能铁锂电池安全可靠。
在安全性方面,铁锂电池痛其他锂电池有本质上的区别,和铅酸电池完全相同。
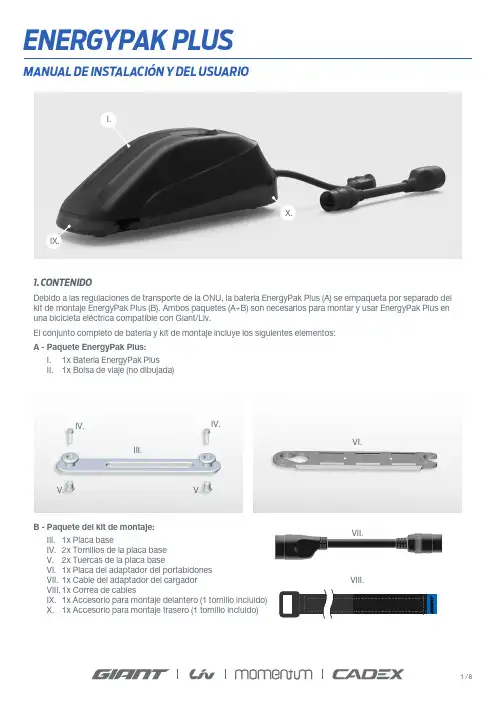
1. CONTENIDODebido a las regulaciones de transporte de la ONU, la batería EnergyPak Plus (A) se empaqueta por separado del kit de montaje EnergyPak Plus (B). Ambos paquetes (A+B) son necesarios para montar y usar EnergyPak Plus en una bicicleta eléctrica compatible con Giant/Liv.El conjunto completo de batería y kit de montaje incluye los siguientes elementos:A - Paquete EnergyPak Plus:I. 1x Batería EnergyPak PlusII. 1x Bolsa de viaje (no dibujada)B - Paquete del kit de montaje:III. 1x Placa baseIV. 2x Tornillos de la placa baseV. 2x Tuercas de la placa baseVI. 1x Placa del adaptador del portabidonesVII. 1x Cable del adaptador del cargadorVIII. 1x Correa de cablesIX. 1x Accesorio para montaje delantero (1 tornillo incluido)X. 1x Accesorio para montaje trasero (1 tornillo incluido)IV.III.VI.V.V.IV.IV.VIII.VII.I.IX.X.2. ESPECIFICACIONESTipo: I on-litioVoltaje: 36 VCapacidad:6620 mAh Energía: 238 WhSalida máxima del puerto USB: 5 V / 3 ADimensiones: 5,6 mm * 99,9 mm * 87,4 mm 3. COMPATIBILIDADLa batería EnergyPak Plus es compatible solo con bicicletas Giant o Liv específicas del modelo del año 2020 o posterior. Estas bicicletas específicas están equipadas con una toma de carga de 7 contactos, una batería EnergyPak Smart y un cuadro con orificios pretaladrados para el kit de montaje EnergyPak Plus. Consulte siempre a su distribuidor local de Giant si necesita más información y consejos sobre compatibilidad, instalación y uso.4. CARGAR LA BATERÍA ENERGYPAK PLUSLa batería EnergyPak Plus se suministrará de fábrica en estado de hibernación. Primero debe activarse conectándola al cargador.Se recomienda cargar completamente la batería EnergyPak Plus antes del primer uso. Para cargar la batería EnergyPak Plus, use el cargador inteligente original Giant suministrado con la bicicleta y el cable adaptador (VII) proporcionado en el kit de montaje.5. SEGURIDAD, ALMACENAMIENTO Y TRANSPORTELas mismas reglas sobre seguridad, almacenamiento y transporte que se aplican a la bicicleta eléctrica Giant o Liv y a Energypak Smart, también se aplican a la batería EnergyPak Plus. Consulte el manual de usuario de la bicicleta eléctrica y asegúrese de haber leído y entendido toda la información. Si no tiene acceso al manual de la bicicleta eléctrica, pida a su distribuidor una copia impresa o descargue una copia digital de dicho manual del sitio web de Giant o Liv.Durante la carga, el indicador LED de la batería EnergyPak plus se encenderá en una secuencia de abajo hacia arriba. Cada led representa una sección del 20 % de la capacidad total. Cuando una sección se llene, el LED se iluminará constantemente y los LED restantes continuarán la secuencia hasta que todos ellos se iluminen permanentemente, lo que indica que la batería EnergyPak está completamente cargada.Tiempo de carga:0 – 60%:1:28 h 0 – 100%: 3:25 hPeso: 1,8 kg Temperatura de funcionamiento: (carga): -20° C ~ 45° C Temperatura de funcionamiento: (descarga): -20° C ~ 60° C Temperatura de almacenamiento (corto plazo): -20 °C ~ 40 °C (< 3 meses)Temperatura dealmacenamiento (largo plazo):-20 °C ~ 20 °C (> 3 meses)Asegure el accesorio para montaje trasero con el tornillo. Apriete a 2 N•m.PASO 6Deslice el accesorio para montaje trasero en la batería EnergyPak Plus.PASO 5Alinee las pestañas del accesorio para montaje trasero (X).PASO 46. INSTALACIÓN DEL ACCESORIO PARA MONTAJE DELANTERO Y TRASEROSe recomienda encarecidamente que su distribuidor local de Giant instaletodas las piezas.Asegure el accesorio para montaje delantero con el tornillo. Apriete a 2 N•m.PASO 3Deslice el accesorio para montaje delantero en la batería EnergyPak Plus.PASO 2Alinee las pestañas del accesorio para montaje delantero (IX).PASO 1IX.X.Vuelva a comprobar si la placa de montaje está firmemente asegurada en el cuadro.Asegúrese de que no haya tornillos de portabidones u otros elementos que sobresalganpor encima de la superficie de la placa base.PASO 6Coloque un tornillo de la placa de montaje (IV.) desde la parte superior de la placa base.Atorníllelo ligeramente en la tuerca unas vueltas. Repita el procedimiento con la segundatuerca y el tornillo en el otro extremo. Apriete ambos tornillos a 4 N • m.Asegúrese de que las tuercas no giren mientras las aprieta. Bloquee la rotación con unallave de 10 mm si es necesario.PASO 5Coloque una tuerca de placa de montaje (V.) en el orificio superior desde el interior delcuadro. Sujétela en su lugar con un dedo. Coloque la placa base (III.) en la tuerca que salea través del cuadro.PASO 47. INSTALACIÓN DEL KIT DE MONTAJESe recomienda encarecidamente que un mecánico experto del distribuidor Giant instale el kit de montaje EnergyPak. Utilice solo las piezas y el hardware originales suministrados en el kit de montaje.Retire los tapones de goma de los orificios de montaje de su EnergyPak Plus del tuboinferior. Empuje el tapón desde el interior del tubo inferior y extráigalo desde la partesuperior.PASO 3Retire todos los portabidones, tornillos u otros accesorios instalados de los soportes deportabidones.PASO 2Retire su EnergyPak Smart de la bicicleta.PASO 1Inserte el enchufe del conector del EnergyPak Plus al puerto de carga de la bicicleta.Asegúrese de presionar firmemente el enchufe del conector completamente en el puertode carga, para asegurar un contacto adecuado y evitar la entrada de humedad.Rodee el cable EnergyPak Plus y la estructura con la correa de cables (VIII.) y fíjela.Se recomienda colocar la hebilla de la correa en la parte inferior de la estructura.Asegúrese de que ni el cable ni la correa interfieran con la rotación de la manivela.Con todo instalado correctamente, el EnergyPak está listo para usarse.PASO 6PASO 7Compruebe si está bien asegurada en su lugar.PASO 3Asegure la palanca de retención con una llave Torx T25. Apriete “a mano”(aproximadamente 2 4 N • m)PASO 5Deslice el lado frontal de su EnergyPak Plus sobre el pilar superior de la placa base, hastaque el mecanismo de bloqueo se enganche por completo.PASO 2Deslice suavemente la parte trasera del EnergyPak Plus sobre el pilar inferior de la placabase por completo hasta que no pueda avanzar más.PASO 1Cierre la palanca de retención en el lado opuesto de su EnergyPak Plus.PASO 48. INSTALACIÓN DE SU ENERGYPAK PLUSPara colocar su EnergyPak Plus en la bicicleta.Para quitar su EnergyPak Plus de la bicicleta, simplemente siga el procedimiento deinstalación en orden inverso, excepto:1. Después de abrir la palanca de retención con la llave Torx (paso 5-4), tire de la palanca debloqueo de la parte inferior de su EnergyPak Plus para abrir el mecanismo de bloqueo.2. Empuje su Energypak Plus fuera del pilar superior de la placa base.Encienda la bicicleta con el botón de alimentación RideControl situado en el manillar.El indicador de batería de la pantalla RideControl mostrará el nivel de carga de la bateríaprincipal.CÓMO QUITAR SU ENERGYPAK PLUS:PASO 19. DESINSTALACIÓN DE SU ENERGYPAK PLUSPara quitar su EnergyPak Smart de la bicicleta:10. FUNCIONAMIENTO DE SU ENERGYPAK PLUSAsegúrese de que SU EnergyPak Plus esté correctamente instalado y conectado a la bicicleta.Presione el botón situado en la parte superior de su Energypak Plus.El indicador LED colocado junto al botón mostrará el nivel de carga de su EnergyPak Plus.Su EnergyPak Plus ahora está conectado al sistema.Los leds indicadores del RideControl mostraran el nivel total de ambas bateríascombinadas.Cuando la batería principal (A) está casi descargada, el sistema cambia a EnergyPak Plus(B).Cuando el EnergyPak plus (B) está vacío, el sistema volverá a la batería principal (A).La batería principal suministrará energía por un corto tiempo, hasta que la asistenciafinalmente se apague y el indicador de batería en el RideControl comience a parpadear.PASO 2PASO 3PASO 412. PUERTO USBSu EnergyPak Plus también puede funcionar como batería externa para cargar su dispositivo. Use el puerto USB solo en áreas bien ventiladas y en condiciones secas. Asegúrese siempre de que la tapa del puerto USB esté completamente cerrada mientras monta en bicicleta con su EnergyPak Plus.CÓMO USAR EL PUERTO USB:1. Tire y levante la tapa del puerto USB para dejar al descubierto dicho puerto.2. Conecte el dispositivo a un cable USB compatible.3. Cuando termine, retire el dispositivo y el cable de su EnergyPak Plus.4. Cierre la tapa del puerto USB.Deslice el adaptador hacia abajo sobre la placa base hasta que encaje en su lugar.Para retirar el adaptador con el portabidones, tire en la dirección opuesta.PASO 213. PREGUNTAS MÁS FRECUENTESP: ¿Puedo activar la energía de mi EnergyPak Plus mientras practico ciclismo?R: Sí. Puede conectar y activar la energía de mi EnergyPak Plus en cualquier momento, sin necesidad de apagar la bicicleta eléctrica.P: ¿Puedo cargar la batería de mi bicicleta eléctrica y EnergyPak Plus al mismo tiempo?R: No. El cargador inteligente solo puede conectarse a un EnergyPak en cada momento.P: ¿Puedo usar EnergyPak Plus sin la batería principal?R: No. La bicicleta se puede encender, pero el motor no puede obtener energía de su EnergyPak Plus si la batería principal no está presente.P: ¿Cuántas veces puedo cargar mi EnergyPak Plus?R: Tantas y tantas veces como sea necesario. Sin embargo, todas las baterías se degradan con el paso del tiempo y, al final, se desgastarán.La velocidad a la que se degradará la capacidad de la batería dependerá de varias circunstancias, como la edad, la carga de trabajo, la temperatura y el número de cargas y descargas.P: ¿Cómo muestra la pantalla el nivel de batería?R: El display mostrara el nivel total de ambas baterías combinadasP: ¿Cómo muestra la pantalla el intervalo restante de la batería?R: El display muestra la distancia restante de las dos EnergyPack combinadas14. GARANTÍAGiant garantiza que el propietario original de la batería EnergyPak Plus (incluido el kit de montaje) estará libre de defectos materiales y de mano de obra durante un período de dos años a partir de la fecha de compra, para el 60 % de la capacidad nominal original de la batería con un máximo de 250 cargas.Esta garantía solo se aplica cuando la batería EnergyPak Plus se compra nueva a un distribuidor autorizado de Giant. DERECHOS Y ACCIONES LIMITADOSExcepto que se indique lo contrario, las únicas acciones a las que da derecho esta garantía, o cualquier garantíaimplícita, quedan limitas a la sustitución de piezas defectuosas por aquellas de igual valor o superior a entera discreción de Giant. Esta garantía se extiende a partir de la fecha de la compra, solo se aplica al propietario original y no es transferible.En ningún caso, Giant será responsable por daños directos, accidentales o derivados, incluyendo, entre otros, lesiones personales, daños a la propiedad o pérdidas económicas, tanto basadas en contrato, garantía, negligencia, responsabilidad del producto o cualquier otra teoría.Giant no ofrece ninguna otra garantía, ni expresa ni implícita. Todas las garantías implícitas, incluyendo las garantíasde comerciabilidad e idoneidad para cualquier fin particular limitan su duración a la indicada en las anteriores garantías expresas.Cualquier reclamación contra esta garantía deberá tramitarse a través de un distribuidor autorizado Giant. Para poder procesar una reclamación de garantía es necesario el recibo de compra o cualquier otra prueba de la fecha de compra. Las reclamaciones realizadas fuera del país de compra pueden estar sujetas a tasas y restricciones adicionales. La duración y los detalles de la garantía pueden variar en función del país. Esta garantía le confiere unos derechos legales específicos y, dependiendo del país, podrá ostentar además otros derechos. ESTA GARANTÍA NO AFECTA A SUS DERECHOS LEGALES.EXCLUSIONES• El desgaste normal y la rotura de piezas en situaciones en las que no haya defectos de montaje o de los materiales.• Las bicicletas no suministradas por un distribuidor autorizado Giant.• Modificaciones del estado original.• El uso de la bicicleta para actividades anómalas, competitivas y/o comerciales o con fines distintos al uso previsto del producto.• Los daños causados por no seguir el manual del propietario.• Los daños en el acabado de la pintura y en las pegatinas provocados por la participación en competiciones, saltos, descensos y/o entrenamientos de dichas actividades o eventos, ni aquellos que resulten de exponer la bicicleta a condiciones o climas extremos o montar en ella en dichas condiciones o climas.• Los gastos de mano de obra por sustitución o cambio de piezas.Excepto en lo dispuesto en esta garantía y sujeto a todas las garantías adicionales, Giant y sus empleados y agentes no serán responsables de ninguna pérdida o daño (incluyendo las pérdidas accidentales o derivadas, ni los daños causados por negligencia o imprudencia) provocados o relacionados con cualquier bicicleta Giant.。
电动自行车用阀控密封式铅酸蓄电池补水方法1、准备工作用纯水和分析纯硫酸配置硫酸溶液电解液,比例是,500ml纯水,加入0.5ml纯硫酸。
准备标准的橡胶排气阀备用。
工具:起子、吸管(可以用一次性针管代替),透明聚乙烯管,直径要适合吸管(针管)吸口。
ABS胶。
2、顺着排气孔撬开电池上方的盖板。
一些电池的盖板是ABS胶粘接的,一些电池是达扣连接的。
注意撬开盖板的时候,不要损坏盖板。
这时可以看到6个排气阀的橡胶帽。
3、打开橡胶帽,露出排气孔,通过排气孔可以看到电池内部。
一些电池的排气阀是可以旋开的,如天能电池就是如此。
一些电池的橡胶帽周围还有一些填充物,注意包管填充物。
4、用滴管吸入配制好的电解液由排气孔注入电解液。
电解液要恰好覆盖极板1mm。
5、把灌好电解液的电池用透气的遮挡物覆盖盖上排气孔以防止灰尘落入排气孔,静止24小时,观察排气孔内部的电解液,应该有流动的电解液,否则要补充电解液。
6、在排气孔没有覆盖的条件小给标称12V的电池进行16.2V恒压限流充电。
充电时最好把电池放在耐酸的容器内,防止溢出的电解液污染环境。
在电池充电电流下降到400mA~300mA或者电压达到16.2V三小时以后,认为电池初次充电充满。
7、初次充电结束以后,检查电池表面是否还有电解液,如果没有电解液,应该补充电解液以后,再次进行恒压限流充电,如果6个格里边还有电解液,用吸管吸出多余的电解液。
8、采用14.8V恒压限流充电,一直到充电电流下降到300mA。
9、盖上排气阀,再次安装排气阀以后,注意恢复填充物。
如果是打开的橡胶排气阀,最好更换,如果特性很好,也可以不更换但是一定要检查其弹性,如果弹性不好,就必须要找好的排气阀更换。
10、盖上电池盖板,如果时胶接的,应该涂胶粘接。
再静止24小时,待胶完全凝固,再次进行14.8V恒压限流充电,一直到充电电流下降到300mA。
11、再次测试电池容量,判断电池容量是否恢复。
电池维修不好(容量上升不大,或者没有达到标称容量的70%以上)的原因:1、电池正极板软化,其显著表现是:在上述第7步骤时,会发现吸出的多余电解液中有黑色杂质,如果黑色杂质比较多的时候,就是正极板软化排出的,这样的电池基本上无法修好,只能够报废。
电瓶车的使用说明书电瓶车的使用说明书敬告用户1、在未仔细阅读本说明书,了解电瓶三轮车性能之前,请勿随意使用电瓶三轮车2、不要借给不会操作电瓶三轮车的热骑行3、停车时必须将组合开关置于“停”位4、停车时要拉紧手刹装置5、严禁爬坡和长时间的操作,操作时间不能超过1个小时6、必须严格遵守交通规则,行驶于非机动车道使用保养1、插入电源钥匙,向右旋转,电压表指示针指示到36度或40之间2、起动:将组合开关打开、放开刹车,将手柄慢慢转动,车辆即缓慢起动,不能全速行驶3、制动:刹车制动时,车子会自行断电,停止行驶再将组合开关旋到中间的位置,锁定手刹车,拔掉钥匙,人即可离开4、应急情况:车辆行驶中,如有高桥、高坡、满载、载重无法上去时,一定要助力或拉或推,长时间的过重行驶会烧坏电动机以及电器元件线路。
遇到有电器故障或其他原因刹车不能使车子断路时,首先关掉组合开关,再关掉钥匙开关。
5、在行车途中,如发现电压指示跌倒32时,表明电量已严重不足,不宜再用,需充电后再行使,如果严重亏电,需充电24小时以上。
充电前应检查充电器输入电压电区域,防止金属物短路。
6、在充电时,请先关掉钥匙和组合开关,然后接通220V电源,按下慢档,待电瓶量充到半数时,可用中档或快档,否则将烧掉变压器,在阴雨或潮湿天气时,请检查变压器是否受湿,以免造成漏电事故。
如遇异常情况,立即切断电源,并请专业技师修理。
正常情况下,充电时间在12小时以上。
7、电瓶表面应保持干燥,清洁,以免电瓶漏电,不得让杂物落入瓶内,以免电瓶损伤或断路。
车辆行驶半年,应拆卸检修、润滑。
8、每次开车前,都需要检查刹车的灵敏度,紧固易松动的螺丝,以免螺丝脱落刹车失灵而影响开车安全。
9、电机每一个月对换向器进行一次清洗和检查燃刷磨损情况,磨损严重的更换新电刷,以防烧坏换向器。
10/电机尾部的防尘罩不得脱下,以免灰尘杂物进电机,损坏换向器。
11应定期分别对轴承、齿轮、链条用润滑脂机油进行润滑。
执行标准:GB17761-1999电动自行车使用说明书庆隆车业地址:省市蓬街工业区:03 82752338网址:.qinglongcheye.传真:03庆隆车业,是首批通过国家工业产品生产许可证验收的企业。
现拥生产基地,10条全自动生产流水线,具备年生产100万辆电动自行车能力。
企业自创建至今,先后与大学、工业大学、省技术监督检测研究院、省电动自行车产品质量检验中心等高校及科研单位建立了合作及协作关系,始终保持着朝气蓬勃、蒸蒸日上的发展势头。
庆隆人秉承“诚信合作、品质至上”的经营理念,为长期合作伙伴提供最优质的服务,为广大消费者提供最优质的产品。
公司上下同心同德、合力进取,必将使安琪儿电动车走进千家万户,成为国人理想的代步工具。
美好生活,天使相伴;幸福之路,庆隆与您同行。
尊敬的用户朋友,为了您和他人的安全,为确保电动自行车性能优良、稳定,请您在使用前详细阅读说明书后再使用本产品。
本手册中提供的有关日常形式和保养知识,可便于您更熟悉本车的操控,任何不当操作,都有可能损坏您的爱车。
感您购买“庆隆”牌电动自行车。
由于产品在技术上不断改进更新,可能未现实物与说明书稍有不同的情况,请以实物为准。
本手册中标有号容,请认真阅读和遵守。
目录1用户注意事项----------------------------------------------------------------------------------32电动车主要技术参数-------------------------------------------------------------------------5 3产品特性介绍----------------------------------------------------------------------------------7 4电池充电说明----------------------------------------------------------------------------------9 5骑行注意事项--------------------------------------------------------------------------------10 6维修保养说明--------------------------------------------------------------------------------12 7常见保养说明--------------------------------------------------------------------------------14 8重要提示与忠告-----------------------------------------------------------------------------20 9保修卡-----------------------------------------------------------------------------------------22敬请用户注意1、骑行前,请仔细阅读《产品使用说明书》,认真检查各零部件是否完好,以确保您骑行安全,如发现问题请及时与经销商联系。