pthread使用实例
- 格式:docx
- 大小:12.85 KB
- 文档页数:2
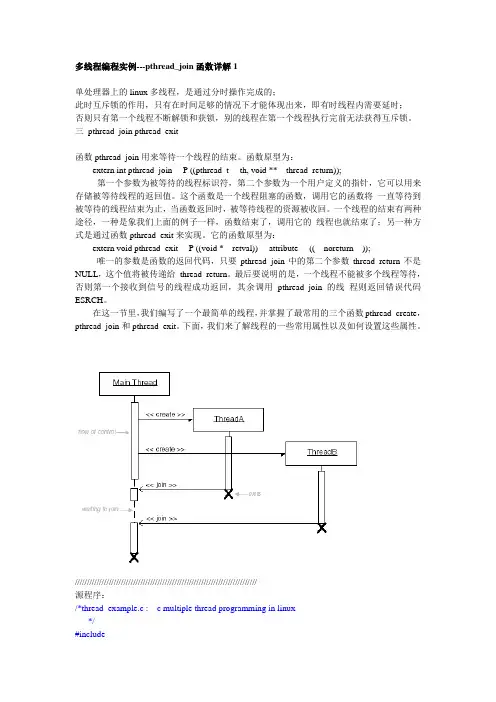
多线程编程实例---pthread_join函数详解1单处理器上的linux多线程,是通过分时操作完成的;此时互斥锁的作用,只有在时间足够的情况下才能体现出来,即有时线程内需要延时;否则只有第一个线程不断解锁和获锁,别的线程在第一个线程执行完前无法获得互斥锁。
三pthread_join pthread_exit函数pthread_join用来等待一个线程的结束。
函数原型为:extern int pthread_join __P ((pthread_t __th, void **__thread_return));第一个参数为被等待的线程标识符,第二个参数为一个用户定义的指针,它可以用来存储被等待线程的返回值。
这个函数是一个线程阻塞的函数,调用它的函数将一直等待到被等待的线程结束为止,当函数返回时,被等待线程的资源被收回。
一个线程的结束有两种途径,一种是象我们上面的例子一样,函数结束了,调用它的线程也就结束了;另一种方式是通过函数pthread_exit来实现。
它的函数原型为:extern void pthread_exit __P ((void *__retval)) __attribute__ ((__noreturn__));唯一的参数是函数的返回代码,只要pthread_join中的第二个参数thread_return不是NULL,这个值将被传递给thread_return。
最后要说明的是,一个线程不能被多个线程等待,否则第一个接收到信号的线程成功返回,其余调用pthread_join的线程则返回错误代码ESRCH。
在这一节里,我们编写了一个最简单的线程,并掌握了最常用的三个函数pthread_create,pthread_join和pthread_exit。
下面,我们来了解线程的一些常用属性以及如何设置这些属性。
///////////////////////////////////////////////////////////////////////////源程序:/*thread_example.c : c multiple thread programming in linux*/#include#include#include#define MAX1 10#define MAX2 30pthread_t thread[2];pthread_mutex_t mut;int number=0, i;void *thread1(){printf ("thread1 : I'm thread 1\n");for (i = 0; i < MAX1; i++){printf("thread1 : number = %d i=%d\n",number,i);pthread_mutex_lock(&mut);number++;pthread_mutex_unlock(&mut);sleep(2);}printf("thread1 :Is main function waiting for me acomplishing task? \n");pthread_exit(NULL);}void *thread2(){printf("thread2 : I'm thread 2\n");for (i = 0; i < MAX2; i++){printf("thread2 : number = %d i=%d\n",number,i);pthread_mutex_lock(&mut);number++;pthread_mutex_unlock(&mut);sleep(3);}printf("thread2 :Is main function waiting for me to acomplish task ?\n");pthread_exit(NULL);}void thread_create(void){int temp;memset(&thread, 0, sizeof(thread)); //comment1/*创建线程*/if((temp = pthread_create(&thread[0], NULL, thread1, NULL)) != 0)printf("线程1创建失败!\n");elseprintf("Thread 1 is established\n");if((temp = pthread_create(&thread[1], NULL, thread2, NULL)) != 0) //comment3 printf("线程2创建失败");elseprintf("Thread 2 is established\n");}void thread_wait(void){/*等待线程结束*/if(thread[0] !=0) { //comment4pthread_join(thread[0],NULL);printf("Thread 1 is over \n");}if(thread[1] !=0) { //comment5pthread_join(thread[1],NULL);printf("Thread 2 is over\n");}}int main(){/*用默认属性初始化互斥锁*/pthread_mutex_init(&mut,NULL);printf("I am the main funtion,and I am establishing threads. Ha-ha\n");thread_create();printf("I am the main funtion,and I am waiting for thread to accomplish task. Ha-ha\n");thread_wait();return 0;}///////////////////////////////////////////////////////////执行情况1(linux终端):[root@localhost root]# gcc -o joint joint.c -lpthread[root@localhost root]# ./jointI am the main funtion,and I am establishing threads. Ha-hathread1 : I'm thread 1thread1 : number = 0 i=0Thread 1 is establishedthread2 : I'm thread 2thread2 : number = 1 i=0Thread 2 is establishedI am the main funtion,and I am waiting for thread to accomplish task. Ha-hathread1 : number = 2 i=1thread2 : number = 3 i=2thread1 : number = 4 i=3thread2 : number = 5 i=4thread1 : number = 6 i=5thread1 : number = 7 i=6thread2 : number = 8 i=7thread1 : number = 9 i=8thread2 : number = 10 i=9thread1 :Is main function waiting for me acomplishing task? Thread 1 is overthread2 : number = 11 i=11thread2 : number = 12 i=12thread2 : number = 13 i=13thread2 : number = 14 i=14thread2 : number = 15 i=15thread2 : number = 16 i=16thread2 : number = 17 i=17thread2 : number = 18 i=18thread2 : number = 19 i=19thread2 : number = 20 i=20thread2 : number = 21 i=21thread2 : number = 22 i=22thread2 : number = 23 i=23thread2 : number = 24 i=24thread2 : number = 25 i=25thread2 : number = 26 i=26thread2 : number = 27 i=27thread2 : number = 28 i=28thread2 : number = 29 i=29thread2 :Is main function waiting for me to acomplish task ? Thread 2 is over。
c语言创建线程例子一、什么是线程在计算机科学中,线程是程序执行流的最小单元。
一个线程包含有程序计数器、寄存器集合和栈。
在多线程环境下,多个线程共享同一个进程的资源,但拥有各自的程序计数器、寄存器集合和栈。
线程可以并发执行,可以提高程序的性能和效率。
二、为什么使用线程使用线程可以实现多个任务的并发执行,提高程序的执行效率。
而且线程之间可以共享进程的资源,可以更加高效地利用计算机的硬件资源。
线程的使用可以提供更好的用户体验,比如在图形界面中使用线程可以让程序响应更加迅速,避免出现界面卡顿的情况。
三、C语言中创建线程的方法C语言提供了多种创建线程的方法,下面列举了十个常用的例子:1. 使用pthread库创建线程```c#include <pthread.h>#include <stdio.h>void* thread_func(void* arg) {printf("This is a new thread.\n");return NULL;}int main() {pthread_t tid;pthread_create(&tid, NULL, thread_func, NULL);pthread_join(tid, NULL);printf("Back to main thread.\n");return 0;}```上述代码使用pthread库中的pthread_create函数创建了一个新的线程,并在新线程中执行thread_func函数。
主线程使用pthread_join函数等待新线程执行完毕后再继续执行。
2. 使用Windows API创建线程```c#include <windows.h>#include <stdio.h>DWORD WINAPI thread_func(LPVOID lpParam) {printf("This is a new thread.\n");return 0;}int main() {DWORD dwThreadId;HANDLE hThread = CreateThread(NULL, 0, thread_func, NULL, 0, &dwThreadId);WaitForSingleObject(hThread, INFINITE);printf("Back to main thread.\n");return 0;}```上述代码使用Windows API中的CreateThread函数创建了一个新的线程,并在新线程中执行thread_func函数。
pthread示例-回复pthread是一个在Unix或类Unix系统上实现多线程编程的库。
它提供了一种创建、同步和管理线程的方法,使程序能够同时执行多个任务。
本文将详细介绍pthread库的使用方法和一些常见的示例。
一、什么是pthread库pthread库是一组函数的集合,用于多线程编程。
它为程序员提供了一种简单而强大的方法来创建和操作线程。
pthread库的全称是"POSIX threads",其中POSIX是可移植操作系统接口的简称,是一个标准协议。
因此,pthread库是符合POSIX标准的多线程库。
二、pthread的基本使用方法1. 引入头文件:在使用pthread库之前,需要引入头文件`#include<pthread.h>`。
2. 创建线程:使用`pthread_create()`函数来创建一个新的线程。
它接受四个参数,包括指向线程标识符的指针、线程属性、线程函数的起始地址和传递给线程函数的参数。
下面是一个创建线程的示例:c#include <pthread.h>#include <stdio.h>线程函数void *thread_function(void *arg){int *num = (int *)arg;printf("Hello from thread! The parameter is d\n", *num);pthread_exit(NULL);}int main(){pthread_t thread;int num = 42;pthread_create(&thread, NULL, thread_function, (void *)&num);pthread_join(thread, NULL);return 0;}3. 等待线程结束:主线程可以使用`pthread_join()`函数等待其他线程结束。
pthread示例-回复[实时音频处理的线程管理示例:pthread]在实时音频处理中,线程的管理至关重要。
通过合理地利用线程,我们可以实现并行处理,提高音频处理的效率和性能。
本文将以pthread线程库为例,介绍如何编写一个简单的音频处理程序,并详细讲解线程的创建、同步与销毁。
希望通过本文的阐述,读者能够掌握pthread库的基本使用方法,并能在实际项目中灵活应用。
# 1. 导入头文件在使用pthread线程库之前,我们首先需要引入相关的头文件,以便能够使用pthread的函数和数据结构。
在C语言中,可以通过`#include`指令来导入头文件。
对于pthread库而言,我们需要导入`<pthread.h>`头文件。
因此,在编写代码前,我们首先添加以下语句:c#include <pthread.h># 2. 定义线程主函数在实际的音频处理程序中,我们需要定义一个主函数,用于处理音频数据。
这个主函数可以是一个独立的函数,也可以是代码中的某一部分。
在本文中,我们将以一个独立的函数作为主函数示例。
假设我们需要实现一个简单的音频增大音量的功能,那么我们可以定义如下的主函数:cvoid* increaseVolume(void* data){音频增大音量的具体实现逻辑...}# 3. 创建线程在pthread库中,我们可以使用`pthread_create`函数来创建一个新的线程。
该函数的原型如下:cint pthread_create(pthread_t *thread, const pthread_attr_t *attr, void *(*start_routine) (void *), void *arg);这个函数有四个参数,分别是新线程的标识符、线程的属性、线程的主函数和传递给主函数的参数。
在以上参数中,我们只需要关注前三个参数,因为我们的示例代码并不需要传递参数给主函数。
简单的多线程编程Linux系统下的多线程遵循POSIX线程接口,称为pthread。
编写Linux下的多线程程序,需要使用头文件pthread.h,连接时需要使用库libpthread.a。
顺便说一下,Linux下pthread的实现是通过系统调用clone()来实现的。
clone ()是Linux所特有的系统调用,它的使用方式类似fork,关于clone()的详细情况,有兴趣的读者可以去查看有关文档说明。
下面我们展示一个最简单的多线程程序 example1.c。
/* example.c*/#include <stdio.h>#include <pthread.h>void thread(void){int i;for( i = 0;i < 3; i++ )printf("This is a pthread.\n");}int main(void){pthread_t id;int i,ret;ret = pthread_create( &id, NULL, (void *)thread, NULL );if ( ret!=0 ) {printf ("Create pthread error!\n");exit (1);}for( i = 0; i < 3; i++ )printf("This is the main process.\n");pthread_join(id,NULL);return (0);}我们编译此程序:gcc example1.c -lpthread -o example1运行example1,我们得到如下结果:This is the main process.This is a pthread.This is the main process.This is the main process.This is a pthread.This is a pthread.再次运行,我们可能得到如下结果:This is a pthread.This is the main process.This is a pthread.This is the main process.This is a pthread.This is the main process.前后两次结果不一样,这是两个线程争夺CPU资源的结果。
pthreads使用示例pthreads是一种在多线程编程中常用的库,它提供了一系列函数和数据结构,方便程序员在多线程环境下进行线程的创建、同步与通信。
本文将以示例的方式介绍pthreads的使用。
## 示例1:线程的创建与销毁在使用pthreads创建线程之前,我们需要先包含头文件`pthread.h`。
下面的示例展示了如何创建一个简单的线程,并在线程中输出一句话。
```c#include <stdio.h>#include <pthread.h>void* thread_func(void* arg) {printf("Hello, pthreads!\n");pthread_exit(NULL);}int main() {pthread_t thread;pthread_create(&thread, NULL, thread_func, NULL);pthread_join(thread, NULL);return 0;}```在上述示例中,首先定义了一个`thread_func`函数,它是线程的入口函数。
在该函数中,我们使用`printf`函数输出一句话。
然后,在`main`函数中,我们调用`pthread_create`函数创建一个新的线程,并将`thread_func`作为线程的入口函数。
最后,我们使用`pthread_join`函数等待线程的结束。
## 示例2:线程的同步与互斥在多线程编程中,线程之间的同步与互斥是非常重要的。
pthreads 提供了一些函数和数据结构,可以帮助我们实现线程的同步与互斥。
下面的示例展示了如何使用互斥锁在多个线程之间实现数据的同步与互斥访问。
```c#include <stdio.h>#include <pthread.h>pthread_mutex_t mutex;int count = 0;void* thread_func(void* arg) {for (int i = 0; i < 1000000; i++) {pthread_mutex_lock(&mutex);count++;pthread_mutex_unlock(&mutex);}pthread_exit(NULL);}int main() {pthread_t threads[10];pthread_mutex_init(&mutex, NULL);for (int i = 0; i < 10; i++) {pthread_create(&threads[i], NULL, thread_func, NULL);}for (int i = 0; i < 10; i++) {pthread_join(threads[i], NULL);}pthread_mutex_destroy(&mutex);printf("Final count: %d\n", count);return 0;}```在上述示例中,我们首先定义了一个互斥锁`mutex`和一个全局变量`count`。
pthread多线程用法pthread(POSIX Threads)是一种线程库,它提供了用于创建和管理线程的函数。
使用pthread多线程可以便捷地实现并行计算和并发执行。
要使用pthread多线程,需要包含pthread.h头文件,并在编译时链接pthread库。
接下来,我们将介绍pthread多线程的几个常用用法。
1. 创建线程:使用pthread_create函数可以创建一个新的线程,并指定它的执行函数。
线程创建成功后,会立即开始执行。
例如:```cvoid* thread_func(void* arg) {// 线程的执行函数return NULL;}int main() {pthread_t thread_id;pthread_create(&thread_id, NULL, thread_func, NULL);// 等待线程执行完毕pthread_join(thread_id, NULL);return 0;}```在上面的例子中,`pthread_create`函数创建了一个新线程,并将其指定的执行函数设置为`thread_func`。
线程创建后,可以使用`pthread_join`函数等待线程执行完毕。
2. 线程同步:在多线程编程中,线程之间的执行往往是并发的,为了保证数据的一致性和避免竞态条件,需要使用线程同步的机制。
pthread提供了多种线程同步的方法,例如互斥锁(mutex)、条件变量(condition variable)、信号量(semaphore)等。
通过对共享资源的访问进行同步,可以避免数据错乱和线程间的竞争问题。
3. 线程间通信:多个线程之间经常需要进行数据传递和共享资源的访问,为了保证线程之间的正确通信,可以使用线程间通信的机制。
pthread提供了一些线程间通信的方法,例如消息队列、共享内存、管道等。
这些机制可以实现不同线程之间的数据传递和同步操作。

一、介绍PHP pthreadsPHP pthreads是一个多线程支持的PHP扩展库,可以让PHP语言支持多线程并发执行。
它允许开发人员在PHP中像其他语言一样高效地创建多线程程序。
PHP pthreads还提供了一套丰富的API,使得多线程编程变得更加方便和灵活。
二、使用场景1. 并行处理任务在某些应用中,有一些任务是可以并行执行的,比如数据处理、数据导入导出等。
使用PHP pthreads可以将这些任务分配给不同的线程,提高程序运行的效率。
2. 提高服务器性能对于一些高并发的Web应用,使用PHP pthreads可以让服务器同时处理多个请求,提高系统的并发处理能力,提升全球信息站的性能。
3. 利用多核处理器现代服务器多数配备了多核处理器,使用PHP pthreads可以充分利用多核处理器的性能,提高程序运行的效率。
三、使用方法1. 安装PHP pthreads首先需要确保PHP安装了pthreads扩展,可以通过pecl命令进行安装:pecl install pthreads2. 创建线程类在PHP中使用多线程需要先创建一个线程类,继承自Thread类,并实现run方法。
例如:class MyThread extends Thread {public function run() {// 线程执行的代码}}3. 创建线程对象并启动创建线程对象并调用start方法启动线程执行:$thread = new MyThread();$thread->start();4. 等待线程执行完毕可以使用join方法等待线程执行完毕:$thread->join();四、注意事项1. 线程安全在多线程编程中需要特别注意线程安全,避免多个线程同时访问共享变量导致的数据竞争和死锁。
2. 内存管理多线程程序在内存管理上需要更加小心,避免出现内存泄漏等问题。
3. 性能调优使用PHP pthreads需要在性能调优方面做好工作,合理分配资源和线程数,避免线程过多导致系统性能下降。
pthread示例一、简介pthread是POSIX线程库的简称,它提供了一种在多线程环境中进行编程的方式。
pthread库提供了一组函数和数据类型,用于创建和管理线程,同步和通信,以及处理线程的属性和资源。
二、基本用法1. 创建线程:使用pthread_create函数创建线程。
该函数需要指定线程的属性(如优先级、栈大小等),以及要执行的函数和参数。
```c#include <pthread.h>void *thread_function(void *arg) {// 线程执行的代码return NULL;}int main() {pthread_t thread_id;int ret = pthread_create(&thread_id, NULL, thread_function, NULL);if (ret != 0) {// 创建线程失败,处理错误}// 其他代码return 0;}```2. 等待线程结束:使用pthread_join函数等待线程结束。
该函数需要指定要等待的线程ID,并返回该线程的返回值。
```cint main() {pthread_t thread_id;void *retval;int ret = pthread_join(thread_id, &retval);if (ret != 0) {// 等待线程结束失败,处理错误}// 其他代码return 0;}```3. 同步和互斥:使用pthread_mutex、pthread_rwlock等互斥量和条件变量等同步机制来保护共享资源,避免竞态条件和死锁。
三、高级用法1. 线程池:使用pthread库中的线程池功能,可以更有效地管理线程,提高系统性能。
2. 多线程编程技巧:学习并掌握一些多线程编程的技巧,如避免数据竞争、合理使用本地变量和全局变量、使用线程局部存储等。
3. 错误处理:在多线程编程中,错误处理非常重要。
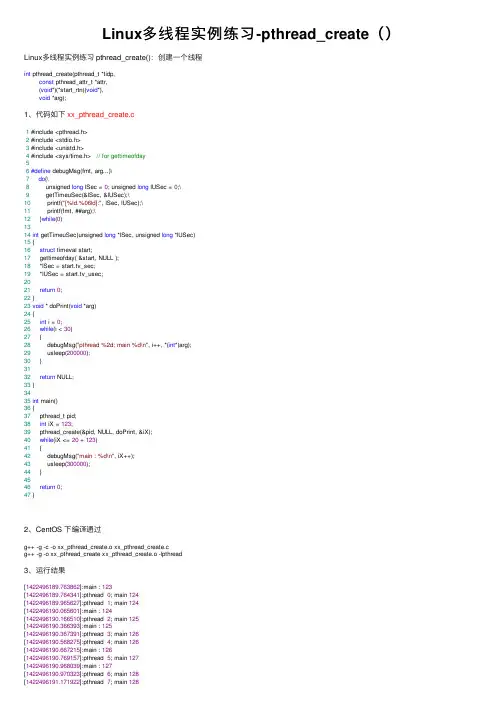
Linux多线程实例练习-pthread_create()Linux多线程实例练习 pthread_create():创建⼀个线程int pthread_create(pthread_t *tidp,const pthread_attr_t *attr,(void*)(*start_rtn)(void*),void *arg);1、代码如下xx_pthread_create.c1 #include <pthread.h>2 #include <stdio.h>3 #include <unistd.h>4 #include <sys/time.h> // for gettimeofday56#define debugMsg(fmt, arg...)\7do{\8 unsigned long lSec = 0; unsigned long lUSec = 0;\9 getTimeuSec(&lSec, &lUSec);\10 printf("[%ld.%06ld]:", lSec, lUSec);\11 printf(fmt, ##arg);\12 }while(0)1314int getTimeuSec(unsigned long *lSec, unsigned long *lUSec)15 {16struct timeval start;17 gettimeofday( &start, NULL );18 *lSec = _sec;19 *lUSec = _usec;2021return0;22 }23void * doPrint(void *arg)24 {25int i = 0;26while(i < 30)27 {28 debugMsg("pthread %2d; main %d\n", i++, *(int*)arg);29 usleep(200000);30 }3132return NULL;33 }3435int main()36 {37 pthread_t pid;38int iX = 123;39 pthread_create(&pid, NULL, doPrint, &iX);40while(iX <= 20 + 123)41 {42 debugMsg("main : %d\n", iX++);43 usleep(300000);44 }4546return0;47 }2、CentOS 下编译通过g++ -g -c -o xx_pthread_create.o xx_pthread_create.cg++ -g -o xx_pthread_create xx_pthread_create.o -lpthread3、运⾏结果[1422496189.763862]:main : 123[1422496189.764341]:pthread 0; main 124[1422496189.965627]:pthread 1; main 124[1422496190.065601]:main : 124[1422496190.166510]:pthread 2; main 125[1422496190.366393]:main : 125[1422496190.367391]:pthread 3; main 126[1422496190.568275]:pthread 4; main 126[1422496190.667215]:main : 126[1422496190.769157]:pthread 5; main 127[1422496190.968039]:main : 127[1422496190.970323]:pthread 6; main 128[1422496191.171922]:pthread 7; main 128[1422496191.269869]:main : 128 [1422496191.373803]:pthread 8; main 129 [1422496191.571696]:main : 129 [1422496191.574958]:pthread 9; main 130 [1422496191.776566]:pthread 10; main 130 [1422496191.873512]:main : 130 [1422496191.977457]:pthread 11; main 131 [1422496192.174348]:main : 131 [1422496192.178362]:pthread 12; main 132 [1422496192.379214]:pthread 13; main 132 [1422496192.475159]:main : 132 [1422496192.580095]:pthread 14; main 133 [1422496192.776006]:main : 133 [1422496192.781267]:pthread 15; main 134 [1422496192.981968]:pthread 16; main 134 [1422496193.076864]:main : 134 [1422496193.182797]:pthread 17; main 135 [1422496193.377656]:main : 135 [1422496193.384089]:pthread 18; main 136 [1422496193.584595]:pthread 19; main 136 [1422496193.678472]:main : 136 [1422496193.785406]:pthread 20; main 137 [1422496193.980296]:main : 137 [1422496193.987689]:pthread 21; main 138 [1422496194.189201]:pthread 22; main 138 [1422496194.281149]:main : 138 [1422496194.390049]:pthread 23; main 139 [1422496194.582987]:main : 139 [1422496194.590944]:pthread 24; main 140 [1422496194.792793]:pthread 25; main 140 [1422496194.883821]:main : 140 [1422496194.993852]:pthread 26; main 141 [1422496195.184826]:main : 141 [1422496195.195665]:pthread 27; main 142 [1422496195.397447]:pthread 28; main 142 [1422496195.486468]:main : 142 [1422496195.598408]:pthread 29; main 143 [1422496195.787329]:main : 143。
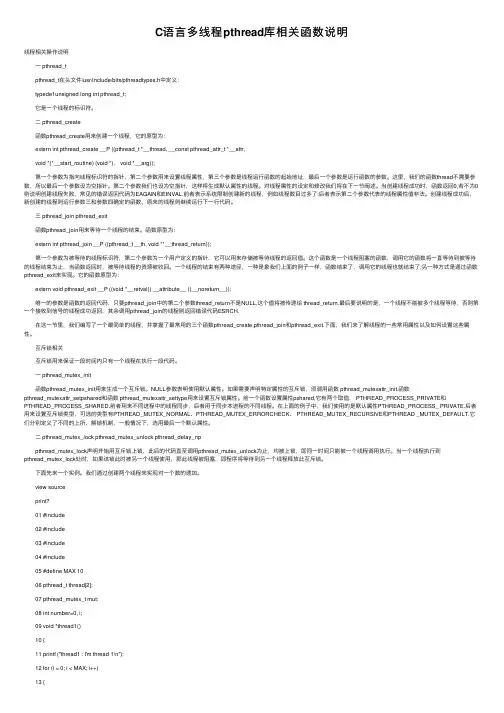
C语⾔多线程pthread库相关函数说明线程相关操作说明 ⼀ pthread_t pthread_t在头⽂件/usr/include/bits/pthreadtypes.h中定义: typedef unsigned long int pthread_t; 它是⼀个线程的标识符。
⼆ pthread_create 函数pthread_create⽤来创建⼀个线程,它的原型为: extern int pthread_create __P ((pthread_t *__thread, __const pthread_attr_t *__attr, void *(*__start_routine) (void *), void *__arg)); 第⼀个参数为指向线程标识符的指针,第⼆个参数⽤来设置线程属性,第三个参数是线程运⾏函数的起始地址,最后⼀个参数是运⾏函数的参数。
这⾥,我们的函数thread不需要参数,所以最后⼀个参数设为空指针。
第⼆个参数我们也设为空指针,这样将⽣成默认属性的线程。
对线程属性的设定和修改我们将在下⼀节阐述。
当创建线程成功时,函数返回0,若不为0则说明创建线程失败,常见的错误返回代码为EAGAIN和EINVAL.前者表⽰系统限制创建新的线程,例如线程数⽬过多了;后者表⽰第⼆个参数代表的线程属性值⾮法。
创建线程成功后,新创建的线程则运⾏参数三和参数四确定的函数,原来的线程则继续运⾏下⼀⾏代码。
三 pthread_join pthread_exit 函数pthread_join⽤来等待⼀个线程的结束。
函数原型为: extern int pthread_join __P ((pthread_t __th, void **__thread_return)); 第⼀个参数为被等待的线程标识符,第⼆个参数为⼀个⽤户定义的指针,它可以⽤来存储被等待线程的返回值。
这个函数是⼀个线程阻塞的函数,调⽤它的函数将⼀直等待到被等待的线程结束为⽌,当函数返回时,被等待线程的资源被收回。
pthread详解我并不假定你会使⽤Linux的线程,所以在这⾥就简单的介绍⼀下。
如果你之前有过多线程⽅⾯的编程经验,完全可以忽略本⽂的内容,因为它⾮常的初级。
⾸先说明⼀下,在Linux编写多线程程序需要包含头⽂件#include <pthread.h>当然,进包含⼀个头⽂件是不能搞定线程的,还需要连接libpthread.so这个库,因此在程序链接阶段应该有类似gcc program.o -o program -lpthread第⼀个例⼦在Linux下创建的线程的API接⼝是pthread_create(),它的完整定义是:int pthread_create(pthread_t *thread, const pthread_attr_t *attr, void *(*start_routine)(void*), void *arg);函数参数:1. 线程句柄 thread:当⼀个新的线程调⽤成功之后,就会通过这个参数将线程的句柄返回给调⽤者,以便对这个线程进⾏管理。
2. ⼊⼝函数 start_routine():当你的程序调⽤了这个接⼝之后,就会产⽣⼀个线程,⽽这个线程的⼊⼝函数就是start_routine()。
如果线程创建成功,这个接⼝会返回0。
3. ⼊⼝函数参数 *arg : start_routine()函数有⼀个参数,这个参数就是pthread_create的最后⼀个参数arg。
这种设计可以在线程创建之前就帮它准备好⼀些专有数据,最典型的⽤法就是使⽤C++编程时的this指针。
start_routine()有⼀个返回值,这个返回值可以通过pthread_join()接⼝获得。
4. 线程属性 attr:pthread_create()接⼝的第⼆个参数⽤于设置线程的属性。
这个参数是可选的,当不需要修改线程的默认属性时,给它传递NULL就⾏。
具体线程有那些属性,我们后⾯再做介绍。
c语言中thread函数C语言是一种广泛应用于系统开发、嵌入式系统和网络编程等领域的程序设计语言。
在C语言中有一种非常重要的函数,那就是thread函数。
thread函数(或线程函数)是C语言中用来创建线程的函数。
线程是程序中独立运行的部分,也称为轻量级进程。
下面将详细介绍C语言中的thread函数,包括它的概念、使用方法和实用性。
一、thread函数的概念thread函数是在C语言中用来创建线程的函数。
线程可以理解为一个程序执行流程,它可以独立的运行,而不会影响程序的其他部分。
线程是轻量级的,因为它不需要像进程那样拥有独立的地址空间,所以在创建线程时需要将它与主进程共享一些资源,比如文件描述符、内存等等。
二、thread函数的使用方法thread函数的使用方法很简单,主要包括线程创建、线程的执行和线程的销毁。
在C语言中使用thread函数主要用到以下三个函数:1. pthread_create():该函数用来创建线程。
2. pthread_join():该函数用来等待线程终止。
3. pthread_exit():该函数用来终止一个线程。
下面是使用thread函数创建线程的一个实例:#include <pthread.h>#include <stdio.h>void *say_hello(void* arg){printf("Hello,World!\n");return NULL;}int main(void){pthread_t tid;pthread_create(&tid, NULL, say_hello, NULL);pthread_join(tid, NULL);return 0;}以上代码会创建一个线程,然后在线程中输出一句"Hello,World!",最终将该线程等待并销毁。
三、thread函数的实用性thread函数在编写多线程程序时非常有用。
pthreadcreate用法pthread_create的用法pthread_create是一个用来创建线程的函数,是POSIX标准库中的一部分。
它的原型如下:int pthread_create(pthread_t* thread, const pthread_attr_t* attr, void* (*start_routine)(void*), void* arg);参数解析•thread是指向线程标识符的指针,用来存储新创建的线程的标识符。
•attr是一个指向线程属性的指针,它指定了新线程的一些属性。
如果不需要特殊属性,可以传入NULL。
•start_routine是线程的主函数,该函数在新线程中执行。
它的返回值和参数都是void指针类型,可以用来传递任意类型的数据。
•arg是传递给start_routine的参数。
使用示例以下是使用pthread_create函数创建新线程的几个示例:•示例1:创建一个不带参数的新线程#include <>#include <>void* thread_function(void* arg) {printf("Hello from a new thread!\n");pthread_exit(NULL);}int main() {pthread_t thread_id;pthread_create(&thread_id, NULL, thread_function, NU LL);pthread_join(thread_id, NULL);printf("Main thread exiting...\n");return 0;}•示例2:创建一个带参数的新线程#include <>#include <>void* thread_function(void* arg) {int thread_arg = *((int*) arg);printf("Hello from a new thread! Argument: %d\n", th read_arg);pthread_exit(NULL);}int main() {pthread_t thread_id;int arg = 42;pthread_create(&thread_id, NULL, thread_function, (v oid*) &arg);pthread_join(thread_id, NULL);printf("Main thread exiting...\n");return 0;}•示例3:创建多个新线程#include <>#include <>void* thread_function(void* arg) {printf("Hello from a new thread! Thread ID: %lu\n", (unsigned long) pthread_self());pthread_exit(NULL);}int main() {const int num_threads = 5;pthread_t thread_ids[num_threads];for (int i = 0; i < num_threads; ++i) {pthread_create(&thread_ids[i], NULL, thread_func tion, NULL);}for (int i = 0; i < num_threads; ++i) {pthread_join(thread_ids[i], NULL);}printf("Main thread exiting...\n");return 0;}总结通过使用pthread_create函数,我们可以方便地创建新的线程并在其中执行指定的函数。
PHP使⽤Pthread实现的多线程操作实例 1 <?php2class vote extends Thread {3public$res = '';4public$url = array();5public$name = '';6public$runing = false;7public$lc = false;8public function __construct($name) {9$this->res = '暂⽆,第⼀次运⾏.';10$this->param = 0;11$this->lurl = 0;12$this->name = $name;13$this->runing = true;14$this->lc = false;15 }16public function run() {17while ($this->runing) {18if ($this->param != 0) {19$nt = rand(1, 10);20echo "线程[{$this->name}]收到任务参数::{$this->param},需要{$nt}秒处理数据.\n";21$this->res = rand(100, 999);22sleep($nt);23$this->lurl = $this->param;24$this->param = '';25 } else {26echo "线程[{$this->name}]等待任务..\n";27 }28sleep(1);29 }30 }31 }32//这⾥创建线程池.33$pool[] = new vote('a');34$pool[] = new vote('b');35$pool[] = new vote('c');36//启动所有线程,使其处于⼯作状态37foreach ($pool as$w) {38$w->start();39 }40//派发任务给线程41for ($i = 1; $i < 10; $i++) {42$worker_content = rand(10, 99);43while (true) {44foreach ($pool as$worker) {45//参数为空则说明线程空闲46if ($worker->param=='') {47$worker->param = $worker_content;48echo "[{$worker->name}]线程空闲,放⼊参数{$worker_content},上次参数[{$worker->lurl}]结果[{$worker->res}].\n";49break 2;50 }51 }52sleep(1);53 }54 }55echo "所有线程派发完毕,等待执⾏完成.\n";56//等待所有线程运⾏结束57while (count($pool)) {58//遍历检查线程组运⾏结束59foreach ($pool as$key => $threads) {60if ($worker->param=='') {61echo "[{$threads->name}]线程空闲,上次参数[{$threads->lurl}]结果[{$threads->res}].\n";62echo "[{$threads->name}]线程运⾏完成,退出.\n";63//设置结束标志64$threads->runing = false;65unset($pool[$key]);66 }67 }68echo "等待中...\n";69sleep(1);70 }71echo "所有线程执⾏完毕.\n";。
#include <stdio.h>#include <unistd.h>#include <stdlib.h>#include <pthread.h>void *thread_function(void *arg);char message[] = "Hello World";int main(){int res;pthread_t thread_1;void *thread_result;res = pthread_create(&thread_1, NULL, thread_function, (void *)message);//创建线程,参数为messageif (res != 0) {perror("thread creation failed");exit(-1); //exit(EXIT_FAILURE);}printf("Message is %s\n",message);printf("Waiting for thread to finish...\n");res = pthread_join(thread_1, &thread_result); //等待线程结束,并将返回的结果放到thread_result中if (res != 0) {perror("thread join failed");exit(-1);}printf("Thread joined, return %s, Message is changed to %s\n", (char *)thread_result, message);//message被线程改变exit(0);}void *thread_function(void *arg){printf("thread_function is running. Argument is %s\n", (char *)arg);sleep(2);//线程等待2sstrcpy(message, "Bye!");//与主线程共享数据message,所以可以改变message的值pthread_exit("Thank you for the CPU time");//返回字符串给thread_result}GCC下运行结果:[root@SW4-SW one C]# gcc -o thread1 thread1.c -lpthreadthread1.c: In function ‘thread_function’:thread1.c:35: warning: incompatible implicit declaration of built-in function ‘strcpy’[root@SW4-SW one C]#[root@SW4-SW one C]#[root@SW4-SW one C]# ./thread1Message is Hello Worldthread_function is running. Argument is Hello WorldWaiting for thread to finish...Thread joined, return Thank you for the CPU time, Message is changed to Bye![root@SW4-SW one C]#。
pthread⼀个例⼦.c⽂件-创建两个线程,⼀个⽤于将接收的数据写⼊⽂件,⼀个⽤于监听(监听到指令后进⾏介绍操作)1 #include "test_umb.h"23static umb_inst_id_t g_safety_inst_id[7];4 suglog_info g_safety_sug_info = {0};5 ctxlog_info g_ctx_info = {0};67 FILE *p_sug_file;89 pthread_t listen_pb;10 pthread_t sug_pb;11 pthread_t ctx_pb;12 uint64 old_time_interval = 0;1314void umb_init_for_test(void);15static int sug_cb(umb_inst_id_t inst_id, umb_msgbuff_t *data, umb_timestamp_t *tm, void *param);16static int ctx_cb(umb_inst_id_t inst_id, umb_msgbuff_t *data, umb_timestamp_t *tm, void *param);17//void *sug_pthread(void *arg);18void *ctx_pthread(void *arg);19 uint32 write_log(FILE *p_file,uint32 type);20void *listen_pthread(void *arg);212223void main(void)24 {25 sint32 ret = 0;26char filename[100];27 time_t time_curr = time(NULL);28struct tm *tm_curr = localtime(&time_curr);29// umb_version_t version;3031 snprintf(filename,22,"sug%d%02d%02d%02d%02d%02d.log",(tm_curr->tm_year+1900),tm_curr->tm_mon+1,tm_curr->tm_mday,32 tm_curr->tm_hour,tm_curr->tm_min,tm_curr->tm_sec);3334 umb_init_for_test();35// umb_get_version(&version);36// printf("umb version is %d-%d-%d",version.major,version.minor,version.patch);3738 p_sug_file = fopen(filename,"a+");3940 g_safety_sug_info.status = 1;41 g_ctx_info.status = 1;4243 printf("start safety log...\n");4445// ret = pthread_create(&sug_pb,NULL,sug_pthread,NULL);46// if (0 != ret) {47// printf("sug_pthread create failed!\n");48// }49 ret = pthread_create(&ctx_pb,NULL,ctx_pthread,NULL);50if (0 != ret) {51 printf("ctx_pthread create failed!\n");52 }53 ret = pthread_create(&listen_pb,NULL,listen_pthread,NULL);54if (0 != ret) {55 printf("listen_pthread create failed!\n");56 }5758 pthread_join(listen_pb,NULL);59 sleep(1);60// printf("exit...\r\n");61// while(1) {62// sleep(10);63// }64return;6566 }6768void umb_init_for_test(void)69 {70 umb_qosparam_t qos = {0};71 qos.frag = 1;72 qos.reliable = 0;73 umb_init(NULL, NULL);74 umb_sub_reg(&g_safety_inst_id[0], 1032, 166, sug_cb, NULL);75 umb_sub_reg(&g_safety_inst_id[2], 1036, 301, ctx_cb, NULL);76// umb_sub_adv_reg(&g_safety_inst_id[2], 1036, 301, ctx_cb, &qos);77 }80static int sug_cb(umb_inst_id_t inst_id, umb_msgbuff_t *data, umb_timestamp_t *tm, void *param)81 {82 (void)tm;83 (void)param;8485if (data->len <= sizeof(SafetySug))86 {87 memcpy(&(g_safety_sug_info.sug), (*data).buff, sizeof(unsigned char) * (data->len));88 g_safety_sug_info.count++;89 g_safety_sug_info.flag = 1;90 }91 }9293static int ctx_cb(umb_inst_id_t inst_id, umb_msgbuff_t *data, umb_timestamp_t *tm, void *param)94 {95 (void)tm;96 (void)param;97 uint16 count = 0;98 uint16 sonar_count = 0;99 uint16 visual_count = 0;100 uint8 temp_buff[CTX_SIZE_MAX];101102103if (data->len < CTX_SIZE_MAX)104 {105 memcpy(temp_buff, (*data).buff, data->len);106107 memcpy(&(g_ctx_info.car_status), temp_buff, sizeof(CarStatus));108 count = sizeof(CarStatus);109110if(temp_buff[count] > 0) {111 g_ctx_info.sonar_obstl.count = (temp_buff[count]>64)?64:temp_buff[count];112 sonar_count = sizeof(SonarObstacleEntry)*g_ctx_info.sonar_obstl.count;113 memcpy(&(g_ctx_info.sonar_obstl.arr), &(temp_buff[count+1]), sonar_count);114 count += sonar_count +1;115 }116else {117 count += 1;118 }119if((temp_buff[count] > 0)&&(count < CTX_SIZE_MAX)) {120 g_ctx_info.visual_obstl.count = (temp_buff[count]>208)?208:temp_buff[count];121 visual_count = sizeof(VisualObstacleEntry)*g_ctx_info.visual_obstl.count;122 memcpy(&(g_ctx_info.visual_obstl.arr), &(temp_buff[count+1]), visual_count);123 count += visual_count+1;124 }125else {126 count += 1;127 }128if(count < (CTX_SIZE_MAX-8)) {129 memcpy(&(g_ctx_info.obstl_time_period),&(temp_buff[count+1]),sizeof(uint64));130 }131 g_ctx_info.count++;132 g_ctx_info.flag = 1;133 }134 }135136137//void *sug_pthread(void *arg)138//{139// (void)arg;140141// while(g_safety_sug_info.status) {142// if (1 == g_safety_sug_info.flag) {143// write_log(p_sug_file,SUG_TYPE);144// g_safety_sug_info.flag = 0;145// }146// }147//}148149void *ctx_pthread(void *arg)150 {151 (void)arg;152153while(g_ctx_info.status) {154if (1 == g_ctx_info.flag) {155 write_log(p_sug_file,CTX_TYPE);156 g_ctx_info.flag = 0;157 }158 {159 pthread_testcancel();160 }161 usleep(100);164165166 uint32 write_log(FILE *p_file,UMB_DATA_TYPE type)167 {168 uint16 i = 0;169static uint16 cnt = 0;170171 time_t time_log = time(NULL);172struct tm *tm_log = localtime(&time_log);173 fprintf(p_file,"%02d-%02d-%02d\r\n",tm_log->tm_hour,tm_log->tm_min,tm_log->tm_sec);174// if (SUG_TYPE == type) {175 fprintf(p_file," sug status:\r\n");176 {177 fprintf(p_file," run_status:%d\r\n",g_safety_sug_info.sug.run_status);178 fprintf(p_file," win:%d\r\n",g_safety_sug_info.sug.win);179 fprintf(p_file," brake_pedal_vehicle:%.3f\r\n",g_safety_sug_info.sug.brake_pedal_vehicle);180 fprintf(p_file," brake_pedal_safety_out:%.3f\r\n",g_safety_sug_info.sug.brake_pedal_safety_out); 181 fprintf(p_file," min_dist:%.3f, x:%.3f, y%.3f\r\n",g_safety_sug_info.sug.obst_info.min_dist,182 g_safety_sug_info.sug.obst_info.point.x,183 g_safety_sug_info.sug.obst_info.point.y);184 fprintf(p_file," count:%d\r\n",g_safety_sug_info.count);185 }186// }187188// if (CTX_TYPE == type) {189 fprintf(p_file," car status:\r\n");190 {191 fprintf(p_file," vehicle_speed:%.3f\r\n",g_ctx_info.car_status.vehicle_speed);192 fprintf(p_file," steering_angle:%.3f\r\n",g_ctx_info.car_status.steering_angle);193 fprintf(p_file," gear:%d\r\n",g_ctx_info.car_status.gear);194 fprintf(p_file," brake_pedal:%.3f\r\n",g_ctx_info.car_status.brake_pedal);195 }196197 fprintf(p_file," sonar obstl:\r\n");198 {199 fprintf(p_file," count:%d\r\n",g_ctx_info.sonar_obstl.count);200for (i = 0; i < g_ctx_info.sonar_obstl.count; i++) {201 fprintf(p_file," obstl:x:%.3f, y:%.3f, d:%.3f\r\n",g_ctx_info.sonar_obstl.arr[i].location.x,202 g_ctx_info.sonar_obstl.arr[i].location.y,203 g_ctx_info.sonar_obstl.arr[i].distance);204 }205 }206207 fprintf(p_file," visual obstl:\r\n");208 {209 fprintf(p_file," count:%d\r\n",g_ctx_info.visual_obstl.count);210for (i = 0; i < g_ctx_info.visual_obstl.count; i++) {211 fprintf(p_file," obstl:x:%.3f, y:%.3f, d:%.3f\r\n",g_ctx_info.visual_obstl.arr[i].location.x,212 g_ctx_info.visual_obstl.arr[i].location.y,213 g_ctx_info.visual_obstl.arr[i].distance);214 }215 }216217 fprintf(p_file," obstal HZ:\r\n");218 {219 fprintf(p_file," sonar interval:%d",g_ctx_info.obstl_time_period);220 }221if(old_time_interval == g_ctx_info.obstl_time_period) {222 cnt++;223if (cnt > 3) {224 fprintf(p_file," error\r\n");225 }226 }227else {228 fprintf(p_file,"\r\n");229 cnt = 0;230 }231 fprintf(p_file," count:%d\r\n",g_ctx_info.count);232 old_time_interval = g_ctx_info.obstl_time_period;233// }234235return0;236 }237238void *listen_pthread(void *arg)239 {240 (void)arg;241242while (1)243 {244char buff[50];247 {248// g_safety_sug_info.status = 0;249 g_ctx_info.status = 0;250251 fflush(p_sug_file);252 fclose(p_sug_file);253 pthread_cancel(ctx_pb);254 pthread_join(ctx_pb,NULL);255 usleep(200000);256 printf("exit log...\r\n");257break;258 }259 usleep(200000);260 }261 }.h⽂件1 #ifndef TEST_UMB2#define TEST_UMB 134 #include "umb.h"5 #include <stdio.h>6 #include <time.h>7 #include <stdarg.h>8 #include <pthread.h>9 #include <string.h>10 #include <unistd.h>1112#define CTX_SIZE_MAX 28901314 typedef float float32;15 typedef unsigned int uint32;16 typedef unsigned short uint16;17 typedef unsigned char uint8;18 typedef int sint32;19 typedef unsigned long uint64;2021 typedef enum {22 SUG_TYPE = 0,23 CTX_TYPE,2425 } UMB_DATA_TYPE;2627 typedef enum {28 GEAR_NONE = 0,29 GEAR_PARKING = 1,30 GEAR_REVERSE = 2,31 GEAR_NEUTRAL = 3,32 GEAR_DRIVE = 4,33 } Gear;343536 typedef struct _obstacle_point {37 float32 x;38 float32 y;39 } obstacle_point;4041 typedef struct _min_dist_obstacle {42 float32 min_dist;43 obstacle_point point;44 } min_dist_obstacle;4546 typedef struct _SafetySug {47 uint32 run_status; // 1-safety run 0-safety exit48 uint32 win; // 1-safety win 0-safety nonthing49 float32 brake_pedal_vehicle; // current vehicle brake pedal50 float32 brake_pedal_safety_out; // 0-safety nonthing, other-safety out51 min_dist_obstacle obst_info; // safety obstacle info52 uint32 reverse[3]; //reverse53 } SafetySug;5455 typedef struct _suglog_info {56 SafetySug sug;57 uint32 flag;58 uint32 count;59 uint32 status;60 } suglog_info;6162 typedef struct {64 float32 steering_angle; // deg65 Gear gear; // described above66 float32 brake_pedal;67 } CarStatus;6869 typedef struct {70 obstacle_point location;71 float32 distance;72 } SonarObstacleEntry;7374 typedef struct {75 SonarObstacleEntry arr[2 * 32];76 uint32 count;77 } SonarObstaclesPept;7879 typedef struct {80 obstacle_point location;81 float32 distance;82 } VisualObstacleEntry;8384 typedef struct {85 VisualObstacleEntry arr[208];86 uint32 count;87 } VisualObstaclesPept;888990 typedef struct _ctxlog_info {91 CarStatus car_status;92 SonarObstaclesPept sonar_obstl;93 VisualObstaclesPept visual_obstl;94 uint64 obstl_time_period;95 uint32 flag;96 uint32 count;97 uint32 status;98 } ctxlog_info;105#endif /* TEST_UMB */makefile:1 CC = gcc2 LIBS = -L /home/user/umb/umb_output/lib -lumb3 LIBS += -lpthread4 SOURCES = test_umb.c test_umb.h5 OBJECTS = test_umb.o6 TARGET = test_umb7 #INCPATH += -I/home/user/8 #INCPATH += -I/home/ubuntu/umb/umb_output/lib/9 INCPATH += -I/home/user/umb/umb_output/include/10 all build:: $(TARGET)11 $(OBJECTS): $(SOURCES)12 $(CC) -c $(INCPATH) -o "$@""$<"1314 $(TARGET): $(OBJECTS)15 $(CC) -g -o $@ $(OBJECTS) $(LIBS)1617 clean:18 rm -rf *.o19 rm -rf test_umb。