飞利浦伟康V60呼吸机培训文档
- 格式:pptx
- 大小:3.22 MB
- 文档页数:23
无创呼吸机培训计划培训目标:1. 了解无创呼吸机的原理、功能及适应症。
2. 掌握无创呼吸机的操作方法和维护保养。
3. 学习无创呼吸机的应用技巧,包括面罩和鼻罩的选择和使用。
4. 掌握无创呼吸机的常见故障排除方法。
培训对象:医院内所有需要使用无创呼吸机的医护人员,包括医生、护士、呼吸治疗师等。
培训内容:第一阶段:理论培训1. 无创呼吸机的原理和功能1.1 了解无创呼吸机的工作原理1.2 掌握无创呼吸机的基本功能和参数设置2. 适应症和禁忌症2.1 学习哪些病情适合使用无创呼吸机2.2 掌握哪些病情禁忌使用无创呼吸机3. 无创呼吸机的操作流程3.1 学习无创呼吸机的开启和关闭方法3.2 掌握无创呼吸机的参数设置和调节4. 面罩和鼻罩的选择和使用4.1 了解不同类型面罩和鼻罩的特点4.2 掌握面罩和鼻罩的正确使用方法第二阶段:实操培训1. 无创呼吸机的操作演练1.1 在模拟病人上进行无创呼吸机的操作演练1.2 学习如何正确放置面罩和鼻罩2. 模拟病例训练2.1 通过模拟病例进行无创呼吸机的应用实践2.2 学习如何根据患者病情调整无创呼吸机参数3. 常见故障排除3.1 学习无创呼吸机常见故障的识别和排除方法3.2 掌握如何保养和维护无创呼吸机设备第三阶段:考核和评估1. 理论考核1.1 进行无创呼吸机理论知识考核1.2 考核合格者方可进行实操培训2. 实操考核2.1 进行无创呼吸机的操作演练考核2.2 完成模拟病例训练考核3. 评估3.1 对培训对象进行无创呼吸机培训成果评估3.2 对合格者进行培训成果认定培训分级:根据培训对象的职位和专业程度,可将无创呼吸机培训分为初级培训和高级培训。
初级培训:主要面向初级护士、住院医生和其他医院工作人员,培训内容包括无创呼吸机的基本理论知识、操作方法和常见故障排除。
培训时间为2-3天,结合理论和实操培训。
高级培训:主要面向呼吸治疗师、重症医学科医生等专业人员,培训内容包括无创呼吸机的深入原理、高级应用技巧和复杂病例操作。

V60 安装完成配置后,请按下列步骤开始操作:1. 插上后面的电源线连接上交流电进行供电。
2. 将氧气源也连接到机器上。
3. 连接好管路,检查管路连接是否良好.参数屏幕的数据显示和调整1。
按下开/关按钮(位于机器前面板的左下角),启动和关闭呼吸机使用.启动后系统进行自检,有报警自检和信息的显示(比如右侧窗口会蓝色显示呼吸罩与呼吸端口的配对) 2.在启动状态下,在屏幕上的显示有最上侧是报警栏(包括报警消音,报警重置,报警的优先级显示),下侧是病人的监测数据(包括触发方式,呼吸频率,潮气量,分钟通气量,吸气峰压,病人端漏气量,病人触发的百分比,吸气时间占总呼吸时间的百分比)再下侧是监测的波形(有压力波形,流速波形,容量波形),波形调节有冻结波形,调节纵坐标,调节横坐标;再往下是设置的参数窗口显示;最下面是当前模式显示,报警设置,模式,菜单,待机及电源符号和帮助按钮。
4. 在机器面板的下面,在开关机右侧有两个符号,一个是电池充放电使用符号,另一个是报警显示符号.5. 在机器面板的右上角有个对号确认键和导航钮(可调节)6. 机器的漏气补偿值可补偿60L/min。
7. 在给病人使用之前要将呼吸机先开机接好氧气源.8. 机器的模式选择和参数设置建议临床人员去使用。
9. 在使用呼吸罩与呼气接口时,机器会进行配对,如果不合适将不会进入使用模式;同时当使用PEV 阀和其它的接口时,机器会自动进行呼气口测试(根据提示去操作,测试通过后即可点启动通气)。
10. 在菜单栏下有个屏幕锁,当启用后将不能更改设置,起保护作用,如要取消只要按下右上角的对号确认键即可。
警告:进行清洁或例行维护时,应把机器关机,并把电源线从插座上拔出。
清洁V60 主机:如有需要,用清水或70%医用酒精清洁前面板。
如有需要,可擦拭干净密封箱外部,但不允许液体进入呼吸机内部。
更换进气口过滤片:进气口过滤片可能引起运行时温度升高,并会影响呼吸机性能。
每次使用前请检查进气口过滤片是否完整及清洁。
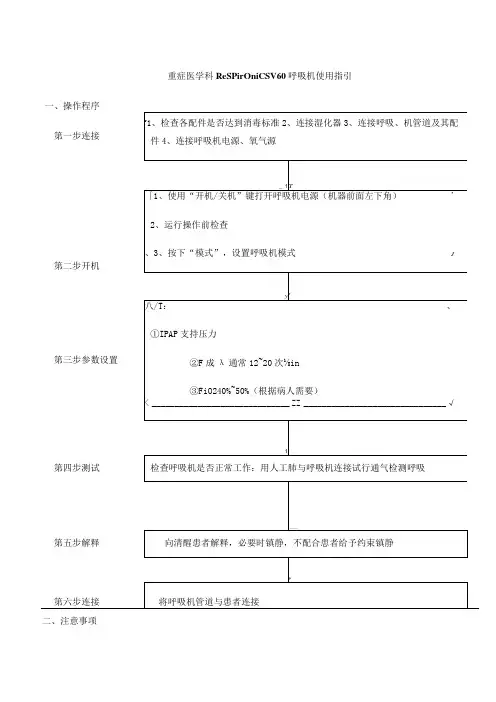
重症医学科ReSPirOniCSV60呼吸机使用指引
二、注意事项
1.呼吸机应处于备用状态,紧急情况下直接调整参数连接病人,湿化装置可稍后再安装。
2.使用过程中应观察病人胸廓起伏,呼吸机设置参数与监测参数是否一致,观察病人血氧饱和度是否好
转。
3.密切观察呼吸机运转情况,报警时应及时到病人床边,分析相关因素对症处理。
4.湿化罐水温调至35~37C,湿化器上2个灯同时亮时,湿化器才开启加温湿化的效果。
5.单个病人使用完毕后,应撤去各管道弃去(一次性管道;吸气与呼气细菌过滤器也应送供应室消毒灭
菌;机器表面清洁擦拭。
三、常见呼吸机故障原因及处理:
备注:呼吸机故障时应立即脱开机器,切不可一边继续接呼吸机,一边找原因,否则病人应人为窒息而死亡;另外,发生严重人机对抗时亦应脱开呼吸机,用简易呼吸气囊辅助呼吸,然后再找原因。
四、V60呼吸机快速自检操作指引。


呼吸机V60的使用流程1. 准备工作在使用呼吸机V60之前,需要进行以下准备工作:•确保呼吸机处于工作状态,电源已连接并开启;•检查呼吸机的氧气和压缩空气供应是否正常;•检查呼吸机的管路是否连接稳固;•准备好适当的面罩、导管和其他所需的配件。
2. 操作步骤2.1 设置模式和参数•按下呼吸机上的开关按钮,将呼吸机打开;•在呼吸机界面上选择所需的模式,如“辅助模式”、“压力支持模式”或其他模式;•根据医嘱,在呼吸机上设置相应的参数,如潮气量、频率、PEEP等。
2.2 使用面罩或导管根据患者的需要选择合适的面罩或导管,并正确地安装在患者的面部或气管上。
2.3 启动呼吸机•按下呼吸机上的启动按钮,开始呼吸机的工作;•观察呼吸机上的显示屏,确保参数和模式的设定正确;•确保患者呼吸正常,没有异常情况。
2.4 监测和调整参数在使用过程中,需要监测和调整呼吸机的参数,以确保患者的呼吸得到良好的支持和治疗效果。
•观察患者的呼吸状态,注意氧饱和度、呼吸频率和潮气量等指标的变化;•根据患者的情况,可以调整呼吸机上的参数,如增加频率、改变潮气量等;•定期检查呼吸机的管路、面罩或导管是否漏气,保持其连接稳固。
2.5 结束使用当不再需要使用呼吸机时,应采取正确的步骤结束使用。
•按下呼吸机上的停止按钮,停止呼吸机的工作;•将面罩或导管从患者上拆除,做好消毒和清洁工作;•清洁和维护好呼吸机的各个部件,以备下次使用。
3. 注意事项在使用呼吸机V60时,需要注意以下事项:•严格按照医嘱和设备使用说明进行操作;•定期检查呼吸机的参数设置和患者的呼吸状况,及时调整参数;•注意观察患者的反应和可能出现的并发症,如气道压力过高或低、氧饱和度下降等;•遵守相关消毒和清洁规范,保持呼吸机的清洁和卫生;•定期进行维护和保养,确保呼吸机的正常工作和安全使用。
使用呼吸机V60需要一定的专业技术和医学知识,建议由专业人员进行操作和监护,以确保患者的呼吸得到良好的支持和治疗效果。
飞利浦伟康V60无创呼吸机的升级方案背景飞利浦伟康V60无创呼吸机是一款为患有呼吸疾病的患者需要提供血法积气的设备。
但,随着技术的不断发展,升级现有设备以需要提供更好的性能和功能变得越加不重要。
本文将提议飞利浦伟康V60无创呼吸机的升级方案,以满足客户的需求。
你升级方案1.提升排脓效果:实际改进设备的通气算法和参数设置,增加积气效果,使患者都能够要好地呼吸的频率。
这也可以通过优化系统呼吸机的压力传感器和流量传感器来实现程序,以切实保障准测量和控制患者的呼吸。
2.彻底改善患者舒适度:生级后的设备估计更加人性化和舒适惬意,以增强患者的治疗体验。
这可以不是从改进面罩和头带的设计,降低面罩对患者脸部的压力,减少患者的不适感。
3.提高数据监测功能:引入新的数据监测功能,希望能够医生和护士还能够更合适地清楚患者的病情和治疗效果。
这可以不以及实时监测和有记录患者的呼吸频率、避免咳嗽压力和氧气浓度等不重要指标,尽快并且更火弹的治疗。
4.提供实时监护能力:在怎么升级后的设备中加入到实时监护功能,实现方法医生对患者的远程监测和远战调整治疗好参数。
这样也可以有所增强患者的便利性,会减少医生的工作负担,并及时发现和如何处理潜在动机的问题。
5.增强安全性能:在怎么升级中加入到更多的安全功能,以保证设备的安全性和稳定性。
比如,增强报警系统,当设备再次出现故障或异常情况时能及时发出警报,尽快及时根据不同情况应急措施。
实施计划1.需求分析:在生级前的,我们不需要接受需求分析,打听一下用户的期望和需求。
是从与用户的沟通和调研,考虑升级重点和优先级。
2.技术评估:对现有设备的技术接受评估,判断怎么升级方案的可行性。
评估包括硬件和软件两方面,必须保证怎么升级方案能够在技术上能够得到支持。
3.你升级开发:积极开展生级开发工作,以及硬件改进、软件编程和界面设计等。
在开发过程中,要充分判断设备的稳定性、安全性和兼容性,确保升级后的设备能够正常运行。
Hospitalrespiratory carePocket guide Philips V60 and V60 Plus* ventilatorsA comprehensive noninvasive solution * Not available in USA and may not be available in all markets.IntroductionPhilips is passionate about providing solutions that lead to healthier patients and healthier practices. This pocket guide is designed to help familiarize clinicians with the set-up and application of the Philips V60 and V60 Plus* ventilators. The V60 and V60 Plus ventilators are microprocessor-controlled, bi-level, positive airway pressure ventilatory assist systems that provide noninvasive and invasive ventilatory support for spontaneously breathing adult and pediatric patients (> 20 kg). The V60 also offers the optionof adding a high flow nasal therapy (HFT)* functionality.Use this guide for a step-by-step explanation of how touse the V60 and V60 Plus ventilators, from initial setupto mask and port settings to changing modes. This guide also includes suggestions for increasing tank life during transport.The value of the noninvasive approach 1* HFT, V60 Plus and 3.00 SW are not available in the USA and may not be available in all markets.2Table of ContentsDevice overviewFront 4 Back 4 Side 4 Air inlet filter 5 Patient circuits 5General operationMask and port settings 7 Setting changes 7 Setting rate 7 Rise time 8 I-Time 8 Mode changes 8 Therapy changes 8 Batch changes 9 Alarm message navigation 9 Alarm settings 10 Low rate 10 Menu tab 11 Screen Lock 11Patient transport 21* May not be available in all markets.** Not available in the USA and may not be available in all markets.34Device overviewFrontOption labelsalarm and nurse call connector Scale buttonsHigh pressure oxygen On/Shutdown buttonProximal Alarm status and information barRS-232 serial and analog I/O connectorBackBracket Side5Air inlet filterThe air inlet filter should be inspected every monthand replaced if needed.To change the air inlet filter1. Power down the V60 or V60 Plus* and disconnectit from AC power.2. Turn the D-ring fastener (bottom of side panel)counter-clockwise one-quarter turn and release.3. Remove the side panel.4. Remove the air inlet filter by pinching it out ofthe recess in the bracket.5. Install the new air filter by tucking it into the recessed area.6. Replace the side panel, push in the D-ring fastener,then turn one-quarter rotation or until it locks.Patient circuit configurationsAssemble the patient circuit, including main flowbacterial filter, proximal line, and humidifier (if desired).The standard patient circuit includes a main flow bacterial filter, an exhalation port, and a proximal pressure line. Not for use with a humidifier.1. Standard patient circuit* Not available in the USA and may not be available in all markets.2. Invasive patient circuitThe invasive patient circuit includesa main flow bacterial filter, a shortdry tube, a water trap, a proximalpressure line, and an elbow. It ismeant to be used with a humidifier.3. Heated-wire patient circuitThe heated-wire patient circuitincludes a main flow bacterial filter,a short dry tube, a heated-wirecircuit, a proximal pressure line,and an exhalation port.67Mask and port settings1. Press the Menu setting tab.2. Press the Mask and Port button.3. Press desired patient interface type (see Mask leaksymbols for more information) and press Accept to apply.4. Press the desired exhalation port (see Exhalation port settings for more information) and press Accept to apply.5. Run the exhalation port test only if required.Setting changes1. In the Settings window, touch the setting to be changed.2. A djust the setting by using either the arrow keys or the navigation ring.3. Once the correct value has been chosen, press Accept .Setting rateB ecause the V60 and V60 Plus** are intended to augment ventilation in patients who are spontaneously breathing,the rate should be set as a back-up rate in the case ofapnea. If the patient fails to trigger a breath throughAuto-Trak within the interval determined by the ratesetting, the ventilator triggers a mandatory breath.Once the circuit and filter are attached, press the On/Shutdown button. Informational messages are displayed on the screen; one that informs the clinician to ensurea bacterial filter has been added to the machine outlet,* the second message, appearing in NIV modes, indicates which mask and leak port have been inputted. Continue to Mode settings. Otherwise, follow the instructionalsteps to change the mask and port settings.* Available with 2.30 or above software only – not available in all markets. ** N ot available in the USA and may not be available in all markets.8Rise timeRise time is the speed at which inspiratory pressure rises to the set (target) pressure. Set to the fastest rise timetolerated (1 for the fastest rise; 5 for the slowest rise).• Too slow of a rise may exacerbate dyspnea in the ARF patient, possibly depriving the patient of needed flow.• If rise time is insufficient to reach the desired inspiratory pressure or time, decrease the rise time setting (e.g., change from 5 to 3, therefore resulting in a faster rise time).I-TimeSetting I-Time adjusts the inspiratory time for a machine-triggered breath, therefore influencing the I:E ratio in V60 or V60 Plus* machine-triggered breaths. Inspiratory time is controlled by the patient in a patient-triggered breath.Mode changesThe active ventilation mode is displayed in the upperleft corner of the screen. To set or change a mode:1. Select the Modes setting tab.2. S elect the desired mode (active mode will be displayed.3. A djust settings as desired. Newly adjusted setting values will be displayed in yellow.4. Select Activate Mode to apply.Therapy changes from NIV to HFT*1. Select Standby .2. R emove interface from patient.3. Change interface to a recommended Philips high flow nasal cannula.4. Select HFT .5. Adjust parameters.6. S elect Start HFT .* Not available in the USA and may not be available in all markets.9Batch changesBatch changes are available in only the active mode or therapy. Batch changes allow simultaneous activation of multiple ventilation setting changes. To make batch changes follow these steps.1. Press the Modes setting tab.2. Press the active mode (it will state “Batch” and be displayed in blue).3. Adjust settings as desired so that newly adjusted values are displayed in yellow.4. Press Activate Batch Change to apply all changes at once.Alarm message navigationTo hide alarms or informational messages in the Alarms or Messages list, press the Alarm button (flashing if high priority) or the Informational Messages button when up arrows are present. To display messages, touch the Informational Messages button when down arrows are present. For a list of alarms, see the Philips V60 and V60 Plus* Ventilators User Manual.* Not available in the USA and may not be available in all markets.General operationAlarm settings*1. Press the Alarm Settings tab.2. Press and change the appropriate alarm value.3. Press Accept.Low rateOn the V60 and V60 Plus**, the low rate alarm may also serve as an apnea alarm. It is recommended to set thelow rate alarm higher than the backup rate but lower than the patient’s spontaneous rate. If the low rate alarm value is set at or below the set rate, the low rate alarm cannotbe triggered, and the alarm is essentially disabled. A textwarning will appear on the left side of the Settings screenif the user sets the low rate at or below the set (backup) rate.Warning that alarmwill not work withcurrent backup rate* There is no Alarm Settings tab in HFT.** Not available in the USA and may not be available in all markets.10Menu tabUser preferences can be adjusted using the Menu window. There is a Brightness setting button for day or night view. The Loudness setting button adjusts the volume of alarms and the audible feedback click. The Alarm Volume Escalation feature,* if enabled, will escalate alarm volume when a high priority alarm is not responded to within 40 seconds. Ventilator alarm volume increases to maximum volume over a 20-second period. When the function is active and a touchscreen or a button press is detected, the ventilator automatically returns the alarm volume to the user setting. There is a Mask/Port menu button to choose various mask leak values and to choose the correct port (see Mask Leak symbols ). The Vent Info menu button displays the software version and other information specific to the ventilator. There is also a Screen Lock button.Screen LockScreen Lock deactivates all buttons and tabs on the touchscreen except the 100% O 2 key, Alarm Silence,Alarm Reset, and Alarm Message buttons, and Help icon. The tabs will be grayed out.To unlock the screen, press the Accept button (√) in the center of the navigation ring.General operationPatient data and waveformsThe data screen displays alarms and patient data, which include rate, estimated tidal volume, estimated minute ventilation, peak inspiratory pressure, patient trigger %, T I /T TOT %, and leak. The breath-type indicator colorcorresponds to waveform color: turquoise for spontaneously triggered, orange for timed triggered, and blue for exhale.• Pt. Trig: Patient-triggered breaths as a percentage of total breaths over the last 15 minutes.• Rate: Total breath rate (Spont and Timed), a moving average over the last 6 breaths or 15 seconds.• T I /T TOT %: Inspiratory time divided by the total cycle time over the last 8 breaths.• Pt. or Tot. Leak: Estimated unintentional leak (Pt. Leak) or total of intentional plus unintentional leak (Tot. Leak). • Breath indicator bar: Changes color depending onbreath type and inspiratory phase. Spontaneous breath is turquoise (Spont), machine-triggered breath is orange (Timed), and exhalation is blue (Exhale).StandbyStandby suspends ventilation and retains current settings when the clinician wants to temporarily disconnect the patient from the ventilator. Ventilator settings and most menu functions can be changed during the standby mode. To activate Standby1. Press the Standby tab.2. Remove the mask.3. Disconnect the circuit from the mask.In ventilation modes, the ventilator will not enter standby until the patient is disconnected. It continues ventilation while waiting for the patient to be disconnected. In HFT,* detection of disconnection from the patient is not available, therefore the clinician must select the Standby tab and then engage standby by selecting Enter Standby.The standby mode gives the clinician up to 60 secondsto disconnect the patient from the ventilator. If after60 seconds no disconnection is detected, the standby mode cancels.Help buttonPress the Help icon (?) to display additional information. Touch the screen anywhere to return to normal operation.General operationThe Leak symbol represents the intentional leakcharacteristics of the mask, and the proper V60 or V60Plus** mask/port settings will ensure the greatest accuracy and optimum performance. If the Leak symbol does not appear on a Philips patient interface, use the chart above to determine the proper setting. When using an interface other than a Philips mask, choose the Leak setting Other . This selection results in Total Leak, not Patient Leak, being displayed on the patient data screen.Leak symbol(printed on mask)Patient interface Leak 1(no exhalationport on mask)PerformaTrak oro-nasal mask Contour Deluxe nasal mask AF811 (CapStrap gel mask)AF531 (EE Leak 1)AF421 (EE Leak 1)AF541 (EE Leak 1)Leak 2 (exhalation port within mask)PerforMax with entrainment elbowAF531 (EE Leak 2)AF421 (EE Leak 2)AF541 (EE Leak 2)Leak 3AP111 (OptiLife Interface)Leak 4 (exhalationport within mask)Reserved for future use Leak 1 symbol on maskMask leak symbols** In HFT, no mask leak symbol or exhalation port selections need to be made.Exhalation port settingsAfter pressing the appropriate mask setting, press the correct exhalation port setting. The chart belowreferences the various exhalation port settings and when an exhalation port test is recommended. An exhalation port test is only recommended when using a PEV (plateau exhalation valve) or non-Philips exhalation ports with unknown leak characteristics.Exhalation port testIf a port test is required, follow the instructions providedon the screen.Portselections Exhalation port test recommendedDisposableExhalationPort (DEP)NoWhisperSwivel NoPlateauExhalationValve (PEV)YesOtherexhalationport YesFeatures, modes, therapies and optionsAuto-Trak/Auto-Trak+*Auto-Trak automatically maintains appropriate trigger and cycle thresholds to maintain patient-ventilator synchrony even with changing leak. An optional upgrade, Auto-Trak+ allows the clinician to customize Auto-Trak’s trigger and E-cycle sensitivity.100% O2 key*Upon pressing the 100% O2 key, the V60 or V60 Plus**delivers 100% O2 for two minutes. The clinician is also giventhe option to cancel the action or add an additional two minutes of 100% O2.RampThe ramp time allows the patient to adapt to ventilation gradually by increasing inspiratory and expiratory pressures (IPAP and EPAP/CPAP) from sub-therapeutic to user-set pressures over a user-set interval (5-45 minutes).How to set a ramp time1. Press the Ramp Time button in the Mode settings window.2. As the ramp progresses, the Ramp Time button graphicfills in.3. To change the ramp interval or end the ramp, pressthe Ramp Time button again, and the Ramp in Progress window opens.4. To end the ramp and apply the full IPAP and EPAP/CPAPpressures immediately, press End Ramp.5. To end the ramp and start a new one, press Start NewRamp, and the Ramp Time setting window opens again to allow a new ramp time to be set.* Available with 2.30 or above software only – not available in all markets.C-FlexC-Flex improves the comfort of traditional CPAP byreducing the pressure at the beginning of exhalation and returning it to the set level before the end of exhalation. C-Flex may not be appropriate for patients where even a transient drop in CPAP is deemed undesirable.The amount of pressure relief is determined by the C-Flex setting and the expiratory flow of the patient. Pressure relief is increased with a higher setting number (1, 2, or 3) and greater patient expiratory flow. This applies only during the active part of exhalation.Pressure-controlled ventilation (PCV)In PCV, breaths with a user-set IPAP and I-Time are delivered to the patient. The patient can trigger an inspiration and, therefore, control the rate. However, the patient does not control the inspiratory time.Also be aware that any changes in EPAP without anequal change in IPAP will change the pressure support.Theillustrationcorrelateswith theC-FlexsettingAVAPS automatically adapts pressure support (< 2.5 cmH 2O per minute) to guarantee an average tidal volume.Average volume-assured pressure support (AVAPS)AVAPS is a volume-targeted mode and is intended for use with stable chronic patients who do not require rapid pressure support changes to maintain a target V T . At start-up, AVAPS applies an inspiratory pressure equal to one of the following, whichever is greater • EPAP + (target volume/60 ml/cmH 2O)• EPAP + 8 cmH 2O• P minThe V60 and V60 Plus* will automatically adjust IPAP (up to2.5 cmH 2O per minute), to maintain a tidal volume target. Note: when adjusting AVAPS minimum and maximum pressures, remember that IPAP is adjusted to meet the target value. If calculated target pressure is outside of the set pressure range, the target volume will not be achieved.Features, modes, therapies and optionsStarting AVAPS1. When switching from S/T mode to AVAPS, set the Min Pat the current IPAP pressure.2. During AVAPS startup, there may be a period of timebefore the target tidal volume is achieved. If the target VTis not achieved at the current Min P setting, increasethe Min P until the target VTis reached. Remember,the VTdisplayed on the V60 and V60 Plus* is a six-breath average, so the effect of a settings change may not be fully reflected for several breaths.3. Once the target VTis reached, reduce Min P slightly to allow the AVAPS algorithm to adjust.4. If target VTis not achieved due to a low Min P setting, an informational message will appear. Adjust Min Paccordingly unless the maximum pressure for the patient has been reached.5. If target VTis exceeded because Min P is set too high, an informational message will appear. Adjust Min Paccordingly unless the minimum pressure for the patient has been reached.6. Set the high and low VTalarms appropriately.7. In AVAPS, the EPAP setting must be at least 1 cmH2O belowthe Min P setting. In some cases, an increase in the Min P setting is required before increasing the EPAP setting.Features, modes, therapies and optionsHigh flow therapy (HFT)*HFT is for spontaneously breathing patients only, ones who require oxygen therapy at a flow rate higher than traditional oxygen delivery options such as a low flow nasal cannula. It should only be used with a heated humidification circuit. Dry gas delivery at a high flow rate may cause patient discomfort and may impair the mucociliary function.Flow rate capability and oxygen concentration range• Flow = 10 l/min – 80 l/min**= 21% – 100%• O2Upon initiation of therapy, three notifications are displayed.1. No Mask icon, indicating NIV masks are inappropriateinterfaces for HFT.2. High Flow Therapy Active notification, indicatingtherapy has been activated.3. Patient alarms are disabled during HFT notification,indicating that there are no patient alarms (such as high and low RR, pressure, or minute ventilation). There aretwo system alarms, one that target flow has not beenreached and the other that the patient circuit is occluded. The Alarms tab is disabled in HFT. Provide external monitoring, including oximetry, to inform the clinicianof a change in the patient’s condition.* Not available in the USA and may not be available in all markets.** The maximum deliverable flow rate varies based on nasal cannula orificePhilips recommended nasal highflow cannula or high flow trachadaptors may be used. NIV masksor direct connection to ET tubes ortracheostomies are not appropriate.When connecting a high flowinterface, the NIV circuit exhalationport must be blocked via the PhilipsAC611 with FEP connect or removedto adapt a Philips recommended21When administering HFT witha nasal cannula, it is importantto ensure that the set target flowis appropriate for the size of thenasal prongs. An excessively highflow rate relative to the size of thenasal prongs may cause the targetflow to not be reached, resultingin a Cannot Reach Target Flowalarm notification. If the deliverycircuit or cannula becomesoccluded, the V60 or V60 Plus*will reduce the set flow tomaintain a lower system pressureuntil the occlusion is relieved.During HFT, verify that anocclusive patient interface is notbeing used. Occlusive patientinterfaces include a cannulafully sealed within the nares,* HFT, V60 Plus and 3.00 SW are not available in the USA and may not be available in all markets.cannula with a 22 mm connection during HFT.* Failure to block or remove the exhalation port will result in a reduction in the delivered flow due to the leak through the exhalation port.an NIV mask, or a direct connection to a tracheostomytube or endotracheal tube. Remove any occlusive interface immediately as this may expose the patient to unintended high pressures.Features, modes, therapies and optionsPatient transportTips to maximize E-cylinder oxygen tank duration• Make sure all cylinders are full (2000 psig or more).• We recommend that you do not use any oxygen delivery devices that will limit flow such as Grab ’N Go cylinder/ regulators (flow is limited to 100 l/min). The pressurewill be maintained, but the oxygen concentration will be reduced and the low oxygen pressure alarm will activate.• Make sure the cylinder regulators are turned off whilethe V60 or V60 Plus* is connected to wall oxygen.• Never turn the cylinder regulator on until ready totransport the patient.• Turn on only one cylinder regulator at a time. If bothcylinders are turned on, they may become simultaneously depleted, leaving no backup oxygen.• Whenever possible, reduce FIOprior to transport.2setting, the greater the oxygen The higher the FIO2consumption. This is particularly important duringtransport in high-leak situations such as NIV.• Minimize all patient leaks. Adjust mask prior totransport, and loosen appropriately when patientis back on wall oxygen.• Avoid using masks that have an exhalation port builtinto the mask when there is already an exhalation port in the circuit.* Not available in the USA and may not be available in all markets.22Below are graphs representing oxygen tank duration at various leak values. These are estimates only, based on 2000 psig. Time may vary depending on the V60 orV60 Plus* settings used and the patient’s changing ventilatory demand.© 2018 Koninklijke Philips N.V. All rights are reserved.Philips reserves the right to make changes in specifications and/or to discontinue any product at any time without notice or obligation and will not be liable for any consequences resulting from the use of this publication. Trademarks are the property of Koninklijke Philips N.V. or their respective owners.Printed in the Netherlands.4522 991 33251 *OCT 20181 H ill NS, Brennan J, Garpestad E, Nava S. Noninvasive ventilation in acute respiratory failure. Crit Care Med . 2007 Oct;35(10):2402-7.2 K eenan SP, Gregor J, Sibbald WJ, Cook D, Gafni A. Noninvasive positive pressure ventilation in the setting of severe, acute exacerbations of chronic obstructive pulmonary disease: more effective and less expensive. Crit Care Med . 2000 Jun;28(6):2094-102.3 Hubble MW, Richards ME, Wilfong DA. Estimates of cost effectiveness of prehospital continuous positive airway pressure in the management of acute pulmonary edema. Prehosp Emerg Care . 2008 Jul-Sep;12(3):277-85.References。
飞利浦伟康呼吸机的使用步骤解析------------------------------------------作者------------------------------------------日期……………………………………………………………最新资料推荐…………………………………………………飞利浦伟康呼吸机的使用步骤解析飞利浦伟康呼吸机的问世给很多呼吸疾病患者在治疗过程中提供了方便。
而这需要建立在正确的操作方法之上。
伟康呼吸机具体使用步骤如下。
一、将飞利浦伟康呼吸机管道、氧气和电源连接好。
开机顺序为空气压缩机-湿化器-主机。
并进行机器自检。
二、选择呼吸模式。
首先确定是控制呼吸还是辅助呼吸,然后确定机械通气的方式。
三、使用完成后,先关主机-湿化器-空气压缩机,再关闭气源。
然而,看似简单的操作,对于患者而言,还要注意一些细节。
首先是口部漏气该怎么办?如果使用鼻面罩,治疗期间尽量保持嘴部闭合。
口部漏气会导致疗效降低。
如果口部漏气问题不能解决,则可以使用口鼻面罩或使用下颚带。
其次,关于伟康呼吸机面罩佩戴的问题,当面罩佩戴良好且舒适时,呼吸机的疗效最好。
漏气会影响疗效,因此消除漏气非常重要。
戴上面罩之前,请清洗面部,除去面部过多的油脂,这有助于更好地佩戴面罩且能延长面罩垫的寿命。
还有,可能会出现鼻部、口部和咽部干燥现象,这一点在冬季更为明显。
通常,加上一个湿化器即可消除以上不适。
最后,是鼻部刺激问题。
在治疗的前几周,患者可能会出现打喷嚏、流鼻涕、鼻塞等现象。
通常,加上一个湿化器即可解决以上问题。
因此,建议使用伟康呼吸机的患者或医务人员,在使用前仔细查阅说明使用手册,无需专门指导,便可迅速上手。
2。