SAJ三晶变频器S350系列说明书知识讲解
- 格式:doc
- 大小:12.19 MB
- 文档页数:34
西奥科技(香港)控股有限公司S350高端单体门禁机产品使用说明书目录第一章安全指南/注意事项 (2)第二章产品介绍 (2)2.1门禁机外观介绍 (2)2.1.1 外型介绍 (2)2.1.2 触摸屏介绍 (3)2.1.3 键盘介绍 (3)2.2功能特征 (3)第三章设备安装 (5)3.1系统配置 (5)3.2接口说明 (5)3.3通讯联网 (6)3.3.1. TCP/IP通讯 (6)3.3.2 TCP网络接线方法 (7)3.3.3 无线网络接线方法 (8)3.4设备安装 (9)3.4.1 安装示意图 (9)3.4.2外接设备接线图 (10)3.5系统安装要求及注意事项 (11)第四章脱机操作说明 (12)第五章产品规格 (15)第一章安全指南/注意事项为确保你的安全及延长产品使用寿命,请在使用前阅读下述安全指南/注意事项:●在使用本机前,必须阅读并理解所有使用指示。
●必须妥善保存使用说明书,以备将来之需要。
●操作时必须遵照所有使用说明。
●请勿使用制造商没有推荐的附设装置。
●请使用产品所配的电源适配器。
在把AC电源线连接到电源插座之前,请检查产品规定的电压是否适合本地电源供应条件。
如果您不能确定使用电源的类型,请与经销商或与当地的电力部门联系。
●本机需要更换配件时,请向维修人员确认使用制造商指定的或性能与原件相同的配件,配件使用不当会损害产品或造成安全隐患。
●若要将本机挂装在墙壁上或其它地方时,请按照制造商推荐的方法进行安装。
●清洁本机前,拔下电源插头。
请使用略湿的抹布清洁本机。
清洁时请勿使用液体清洁剂或喷雾清洁剂。
●不要将本机置于阳光直射处或热源附近,如散热器、暖气设备,火炉或其它发热物体等。
●用户刷卡时,请将卡放置于设备的感应区内并停留片刻约1秒,不要用卡拍打机器以免造成卡的损坏。
●请勿试图自行维修本机。
若本设备发生故障,非专业人员不要打开机器,应及时与当地经销商技术服务中心联系,否则将只予以有偿维护处理。
三晶S350矢量变频器在包装机上的运用(doc 10页)更多企业学院:《中小企业管理全能版》183套讲座+89700份资料《总经理、高层管理》49套讲座+16388份资料《中层管理学院》46套讲座+6020份资料《国学智慧、易经》46套讲座《人力资源学院》56套讲座+27123份资料《各阶段员工培训学院》77套讲座+ 324份资料《员工管理企业学院》67套讲座+ 8720份资料《工厂生产管理学院》52套讲座+ 13920份资料《财务管理学院》53套讲座+ 17945份资料《销售经理学院》56套讲座+ 14350份资料《销售人员培训学院》72套讲座+ 4879份资料三晶S350矢量变频器在包装机上的应用S350系列是新一代高性能矢量变频器,有如下特点:■采用最新高速电机控制专用芯片DSP,确保矢量控制快速响应■硬件电路模块化设计,确保电路稳定高效运行■外观设计结合欧洲汽车设计理念,线条流畅,外形美观■结构采用独立风道设计,风扇可自由拆卸,散热性好■无PG矢量控制、有PG矢量控制、转矩控制、V/F控制均可选择■强大的输入输出多功能可编程端子,调速脉冲输入,两路模拟量输出■独特的“挖土机”自适应控制特性,对运行期间电机转矩上限自动限制,有效抑制过流频繁跳闸■宽电压输入,输出电压自动稳压(AVR),瞬间掉电不停机,适应能力更强■内置先进的PID 算法,响应快、适应性强、调试简单;16 段速控制,简易PLC 实现定时、定速、定向等多功能逻辑控制,多种灵活的控制方式以满足各种不同复杂工况要求■内置国际标准的MODBUS RTU ASCII 通讯协议,用户可通过PC/PLC控制上位机等实现变频器4 85通讯组网集中控制包装机简单来说,包装机就是把产品包装起来机器,起着保护,美观的作用。
包装机主要分2个方面: 1。
流水线式整体生产包装。
2。
产品外围包装设备。
这类包装机具有两种或两种以上的功能。
其主要种类有:①充填封口机。

ACS350用户手册ACS350变频器 (0.37~18.5kW)ACS350 变频器0.37~18.5kW用户手册3ABD00018670 版本D中文PDM:30020798BASED ON:3AFE68462401版本D英文生效日期: 2007-12-26©北京ABB 电气传动系统有限公司5安全须知概述本章介绍了在对变频器进行安装、操作和维护时必须遵守的安全须知。
如果忽视这些安全须知可能会造成人身伤亡或者变频器、电机或执行机构的损坏。
警告标志本手册中有下面两种警告标志:危险电压信号;可能会造成人身伤害或者设备损坏的高电压。
一般警告;除电之外的因素引起的可能会造成人身伤害或者设备损坏情况的警告。
安装和维修工作下面这些警告适用于需要对变频器、电机电缆或者电机进行安装和维护工作的人员。
警告!忽视下面这些警告可能会造成人身伤亡或者设备损坏。
只有具备资质的电气工程师才可以对变频器进行安装和维修!•通电情况下不能对变频器、电机电缆或者电机进行维修。
在断开电源后,对变频器、电机或者电机电缆进行检查和维修之前,必须等待至少5分钟,让变频器的中间直流电路电容器放电完毕。
通过用万用表测量的方法来确认(电阻至少为1MΩ):1. 变频器的输入U1, V1 和 W1 三相与地之间没有电压。
2. BRK+ 和 BRK- 端与地之间没有电压。
•在变频器或者外部控制电路通电时,不要对控制电缆进行任何操作。
即使变频器的电源已经切断,由外部电源供电的控制电路也会将危险电压引入变频器内部。
•不要对变频器或者变频器模块进行任何绝缘或者耐压测试。
注意:•当电源接通时,不管电机是否转动,在端子 U1、 V1、W1 、 U2、V2、W2 、BRK+ 和 BRK-上都会带有危险电压。
警告!忽视下面这些安全须知可能会造成人身伤亡或者设备损坏。
•变频器不是现场就能修复的。
不要企图在现场修复一台故障的变频器;请联系当地的ABB代表处或者授权的维修中心进行更换。

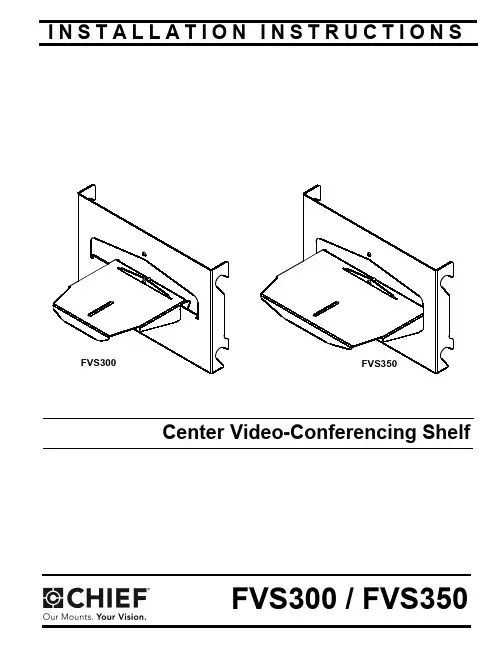
I N S T A L L A T I O N I N S T R U C T I O N SCenter Video-Conferencing ShelfFVS300 / FVS350FVS300 / FVS350Installation InstructionsDISCLAIMERMilestone AV Technologies and its affiliated corporations and subsidiaries (collectively "Milestone"), intend to make this manual accurate and complete. However, Milestone makes no claim that the information contained herein covers all details, conditions or variations, nor does it provide for every possible contingency in connection with the installation or use of this product. The information contained in this document is subject to change without notice or obligation of any kind. Milestone makes no representation of warranty, expressed or implied, regarding the information contained herein. Milestone assumes no responsibility for accuracy, completeness or sufficiency of the information contained in this document.Chief® is a registered trademark of Milestone AV Technologies. All rights reserved.IMPORTANT WARNINGS AND CAUTIONS!WARNING: A WARNING alerts you to the possibility of serious injury or death if you do not follow the instructions.CAUTION: A CAUTION alerts you to the possibility of damage or destruction of equipment if you do not follow the corresponding instructions.WARNING:Failure to read, thoroughly understand, and follow all instructions can result in serious personal injury, damage to equipment, or voiding of factory warranty! It is the installer’s responsibility to make sure all components are properly assembled and installed using the instructions provided.WARNING:Failure to provide adequate structural strength for this component can result in serious personal injury or damage to equipment! It is the installer’s responsibility to make sure the structure to which this component is attached can support five times the combined weight of all equipment. Reinforce the structure as required before installing the component.WARNING:Exceeding the weight capacity can result in serious personal injury or damage to equipment! It is the installer’s responsibility to make sure the combined weight of all components located on the FVS300/FVS350 does not exceed 10 lbs (4.5 kg).LEGENDApretar elemento de fijación Befestigungsteil festziehen Apertar fixadorSerrare il fissaggio Bevestiging vastdraaien Serrez les fixationsAflojar elemento de fijación Befestigungsteil lösen Desapertar fixador Allentare il fissaggio Bevestiging losdraaien Desserrez les fixations Marcar con lápiz Stiftmarkierung Marcar com lápis Segno a matita Potloodmerkteken Marquage au crayonLlave de seguridad Sicherheitsschlüssel Chave de segurança Chiave di sicurezza VeiligheidssleutelClé de sécuritéDIMENSIONSTOOLS REQUIRED FOR INSTALLATIONPARTSunion for both the top and bottom rail. (See Figure 3) Figure 12.Secure shelf using one 10-24 x 5/8" Phillips pan head screwFigure 3FVS300 / FVS350Installation Instructions 3.Attach wall mounts to wall following installation instructionsincluded with the wall mounts.4.Hang shelf unit on rails.5.Adjust location of shelf and install one 10-24 x 1" Phillipspan head screw (L) to tighten shelf against rails.(See Figure 4)OPTIONAL: The 10-24 x 1" button head security screw (J)may be used instead to prevent removal of shelf.6.Install camera to shelf.NOTE:If camera has a bottom mounting screw, attach itthrough the mounting slot in the shelf. (See Figure 4)7.Hang displays on wall mounts following installationinstructions included with the wall mounts.8.Slide displays to the sides of the shelf.Installation Instructions FVS300 / FVS350FVS300 / FVS350Installation InstructionsUSA/InternationalA 8401 Eagle Creek Parkway, Savage, MN 55378P 800.582.6480 / 952.894.6280F 877.894.6918 / 952.894.6918EuropeA Fellenoord 130 5611 ZB EINDHOVEN, The Netherlands P +31 (0)40 2668620F +31 (0)40 2668615Asia PacificARoom 24F, Block D, Lily YinDu International BuildingLuoGang, BuJi Town, Shenzhen, CHINA.P +86-755-8996 9226F +86-755-8996 9217Chief Manufacturing, a products division of Milestone AV Technologies 8807-0000772008 Milestone AV Technologies, a Duchossois Group Company 12/08。
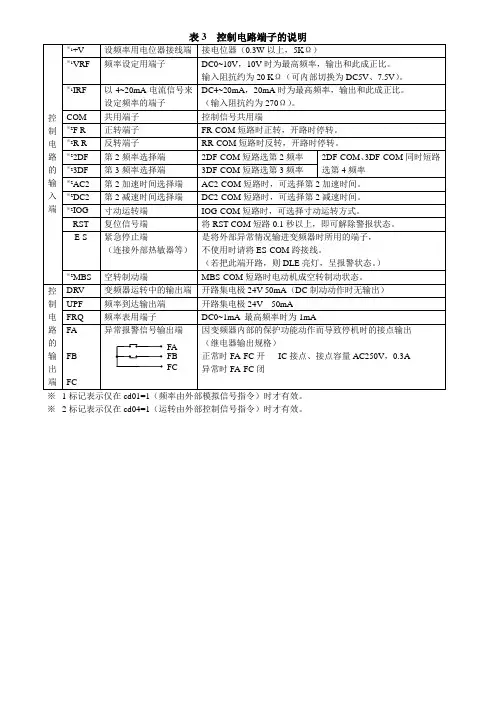
二、配线变频器配线部分,分为主回路和控制回路。
用户可将外壳的盖子掀开,此时可看到主回路端子和回路端子,用户必须依照下列的配线回路准确连接。
备注:(1)如果只有DCM端子,则ACM端子等效于DCM端子。
(2)AM端子等效于FM端子(AM为可选端子)。
三、操作及运行1、操作说明(1)键盘说明(2)状态提示灯功能☐Hz:当LED显示内容为频率数据时,该指示灯亮。
☐I:当LED显示内容为电流数据时,该指示灯亮。
☐FWD:当变频器处于正转运行时,该指示灯亮。
☐REV:当变频器处于反转运行时,该指示灯亮。
(3)监视运行参数变频器在运行过程中,按一次“DATA”键,再按“▲”或“▼”键选择观看运行电流或运行频率。
Hz灯亮表示频率,I灯亮表示电流。
(4)查看故障记录变频器在运行过程中或待机状态下,按两次“PRGM”键,再按“▲”或“▼”键可逐次观看最近4次故障记录。
观看完后按“DATA”键,变频器复位。
(5)参数修改步骤变频器在待机状态下:步骤1:按“PRGM”键,变频器显示“Fxxx”,“xxx”为参数号。
步骤2:按“▲”或“▼”键选择所需要参数码,按“STOP/RESET”键可移动光标位置。
步骤3:按“RD/WT”键读取该参数的内容。
步骤4:按“▲”或“▼”键修改该参数值,按“STOP/RESET”键可以移动光标位置。
步骤5:按“RD/WT”键把数值设定。
如欲修改其它参数,请重复步骤1~5即可。
备注:要修改RE/WT类型的参数时必须先把F096设为“1”。
2、操作范例(1)修改参数(将F002的参数值从10S改为5S)。
变频器通电后,键盘显示“0.00”,按一次“PRGM”键,键盘显示“F000”;按“▲”键调到“F002”,按一次“RD/WT”键,读出该参数内容,键盘显示“10.0”,按“▼”键把“10”改为“5”,在按一次“ED/WT”键设定,然后按“DATA”键即可。
(2)变频器参数初始化变频器通电后,键盘显示“0.00”,按一次“PRGM”键,键盘显示“F000”,然后按“▲”键把“F000”调到“F094”,再按一次“RD/WT”键,键盘显示“0”,按“▲”键改为“1”,按“RD/WT”键设定,再按两次“PRGM”键,键盘显示“0.--”,然后在按一次“STOP/RESET”键,变频器开始初始化。