Checkpoint防火墙测试用例
- 格式:doc
- 大小:1.31 MB
- 文档页数:99
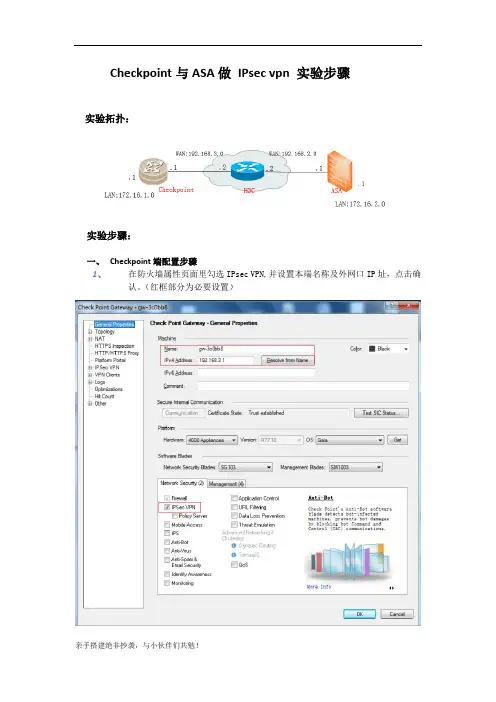
Checkpoint与ASA做IPsec vpn 实验步骤实验拓扑:实验步骤:一、Checkpoint端配置步骤1、在防火墙属性页面里勾选IPsec VPN,并设置本端名称及外网口IP址,点击确认。
(红框部分为必要设置)再次打开防火墙属性,在Topology页面,定义本端VPN加密域,确保拓扑与实际一致,Localnet-1.0为本端内网网段2、添加VPN对端设备,定义对端名称及对端设备建立VPN使用的出口IP地址确保Topology与实际一致,定义对端拓扑和加密Domain,peer-2.0为对方需走VPN 隧道的内网网段3、建立Ipsec VPN隧道,点击Communities—New—Meshed设定隧道名称添加本地和对端VPN网关设备定义VPN建立过程中两个阶段的加密和验证方式,必须与路由器端一致,第一个阶段对应对端设备的IKE第一阶段配置crypto isakmp policy 10,第二个阶段对应对端设备转换集配置。
设置预共享密钥设置VPN的高级属性,注: group组两端必须一致4、定义VPN策略,双向允许,否则只能进行单向通信。
二、对端ASA防火墙IPSEC配置interface GigabitEthernet0/0nameif outsidesecurity-level 0ip address 192.168.2.1 255.255.255.0!interface GigabitEthernet0/1nameif insidesecurity-level 100ip address 172.16.2.1 255.255.255.0access-list CPVPN extended permit ip 172.16.2.0 255.255.255.0 172.16.1.0 255.255.255.0route outside 0.0.0.0 0.0.0.0 192.168.2.2 1crypto ipsec transform-set deppon esp-3des esp-md5-hmaccrypto map outside_map 10 match address CPVPNcrypto map outside_map 10 set peer 192.168.3.1crypto map outside_map 10 set transform-set depponcrypto map outside_map interface outsidecrypto isakmp enable outsidecrypto isakmp policy 10authentication pre-shareencryption 3deshash md5group 2lifetime 86400tunnel-group 180.168.12.10 type ipsec-l2ltunnel-group 180.168.12.10 ipsec-attributespre-shared-key hfq@123456至此配置完成!三、验证是否建立成功1、ASA端VPN状态ciscoasa# SH cry isa saIKEv1 SAs:Active SA: 1Rekey SA: 0 (A tunnel will report 1 Active and 1 Rekey SA during rekey) Total IKE SA: 11 IKE Peer: 192.168.3.1Type : L2L Role : initiatorRekey : no State : MM_ACTIVEThere are no IKEv2 SAsciscoasa# show cry ips sainterface: outsideCrypto map tag: outside_map, seq num: 10, local addr: 192.168.2.1access-list CPVPN extended permit ip 172.16.2.0 255.255.255.0 172.16.1.0 255.255.255.0local ident (addr/mask/prot/port): (172.16.2.0/255.255.255.0/0/0)remote ident (addr/mask/prot/port): (172.16.1.0/255.255.255.0/0/0)current_peer: 192.168.3.1#pkts encaps: 19, #pkts encrypt: 19, #pkts digest: 19#pkts decaps: 19, #pkts decrypt: 19, #pkts verify: 19#pkts compressed: 0, #pkts decompressed: 0#pkts not compressed: 19, #pkts comp failed: 0, #pkts decomp failed: 0#pre-frag successes: 0, #pre-frag failures: 0, #fragments created: 0#PMTUs sent: 0, #PMTUs rcvd: 0, #decapsulated frgs needing reassembly: 0 #TFC rcvd: 0, #TFC sent: 0#Valid ICMP Errors rcvd: 0, #Invalid ICMP Errors rcvd: 0#send errors: 0, #recv errors: 0local crypto endpt.: 192.168.2.1/0, remote crypto endpt.: 192.168.3.1/0 path mtu 1500, ipsec overhead 58(36), media mtu 1500PMTU time remaining (sec): 0, DF policy: copy-dfICMP error validation: disabled, TFC packets: disabledcurrent outbound spi: 36CA5528current inbound spi : 6901DACAinbound esp sas:spi: 0x6901DACA (1761729226)transform: esp-3des esp-md5-hmac no compressionin use settings ={L2L, Tunnel, IKEv1, }slot: 0, conn_id: 31961088, crypto-map: outside_mapsa timing: remaining key lifetime (kB/sec): (3914998/28704) IV size: 8 bytesreplay detection support: YAnti replay bitmap:0x00000000 0x000FFFFFoutbound esp sas:spi: 0x36CA5528 (919229736)transform: esp-3des esp-md5-hmac no compressionin use settings ={L2L, Tunnel, IKEv1, }slot: 0, conn_id: 31961088, crypto-map: outside_mapsa timing: remaining key lifetime (kB/sec): (3914998/28704) IV size: 8 bytesreplay detection support: YAnti replay bitmap:0x00000000 0x000000012、 Checkpoint端VPN状态。
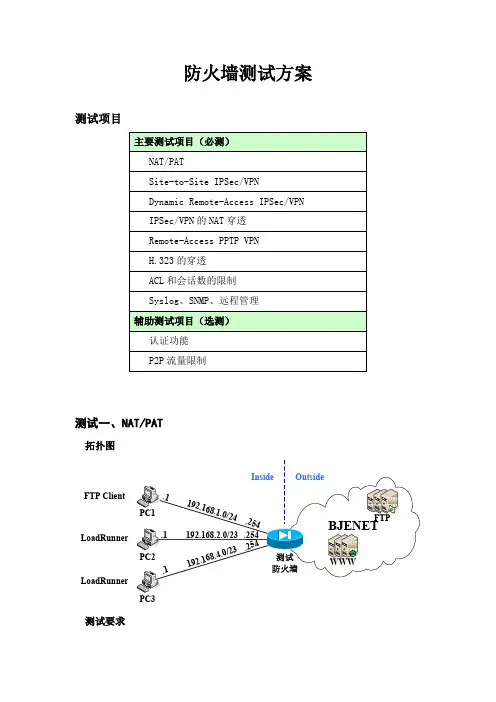
防火墙测试方案测试项目测试一、NAT/PAT拓扑图FTP ClientLoadRunnerLoadRunnerPC3测试要求(如防火墙inside 接口不够,则使用交换机连接内部三台pc 并将内部网络合并为192.168.0.0/16)1. 将192.168.1.1(pc1)静态翻译(地址翻译)为58.135.192.552. 将192.168.2.0-192.168.4.254动态翻译(端口翻译)为58.135.192.56 检查方法及检查项目● PC1通过FTP 方式从教育网下载数据● PC2和PC3使用LoadRunner 分别模拟500台电脑浏览网页 ● 查看设备负载和网络延迟测试二、Site-to-Site IPSec/VPN拓扑图5540测试防火墙PC1PC2测试要求 1. ISAKMP 配置 2. IPSec 配置 3. 只对10.0.1.1和10.0.2.2之间互访的流量进行IPSEC 的加密 检查方法及检查项目● PC1和PC2能否相互PING 通,在ASA5540上检测数据是否为加密数据。
● 修改PC2的ip 地址为10.0.2.22,使用pc1 PING pc2,在asa5540上检查数据是否为明文。
测试三、Dynamic Remote-Access IPSec/VPN拓扑图.2.0/24168.1.0/24PC1PC2测试要求 1. ISAKMP 配置2. IPSec 配置3. 其他4. 防火墙Outside 外任何主机都可以与防火墙建立IPSec/VPN 连接。
5. 只对PC1和PC2互访的数据加密。
检查方法及检查项目● PC2修改IP 地址为10.0.2.22后是否能与防火墙建立IPSec/VPN 连接。
● PC2能否获得正确的DNS 。
● PC1和PC2能否相互PING 通。
● 检查防火墙Outside 接口收到的数据是否为明文。
测试四、IPSec/VPN 的NAT 穿透拓扑图5540测试防火墙1PC1PC2测试防火墙2OutsideInside测试要求 1. ISAKMP 配置 2. IPSec 配置 3. Cisco ASA 5540上允许以下流量进入其内网检查方法及检查项目● 两测试设备是否可以正常建立IPSec/VPN 连接 ● PC1和PC2是否可以相互PING 通测试五、Remote-Access PPTP VPN拓扑图.2.0/24168.1.0/24PC1PC2测试要求检查方法及检查项目● PC2使用Windows 自带的VPN 与防火墙建立PPTP 连接 ● PC2能否获得正确的DNS ● PC2和PC1能否相互PING 通测试六、H.323的穿透拓扑图.2.0/24168.1.0/24PC1PC2测试要求1. 测试防火墙配置静态地址翻译,将192.168.1.1(PC 翻译为192.168.2.1 2. 测试防火墙配置端口翻译,将192.168.1.1(PC 翻译为192.168.2.11 检查方法及检查项目● 配置静态地址翻译后,PC 和PC 否可以用NetMeeting 进行语音通话,如果可以正确建立连接,是否存在单向音问题。

Checkpoint防火墙安全配置指南中国联通信息化事业部2012年 12月备注:1.若此文档需要日后更新,请创建人填写版本控制表格,否则删除版本控制表格。
目录第1章概述 (1)1.1目的 (1)1.2适用范围 (1)1.3适用版本 (1)1.4实施 (1)1.5例外条款 (1)第2章安全配置要求 (2)2.1系统安全 (2)2.1.1用户账号分配 (2)2.1.2删除无关的账号 (3)2.1.3密码复杂度 (3)2.1.4配置用户所需的最小权限 (4)2.1.5安全登陆 (5)2.1.6配置NTP (6)2.1.7安全配置SNMP (6)第3章日志安全要求 (7)3.1日志安全 (7)3.1.1启用日志功能 (7)3.1.2记录管理日志 (8)3.1.3配置日志服务器 (9)3.1.4日志服务器磁盘空间 (10)第4章访问控制策略要求 (11)4.1访问控制策略安全 (11)4.1.1过滤所有与业务不相关的流量 (11)4.1.2透明桥模式须关闭状态检测有关项 (12)4.1.3账号与IP绑定 (13)4.1.4双机架构采用VRRP模式部署 (14)4.1.5打开防御DDOS攻击功能 (15)4.1.6开启攻击防御功能 (15)第5章评审与修订 (16)第1章概述1.1 目的本文档规定了中国联通通信有限公司信息化事业部所维护管理的CheckPoint防火墙应当遵循的设备安全性设置标准,本文档旨在指导系统管理人员进行CheckPoint防火墙的安全配置。
1.2 适用范围本配置标准的使用者包括:网络管理员、网络安全管理员、网络监控人员。
本配置标准适用的范围包括:中国联通总部和各省公司信息化部门维护管理的CheckPoint防火墙。
1.3 适用版本CheckPoint防火墙;1.4 实施本标准的解释权和修改权属于中国联通集团信息化事业部,在本标准的执行过程中若有任何疑问或建议,应及时反馈。
本标准发布之日起生效。
check point模板Check Point模板是一种用于网络安全的防火墙解决方案。
它提供了全面的安全服务,包括防火墙、入侵检测和防护系统(IDPS)、虚拟专用网络(VPN)和网络安全事件管理(SIEM)等功能。
在本文中,我们将一步一步地回答关于Check Point模板的基本问题。
一、什么是Check Point模板?Check Point模板是由Check Point Software Technologies开发并提供的一种网络安全解决方案。
它集成了防火墙、入侵检测和防护系统、虚拟专用网络和网络安全事件管理等多种安全功能,为企业提供全面的安全保护。
二、Check Point模板的主要功能有哪些?1. 防火墙:Check Point模板提供了一种有效的防火墙机制,用于监控和保护企业网络免受未授权访问、恶意软件和网络攻击的侵害。
2. 入侵检测和防护系统(IDPS):Check Point模板能够检测和阻止潜在的入侵攻击,包括网络入侵、应用程序攻击和数据泄露。
3. 虚拟专用网络(VPN):Check Point模板支持建立虚拟专用网络连接,通过加密和隧道协议来保护远程工作人员和分支机构的网络通信。
4. 网络安全事件管理(SIEM):Check Point模板提供了一种集成式的事件管理和报告系统,用于监控和响应网络安全事件,并提供实时报告和分析。
三、为什么企业需要使用Check Point模板?1. 强大的安全保护:Check Point模板提供了多种安全功能,可以有效地保护企业网络免受未经授权的访问、恶意软件和网络攻击的威胁。
2. 高度可扩展性:Check Point模板具有高度可扩展性,可以根据企业的需求进行灵活配置和部署,适用于各种规模的企业网络。
3. 简化管理和运维:Check Point模板提供了集成的管理界面和工具,使企业能够更轻松地管理和监控网络安全,降低运维成本和复杂性。
4. 实时威胁情报和更新:Check Point模板通过与Check Point的威胁情报中心连接,可以及时获取最新的威胁情报和安全更新,提供及时的保护。
本文由no1moonboy贡献doc文档可能在WAP端浏览体验不佳。
建议您优先选择TXT,或下载源文件到本机查看。
双 CheckPoint 防火墙实施方案目录第一章客户环境概述…… 4 1.1 概述…… 4 1.2 网络拓扑与地址分配表…… 4 1.3 安装前准备事宜…… 6 第二章 Nokia IP380 安装与配置…… 7 2.1 概述…… 7 2.2 初始化 nokia380 …… 7 2.3 设置 nokia 基本信息…… 8 2.3.1 Nokia 端口 IP 地址设定…… 8 2.3.2 设置网关路由…… 8 2.3.3 设置 Nokia 平台时间…… 9 2.3.4 设定Nokia 高可用 VRRP 参数…… 9 2.4 初始化 checkpoint …… 14 2.4.1 在 nokia 平台上checkpoint 的安装与卸载…… 14 2.4.2 初始化 checkpoint …… 16 第三章管理服务器的安装与配置…… 17 3.1checkpoint smartcenter 的安装…… 18 3.1.1 安装前的准备…… 18 3.1.2 安装步骤…… 18 3.2 配置 checkpoint 对象和参数…… 20 3.2.1 建立 sic …… 20 3.2.2 定义防火墙对象拓扑结构…… 21 3.2.3 使用同样的步骤按照表 1 的参数建立 IP380B checkpoint gateway 对象。
…… 21 3.3 基于 nokia vrrp 或者cluster 的设置…… 22 3.3.1 基于 Nokia VRRP 的设置…… 22 3.3.2 为 nokia vrrp 定义策略…… 22 3.3.3 高可用性的检查…… 23 3.4nokia cluster 的设置…… 23 3.5 暂时没有…… 23 第四章策略设定…… 24 4.1 概述…… 24 4.2 netscreen 的策略……24 4.3 经过整理后转换成 checkpoint 的策略...... 24 4.4 设定策略...... 24 4.4.1 定义主机对象...... 24 4.4.2 定义网络对象...... 25 4.4.3 定义组...... 26 4.4.4 定义服务 (26)4.4.5 添加标准策略…… 27 4.4.6 添加 NAT 策略…… 27 第五章切换与测试……29 5.1 切换...... 29 5.2 测试...... 29 5.3 回退...... 30 第六章日常维护...... 31 6.1 防火墙的备份与恢复...... 31 6.1.1 nokia 防火墙的备份与恢复方法...... 31 6.1.2 checkpoint management 上的备份与恢复 (33)第一章客户环境概述1.1 概述XXXXXX 公司因应企业内部的网络需求,对总部网络进行扩容改动,中心防火墙从原来的 netscreen 换成两台 Nokia IP380,两台 nokia 互为热备。
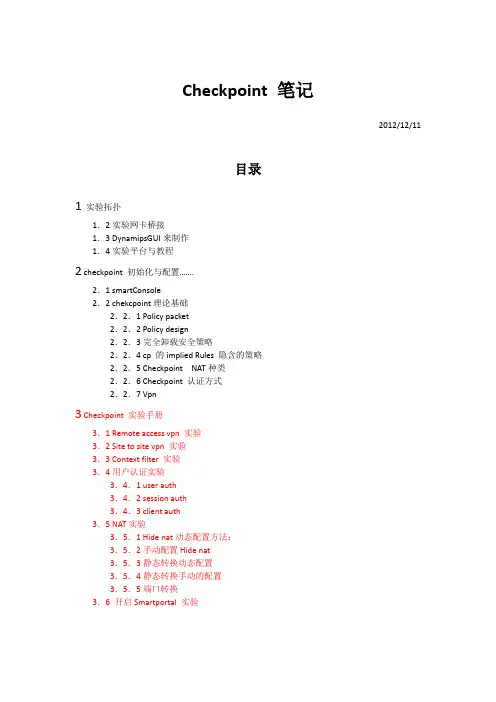
Checkpoint 笔记2012/12/11目录1实验拓扑1.2实验网卡桥接1.3 DynamipsGUI来制作1.4实验平台与教程2 checkpoint 初始化与配置…….2.1 smartConsole2.2 chekcpoint理论基础2.2.1 Policy packet2.2.2 Policy design2.2.3完全卸载安全策略2.2.4 cp 的implied Rules 隐含的策略2.2.5 Checkpoint NAT种类2.2.6 Checkpoint 认证方式2.2.7 Vpn3 Checkpoint 实验手册3.1 Remote access vpn 实验3.2 Site to site vpn 实验3.3 Context filter 实验3.4用户认证实验3.4.1 user auth3.4.2 session auth3.4.3 client auth3.5 NAT实验3.5.1 Hide nat动态配置方法:3.5.2手动配置Hide nat3.5.3静态转换动态配置3.5.4静态转换手动的配置3.5.5端口转换3.6 开启Smartportal 实验1、实验拓扑:1.2实验网卡桥接1.3通过DynamipsGUI来制作桥接的三台虚拟路由器生成BA T文件就可以了。
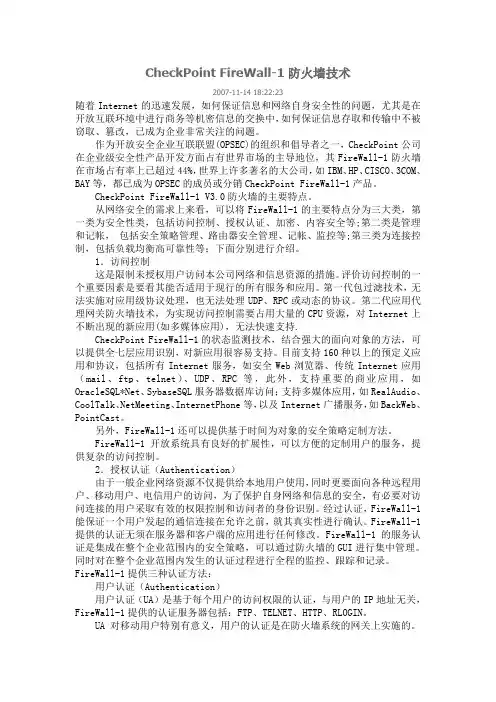
1.4实验平台与教程Checkpoint 防火墙图形化界面配置Checkpoint IoS: CheckPoint_NGX_R65_Suite_SPLAT_Linux30.ISO 视频教程: 秦柯CheckPoint防火墙.isz虚拟机安装vmware 9需要通过web进去初始化,初始化完成后,会应该默认的deny 策略。
(只支持IE浏览器)二、checkpoint 初始化与配置基本的信息都可以通过web去做修改和查看。
全功能版的授权只有15天,如果15天后想继续使用,只能够重装checkpoint 系统,授权是跟网卡绑在一起,暂时还没有找到办法去破解。
CheckPoint FireWall-1防火墙技术2007-11-14 18:22:23随着Internet的迅速发展,如何保证信息和网络自身安全性的问题,尤其是在开放互联环境中进行商务等机密信息的交换中,如何保证信息存取和传输中不被窃取、篡改,已成为企业非常关注的问题。
作为开放安全企业互联联盟(OPSEC)的组织和倡导者之一,CheckPoint公司在企业级安全性产品开发方面占有世界市场的主导地位,其FireWall-1防火墙在市场占有率上已超过44%,世界上许多著名的大公司,如IBM、HP、CISCO、3COM、BAY等,都已成为OPSEC的成员或分销CheckPoint FireWall-1产品。
CheckPoint FireWall-1 V3.0防火墙的主要特点。
从网络安全的需求上来看,可以将FireWall-1的主要特点分为三大类,第一类为安全性类,包括访问控制、授权认证、加密、内容安全等;第二类是管理和记帐,•包括安全策略管理、路由器安全管理、记帐、监控等;第三类为连接控制,包括负载均衡高可靠性等;下面分别进行介绍。
1.访问控制这是限制未授权用户访问本公司网络和信息资源的措施。
评价访问控制的一个重要因素是要看其能否适用于现行的所有服务和应用。
第一代包过滤技术,无法实施对应用级协议处理,也无法处理UDP、RPC或动态的协议。
第二代应用代理网关防火墙技术,为实现访问控制需要占用大量的CPU资源,对Internet上不断出现的新应用(如多媒体应用),无法快速支持.CheckPoint FireWall-1的状态监测技术,结合强大的面向对象的方法,可以提供全七层应用识别,对新应用很容易支持。
目前支持160种以上的预定义应用和协议,包括所有Internet服务,如安全Web浏览器、传统Internet应用(mail、ftp、telnet)、UDP、RPC等,此外,支持重要的商业应用,如OracleSQL*Net、SybaseSQL服务器数据库访问;支持多媒体应用,如RealAudio、CoolTalk、NetMeeting、InternetPhone等,以及Internet广播服务,如BackWeb、PointCast。

CheckPoint防火操作手册1 配置主机对象定义防火墙策略时,如需对I P 地址进行安全策略控制则需首先配置这个对象,下面介绍主机对象配置步骤,在“Network Objects”图标处,选择“Nodes”属性上点击右键,选择“Node”,点击“Host”选项,定义主机对象的名称,IP Address属性,同时可按照该主机的重要性定义颜色,配置完成后点击OK,主机对象创建完成。
2 配置网段对象定义防火墙策略时,如需对网段进行安全策略控制则需首先配置这个网络对象,配置步骤如下,在防火墙“Network”属性上点击右键,选择“Network”,选项,定义网段名称,比如DMZ,Internal,建议根据网段所处位置定义,配置网段地址和子网掩码,如有必要可以添加注释(Comment),配置完成后点击确认。
3 配置网络组对象如果需要针对单个I P 地址、IP 地址范围或者整个网段进行安全策略控制,可以将这些对象添加到网络组,如下在防火墙“Group”属性上点击右键,选择“Simple Group”选项,成后点击O K 即可4 配置地址范围对象除了配置I P 地址,网段,也可以指定地址范围(IP range),地址范围对象配置步骤是,如下在防火墙“Network”属性上点击右键,选择去掉“Do not show empty folders”选项,让I P Range 配置属性显示出来。
配置“Address Rage”,选择“Address Ranges”,如下图输入地址名称、起始IP地址与结束IP地址,完成后点击OK即可。
5 配置服务对象5.1 配置T CP 服务对象Check Point 防火墙内置了预定义的近千种服务,包括T CP、UDP、RPC、ICMP 等各种类型服务,通常在定义防火墙安全策略时,大多数服务已经识别并内置,因此无需额外添加,但也有很多企业自有开发程序使用特殊端口需要自行定义,下面介绍如何自定义服务,如下图所示,点击第二个模块标签,即S ervices,已经预定义多种类型服务,用户根据需要自定义新的服务类型,下面举例定义T CP 类型服务,右键点击“TCP”,选择“New TCP如下图,可以点以单个TCP服务端口服务对象,如果是一段端口,可以定义端口范围以上举例新建T CP 协议的端口服务,如需定义U DP 协议或其他协议类型按照同样流程操作即可。
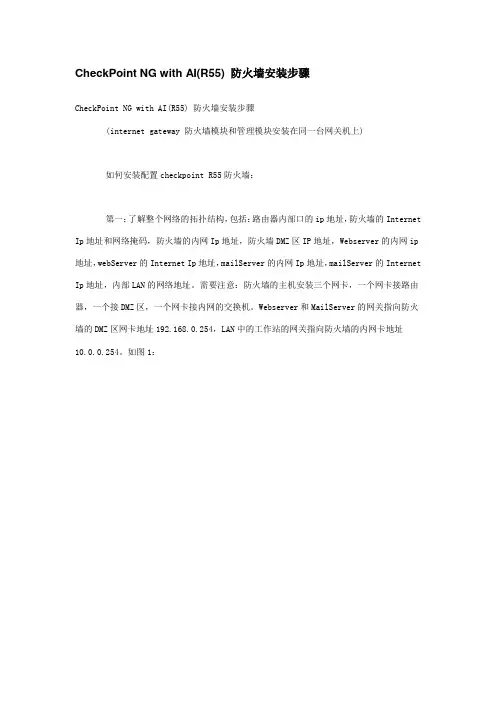
CheckPoint NG with AI(R55) 防火墙安装步骤CheckPoint NG with AI(R55) 防火墙安装步骤(internet gateway 防火墙模块和管理模块安装在同一台网关机上)如何安装配置checkpoint R55防火墙:第一:了解整个网络的拓扑结构,包括:路由器内部口的ip地址,防火墙的Internet Ip地址和网络掩码,防火墙的内网Ip地址,防火墙DMZ区IP地址,Webserver的内网ip 地址,webServer的Internet Ip地址,mailServer的内网Ip地址,mailServer的Internet Ip地址,内部LAN的网络地址。
需要注意:防火墙的主机安装三个网卡,一个网卡接路由器,一个接DMZ区,一个网卡接内网的交换机。
Webserver和MailServer的网关指向防火墙的DMZ区网卡地址192.168.0.254,LAN中的工作站的网关指向防火墙的内网卡地址10.0.0.254。
如图1:在安装防火墙前要确认webserver在没有防火墙的情况下已经可以从互联网上访问到,保证通往外网的线路是通的。
第二:安装防火墙主机*作系统(这里以windows 2000 server为例):1.将防火墙主机中增加网卡,这样,该主机有三块网卡2.安装windows 2000 server(中英文都可),建议打上sp2的补丁3.安装三个网卡的驱动程序,协议只需安装tcp/ip协议4. 配置ip地址,如图2:防火墙外网卡:(防火墙外网卡的地址,该ip address 61.132.122.116和subnet mask 255.255.255.248应该由客户或电信部门提供,应该和路由器在一个网段上,default gateway指向路由器内部口的ip地址:61.132.122.113)防火墙内网卡:(不要设网关)如图3如图4(防火墙内网卡的ip地址,防火墙在内部网的ip是:10.0.0.254 ,subnet mask是:255.255.255.0 ,网关不设定,应为防火墙此时自身就是内部网络的网关),防火墙DMZ 区网卡:(不要设网关).(防火墙DMZ网卡的ip地址,防火墙在内部网的ip是:192.168.0.254 ,subnet mask 是:255.255.255.0 ,网关不设定,应为防火墙此时自身就是DMZ网络的网关)5. 开启防火墙网关的路由转发功能开启该功能可以采用windows2000中的管理工具中的“路由和远程访问”工具开启,但根据我们多次安装实施经验,我们建议您按照下面的方法开启该功能:在开始菜单中的“运行”中,输入“regedit”打开注册表,转到 HKEY_LOCAL_MACHINE\SYSTEM\CurrentContralSet\Services\Tcpip\Parameters项,将IPEnableRouter值设为1,重新启动机器。
C h e c k P o i n t防火墙配置S p e c i f i c a t i o n f o r C h e c k P o i n t F i r e W a l lC o n f i g u r a t i o n U s e d i n C h i n a M o b i l e版本号:1.0.0╳╳╳╳-╳╳-╳╳发布╳╳╳╳-╳╳-╳╳实施中国移动通信有限公司网络部目录1概述 (2)1.1适用范围 (2)1.2内部适用性说明 (2)1.3外部引用说明 (4)1.4术语和定义 (4)1.5符号和缩略语 (4)2CHECKPOINT防火墙设备配置要求 (5)前言概述1.1 适用范围本规范适用于中国移动通信网、业务系统和支撑系统的CHECKPOINT防火墙设备。
本规范明确了设备的基本配置要求,为在设备入网测试、工程验收和设备运行维护环节明确相关配置要求提供指南。
本规范可作为编制设备入网测试规范,工程验收手册,局数据模板等文档的参考1.2内部适用性说明本规范是依据《中国移动防火墙配置规范》中配置类规范要求的基础上提出的CHECKPOINT防火墙配置要求规范,为便于比较,特作以下逐一比较及说明(在“采纳意见”部分对应为“完全采纳”、“部分采纳”、“增强要求”、“新增要求”、“不采纳”。
在“补充说明”部分,对于增强要求的情况,说明在本规范的相应条款中描述了增强的要求。
对于“不采纳”的情况,说明采纳的原因)。
内容采纳意见备注1.不同等级管理员分配不同账号,避完全采纳免账号混用。
完全采纳2.应删除或锁定与设备运行、维护等工作无关的账号。
完全采纳3.防火墙管理员账号口令长度至少8位,并包括数字、小写字母、大写字母和特殊符号4类中至少2类。
4.账户口令的生存期不长于90天。
部分采纳IPSO操作系统支持5.应配置设备,使用户不能重复使用部分采纳IPSO操作系统支持最近5次(含5次)内已使用的口令。
Checkpoint防⽕墙安全配置⼿册V1.1Checkpoint防⽕墙安全配置⼿册v1.1CheckPoint防⽕墙安全配置⼿册Version 1.1XX公司⼆零⼀五年⼀⽉第1页共41 页⽬录1 综述 (3)2 Checkpoint的⼏种典型配置 (4)2.1 checkpoint 初始化配置过程: (4)2.2 Checkpoint Firewall-1 GUI安装 (13)2.3 Checkpoint NG的对象定义和策略配置 (19)3 Checkpoint防⽕墙⾃⾝加固 (37)1综述本配置⼿册介绍了Checkpoint防⽕墙的⼏种典型的配置场景,以加强防⽕墙对⽹络的安全防护作⽤。
同时也提供了Checkpoint防⽕墙⾃⾝的安全加固建议,防⽌针对防⽕墙的直接攻击。
通⽤和共性的有关防⽕墙管理、技术、配置⽅⾯的内容,请参照《中国移动防⽕墙安全规范》。
2Checkpoint的⼏种典型配置2.1checkpoint 初始化配置过程:在安装完Checkpoint软件之后,需要在命令⾏使⽤cpconfig命令来完成Checkpoint 的配置。
如下图所⽰,SSH连接到防⽕墙,在命令⾏中输⼊以下命令:IP350[admin]# cpconfigWelcome to Check Point Configuration Program================================================= Please read the following license agreement.Hit 'ENTER' to continue...(显⽰Checkpoint License版权信息,敲回车继续,敲q可直接跳过该License提⽰信息)Do you accept all the terms of this license agreement (y/n) ?y(输⼊y同意该版权声明)Which Module would you like to install ?-------------------------------------------(1) VPN-1 & FireWall-1 Enterprise Primary Management and Enforcement Module(2) VPN-1 & FireWall-1 Enforcement Module(3) VPN-1 & FireWall-1 Enterprise Primary ManagementCheckpoint Firewall-1/VPN-1⽀持多种安装模式,Firewall-1/VPN-1主要包括三个模块:GUI:⽤户看到的图形化界⾯,⽤于配置安全策略,上⾯并不存储任何防⽕墙安全策略和对象,安装于⼀台PC机上;Management:存储为防⽕墙定义的各种安全策略和对象;Enforcement Module:起过滤数据包作⽤的过滤模块,它只与Managerment通信,其上的安全策略由管理模块下载;以上三个选项中如果Management与Enforcement Module安装于同⼀台设备上,则选择(1),如果Management与Enforcement Module分别安装于不同的设备上,则选择(2)或(3)。
CheckPoint防火墙安全配置手册Version 1.1XX公司二零一五年一月目录1 综述 (3)2 Checkpoint的几种典型配置 (4)2.1 checkpoint 初始化配置过程: (4)2.2 Checkpoint Firewall-1 GUI安装 (13)2.3 Checkpoint NG的对象定义和策略配置 (19)3 Checkpoint防火墙自身加固 (37)1综述本配置手册介绍了Checkpoint防火墙的几种典型的配置场景,以加强防火墙对网络的安全防护作用。
同时也提供了Checkpoint防火墙自身的安全加固建议,防止针对防火墙的直接攻击。
通用和共性的有关防火墙管理、技术、配置方面的内容,请参照《中国移动防火墙安全规范》。
2Checkpoint的几种典型配置2.1checkpoint 初始化配置过程:在安装完Checkpoint软件之后,需要在命令行使用cpconfig命令来完成Checkpoint 的配置。
如下图所示,SSH连接到防火墙,在命令行中输入以下命令:IP350[admin]# cpconfigWelcome to Check Point Configuration Program================================================= Please read the following license agreement.Hit 'ENTER' to continue...(显示Checkpoint License版权信息,敲回车继续,敲q可直接跳过该License提示信息)Do you accept all the terms of this license agreement (y/n) ?y(输入y同意该版权声明)Which Module would you like to install ?-------------------------------------------(1) VPN-1 & FireWall-1 Enterprise Primary Management and Enforcement Module(2) VPN-1 & FireWall-1 Enforcement Module(3) VPN-1 & FireWall-1 Enterprise Primary ManagementCheckpoint Firewall-1/VPN-1支持多种安装模式,Firewall-1/VPN-1主要包括三个模块:GUI:用户看到的图形化界面,用于配置安全策略,上面并不存储任何防火墙安全策略和对象,安装于一台PC机上;Management:存储为防火墙定义的各种安全策略和对象;Enforcement Module:起过滤数据包作用的过滤模块,它只与Managerment通信,其上的安全策略由管理模块下载;以上三个选项中如果Management与Enforcement Module安装于同一台设备上,则选择(1),如果Management与Enforcement Module分别安装于不同的设备上,则选择(2)或(3)。
Checkpoint防⽕墙命令⾏维护⼿册Checkpoint防⽕墙命令⾏维护⼿册制订模版:NGX-R65版本号:V1.0⽬录⼀、基本配置命令 (1)1.1SYSCONFIG (1)1.2CPCONFIG (2)1.3CPSTOP (3)1.4CPSTART (3)1.5EXPERT (3)1.6IDLE (4)1.7WEBUI (4)1.8脚本添加路由 (4)⼆、查看系统状态 (1)2.1TOP (1)2.2DF –H (2)2.3FREE (2)三、HA相关命令 (1)3.1CPHAPROB STAT (1)3.2CPHAPROB –A IF (1)3.3CPHACONF SET_CCP BROADCAST (1)3.4CPHAPROB LIST (2)3.5CPHASTART/CPHASTOP (3)3.6FW CTL PSTAT (3)四、常⽤维护命令 (1)4.1VER (1)4.2FW VER (1)4.3查看防⽕墙UTM/POWER版本 (1)4.4查看防⽕墙硬件型号 (1)4.5LICENSE查看和添加 (1)4.6IFCONFIG/IFCONFIG –A (1)4.7MII-TOOL (1)4.8ETHTOOL (1)4.9CPSTAT FW (2)4.10会话数查看 (1)五、⽇志查看命令 (1)5.1FW LOG (1)5.2FW LSLOGS (1)5.3FW LSLOGS –E (1)5.4FW LOGSWITCH (1)5.5导出⽇志⽂件 (2)六、防⽕墙的备份和恢复 (1)6.1备份防⽕墙 (1)6.2在IE中备份 (1)6.3在防⽕墙上备份 (2)6.4恢复防⽕墙 (2)⼀、基本配置命令1.1sysconfig可以对系统进⾏配置和修改,⽐如主机名修改,DNS配置修改,以及路由的配置等,另外还可以配置DHCP功能,以及产品的安装等等如上图所⽰,在命令提⽰符输⼊:sysconfig,将会出现下图所列⼀些选项,在Your choice 后⾯输⼊你想配置的选项前的数字,然后按回车可以看到,依次的选项为主机名,域名,域名服务,时间和⽇期,⽹络连接,路由,DHCP服务配置,DHCP中继配置,产品安装,产品配置等例如我们选择5,为防⽕墙新增⼀个接⼝IP地址然后选择2,进⾏连接配置,也就是配置IP地址选择1进⾏IP地址配置更改如上图所⽰按照提⽰配置IP地址和⼦⽹掩码进⾏其他配置也如同上述操作,选择对应的编号然后按照提⽰进⾏配置1.2cpconfig可以对checkpoint防⽕墙进⾏相关的配置,如下图所⽰,也是按照列表的形式列出,分别是license,snmp,PKCS#11令牌,随机池,SIC,禁⽤cluster,禁⽤安全加速,产品⾃动启动常⽤的选项⼀般为SIC的配置,cluster功能模块的启⽤等;选择7是开启cluster功能模块;选择5是设置SIC。
Check point 防火墙基本操作手册For NGX Release了解check point 防火墙架构Check point 防火墙的管理是通过一个三层架构来实现的。
首先我们可以在任意的机器上安装防火墙客户端控制台,然后利用控制台的图形化界面登录check point 的管理服务器,定义出各个网络对象,定义企业各条策略,最后下发到防火墙执行模块。
具体实现过程见图示:防火墙的管理首先打开控制台软件,出现登录界面:SmartDashboard是配置防火墙策略和对象的一个控制软件,我们定义对象和规则时就利用他来实现,SmartUpdate是用于添License时要用到的一个控制软件,SmartView Tracker是查看日志时用到的客户端软件。
点击SmartDashboard后出现登录界面,如图:这里输入用户名,密码,以及管理服务器的ip地址。
点击ok 登录到配置界面。
第一个选项Demo Mode 是查看防火墙的演示界面。
点击Demo Mode 选择下拉列表框中的Advance选项可以查看Check point 公司定义的各项配置演示。
Cetificate(证书)选项是替代管理员用户名和密码验证的一种选择,这个证书有管理服务器生成,用户自己保存在本地,需要用它验证时点击旁边的小方块,添加这个证书,然后选择管理服务器地址,然后点击ok 登录。
最下面的Read Only 选项是以只读方式登录防火墙。
没有改配置的权限。
注意:防火墙一次只可以容许一个用户以管理员身份登录,可以修改火墙配置,其他以管理员身份登录防火墙的用户,要么强制断开当前已登陆的帐户,要么以只读身份登录。
登陆SmartConsole配置界面:上边标记处是添加防火墙规则的按钮。
左边是定义各种对象的区域,有防火墙对象,主机对象,网络对象,以及组对象。
右边Security选项显示的是规则库,显示当前定义的各条规则。
下面是已经定义的所有对象以及他们相应得属性。
C h e c k P o i n t防火墙配置Company Document number:WTUT-WT88Y-W8BBGB-BWYTT-19998C h e c k P o i n t 防火墙配置╳╳╳╳-╳╳-╳╳发布 ╳╳╳╳-╳╳-╳╳实施S p e c i f i c a t i o n f o r C h e c k P o i n t F i r e W a l lC o n f i g u r a t i o n U s e d i n C h i n a M o b i l e版本号:1.0.0中国移动通信有限公司网络部目录前言概述1.1 适用范围本规范适用于中国移动通信网、业务系统和支撑系统的CHECKPOINT防火墙设备。
本规范明确了设备的基本配置要求,为在设备入网测试、工程验收和设备运行维护环节明确相关配置要求提供指南。
本规范可作为编制设备入网测试规范,工程验收手册,局数据模板等文档的参考1.2内部适用性说明本规范是依据《中国移动防火墙配置规范》中配置类规范要求的基础上提出的CHECKPOINT防火墙配置要求规范,为便于比较,特作以下逐一比较及说明(在“采纳意见”部分对应为“完全采纳”、“部分采纳”、“增强要求”、“新增要求”、“不采纳”。
在“补充说明”部分,对于增强要求的情况,说明在本规范的相应条款中描述了增强的要求。
对于“不采纳”的情况,说明采纳的原因)。
内容采纳意见备注1.不同等级管理员分配不同账完全采纳号,避免账号混用。
2.应删除或锁定与设备运行、维护等工作无关的账号。
完全采纳3.防火墙管理员账号口令长度至少8位,并包括数字、小写字母、大写字母和特殊符号4类中至少2类。
完全采纳4.账户口令的生存期不长于90天。
部分采纳IPSO操作系统支持5.应配置设备,使用户不能重复使用最近5次(含5次)内已使用的口令。
部分采纳IPSO操作系统支持6.应配置当用户连续认证失败次数超过6次(不含6次),锁定该用户使用的账号。
C h e c k p o i n t防火墙安全配置指南This model paper was revised by the Standardization Office on December 10, 2020Checkpoint防火墙安全配置指南中国联通信息化事业部2012年 12月备注:1.若此文档需要日后更新,请创建人填写版本控制表格,否则删除版本控制表格。
目录第1章概述1.1目的本文档规定了中国联通通信有限公司信息化事业部所维护管理的CheckPoint防火墙应当遵循的设备安全性设置标准,本文档旨在指导系统管理人员进行CheckPoint防火墙的安全配置。
1.2适用范围本配置标准的使用者包括:网络管理员、网络安全管理员、网络监控人员。
本配置标准适用的范围包括:中国联通总部和各省公司信息化部门维护管理的CheckPoint防火墙。
1.3适用版本CheckPoint防火墙;1.4实施本标准的解释权和修改权属于中国联通集团信息化事业部,在本标准的执行过程中若有任何疑问或建议,应及时反馈。
本标准发布之日起生效。
1.5例外条款欲申请本标准的例外条款,申请人必须准备书面申请文件,说明业务需求和原因,送交中国联通集团信息化事业部进行审批备案。
第2章安全配置要求2.1系统安全2.1.1用户账号分配2.1.2删除无关的账号2.1.3密码复杂度2.1.4配置用户所需的最小权限2.1.5安全登陆2.1.6配置NTP安全配置SNMP2.1.7第3章日志安全要求3.1日志安全3.1.1启用日志功能3.1.2记录管理日志3.1.3配置日志服务器3.1.4日志服务器磁盘空间第4章访问控制策略要求4.1访问控制策略安全4.1.1过滤所有与业务不相关的流量4.1.2透明桥模式须关闭状态检测有关项4.1.3账号与IP绑定4.1.4双机架构采用VRRP模式部署4.1.5打开防御DDOS攻击功能4.1.6开启攻击防御功能第5章评审与修订本标准由中国联通集团信息化事业部定期进行审查,根据审视结果修订标准,并颁发执行。
Checkpoint R65 Test PlanRevision 0.12009-10-14Author: Peng GongRevision History1‘FW MONITOR’ USAGE (7)2TEST SUITES (7)2.1R65I NSTALL &U NINSTALL (7)2.1.1Create a v3 vap-group with vap-count/max-load-count set >1, Confirm R65 and related HFA could beinstalled on all vap within vap-group successfully (7)2.1.2Create a v4 vap-group, confirm XOS would prompt correctly message and failure install would causeunexpected issue to system (9)2.1.3Create a v5 vap-group, confirm XOS would prompt correctly message and failure install would causeunexpected issue to system (10)2.1.4Create a v5_64 vap-group, confirm XOS would prompt correctly message and failure install wouldcause unexpected issue to system (11)2.1.5Try to install R65 on a v3 vap-group and abort the install process, confirm nothing is left afterwards122.1.6Reduce max-load-count down to 1, confirm only one Vap is allowed to run R65 accordingly (13)2.1.7Increase vap-count and max-load-count to maximum vap count and executing "application-update",confirm all the Vap are running R65 properly (14)2.1.8Reduce vap-count to 3, Confirm the surplus Vap is stopped from running R65 and related partitionsare removed from CPM (15)2.1.9Enable/Disable IPv6 in vap-group and w/o ipv6-forwarding, confirm R65 wouldn't be affected. (16)2.1.10Confirm the installed R65 could be stopped through CLI (17)2.1.11Confirm the installed R65 could be started through CLI (18)2.1.12Confirm the installed R65 could be restarted through CLI (18)2.1.13Confirm the installed R65 could be reconfigured through CLI (19)2.1.14Confirm checkpoint could be upgraded to R70 by CLI: application-upgrade (19)2.1.15Confirm R65 could run properly while reload vap-group totally (20)2.1.16Confirm R65 could run properly while reload all chassis totally (20)2.1.17Create 2 vap groups, install R65 on both. Confirm R65 are running on both vap-groups without anymutual impact. (21)2.1.18Confirm configure operation couldn't be allowed if some Vap don't run R65 properly. (23)2.1.19Confirm uninstall/Configure operation couldn't be allowed if some Vap don't run properly. (24)2.1.20Confirm start/stop/restart operation could works prope rly if R65 doesn’t run properly on someVaps.252.1.21Confirm configure operation couldn't be allowed if vap-count>max-load-count causing some Vapdon't run properly (26)2.1.22Confirm uninstall operation couldn't be allowed if vap-count>max-load-count causing some Vapdon't run properly (27)2.1.23Confirm start/stop/restart operation couldn't be allowed if vap-count>max-load-count causingsome Vap don't run properly (28)2.1.24Confirm R65 could be uninstalled from vap-group (29)2.1.25Confirm R65 installation package could be remove from XOS by CLI: application-remove (30)2.2C HECKPOINT F EATURES (31)2.2.1Create GW and Set SIC, get topology from Smart Dashboard (31)2.2.2Configure Policy and push policy (31)2.2.3Confirm R65 could be started/stoped/restarted by cp-command (32)2.2.4Confirm different kinds of rule actions could work - allow/drop/reject (33)2.2.5Verify different kinds of tracking actions could work properly - log/alert/account (33)2.2.6Verify static NAT and hide NAT work properly (34)2.2.7Verify default license is installed automatically (34)2.2.8Verify some usual fw commands output - fw ver -k/ fw ctl pstat/ fw tab/ fw stat/ cphaprob stat /fwfetch /fw unloadlocal / fwaccel stat (34)2.2.9Verify SXL status if enable/disable it (36)2.2.10Verify the log information in SmartViewer are displayed correctly. (37)2.2.11Verify the GW and its member information in SmartViewer are displayed correctly (37)2.2.12Define a VPN Community between two GW; Confirm traffic can pass (37)2.2.13Create a VPN client tunnel, make sure client can login and traffic is encrypted as it should (38)2.2.14Enabling/Disabling SXL during connections (39)2.2.15Fail over the active member during connections (39)2.3I NTERFACE T EST-T RAFFIC MIXED WITH IPV6 AND IPV4 (39)2.3.1Verify traffic pass through the interface without SXL - non vlan<--->vlan (tcp+udp+icmp) (39)2.3.2Verify traffic pass through the interface without SXL - mlt <---> vlan (tcp+udp+icmp) (40)2.3.3Verify traffic pass through the interface without SXL - mlt+vlan <---> vlan (tcp+udp+icmp) (41)2.3.4Verify traffic pass through the internal circuit interface (tcp+udp+icmp) (42)2.3.5Verify traffic pass through the interface with SXL - non vlan<--->vlan (tcp+udp+icmp) (42)2.3.6Verify traffic pass through the interface with SXL - mlt <---> vlan (tcp+udp+icmp) (43)2.3.7Verify traffic pass through the interface with SXL - mlt+vlan <---> vlan (tcp+udp+icmp) (44)2.4A PPLICATION M ONITOR (45)2.4.1Verify the application-monitor is enabled by default (45)2.4.2Verify the command "show application vap-group ..." could return correct app status whileapplication is stopped/restarted by hand (46)2.4.3Confirm the command "show application vap-group ..." could return correct app status whileapplication is stopped/restarted/started by CLI command (47)2.4.4Confirm the command "show application vap-group" could return correct app status while cpd/fwd iskilled in a vap(rsh to ap) (48)2.4.5Confirm the application-monitor could be disabled/enabled and the output of command "showapplication vap-group "is correct (49)2.4.6While Disabled: Stop Application, confirm the new and established flows couldn’t be impacted (50)2.4.7While Enabled: stop app on all VAPs using CLI, confirm that VAPs won’t server transmitting and newflows522.4.8While Enabled: Stop App on 1 VAP (rsh to vap), confirm only that AP won't receive new flows (52)2.4.9While Enabled: Use CLI to start app on all VAPs, confirm that all VAPs will server new flows (53)2.4.10While Enabled: Use CLI to Reload VAP Group, confirm they'll all receive new flows after reboot (53)2.4.11While Enabled: Start App on 1 VAP (rsh to vap), confirm it will receive new flows (54)2.4.12While Enabled: Reduce max-load-count to 1, confirm only this VAP will receive new flows (54)2.4.13While Enabled: Increase max-load-count to vap-count, confirm all VAPs will receive new flows .. 552.4.14While Enabled: Uninstall app, confirm all VAPs will receive new flows and "show application vap-group ..." could return correct app status . (55)2.5F AILOVER -NP/CP/VAP (56)2.5.1Reload all NPM, confirm the traffic could recover after NP is rebooted (56)2.5.2Reload a master NPM; confirm the traffic couldn't be impacted (56)2.5.3Reload other non-related npm; confirm the traffic couldn't be impacted. (57)2.5.4Reload all CPM, confirm the connected traffic couldn't be affected and new connection could be builtafter CPM is rebooted. (58)2.5.5Reload a master CPM, confirm the traffic couldn't be affected and secondary CPM switches to mastersuccessfully. (58)2.5.6Reload a secondary CPM, confirm the traffic couldn't be affected (59)2.5.7Redundancy mode: Reload master AP by CLI "reload module x"/"reload vap-group x y"; confirm thetraffic couldn't be affected and backup AP switches to master (59)2.5.8Redundancy Mode: Rsh to master AP and Reboot it by "reboot" command in Linux shell; confirm thetraffic couldn't be affected and backup AP switches to master (60)2.5.9Redundancy Mode: Reset master AP by cb script "cbs_reset_slot x"; confirm the traffic couldn't beaffected and backup AP switches to master (61)2.5.10Redundancy Mode: Disable master AP by CLI "configure module x disable"; confirm the trafficcouldn't be affected and backup AP switches to master. (62)2.5.11Redundancy Mode: Remove master AP from ap-list; confirm the allocated traffic could beredirected to secondary AP and secondary AP switch to master (62)2.5.12Redundancy Mode: Reload Vap-group totally; confirm the traffic could recover after APs arerebooted632.5.13Load Balance Mode: Rsh to an AP and Reboot it by "reboot" command in Linux shell; confirm theallocated traffic could be redirected to other AP. (63)2.5.14Load Balance Mode: Reload one AP by CLI "reload module x"/"reload vap-group x y", confirm theallocated traffic could be redirected to another AP. (64)2.5.15Load Balance Mode: Reset one AP by cb script "cbs_reset_slot x", confirm the allocated trafficcould be redirected to another AP. (64)2.5.16Load Balance Mode: Disable one AP by CLI "configure module x disable"; confirm the allocatedtraffic could be redirected to another AP. (65)2.5.17Load Balance Mode: Remove one AP from ap-list, confirm the allocated traffic could be redirectedto another AP (65)2.5.18Load Balance Mode: Reload the whole vap-group, confirm the traffic could be rebuilt afterrebooting.662.5.19Reload the whole XOS system; confirm the traffic could recover and system runs properly (66)2.5.20Re-power the chassis; confirm the traffic could recover and system runs properly after power on 67 2.6I NTERFACE R EDUNDANCY (67)2.6.1L3 Redundancy: configure interface with vlan and non-vlan on one NPM, make interface failover bydisable interface; Confirm traffic, passing through master interface, could be switched to backup interface. . 672.6.2L3 Redundancy: configure interface with vlan and non-vlan on two NPM, make interface failover byreloading NPM, the master interface locating at; Confirm traffic, passing through master interface, could be switched to backup interface (68)2.6.3Bridge-Mode Redundancy: Two interfaces in bridge mode, configure interface redundancy for bridgeinterface; Make interface failover by disable interface; Confirm traffic is passing through bridge from the backup interface (69)2.6.4Bridge-Mode Redundancy configure two interfaces with different vlan on two NPM, make interfacefailover by reloading NPM, the master interface locating at; Confirm traffic, passing through master interface, could be switched to backup interface. (70)2.6.5GroupInterface-Mode Bridge Redundancy: Two interfaces in bridge mode, configure interfaceredundancy for bridge interface; Make interface failover by disable interface; Confirm traffic is passing through bridge from the backup interface. (71)2.6.6GroupInterface-Mode Bridge Redundancy configure two interfaces with different vlan on two NPM,make interface failover by reloading NPM, the master interface locating at; Confirm traffic, passing through master interface, could be switched to backup interface. (73)2.7CP REDUNDANCY (74)2.7.1When Disk synchronization statistics is 100%, install/uninstall/application-update R65 in the primaryCPM; Confirm secondary CPM has also been install/uninstall/application-update automatically (74)2.7.2When Disk synchronization statistics is less than 100%, install/uninstall/application-update the R65 inthe primary CPM; Confirm the secondary CPM also has been install/uninstall/application-updateautomatically after synchronization is completed. (75)2.7.3Reboot or reload CP; Confirm checkpoint works without any impact and CP redundancy worksproperly (77)2.7.4When Disk synchronization statistics is 100%, push new policy to checkpoint and then make a cpfailover; Confirm the new policy also take effect in the new master CPM after the failover (78)2.8DBHA (78)2.8.1Active-Standy Mode: Configure and Disable non-vlan interface on Vrrp Master Xbox, confirm Vrrpfailover occurs properly and check out CHKP’s and XOS's logs for any errors or messages. (79)2.8.2Active-Standy Mode: Configure and Disable vlan interface on Vrrp Master Xbox, confirm Vrrp failoveroccurs properly and check out CHKP’s a nd XOS's logs for any errors or messages (81)2.8.3Active-Standy Mode: Configure and Disable mlt+vlan interface on Vrrp Master Xbox, confirm Vrrpfailover occurs properly and check out CHKP’s and XOS's logs for any errors or messages. (83)2.8.4Active-Standy Mode: Enable the previous disabled interface, confirm the original Vrrp-master X-boxswitchs back master ownership and traffic are also switched back properly. (84)2.8.5Active-Standy Mode: Configure interface redundancy for Vrrp-master's interface, Disable Vrrp-master's interface, supporting traffic, confirm traffic are switching to Vrrp-master's backup interface and doesn't occur Vrrp failover between 2 X-box. (85)2.8.6Active-Standy Mode: Reload NPM on Vrrp-master's x-box, confirm Vrrp failover occurs properly andTraffic is switching to another X-box during the NPM is reloading (86)2.8.7Active-Standy Mode: Reload NPM on Vrrp-master's x-box; confirm Vrrp failover occurs properly,confirm Traffic and master ownership could be switched back original X-box after NPM is reloaded (86)2.8.8Active-Standby Mode: Reload vap-group on Vrrp-master's Xbox, confirm Vrrp failover occurs properlyand Traffic is switching to another X-box during the vap-group is reloading (87)2.8.9Active-Standby Mode: Reload vap-group on Vrrp-master's Xbox; confirm Vrrp failover occurs twiceproperly the master ownership could be switched back original X-box after vap-group is reloaded. (88)2.8.10Active-Standby Mode: Reload Master X-box fully, confirm Vrrp failover occurs properly and Trafficis switching to another X-box during the X-box is reloading. (88)2.8.11Active-Standby Mode: Reload Master X-box fully, confirm Vrrp failover occurs properly; confirmTraffic and master ownership could be switched back original X-box after Xbox is reloaded. (89)2.8.12Active-Active Mode: Disable interface on Vrrp Master Xbox, confirm Vrrp failover occurs properlyand check out CHKP’s and XOS's logs for any errors or messages (89)2.8.13Active-Active Mode: Configure and Disable vlan interface on Vrrp Master Xbox, confirm Vrrpfailover occurs properly (90)2.8.14Active-Active Mode: Configure and Disable mlt+vlan interface on Vrrp Master Xbox, confirm Vrrpfailover occurs properly (90)2.8.15Active-Active Mode: Enable the previous disabled interface, Confirm the master ownership couldbe switched back as interface recover (91)2.8.16Active-Active Mode: Configure interface redundancy for Vrrp-master's interface, Disable Vrrp-master's interface, supporting traffic; confirm traffic are switching to redundancy interface and doesn't occur Vrrp failover between 2 X-box. (92)2.8.17Active-Active Mode: Reload NPM on Vrrp-master's x-box, confirm Vrrp failover occurs properly andTraffic is switching to another X-box during the NPM is reloading (92)2.8.18Active-Active Mode: Reload NPM on Vrrp-master's x-box; confirm Vrrp failover occurs properly,confirm Traffic and master ownership could be switched back original X-box after NPM is reloaded (93)2.8.19Active-Active Mode: Reload vap-group on Vrrp-master's Xbox, confirm Vrrp failover occursproperly and Traffic is switching to another X-box during the vap-group is reloading. (93)2.8.20Active-Active Mode: Reload vap-group on Vrrp-master's Xbox; confirm Vrrp failover occursproperly, confirm Traffic and master ownership could be switched back original X-box after vap-group is reloaded.942.8.21Active-Active Mode: Reload Master X-box fully, confirm Vrrp failover occurs properly and Traffic isswitching to another X-box during the chassis is reloading (94)2.8.22Active-Active Mode: Reload Master X-box fully, confirm Vrrp failover occurs properly , confirmTraffic and master ownership could be switched back original X-box after Xbox is reloaded. (94)2.9S TRESS &N EGATIVE (95)2.9.1Valid traffic mix TCP/UDP (HTTP/FTP pass/FTP act/ICMP/RTSP/TFTP/IMAP) small rates (10-100cons/sec) (95)2.9.2Valid traffic mix TCP/UDP (HTTP/FTP pass/FTP act/ICMP/RTSP/TFTP/IMAP) high rates (1000-5000cons/sec) (95)2.9.3Invalid IP packets (bad checksum, wrong IP version, etc, use isic, targa3); make sure non system errorsuch as module crash (96)2.9.4Short run (minutes to hours) (96)2.9.5Fragmented traffic (97)2.9.6Over-night test (12 hours) (97)2.9.7Over-weekend test (60 hours) (97)2.9.8UDP, TCP traffic (98)2.9.9Administration operations during the traffic (98)2.9.10Check for memory leaks during the tests. (98)2.9.11Performance test, via Sprirent (99)1‘Fw monitor’ usage1)Firewall is located between NIC and IP stac k. It doesn’t use promiscuous mode tocapture packets.2)In contrast to tcpdump, ‘Fw monitor’ can capture packets at several different point,it doesn’t use promiscuous mode.3) 4 capture pointsNIC --------- FW -------- IP --------- TCP --------- App|forwardNIC --------- FW ---------IP --------- TCP --------- App4 capturing point for fw monitor: pre-inbound iPost-inbound IPre-outbound oPost-outbound Oi---->I ---- o----->O4)Different capture point ----→ -m 4pointsFw monitor -m IOFw monitor -m i5)Print packet raw date ----→ -xFw monitor -m i -x 52, 966)Different CP kernel module chain --→ -p (fw ctl chain)fw monitor insert its own module in the chain and capture packets at that place. (fwmonitor i/f side if it is started)fw monitor -pi -secxl_syncfw monitor -p all (all module places)7)Output to file --→ -oFw monitor -o dump.cap8)2Test Suites2.1R65 Install & Uninstall2.1.1Create a v3 vap-group with vap-count/max-load-count set >1, Confirm R65 andrelated HFA could be installed on all vap within vap-group successfully2.1.2Create a v4 vap-group, confirm XOS would prompt correctly message and failureinstall would cause unexpected issue to system2.1.3Create a v5 vap-group, confirm XOS would prompt correctly message and failureinstall would cause unexpected issue to system2.1.4Create a v5_64 vap-group, confirm XOS would prompt correctly message andfailure install would cause unexpected issue to system2.1.5Try to install R65 on a v3 vap-group and abort the install process, confirmnothing is left afterwards2.1.6Reduce max-load-count down to 1, confirm only one Vap is allowed to run R65accordingly2.1.7Increase vap-count and max-load-count to maximum vap count and executing"application-update", confirm all the Vap are running R65 properly2.1.8Reduce vap-count to 3, Confirm the surplus Vap is stopped from running R65and related partitions are removed from CPM2.1.9Enable/Disable IPv6 in vap-group and w/o ipv6-forwarding, confirm R65wouldn't be affected.2.1.10Confirm the installed R65 could be stopped through CLI2.1.11Confirm the installed R65 could be started through CLI2.1.12Confirm the installed R65 could be restarted through CLI2.1.13Confirm the installed R65 could be reconfigured through CLI2.1.14Confirm checkpoint could be upgraded to R70 by CLI: application-upgrade2.1.15Confirm R65 could run properly while reload vap-group totally2.1.16Confirm R65 could run properly while reload all chassis totally2.1.17Create 2 vap groups, install R65 on both. Confirm R65 are running on both vap-groups without any mutual impact.2.1.18Confirm configure operation couldn't be allowed if some Vap don't run R65properly.2.1.19Confirm uninstall/Configure operation couldn't be allowed if some Vap don't runproperly.2.1.20Confirm start/stop/restart operation could works properly if R65 doesn’t runproperly on some Vaps.2.1.21Confirm configure operation couldn't be allowed if vap-count>max-load-countcausing some Vap don't run properly.2.1.22Confirm uninstall operation couldn't be allowed if vap-count>max-load-countcausing some Vap don't run properly.2.1.23Confirm start/stop/restart operation couldn't be allowed if vap-count>max-load-count causing some Vap don't run properly.2.1.24Confirm R65 could be uninstalled from vap-group2.1.25Confirm R65 installation package could be remove from XOS by CLI: application-remove2.2Checkpoint Features2.2.1Create GW and Set SIC, get topology from Smart Dashboard2.2.2Configure Policy and push policy2.2.3Confirm R65 could be started/stoped/restarted by cp-command2.2.4Confirm different kinds of rule actions could work - allow/drop/reject2.2.5Verify different kinds of tracking actions could work properly - log/alert/account2.2.6Verify static NAT and hide NAT work properly2.2.7Verify default license is installed automatically2.2.8Verify some usual fw commands output - fw ver -k/ fw ctl pstat/ fw tab/ fw stat/cphaprob stat /fw fetch /fw unloadlocal / fwaccel stat2.2.9Verify SXL status if enable/disable it2.2.10Verify the log information in SmartViewer are displayed correctly.2.2.11Verify the GW and its member information in SmartViewer are displayedcorrectly.2.2.12Define a VPN Community between two GW; Confirm traffic can pass2.2.13Create a VPN client tunnel, make sure client can login and traffic is encrypted asit should2.2.14Enabling/Disabling SXL during connections2.2.15Fail over the active member during connections2.3Interface Test- Traffic mixed with ipv6 and ipv42.3.1Verify traffic pass through the interface without SXL - non vlan<--->vlan(tcp+udp+icmp)2.3.2Verify traffic pass through the interface without SXL - mlt <---> vlan(tcp+udp+icmp)2.3.3Verify traffic pass through the interface without SXL - mlt+vlan <---> vlan(tcp+udp+icmp)2.3.4Verify traffic pass through the internal circuit interface (tcp+udp+icmp)2.3.5Verify traffic pass through the interface with SXL - non vlan<--->vlan(tcp+udp+icmp)2.3.6Verify traffic pass through the interface with SXL - mlt <---> vlan (tcp+udp+icmp)2.3.7Verify traffic pass through the interface with SXL - mlt+vlan <---> vlan(tcp+udp+icmp)2.4Application Monitor2.4.1Verify the application-monitor is enabled by default2.4.2Verify the command "show application vap-group ..." could return correct appstatus while application is stopped/restarted by hand2.4.3Confirm the command "show application vap-group ..." could return correct appstatus while application is stopped/restarted/started by CLI command2.4.4Confirm the command "show application vap-group" could return correct appstatus while cpd/fwd is killed in a vap(rsh to ap)2.4.5Confirm the application-monitor could be disabled/enabled and the output ofcommand "show application vap-group "is correct2.4.6While Disabled: Stop Application, confirm the new and established flowscouldn’t be impacted。