产品维修手册(13版v4.0)
- 格式:docx
- 大小:5.31 MB
- 文档页数:44
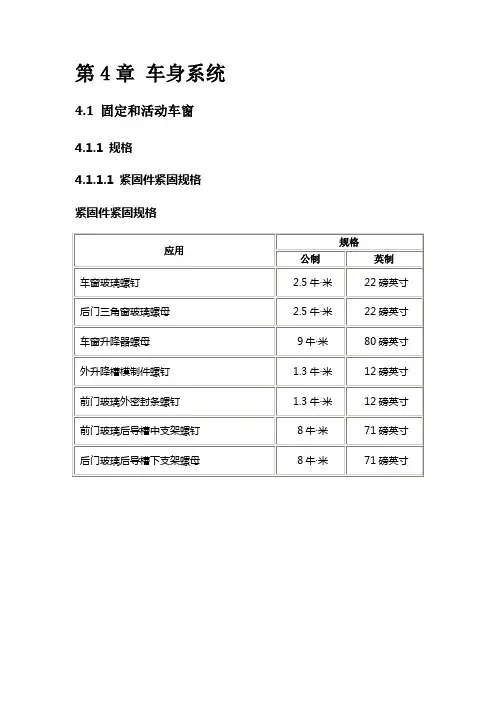
第4章车身系统4.1 固定和活动车窗4.1.1 规格4.1.1.1 紧固件紧固规格紧固件紧固规格4.1.2 示意图和布线图4.1.2.1 活动车窗示意图活动车窗示意图(&A31)活动车窗示意图(&A31)4.1.2.2 除雾器示意图除雾器示意图4.1.3 诊断信息和程序4.1.3.1 症状- 固定和活动车窗起动前的重要初步检查:1. 在使用“症状表”前,执行“诊断系统检查-车辆”,确认以下情况属实:▪未设置故障诊断码。
▪控制模块能通过串行数据链路进行通信。
2. 查阅电动车窗系统的操作或后窗除雾器系统的操作,以了解系统功能。
参见以下内容:▪后窗除雾器的说明与操作▪电动车窗的说明与操作目视/ 外观检查•检查是否存在可能影响后窗除雾器工作的售后加装设备。
参见“11.3.4.8 检查售后加装附件”。
•检查易于触及或可见的系统部件是否有导致该症状的明显损坏或故障。
间歇性故障注意:•如果存在间歇性故障,则检查电子部件是否正确安装。
间歇性故障可能是由电气连接故障或线束故障引起的。
参见“11.3.4.22 测试间歇性故障和接触不良”。
•故障不一定点亮“SERVICE VEHICLE SOON(尽快维修车辆)”指示灯或存储故障诊断码。
不要使用症状表诊断间歇性故障。
故障必须出现以确定故障的位置。
电气接触不良或线束故障导致多数间歇性故障。
仔细执行目视/ 外观检查以确认是否存在以下情况:•插头配合不当或端子未完全卡入连接器壳体。
•端子变形或损坏。
•整形或更换故障电路中的连接器端子以确保合适的接触张力。
•端子与导线接触不良需要从连接器壳体拆下端子以执行检查。
症状列表参见下表中的症状诊断程序,以便对症状进行诊断:•电动车窗故障•后窗除雾器故障4.1.3.2 电动车窗故障诊断说明•在使用此诊断程序之前,执行“诊断系统检查-车辆”。
•查阅“基于策略的诊断”,以获得诊断方法的概述。
•“诊断程序说明”提供每种诊断类别的概述。
®OWNER’S LITERATURE INFORMATION (2)INTRODUCTIONNissan Maintenance (3)Why Nissan Service? (4)NISSAN MAINTENANCE&REPAIR SUPPORTExtended Service Plans (5)Genuine Nissan Collision Parts (7)Complimentary Multi-Point Inspection (12)Genuine Nissan Parts You Can Rely On..................................14,15Nissan Services Designed With You in Mind...............................18,20SCHEDULED MAINTENANCE GUIDEDetermining the Proper Maintenance Interval (8)Explanation of Scheduled Maintenance Items (9)Maintenance Schedule (11)Maintenance Log (37)1INDEX OF TOPICS WHERE TO FIND INFORMATIONRecommended Lubricants,Fluids.........Owner’s Manual:chapter9Radio/CD Operation/Heater/AC Operation...Navigation Manual:chapter4Charging Your Vehicle.................Owner’s Manual:chapter CHStarting and Driving Your Vehicle..........Owner’s Manual:chapter5Security System Operation..............Owner’s Manual:chapter2If You Have a Flat Tire..................Owner’s Manual:chapter6New Vehicle Limited Warranty............Warranty Information Booklet:“2013New Vehicle LimitedWarranty”Tire Pressure/Rotation.................Owner’s Manual:chapter8Tire Warranties/Safety Information.........Warranty Information Booklet:Individual tire manufacturerwarranty sectionsConsumer Affairs Assistance.............Warranty Information Booklet:“Nissan’s Customer Care Program”Customer Care/Lemon Law Information Booklet* Do It Yourself Information...............Owner’s Manual:chapter8General Maintenance..................Owner’s Manual:chapter8*Not applicable outside the United States2Maintain Your InvestmentPreventative scheduled maintenance is an important investment tooptimize the performance,reliability,durability,safety and resale value ofyour Nissan.Scheduling your electric vehicle’s maintenance at therecommended intervals will ensure your electric vehicle functions at itsbest.We want you to enjoy your Nissan electric vehicle.This Service andMaintenance Guide is designed to help you make sure your electricvehicle receives proper and timely maintenance that is necessary.Keyservices are explained in detail,along with an outline of scheduledmaintenance to help you maintain your electric vehicle.Your localNissan LEAF certified dealer can assist you in determining the bestschedule based on your driving habits and local conditions.Failure to perform scheduled maintenance may result in excludingportions of your electric vehicle from warranty coverage and may reducethe performance,safety,reliability,durability and/or resale value of yourelectric vehicle.See your Warranty Information Booklet and Owner’sManual for details.3To preserve the quality,reliability and safety of your elec-tric vehicle,an authorized Nissan LEAF certified dealer is recommended for maintenance or repair.Only an autho-rized Nissan LEAF certified dealer offers you these advan-tages:●Nissan trained and ASE certified technicians●Immediate access to warranty service history andNissan technical information●Latest diagnostic,special tools and service techniques ●Genuine Nissan Parts that meet Nissan’s demandingstandards●12month/12,000mile parts and labor limited warrantywhen Genuine Nissan Parts are installed by your dealer ●Lifetime limited warranty on select replacement parts ●Complimentary Multi-Point Inspections(at participat-ing dealers)●Clear,up-front estimates●Time guaranteed Express Services(at participatingdealers)●Shuttle service/Courtesy van(at participating dealers)Your Nissan LEAF certified dealer is a full-service mainte-nance and repair center.We recommend using authorized Nissan Service and genuine Nissan Parts that we have designed for their reliability,safety and suitability for your Nissan electric vehicle.We are committed to providing you with quick,efficient,and competitively priced service and parts.**May differ or not apply outside the United States,please inquire of your Nissan LEAF certified dealer.GENUINE SERVICE4EXTENDED PROTECTION PLANSIf someone told you,you could drive your new Nissan for the next8years or100,000miles,almost worry-free of unexpected repair costs,would you be interested? Nissan’s Security+Plus family of extended service con-tracts delivers the peace of mind that does just that. Security+Plus Extended Protection Plans can cover everything from over600up to900vehicle components to roadside assistance to rental vehicle costs,and pro-vide:Nationwide Coverage;utilizing:Genuine Nissan Parts(new or in some cases remanufactured);installed by:Factory-Trained Technicians(trained by us to work on your vehicle).And you’ll be protected against future inflation(rising cost of parts and labor).Security+Plus Extended Protection Plans can be pur-chased any time within your vehicle’s original 3-year/36,000-mile basic limited warranty period.Just contact your selling Nissan LEAF certified dealer and tell them you’d like to take advantage of one of the best mechanical breakdown plans available for your Nissantoday.5PREPAID MAINTENANCE PLANSDo you currently have someone that maintains your yard?Cleans your house?Maintains your vehicle?WithSecurity+Plus Prepaid Maintenance Plans you’ll be hir-ing Nissan to maintain your vehicle to factory specifica-tions by factory-trained technicians.Like our ExtendedProtection Plans,you’ll benefit from Nationwide Cover-age,Genuine Nissan Parts,Factory-Trained Tech-nicians,and you’ll be protected against future inflation(rising costs of parts and labor).What could be easier?Security+Plus Prepaid Maintenance offers two servicelevels,one service interval and five time and mileageperiods.So it’s easy to find a plan that’s right for you.Didn’t purchase Prepaid Maintenance Plan at the timeof vehicle delivery?Don’t sweat the small stuff,‘New’Security+Plus prepaid maintenance contracts can bepurchased any time within the first6months/7,500milesof original vehicle sale date.Just contact your sellingNissan LEAF certified dealer and tell them you’d like totake advantage of one of the best maintenance plansavailable for your Nissan today.*These products not available outside the United States.See your participating Nissan LEAF certified dealer for details.6If you have an accident,insist on Genuine Nissan Collision Parts.If you want your electric vehicle to be restored using parts made to Nissan’s original exacting specifications–if you want it to last,help to protect your personal safety and to help hold its resale value,the solution is simple.Tell your insurance agent and your repair shop to use only Genuine Nissan Collision Parts.Many non-genuine parts are copies made from impres-sions of Nissan parts and may not match the specifica-tions and performance standards of Genuine Nissan Parts.As a result,non-genuine parts may not look or fit right,and may be less safe.The hood on your electric vehicle is a good example. Nissan designed it with hood buckling creases to help prevent the hood from penetrating the interior of your electric vehicle in an accident.Non-genuine parts may not provide such built-in safeguards.In some states,the law says you must be advised if non-genuine parts are used to repair your electric vehicle. Why should you take a chance?Replacement Panel Limited Lifetime Corrosion Warranty*If you have your collision damage repaired using Genuine Nissan Outer Sheet Metal Panels you don’t have to worry about corrosion.That’s because these panels are war-ranted against inside out rust-through perforation for as long as you own your Nissan.Another reason to insist on Genuine Nissan Collision Repair Parts.Vehicle Lease agreements,such as those offered by Nissan Motor Ac-ceptance Corporation,may require that ONLY Genuine Nissan replace-ment parts be utilized for collision repairs to the vehicle.*This warranty does not apply to vehicles or parts not distributed by Nissan North America and/or sold outside the United States.7As a condition of your electric vehicle’s warranty,you are responsible for properly maintaining your electric vehicle.In maintaining your electric vehicle,you should follow either Schedule1or Schedule2as listed e these guidelines to determine which maintenance schedule to use.SCHEDULE1(more severe operating conditions)Use Schedule1if you primarily operate your electric vehicle under any of these conditions:●Repeated short trips of less than5miles in normal temperatures or less than10miles in freezing temperatures●Stop-and-go traffic in hot weather or low speed driving for long dis-tances●Driving in dusty conditions or on rough,muddy,or salt-spread roads ●Using a car-top carrier SCHEDULE2(less severe operating conditions)Schedule2features7,500-mile service intervals;with Schedule2 fewer maintenance items are regularly checked or replaced than with Schedule1.Generally,Schedule2applies only to highway driving in temperate e Schedule2only if you primarily operate your electric vehicle under conditions other than those listed in Schedule1.8The following descriptions are pro-vided to give you a better understand-ing of the scheduled maintenance items that should be regularly checked or replaced.The mainte-nance log indicates at which mileage/time intervals each item re-quires service.In addition to scheduled mainte-nance,your Nissan requires that some items be checked during nor-mal day-to-day operation.You can find these items listed under“General Maintenance”in Chapter8of your Owner’s Manual.Items marked with“*”are recom-mended by Nissan for reliable electric vehicle operation.You are not re-quired to perform maintenance on these items in order to maintain the warranties which come with your Nissan.Other maintenance items and intervals are required.When applicable,additional informa-tion can be found in the“Maintenance and do-it-yourself”section in Chapter8of your Owner’s Manual.NOTE:Nissan North America doesnot advocate the use of non-OEMapproved aftermarket flushing sys-tems and strongly advises againstperforming these services on aNissan product.Many of the aftermar-ket flushing systems use non-OEMapproved chemicals or solvents,theuse of which has not been validatedby Nissan North America.For recommended lubricants,fluids,grease,and refrigerant,refer toChapter9in your Owner’s Manual.EV SystemCharging Port*Check the charging port for any signsof contamination,dust,sand,etc.Charging Port Sealing Cap*Use only compressed air with propereye protection to clean any contami-nation from the sealing cap.EV Battery Usage ReportTo maximize the life of your Li-ion bat-tery,have the EV Battery Usage Re-port generated and reviewed withyou.Review of the EV Battery UsageReport is required as a condition ofEV battery warranty.Refer to your2013LEAF warranty informationbooklet for details.Both the12monthand24month inspections will be per-formed by your Nissan LEAF certifieddealer at no cost to the vehicle owner.CoolantReplace coolant at the interval speci-fied below.When adding or replacingcoolant,be sure to use only GenuineNissan Long Life Antifreeze/Coolant(Blue)or equivalent with the propermixture.(Refer to the Owner’s Manualto determine the proper mixture foryour area.)The recommended ser-vice interval of the factory-fill coolantis125,000miles(200,000km)or15years,whichever comes first.Sub-sequent replacement of Genuine9Nissan Long Life Antifreeze/Coolant (Blue)should occur every 75,000miles(120,000km)or 5years whichever comes first. NOTE:Mixing any other type of cool-ant or the use of non-distilled water will reduce the recommended service interval of the coolant.Chassis and Body Maintenance:Brake Lines and Cables Visually inspect for proper installa-tion.Check for chafing,cracks,dete-rioration,and signs of leaking.Re-place any deteriorated or damaged parts immediately.Brake Pads&RotorsCheck for wear,deterioration and fluid leaks.Replace any deteriorated or damaged parts immediately.In-Cabin MicrofilterReplace at specified intervals.Whendriving for prolonged periods in dustyconditions,replace the filter more fre-quently.Steering Gear and Linkage,Axleand Suspension Parts,DriveShaft BootsCheck for damage,looseness,andleakage of oil or grease.Under severedriving conditions,inspect more fre-quently.Tire RotationTires should be rotated every7,500miles according to the instruc-tions in the Owner’s Manual.Whenrotating tires,check for damage anduneven wear.Replace if necessary.Reduction Gear OilVisually inspect for signs of leakage atspecified intervals.Off-Road MaintenanceCheck the following items frequentlywhenever you drive off-road throughdeep sand,mud or water:●Brake pads and rotors●Brake lines and hoses●Reduction gear oil●Steering linkage10The following Maintenance Schedule has been compiled by Nissan toassist you in performing the recommended maintenance services andkeeping appropriate records of services performed.Along with therelated repair invoices,receipts,and other such records,a properlydocumented maintenance history could enhance the value of yourelectric vehicle should you ever wish to sell it.The services listedrepresent the minimal Nissan recommended requirements for eachtime/mileage interval,up to120,000miles/96months.Beginning onpage37you will find a log that should be used to track when andwhere services were performed.Ask your Service Advisor to updateyour log each time your electric vehicle is serviced.11❑For the ultimate in preventative maintenance,ask your Service Advisor for a complimentary Multi-Point Inspection every time you visit your partici-pating Nissan LEAF certified dealer.See page 12for more information on Multi-Point Inspections.13MAINTENANCE SCHEDULEIn-Cabin MicrofilterThe In-Cabin Microfilter filters the air you breathe in your electric vehicle.This system filters both outside and re-circulated air used by the air conditioning system in your electric vehicle.Replacing the Microfilter every year or 15,000miles is the best way to help prevent road dust,pollen and other air pollutants from entering the interior of your electric vehicle and the air you breathe.If your electric vehicle is not equipped with an In-Cabin Micro-filter system –see your Nissan LEAF certified dealer about getting one installed –you’ll breatheeasier.15MAINTENANCE SCHEDULE❑For the ultimate in preventative maintenance,ask your Service Advisor for a complimentary Multi-Point Inspection every time you visit your partici-pating Nissan LEAF certified dealer.See page 12for more information on Multi-Point Inspections.17MAINTENANCE SCHEDULE<This check must be performed based solely on the number of service months,not mileage>❑For the ultimate in preventative maintenance,ask your Service Advisor for a complimentary Multi-Point Inspection every time you visit your partici-pating Nissan LEAF certified dealer.See page 12for more information on Multi-Point Inspections.1Review of the EV Battery Usage Report is required as a condition of EV battery warranty.Refer to your 2013LEAF warranty information booklet for details.Both the 12month and 24month inspections will be performed by your Nissan LEAF certified dealer at no cost to the vehicle owner.19MAINTENANCE SCHEDULE❑For the ultimate in preventative maintenance,ask your Service Advisor for a complimentary Multi-Point Inspection every time you visit your partici-pating Nissan LEAF certified dealer.See page 12for more information on Multi-Point Inspections.21MAINTENANCE SCHEDULE❑For the ultimate in preventative maintenance,ask your Service Advisor for a complimentary Multi-Point Inspection every time you visit your partici-pating Nissan LEAF certified dealer.See page 12for more information on Multi-Point Inspections.23MAINTENANCE SCHEDULEnot mileage>Inspection every time you visit your par-LEAF warranty information booklet for details.❑For the ultimate in preventative maintenance,ask your Service Advisor for a complimentary Multi-Point Inspection every time you visit your partici-pating Nissan LEAF certified dealer.See page 12for more information on Multi-Point Inspections.25MAINTENANCE SCHEDULE❑For the ultimate in preventative maintenance,ask your Service Advisor for a complimentary Multi-Point Inspection every time you visit your partici-pating Nissan LEAF certified dealer.See page 12for more information on Multi-Point Inspections.27MAINTENANCE SCHEDULEnot mileage>Inspection every time you visit your par-LEAF warranty information booklet for details.❑For the ultimate in preventative maintenance,ask your Service Advisor for a complimentary Multi-Point Inspection every time you visit your partici-pating Nissan LEAF certified dealer.See page 12for more information on Multi-Point Inspections.29MAINTENANCE SCHEDULE❑For the ultimate in preventative maintenance,ask your Service Advisor for a complimentary Multi-Point Inspection every time you visit your partici-pating Nissan LEAF certified dealer.See page 12for more information on Multi-Point Inspections.31MAINTENANCE SCHEDULEnot mileage>Inspection every time you visit your par-LEAF warranty information booklet for details.When replacing the Li-ion battery assembly or module,be sure to record the ID in the space provided.Please confirm the service manual for modulelocation.333435367,500Miles or6Months Dealer Name:Date:Mileage:DealerStamp:15,000Miles or12MonthsDealer Name:Date:Mileage:DealerStamp:22,500Miles or18MonthsDealer Name:Date:Mileage:DealerStamp:30,000Miles or24Months Dealer Name:Date:Mileage:DealerStamp:37,500Miles or30MonthsDealer Name:Date:Mileage:DealerStamp:45,000Miles or36MonthsDealer Name:Date:Mileage:DealerStamp:52,500Miles or42Months Dealer Name:Date:Mileage:DealerStamp:60,000Miles or48MonthsDealer Name:Date:Mileage:DealerStamp:67,500Miles or54MonthsDealer Name:Date:Mileage:DealerStamp:37。

2013北斗星维修手册一、简介本维修手册专为2013款北斗星汽车提供全面的维修和保养指南。
本手册详细介绍了车辆各部件的功能、工作原理、以及维护和修理的方法,旨在帮助车主和维修人员更好地理解并操作这款车辆。
二、车辆各部件介绍1. 发动机:负责提供车辆运行所需的动力,包括缸体、曲轴、活塞等关键部件。
2. 底盘:支撑和承载车辆整体结构,包括传动系统、悬挂系统、刹车系统等。
3. 电气系统:管理车辆的电源和电路,包括电池、发电机、起动机、各种传感器和开关等。
4. 油液:为车辆提供润滑和冷却,包括机油、变速箱油、刹车油等。
5. 空调及制冷系统:控制车内温度和空气质量,包括压缩机、冷凝器、蒸发器等部件。
三、发动机维修保养1. 定期更换机油和机油滤清器,按照厂家推荐的规格和周期进行。
2. 检查冷却液的水平和浓度,确保发动机的正常散热。
3. 定期检查火花塞和点火线圈的工作状态。
4. 根据需要进行发动机内部的清洗。
四、底盘维修保养1. 定期检查轮胎气压和磨损情况,确保行驶安全。
2. 定期更换刹车片和刹车油,确保刹车性能良好。
3. 检查悬挂系统和传动系统的工作状态,确保车辆行驶平稳。
4. 定期进行底盘的清洁和防锈处理。
五、电气系统维修保养1. 定期检查电池电解液的水平和浓度,必要时进行充电或更换。
2. 检查灯光、转向灯、雨刮器等电器设备是否正常工作。
3. 检查传感器和执行器的功能是否正常。
4. 定期进行电气系统的线路检查,预防短路或断路问题的发生。
六、油液更换及检查1. 定期更换机油,按照保养周期进行。
2. 定期检查变速箱油、刹车油等油液的水平,确保油液充足且无杂质。
3. 油液更换时应选择厂家推荐的规格和品牌。
4. 检查油液的质量,如发现油液变质或污染严重,应立即更换。
七、空调及制冷系统维修保养1. 定期清洁空调滤芯,保持空气流通。
2. 检查制冷剂的压力和水平,必要时进行补充或更换。
3. 检查冷凝器和蒸发器的工作状况,确保制冷效果良好。
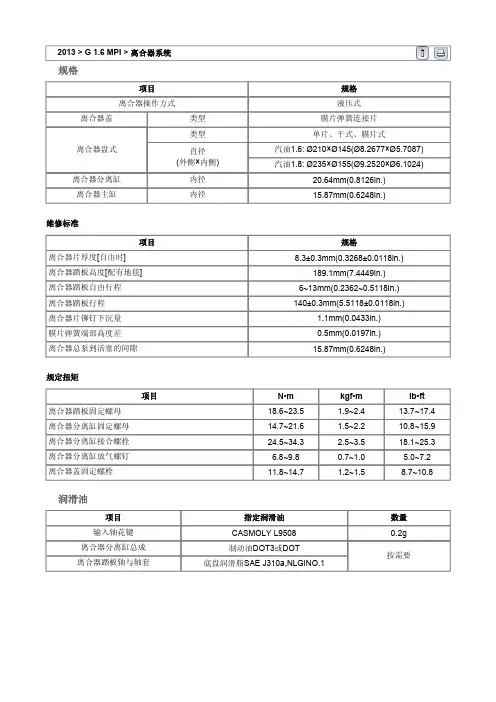
规格项目规格离合器操作方式液压式离合器盖类型膜片弹簧连接片离合器盘式类型单片、干式、膜片式直径(外侧×内侧)汽油1.6: Ø210×Ø145(Ø8.2677×Ø5.7087)汽油1.8: Ø235×Ø155(Ø9.2520×Ø6.1024)离合器分离缸内径20.64mm(0.8126in.)离合器主缸内径15.87mm(0.6248in.)维修标准项目规格离合器片厚度[自由时] 8.3±0.3mm(0.3268±0.0118in.)离合器踏板高度[配有地毯] 189.1mm(7.4449in.)离合器踏板自由行程6~13mm(0.2362~0.5118in.)离合器踏板行程140±0.3mm(5.5118±0.0118in.)离合器片铆钉下沉量 1.1mm(0.0433in.)膜片弹簧端部高度差0.5mm(0.0197in.)离合器总泵到活塞的间隙15.87mm(0.6248in.)规定扭矩项目N•m kgf•m lb•ft 离合器踏板固定螺母18.6~23.5 1.9~2.4 13.7~17.4 离合器分离缸固定螺母14.7~21.6 1.5~2.2 10.8~15.9 离合器分离缸接合螺栓24.5~34.3 2.5~3.5 18.1~25.3离合器分离缸放气螺钉 6.8~9.8 0.7~1.0 5.0~7.2离合器盖固定螺栓11.8~14.7 1.2~1.5 8.7~10.8 润滑油项目指定润滑油数量输入轴花键CASMOLY L9508 0.2g 离合器分离缸总成制动油DOT3或DOT按需要离合器踏板轴与轴套底盘润滑脂SAE J310a,NLGINO.1专用维修工具工具(编号和名称) 图示用途安装离合器片09411-1P000离合器片导轨部件1.离合器分离拨叉2.离合器盖总成3.离合器片总成4.离合器分离轴承拆卸1.拆卸变速器总成。
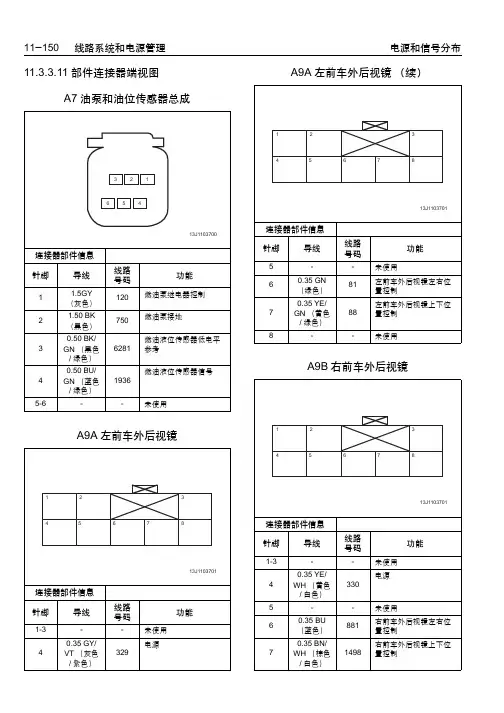
11.3.3.11 部件连接器端视图A7油泵和油位传感器总成A9A 左前车外后视镜A9B 右前车外后视镜A9A 左前车外后视镜(续)A10 内部后视镜A9B 右前车外后视镜(续)A11收音机模块1A11收音机模块2连接器部件信息针脚导线线路号码功能1BARE(裸线)6015天线信号-20.5 WH(白色)6001天线信号+A11收音机模块1(续)A23D左前门锁闩A23LR左后门锁闩A23RF 右前门锁闩A23RR 右后门锁闩B1空调制冷剂压力传感器B5LF 左前轮速传感器B5LR 左后轮速传感器B5RF 右前轮速传感器B5RR 右后轮速传感器B16倒车灯开关B19C 电子真空助力泵开关B20制动液位传感器B22制动踏板位置传感器B23E 凸轮轴排气位置传感器B23F 凸轮轴进气位置传感器B23E 凸轮轴排气位置传感器(续)B24 Onstar 麦克风B25离合器踏板位置开关B26曲轴位置传感器B28D 驾驶员侧门柱开关X1B28D 驾驶员侧门柱开关X2B28LR 左后门柱开关B28P 乘客侧门柱开关B28RR 右后门柱开关B34发动机冷却液温度传感器B37发动机机油压力开关B39空调蒸发器温度传感器B52A 加热型氧传感器1B52B 加热型氧传感器2B56点火钥匙输入开关B66进气温度传感器B68爆震传感器B74进气歧管绝对压力传感器B78E 左后中间倒车雷达传感器B78G 左后角倒车雷达传感器B78F 右后中间倒车雷达传感器B78H 右后角倒车雷达传感器B80驻车制动开关B85后备箱钥匙输入开关B88D驾驶员侧安全带开关B107加速踏板位置传感器B115车速传感器B182换挡位置传感器E4Y 左侧转向灯信号复示灯E4Z 右侧转向信号复示灯E5AA左侧尾灯E5AB右侧尾灯E5B 右尾灯倒车灯E6中央高位制动灯E7牌照灯E7牌照灯E8S 后备箱灯E13L 左侧前照灯E13L 左侧前照灯(续)E13R 右侧前照灯E18后窗除雾栅格E29LF 左前雾灯E29RF 右前雾灯E29RR 右后雾灯E32点烟器E37A 阅读灯F105乘客侧安全气囊F107方向盘安全气囊G10主冷却风扇G10副冷却风扇G13 发电机 X1G13 发电机 X2连接器部件信息针脚导线线路号码功能A25 RD/YE(红色/黄色)2蓄电池正极G24洗涤泵K9 车身控制模块X1K9 车身控制模块X1(续)K9 车身控制模块X2K9 车身控制模块X3K9车身控制模块X4K9车身控制模块X5K9车身控制模块X4(续)K9车身控制模块X5(续)K9车身控制模块X6K15中央门锁控制模块K17电子制动控制模块K15中央门锁控制模块(续)K17电子制动控制模块(续)K20发动机控制模块K17电子制动控制模块(续)K20发动机控制模块(续)K20发动机控制模块(续)K20发动机控制模块(续)K20发动机控制模块(续)K20发动机控制模块(续)K33暖风、通风与空调系统控制模块X2K33暖风、通风与空调系统控制模块X1K36传感诊断模块K36传感诊断模块(续)K41驻车辅助控制模块K36传感诊断模块(续)K41驻车辅助控制模块(续)K46 天线模块1K46 天线模块2连接器部件信息针脚导线线路号码功能1BARE(裸线)6015天线信号-20.5 WH(白色)6001天线信号+K73 OnStar模块K71变速器控制模块K73 OnStar模块(续)K84无钥匙进入模块K71变速器控制模块(续)K89防盗控制模块K84无钥匙进入模块(续)K180动力转向开关KR14电子真空泵电机继电器KR47后雾灯继电器KR56转向信号危险警告闪烁继电器M8鼓风机M37空调模式执行电机M8鼓风机(续)M40后备箱锁闩M64起动电机X1连接器部件信息针脚导线线路号码功能12.0 YE(黄色)6起动继电器控制M64起动电机X2连接器部件信息针脚导线线路号码功能125 RD/ YE(红色/黄色)2蓄电池电源M69天窗电机M74D 驾驶员侧车窗电机M74P 乘客侧车窗电机M74LR 左后车窗电机M74RR 右后车窗电机M75 雨刮电机P12 喇叭P16 组合仪表AP16 组合仪表A(续)P16 组合仪表BP19AG 左前门扬声器P19AH 右前门扬声器P19AL 左后门扬声器P19AM 右后门扬声器P19H 左前门高音扬声器P19V 右前门高音扬声器Q2 空调压缩机离合器Q6A 排气凸轮轴位置执行器电磁阀Q6B 进气凸轮轴位置执行器电磁阀Q12 蒸发排放吹洗电磁阀Q17 A 喷油器1Q17 B 喷油器2Q17 C 喷油器3Q17D 喷油器4Q22可变进气歧管电磁阀Q32自动换档执行器Q38节气门体R3 暖风空调鼓风机电阻器R14 后窗除雾格栅X1连接器部件信息针脚导线线路号码功能12.5 BN/VT(棕色/紫色)938后窗除雾栅格电源R14后窗除雾滤波器X2连接器部件信息针脚导线线路号码功能12.5 BN/VT(棕色/紫色)938后窗除雾栅格电源22.0 BN/WH(棕色/白色)683除雾滤波器电源S12顶灯开关S13驾驶员侧门锁开关(高配)S13驾驶员侧门锁开关(低配)S13驾驶员侧门锁开关(高配)(续)S15 驾驶员侧门上后备箱开启开关S26危险警告灯开关S26危险警告灯开关(续)S33喇叭开关S39点火开关S42前照灯水平调节开关S39点火开关(续)S52车外后视境调节开关S42前照灯水平调节开关(续)S72 天窗开关S52车外后视境调节开关(续)S78 多功能控制开关X1S72 天窗开关(续)S78 多功能控制开关X2S78 多功能控制开关X1(续)。
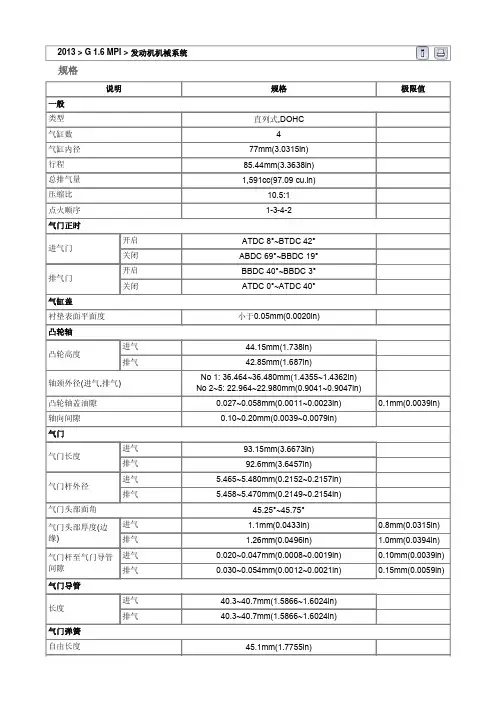
2013 > G 1.6 MPI > 发动机机械系统规格说明规格极限值一般类型直列式,DOHC气缸数 4 气缸内径77mm(3.0315in)行程85.44mm(3.3638in)总排气量1,591cc(97.09 cu.in)压缩比10.5:1 点火顺序1-3-4-2气门正时进气门开启ATDC 8°~BTDC 42° 关闭ABDC 69°~BBDC 19°排气门开启BBDC 40°~BBDC 3° 关闭ATDC 0°~ATDC 40°气缸盖衬垫表面平面度小于0.05mm(0.0020in) 凸轮轴凸轮高度进气44.15mm(1.738in) 排气42.85mm(1.687in)轴颈外径(进气,排气)No 1: 36.464~36.480mm(1.4355~1.4362in) No 2~5: 22.964~22.980mm(0.9041~0.9047in)凸轮轴盖油隙0.027~0.058mm(0.0011~0.0023in) 0.1mm(0.0039in) 轴向间隙0.10~0.20mm(0.0039~0.0079in)气门气门长度进气93.15mm(3.6673in) 排气92.6mm(3.6457in)气门杆外径进气 5.465~5.480mm(0.2152~0.2157in) 排气 5.458~5.470mm(0.2149~0.2154in)气门头部面角45.25°~45.75°气门头部厚度(边缘) 进气 1.1mm(0.0433in) 0.8mm(0.0315in) 排气 1.26mm(0.0496in) 1.0mm(0.0394in)气门杆至气门导管 间隙进气0.020~0.047mm(0.0008~0.0019in) 0.10mm(0.0039in)排气0.030~0.054mm(0.0012~0.0021in) 0.15mm(0.0059in)气门导管长度进气40.3~40.7mm(1.5866~1.6024in) 排气40.3~40.7mm(1.5866~1.6024in)气门弹簧自由长度45.1mm(1.7755in)直角度小于1.5°气缸体气缸内径77.00~77.03mm(3.0315~3.0327in)衬垫表面平面度小于0.05mm(0.0020in)/小于0.02mm(0.0008in)100mm×100mm活塞活塞外径76.97~77.00mm(3.0303~3.0315in) 活塞至气缸间隙0.020~0.040mm(0.0008~0.0016in)环槽宽度1号环槽 1.23~1.25mm(0.0484~0.0492in) 1.26mm(0.0496in) 2号环槽 1.23~1.25mm(0.0484~0.0492in) 1.26mm(0.0496in)油环槽 2.01~2.025mm(0.0791~0.0797in) 2.05mm(0.0807in)活塞环侧面间隙1号环0.04~0.08mm(0.0015~0.0031in) 0.1mm(0.0039in) 2号环0.04~0.08mm(0.0015~0.0031in) 0.1mm(0.0039in) 油环0.06~0.135mm(0.0024~0.0053in) 0.2mm(0.0079in)端隙1号环0.14~0.28mm(0.0055~0.0110in) 0.30mm(0.0118in) 2号环0.30~0.45mm(0.0118~0.0177in) 0.50mm(0.0197in)油环0.20~0.70mm(0.0079~0.0276in) 0.80mm(0.0315in)活塞销活塞销外径18.001~18.006mm(0.7087~0.7089in)活塞销孔内径18.016~18.021mm(0.7093~0.7095in)活塞销孔间隙0.010~0.020mm(0.0004~0.0008in)连杆小头孔内径17.974~17.985mm(0.7076~0.7081in)活塞销压入负荷500~1,500kg(1,102~3,306lb) 连杆连杆大头内径45.000~45.018mm(1.7717~1.7724in)连杆轴承油层间隙0.018~0.036mm(0.0013~0.0020in) 0.060mm (0.0024in)侧面间隙0.10~0.25mm(0.0039~0.0098in) 0.35m(0.0138in) 曲轴主轴承油层间隙No.1,2,3,4,5 0.006~0.024mm(0.0002~0.0009in)0.05mm(0.0020in)轴向间隙0.05~0.25mm(0.0020~0.0098in) 0.3mm(0.0118in) 发动机机油油量总计 4.0L(4.22US qt, 3.51lmp qt, 1.05 US gal)更换短发动机或缸体总成时油底壳 3.3L(3.48US qt, 2.90lmp qt, 0.87 US gal)排放和填充 3.6L(3.80US qt, 3.16lmp qt, 0.95 US gal) 包括机油滤清器推荐5W-20/API SM&ILSAC GF4 或ACEA A5如果没有,参考推荐的API、ILSAC或ACEA等级和SAE粘度编号机油等级等级API SM或以上ILSAC GF4以上ACEA A5或以上(仅准许现代发动机机油)"如果没有,可以使用API SL、ILSACGF3、ACEA A3 SAE粘度等级推荐SAE粘度编号参考"润滑系统"油压(1000rpm时) 100kpa(1.0kg/cm²,14.5psi)以上油底壳的油温: 110±2°C(230±36°F)冷却系统冷却方式用冷却风扇强制循环冷却水量 5.3L(5.6US qt.,4.7lmp qt.,1.4US gal)节温器类型石蜡式开启温度82±1.5°C(179.6±2.7°F)全开启时温度95°C(203°F)散热器盖主阀打开压力93.16~122.58kpa(0.95~1.25kgf/cm²,13.51~17.78psi) 真空阀开启压力最大6.86kPa(0.07kgf/cm²,1.00psi)水温传感器类型热敏电阻式电阻20°C(68°F) 2.45±0.14kΩ80°C(176°F) 0.3222kΩ规定扭矩项目数量N•m kgf•m lb•ft 气缸体发动机支撑架螺栓(发动机侧) 4 29.4~41.2 3.0~4.2 21.7~30.4梯形架螺栓13 18.6~23.5 1.9~2.4 13.7~17.4连杆盖螺栓8 [17.7~21.6]+[88~92°][1.8~2.2]+[88~92°][13.0~15.9]+[88~92°]曲轴主轴承盖螺栓10 [17.7~21.6]+[88~92°][1.8~2.2]+[88~92°] [13.0~15.9]+[88~92°]飞轮螺栓(M/T) 6 71.6~75.5 7.3~7.7 52.8~55.7驱动盘螺栓(A/T) 6 71.6~75.5 7.3~7.7 52.8~55.7正时链条系统正时链条和油泵总成盖螺栓(M6×20)10 9.8~11.8 1.0~1.2 7.2~8.7正时链条和油泵总成盖螺栓(M6×38)1 9.8~11.8 1.0~1.2 7.2~8.7正时链条和油泵总成盖螺栓(M8×22)3 18.6~23.5 1.9~2.4 13.7~17.4惰轮总成螺栓 1 42.2~53.9 4.3~5.5 31.1~39.8正时链条张紧器臂螺栓 1 9.8~11.8 1.0~1.2 7.2~8.7正时链条导轨螺栓 2 9.8~11.8 1.0~1.2 7.2~8.711T 1 127.5~137.3 13.0~14.0 94.0~101.3曲轴皮带轮螺栓 12T 1 [47.1~51.0]+[38~42°][4.8~5.2]+ [38°~42°][34.7~37.6]+ [38°~42°]正时链条张紧器螺栓 2 9.8~11.81.0~1.27.2~8.7气缸盖 发动机盖螺栓 4 7.8~11.8 0.8~1.2 5.8~8.7气缸盖螺栓16 [3.9~5.9]+[7.8~9.8] [0.4~0.6]+ [0.8~1.0] [2.9~4.3]+[5.8~7.2] 凸轮轴轴承盖螺栓(M6) 16 11.8~13.7 1.2~1.4 8.7~10.1 凸轮轴轴承盖螺栓(M8) 4 18.6~22.61.9~2.313.7~16.6气缸盖螺栓 10 [29.4]+[90°]+[90°] [3.0]+[90°]+[90°] [21.7]+[90°]+[90°]冷却系统 水泵皮带轮螺栓 4 9.8~11.8 1.0~1.2 7.2~8.7 水泵螺栓5 9.8~11.8 1.0~1.2 7.2~8.7 水温控制总成固定螺栓 3 9.8~11.8 1.0~1.2 7.2~8.7 进水管螺母2 18.6~23.5 1.9~2.4 13.7~17.4 加热器管固定螺栓/螺母(M6) B-1/N-2 9.8~11.8 1.0~1.2 7.2~8.7 加热器管固定螺栓(M8)1 18.6~23.5 1.9~2.4 13.7~17.4 发动机冷却水温传感器(ECTS) 1 29.4~39.23.0~4.021.7~28.9润滑系统 机油滤清器 1 11.8~15.7 1.2~1.6 8.7~11.6 油底壳螺栓 11 9.8~11.8 1.0~1.2 7.2~8.7 油底壳排放塞 1 34.3~44.1 3.5~4.5 25.3~32.5 机油滤网螺栓 2 19.6~26.5 2.0~2.7 14.5~19.5 机油压力开关1 7.8~11.8 0.8~1.2 5.8~8.7 机油标尺总成固定螺栓 1 9.8~11.81.0~1.27.2~8.7进气和排气系统进气歧管和气缸盖固定螺母 5 18.6~23.5 1.9~2.4 13.7~17.4 排气歧管和气缸盖固定螺母 9 29.4~41.2 3.0~4.2 21.7~30.4 氧传感器固定 2 39.2~49.0 4.0~5.0 28.9~36.2 排气歧管隔热板 3 16.7~21.6 1.7~2.2 12.3~15.9 排气歧管拉杆螺栓 3 39.2~49.0 4.0~5.0 28.9~36.2 空气滤清器总成固定螺栓 3 3.9~5.9 0.4~0.6 2.9~4.3 排气歧管和前消音器固定螺母 2 39.2~58.8 4.0~6.0 28.9~43.4 前消音器和催化转化器固定螺母 2 39.2~58.8 4.0~6.0 28.9~43.4 中央消音器和后消音器固定夹螺母 1 16.7~26.51.7~2.712.3~19.52013 > G 1.6 MPI > 发动机机械系统规格说明规格极限值一般类型直列式,DOHC气缸数 4 气缸内径77mm(3.0315in)行程85.44mm(3.3638in)总排气量1,591cc(97.09 cu.in)压缩比10.5:1 点火顺序1-3-4-2气门正时进气门开启ATDC 8°~BTDC 42° 关闭ABDC 69°~BBDC 19°排气门开启BBDC 40°~BBDC 3° 关闭ATDC 0°~ATDC 40°气缸盖衬垫表面平面度小于0.05mm(0.0020in) 凸轮轴凸轮高度进气44.15mm(1.738in) 排气42.85mm(1.687in)轴颈外径(进气,排气)No 1: 36.464~36.480mm(1.4355~1.4362in) No 2~5: 22.964~22.980mm(0.9041~0.9047in)凸轮轴盖油隙0.027~0.058mm(0.0011~0.0023in) 0.1mm(0.0039in) 轴向间隙0.10~0.20mm(0.0039~0.0079in)气门气门长度进气93.15mm(3.6673in) 排气92.6mm(3.6457in)气门杆外径进气 5.465~5.480mm(0.2152~0.2157in) 排气 5.458~5.470mm(0.2149~0.2154in)气门头部面角45.25°~45.75°气门头部厚度(边缘) 进气 1.1mm(0.0433in) 0.8mm(0.0315in) 排气 1.26mm(0.0496in) 1.0mm(0.0394in)气门杆至气门导管 间隙进气0.020~0.047mm(0.0008~0.0019in) 0.10mm(0.0039in)排气0.030~0.054mm(0.0012~0.0021in) 0.15mm(0.0059in)气门导管长度进气40.3~40.7mm(1.5866~1.6024in) 排气40.3~40.7mm(1.5866~1.6024in)气门弹簧自由长度45.1mm(1.7755in)直角度小于1.5°气缸体气缸内径77.00~77.03mm(3.0315~3.0327in)衬垫表面平面度小于0.05mm(0.0020in)/小于0.02mm(0.0008in)100mm×100mm活塞活塞外径76.97~77.00mm(3.0303~3.0315in) 活塞至气缸间隙0.020~0.040mm(0.0008~0.0016in)环槽宽度1号环槽 1.23~1.25mm(0.0484~0.0492in) 1.26mm(0.0496in) 2号环槽 1.23~1.25mm(0.0484~0.0492in) 1.26mm(0.0496in)油环槽 2.01~2.025mm(0.0791~0.0797in) 2.05mm(0.0807in)活塞环侧面间隙1号环0.04~0.08mm(0.0015~0.0031in) 0.1mm(0.0039in) 2号环0.04~0.08mm(0.0015~0.0031in) 0.1mm(0.0039in) 油环0.06~0.135mm(0.0024~0.0053in) 0.2mm(0.0079in)端隙1号环0.14~0.28mm(0.0055~0.0110in) 0.30mm(0.0118in) 2号环0.30~0.45mm(0.0118~0.0177in) 0.50mm(0.0197in)油环0.20~0.70mm(0.0079~0.0276in) 0.80mm(0.0315in)活塞销活塞销外径18.001~18.006mm(0.7087~0.7089in)活塞销孔内径18.016~18.021mm(0.7093~0.7095in)活塞销孔间隙0.010~0.020mm(0.0004~0.0008in)连杆小头孔内径17.974~17.985mm(0.7076~0.7081in)活塞销压入负荷500~1,500kg(1,102~3,306lb) 连杆连杆大头内径45.000~45.018mm(1.7717~1.7724in)连杆轴承油层间隙0.018~0.036mm(0.0013~0.0020in) 0.060mm (0.0024in)侧面间隙0.10~0.25mm(0.0039~0.0098in) 0.35m(0.0138in) 曲轴主轴承油层间隙No.1,2,3,4,5 0.006~0.024mm(0.0002~0.0009in)0.05mm(0.0020in)轴向间隙0.05~0.25mm(0.0020~0.0098in) 0.3mm(0.0118in) 发动机机油油量总计 4.0L(4.22US qt, 3.51lmp qt, 1.05 US gal)更换短发动机或缸体总成时油底壳 3.3L(3.48US qt, 2.90lmp qt, 0.87 US gal)排放和填充 3.6L(3.80US qt, 3.16lmp qt, 0.95 US gal) 包括机油滤清器推荐5W-20/API SM&ILSAC GF4 或ACEA A5如果没有,参考推荐的API、ILSAC或ACEA等级和SAE粘度编号机油等级等级API SM或以上ILSAC GF4以上ACEA A5或以上(仅准许现代发动机机油)"如果没有,可以使用API SL、ILSACGF3、ACEA A3 SAE粘度等级推荐SAE粘度编号参考"润滑系统"油压(1000rpm时) 100kpa(1.0kg/cm²,14.5psi)以上油底壳的油温: 110±2°C(230±36°F)冷却系统冷却方式用冷却风扇强制循环冷却水量 5.3L(5.6US qt.,4.7lmp qt.,1.4US gal)节温器类型石蜡式开启温度82±1.5°C(179.6±2.7°F)全开启时温度95°C(203°F)散热器盖主阀打开压力93.16~122.58kpa(0.95~1.25kgf/cm²,13.51~17.78psi) 真空阀开启压力最大6.86kPa(0.07kgf/cm²,1.00psi)水温传感器类型热敏电阻式电阻20°C(68°F) 2.45±0.14kΩ80°C(176°F) 0.3222kΩ规定扭矩项目数量N•m kgf•m lb•ft 气缸体发动机支撑架螺栓(发动机侧) 4 29.4~41.2 3.0~4.2 21.7~30.4梯形架螺栓13 18.6~23.5 1.9~2.4 13.7~17.4连杆盖螺栓8 [17.7~21.6]+[88~92°][1.8~2.2]+[88~92°][13.0~15.9]+[88~92°]曲轴主轴承盖螺栓10 [17.7~21.6]+[88~92°][1.8~2.2]+[88~92°] [13.0~15.9]+[88~92°]飞轮螺栓(M/T) 6 71.6~75.5 7.3~7.7 52.8~55.7驱动盘螺栓(A/T) 6 71.6~75.5 7.3~7.7 52.8~55.7正时链条系统正时链条和油泵总成盖螺栓(M6×20)10 9.8~11.8 1.0~1.2 7.2~8.7正时链条和油泵总成盖螺栓(M6×38)1 9.8~11.8 1.0~1.2 7.2~8.7正时链条和油泵总成盖螺栓(M8×22)3 18.6~23.5 1.9~2.4 13.7~17.4惰轮总成螺栓 1 42.2~53.9 4.3~5.5 31.1~39.8正时链条张紧器臂螺栓 1 9.8~11.8 1.0~1.2 7.2~8.7正时链条导轨螺栓 2 9.8~11.8 1.0~1.2 7.2~8.711T 1 127.5~137.3 13.0~14.0 94.0~101.3曲轴皮带轮螺栓 12T 1 [47.1~51.0]+[38~42°][4.8~5.2]+ [38°~42°][34.7~37.6]+ [38°~42°]正时链条张紧器螺栓 2 9.8~11.81.0~1.27.2~8.7气缸盖 发动机盖螺栓 4 7.8~11.8 0.8~1.2 5.8~8.7气缸盖螺栓16 [3.9~5.9]+[7.8~9.8] [0.4~0.6]+ [0.8~1.0] [2.9~4.3]+[5.8~7.2] 凸轮轴轴承盖螺栓(M6) 16 11.8~13.7 1.2~1.4 8.7~10.1 凸轮轴轴承盖螺栓(M8) 4 18.6~22.61.9~2.313.7~16.6气缸盖螺栓 10 [29.4]+[90°]+[90°] [3.0]+[90°]+[90°] [21.7]+[90°]+[90°]冷却系统 水泵皮带轮螺栓 4 9.8~11.8 1.0~1.2 7.2~8.7 水泵螺栓5 9.8~11.8 1.0~1.2 7.2~8.7 水温控制总成固定螺栓 3 9.8~11.8 1.0~1.2 7.2~8.7 进水管螺母2 18.6~23.5 1.9~2.4 13.7~17.4 加热器管固定螺栓/螺母(M6) B-1/N-2 9.8~11.8 1.0~1.2 7.2~8.7 加热器管固定螺栓(M8)1 18.6~23.5 1.9~2.4 13.7~17.4 发动机冷却水温传感器(ECTS) 1 29.4~39.23.0~4.021.7~28.9润滑系统 机油滤清器 1 11.8~15.7 1.2~1.6 8.7~11.6 油底壳螺栓 11 9.8~11.8 1.0~1.2 7.2~8.7 油底壳排放塞 1 34.3~44.1 3.5~4.5 25.3~32.5 机油滤网螺栓 2 19.6~26.5 2.0~2.7 14.5~19.5 机油压力开关1 7.8~11.8 0.8~1.2 5.8~8.7 机油标尺总成固定螺栓 1 9.8~11.81.0~1.27.2~8.7进气和排气系统进气歧管和气缸盖固定螺母 5 18.6~23.5 1.9~2.4 13.7~17.4 排气歧管和气缸盖固定螺母 9 29.4~41.2 3.0~4.2 21.7~30.4 氧传感器固定 2 39.2~49.0 4.0~5.0 28.9~36.2 排气歧管隔热板 3 16.7~21.6 1.7~2.2 12.3~15.9 排气歧管拉杆螺栓 3 39.2~49.0 4.0~5.0 28.9~36.2 空气滤清器总成固定螺栓 3 3.9~5.9 0.4~0.6 2.9~4.3 排气歧管和前消音器固定螺母 2 39.2~58.8 4.0~6.0 28.9~43.4 前消音器和催化转化器固定螺母 2 39.2~58.8 4.0~6.0 28.9~43.4 中央消音器和后消音器固定夹螺母 1 16.7~26.51.7~2.712.3~19.52013 > G 1.6 MPI > 发动机机械系统压缩压力检查如果缺乏动力、耗油量过大或燃油经济性不良,测量压缩压力。
2013款雪佛兰科鲁兹维修手册序言第1章一般信息第2章车身金属构件和装饰件第3章车身修理第4章车身系统第5章制动器第6章诊断概述第7章传动系统/车桥第8章驾驶员信息和娱乐系统第9章发动机第10章 HVAC第11章电源和信号分布第12章车顶第13章安全和防护第14章座椅第15章转向系统第16章悬架系统第17章变速器本中文维修手册提供了有关2013款雪佛兰SGM7184ATB 型、SGM7166MTC型、SGM7166ATC型、SGM7166TMTC系列车型的诊断、维修程序、调整和规格等信息。
上汽通用汽车销售有限公司授权的维修站雇员了解本手册和以后出版的上汽通用汽车销售有限公司维修技术通讯,可为雪佛兰科鲁兹维修手册汽车用户提供更好的服务。
对于本手册所提及的品牌产品、零件号或专用工具,建议通过上海通用汽车获得这些产品、零件或工具。
序言——危险、警告和告诫简介(1)“危险”、“警告”、“告诫”和“注意”的定义通用汽车维修手册中的诊断和修理程序包含一般和特定的危险、警告、告诫、注意或重要注意事项。
通用汽车公司致力于提供维修信息来帮助技师诊断并修理维持车辆正常运行的所需的系统。
然而,如果不遵守推荐方案,某些程序可能会对技师造成伤害。
“危险”、“警告”、“告诫”和“注意”或“重要注意事项”是为防止出现上述危险而编制的,但并非所有危险均可以预见。
该信息位于维修手册中显眼的位置。
为防止出现以下情况而编制:●对技术人员造成严重人身伤害或死亡。
●损坏车辆。
●不必要的车辆维修。
●不必要的部件更换。
●车辆部件维修或更换不当。
●在此维修类别中出现的任何警告或告诫均引自各单独的维修类别。
“危险”的定义遇到一条“危险”时,要求您采取必要的操作或不要采取禁止的操作。
如果忽视“危险”,会导致以下后果:●对技术人员造成严重人身伤害或死亡。
●对工作区中的其他技术人员造成严重人身伤害或死亡。
“警告”的定义遇到一条“警告”时,要求您采取必要的操作或不要采取禁止的操作。
2013年全新高级修订版本《中国重型汽车维修手册》隆重推出
简介
2013版最新完全版《中国重型汽车维修手册》,共四册。
本书由中国汽车技术信息资料中心组织权威专家、资深教授根据斯太尔系列重型载货汽车相关技术资料编写而成,此版本在保留原12版内容的基础上,经过多次修订汇总新增添了10款
HW7E(EGR)共轨发动机电气电路系统、电器控制系统诊断、HOWO A7车门电器控制系统(配遥控)使用维修、空调系统原理分析及故障检测、WABCO系统维修、重汽桥箱产离合器维修保养,重汽WD615潍柴天然气发动机使用技术故障排除维修、重汽黄河王子电气电路图等新的内容,技术含量更高。
本手册涵盖了以斯太尔技术平台开发提升的所有重型汽车车型,内容包括各总成部件的结构特点、工作原理、拆装程序、维修及调整规范(主要零部件的配合间隙、使用极限、装配工艺及扭矩和技术要求)、主要故障的排除以及维修专用工具的使用,是重型汽车维修人员和汽车培训学校技术人员培训必不可少的教材。
也适用汽车使用、维修、车管人员阅读应用,也可以供其他重型汽车维护保养等有关技术人员参考。
2013别克凯越维修手册序言第1章一般信息第2章车身金属构件和装饰件第3章车身维修第4章车身系统第5章制动器第6章诊断概述、起点和编程第7章传动系统第8章驾驶员信息和娱乐系统第9章发动机第10章暖风、通风与空调系第11章电源和信号分布第12章车顶第13章安全和防护第14章座椅第15章转向系统第16章悬架系统第17章变速器2013别克凯越维修手册本中文维修手册提供了有关2013别克凯越SGM7150MTA SGM7150ATA 系列车型的诊断、维修程序、调整和规格等信息。
上汽通用汽车销售有限公司特约维修中心技术人员,掌握本手册内容和有关的上汽通用汽车销售有限公司维修技术通讯中的资料后,可为别克凯越车辆的用户提供更好的服务。
建议您与上汽通用汽车销售有限公司联系,取得本手册所提到的有关产品品牌、零件号或专用工具的相关信息。
©2013 上海通用汽车有限公司版权所有信息截止日期为2013年1月未经上海通用汽车有限公司提前书面准许,本手册任何部分不得复制、存储在检索系统中或以任何形式或手段传播(包括但不限于电子、机械、复印和录制)。
本项要求适用于所有文字、图示和表格。
告诫告诫:为降低伤人和/或财产损坏的可能性,务必认真遵守如下说明:上海通用汽车有限公司所提供的维修手册是为合格的专业技术人员编写的。
如果未经适当的培训,没有合适的工具和设备,而试图进行维修或修理,会伤害自己或他人。
而且,还会损坏车辆或导致车辆操作异常。
正确的车辆维修和修理,对于维修人员的人身安全和所有机动车辆安全、可靠的操作,均十分重要。
如果需要更换一个零件,请使用相同的件号或由上海通用汽车有限公司指定的件号。
切勿使用未经上海通用汽车有限公司认可的更换件。
本手册中所推荐和介绍的维修程序,是进行维修和修理的有效方法。
其中,有些程序需要使用为其特别设计的工具。
因此,任何想使用未经上海通用汽车有限公司推荐或认可的更换件、维修程序或工具,必须首先肯定对人身安全或车辆的安全操作没有危害。
OVERVIEW OF BODY FEATURES1.Next-Generation Advanced Compatibility Engineering™ (ACE™) body structure.2.Extensive use of high tensile strength steel (55.8%), including 17.2% in grades 780, 980, and 1,500 MPa.3.Roof panel assembly with integrated roof rail and roof arch extensions.DISCLAIMER: This publication contains a summary of new body and vehicle technology that may affect collision and other body repairs. Always refer to the appropriate service and body repair manuals for complete repair information. For body shops outside of the Honda dealer network in Canada, a subscription may be purchased at: . Body Repair News2013 Accord: New Model Body Repair InformationTABLE OF CONTENTS12 MODEL/YEAR MODÈLE /ANNÉE DATE OF ISSUE DATE EN VIGUEUR BULLETIN NUMBER NUMÉRO DU BULLETIN2013 ACCORD Dec. 9, 2013BRN-13-1BODY CONSTRUCTION AND HIGH STRENGTH STEEL CONTENT•Steel parts are colour-coded based on their tensile strength in megapascals (MPa).•High strength steel is defined as any steel with a tensile strength of 340 MPa or higher.•Steel repair and welding procedures vary depending on the tensile strength of the parts involved.NOTE: These illustrations are for general reference only. Some body parts, such as the front pillars, are constructed from multiple layers of different tensile strength steels. Always refer to the body repair manual body construction section for specific steel tensile strength information.New Model Body Technology4-Door Body Construction2-Door Body ConstructionSteel TensileStrength Legend1500 MPa in Front Pillars (Behind 590 MPa)1 34 51,500 MPa (HOT STAMP) STEEL LOCATIONS1,500 MPa steel is stronger than ordinary steel, so it can help protect vehicle occupants while reducing overall vehicle weight to improve fuel efficiency.The numbered parts in the diagrams below are constructed of 1,500 MPa steel:1234ROOF PANEL ATTACHMENTThe roof rail and roof arch extensions are integrated into the roof panel assembly. Previously, these were separate parts. The roof panel bolts and spot welds must be removed and installed to the inner pillar and roof rail structure using a specific procedure. Refer to the body repair manual section titled “Roof Panel Removal and Installation” for complete information. TOWING AND LIFTING PRECAUTIONS•Flat bed towing equipment is the preferred method to transport this vehicle.•Front wheel lift towing equipment may also be used to tow this vehicle.For more information, refer to “Emergency Towing” in the owner’s manual.•Lift or jack only at the specified points to avoid damaging the vehicle.•Do not lift or tow this vehicle by its bumpers, or serious damage will result.For more information, refer to “Lift and Support Points” inthe service or body repair manual.Front Roof Rail ExtensionRoof Arch ExtensionRear Roof Rail4-Door Model Shown, 2-Door SimilarACOUSTIC SEPARATOR LOCATIONSto reduce road noise intrusion into the cabin.•Factory-installed separator foam is expandedduring the primer and paint baking process.•Use care to avoid separator foam damage.The original foam cannot be restored if damaged.•Replacement plastic separators are availableas service parts. These will not produce foam,even if heated. To seal the new separator,apply urethane sealer around the separatorto fill in the gap with the panel.= Acoustic Foam Separator Location(4-door model shown, 2-door similar) Body Repair InformationUSE OF HEAT DURING BODY STRAIGHTENING AND REPAIRWhen you are doing body straightening and repair procedures:•DO NOT apply heat to any body part during straightening.This may compromise the internal structure and strengthof high-strength steel parts.•Any part that has heat applied to it during straighteningMUST be replaced with new parts.•Ignoring these instructions may significantly reduceoccupant protection in any subsequent collision.SECTIONING (CUT AND JOINT) GUIDELINESBecause of body structure improvements for collisionsafety and rigidity, the materials, steel thickness, andinternal reinforcements have become very specific.Follow these guidelines to avoid an unsafe repair:•Avoid sectioning (cut and joint) except for outer panelsand floor panels unless a specific procedure is providedin the body repair manual.•Replace body structural components as assembliesthat match the replacement parts configuration.NOTE: The following content is intended only to highlight new/special concerns. No body repairs should be attempted without first referring to the appropriate body repair manual for complete information.MIG BRAZING GUIDELINES FOR 1,500 MPa STEEL PARTS Refer to the body repair manual for complete information: •MIG brazed joint locations are specified in the body repair manual.• A single, or double, hole MIG braze may be specified in the body repair manual depending on the tensile strength of the parts being joined.•The size and number of holes is critical to achieving adequate joint strength.• A pulsed MIG welder MUST be used. Refer to the equipment manufacturer’s instructions for welder voltage and current setup.•Photos at right show the difference in results between pulsed and non-pulsed MIG brazing.Welding Precautions and InformationREPAIRING 1,500 MPa STEEL PARTSObserve these precautions when repairing 1,500 MPa steel parts: •NEVER attempt to straighten damaged 1,500 MPa steel parts because they may crack.•1,500 MPa steel parts MUST be replaced at factory seams using squeeze-type resistance spot welding (STRSW).•MIG brazed joints should be used ONLY in locations not accessible by a spot welder.•To assure adequate weld tensile strength, always set the spot welder to the specifications provided in the body repair manual.•NEVER perform MAG welding on 1,500 MPa steel. The heat generated during welding will significantly reduce the strength and structural integrity of 1,500 MPa steel parts.•This photo shows tensile strength test results ofwelded 1,500 MPa steel. The 1,500 MPa steel fractured first, because the welding heat reduced its strength to far below 590 MPa.•For more information, refer to “Hot Stamp (1,500 MPa) Parts Welding Specifications” in the body repair manual.MAG WELDING SPECIFICATIONS FOR 590-980 MPa HIGH-STRENGTH STEEL PARTS NOTE: In this publication and the body repair manuals,gas metal arc welding (GMAW) is referred to by itssubtypes depending on the welding/brazingrequirements:•MIG welding/brazing = Metal inert gas welding orbrazing where 100% Argon (Ar) shielding gas isused. Argon is inert and does not react with themolten weld pool or brazing operation.•MAG welding = Metal active gas welding wherethe shielding gas being used contains a mixture of80% Argon (Ar) and 20% Carbon Dioxide (CO2).It is considered active because the CO2 undergoesa limited reaction with the molten weld pool.The body repair manual specifies the weld types and locations for each body panel:•The welding wire used must have a tensile strength equal to, or greater than, the lowest tensile strength of the parts being welded. This conversion chartshows the relationship of steel tensile strength (MPa) to the minimum welding wire tensile strength (ksi).•Refer to the diagrams shown below:MAG PLUG WELDING GUIDELINES•MAG plug welding may be done when joining body components to 590-980 MPa steel parts.•Follow the recommendations described in the body repair manual section “MAG welding specifications for high-strength steel parts 590 MPa and higher.” MAG BUTT WELDING GUIDELINES•MAG butt welding may be done only on steel parts with a tensile strength of 590 MPa and lower. •Welding speed is critical to achieve the correct weld strength and minimize the heat affected zone (HAZ). •Follow the recommendations described in the body repair manual section “MAG welding specifications for high-strength steel parts 590 MPa and higher.”AIRBAG SYSTEM COMPONENTSThe airbag system in this vehicle includesthe following components that may deploy in a collision:1.Driver and front passenger seat belt tensioners(may deploy independently from any airbags). 2.Driver and front passenger SRS airbags. 3.Side airbags mounted in the outer driver andfront passenger seat-backs.4.Left and right side curtain airbags mountedabove the side windows under the headliner.SMARTVENT™ SIDE AIRBAGSThis vehicle is equipped with new SmartVent side airbag construction: •This airbag design helps mitigate the risk of excessive airbag deployment force and risk of injury to smaller seat occupants. •Eliminates the need for the Occupant Position Detection System (OPDS) sensor in the front passenger’s seatback.As with all side airbags, the following service precautions apply: •Special seat covers and/or breakaway thread are used to insure proper deployment path.•Damaged front seat covers should be replaced, not repaired. •Do not install non-factory seat covers, because they may alter the airbag's intended deployment path.Airbag System Components and Repairs342 1SmartVent Side AirbagAIRBAG SYSTEM ELECTRICAL REPAIRSExcept when doing electrical inspections that require battery power, always turn the ignition to the OFF (LOCK) mode, disconnect the negative battery cable, then wait at least 3 minutes before starting work. •For easier identification, electrical connectors that contain only airbag system wiring are yellow in colour.•Many harnesses that contain primarily airbag wiring are also wrapped in yellow tape.•Airbag system wiring that runs in a common harness, such as a floor harness, is generally not marked.•NEVER attempt to modify, splice, or repair airbag system wiring. If airbag system wiring is damaged, replace the wiring harness(es). NOTE: Refer to the service manual for complete restraint systemsoperation, diagnostic, and repair information.AIRBAG SYSTEM INDICATORSThere are two indicators used for the airbag system:Supplemental Restraint System (SRS) IndicatorWhen you turn the ignition to the ON mode, this indicator should come on and then turn off after about 6 seconds.•If the SRS indicator does not go off, or does not come on at all, there is a problem with the system.•DTCs must be read and cleared using the HDS (or equivalent) scan tool. Contact a Honda dealer for assistance if necessary. •If a vehicle is sent to the dealer for airbag system repair or troubleshooting, include a copy of the repair estimate with part numbers and the source for any replaced airbag system parts.Passenger Airbag OFF IndicatorThe indicator comes on to alert you that the passenger’s front airbag has been turned off. •This occurs when the front passenger’s weight sensors detect 65 lb. (29 kg) or less, the weight of an infant or small child, on the seat.•If the indicator comes on with no front passenger and no objects on the seat, or with an adult occupying the seat, something may be interfering with the seat weight sensors, or there may be a problem with the system. Contact a Honda dealer for assistance if necessary.AIRBAG SYSTEM REPAIRS REQUIRED AFTER DEPLOYMENTTo restore proper function and allow DTCs to be cleared, the airbag system MUST be repaired as specified in the service manual. Refer to “Component Replacement/Inspection After Deployment” for complete information. •DO NOT install used, refurbished, or modified airbag system parts.•When making airbag system repairs, only use new Honda genuine replacement parts, which are manufactured to the same standards and quality as the original parts.•To ensure the correct replacement airbag system parts are installed, provide the vehicle’s VIN whenordering parts. Compare the part numbers on the new and removed parts to make sure they match.REPLACEABLE HEADLIGHT BRACKETSIf any of the headlight assembly attachment brackets are broken, replacement brackets are available as service parts.A broken headlight assembly can be repaired using service brackets provided it meets the following criteria: •No damage to the headlight assembly•Sealing of the headlight lens and headlight housing is maintained.These service brackets are available:1.Upper front bracket2.Upper rear bracket3.Lower bracketRefer to “Headlight Bracket Replacement” in the body repair manual for complete information.1 3 Service Headlight Brackets SYSTEMS THAT MAY REQUIRE DEALER ASSISTANCE WITH AIMINGSome models may be equipped with one or more of the following systems that require aiming after collision repairs. Special tools are required to complete the aiming procedures. Contact a Honda dealer for assistance.LaneWatch™:LaneWatch uses a camera and the center display to help drivers recognize objects in the blind spot of the passenger side door mirror.The LaneWatch camera must be aimed after one or more of the following procedures are done: •LaneWatch camera removal or replacement •Door mirror removal or replacement •Door panel removal or replacement •Door panel body repairLaneWatch does not set DTCs. Troubleshooting and camera aiming are done using the navigation system or center display self-diagnostics. LaneWatch does not have a malfunction indicator.TIRE PRESSURE MONITORING SYSTEM (TPMS)This vehicle is equipped with an indirect TPMS. It uses the VSA wheel speed sensors to monitor and compare tire characteristics while driving to determine if one or more tires are significantly underinflated. The low tire pressure/TPMS indicator blinks and/or comes on if: •The air pressure is too low in one or more tires. •The system requires calibration or is calibrating. •The compact spare tire is mounted. •There is a TPMS problem.TPMS calibration must be started every time you: •Adjust the pressure in one or more tires•Rotate the tires•Replace one or more tires•Replace or update the VSA-modulator control unit.Refer to “TPMS Calibration ” in the service or owner’s manual for complete information. •Contact a Honda dealer for assistance if necessary.Electrical Repair InformationLow Tire Pressure/TPMS Indicator11 of 11ELECTRICAL GROUND WIRE PROTECTION•Painting over electrical ground locations may causeelectrical systems, such as Vehicle Stability Assist(VSA), to malfunction and set DTCs that may bedifficult to diagnose.•Protect the ground wire and the ground wire mountinghole threads with a bolt or silicone plug when primingor painting. Forward Collision Warning and Lane Departure Warning (FCW/LDW): The FCW/LDW camera must be re-aimed if:•The FCW/LDW camera unit is removed or replaced•The windshield is removed or replacedIf the aiming is incomplete, the FCW and LDW indicators come on and/or blink. © 2013 Honda Canada., Inc. – All Rights Reserved。
第2章车身金属构件和装饰件2.1 外饰2.1.1 规格2.1.1.1 紧固件紧固规格紧固件紧固规格2.1.2 维修指南2.1.2.1 前侧门车窗窗框后饰件的更换拆卸程序1. 拆卸外槽模制件。
参见“车门”中的“4.1.4.14 前侧门车窗外密封条的更换”。
2. 移开密封条,露出螺钉。
3. 拆卸螺钉和中柱模制件。
安装程序告诫:参见“有关紧固件的告诫”。
1. 安装螺钉和中柱模制件。
紧固紧固中柱模制件螺钉至1.3牛·米(12磅英寸)。
2. 将密封条装回原来位置。
3. 安装外槽模制件。
参见“车门”中的“4.1.4.14 前侧门车窗外密封条的更换”。
2.1.2.2 挡泥板的更换-后拆卸程序1.拆卸螺钉、螺栓和挡泥板。
安装程序告诫:参见“有关紧固件的告诫”。
1.用螺栓和螺钉安装挡泥板。
紧固紧固挡泥板螺栓至2牛·米(18磅英寸)。
2.1.2.3 散热器格栅的更换拆卸程序1. 打开发动机罩。
2. 拆卸螺钉和散热器格栅。
安装程序告诫:参见“有关紧固件的告诫”。
1. 用螺钉安装散热器格栅。
2.1.2.4 车顶排水槽装饰条的更换拆卸程序1. 从金属卡夹上拆卸车顶模制件。
安装程序1. 将车顶模制件压入金属卡夹中。
2.1.2.5 后牌照灯装饰条的更换拆卸程序1. 拆卸行李箱盖内饰板。
2. 拆卸牌照灯饰板到行李厢盖螺母。
2.1.2.6 散热器中间格栅的更换散热器中间格栅的更换2.1.2.7 行李厢盖徽标/铭牌的更换(EXCELLE)行李厢盖徽标/铭牌的更换(EXCELLE)2.1.2.8 行李厢盖徽标/铭牌的更换(别克)行李厢盖徽标/铭牌的更换(别克)2.1.2.9 行李厢盖徽标/铭牌的更换(上海通用)行李厢盖徽标/铭牌的更换(上海通用)2.1.2.10 后门框饰件的更换后门框饰件的更换2.1.2.11 前保险杠蒙皮徽标/铭牌的更换前保险杠蒙皮徽标/铭牌的更换2.2 地板覆盖物和车顶内衬2.2.1 规格2.2.1.1粘合剂、油液、润滑剂和密封胶粘合剂、油液、润滑剂和密封胶2.2.2 维修指南2.2.2.1 消除车内的异味SGM 车辆异味清除剂,参见“2.2.1.1粘合剂、油液、润滑剂和密封胶”,可控制或消除SGM 车辆内饰和行李厢区域的异味。
产品维修手册
V4.0
一、概述
维修是整个生产中一个重要环节,维修的速度与质量关系到整个生产的良品率和生产效率,对一个产品来说发现的不良大部分是焊接不良(SMT波峰焊及补焊)和器件来料不良,所以维修因从这两点入手。
二、维修规范
1.1 更换、焊接任何元器件和拨、插连接线时,必须将电源切断,断开电池点,不得断电插拔以免击坏元器件。
1.2 防静电措施(整个维修过程都必须防静电!)
a)不得随便用手触摸 IC;
b)使用防静电烙铁,电烙铁要接地;
c)焊接工必须戴有线防静电手腕。
1.3 更换元器件时,应参照表计物料清单,不得随意更换规格、型号、厂家。
1.4 对于需要重刷程序的维修表计必须查询核对原有订单的程序版本信息,应配烧原有程序不得随意配烧当前最新程序(批量返修重烧程序除外)。
1.5 整表拆解后零部件必须统一放置拆解料盒内。
2.1 焊点检验:
a)维修焊接后需检查虚焊、连焊,焊后必须用防静电毛刷清除锡珠。
2.2、元器件检验:
a)更换器件之前要确认器件是否坏;
b)确认新器件是否与不良器件的物料一致;
c)更换器件后再次确认更换物料是否正确。
2.3、维修完毕组装时应倾倒检查表内是否有异物残留,组装完毕需检查拆解料盒内是否有漏装件。
注:在维修之时请严格遵守上述规范
三、维修工具及设备
万用表、掌机、维修录入掌机、电动起子、恒温电烙铁、三相功率源、三相标准表、电脑、多功讯线、起子、镊子、斜口钳等。
四、故障排查及维修方法(单相)
RS485芯片引脚分配图
红外接收
红外发射
计量电路
火线电流采样
零线电流采样
电压采样
电源电压测试点
路路路
五、故障排查及维修方法(三相)
RS485芯片引脚分配图
A B C
零线
线线
三相SW2L30计
量芯片管脚分
布图
有功灯无功
灯
跳闸
灯
备注:单(三)相表计任何故障现象均与主芯片有关联。