apachedsldap配置使用说明
- 格式:doc
- 大小:15.58 KB
- 文档页数:14

ldap配置过程详解ldap常⽤名称解释1.环境搭建操作系统:centos6.5 x86_64关闭防⽕墙、selinux开启时间同步# crontab -e加⼊# time sync*/5 * * * * /usr/sbin/ntpdate 192.168.8.102 >/dev/null 2>&1# crontab -l*/5 * * * * /usr/sbin/ntpdate -u 192.168.8.102 >/dev/null 2>&1配置域名解析:# echo "192.168.8.43 " >> /etc/hosts解决依赖关系# yum grouplistBaseDebugging ToolsPerformance ToolsCompatibility librariesDevelopment toolsDial-up Networking SupportHardware monitoring utilities如果缺少组包,需要安装yum groupinstall -y "Compatibility libraries"2.安装openldap master# yum install -y openldap openldap-*# yum install -y nscd nss-pam-ldapd nss-* pcre pcre*# rpm -qa | grep openldap*compat-openldap-2.3.43-2.el6.x86_64openldap-2.4.40-12.el6.x86_64openldap-clients-2.4.40-12.el6.x86_64openldap-servers-sql-2.4.40-12.el6.x86_64openldap-servers-2.4.40-12.el6.x86_64openldap-devel-2.4.40-12.el6.x86_643.配置slapd.conf⽂件# cd /etc/openldap/[root@node5 openldap]# cp /usr/share/openldap-servers/slapd.conf.obsolete slapd.conf [root@node5 openldap]# cp slapd.conf slapd.conf.bak[root@node5 openldap]# slappasswd -s chinasoft|sed -e "s#{SSHA}#rootpw\t{SSHA}#g"rootpw {SSHA}D9+lqUJZVPobp0sZfXl37jE1aVvR2P9K[root@node5 openldap]# slappasswd -s chinasoft|sed -e "s#{SSHA}#rootpw\t{SSHA}#g">>/etc/openldap/slapd.conf[root@node5 openldap]# tail -1 slapd.confrootpw {SSHA}FvBRnIPqtIi0/u11O2gOfOCrRJr+xMAr# vim slapd.conf注释掉⼀下四⾏# database dbb#suffix "dc=my-domain,dc=com"#checkpoint 1024 15#rootdn "cn=Manager,dc=my-domain,dc=com"添加如下内容# add start by jack 2016/07/01database bdbsuffix "dc=chinasoft,dc=com"rootdn "cn=admin,dc=chinasoft,dc=com"对⽐修改是否成功:[plain]1. # diff slapd.conf.bak slapd.conf2. 114,117c114,1223. < database bdb4. < suffix "dc=my-domain,dc=com"5. < checkpoint 1024 156. < rootdn "cn=Manager,dc=my-domain,dc=com"7. ---8. > #database bdb9. > #suffix "dc=my-domain,dc=com"10. > #checkpoint 1024 1511. > #rootdn "cn=Manager,dc=my-domain,dc=com"12. > # add start by jack 2016/07/0113. > database dbd14. > suffix "dc=chinasoft,dc=com"15. > rootdn "cn=admin,dc=chinasoft,dc=com"16. >17. 140a14618. > rootpw {SSHA}FvBRnIPqtIi0/u11O2gOfOCrRJr+xMAr添加如下内容cat >> /etc/openldap/slapd.conf<<EOF# add start by jack 2016/07/01loglevel 296cachesize 1000checkpoint 2018 10EOF参数说明:# add start by jack 2016/07/01loglevel 296 # ⽇志级别,记录⽇志信息⽅便调试,296级别是由256(⽇志连接/操作/结果)、32(搜索过滤器处理)、8(连接管理)累加的结果cachesize 1000 # 设置ldap可以换成的记录数checkpoint 2018 10 # 可以设置把内存中的数据协会数据⽂件的操作上,上⾯设置表⽰每达到2048KB或者10分钟执⾏⼀次,checkpoint即写⼊数据⽂件的操作4.ldap授权及安全参数配置# vim /etc/openldap/slapd.conf删除如下内容:[plain]1. database config2. access to *3. by dn.exact="gidNumber=0+uidNumber=0,cn=peercred,cn=external,cn=auth" manage4. by * none5.6.7. # enable server status monitoring (cn=monitor)8. database monitor9. access to *10. by dn.exact="gidNumber=0+uidNumber=0,cn=peercred,cn=external,cn=auth" read11. by dn.exact="cn=Manager,dc=my-domain,dc=com" read12. by * none改为:access to *by self writeby anonymous authby * read5.加⼊⽇志记录# cp /etc/rsyslog.conf /etc/rsyslog.conf.bak.$(date +%F%T)# echo '#record ldap.log by jack 2016-07-01' >> /etc/rsyslog.conf# echo 'local4.* /var/log/ldap.log'>> /etc/rsyslog.conf# tail -1 /etc/rsyslog.conflocal4.* /var/log/ldap.log# service rsyslog restart6.配置ldap数据库路径# cp /usr/share/openldap-servers/DB_CONFIG.example /var/lib/ldap/DB_CONFIG[root@node5 openldap]# ll /var/lib/ldap/DB_CONFIG-rw-r--r-- 1 root root 845 Jul 1 17:29 /var/lib/ldap/DB_CONFIG[root@node5 openldap]# chown ldap:ldap /var/lib/ldap/DB_CONFIG[root@node5 openldap]# chmod 700 /var/lib/ldap/[root@node5 openldap]# ls -l /var/lib/ldap/total 4-rw-r--r-- 1 ldap ldap 845 Jul 1 17:29 DB_CONFIG验证配置是否Ok# slaptest -uconfig file testing succeeded7.启动服务:# /etc/init.d/slapd restart# lsof -i :389COMMAND PID USER FD TYPE DEVICE SIZE/OFF NODE NAMEslapd 50735 ldap 7u IPv4 75541 0t0 TCP *:ldap (LISTEN)slapd 50735 ldap 8u IPv6 75542 0t0 TCP *:ldap (LISTEN)[root@node5 openldap]# ps -ef |grep ldap|grep -v grepldap 50735 1 0 17:33 ? 00:00:00 /usr/sbin/slapd -h ldap:/// ldapi:/// -u ldap配置随机启动# chkconfig slapd on[root@node5 openldap]# chkconfig --list slapdslapd 0:off1:off2:on3:on4:on5:on6:off8.测试查找内容# ldapsearch -LLL -W -x -H ldap:// -D "cn=admin,dc=chinasoft,dc=com" -b "dc=chinasoft,dc=com" "(uid=*)" Enter LDAP Password:报错:ldap_bind: Invalid credentials (49)解决办法:[plain]1. # rm -rf /etc/openldap/slapd.d/*2. # slaptest -f /etc/openldap/slapd.conf -F /etc/openldap/slapd.d3. 57763ec6 bdb_monitor_db_open: monitoring disabled; configure monitor database to enable4. config file testing succeeded5. # ldapsearch -LLL -W -x -H ldap:// -D "cn=admin,dc=chinasoft,dc=com" -b "dc=chinasoft,dc=com" "(uid=*)"6. Enter LDAP Password:7. No such object (32)重启服务# service slapd restartStopping slapd: [FAILED]Checking configuration files for slapd: [FAILED]57763eee ldif_read_file: Permission denied for "/etc/openldap/slapd.d/cn=config.ldif"slaptest: bad configuration file![root@node5 openldap]# chown -R ldap.ldap /etc/openldap/slapd.d/[root@node5 openldap]# service slapd restartStopping slapd: [FAILED]Starting slapd: [ OK ]# lsof -i :389COMMAND PID USER FD TYPE DEVICE SIZE/OFF NODE NAMEslapd 51164 ldap 7u IPv4 77503 0t0 TCP *:ldap (LISTEN)slapd 51164 ldap 8u IPv6 77504 0t0 TCP *:ldap (LISTEN)9.为ldap master初始化数据(如果不初始化,后⾯⽆法通过web界⾯管理)增加初始的⼊⼝(entries)1) 创建LDIF⽂件编辑⼀个LDIF格式⽂件:# vim base.ldif[plain]1. dn: dc=chinasoft, dc=com2. objectClass: organization3. objectClass: dcObject4. dc: chinasoft5. o: chinasoft6.7.8. dn: ou=People, dc=chinasoft, dc=com9. objectClass: organizationalUnit10. ou: People11.12.13. dn: ou=group, dc=chinasoft, dc=com14. objectClass: organizationalUnit15. ou: group16.17.18. dn: cn=tech, ou=group, dc=chinasoft, dc=com19. objectClass: posixGroup20. description:: 5oqA5pyv6YOo21. gidNumber: 1000122. cn: tech# vim jack.ldif[plain]1. dn: uid=jack,ou=People,dc=chinasoft,dc=com2. objectClass: posixaccount3. objectClass: inetOrgPerson4. objectClass: organizationalPerson5. objectClass: person6. homeDirectory: /home/jack7. loginShell: /bin/bash8. uid: jack9. cn: jack10. userPassword:: 55G/ReqPKeOZ8SpgszwIQhaBXySNU4mw11. uidNumber: 1000512. gidNumber: 1000113. sn: jack[plain]1. # ldapadd -x -H ldap:// -D "cn=admin,dc=chinasoft,dc=com" -W -f base.ldif2. Enter LDAP Password:3. adding new entry "dc=chinasoft, dc=com"4.5.6. adding new entry "ou=People, dc=chinasoft, dc=com"7.8.9. adding new entry "ou=group, dc=chinasoft, dc=com"10.11.12. adding new entry "cn=tech, ou=group, dc=chinasoft, dc=com"2) 运⾏ldapadd# ldapadd -x -H ldap:// -D "cn=admin,dc=chinasoft,dc=com" -W -f base.ldifEnter LDAP Password:[plain]1. 报错:2. adding new entry "dc=chinasoft,dc=com"3. ldap_add: Invalid syntax (21)4. additional info: objectClass: value #0 invalid per syntax5. 原因:ldif⽂件中存在空格或者个别单词拼写错误6. 正确书写格式:7. (1空⾏)8. dn:(空格) dc=mail,dc=kaspersky,dc=com(结尾⽆空格)9. objectclass: (空格)dcObject(结尾⽆空格)10. objectclass: (空格)organization(结尾⽆空格)11. o: (空格)kaspersky(结尾⽆空格)12. dc:(空格) test(结尾⽆空格)13. (1空⾏)14. dn: (空格)cn=test,dc=mail,dc=kaspersky,dc=com(结尾⽆空格)15. objectclass: (空格)organizationalRole(结尾⽆空格)16. cn: (空格)test(结尾⽆空格)17. (结尾⽆空⾏)# ldapadd -x -H ldap:// -D "cn=admin,dc=chinasoft,dc=com" -W -f jack.ldifEnter LDAP Password:adding new entry "uid=jack,ou=People,dc=chinasoft,dc=com"3) 检查是否已经开始正常⼯作# ldapsearch -LLL -W -x -H ldap:// -D "cn=admin,dc=chinasoft,dc=com" -b "dc=chinasoft,dc=com" "(uid=*)" Enter LDAP Password:dn: uid=jack,ou=People,dc=chinasoft,dc=comobjectClass: posixAccountobjectClass: inetOrgPersonobjectClass: organizationalPersonobjectClass: personhomeDirectory: /home/jackloginShell: /bin/bashuid: jackcn: jackuserPassword:: 55G/ReqPKeOZ8SpgszwIQhaBXySNU4mwuidNumber: 10005gidNumber: 10001sn: jack10.为ldap master配置web管理接⼝安装lamp环境# yum install -y httpd php php-ldap php-gd# rpm -qa httpd php php-ldap php-gdphp-5.3.3-47.el6.x86_64httpd-2.2.15-53.el6.centos.x86_64php-gd-5.3.3-47.el6.x86_64php-ldap-5.3.3-47.el6.x86_64安装ldap-account-manager管理软件https:///lamcms/releases?page=3将ldap-account-manager-3.7.tar.gz安装包上传到/var/www/html⽬录# cd /var/www/html/[root@node5 html]# tar zxf ldap-account-manager-3.7.tar.gz[root@node5 html]# mv ldap-account-manager-3.7 ldap[root@node5 html]# cd ldap/config[root@node5 config]# cp config.cfg_sample config.cfg[root@node5 config]# cp lam.conf_sample lam.conf[root@node5 config]# sed -i 's#cn=Manager#cn=admin#g' lam.conf[root@node5 config]# sed -i 's#dc=my-domain#dc=chinasoft#g' lam.conf[plain]1. [root@node5 config]# diff lam.conf_sample lam.conf2. 13c133. < admins: cn=Manager,dc=my-domain,dc=com4. ---5. > admins: cn=admin,dc=chinasoft,dc=com6. 55c557. < types: suffix_user: ou=People,dc=my-domain,dc=com8. ---9. > types: suffix_user: ou=People,dc=chinasoft,dc=com10. 59c5911. < types: suffix_group: ou=group,dc=my-domain,dc=com12. ---13. > types: suffix_group: ou=group,dc=chinasoft,dc=com14. 63c6315. < types: suffix_host: ou=machines,dc=my-domain,dc=com16. ---17. > types: suffix_host: ou=machines,dc=chinasoft,dc=com18. 67c6719. < types: suffix_smbDomain: dc=my-domain,dc=com20. ---21. > types: suffix_smbDomain: dc=chinasoft,dc=com# chown -R apache.apache /var/www/html/ldap访问http://192.168.8.43/ldap/templates/login.php使⽤刚才配置的 admin 和密码chinasoft登陆即可添加⽤户、配置密码查看通过web界⾯添加的tom⽤户是否⽣效[plain]1. # ldapsearch -LLL -W -x -H ldap:// -D "cn=admin,dc=chinasoft,dc=com" -b "dc=chinasoft,dc=com" "(uid=lily)"2. Enter LDAP Password:3. dn: uid=lily,ou=People,dc=chinasoft,dc=com4. objectClass: posixAccount5. objectClass: inetOrgPerson6. objectClass: organizationalPerson7. objectClass: person8. homeDirectory: /home/lily9. loginShell: /bin/bash10. uid: lily11. cn: lily12. uidNumber: 1000713. gidNumber: 1000214. userPassword:: e1NTSEF9RkY1eHFNUk5JbGJHNFpCQWtBK0pwN1RmcmdIci9Mems=15. sn: lily16. givenName: lily17.。

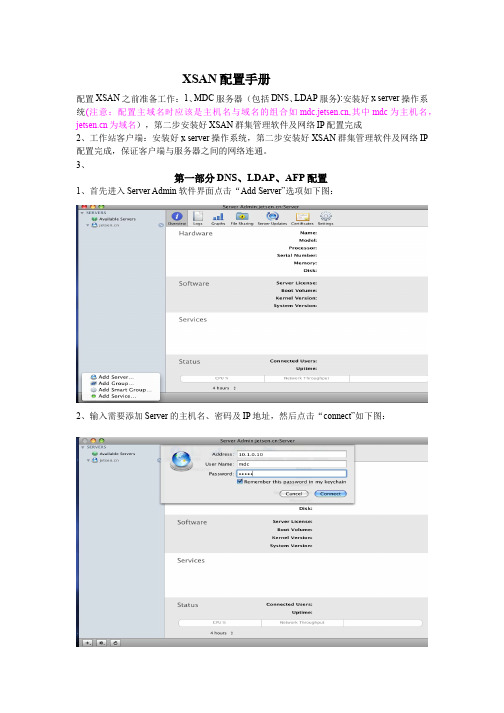
XSAN配置手册配置XSAN之前准备工作:1、MDC服务器(包括DNS、LDAP服务):安装好x server操作系统(注意:配置主域名时应该是主机名与域名的组合如,其中mdc为主机名,为域名),第二步安装好XSAN群集管理软件及网络IP配置完成2、工作站客户端:安装好x server操作系统,第二步安装好XSAN群集管理软件及网络IP 配置完成,保证客户端与服务器之间的网络连通。
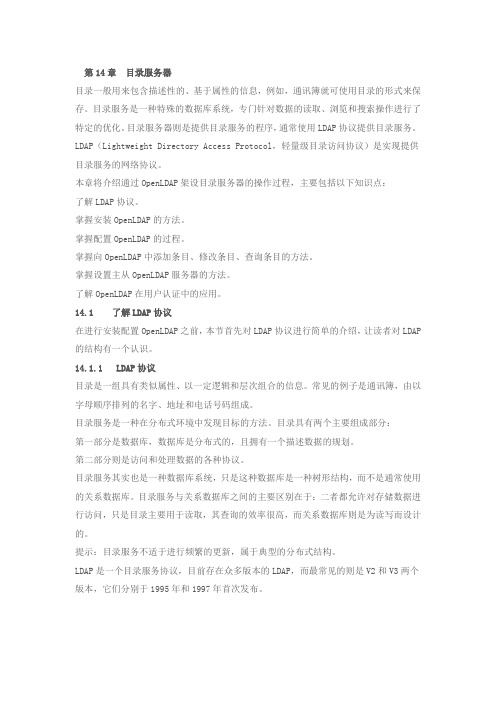
3、第一部分DNS、LDAP、AFP配置1、首先进入Server Admin软件界面点击“Add Server”选项如下图:2、输入需要添加Server的主机名、密码及IP地址,然后点击“connect”如下图:3、连接成功后,我们选中“setting”下的“Service”选项,然后选中AFP、DNS、Open Directory,点击“save”如下图:4、配置DNS服务前可先启动AFP服务,然后在DNS服务的"zones"选项中点击“Add Zone”,选择“Add Primary Zone(Master)”如下图:5、输入 Primary Zone Name:.和Hostname:mdc(注:必须与装操作系统时配置的主机名相对应)然后点击“save”如下图:6、输入Machine Name:mdc和IP Addresses:如10.1.0.10然后点击“save”如下图:7、8、打开终端命令行用nslookup命令检查DNS配置是否正确如下图:9、DNS配置正确后启动DNS服务,DNS配置完毕第二部分XSAN配置1、首先我们点击 进入SAN Setup点击“Continue”如下图2、选择“Configure new SAN.” 点击“Continue”如下图3、首先输入SAN名,然后输入SAN管理员的姓名和电子邮件地址。
点击“Continue”如下图4、首先我们添加metadata controller确保所需要的电脑被选中。
第14章目录服务器目录一般用来包含描述性的、基于属性的信息,例如,通讯簿就可使用目录的形式来保存。
目录服务是一种特殊的数据库系统,专门针对数据的读取、浏览和搜索操作进行了特定的优化。
目录服务器则是提供目录服务的程序,通常使用LDAP协议提供目录服务。
LDAP(Lightweight Directory Access Protocol,轻量级目录访问协议)是实现提供目录服务的网络协议。
本章将介绍通过OpenLDAP架设目录服务器的操作过程,主要包括以下知识点:了解LDAP协议。
掌握安装OpenLDAP的方法。
掌握配置OpenLDAP的过程。
掌握向OpenLDAP中添加条目、修改条目、查询条目的方法。
掌握设置主从OpenLDAP服务器的方法。
了解OpenLDAP在用户认证中的应用。
14.1 了解LDAP协议在进行安装配置OpenLDAP之前,本节首先对LDAP协议进行简单的介绍,让读者对LDAP 的结构有一个认识。
14.1.1 LDAP协议目录是一组具有类似属性、以一定逻辑和层次组合的信息。
常见的例子是通讯簿,由以字母顺序排列的名字、地址和电话号码组成。
目录服务是一种在分布式环境中发现目标的方法。
目录具有两个主要组成部分:第一部分是数据库,数据库是分布式的,且拥有一个描述数据的规划。
第二部分则是访问和处理数据的各种协议。
目录服务其实也是一种数据库系统,只是这种数据库是一种树形结构,而不是通常使用的关系数据库。
目录服务与关系数据库之间的主要区别在于:二者都允许对存储数据进行访问,只是目录主要用于读取,其查询的效率很高,而关系数据库则是为读写而设计的。
提示:目录服务不适于进行频繁的更新,属于典型的分布式结构。
LDAP是一个目录服务协议,目前存在众多版本的LDAP,而最常见的则是V2和V3两个版本,它们分别于1995年和1997年首次发布。
14.1.2 LDAP的基本模型LDAP的基本模型是建立在"条目"(Entry)的基础上。
LDAP插件用户手册(插件版本:标准版)2011年06月目录第一章产品及功能介绍31.1产品版本介绍: (3)1.LDAP插件版本(此文档主要针对标准版进行说明): (3)2.标准版和高级版本功能对比列表 (3)1.2新功能: (4)1.呈现整个域目录树,根据需求可选择指定部门同步;(新功能) (4)2.支持指定禁用某些用户(支持快速模糊匹配查找); (5)3.优化同步机制,大大提高同步性能和稳定性(500个部门、5k用户第一次导入只需3-5mins,第二次更新只需10秒左右); (5)1.3概述(应用场景): (5)1.4产品优势: (5)1.5成功案例: (6)第二章LDAPSyncTool插件的安装72.1安装所需的软硬件环境 (7)2.2LDAPSyncTool服务端插件的安装 (7)第三章功能使用说明73.1配置LDAPSyncTool (7)1.配置LDAP服务器信息 (8)2.配置RTX服务器信息 (9)3.选择需同步的部门 (10)4.配置同步管理信息 (11)3.2同步LDAP数据 (12)3.3禁止指定的AD用户导入 (13)3.4用户登录域(第三方认证) (14)3.5注册LDAPSyncTool (15)第四章附录154.1 名词解释 (15)第一章产品及功能介绍1.1产品版本介绍:1.LDAP插件版本(此文档主要针对标准版进行说明):a)标准版:拥有通用基础功能(适用中小企业);b)高级版本:拥有标准版功能,还具有更多强大的功能(适用大型企业);2.标准版和高级版本功能对比列表1.2新功能:1.呈现整个域目录树,根据需求可选择指定部门同步;(新功能)2.支持指定禁用某些用户(支持快速模糊匹配查找);3.优化同步机制,大大提高同步性能和稳定性(500个部门、5k用户第一次导入只需3-5mins,第二次更新只需10秒左右);1.3概述(应用场景):企业在使用RTX之前一般情况会有其它的办公IT系统(比如OA\ERP\CRM等);随着IT办公软件的增多,使企业IT管理员的工作量不断增加,而且不方便维护和管理众多的IT办公软件的用户或部门管理;而且由于IT系统由不同的供应商提供,企业IT系统安全性参差不齐,存在较大的安全隐患。
版本:ApacheDS2.0
操作说明:
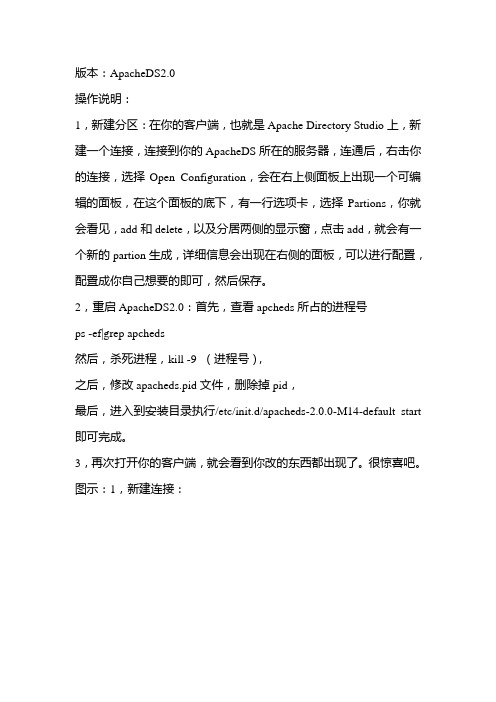
1,新建分区:在你的客户端,也就是Apache Directory Studio上,新建一个连接,连接到你的ApacheDS所在的服务器,连通后,右击你的连接,选择Open Configuration,会在右上侧面板上出现一个可编辑的面板,在这个面板的底下,有一行选项卡,选择Partions,你就会看见,add和delete,以及分居两侧的显示窗,点击add,就会有一个新的partion生成,详细信息会出现在右侧的面板,可以进行配置,配置成你自己想要的即可,然后保存。
2,重启ApacheDS2.0:首先,查看apcheds所占的进程号
ps -ef|grep apcheds
然后,杀死进程,kill -9 (进程号),
之后,修改apacheds.pid文件,删除掉pid,
最后,进入到安装目录执行/etc/init.d/apacheds-2.0.0-M14-default start 即可完成。
3,再次打开你的客户端,就会看到你改的东西都出现了。
很惊喜吧。
图示:1,新建连接:
2,打开配置
3,进行配置:
4,配置完成:
5,重启服务(参照重启ApacheDS2.0)6,完成
注意事项:
1.密码必须设置为:Relaxed(见下图)
2.配置索引:
在ADS中右键选择Open Configuration选项,然后按照如下图配置需要添加索引的选项即可。
(见下图)
3.数据备份:
Ldap数据路径为: /var/lib/apacheds-2.0.0-M12/default/partitions/ 该目录下面的文件夹里面的数据就是LDAP中的数据,请注意保存!。
ldapadmin使用手册一、简介ldapadmin是一款功能强大的LDAP(轻量目录访问协议)管理工具,它提供了用户友好的界面,用于管理和维护LDAP服务器上的目录。
本手册将向您介绍如何使用ldapadmin进行LDAP目录的管理。
二、安装和配置2.1 下载和安装ldapadmin1.打开ldapadmin的官方网站。
2.在下载页面选择适用于您操作系统的版本,然后单击下载按钮。
3.下载完成后,按照安装向导进行安装。
2.2 配置ldap服务器连接在首次启动ldapadmin之后,您需要配置与LDAP服务器的连接。
按照以下步骤进行配置: 1. 打开ldapadmin并选择“文件”>“设置”。
2. 在设置窗口中,选择“连接”选项卡。
3. 点击“添加”按钮,输入连接名称和LDAP服务器的主机名和端口号。
4. 输入管理员用户名和密码,并验证连接是否成功。
5. 单击“确定”保存配置。
三、目录管理3.1 创建目录项您可以使用ldapadmin创建新的目录项。
按照以下步骤进行操作: 1. 在ldapadmin的主界面上选择您要在其中创建目录项的上级目录。
2. 单击工具栏上的“新建目录项”按钮。
3. 在弹出的对话框中,输入新目录项的属性和值。
4. 单击“确定”按钮创建目录项。
3.2 编辑目录项您可以通过ldapadmin编辑目录项的属性和值。
按照以下步骤进行操作: 1. 在ldapadmin的主界面上选择要编辑的目录项。
2. 单击工具栏上的“编辑目录项”按钮。
3. 在弹出的对话框中,可以修改目录项的属性和值。
4. 单击“确定”按钮保存更改。
3.3 删除目录项如果您需要删除一个目录项,可以按照以下步骤进行操作: 1. 在ldapadmin的主界面上选择要删除的目录项。
2. 单击工具栏上的“删除目录项”按钮。
3. 单击“确定”按钮确认删除操作。
四、搜索和过滤4.1 执行搜索操作ldapadmin提供了强大的搜索功能,您可以根据特定的条件搜索目录项。
本教程是在笔者学习JNDI过程中,由于没有合适的免费服务器做为实验,给Sun的JNDI 教程的LDAP服务器使用的又是Sun的服务器,OpenLDAP又没有找到Windows的版本,所以就决定使用Apache的开源LDAP服务器---Apache Directory Server。
下面是Apache 网站对Apache Directory Project的介绍:The Apache Directory Project provides directory solutions entirely written in Java. These include a directory server, which has been certified as LDAP v3 compliant by the Open Group (Apache Directory Server), and Eclipse-based directory tools (Apache Directory Studio).Apache Directory项目提供了用纯Java编写的目录解决方案,其中包含ApacheDS,即Apache Directory Server,它是一个被授权的LDAP v3的服务器。
同时还包含基于Eclipse 的目录工具,即Apache Directory Studio。
ApacheDS基本用户参考指南,主要介绍了如何安装ApacheDS 1.0,通过不同的图形化客户端连接服务器,当然主要还是需要通过JNDI编程来实现服务器的连接,这部分内容在JNDI教程中进行介绍。
同时介绍了如何操作目录服务中的数据以及将ApacheDS和其它软件进行集成。
Apache Directory Server简介ApacheDS 1.0是一个由纯Java语言编写的开源LDAP服务器。
ApacheDS具有可嵌入、可扩展、标准的遵守LDAP协议等特性,同时支持其他的网络协议,例如NTP和Kerberos。
LDAP Setup Guide Release 14.3.0.0.0 Part No. F18720-01May 2019LDAP Setup GuideOracle Financial Services Software LimitedOracle ParkOff Western Express HighwayGoregaon (East)Mumbai, Maharashtra 400 063IndiaWorldwide Inquiries:Phone: +91 22 6718 3000Fax: +91 22 6718 3001/financialservices/Copyright © 2019, Oracle and/or its affiliates. All rights reserved.Oracle and Java are registered trademarks of Oracle and/or its affiliates. Other names may be trademarks of their respective owners.U.S. GOVERNMENT END USERS: Oracle programs, including any operating system, integrated software, any programs installed on the hardware, and/or documentation, delivered to U.S. Government end users are “commercial computer software” pursuant to the applicable Federal Acquisition Regulation and agency-specific supplemental regulations. As such, use, duplication, disclosure, modification, and adaptation of the programs, including any operating system, integrated software, any programs installed on the hardware, and/or documentation, shall be subject to license terms and license restrictions applicable to the programs. No other rights are granted to the U.S. Government.This software or hardware is developed for general use in a variety of information management applications. It is not developed or intended for use in any inherently dangerous applications, including applications that may create a risk of personal injury. If you use this software or hardware in dangerous applications, then you shall be responsible to take all appropriate failsafe, backup, redundancy, and other measures to ensure its safe use. Oracle Corporation and its affiliates disclaim any liability for any damages caused by use of this software or hardware in dangerous applications.This software and related documentation are provided under a license agreement containing restrictions on use and disclosure and are protected by intellectual property laws. Except as expressly permitted in your license agreement or allowed by law, you may not use, copy, reproduce, translate, broadcast, modify, license, transmit, distribute, exhibit, perform, publish or display any part, in any form, or by any means. Reverse engineering, disassembly, or decompilation of this software, unless required by law for interoperability, is prohibited.The information contained herein is subject to change without notice and is not warranted to be error-free. If you find any errors, please report them to us in writing.This software or hardware and documentation may provide access to or information on content, products and services from third parties. Oracle Corporation and its affiliates are not responsible for and expressly disclaim all warranties of any kind with respect to third-party content, products, and services. Oracle Corporation and its affiliates will not be responsible for any loss, costs, or damages incurred due to your access to or use of third-party content, products, or services.Table of Contents1.PREFACE ........................................................................................................................................................ 1-1 1.1I NTRODUCTION ......................................................................................................................................... 1-1 1.2A UDIENCE................................................................................................................................................. 1-1 1.3D OCUMENTATION A CCESSIBILITY ............................................................................................................ 1-11.4R ELATED D OCUMENTS ............................................................................................................................. 1-12.INSTALLING AND CONFIGURING OUD ................................................................................................. 2-1 2.1P REREQUISITES ......................................................................................................................................... 2-1 2.2I NSTALLATION OF OUD12.2.1.3 .............................................................................................................. 2-1 2.3R UNNING RCU S CHEMAS ......................................................................................................................... 2-1 2.4OUD S ETUP.............................................................................................................................................. 2-1 2.5C ONFIGURING D IRECTORY M ANAGEMENT D OMAIN FOR OUD ................................................................ 2-11. Preface1.1 IntroductionLDAP server is used by Plato Api-gateway application, which uses plato-security-jwt to get details from ldap server and authentication against the input details to create tokens.If enterprise level LDAP server is not present, use OUD 12.2.1.3 as LDAP server and configurethe details in SECURITY_CONFIG INC script.1.2 AudienceThis document is intended for WebLogic admin or ops-web team who are responsible forinstalling the OFSS banking products.1.3 Documentation AccessibilityFor information about Oracle's commitment to accessibility, visit the Oracle Accessibility Program website at /pls/topic/lookup?ctx=acc&id=docacc.1.4 Related Documents∙Common Core Services Installation Guide∙Day 0 Setup Guide∙ANNEXURE-1∙Oracle Banking Credit Facilities Process Management Pre-Installation Guide∙Oracle Banking Credit Facilities Process Management Services Installation Guide∙Oracle Banking Credit Facilities Process Management User Interface Installation Guide∙Oracle Banking Credit Facilities Process Management BPMN Process Installation Guide∙Plato Infrastructure Services Installation Guide∙Security Management System Services Installation Guide∙SSL Setup Guide2. Installing and Configuring OUD2.1 PrerequisitesOracle fusion middleware 12.2.1.3 should be installed on the machine prior to OUD 12.2.1.3installation. For configuring OUD directory management domain, RCU schemas should bepresent.2.2 Installation of OUD 12.2.1.3Refer this oracle documentation on how to install OUDhttps:///middleware/12213/oud/install.htm2.3 Running RCU SchemasFor configuring domain with directory management template, RCU schemas has to be provided.Refer this document for creating RCU schemas using 12.2.1.3 middleware home.https:///middleware/12213/lcm/RCUUG/RCUUG.pdf2.4 OUD SetupRefer this oracle documentation to setup LDAP (and LDAPS) OUD directory.https:///middleware/12213/oud/OUDIG/setting-oracle-unified-directory-directory-server.htm#OUDIG000492.5 Configuring Directory Management Domain for OUDRefer this oracle documentation on how to configure domain for OUD with directory management template.https:///middleware/12213/oud/OUDIG/installing-oracle-unified-directory-software.htm#OUDIG-GUID-3EB44650-2322-445B-90B7-00BAFCEA1B8D。
LDAP过滤器使⽤说明(⽤户、组和容器的默认LDAP过滤器和属性)说明来源:/html/E35191_01/ldap-filters-attrs-users.html#ldap-filters-attributes-users-default⽤户、组和容器的默认 LDAP 过滤器和属性下表包含⽤户、组和容器的默认 LDAP 过滤器和属性。
Oracle VDI Manager默认值名称⽤户过滤器(&(|(objectclass=user)(objectclass=person)(objectclass=inetOrgPerson) (objectclass=organizationalPerson))(!(objectclass=computer)))⽤户搜索过滤器(|(cn=$SEARCH_STRING)(uid=$SEARCH_STRING) (userPrincipalName=$SEARCH_STRING)(mail=$SEARCH_STRING))⽤户 ID 属性uid,sAMAccountName,userPrincipalName,mail⽤户成员属性memberof,primaryGroupID⽤户短属性组过滤器(|(objectclass=group)(objectclass=groupofnames) (objectclass=groupofuniquenames))组搜索过滤器(|(dc=$SEARCH_STRING)(o=$SEARCH_STRING)(ou=$SEARCH_STRING) (cn=$SEARCH_STRING)(uid=$SEARCH_STRING) (mail=$SEARCH_STRING))组成员属性member,uniquemember组短属性primaryGroupToken容器对象过滤器(|(objectclass=domain)(objectclass=organization) (objectclass=organizationalUnit)(objectclass=container))容器搜索过滤器(|(cn=$SEARCH_STRING)(dc=$SEARCH_STRING)(ou=$SEARCH_STRING))默认属性dc,o,ou,cn,uid,mail,member,uniquemember,memberof,sAMAccountName, primaryGroupToken,primaryGroupID。
ApacheDS LDAP 配置使用说明Apache LDAP包括ApacheDS服务和Apache Directory Studio RCP工具。
下面的内容主要介绍ApacheDS服务和ApacheDS工具。
ApacheDS服务下载地址:/apacheds/2.0/downloads.html 下载独立的Apache Directory Studio的RCP程序:/studio/安装Eclipse插件:/studio/update/2.x/一、安装ApacheDS服务安装ApacheDS服务器,在ApacheDS官网下载最新的服务器,目前的版本是ApacheDS2.0.0-M8 ,可以根据需要下载适合自己的版本:如Windows系统:1、可以下载“Download Windows installer”安装版,ApacheDS的安装比较简单,没有什么特殊的设置。
在ApacheDS 安装完成后要启动ApacheDS服务。
路径如下:控制面板---à管理工具---à服务--àApache Directoryserver,ApacheDS的监听端口默认为10389。
2、还可以下载“Download Archivezip/tar.gz",解压apacheds-2.0.0-M8.tar包,然后在apacheds-2.0.0-M8目录下的bin目录,点击ApacheDS.bat 可启动服务。
也可以将此服务设置成系统服务。
在每次机器启动时会自动开启。
二、Apache Directory Studio使用说明Apache Directory Studio 是一个LDAP 的工具平台,用来连接到任何LDAP 服务器并进行管理和开发工作。
主要功能:LDAP浏览器、LDIF编辑器、嵌入式ApacheDS、ACI编辑器。
1、安装Apache directory studio该软件是ApacheDS的一个客户端工具。
用于连接ApacheDS,搜索,更新,删除,添加数据。
安装时也没有特别设置,请按默认设置安装该软件。
2、使用Apache directory studio连接ApacheDS服务第一步:在菜单栏中选择LDAP菜单下的New Connection 选项第二步:在下面的对话框中输入相应的值。
第三步:在一下对话框中输入要连接的根DN和密码。
在ApacheDS安装完成后,已经创建了几个DIT(目录信息树),第一次登录ApacheDS的话一般会连接如下输入的根节点的DN 密码为:secret。
当然可以在第一个选项框中选择No Authentication。
这是不需要输入下面的验证信息。
这种登录术语匿名登录。
权限受限制。
第四步。
连接完成后,如下图:图中出现了ApahceDS安装默认创建的三个目录信息树也可以连接OpenLDAP服务,如:3、设置ApacheDS新分区ApacheDS默认设置的三个分区无法满足开发者或者客户需要,需要创建新的分区,如《统一用户管理系统》的LDAP 分区是dc=ablaze,dc=com。
这就需要创建新分区。
3.1ApacheDS1.0版本设置新分区ApacheDS2.0版本之前设置分区是通过Server.xml文件。
第一步:创建Partition。
ApacheDS中的目录信息是保存在Partition中的。
所以在创建新的目录树之前首先要创建Partition。
创建Partition的一个方法是修改server.xml配置文件。
该文件路径如下:C:\Program Files\Apache Directory Server\instances\default\conf\在该文件中找到Partitions元素。
添加元素。
第二步:创建完成之后,重启Apache direcory server 服务。
在Apache directorystudio视图中看到结果如下,在右侧栏中我们可以看到我们刚刚添加的Partition。
但是在左侧栏中,我们并没有看到该目录分支存在。
因为,必须要创建一个Context Entry。
第三步:创建Context Entry 1234563.2ApacheDS2.0版本设置新分区ApacheDS2.0版本取消server.xml文件,设置新分区通过Apache Directory Server工具实现。
第一步:创建Server DS服务,打开Apache Directory Server 工具,在菜单选择file->new,在弹出对话框选中Apache DS Server项。
第二步:点击下一步,输入服务名称DSServer.点击finish。
创建服务完成如下图:第三步:双击DS Server服务,在编辑框打开Server.xml 文件,编辑ApacheDS服务。
在“General"项可以看到,可以在此修改ApacheDS端口号。
如果创建新分区,需要定位到“Partitions”项,如下图:点击“Add”按钮,在“AllPartitions”列表中增加一个分区,再在右边的Partition Details中填写需要的信息即可。
点击保存按钮,重新启动ApacheDS服务可生效。
重新启动服务第四步:将增加的ablaze分区放到DIT浏览中。
创建Context Entry123456三、ApacheDS应用场景使用JNDI操作目录服务1.准备连接目录服务器的相应配置文件(以ApacheDS为例)apacheds.propertiesjava.naming.factory.initial=com.sun.jndi.ldap.LdapCtxFactoryjava.naming.provider.url=ldap://localhost:10389/dc=ablaze ,dc=comjava.naming.security.authentication=simplejava.naming.security.principal=uid=ligr,dc=ablaze,dc=com java.naming.security.credentials=secret2.创建测试类Hashtable env = newHashtable();env.put(Context.INITIAL_CONTEXT_FACTORY,"com.sun.jndi.ldap.LdapCtxFactory");env.put(Context.PROVIDER_URL,"ldap://localhost:10389/dc=ablaze,dc=com");env.put(Context.SECURITY_PRINCIPAL,"uid=admin,dc=ablaze,dc=com");env.put(Context.SECURITY_CREDENTIALS, "secret");env.put(Context.SECURITY_AUTHENTICATION,"simple");InitialDirContext ctx = newInitialDirContext(env);Attributes attrs =ctx.getAttributes("");NamingEnumeration enm =attrs.getAll();while (enm.hasMore()) {System.out.println(enm.next());}四、ApacheDS开发包---深度开发ApacheDS在安装路径lib目录的下,存放apacheds-service-2.0.0-M8.jar和apacheds-wrapper-2.0.0-M8.jar包,可以同样完成Apache DirectoryStudio工具操作的任务。
如创建分区,也可以通过代码完成:JdbmPartition sevenseasPartition =new JdbmPartition();sevenseasPartition.setId("sevenseas"); sevenseasPartition.setSuffix("dc=ablaze,dc=com"); sevenseasPartition.setCacheSize(1000); sevenseasPartition.init(directoryService);// Create some indices(optional)Set> indexedAttrs = newHashSet>();indexedAttrs.add( newJdbmIndex ("objectClass"));indexedAttrs.add( newJdbmIndex ("o"));sevenseasPartition.setIndexedAttributes( indexedAttrs );//Add partition to the directoryservicedirectoryService.addPartition(sevenseasPartition);// start the directoryservicedirectoryService.startup();// create the contextentryServerEntry entry = newDefaultServerEntry( directoryService.getRegistries(), new LdapDN("o=sevenseas") );entry.put( "objectClass", "top", "organization");entry.put("o","ablaze");// add the context entry AddContextPartitionOperationContextadOpContext = new AddContextPartitionOperationContext( directoryService.getAdminSession(), sevenseasPartition);adOpContext.add( entry, null);directoryService.getPartitionNexus().addContextPartition( adOpContext );。