M760D技术手册
- 格式:pdf
- 大小:778.04 KB
- 文档页数:30


LS 60d Product ManualForewordThank you for purchasing Aputure “Light Storm” LS 60d. The Aputure LS 60d is a series of light storm brand new design with its own optical system lamps. The lamp integrates a new lens design to greatly improve the optical quality and texture of low-power light sources. Compact structure design, metal lamp body, excellent texture. LS60d/x is the fixture with weather resistance design, to meet more severe use scenarios. Cooperate with the use of Barn doors, soft light box and other accessories to enrich the use form of products. So that the product to meet the needs of light control in different occasions, easy to achieve broadcast level photography. IMPORTANT SAFETY INSTRUCTIONS When using this unit, basic safety precautions should always be followed, including the following:1. Read and understand all instructions before using.2. Close supervision is necessary when any fixture is usedby or near children. Do not leave fixture unattended whilein use.3. Care must be taken as burns can occur from touching hot surface.4. Do not operate the fixture if a cord is damaged or if thefixture has been dropped or damaged - until it has been examined by qualified service personnel.5. Position any power cables such that they will not be tripped over, pulled, or put into contact with hot surfaces.6. If an extension cord is necessary, a cord with an amperage rating at least equal to that of the fixture should be used. Cords rated for less amperage than the fixture may overheat.7. Always unplug the lighting fixture from the electrical outlet before cleaning and servicing, or when not in use. Never yank the cord to remove the plug from the outlet.8. Let the lighting fixture cool completely before storing.9. To reduce the risk of electric shock, do not immerse this fixture in water or any other liquids.10. To reduce the risk of fire or electric shock, do not disassemble this fixture. Contact Aputure Customer Service or take it to qualified service personnel when service or repair work is required. Incorrect reassembly may cause electric shock when the lighting fixture is in use.11. The use of an accessory attachment not recommended by the manufacturer may increase the risk of fire, electric shock, or injury to any persons operating the fixture.12. Power this fixture by connecting it to a grounded outlet.13. Please remove the protective film from the optical lens before use.14. Please do not block the ventilation and do not look at the light directly when it is powered on.15. Please do not place the LED lighting fixture near any liquids or other flammable objects.16. Only use a dry microfiber cloth to clean the product.17 Please have the product checked by authorized service personnel agent if your product has a problem.18. The malfunctions caused by unauthorized disassemble are not covered under the warranty.19. We recommend only using the original Aputure cable accessories. Please note that our warranty for this product does not apply to any repairs required due to any malfunctions of unauthorized Aputure accessories, although you may request such repairs for a fee.20. This product is certified by RoHS, CE, KC, PSE, and FCC. Please operate the product in full compliance with the operation standards. Please note that this warranty doesnot apply to repairs arising from malfunctions, althoughyou may request such repairs on a chargeable basis.21. The instructions and information in this manual are based on thorough, controlled company testing procedures. Further notice will not be given if the design orspecifications change.SAVE THESE INSTRUCTIONSFCC Compliance StatementThis device complies with Part 15 of the FCC Rules. Operation is subject to the following two conditions: (1) This device may not cause harmful interference. (2) This device must accept any interference received, including interference that may cause undesired operation.Warning: Changes or modifications not expressly approved by the party responsible for compliance could void the user's authority to operate the equipment.NOTE: This equipment has been tested and found to comply with the limits for a Class B digital device, pursuant to Part 15 of the FCC Rules. These limits are designed to provide reasonable protection against harmful interference in a residential installation. This equipment generates uses and can radiate radio frequency energy and, if not installed and used in accordance with the instructions, may cause harmful interference to radio communications. However, there is no guarantee that interference will not occur in a particular installation. If this equipment does cause harmful interference to radio or television reception, which can be determined by turning the equipment off and on, the user is encouraged to try reorient or relocate the receiving antenna.Increase the separation between the equipment and receiver.Connect the equipment into an outlet on a circuit different from that to which the receiver isconnected.Consult the dealer or an experienced radio/TV technician for help.RF warning statement:This device has been evaluated to meet general RF exposure requirements.Check listWhen you unbox the product, please make sure all the items listed below are included.Otherwise, please contact the seller immediately.Adapter (1 pc)Bowens MountAdapter (1 pc)(1 pc)D-tap to DC Cable (1 pc)Barn Doors (1 pc)Battery case (1 pc)Red lock keyBlack lock keyInstallations1. Install the Bowens Mount AdapterLift the claw directly above the lamp cap and rotate it 90° to the side, then point the Bowens Mount Adapter at the other three slots on the lamp cap, place it into the slots from top to bottom, then lift the socket directly above and rotate it to the front.Lift the claw directly above the lamp cap and rotate it 90° to the side, then point the Barn Doors at the other three slots on the lamp cap, place it into the slots from top to bottom, then lift the socket directly above and rotate it to the front.* To remove the Adapter, press the V-mount seat button and pull the Adapter case upward.2. Battery powered* Rotate the red rotary ring of the DC input connector clockwise, then pull out to remove the adapter.* Rotate the red rotary ring of the DC input connector clockwise and then pull it out to remove the battery case. Do not pull it out forcibly.* When using a single battery for power supply, be sure to install the battery in the battery slot corresponding to the red key;When removing the battery, press the red lock button to pull out the battery. Do not pull it out forcibly.* Single battery: Voltage 6~8.4V; Recommended ≥6.6A continuous discharge.1. Ac power supplyThe power supply* Rotate the red rotary ring of the DC input connector clockwise and then pull it out to remove the battery case. Do not pull it out forcibly.the red/black lock key successively;When removing the battery, press the red/black lock button and then pull out the battery one by one. Do not pull it out forcibly..* Dual battery: Voltage 12~16.8V; Recommended ≥6.6A continuous discharge.* Only use batteries that support the necessary continuous current discharge specificationsmentioned above. If non-compatible batteries are used, the batteries will enter a protection state and the lighting fixture will not operate as intended.* Do not use a battery with a specification of more than 21V. Using the wrong battery will cause damage to the lamp.* Press the V port seat button and pull out the V-Mount battery upward. Do not pull it out forcibly.* Rotate the red rotary ring of the DC input connector clockwise and then pull it out to remove the D-tap to DC Cable. Do not pull it out forcibly.Lamp Head.Operations2) Click the MENU key to enter the MENU interface, as shown below.increase the brightness, counterclockwise to reduce the brightness. Stepless adjustment can be realized.minRotate the "MENU" key to select MENU options, and click the "MENU" key to enter the selected MENU items; To exit the MENU interface, click the "MENU" key and select "exit" to return to the CCT interface.3) CCT mode* In lighting mode, short press the “OK” button to single trigger the light effect, long press the “OK” button to enter the cycle mode.b. Fireworks Mode a. Paparazzi Mode c. Faulty bulb Mode d. Lightning Mode Select "CCT" from the menu interface and enter THE CCT mode. Rotate the "OK" key to adjust the INT.4) FX modef. Pulsing Modee. TV Mode Select "FX Mode" from the menu interface. Rotate and click "OK" to enter differentFX modes.* If the light is powered off, upon turning on again, the light resumes its last saved setting.* Through the menu interface, select "Device serial number" to view the serial number of the device.Rotate the MENU key to select "INT, frequency", and then rotate the "OK" knob to adjust the brightness value (10% ~ 100%), and frequency [1-10, R (random)].Users can connect devices with the name LS 60d ****** through the bluetooth oftheir mobile phones or tablets (six digits + letters are the serial number of themachine). At this time, they can control the devices wirelessly through their mobile phones or tablets.6) Dimming curve mode5) Wireless mode* In explosion mode, short press the Trigger button to single trigger the light effect.* The adjustable frequency of explosion mode is 1~10.g. Strobe Mode h. Explosion Mode* In FX mode, click "MENU" to return to the light effects MENU interface. At this point, rotate "OK" to switch to different light effects. Click "MENU" again to return to the main MENU interface.At this time, the selected FX mode is still maintained. You can choose different options according to your needs, and select "CCT" to exit FX mode.Press “MENU” key to enter MENU mode, rotate “MENU” key to select "Dimming curve" item, click “MENU” key to enter "Dimming curve" mode, rotate "OK" key to select exponential, logarithmic, linear and "S" dimming curve, and then click "OK" key to confirm the selection.* When Studio Mode is active, the light will turn on as soon as it receives power, without having to press the power button.* The factory default language is English.* Studio Mode is active as the factory default.* The light must be connected to your mobile device using the Sidus Link mobile application, and not via your device's typical Bluetooth connection menu.9) Language7) Studio mode8) Bluetooth reset (2) After resetting the light's Bluetooth connection, your mobile phone or tablet will be able to connect to and control the LS 60d.(3) If the Bluetooth Reset fails, a [Reset Failed] screen will pop-up, and the light will return to Bluetooth mode after 2 seconds.Press “MENU” key to enter MENU mode, rotate “MENU” key to select Language, click “MENU” key to enter Language MENU, rotate “OK” key to select English or Chinese, and then click “OK “key to confirm the selection.Press “MENU” key to enter the MENU mode, rotate “MENU” key to select studio mode, click “MENU” key to enter studio mode, then rotate "OK" key to select "Yes" or "No", and click "OK" key to open or close studio mode.(1) Press “MENU” key to enter MENU mode, rotate “MENU” key to select Bluetooth reset, click “MENU” key to enter Bluetooth Reset mode, then rotate “OK” key to select "Yes" and press “OK” key short to reset Bluetooth (the current reset progress will be displayed on the pop-up interface, and the progress will be displayed within 5 seconds); Select "NO" to return to the previous menu.3. Focusing11) OTA modeFirmware updates can be updated online via the Sidus Link app for OTA updates.Optical "wide Angle" and "focus" can be achieved by rotating the focusing knob, clockwise rotation of the focusing knob to achieve "focus", counterclockwise4. Using the Sidus Link APPYou can download the Sidus Link app from the iOS App Store or Google Play Store for enhancing the functionality of the light. Please visit sidus.link/app/help for more details regarding how to use the app to control your Aputure lights.Sidus.link/app/help--- 157500 lux— 31500 lux--- 54300 lux— 9014 lux--- 16300 lux— 2200 luxTrademarksBowens is a trademark or registered trademark of Bowens in the P.R.C and other countries. Anton bauer is a trademark or registered trademark of Anton bauer in the US and other countries. IDX is a trademark or registered trademark of IDX in the JP and other countries.Detailed product manual for Light Storm can be found on .from defects in material and workmanship for a period of one (1) year after the光•风暴LS 60d使用者指南前言感谢您购买爱图仕“光•风暴”系列LED摄影灯—LS 60d。
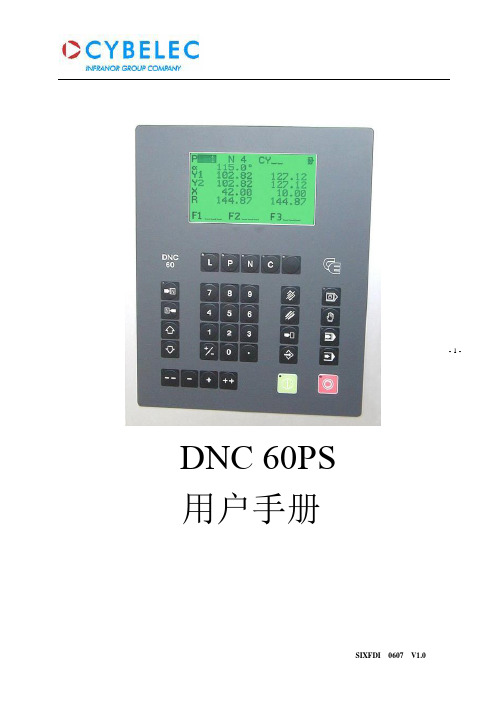
- 1 - DNC 60PS用户手册- 2 - 目录1 硬件介绍...................................................................................................................1 1.1 前面板....................................................................................................................1 2 按键功能...................................................................................................................2 2.1 屏幕页面选择键........................................................................................................2 2.2 工作模式选择键........................................................................................................2 2.3 指令键....................................................................................................................3 2.4 光标键....................................................................................................................4 2.5 “手动操作”键.......................................................................................................4 3 系统说明..................................................................................................................4 3.1 主菜单...................................................................................................................4 3.2 等级保护................................................................................................................5 4 模具编程..................................................................................................................6 4.1 查询上模目录..........................................................................................................6 4.2 查询下模目录..........................................................................................................7 4.3 上模/下模编制..........................................................................................................7 5 产品编程..................................................................................................................8 5.1 L-alpha 长度角度编程.............................................................................................8 5.2 N 页面直接编程. (16)5.3 产品校正...............................................................................................................19 6 产品目录管理...........................................................................................................20 6.1 调用产品...................................................................................................................20 6.2 删除产品...................................................................................................................20 7 参数模具备份和一键恢复功能......................................................................................20 7.1 Internal backup 内部备份......................................................................................21 7.2 Internal restore 内部恢复.......................................................................................21 8 系统报警信息说明 (22)- 3 -1 硬件介绍1.1 前面板下图为60系统的前面板,该前面板包括1块5.5英寸高对比度LCD 液晶显示器和编程及轴控制所需用到的各类按键.各按键功能将在下一章节详细介绍.按键面板包括以下按键: ·10个数字键(0-9) ·指令键·翻页与光标移动键 ·手动操作键·屏幕页面选择键(LED 灯显示按键状态) ·4种工作模式选择键(LED 灯显示按键状态) ·启动与停止键(LED 灯显示按键状态)液晶显示器 屏幕页面选择键 工作模式选择键 数字键 指令键 手动操作键 启动键 停止键- 4 - 2 按键功能2.1 屏幕页面选择键主菜单进入主菜单和EASY BEND(轻松折弯)页面。


ARM8060嵌入式主板说明书北京阿尔泰科技发展有限公司Beijing Art Technology Development Co.,Ltd.!安全须知电气方面安全性➢为避免可能的电击造成严重损害,在移动主板之前,请先将主板的电源切断。
➢当您要加入硬件设备到系统中或者要移除系统中的硬件设备时,请务必先连接该设备的信号线,然后再连接电源线。
➢请确定电源的电压设置已调整到所规定的电压标准值。
操作方面的安全性➢在您安装主板以及加入硬件设备之前,请务必详细阅读本手册所提供的相关信息。
➢在使用本产品之前,请确定所有的排线、电源线都正确地连接好。
若您发现有任何重大的瑕疵,请尽快联系我们或您的经销商。
➢为避免发生电气短路情形,请务必将所有没用到的螺丝、回形针及其它零件收好,不要遗留在主板上。
➢灰尘、湿气以及剧烈的温度变化都会影响主板的使用寿命,因此请尽量避免放置在这些地方。
➢当操作系统启动过程中,请勿断电,为避免损坏主板芯片➢系统运行过程中,防止静电,最好不要用手接触主板➢若在本产品使用上有任何的技术性问题,请和我们的技术支持人员联系。
目录目录11.产品简介11.1产品概述11.2 产品特点错误!未定义书签。
2产品特性72.1跳线说明72.2 外围设备接口连接82.3 软件特性错误!未定义书签。
3.电气参数及机械特性14附录A 订购信息15附录B 应用程序开发环境151.产品简介1.1产品概述ARM8060是北京阿尔泰科技发展有限公司基于Atmel公司ARM926EJ-S内核的AT91SAM9261处理器,结合PC104总线规范设计的一款具有极高性价比、结构和尺寸极其紧凑并且功耗极低的工业级嵌入式主板,其上运行嵌入式Linux 或WinCE操作系统,可以处理多种计算任务。
主板采用超低功耗嵌入式处理器,无风扇设计,超宽工作温度-20°C ~+70°C,低温工作性能优良,高温工作彻底解决了由于风扇可靠性而引起的故障。

一:清EEPROM 及其它面板操作速查(打印机内存全清)1.针打系列LQ-300k+换行/换页+进纸/退纸+暂停+电源LX-300+换行/换页+进纸/退纸+暂停+电源LQ-580K :换行/换页+进退纸+暂停+电源.LQ-630K :清EEPROM:换行/换页+进退纸+暂停+电源. 设置: 进纸/退纸 + 暂停 + 电源键盘锁定: 换行/换页 + 暂停 + 5秒以上,响二声。
解锁: 进纸/退纸 + 换行/换页 + ON.LQ-670K:高速+切纸电+源LQ-680K :换行/换页+进纸/退纸+暂停+电源LQ-1600K3/K3+,2600K字体+切纸+电源LQ-1600K4/K4+字体+切纸+电源LQ-2600K字体 + 切纸 + 电源DLQ-1000KLine Feed + Form Feed + Micro Adjust ↓ + 电源DLQ-3000K清EEPROM :Selec Type + Paper Select + Pause + 电源DLQ-3500KLF/FF + Load/Eject + Pause + 电源2.喷墨系列COLOR切换 + 字体 + 进/退纸 + 暂停+电源COLOR II切换+暂停+进纸+彩清洗+电源中国专业办公技术论坛h t t p ://w w w .o a c h n .n e tCOLOR 300进纸+清洗+电源, 再按清洗10秒COLOR 400/440/460进纸灯闪几秒后,按 1、 进/退纸清EEPROM 2、 清洗10秒,清废墨计数器COLOR 500进纸 + 黑头清洗 + 彩头清洗 + on ,再按进纸键3秒COLOR 600/640/66O/670进纸+清洗+电源 缺纸灯闪5秒后,再按1、进/退纸清EEPROM及timer IC2、清洗10秒,清废墨计数器COLOR 800/850初始化:进纸+黑头清洗+彩头清洗+ON ,松手再按彩头清洗10秒COLOR 1520K切换+进/退纸+换行/换页+微调↑+ 电源COLOR 3000暂停 + 换行/换页 + 微调↓ + 电源SP870/1270进/退纸 + 清洗 + on 然后按1、 /退纸清EEPROM及timer IC2、 清洗10秒,清废墨计数器SP 950:Paper + Roll paper + on 1. Paper (EEPROM)SP 2100/2200Paper + Roll paper + on 1. Paper (EEPROM)MJ-510进/退纸 + 清洗 + on 松手后再按进/退纸10秒至进纸灯和缺墨灯闪MJ-850切换 + 暂停 + 电源, 再按进/退纸至省墨灯与暂停灯闪烁,再按切换MJ-1000切换 + 省墨/压缩 + 进/退纸 + 暂停 + 电源MJ-1500K/K+切换+微调↓+暂停+换行/换页+ONproxl(xl+) alt +font+load/eject+pause+开机stylus1000 切换+省墨/压缩+进纸/退纸+暂停+开机中国专业办公技术论坛h t t p ://w w w .o a c h n .n e tEPSON 彩喷机需清零的机型分以下几种:1。