国科环宇OpenVPX产品手册2014版
- 格式:pdf
- 大小:20.85 MB
- 文档页数:84

One customer - burdened with global costs of between twenty cents and several euros per mb of data - invented a clever solution: Using a VPN he modified the IP to route ALL traffic to and from the CCGX via his VPN. Using a firewall at the VPN server allows him to control traffic according to time, connection type, place and destinations. Although this is beyond the scope of this manual it works, and - with the help of a Linux and networking expert - it can work for you.1.6.8 More information about setting up an internet connection and VRMSetting up a VRM account (/live/vrm_portal:start)Trouble shooting connectivity between the CCGX and the VRM Portal (/live/vrm_portal:troubleshooting_ccgx_vrm_connectivity)VRM Portal alarms and monitoring (/live/vrm_portal:alarms)VRM Portal - Frequently asked questions (/live/vrm_portal:faq)1.7 Connecting a USB GPSUse a GPS to track remote vehicles or boats and, optionally, get an alarm when they leave a designated area (geofencing). It is also possible to download a gps-tracks.kml file which can be opened with Navlink and Google Earth for example.Victron does not sell USB-GPS, but the CCGX will support third-party GPS modules which use the NMEA0183 command-set - almost all do. It can communicate at both 4800 and 38400 baud rates. Plug the unit into either of the two USB sockets …connection may take a few minutes, but the CCGX will automatically recognize the GPS. The unit's location will automatically be sent to the VRM online portal and its position shown on the map.The CCGX has been tested for compatibility with:Globalsat BU353-W SiRF STAR III 4800 baudGlobalsat ND100 SiRF STAR III 38400 baudGlobalsat BU353S4 SiRF STAR IV 4800 baudGlobalsat MR350 + BR305US SiRF STAR III 4800 baud1.8 Connecting a Fischer Panda GeneratorSee CCGX & Fischer Panda generators (/live/ccgx:fischer_panda).1.9 Connecting NMEA-2000 tank sendersA thrid party NMEA2000 tank sender must meet the following requirements to be visible on the GX Device:Transmit the NMEA2000 Fluid Level PGN, 127505The NMEA2000 device class needs to either General (80) in combination with function code Transducer (190), or Sensor (170). Or, the NMEA2000 device class needs to be Sensors (75), in combination with function Fluid Level (150).A single function reporting multiple Fluid Levels is currently not supported.For some tank senders it is also possible to configure the capacity and the fluid type on the GX Device - for example the Maretron TLA100. This facility may be available with other senders made by other manufacturers - it's well-worth trying.To connect an NMEA2000 network to the VE.Can port on the CCGX, use a VE.Can to NMEA2000 cable [https:///cables/ve-can-to-nmea2000-cable].Alternatively, instead of a VE.Can to NMEA200, you can use a 3802 cable from Oceanic Systems: https:///ve-can-adaptor/ [https:///ve-can-adaptor/]. The difference is that it lends itself well to connecting a single NMEA-2000 device into a VE.Can network. It's also able to power a lower voltage NMEA-2000 network directly from a 48V Victron system.Tested NMEA2000 tank senders:Maretron TLA100Navico Fluid Level Sensor Fuel-0 PK, partno. 000-11518-001. Note that this sender requires a 12V powered NMEA2000 network; it breaks when connected to a 24V-powered NMEA2000 network. And note that you need a Navico display to configure the Capacity, Fluid type, and other parameters of the sensor.Most likely others work as well. If you know of one working well, please edit this page -or- get in touch with us on Community -> Modifications[https:///spaces/31/index.html].1.10 Connecting IMT Solar Irradiance, Temperature and wind sensorsCompatibility and wiringThe compatible types are the Si-RS485TC Series [https:///fileadmin/docs/en/products/Si_Instruction_digital_2017_E.pdf]. The optional wind and temperature sensor are also supported.The sensor is connected using RS485 wiring, and requires our USB to RS485 accessory cable [https:///accessories/rs485%20to%20usb%20interface].Follow this diagram for the connection of the Sensor to the GX device's USB port, via the RS-485 to USB interface.(/live/_media/ccgx:sensordiagram.jpg)The Si-Sensor needs to be powered with 12 to 28V DC supply. If the system voltage will exceed this (eg 24V or 48V systems) then use a nonisolated 24V to 24V DCDC Converter[https:///dc-dc-converters/orion-24-12-5-10], or isolated 48V to 24V DCDC Converter [https:///dc-dc-converters/orion-tr-dc-dc-converters-isolated], with its input in parallel to the GX Device, and output connected to Si-Sensor.BEWARE! The maximum input voltage is 28V, which is too low for a 24V battery system (normally up to 28.8V or more), so it is recommended to use an Orion DCDC Converter.Wire connectionsSi-Sensor RS 485 interface Signal NoteBlack Black Minus Connect to GX Device minus as well.Brown Orange RS485 Data A +Orange Yellow RS485 Data B -Black (thick)Ground GroundRed Power positive (12/24V)Connect to either battery or output of DCDC ConverterMake sure all unused wires of the RS485 USB interface are terminated in an isolated manner. The data sheet for the RS485 to USB adapter is here [/datasheets/652302.pdf? _ga=2.109087045.1341578072.1576877093-346170190.1576877093&_gac=1.114585333.1576877093.CjwKCAiA__HvBRACEiwAbViuU6u5HSgNPlrACh3Qrw5A5ugDJSgYqGM6xd03nfJ0i6vuY-wIwTncoRoComkQAvD_BwE].Isolated RS485 to USB AdaptersIn some applications it may be necessary to use an isolated RS485 interface (eg positive ground systems). You must use the USB485-STIXL : Isolated USB to RS485 converter from Hjelmslund Electronics [https://hjelmslund.eu/default.asp]. Don't use any others, they will not be recognised by the GX Device.Configuration of the sensorNormally, the Sensor should work out of the box. In case it does not, for example when the sensor has previously been used in another system, then:1. Download the Si-MODBUS-Configuration software tool from the IMT website.2. Configure the following settings: Modbus Address - 3, Baud Rate: 9600, Data Format: 8N1 (10 Bit).For more support on configuring the IMT sensor, please contact IMT [https:///contact/].。


快速組裝手冊BESV TRS 2 XCV. 0.0, 20190304內容1.整車箱內容 (2)1.1主內容物 (2)1.2附件箱內容物 (2)2.安裝步驟 (3)2.1龍頭把手 (3)2.2前輪 (4)2.3踏板 (5)2.4座墊座桿 (6)2.5腳架 (6)2.6前燈 (7)2.7前土除 (8)2.8後貨架/土除 (9)2.9伸縮座桿(選配) (10)3.檢查 (14)1.整車箱內容1.1主內容物1.整車車架(含後輪)2.前輪3.附件箱1.2附件箱內容物1. BESV成車說明書-日本(含保固書)2. BESV說明書防竊盜險3. BESV日本保證卡4. 緩衝材5. 緩衝材7. Charger Box(含Charger, Power cord, 充電轉接座)8. 踏板9. 輪輻反光片10. 鈴鐺11. 後反光片/支架12. 儀表14. Shimano說明書2.安裝步驟2.1龍頭, 把手2.1.1調整把手置中後, 角度後掠上揚, 將龍頭與把手依序輪流交互鎖緊至5Nm (龍頭蓋上下間隙需均等)把手角度向後掠上揚間隙均等2.2前輪2.2.1前輪置入前叉後, 插入一快拆輪軸, 轉動螺帽使螺帽外張, 調整快拆把扣緊力道, 確實鎖緊.輪軸螺帽需外張2.2.2調整煞車卡鉗, 使碟盤轉動時, 無受煞車片磨擦d2.3 踏板2.3.1 裝配.“R ” 踏板裝配右側, 以順時針方向確實旋緊“L ” 踏板裝配左側, 以逆時針方向確實旋緊RL2.4座墊座桿2.4.1將座墊依續前後輪流交替鎖緊至6Nm, 鎖緊後, 座墊成水平或前後鎖塊間隙均等狀態.前後間隙均等2.4.2座桿插入部位可抹矽油, 降低磨擦產生異音. 依身高與實際騎乘狀況, 調整座墊高度.取出座桿, 量測插入深度是否足100mm. 否則須更換較長座桿.2.5腳架2.5.1將後腳架上端的鐵片, 放置於車架內側安裝平面平貼, 螺絲由外側穿過車架與腳架鐵片,在車架內側使用尼帽, 將腳架鎖緊(6Nm)Bolts2.6前燈2.6.1移除龍頭前蓋, 更換具有支架鎖點的前蓋, 如圖將龍頭前蓋, Y支架, 前燈鎖固..2.6.2調整前燈角度與位置, 並整理好週圍煞車, 變速, 儀表線.2.6.3連接下管前燈線. 注意白色虛線需與紅線相接2.7前土除2.7.1將土除與土除腳, 用螺絲, 尼帽鎖在一起(M5螺絲8F.7RA38.100, 尼帽8G.12101.851,扭力5Nm)2.7.2將土除腳鎖固在前叉上(M5螺絲8F.7RA38.100, 墊片8H.22201.812, 扭力5Nm)2.7.3將土除鎖固在前叉上橋(M6螺絲8F.8RA6A.100, 墊片8H.22201.A15, 扭力5Nm)2.8後土除2.8後貨架/泥除/反光片2.8.1將反光片與貨架, 用自攻螺絲(反光片配件包)鎖固, (扭力:4Nm)2.8.2使用螺絲(8F.7RY38.100), 墊片(8H.12101.810), 尼帽(8G.12101.851), 將貨架鎖固(扭力:5Nm)) 2.8.3使用螺絲(8F.7RY38.160), 墊片(8H.12101.810), 尼帽(8G.12101.851), 將貨架鎖固(扭力:5Nm) 2.8.4使用螺絲(8F.7RA3A.300), 彈簧墊片(8H.22201.A15), 墊片(8H.12201.A10), 將貨架鎖固在車架勾爪鎖孔上(扭力:6Nm)2.8.5. 使用螺絲(8F.9X138.160), 墊片(8H.12101.810), 配合圓柱墊塊(30.Y28SC.001), 將泥除鎖固在車架上叉橋上(扭力:5Nm)2.8.6.使用螺絲(8F.9X138.160), 墊片(8H.12101.810), 將泥除鎖固在車架下叉橋上(扭力:5Nm)2.9伸縮座桿(選配) (同AM車款裝配方式)2.9.1.購買如下圖之伸縮座桿. 線控機構與上方座桿頭相連接(不可使用底部連接樣式)並準備如下工具2.9.2.將車首入線止栓之固定件取下.2.9.3.將2m的導引線, 由上管後端入線孔穿入在車首左端入線孔, 以LED照入孔內, 車首右端入線孔, 以磁鐵, 鎳子, 將導引線拉出右側入線孔由側面看, 導引線會由上管內部的孔洞, 穿出到下管內,再將導印線從右側入線孔拉出2.9.4.接著將伸縮座桿的黑色外管線, 同樣由上管後端入線孔, 藉由導引線穿入車架內,慢慢的將外管推入車架, 並由車首右側入線孔穿出2.9.5.將導引線抽出車架, 僅留黑色外管在車架內勿移出, 接著將伸縮座桿之內線,同樣由上管後端入線孔, 穿入黑色外管, 一樣由車首右側入線孔穿出.2.9.6.將撥桿鎖固在把手左側, 調整好座桿高度後, 將內線與撥桿, 座桿與座墊鎖緊3.檢察3.1胎壓檢查.3.2煞車, 變速, 鍊條, 功能檢查, 是否連接牢固3.3檢查貨架, 土除, 是否穩固, 並且無歪斜, 以防騎乘危險.3.4插入鑰匙後, 將電池置入, 按下管右側啟動按鈕, 切換左把手之助力模式, 試踩確認馬達運作正常。

XP-8xx7-Atom-CE6 使用手冊XP-8xx7-Atom-CE6 為 XP-8147-Atom-CE6/8347-Atom-CE6/8747-Atom-CE6的簡稱。
XP-8xx6-Atom-CE6 為 XP-8146-Atom-CE6/8346-Atom-CE6/8746-Atom-CE6的簡稱。
重要1. XP-8xx7-Atom-CE6/8xx6-Atom-CE6 的插槽1~7 只支援高卡的 I-8K 與 I-87K I/O模組。
型錄請參考 XP-8xx7-Atom-CE6 CD: \napdos\isagraf\xp-8xx7-atom-ce6\chinese-manu\2. XP-8xx7-Atom-CE6 需設定為固定 IP 位址。
(不可使用 DHCP)3. 如果不使用 XP-8xx7-Atom-CE6的 LAN2,需將 LAN2 設定為 Disable (請參考附錄D)。
4. 建議使用工業級乙太網路交換器NS-205/208 或 RS-405/408來連接 XP-8xx7-Atom-CE6。
注意泓格科技股份有限公司對於因為使用本系列產品所造成的任何損害並不負任何法律上的責任,本公司並保留在任何時候修訂本書且不需通知的權利。
泓格科技股份有限公司將儘可能地提供本系列產品可靠而詳盡的資訊。
然而,本公司並無義務需提供此系列產品詳盡的應用資訊,或對因非法使用本系列產品所遭受的損害負任何責任。
商標與著作權本書所提所有公司商標,商標名稱及產品名稱分別屬於該商標或名稱的擁有者所有。
開發軟體兩種選項: - ISaGRAF: 3.4x或3.5x版,符合IEC 61131-3標準。
LD, ST, FBD, SFC, IL 與 FC。
- 非ISaGRAF: Microsoft EVC++4.0 或 2008/2005/2003 (, C#.net)。
參考資料- ISaGRAF English User’s Manual:XP-8xx7-Atom-CE6 CD: \napdos\isagraf\xp-8xx7-atom-atom-ce6\english-manu\ "user_manual_i_8xx7.pdf" 與"user_manual_i_8xx7_appendix.pdf"(附錄)- ISaGRAF中文進階使用手冊:XP-8xx7-Atom-CE6 CD: \napdos\isagraf\xp-8xx7-atom-ce6\chinese-manu\"chinese_user_manual_i_8xx7.pdf" (手冊) 與 "chinese_user_manual_i_8xx7_appendix.pdf"(附錄)- 更多網頁資訊: > 商品目錄 > 解決方案 > Soft PLC, ISaGRAF & Soft-GRAF HMI > ISaGRAF 首頁 > 產品手冊技術支援請連絡當地的經銷商或 E-mail 問題至****************** .常見問答集請參考FAQ : > 支援服務 > 產品問答 > ISaGRAF Soft-Logic PAC著作者: Chun Tsai; 編譯修改: Eva Li版權所有泓格科技股份有限公司,2012年9月起,保留所有權利。


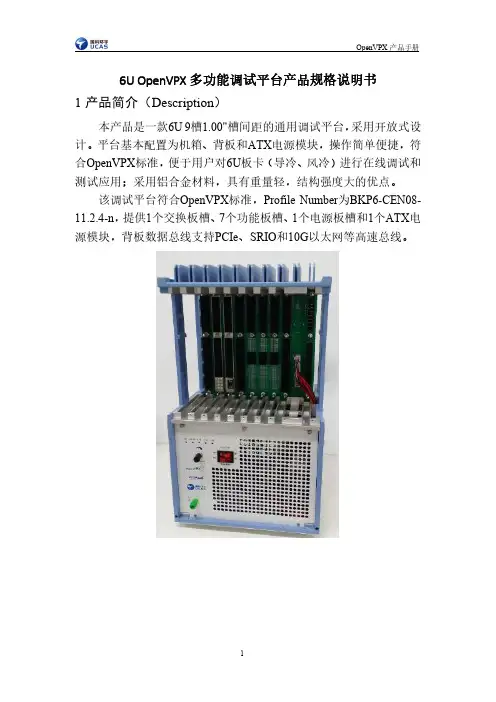
6U OpenVPX多功能调试平台产品规格说明书1 产品简介(Description)本产品是一款6U 9槽1.00"槽间距的通用调试平台,采用开放式设计。
平台基本配置为机箱、背板和ATX电源模块,操作简单便捷,符合OpenVPX标准,便于用户对6U板卡(导冷、风冷)进行在线调试和测试应用;采用铝合金材料,具有重量轻,结构强度大的优点。
该调试平台符合OpenVPX标准,Profile Number为BKP6-CEN08-11.2.4-n,提供1个交换板槽、7个功能板槽、1个电源板槽和1个ATX电源模块,背板数据总线支持PCIe、SRIO和10G以太网等高速总线。
PowerPowerPowerPowerPowerPowerPowerPowerIPMC IPMC IPMC ChMC IPMC IPMC IPMC IPMCData Plane Data Plane Data Plane Data Switch Data Plane Data Plane Data PlaneControl Plane Control Plane Control Plane Control Switch Control Plane Control Plane Control Plane12V ±12V_AUX 3.3V_AUXUtility PlaneManagementPlane (IPMB )Data Plane (FP )Control Plane (UTP )VPX9VPX8VPX7VPX6VPX5VPX3VPX2VPX1VITA67RFVITA66OpticalPowerIPMC Data Plane Control Plane VPX4Expan Plane Expan Plane Expan Plane Expan Plane Expan Plane Expan PlaneExpansion Plane (DFP )Expan Plane FP TPUDPEP(7:0)EP(7:0)Type C VPX9EP(15:8)EP(7:0)Type B VPX 8EP(15EP(7:0)EP(7:0)EP(7Expansion Planelanes Payload slots of 9-slot backplane (DFP = 8 lanes )2 产品应用(Application )(1) 用于VPX 单板调试; (2) 用于VPX 多板集成调试;(3) 用于OpenVPX 原型机功能调试和演示。

C o n t ra ct orV i s i t o rOne of these people has worn out their welcome...Secure • Effective • AffordableV e n d or T e m p o r ar yIncrease your security with a secure, effective, and affordable system.Our badges expire over time or immediately• Patented badges visually expire, indicating the end of an approved visit• No need to collect used badges!• Manage visitor traffic in business, healthcare, schools, and government facilities • Industry leader for over 30 years• Choose from stock styles or design your own custom badges Place FRONTpart over choice of BACKpart andthe expiration process begins(Shown with a Two-Part Expiring Badge3 x 3" (76 x 76mm) yellow color header BACKpart)VISITORDean BransonOpenTech CentralDean Branson OpenTech Central8:35am9/15Dean BransonOpenTech Central8:35am9/151-DAYEXPIRATIONRed LinesAppear GraduallyIMMEDIATEEXPIRATIONBadge Turns Blue When Exposed to UV/DaylightBACKpartFRONTpartValidValidExpiredExpiredMade In the USAManually-Issued ONEstep TIMEbadge ® Expiring Badge• Pre-printed title with area for writing• 1.875" x 2.875" (47 x 73mm) 500/pkg, fan-folded • Adhesive, no hardware or software needed • Choose from 4 badge designsManually-Issued ONEstep TIMEbadge ® Expiring Badge w/ Header• Pre-Printed "VISITOR" on Clip-on red header, plus blank area for writing • 2.625" x 3" (67 x 76mm) 500/box• Use with CARDclip ® (#08075) for easy applicationThermal-Printable TIMEbadge ® Expiring Badge• Comes Blank, 1.875" x 2.875" (47 x 73mm) 500/pkg, fan-folded • Badges print from any direct thermal printer • Use with any visitor software system• Customize your own layout with text or logoCUSTOMIZE IT!VisitorTemporary Contractor VendorAll you need, Pre-Assembled in ONE badge!ONEstepChoose a ONEstep badge for quick & easy issuance...020030200402005020070201402011ONEstep TIMEbadge ®Simply peel away the liner from FRONTpart, press together and issue to visitor!HOW IT WORKS:Please Note: Adhesive Badges should not be applied to delicate materials such as leather, silk, suede and vinyl.Tom HandlerTom Handler Floor 4VISITORTom Handler Investment GroupA c t i v a t ei n O N E e a s ys t e p !Tom Handler Floor 4VISITOR Tom HandlerWorldwide Corp.1-DAYEXPIRATIONRed Lines Appear GraduallyManually-Issued TIMEbadge ® Expiring Badge• Pre-Printed title with area for writing• 1.935" x 2.875" (49 x 73mm) 1,000/pkg, fan-folded • No hardware or software needed• Excellent for low to moderate visitor trafficThermal-Printable TIMEbadge ®Expiring Badge• Comes Blank, 1.935" x 2.8125" 1,000/pkg (5 Rolls of 200)• Badges print from any direct thermal printer • Use with any visitor software system• Customize your own layout with text or logoInkjet or Laser-Printed TIMEjet ® Expiring Badge• Comes Blank, 1.935" x 2.8125" (49 x 71mm) 500/pkg • Badges print from any inkjet or laser printer• Quick and easy to use, print in color or black & white • Badges come 2-up per sheetCARDclip®Reusable plastic CARDclip ® (#08075)are an inexpensive way to attach clip-on badges. 500 clips/pkgAdhesive BACKpart• 2" x 3" (51 x 76mm) 500/pkg • Badges come fan-foldedClip-On BACKpart with PRINTED color header• 3" x 3" (76 x 76mm) 500/pkg • Badges come fan-foldedClip-On BACKpart with PLAIN color header• 3" x 3" (76 x 76mm) 500/pkg • Badges come fan-foldedCUSTOMIZE IT!Visitor VendorTemporary Contractor Yellow 129Red 185Process Blue Reflex BluePurple Pantone Green WhiteChoose a BACKpart:Choose a FRONTpart:21Choose a two-part badge for greater flexibility...0590205903059040590505906059070602705913059370593805915060320591305902061030615102015Button keeps ID straight!C o l or -C o d ef o r D i f f e r e n tG r o u p s !Please Note:Adhesive Badges should not be applied to delicate materials such as leather, silk, suede and vinyl.0610306104061050610706145VisitorTemporary Contractor Vendor Blank08080OpenT ech Central8:35 am9/15DeOpDeOp 8:35amDean BransonOpenTech Central 8:35am 9/15VISITORDean BransonOpenTech CentralDean Branson OpenTech Central8:35am9/15Dean Branson OpenTech Central8:35am9/15VISITORDean BransonOpenTech CentralDean BransonOpenTech Central8:35am9/15Dean BransonOpenTech Central8:35am9/15Tom Handler Floor 4VISITORTom Handler Worldwide Corp.1-DAYEXPIRATIONRed Lines Appear GraduallyLIGHTbadge ® – Expiring Badges• Immediately turns blue when exposed to UV/Daylight • Quick to issue• Manual version, Pre-printed "Visitor" - 1,000/pkg, fan-folded • Printable version (Thermal-Transfer), Blank - 500/roll • 1.9375 x 2.875" (49 x 73mm)Easy Security Solution for Indoor EventsLIGHTbadge®Choose LIGHTbadge ® for IMMEDIATE expiration...0511608188OUTDOORVALIDEXPIREDINDOOR VisitorMatthew AldenMedClinic Ohio596 SUMNER STREET AKRON, OH 44311L a n n e t Av i a t i o n G r o u pJune 3, 2010Sean Wilson Computer LabBrenda DanielsNorth Eastern Sales Rep.VISITORNameDestinationDate Time InIf Vendor Check hereCaroline Montgomery West Wing Sept 212:15pDESIGN YOUR OWN CUSTOM EXPIRING BADGESEllen GraberIMMEDIATEEXPIRATIONBadge Turns Blue When Exposed to UV/DaylightMedClinic Ohio596 SUMNER STREET AKRON, OH 44311O pe nHo us eEx hi bi t io nMedClinic Ohio596 SUMNER STREET AKRON, OH 44311L a n n e t Av i a t i o n G r o u pOpenTech CentralSeth MichaelsMary Stewart Taylor Company Jennifer Hughs August 28B re n d a Da n ie lsN o rt h E ast e rn S ale s R e p .Half-Day (4 hour) andOne Week (5 Day) Badges School Badges(Half-Day and One Day)Double Sided Card Badges Badges withTIMEtoken Indicators Wrist Bands (One Day Expiring and Non-Expiring)Parking Permits (One Day Expiring and Non Expiring)Expiring Spots and TokensBadges withTIMESpot IndicatorsFor more information on these products, visit our website:Non-Expiring Badges。

Openbravo中文利用手册——权限治理权限治理定制权限操作演示:在游览器中输入openbravo后台的登岸用户名和密码,进行操作。
在进行采购治理操作前,先设置下权限,使得你有更大权限进行操作。
点击左上角的Openbravo进行权限设定。
在作用这一栏里选择big bazaar admin,在点击OK。
如此你拥有最大的权限了。
Openbravo中文利用手册——采购治理采购治理采购管理(Procurement Management)采购治理是打算下达、采购单生成、采购单执行、到货接收、查验入库、采购发票的搜集到采购结算的采购活动的全进程,对采购进程中物流运动的各个环节状态进行周密的跟踪、监督,实现对企业采购活动执行进程的科学治理。
以下是Openbravo采购管理的操作演示。
采购治理—交易操作演示在采购治理模块下包括有两个子菜单别离为:交易和报表。
在交易菜单下的一级目录有:申请、采购申请治理、采购申请、采购定单、物料收货、发票(供给商)、已匹配采购定单、已匹配发票、发货产生的发票、待审收料单提示:解释下交易和报表这两个菜单的关系,报表菜单的产生是附于交易菜单,报表菜单是可查看交易菜单中的内容。
请购治理—操作演示是对企业的采购打算进行制定和治理,为企业提供及时准确的采购打算和执行线路。
采购打算包括按期采购打算(如周、月度、季度、年度)、非按期采购任务打算(如系统依照销售和生产需求产生的)。
通过对多对象多元素的采购打算的编制、分解,将企业的采购需求变成直接的采购任务,系统支持企业以销定购、以销定产、以产定购的多种采购应用模式,支持多种设置灵活的采购单生成流程,采购申请单是分公司依照业务需要,要求总公司进货的单据。
采购申请也是采购定单的形成前提。
点击一级菜单“采购管理”,在点击二级菜单“交易”,再点击“交易”下的子菜单“请购管理”,进入“请购管理”页面。
点击左上角上的新建,对请购治理治理表进行编辑,输入:客户、公司、是不是有效、业务伙伴、价目表、货币种类、描述信息、等信息后,点击保留注1:在进行编辑时,可不用手动录入信息,直接下拉选框进行选择。
Instruction Sheet 860337070Issue 7, June 2013M204SMB Surface Mount Box Instructions© 2013 CommScope, Inc. All rights reservedPage 1 of 12GeneralThe CommScope ®M204SMB surface mount box (SMB) is designed for interior surface-mounted applications and can support copper and fiber terminations. The standard unit is equipped with two adapters, which can support two M-series outlets each. The two openings on the front side of the box can be fitted with different adapters that will allow for a wide range of connectivity applications. The SMB can accommodate cable entry through three sides of the box and through the base and also has a snap-in fiber spool to assist with fiber management. The SMB can be mounted to a standard electrical box using the screws provided or if mounting to a wall or other smooth, flat surface, by using the double-sided adhesive tape provided. The SMB is available in four colors. Material ID Part No. Color 760045005 M204SMB-003 Black 760045013 M204SMB-246 Ivory 760044990 M204SMB-262 White 760045021M204SMB-270GrayHow to Contact Us• To find out more about CommScope ®products, visit us on the web at / •For technical assistance:-Within the United States, contact your local account representative or technical support at 1-800-344-0223. Outside the United States, contact your local account representative or Authorized Business Partner.-Within the United States, report any missing/damaged parts or any other issues to CommScope Customer Claims at 1-866-539-2795. Outside the United States, contact your local account representative or Authorized Business Partner.Parts ListVerify contents from the parts listed below: QuantityDescriptionQuantityDescription1 Base 1 Clear label cover 1 Cover 3 Dust covers2 Adapters 4 Mounting screws 1 Fiber spool3 Cable ties1 Cover attachment screw2 Double-sided adhesive tape 1Paper label1Instruction sheet860337070Instruction SheetPage 2 of 12Available AccessoriesMaterial ID Part No.Description760009464 M30FP-BLANK-003 Blank adapter (Black) 760009472 M30FP-BLANK-246 Blank adapter (Ivory) 760009480 M30FP-BLANK-262 Blank adapter (White) 760009498 M30FP-BLANK-270 Blank adapter (Gray) 760009423 M30FP-1RJ45-003 Single adapter (Black) 760009431 M30FP-1RJ45-246 Single adapter (Ivory) 760009449 M30FP-1RJ45-262 Single adapter (White) 760009456 M30FP-1RJ45-270 Single adapter (Gray) 760008649 M30FP-2RJ45-003 Duplex adapter (Black) 760008656 M30FP-2RJ45-246 Duplex adapter (Ivory) 760008664 M30FP-2RJ45-262 Duplex adapter (White) 760008672 M30FP-2RJ45-270 Duplex adapter (Gray) 760005256 M81-SVHS-110-003 S-video outlet (Black) 760005264 M81-SVHS-110-246 S-video outlet (Ivory) 760005272 M81-SVHS-110-262 S-video outlet (White) 760005280 M81-SVHS-110-270 S-video outlet (Gray) 760028704 M30FP-VGA-PT-003 VGA adapter (Black) 760028712 M30FP-VGA-PT-246 VGA adapter (Ivory) 760028720 M30FP-VGA-PT-262 VGA adapter (White) 760028738 M30FP-VGA-PT-270 VGA adapter (Gray) 760017541 M30FP-3RCA-110-003 3-port RCA adapter (Black) 760017558 M30FP-3RCA-110-246 3-port RCA adapter (Ivory) 760017566 M30FP-3RCA-110-262 3-port RCA adapter (White) 760017574 M30FP-3RCA-110-270 3-port RCA adapter (Gray) 108009424 M81-BNC-B BNC coupler 108009432 M81C-B Coaxial coupler M81LC-029 107782641 LC coupler (Clear)M81SC-B 108009416 SC coupler (Black, Ivory, White, Gray) M81ST-B108009408ST ®coupler (Black, Ivory, White, Gray)Note: Outlets are available in a variety of colors. Refer to the CommScope catalog or contactyour account representative for more information.860337070Issue 7, June 2013Page 3 of 12Additional ConfigurationsPossible Configurationsper SMB Opening Material ID(1) Blank760009464, 760009472, 760009480, 760009498 (1) M-series outlet (see note) (2) M-series outlets (see note)(1) S-video outlet 760005256, 760005264, 760005272, 760005280 (2) S-video outlets 760005256, 760005264, 760005272, 760005280 (1) VGA adapter 760028704, 760028712, 760028720, 760028738 (1) RCA adapter 760017541, 760017574, 760017558, 760017566 (1) BNC coupler 108009424 (2) BNC couplers 108009424 (1) Coaxial coupler 108009432 (2) Coaxial couplers 108009432 (1) LC coupler 107782641 (2) LC couplers 107782641 (1) SC coupler 108009416 (2) SC couplers 108009416 (1) ST coupler 108009408 (2) ST couplers108009408Note: Outlets are available as Cat 5e and Cat 6 and in a variety of colors. Refer to theCommScope catalog or contact your account representative for more information.Using the above table as a guide, it is possible to adapt the two openings in the SMB for numerous configurations.For example: To install (1) S-video outlet, (1) BNC coupler, and (1) ST coupler, all in white, you would use: (1) 760005272 ─ M81-SVHS-110-262(1) 108009424 ─ M81-BNC-B (1) 108009408 – M81ST-B(1) 760009449 ─ M30FP -1RJ45-262 (1) 760008664 ─ M30FP -2RJ45-262Offering single and duplex adapters allows the user the flexibility to install a single outlet or coupler in either a single adapter or in a duplex adapter and to use the available dust cover in the unused port. This allows for future use without changing adapters. The figure below illustrates using a dustcover in a duplex adapter.860337070Instruction SheetPage 4 of 12Determine Adapters To Be UsedA full range of adapters are available for use in the 4-port SMB.3-Port RCA Adapter (Includes Adapter)M30FP-3RCA-110S-Video Outlet (Adapter not Included)M81-SVHS-110VGA Adapter (Includes Adapter)M30FP-VGA-PTST and SC Couplers (Adapter not Included)M81ST-B and M81SC-B BNC Coupler (Adapter not Included)M81-BNC-BCoaxial Coupler (Adapter not Included)M81C-B Duplex Adapter(Two Furnished with Box)M30FP-2RJ45Single Adapter M30FP-1RJ45Blank AdapterM30FP-BLANKLC Coupler(Adapter not Included)M81LC-029M-series Outlets(Adapter not Included)(See Note on page 3)860337070Issue 7, June 2013Page 5 of 12Step 1 – Determine Cabling ConfigurationThe SMB can accommodate cable entry from four different locations as described below and shown in figure above:Cable Entry Through Base – Cables from a standard single or duplex electrical box enter base throughany of four oblong openings provided. Cable Entry Through Rear – Cables enter rear of base from either an electrical raceway or fromsurface mounted conduit. One of two knockouts molded into base will need to be removed to allow cable entry. Cable Entry Through Bottom Side – Cables enter bottom side of SMB from either an electricalraceway or from surface mounted conduit. In this configuration, one of two knockouts molded into cover will need to be removed to allow cable entry. Cable Entry Through Top Side – Cables enter top side of SMB from either an electrical raceway orfrom surface mounted conduit. In this configuration, one of two knockouts molded into cover will need tobe removed to allow cable entry.860337070Instruction SheetPage 6 of 12Step 2 – Mount Base UnitNote: Procedure to mount base unit will depend on type of cable entry selected in Step 1. Therefore, this section is divided into three parts.Mounting Base Unit for Cable Entry Through BaseMounting screws1. Route cables through any of four large oblong openings provided in base. It is best to use entrances thatprovide for the least amount of bending and stress on cables. 2. Position base over electrical box so that two of the mounting holes provided in base line up with mountingholes in electrical box. Secure using screws provided with unit. The above figure shows mounting to a single electrical box. If mounting to a duplex box, four screws (provided) should be used to secure base.Note : The base may be rotated in any orientation and there are numerous mounting holes provided in base for mounting flexibility. B. Adhesive Tape Method1. Route cables through any of four large oblong openings provided in base. It is best to use entrances thatprovide for the least amount of bending and stress on cables. 2. Peel away protective backing from one side of double-sided adhesive tape pieces and stick both pieces oftape to back of base unit. Locate the two pieces of tape on opposite ends of base to create a secure bond.Note: Position tape on back of base unit so as not to interfere with openings that cables will be routed through. Tape may need to be trimmed to fit around cable openings.3. Peel away other protective backing from pieces of tape and position base on wall where desired and pressfirmly.Note: For mounting base to any other surface, mounting hardware will need to be obtained locally.860337070Issue 7, June 2013Page 7 of 12Mounting Base Unit for Cable Entry Through RearNote: Before mounting base using this cable entry, one or both knockouts molded into base unit must be removed first.1. Determine whether to remove small or large knockout by comparing the total size of cables to be routedagainst size of knockouts. 2. Position side cutters at bottom edge of base at large or small knockout indention line as shown in Step 1.The indention line is best viewed from inside of base. Using side cutters, make a 1/8-inch (3 mm) cut in base along indention line. Figures above show large knockout being removed. 3. Position needle-nose pliers on knockout to be removed, next to indention line, and rock pliers back and forthuntil edge breaks loose (see Step 2). 4. Repeat this on opposite edge of knockout.5. Position needle-nose pliers in center of knockout and rock back and forth until entire knockout breaks loose(see Step 3). 6. Position base as desired and secure it to wall using either the mounting screw method or double-sidedadhesive tape method described on page 6. Disregard item 1 that addresses routing cables through base.860337070Instruction SheetPage 8 of 12Mounting Base Unit for Cable Entry Through Top or Bottom SidesBefore mounting base using this cable entry, one or both knockouts molded into cover should be removed first. 1. Determine whether to remove small or large knockout by comparing the total size of cables to be routedagainst size of knockouts.2. Position side cutters at bottom edge of cover at large or small knockout indention line as shown in Step 1.The indention line is best viewed from inside of cover. Using side cutters, make a 1/8-inch (3 mm) cut in cover along indention line. Figures above show large knockout being removed.3. Position needle-nose pliers on knockout to be removed, next to edge, and rock pliers back and forth untiledge breaks loose.4. Repeat this on opposite edge of knockout.5. Position needle-nose pliers in center of knockout and rock back and forth until knockout breaks loose.6. Set aside cover.7. Position base as desired and secure it to wall using either the mounting screw method or double-sidedadhesive tape method described on page 6. Disregard item 1 that addresses routing cables through base.Note: If SMB is to be installed tight against an electrical raceway, allow about 1/16-inch (1.6 mm) space between base and raceway for cover to fit. 860337070Issue 7, June 2013Step 3 – Cable RoutingA. For Entry Through Base1.will already have been routed through one of large oblong openings provided in base as part of base mounting procedure.Note: Always use care to minimize movement and stress on cables and twisted-pair conductors.B. For Entry Through Rear2. After routing cables into base, insert a cable tie in slots provided and secure cables to base as shown.Note: Always use care to minimize movement and stress on cables and twisted-pair conductors.Page 9 of 12860337070Instruction SheetPage 10 of 12C. For Entry Through Bottom Side1. Route cables into base within the 1-1/4" (32 mm) wide area as shown above.2. After routing cables into base, insert a cable tie in slots provided and secure cables to base as shown.Note: Always use care to minimize movement and stress on cables and twisted-pair conductors.D. For Entry Through Top Side1. 2. After routing cables into base, insert a cable tie in slots provided and secure cables to base as shown.Note: Always use care to minimize movement and stress on the cables and twisted-pair conductors. 860337070Issue 7, June 2013 Step 4 – Install Fiber Spool (Optional)Note:assist with fiber storage and bend radius control.1. To seat spool onto base, slide spool onto center guide and turn counter-clockwise until a “snap” is heard.Note: If there is a need to remove the spool, the two latching arms on base need to be simultaneously lifted while spool is rotated in a clockwise direction. It is easiest to do this by removing base from its mounting surface and then pushing up on arms from bottom of base. The arms need to be moved just enough to clear locking edge of the spool. Bending arms too much could cause them to break.Step 5 – Prepare Cable and Terminate Information Outlets1. Prepare cables and terminate outlets or connect fibers to connectors per local practices.Note: Always use care to minimize movement and stress on exposed twisted-pair conductors near outlets. Step 6 – Snap Outlets into Adapters1. Once terminated, outlets should be snapped into adapters from inside of base area. Outlets should bemounted into adapters so the mating plugs (once connected) will have their release tabs located toward base of box.2. Slide two adapters into two openings on front side of base. Once in place, adapters may still slide up anddown, but will be secured once the cover has been installed. Adapters may also be snapped in (or removed) from front with the cover installed.Note: Dust covers should be used in all adapter ports that are not populated with outlets. These covers snap into adapters from outside of the box, in a similar fashion to adapters snapping into base.Page 11 of 12860337070Instruction Sheet Page 12 of 12Step 7 – Install Cover and Label1. Align cover as shown above and install on base. Secure using the provided cover mounting screw.Note: If using raceways, multimedia box and cover should be installed first. Various raceways can then be butted up against outside of box and then attached to wall.2. Label box as desired using the provided label and then insert it and clear protective cover into indentionprovided in box cover.Note: There is also a recessed area provided on base below the adapters for labeling. It is recommended that an adhesive label be used in this area to enhance the labeling. One recommendation is the use of a white polyester adhesive label strip that is 1/4 inch (6 mm) wide. This material is commonly available on a spool. If a spool is used, cut a 4-inch (102 mm) piece and apply it in recessed area provided on base.。
ModelCatalog NumberParts Manualc For Technical Assistance call: 800-227-2233, Fax: 888-329-8207To Order Parts call: 888-227-2233, Fax: 888-329-0234Turna fork Clamp44G-TMB-041cascadecorporationSafety DecalsPublicationsG Clamp6033701Installation Instructions6033702Operator Guide6033703Service Manual677555Driver Training Video – VHS678363Troubleshooting Video – VHS680664Servicing Cascade Cylinders – VHS679929Tool Catalog673964Literature Index Order FormBase UnitREF QTY PART NO.DESCRIPTION6253029Base Unit116253027Lower Frame216253026Upper Frame346218618Bearing426253028Cylinder u516095657Hose, 655 mm (A)616138170Hose, 575 mm (B)716242207Hose, 725 mm (C)816076811Hose, 400 mm (D)916803983Mounting Plate – RH 1016803981Mounting Plate – LH 1186028433Bearing Retainer Plugu See Cylinder page for parts breakdown.REF QTY PART NO.DESCRIPTION 128211128Capscrew, M16 x 30 1386029855Capscrew, M16 x 25 1426033542Rod End1526043862Bar1646031224Half Ring174214991Capscrew, M16 x 45 184778100Fitting, M16 192769009Roll Pin – Outer 202768935Roll Pin – Inner 212667625Nut222667624Retainer2326510Cotter PinReference: SK-29935.44GCylinder44GREF QTY PART NO.DESCRIPTION6253028Cylinder116251808Shell216251985Piston/Rod Assembly3217171Plug, 3416031924O-Ring u516031914Piston Guide Ring u616800343Rod Seal u716031916Piston Seal u816800341Rod Wiper u916800476Retainer6800491Service Kitu Included in Service Kit 6800491.Reference: S-24476.Valve GroupREF QTY PART NO.DESCRIPTION6802017Valve Group116800972Valve Assembly u22768518Capscrew, M6 x 6532202346Washer, M6u See Valve Assembly page for parts breakdown.Valve AssemblyREF QTY PART NO.DESCRIPTION6800972Valve Assembly 116800970Valve Body226038929Check Valve − PO 31210266Flow Divider 416056394Relief Cartridge 51609234Plug, 461663694Plug, 372604510Plug, 684778100Fitting92667516Seal Kit1016071170Seal Kit111682170Seal KitFitting GroupREF QTY PART NO.DESCRIPTION6042118Fitting Group 11604511Fitting, 6-621605230Fitting, 6-631611302Fitting, 6-6422645Nut, 6Wear Tile GroupREF QTY PART NO.DESCRIPTION6814152Wear Tile Group 116814147Wear Tile246031581Capscrew, M10 x 16Turnafork Group44GREF QTY PART NO.DESCRIPTION6253024Turnafork Group – LH u6253023Turnafork Group – RH l 116037000Turnafork – LH216037001Turnafork – RH316079654Fork41795205Shaft58795208Capscrew, M16 x 8061795207Grease Fitting71228116Locking Pin826217332Arm Bar912769579Capscrew, M20 x 40u Includes items 1 and 3-9.Items 1 and 3-7 included in LH Turnafork Sub-assembly 6079653. u Includes items 2-9.Items 2-7 included in RH Turnafork Sub-assembly 6079652. Reference: S-21903, S-21902, S-21906, S-21905.Mounting GroupClass IIREF QTYPART NO.DESCRIPTION6077005Upper Hook Group u 6077008Lower Hook Group l 126076991Upper Hook – LH 246031415Capscrew, M20 x 40326028563Spacer416077004Centering Key54212632Capscrew, M10 x 20626077007Lower Hook74685534Capscrew, M16 x 5084667225Washeru Includes items 1-5.lIncludes items 6-8.P A R T S O R D E R I N G L O G P U R C H A S E S E R I A L R E FC A S C ADE C U S T O M E R D A T E O R D E R N U M B E RP A G E N O .Q T Y P A R T N O .P A R T N O .D E S C R I P T I O N P R I C EDo you have questions you need answered right now? Call your nearest Cascade Parts Department.Visit us online at AMERICASCascade CorporationParts Sales2501 Sheridan Ave. Springfield, OH 45505Tel: 888-CASCADE (227-2233) Fax: 888-329-0234Cascade Canada Inc.5570 Timberlea Blvd.Mississauga, OntarioCanada L4W-4M6Tel: 905-629-7777Fax: 905-629-7785Cascade do BrasilRua João Guerra, 134Macuco, Santos - SPBrasil 11015-130Tel: 55-13-2105-8800Fax: 55-13-2105-8899EUROPE-AFRICACascade Italia S.R.L. European Headquarters Via Dell’Artigianato 137030 Vago di Lavagno (VR) ItalyTel: 39-045-8989111Fax: 39-045-8989160Cascade (Africa) Pty. Ltd. PO Box 625, Isando 1600 60A Steel Road Sparton, Kempton Park South AfricaTel: 27-11-975-9240 Fax: 27-11-394-1147ASIA-PACIFICCascade Japan Ltd. 2-23, 2-Chome, Kukuchi Nishimachi Amagasaki, Hyogo Japan, 661-0978 Tel: 81-6-6420-9771 Fax: 81-6-6420-9777Cascade Korea121B 9L Namdong Ind.Complex, 691-8 Gojan-DongNamdong-KuInchon, KoreaTel: +82-32-821-2051Fax: +82-32-821-2055Cascade-XiamenNo. 668 Yangguang Rd.Xinyang Industrial ZoneHaicang, Xiamen CityFujian ProvinceP.R. China 361026Tel: 86-592-651-2500Fax: 86-592-651-2571Cascade India MaterialHandling Private LimitedNo 34, Global Trade Centre1/1 Rambaugh ColonyLal Bahadur Shastri Road,Navi Peth, Pune 411 030(Maharashtra) IndiaPhone: +91 020 2432 5490Fax: +91 020 2433 0881Cascade Australia Pty. Ltd. 1445 Ipswich Road Rocklea, QLD 4107 AustraliaTel: 1-800-227-223Fax: +61 7 3373-7333Cascade New Zealand15 Ra Ora DriveEast Tamaki, AucklandNew ZealandTel: +64-9-273-9136Fax: +64-9-273-9137Sunstream IndustriesPte. Ltd.18 Tuas South Street 5Singapore 637796Tel: +65-6795-7555Fax: +65-6863-1368cCascade Corporation 2012 05-2012。
X24 ProjectorOriginal Instructions(Revision: Feb2015)TABLE OF CONTENTSIntroduction (3)Warnings ................................................................................................................... . (4)Modules (6)Base Unit (6)Wheel Module (8)Lens Module (10)Analog Control Panel (11)Preparing for Use (12)Installing the Lamp (Base Unit) (12)Installing a Glass Pattern (Wheel Module) (13)Installing a Lens Barrel (Lens Accessory) (14)Unit Operation (Analog, Wheel, Lens) (15) (15)MountingPowering Up (15)Adjusting Brightness (16)Adjusting Focus (16)Adjusting Wheel Speed and Direction (16)Adjusting Shutters on the Wheel Module (16)DMX Control Module (17)Dowser (18)Manual Mode (19)DMX Mode (20)Troubleshooting (22)Specifications (24)Mechanical Specifications (24)Electrical Specifications (24)Wheel Module Specifications (24)Lamp Specifications (24)Lens Module Specification (24)Warranty (25)Certificate of Conformity (26)2X24 PROJECTOR ORIGINAL INSTRUCTIONSINTRODUCTION TO YOUR X24 PROJECTORCongratulations on your purchase of the Rosco Laboratories X-24 Projector. (Also known as the X-Effects).This modular projector is intended to provide a range of unique lighting effects with high brightness in a compact package.These effects include, but are not limited to, light reflecting off water and fire of varying intensities.A variety of lenses provide a wide range of beam angles suitable for any situation. In reality, the effects are limited only by your imagination.3WARNINGSThe light beam near the front of the unit (< 1m / 3.3 ft.) is very concentrated.Make sure that no object or person comes into the light beam at this range as burns or fire may result.The top lid of the unit may become hot to the touch during operation.Contact during or immediately following operation may result in burns.The lamp is subject to high temperatures and pressures during operation. Do not attempt to operate unit with lid open. Also do not attempt to handle lamp within 1 hour of operation.High voltages are produced when the unit attempts to strike the lamp. Onlyapply power to the unit when a lamp is attached properly seated in the unit,and the lid is closed.High voltages and stored energy are present inside the unit. Only trained service personnel should engage in repairs or replacements beyond the modules or lamp.At very cold temperatures the lamp may need to warm up close to room temperature before it will properly strike.The use of a safety cable is strongly recommended when hung overhead. Also make sure not to block the top, bottom, or rear vents when mounted during operation.Ventilation openings are not to be obstructed during the operation of the appliance.This appliance is not intended for use by persons (including children) with reduced physical, sensory or mental capabilities, or lack of experience and knowledge, unless they have been given supervision or instruction concerning use of the appliance by a person responsible for their safety.Children shall be supervised to ensure that they do not play with the appliance. 4X24 PROJECTOR ORIGINAL INSTRUCTIONSThis appliance can be used by children aged from 8 years and above and persons with reduced physical, sensory or mental capabilities or lack of experience and knowledge if they have been given supervision or instruction concerning use of the appliance in a safe way and understand the hazards involved.Children shall not play with the appliance.Cleaning and user maintenance shall not be made by children without supervision.Disconnect The X24 from power before maintenance, servicing or replacing parts.Units in outdoor settings may need to be shielded from the elements and/ or heated. There are commercially available enclosures that can serve this purpose, please call Rosco for more information. 1-800-767-2669. 56X24 PROJECTOR ORIGINAL INSTRUCTIONS Yoke Tilt KnobYoke MODULESBase UnitThe base unit contains the lamp, electronic ballast, and accessory power supply. The yoke attaches to the side of the base unit in slots for positional adjustment. It also has a slot for special optical filters.Note: In older versions of the X24 an aspherical lens was fitted behind the front plate.If this lens is fitted please note when handling the base unit alone, be aware that it extends slightly beyond the front plate, and is subject to being scratched.SIDE VIEWBACK VIEWLineFanPower Switch 7TOP VIEW Special Optics SlotLamp MountLamp Clip8X24 PROJECTOR ORIGINAL INSTRUCTIONSWheel ModuleThe wheel module is made up of motors for rotating two overlapping glass patterns.It also has four shutters and a slot for placing an E-size gobo.Note: In older versions of the X24 the glass discs were made to a thinner specification.These should not be used in the latest version of the unit as this may result in damage to the drive pulley.BACK VIEWBottom LidConnector AlignmentPin 9FRONT VIEWFRONT VIEW (with wheels fitted)Idler Wheel Pull TabGlass Pattern (Standard Water)Top Shutter(Not in View)(Not in View)DamperLens ModuleThe lens module provides the mounting for the various lens barrels.At the present time there are barrels available in 19°, 30°, 50° and 70° beam angles.It provides screw focusing and a lock-down knob.The lens barrels themselves also have a slot for inserting a dichroic filter. (See page 14).FRONT VIEW# 20 ScrewLocking KnobLens MountRing10X24 PROJECTOR ORIGINAL INSTRUCTIONSAnalog Control PanelThe analog control panel has all of the panel controls and electronics for controlling the electronic dimming of the lamp.(For DMX see page 17)Control Power IndicatorSpeedAdjustmentSpeed ModeSwitchBrightnessAdjuster1112X24 PROJECTOR ORIGINAL INSTRUCTIONSPREPARING FOR USEInstalling the Lamp (Base Unit)1. Unplug the unit.2. Open the hinged lid on the top of the base unit.3. Pull the lamp clip back away from the lamp gasket. Insert the lamp so that the front of the reflector is seated in the lamp gasket. The wire exiting from the front of the reflector should be positioned in the cut-out of the gasket.4. Release the lamp spring clip to lock the rear of the lamp in place.5. Attach the connector from the lamp to the connector in the unit. It is a polarized connectorand will only connect in one position.CutoutLamp ClipWireInstalling a Glass Pattern (Wheel Module)1. Unplug the unit.2. Remove the lens module pmb knobs on the front.3. Look for the pull tabs on the plates with metal pulleys on either side.4. These pull the plates outward for installing new glass patterns.5. Once the plate is pulled outward, the pattern should be inserted such that the metal ringsits in the groove in the rubber drive pulley and in the 2 plastic idle wheels on the corresponding side.Notes: O nly use 0.1in/2.5mm discs. Thinner discs risk damage to drive pulley.Observe correct orientation of the two discs.Once the discs are in position, the pull tab can be released.6. Replace the lens module plate on the unit by lining up the mounting pins, then tighteningthe three thumb screws.7. Tighten the thumb screw by hand to hold the lens barrel in position.Drive Pulley withIdler WheelMetal RingPull Tab1314X24 PROJECTOR ORIGINAL INSTRUCTIONSThumb Screw Locking Knob Lens BarrelDichroic Glass Filter Dichroic Glass RingInstalling a Lens Barrel (Lens Accessory)1. Unplug the unit.2. Remove the lens mount plate from the unit by loosening the three knobs on thefront.3. Loosen the thumb screw on the lens barrel holding ring.4. Remove the dichroic glass ring from the rear of the lens barrel.5. Thread the lens barrel into the holding ring (CW screws it in).6. Optional] Place a dichroic filter in the rear of the lens barrel.7. Replace the dichroic glass ring on the rear of the lens barrel.8. Replace the lens mount plate on the unit by lining up the mounting pins, then tightening the three knobs.9. Tighten the thumb screw by hand to hold the lens barrel in position.LENS BARRELUNIT OPERATION (ANALOG, WHEEL, LENS)MountingThe yoke angle can be adjusted by loosening the tilt knob on both sides of the unit.In order to slide the yoke back and forth in its track, it is also necessary to loosen the cap screw at the pivot point.When loosening the cap screw, it is strongly recommended to do this prior to hanging the unit to minimize the risk of the unit falling.The unit can be hung from any C-clamp or other mounting device that uses a suitable bolt. The three holes in the yoke are provided for this purpose.The use of a safety cable is strongly recommended when hung overhead. Also make sure not to block the top, bottom, or rear vents when mounted.Powering Up• Check to make sure that a lamp is installed.• Make sure the power switch is in the off position and the hinged lid on the base unit is fully closed.• Ensure the area in front of the lens is free of combustible materials.• Plug the unit in (check electrical specifications to ensure compatibility).• Flip the power switch to the on position.a) If there are no lights on the rear of the unit, check the power cord and the circuit thatthe unit is connected to. Check also the fuse in the unit.b) I f the control panel lights, but there is no sound or lamp light indication, check thatthe lid is fully closed.Note: there is a safety sensor on the lid. If the lid is open the lamp will not light.c) If the control panel lights, and there is a ticking sound accompanied by flashing of thelamp indicator, wait 30 seconds, then turn the unit off. Wait a couple minutes, then try again. If it still does not work, the lamp may need to be replaced.d) I f the control panel lights and the lamp indicator comes on, then the unit is operatingproperly, but it will take a couple of minutes for the lamp to warm up.• Once the lamp is warmed up the unit can be adjusted to suit your needs.15Adjusting Brightness• Using a small flat screwdriver, turn the adjustment on the control panel to achieve the desired brightness.Note: Maximum electronic dimming range is 160-200W.Adjusting Focus• Loosen the thumb screw on the lens barrel holding ring.• Rotate the lens barrel to adjust the focus.• Tighten the thumb screw by hand to hold the lens barrel in position.Important: It is possible for the lens barrel to come in contact with a pattern whilefocusing. Do not force the lens barrel if it stops moving or encounters resistance.Proper rotation of patterns may require the lens to be backed off a bit.Adjusting Wheel Speed and Direction• The switches on the control panel will select between 3 speed modes: “Off”, “Slow”, and “Fast”. One switch for each wheel.• Turn the control panel knobs to fine tune the speed. One knob for each wheel.• The potentiometer knobs can be pulled out or pushed in to change the direction of the wheels.Adjusting Shutters on the Wheel Module• Open the top and bottom hinged lids on the wheel accessory.• The top lid gives access to the top shutter.• The bottom lid gives access to the bottom and side shutters.• Close the top and bottom lids.16X24 PROJECTOR ORIGINAL INSTRUCTIONS 17DMX CONTROL MODULEThe DMX Control Module allows basic manual and full DMX control of the X-24 projector and its accessories. While some of the panel controls (Power, Dimmer, and DMX OK) are common toboth manual and DMX modes, most are used only in a single mode.18X24 PROJECTOR ORIGINAL INSTRUCTIONSDowserThe dowser is fitted behind the front motor module and is only fitted to the DMX version of the X24.It allows for reduction of the light output, fades and blackout by use of one DMX channel. (See page 21).When the unit is powered up the dowser will reset itself.Dowser Shown in Open Position 19 Manual ModeBy turning DIP switch #3 ON, the module is placed into manual mode.This will automatically turn the lamp on and open the dowser (if present). This mode also allows manual control of the dual wheel accessory.The speed of the two wheels can be adjusted by turning the two shafts near the top of the module (full CW is fastest speed, full CCW is stop).The direction of the two wheels can be adjusted by changing the position of DIP switches #1 and #2. Additionally, the brightness of the lamp can be adjusted by the shaft near the bottom of the module with a small flat screwdriver (full CCW is 200W, full CW is 160W).Note: the DMX OK indicator will light if DMX is connected to the unit, even if the unit is not inDMX Mode.20X24 PROJECTOR ORIGINAL INSTRUCTIONS DMX ModeBy turning DIP switch #3 OFF, the module is placed into DMX mode.The unit can then be part of a standard DMX control system.Standard male and female 5-pin XLR connectors are provided for easy connection. (Pin 1 = Ground, pin 2 = Data-, pin 3 = Data+. Pins 4 & 5 are not used by this unit).Furthermore, the unit has pass-through wiring for easy daisy-chaining of multiple units. The DMX OK indicator will light if the unit is powered up and receiving a valid DMX stream.We recommend the use of a 120 ohm termination at the end of the DMX cable run for highest reliability and best performance.The starting address of the unit can be set by the three rotary switches in the middle of themodule. 21Each switch gives one digit in of the starting address, 1s, 10s, or 100s. If an invalid address is entered (0 or 513-999), the unit defaults to using a starting address of 1.The unit uses 5-13 DMX channels depending on the accessories used. In the standard configuration with Dowser and Dual-Wheel Accessory, it uses only 5 channels.Additional channels are built into the system for future accessories. The table below describes all functionality.Note that the lamp brightness function is not controlled by DMX. It is controlled in the same way as in Manual Mode.When the unit powers up in DMX mode, the lamp will be off and the shutter will be in the closed position.If no DMX signal is detected, the system will stay in that state.If a valid DMX signal is detected and the unit has finished homing, it will be fully controllable asdescribed above.TROUBLESHOOTING1. Power indicator will not light.• Check that unit is plugged in and turned on.• Check that the fuse has not blown.2. Power indicator lights, but DMX OK indicator will not light.• Check that unit is properly connected to a DMX controller.• Check cabling.• Check DMX signal with another device.• Check that DMX cable run is properly terminated.3. DMX OK indicator flashes erratically and/or unit behaves erratically.• Check that DMX cable run is properly terminated.4. DMX OK indicator lights, but unit does not respond to commands.• Check that the DIP switch #3 is in the OFF position.• Check channel addressing.5. Unit seems to respond to DMX, but not with all functionality.• Check the mechanics of the missing functionality to ensure that all parts can movefreely and belts are properly in place.• If all else fails, the module can be slid partially out of the unit so that the connections can be checked.• The diagram below shows the location of key connections.6. Fan does not operate.• Check the lamp has not failed. The fan will not run without the lamp.22X24 PROJECTOR ORIGINAL INSTRUCTIONSFor the most part, connectors can be matched up to headers on the PCB. The only exception is the relay and power headers, which are identical. The relay cable uses two blue wires while the power cable uses a red/black combination.23SPECIFICATIONSMechanical SpecificationsBase Unit Size w/o Yoke: 14”L x 7”H x 12”W35.5cm x 18cm x 30.5cmYoke Mounting Distance: 6.57”/167mm to mounting plane from pivotWheel Module Length: 1.5”/38mmLens Module Length: 1.27”/32.4mm (does not include barrel)Complete Unit Weight: 18.1 lbs./8.21 kgElectrical SpecificationsLine Connection: 100-240 VAC 50/60hz250WIEC 320 Grounded Outlet with FuseFuse – 5x20mm, 5A, 250V, Slo-BloPower Factor Correction on Lamp BallastAccessory Power Supply: 24VDC @ 60W MaxSelf-Protection: Internal Thermal Protection on All Internal ElectronicsShort-Circuit Protection on Accessory Power Supply Internal Fan Environmental: 50C Maximum AmbientWheel Module SpecificationsWheel Speeds: At High Speed: .631-9 RPMAt Low Speed: .375 - .8 RPMWheel Module Gobo: X-size patterns: Metal or glass in bezelAperture: 1.04”/26.4mm between Shutter SetsLamp SpecificationsUse only an USHIO 200W EmArc Lamp with Ellipsoidal Reflector (SMR200 D1).Failure to do so may damage the unit and void the warranty.Maximum electronic dimming is to 160W.Lens Module Specification70º Lens Barrel - Focal Length: 18mm50º Lens Barrel - Focal Length: 27mm30º Lens Barrel - Focal Length: 46.7mm19º Lens Barrel - Focal Length: 80mm24X24 PROJECTOR ORIGINAL INSTRUCTIONSLIMITED LIABILITY WARRANTYRosco products are covered by a limited liability warranty from defects in material and work-manship. This warranty does not apply if, in the judgement of Rosco, the product fails due to damage from shipment, handling, storage, accident, abuse or misuse, or if it has been used or maintained in a manner not conforming to product’s instructions, has been modified in any way, or has a defaced or removed serial number.Repair by anyone other than Rosco or a qualified Dealer voids this warranty. In accordance with the terms and conditions of this warranty, Rosco’s liability is limited to the product itself, up to the full purchase price of the good’s.ONE-YEAR PARTS AND LABOR SERVICE WARRANTYThe Rosco X-Effects Projector is covered by a one- year parts and labor warranty. This warranty covers replacement and repair at the discretion of Rosco on all parts excluding the lamp (Ushio EmArc) and the supplied X-size effects discs.In the event that the product needs repair or return, an RMA (Return Merchandise Authorization) is required.Please contact Rosco Customer Service at 1-800-767-2669.Any repair units received after their 1 year warranty has expired will be repaired and billed to the customer in full including shipping charges25Signed by:Joshua AlemanyDirector of Product Marketing26X24 PROJECTOR ORIGINAL INSTRUCTIONS。
OpenVPX 标准浅析Q: 已经有VPX 了, 为什么又推出了 OpenVPX 标准?A: VPX 只规定P1走差分信号, P2-P6 可以走差分也可以走单端信号。
给用户很大的自由的同时, 也导致各家产品的 Pin-out 不兼容。
另外 VPX 很多子规范还处于草稿状态。
上述问题导致了多家产品不兼容, OpenVPX 就是要解决多家产品兼容性问题。
Q: VPX 在系统兼容性上有哪些不足A: VPX.3 指引 Module 使用 sRIO 互联, 同时推荐 Backplane 支持 3.125Gbps 信号传输速率。
但是, VPX 没有规定发送信号的 Pre-Emphasis, 没有为互联的关键参数如 Insertion Loss, Cross-Talk 分配裕量。
而这些参数是系统互联的基础。
Q: OpenVPX 和 VPX 之间有什么联系和区别 ?A: OpenVPX 在 VPX 规范基础上定义了系统兼容框架。
OpenVPX 是系统级标准, VPX 是板级标准。
OpenVPX 不会代替 VPX, 二者互为补充。
Q: OpenVPX 能给客户带来什么 ?A: 各家VPX 产品兼容性更好, 客户系统集成时不再依赖具体哪个厂家, 系统集成也更加容易。
Q: OpenVPX 怎么实现系统兼容的呢 ?A: OpenVPX定义了多种类型的 profile (描述结构和层次的文件), 如 slot profile,backplane profile, module profile, chassis profile。
厂家会提供自己产品的 profile 文件. 如果产品的 profile 文件可以兼容, 产品即可实现兼容。
Q: 上述这些 profile 分别是什么含义?A: Slot profile: - 插槽的 pin 脚定义Module profile: - 插槽的 pin 脚定义 + 协议映射Backplane Profile: - 插槽个数, 插槽类型, 背板拓扑结构, 如星型或mesh .Chassis Profile: - 机箱类型, 插槽个数, 板卡制冷类型, 背板 profileQ: OpenVPX 规范里pipes是什么含义?A: OpenVPX pipes 是差分对的集合, 与协议无关Ultra Thin Pipe (UTP) - 4 wires (2 differential pairs, TX and RX), typically 1000BaseBXThin Pipe (TP) - 8 wires, typically 1000BaseTFat Pipe (FP) - 16 wires, typically x4 SRIO/x4 PCIe or 10GigEDouble Fat Pipe (DFP) - 32 wires, typically x8 PCIeQuad Fat Pipe (QFP) - 64 wires, typically x16 PCIeQ: OpenVPX 规范里planes 是什么含义?A: OpenVPX planes 是设备间互联的物理和逻辑通道。