vegaCAP60中文操作说明书
- 格式:pdf
- 大小:789.13 KB
- 文档页数:40
一 PLICSCOM显示调试模块设置1.1 概述功能/设置显示调试模块PLICSCOM用于测量显示、调整和测试,可安装于下列封装外壳和仪器中:●plics®系列传感器的所有单室壳体和双室壳体;●外置的显示调试单元VEGADIS61;从PLICSCOM的硬件版本…-01开始及其传感器,可以通过调试菜单设置背光显示。
硬件的版本号标示在PLICSCOM的标签上或传感器的电子部件中。
提示:此功能是用于带有安全许可的仪表,如:StEx、WHG或船用许可,以及FM、CSA等一些即将实施的国家专用许可。
备注:您可以在显示调试模块PLICSCOM的操作指引手册中获得详细的资料。
1.2 显示调试模块的安装装卸显示调试模块显示调试模块可随时装卸,装卸可带电操作,无需关闭供电电源。
安装步骤如下:1、旋开外壳面盖;2、把显示调试模块放入电子面板上(你可选择四种不同的方位,每个方位相差90°)3、压紧显示调试模块并顺时针转动,直至模块卡紧到位;4、装回带观察视窗的外壳面盖并旋紧。
拆卸方法则是上述步骤的反操作。
显示调试模块直接由传感器供电,无需连接额外的电源。
图26 显示调试模块安装示意图备注:如果您是在原有的VEGAPULS63上增加显示调试模块用于连续测量显示,将需要配置一个加高的带观察视窗的面盖。
1.3 系统调试图27 显示和调试部件1、液晶显示屏2、菜单编号显示3、调试按键按键功能●[OK] 按键:-返回到菜单首项-确认所选菜单-编辑参数-保存设置●[►]按键选择:-菜单选择-列出选项-位置编辑●[+]按键:-改变参数值●[ESC] 按键:-中断输入-返回上一层菜单系统调试传感器通过显示调试模块的四个按键作调整,液晶屏显示各个菜单选项,各个按键的功能如上所述。
在停止按键10分钟后,模块将会自动回复到显示测量值状态。
任何没有以[OK]键确认的设置将不会保存。
1.4 设置的步骤HART-Multidrop地址设置在HART-Multidrop模式(一个输入设置多个传感器),必须首先设置地址,然后才能作参数调整。

O perating I nstructionsE lectronics moduleVEGACAL series60D ocument ID:30531C apacitiveC ontents1A bout this document1.1F unction (3)1.2T arget group (3)1.3S ymbolism used (3)2F or your safety2.1A uthorised personnel (4)2.2A ppropriate use (4)2.3S afety instructions for E x areas (4)2.4E nvironmental instructions (4)3P roduct description3.1S tructure (5)3.2P rinciple of operation (5)3.3P ackaging ,transport and storage (5)4M ounting4.1G eneral instructions (6)4.2M ounting preparations VEGACAL (6)4.3M ounting steps (7)5S etup5.1S etup -E lectronics 4…20m A ,P ro fibus PA ,F oundation F ieldbus (9)5.2S etup -electronics with signal conditioning instrument .96M aintenance6.1I nstrument repair (10)7D ismounting7.1D ismounting steps (11)7.2D isposal (11)8S upplement8.1T echnical data (12)2E lectronics module •VEGACAL series 60C ontents30531-EN -1104111A bout this document1.1F unctionT his operating instructions manual has all the information you need forquick mounting and setup of a replacement module .P lease read thismanual before you start setup .1.2T arget groupT his operating instructions manual is directed to trained quali fiedpersonnel .T he contents of this manual should be made available tothese personnel and put into practice by them .1.3S ymbolismusedI nformation ,tip ,noteT his symbol indicates helpful additional information .C aution :I f this warning is ignored ,faults or malfunctions canresult .W arning :I f this warning is ignored ,injury to persons and /or seriousdamage to the instrument can result .D anger :I f this warning is ignored ,serious injury to persons and /ordestruction of the instrument can result .E x applicationsT his symbol indicates special instructions for E x applications .l L istT he dot set in front indicates a list with no implied sequence .àA ctionT his arrow indicates a single action .1S equenceN umbers set in front indicate successive steps in a procedure .E lectronics module •VEGACAL series 6031A bout this document30531-E N -1104112F or your safety2.1A uthorised personnelA ll operations described in this operating instructions manual must becarried out only by trained specialist personnel authorised by the plantoperator .D uring work on and with the device the required personal protectiveequipment must always be worn .2.2A ppropriate useO scillator ,emitting electronics ,housing or process components arereplacement components for existing sensors .2.3S afety instructions for E x areasP lease note the E x -speci fic safety information for installation andoperation in E x areas .T hese safety instructions are part of theoperating instructions manual and come with the E x -approvedinstruments .2.4E nvironmental instructionsP rotection of the environment is one of our most important duties .T hatis why we have introduced an environment management system withthe goal of continuously improving company environmental protection .T he environment management system is certi fied according to DINEN ISO 14001.P lease help us ful fil this obligation by observing the environmentalinstructions in this manual :l C hapter "P ackaging ,transport and storage "l C hapter "D isposal "4E lectronics module •VEGACAL series 602F or your safety30531-EN -1104113P roduct description3.1S tructureT he scope of delivery encompasses :lE lectronics module VEGACAL series 60l D ocumentation -this operating instructions manual3.2P rinciple of operationT he electronics module CL 60is suitable for exchange with capacitivesensors VEGACAL series 60.3.3P ackaging ,transport and storageY our instrument was protected by packaging during transport .I tscapacity to handle normal loads during transport is assured by a testaccording to DIN EN 24180.T he packaging of standard instruments consists of environment -friendly ,recyclable cardboard .F or special versions ,PE foam or PE foilis also used .D ispose of the packaging material via specialisedrecycling companies .T ransport must be carried out under consideration of the notes on thetransport packaging .N onobservance of these instructions can causedamage to the device .T he delivery must be checked for completeness and possible transitdamage immediately at receipt .A scertained transit damage orconcealed defects must be appropriately dealt with .U p to the time of installation ,the packages must be left closed andstored according to the orientation and storage markings on theoutside .U nless otherwise indicated ,the packages must be stored only underthe following conditions :lN ot in the open lD ry and dust free lN ot exposed to corrosive media lP rotected against solar radiation l A voiding mechanical shock and vibrationl S torage and transport temperature see chapter "S upplement -T echnical data -A mbient conditions "lR elative humidity 20…85%S cope of delivery A pplication area P ackaging T ransport T ransport inspection S torage S torage and transport temperature E lectronics module •VEGACAL series 6053P roduct description30531-E N -1104114M ounting4.1G eneral instructionsI f the electronics module is defective ,it can be replaced by the user .I n E x applications only one instrument and one electronics module withrespective E x approval may be used .I f there is no electronics module available on site ,one can be orderedfrom the VEGA agency serving you .T he new electronics module must be loaded with the order and factorydata of the sensor .T hese are the options :l A t the factory by VEGAl O r on site by theuserI nformation :W hen loading on site ,first of all the order data must be downloadedfrom the I nternet (see "S etup ").I n both cases ,the sensor serial number is necessary .T he serialnumbers are stated on the type label of the instrument ,inside thehousing or on the delivery note .C aution :T he order data and company data contain important presettings for thesensor .A reliable operation and a correction of the measurement isnot possible without these data .E lectronics modules are adapted to the respective sensor .T hey di ffer ,e .g .in the signal output ,the power supply or approval .F irst of all check by means of the overview in section M ountingpreparations ,if you are using the suitable electronics module .C ompare the new electronics module with the existing one .T hespeci fications on the type label must correspond .T his applies mainlyto instruments with approvals .W arning :S witch o ffvoltage supply before starting the mounting procedure .T hereplacement electronics must only be mounted in idle condition .N on -observance will damage the electronics !4.2M ounting preparations VEGACALE lectronics module CL -E .60H .is suitable for VEGACAL -4…20m A /HART .E lectronics module CL -E .60P .is suitable for VEGACAL -P ro fibus PA .S ensor serial number A ssignment E lectronics versions 6E lectronics module •VEGACAL series 604M ounting30531-EN -110411E lectronics module CL -E .60F .is suitable for VEGACAL -F oundationF ieldbus FF .E lectronics module CL -E .60X .suitable for VEGACAL -with signalconditioning instrument .C aution :I n E x applications only one instrument and one electronics module withrespective E x approval may be used .C heck the speci fications on thetype label .4.3M ounting stepsT he electronics module is located in the electronics compartment .T hebelow illustrations show the respective position of the electronicscompartment in a single or double chamber housing .F ig .1:S ingle chamber housing1P osition of the electronics moduleF ig .2:D ouble chamber housing1P osition of the electronics moduleP roceed as follows :1S witch o ffpower supply2U nscrew housing cover of the electronics compartment3D isconnect the connection cables according to the operatinginstructions manual of the respective sensorM ounting steps E lectronics module •VEGACAL series 6074M ounting30531-E N -1104114L oosen the two holding screws with a screwdriver (T orx size T 10or P hillips size 4)F ig .3:L oosening the holding screws1E lectronics module2S crews (2pcs .)5P ull the previous electronics out by holding the opening levers .6I nsert the new electronics module carefully .7I nsert the two hold screws and tighten them8C onnect the connection cables according to the operatinginstructions manual of the respective sensor9S crew the housing cover onT he electronics exchange is now finished .A s a rule ,an exchange of electronics must be documented internallywhen E x applications are involved .8E lectronics module •VEGACAL series 604M ounting30531-EN -1104115S etup5.1S etup -E lectronics 4…20m A ,P ro fibus PA ,F oundation F ieldbusI f you have ordered the electronics module by stating the sensor serial number ,it is ready for operation after installation andconnection to power supply .I f you have ordered the electronics module without stating thesensor serial number or you are using a suitable electronics modulefrom stock ,you first have to load the sensor data after installation .I n general ,the sensor with the new electronics module is ready foroperation .H owever ,the sensor name is "VEGACAL 62"(presetting )and the serial number is not entered correctly .I f these speci fications should be correct ,you have to enter the serialnumber .M ove via www .vega .com to the item "serial number search ".A fterentering the serial number ,the order data of the sensor are displayed .T he serial number is also available directly from VEGA .B elow the order data you will find "S ensor data for S ervice -DTM "asXML file .L oad this file with "S ave as "on your PC and transfer it thenvia PACT ware and the S ervice DTM to the sensor .A s a rule ,settings already carried out on site with the previouselectronics module such as min ./max .adjustment etc .,however mustbe repeated.T ip :S imply use the copy function of the adjustment module PLICSCOM orthe adjustment software PACT ware .5.2S etup -electronics with signal conditioninginstrumentS et all adjustment elements on the new electronics module to thesettings of the old module .S ince the electronics modules are slightly di fferent (approx .5%),itcan be necessary to carry out an adjustment on the signal conditioninginstrument after having exchanged the electronics .W ith sensor serial num -ber W ithout sensor serial number L oad sensor dataA djustment A djustment E lectronics module •VEGACAL series 6095S etup30531-E N -1104116M aintenance6.1I nstrument repairI f a repair is necessary ,please proceed as follows :Y ou can download a return form (23KB )from our I nternet homepage www .vega .com under :"D ownloads -F orms and certi ficates -R epair form ".B y doing this you help us carry out the repair quickly and without having to call back for needed information .l P rint and fill out one form per instrumentl C lean the instrument and pack it damage -proofl A ttach the completed form and ,if need be ,also a safety data sheet outside on the packagingl P lease ask the agency serving you for the address of your return shipment .Y ou can find the respective agency on our websitewww .vega .com under :"C ompany -VEGA worldwide "10E lectronics module •VEGACAL series 606M aintenance30531-EN -1104117D ismounting7.1D ismounting stepsT ake note of chapters "M ounting "and "C onnecting to power supply "and carry out the listed steps in reverse order .7.2D isposalT he replacement module consists of materials which can be recycled by specialised recycling companies .W e have purposely designed the electronic modules to be easily separable .WEEE directive 2002/96/EGT his instrument is not subject to the WEEE directive 2002/96/EG and the respective national laws (in G ermany e .g .E lektro G ).P ass the instrument directly on to a specialised recycling company and do not use the municipal collecting points .T hese may be used only for privately used products according to the WEEE directive .C orrect disposal avoids negative e ffects to persons and environment and ensures recycling of useful raw materials .M aterials :see chapter "T echnical data "I f you have no way to dispose of the replacement module properly ,please contact us concerning return and disposal .E lectronics module •VEGACAL series 60117D ismounting30531-E N -1104118S upplement8.1T echnical dataT echnical dataare stated in the operating instructions manual of the respective sensor .12E lectronics module •VEGACAL series 608S upplement30531-EN -110411E lectronics module •VEGACAL series 60138S upplement30531-E N -1104118S upplement30531-EN-11041114E lectronics module•VEGACAL series60E lectronics module •VEGACAL series 60158S upplement30531-E N -110411A ll statements concerning scope of delivery,application,practical use and operating conditions of the sensors andprocessing systems correspond to the information avail-able at the time of printing.©VEGA G rieshaber KG,S chiltach/G ermany2011S ubject to change without prior notice30531-EN-110411。
成都龙腾锐达科技有限公司提供成都龙腾锐达科技有限公司重要声明:手册中涉及到的图片信息以及功能示意图,因产品型号不同,可能与实际产品有所出入,请以实物为准。
随着产品的更新换代或升级,本手册内容将会做相应的修改,公司保留对本手册的内容进行修改的权利,恕不另行通知。
本手册版权属于公司,未经许可不得以任何形式和手段复制或抄袭本手册内容。
衷心感谢您选用消费终端,为保持该设备处于最佳状态,延长使用寿命,在使用前,请仔细阅读本手册。
1)遵守标注在设备上的所有警示;2)远离容易引起电磁干扰或易产生静电的环境;3)使用随机配备的电源适配器和电池;4)不要与大功率或容易引起电压波动的电器设备使用同一交流电源插座;5)避免在阳光直射、靠近热源、油烟、多尘或有腐蚀性气体的地方使用;6)如有液体洒落到机体上,请及时切断电源,并用干布擦拭干净;7)请勿将其它物体从外壳孔隙推入机体内,防止触电或引起短路;8)定期清洁设备外观。
清洁前,关闭电源开关,拔下电源插头,使用微湿的柔软布料擦拭;9)妥善放置电源适配器及电源线,防止电源线被踩踏、拉扯,造成机具跌落损坏;10)每次开机后请检查时钟是否准确,若出现较大偏差(如超过5分钟),需校正时间后才能使用,否则可能会造成数据混乱;11)若长期不使用,请清洁机具,保持机具整洁及干燥,将机具、配件、用户手册等重新放回原包装箱内,在通风干燥的环境中保存。
12)请勿自行拆装本产品,以防止损坏机器、丢失数据、触电或产生其它危险。
如需检修请联系服务商;13)使用过程中,如出现其它异常情况,请详细记录当前设备状态,并与服务商联系。
目录1.11.1 12. 1.234 3.5 4.设备外观及接口说明 ..............................................................................................................7 4.1 74.2 84.3 88 5.10115.1 116.5.212136.1 136.214 6.2.1 14 6.2.2 14 6.2.3 18 6.2.4 206.2.5 21 6.36.2.622 2222 6.46.3.22324 6.4.1 24 6.4.2 25 6.4.3 26 6.4.4 26 6.4.5 28 6.4.6 286.4.7 296.4.83132 附录二:系统提示及处理措施 ............................................................................................................3638 设备开机不启动 ............................................................................................................................38 3839 刷卡提示“无此卡号” ................................................................................................................39 终端设备频繁重启 ........................................................................................................................ 40 如何删除终端数据 ........................................................................................................................ 40 通过网络不能传输数据 ................................................................................................................4041 U 盘操作不成功 ............................................................................................................................41 4242 repair 方式软件升级 .....................................................................................................................421. 前言本终端设备使用电子支付手段及介质,如非接触式ID卡、MF1卡及其兼容卡、CPU卡、RFID-UIM卡、RFID-SIM 卡等代替小额现金、代金券进行支付,适用于各类小额消费场所,如餐厅、售卖点、会所的电子收费。
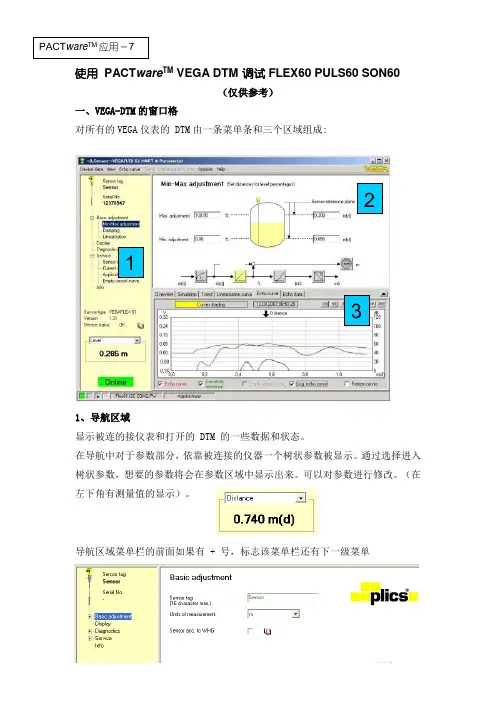
使用PACT ware TM VEGA DTM调试FLEX60 PULS60 SON60(仅供参考)一、VEGA-DTM的窗口格对所有的VEGA仪表的 DTM由一条菜单条和三个区域组成:1、导航区域显示被连的接仪表和打开的 DTM 的一些数据和状态。
在导航中对于参数部分,依靠被连接的仪器一个树状参数被显示。
通过选择进入树状参数,想要的参数将会在参数区域中显示出来。
可以对参数进行修改。
(在左下角有测量值的显示)。
导航区域菜单栏的前面如果有 +号,标志该菜单栏还有下一级菜单123 PACT ware TM应用-7用鼠标左键点击 + 号,使之变为–号,就会展开相关的下一级菜单2、参数区域在这里,可以显示所有仪器的数据并且能对传感器的参数调整做必要的修改。
在左下角有测量值的显示。
通过选择参数部分的功能块按钮或选择导航部分的树状菜单栏调整参数页面。
.几个功能块按钮:阻尼时间、最大最小调整、线性化、电流输出、显示等3、信息区域信息区域由经过挑选的几个文件卡片部分组成。
确定传感器连接的显示部分二、参数调整(修改过的参数用保存到传感器上)1、“Basic adjustment”基本调整在Sensor tag栏,可以为传感器做一个标记,如:“1#原煤仓”。
在Units of measurement测量单位栏,保留默认值 m 。
1.1 Min./Max. adjustment (量程调整)" Basic adjustment – Min-Max Adjustment" (设置物位百分比的距离)VEGAPULS、VEGASON、VEGAFLEX 传感器是距离测量仪表,它们测量的是(传感器)到产品之间的距离而并不是直接的物位。
为了显示这个物位,测量距离对应物位百分比的分配必须进行。
借助这一调整,物位被计算出来。
同样传感器的工作范围是从最大限制到所需的范围。
这些设置的始点是"Sensor reference plane"(传感器基准面),例如FLEX62传感器安装螺纹的根部。
Products Solutions Services TI00363F/28/ZH/15.14技术资料Gammapilot M FMG60放射线测量一体式变送器,用于非接触式液位测量、限位检测和密度检测应用•液体、固体、悬浮液或污泥等的连续非接触式测量•可以在极端工况条件下测量,例如:高压、高温、强腐蚀、毒性及磨损介质•适用于各种过程容器,例如:反应罐、高压釜、分离器、酸液罐、混合罐、旋风分离器、冲天炉•适用于食品加工行业,无需其他要求或认证•通过HART、PROFIBUS PA和基金会现场总线(FF)实现系统集成•进行高限和低限检测时符合安全功能要求优势•一体式变送器:一台仪表即可完成所有测量任务•即使在极端过程条件和环境条件下,也具有最高的适用性、可靠性和安全性•在最低剂量率具有最高灵敏度和最高测量精度(ALARA原理)•使用不同的探测器针对不同应用进行优化调节:–点探测器–不同长度的棒探测器•Ex d、Ex e或Ex i型电流输出,便于实现工厂集成•不锈钢316L外壳,适用于耐用持久的应用场合•进行高限和低限检测时满足SIL2/3认证要求,符合IEC 61508标准•WHG认证•密度测量时带温度补偿•放射线探伤检测•通过四行纯文本显示简单进行菜单引导式现场操作•通过FieldCare调试工具进行简单调试、文档编制和维护/诊断Gammapilot M FMG602Endress+Hauser目录文档信息 . . . . . . . . . . . . . . . . . . . . . . . . . . . . . . . . . . . . . .3图标 . . . . . . . . . . . . . . . . . . . . . . . . . . . . . . . . . . . . . . . . . . . . . . . . 3功能与系统设计 . . . . . . . . . . . . . . . . . . . . . . . . . . . . . . . .4测量原理 . . . . . . . . . . . . . . . . . . . . . . . . . . . . . . . . . . . . . . . . . . . . 4测量系统 . . . . . . . . . . . . . . . . . . . . . . . . . . . . . . . . . . . . . . . . . . . . 5信号计算 . . . . . . . . . . . . . . . . . . . . . . . . . . . . . . . . . . . . . . . . . . . . 7系统集成 . . . . . . . . . . . . . . . . . . . . . . . . . . . . . . . . . . . . . . . . . . . 10输入 . . . . . . . . . . . . . . . . . . . . . . . . . . . . . . . . . . . . . . . . .13测量变量 . . . . . . . . . . . . . . . . . . . . . . . . . . . . . . . . . . . . . . . . . . . 13灵敏度 . . . . . . . . . . . . . . . . . . . . . . . . . . . . . . . . . . . . . . . . . . . . . 13典型脉冲率 . . . . . . . . . . . . . . . . . . . . . . . . . . . . . . . . . . . . . . . . . 14测量范围 . . . . . . . . . . . . . . . . . . . . . . . . . . . . . . . . . . . . . . . . . . . 14密度测量的温度输入(PT100) . . . . . . . . . . . . . . . . . . . . . . . . 15输出 . . . . . . . . . . . . . . . . . . . . . . . . . . . . . . . . . . . . . . . . .16输出信号 . . . . . . . . . . . . . . . . . . . . . . . . . . . . . . . . . . . . . . . . . . . 16故障信号 . . . . . . . . . . . . . . . . . . . . . . . . . . . . . . . . . . . . . . . . . . . 16负载 . . . . . . . . . . . . . . . . . . . . . . . . . . . . . . . . . . . . . . . . . . . . . . . 16输出阻尼时间 . . . . . . . . . . . . . . . . . . . . . . . . . . . . . . . . . . . . . . . 16电源 . . . . . . . . . . . . . . . . . . . . . . . . . . . . . . . . . . . . . . . . .16供电电压 . . . . . . . . . . . . . . . . . . . . . . . . . . . . . . . . . . . . . . . . . . . 16功率消耗 . . . . . . . . . . . . . . . . . . . . . . . . . . . . . . . . . . . . . . . . . . . 16过电压保护等级 . . . . . . . . . . . . . . . . . . . . . . . . . . . . . . . . . . . . . 16防护等级 . . . . . . . . . . . . . . . . . . . . . . . . . . . . . . . . . . . . . . . . . . . 16电势平衡 . . . . . . . . . . . . . . . . . . . . . . . . . . . . . . . . . . . . . . . . . . . 16电气连接 . . . . . . . . . . . . . . . . . . . . . . . . . . . . . . . . . . . . .17端子接线腔 . . . . . . . . . . . . . . . . . . . . . . . . . . . . . . . . . . . . . . . . . 17电缆入口 . . . . . . . . . . . . . . . . . . . . . . . . . . . . . . . . . . . . . . . . . . . 17电势平衡 . . . . . . . . . . . . . . . . . . . . . . . . . . . . . . . . . . . . . . . . . . . 17接线端子分配 . . . . . . . . . . . . . . . . . . . . . . . . . . . . . . . . . . . . . . . 18连接头 . . . . . . . . . . . . . . . . . . . . . . . . . . . . . . . . . . . . . . . . . . . . . 20性能参数/稳定性 . . . . . . . . . . . . . . . . . . . . . . . . . . . . .21响应时间 . . . . . . . . . . . . . . . . . . . . . . . . . . . . . . . . . . . . . . . . . . . 21参考操作条件 . . . . . . . . . . . . . . . . . . . . . . . . . . . . . . . . . . . . . . . 21测量值分辨率 . . . . . . . . . . . . . . . . . . . . . . . . . . . . . . . . . . . . . . . 21环境温度的影响 . . . . . . . . . . . . . . . . . . . . . . . . . . . . . . . . . . . . . 21放射线衰减的统计波动 . . . . . . . . . . . . . . . . . . . . . . . . . . . . . . . 21安装条件 . . . . . . . . . . . . . . . . . . . . . . . . . . . . . . . . . . . . .22液位测量时的安装条件 . . . . . . . . . . . . . . . . . . . . . . . . . . . . . . . 22限位检测时的安装条件 . . . . . . . . . . . . . . . . . . . . . . . . . . . . . . . 23密度和浓度测量时的安装条件 . . . . . . . . . . . . . . . . . . . . . . . . . 23空管检测 . . . . . . . . . . . . . . . . . . . . . . . . . . . . . . . . . . . . . . . . . . . 24环境条件 . . . . . . . . . . . . . . . . . . . . . . . . . . . . . . . . . . . . .25环境温度 . . . . . . . . . . . . . . . . . . . . . . . . . . . . . . . . . . . . . . . . . . . 25气候等级 . . . . . . . . . . . . . . . . . . . . . . . . . . . . . . . . . . . . . . . . . . . 25安装高度(符合IEC 61010-1 Ed.3标准) . . . . . . . . . . . . . . . 25防护等级 . . . . . . . . . . . . . . . . . . . . . . . . . . . . . . . . . . . . . . . . . . . 25抗振性 . . . . . . . . . . . . . . . . . . . . . . . . . . . . . . . . . . . . . . . . . . . . . 25抗冲击性 . . . . . . . . . . . . . . . . . . . . . . . . . . . . . . . . . . . . . . . . . . . 25电磁兼容性 . . . . . . . . . . . . . . . . . . . . . . . . . . . . . . . . . . . . . . . . . 25水冷套管 . . . . . . . . . . . . . . . . . . . . . . . . . . . . . . . . . . . . . . . . . . . 26准直仪 . . . . . . . . . . . . . . . . . . . . . . . . . . . . . . . . . . . . . . .28准直仪 . . . . . . . . . . . . . . . . . . . . . . . . . . . . . . . . . . . . . . . . . . . . . 28过程条件 . . . . . . . . . . . . . . . . . . . . . . . . . . . . . . . . . . . . .28过程温度 . . . . . . . . . . . . . . . . . . . . . . . . . . . . . . . . . . . . . . . . . . . 28过程压力 . . . . . . . . . . . . . . . . . . . . . . . . . . . . . . . . . . . . . . . . . . . 28机械尺寸 . . . . . . . . . . . . . . . . . . . . . . . . . . . . . . . . . . . . .29设计及外形尺寸 . . . . . . . . . . . . . . . . . . . . . . . . . . . . . . . . . . . . . 29材料 . . . . . . . . . . . . . . . . . . . . . . . . . . . . . . . . . . . . . . . . . . . . . . . 30人机界面 . . . . . . . . . . . . . . . . . . . . . . . . . . . . . . . . . . . . .32显示与操作单元FHX40 . . . . . . . . . . . . . . . . . . . . . . . . . . . . . . 32远程操作 . . . . . . . . . . . . . . . . . . . . . . . . . . . . . . . . . . . . . . . . . . . 33证书与认证 . . . . . . . . . . . . . . . . . . . . . . . . . . . . . . . . . . .34安全手册(SIL 2/3) . . . . . . . . . . . . . . . . . . . . . . . . . . . . . . . . . . 34防爆认证(Ex) . . . . . . . . . . . . . . . . . . . . . . . . . . . . . . . . . . . . . . 34其他标准和准则 . . . . . . . . . . . . . . . . . . . . . . . . . . . . . . . . . . . . . 34证书 . . . . . . . . . . . . . . . . . . . . . . . . . . . . . . . . . . . . . . . . . . . . . . . 34订购信息 . . . . . . . . . . . . . . . . . . . . . . . . . . . . . . . . . . . . .37产品选型表 . . . . . . . . . . . . . . . . . . . . . . . . . . . . . . . . . . . . . . . . . 37附件 . . . . . . . . . . . . . . . . . . . . . . . . . . . . . . . . . . . . . . . . .37Commubox FXA195 HART . . . . . . . . . . . . . . . . . . . . . . . . . . . 37Commubox FXA291 . . . . . . . . . . . . . . . . . . . . . . . . . . . . . . . . . 37ToF 适配器FXA291 . . . . . . . . . . . . . . . . . . . . . . . . . . . . . . . . . 37Field Xpert SFX100 . . . . . . . . . . . . . . . . . . . . . . . . . . . . . . . . . . 37分离型显示单元FHX40 . . . . . . . . . . . . . . . . . . . . . . . . . . . . . . 38安装支架FHG60 (适用于液位测量和限位测量) . . . . . . . . . 40密度测量的固定装置FHG61 . . . . . . . . . . . . . . . . . . . . . . . . . . 41密度测量的测量段FHG62 . . . . . . . . . . . . . . . . . . . . . . . . . . . . 41Gammapilot M 的补充文档资料 . . . . . . . . . . . . . . . . .42应用文档 . . . . . . . . . . . . . . . . . . . . . . . . . . . . . . . . . . . . . . . . . . . 42技术资料 . . . . . . . . . . . . . . . . . . . . . . . . . . . . . . . . . . . . . . . . . . . 42操作手册 . . . . . . . . . . . . . . . . . . . . . . . . . . . . . . . . . . . . . . . . . . . 42安全手册 . . . . . . . . . . . . . . . . . . . . . . . . . . . . . . . . . . . . . . . . . . . 42密度测量的固定装置FHG61 . . . . . . . . . . . . . . . . . . . . . . . . . . 42密度测量的测量段FHG62 . . . . . . . . . . . . . . . . . . . . . . . . . . . . 42放射源、放射源盒和调制器的补充文档资料 . . . . . . . .43Gamma 放射源FSG60、FSG61 . . . . . . . . . . . . . . . . . . . . . . . 43源盒 FQG60 . . . . . . . . . . . . . . . . . . . . . . . . . . . . . . . . . . . . . . . . 43源盒FQG61, FQG62 . . . . . . . . . . . . . . . . . . . . . . . . . . . . . . . . . 43源盒FQG63 . . . . . . . . . . . . . . . . . . . . . . . . . . . . . . . . . . . . . . . . 43Gammapilot FTG20 . . . . . . . . . . . . . . . . . . . . . . . . . . . . . . . . . 43源盒QG2000 . . . . . . . . . . . . . . . . . . . . . . . . . . . . . . . . . . . . . . . 43Gamma 信号调制器FHG65 . . . . . . . . . . . . . . . . . . . . . . . . . . . 43Gammapilot M FMG60Endress+Hauser 3文档信息图标安全图标电气图标特定信息图标图中的图标图标说明A0011189-ZH危险!危险状况警示图标。
Vega Prime 培训教材Version 1.2 for Windows ® 2000, Windows ® XP Professional Edition, Solaris ®8.0, and Red Hat 8.0 Linux®北京华力创通科技有限公司仿真系统事业部2003年12月说明 (4)第一章开始 (6)介绍 (6)使用VP和LP (6)VP应用的组成 (7)启动LP (8)退出LP (8)保存 (9)LP的界面构成 (9)第二章创建你的场景 (13)介绍 (13)Prime连接 (13)添加和浏览物体 (14)小结 (21)第三章运动方式和观察者 (22)介绍 (22)运动和观察 (22)设置观察者 (22)创建Transforms (24)添加运动模式 (26)添加碰撞检测 (27)定义通道 (30)修改视窗 (37)小结 (38)第四章环境 (38)介绍 (38)环境设置 (39)定义环境 (39)添加光点 (41)小结 (43)第五章特效 (44)介绍 (44)添加特效 (44)制作碎片效果 (45)制作龙卷风效果 (45)为粮仓制作特效 (55)小结 (55)第六章运行应用 (55)介绍 (55)编译和运行tornado应用程序 (56)建立VC编译环境 (56)小结 (57)附录一V ega Prime API (58)介绍 (58)设置API (58)初始化 (58)vpApp类 (59)定义语句 (60)配置 (61)仿真循环 (61)仿真更新 (61)关闭 (62)VP最小的应用 (62)附录二tornado应用程序 (63)介绍 (63)程序剥析 (63)说明本书主要介绍如何掌握Vega Prime的基本用法。
您可以根据书的内容在自己的工作地点学习使用Vega Prime。
本书将介绍Vega Prime实时应用、Lynx Prime 用户界面,和Vega Prime工具箱的基本用法。

利用PACTWARE操作软件对VEGA物位传感器的调试说明PS60系列雷达式物位传感器版本:3.0寇新华2006.8目录3 调试设备及连线------------------------------------------------------------------------------------4 PACTWARE的进入和初步配置----------------------------------------------------------------传感器量程的设定---------------------------------------------------------------------------------11传感器测量条件的选择--------------------------------------------------------------------------- 16电流输出的设定-------------------------------------------------------------------------------------- 19虚假回波的处理-------------------------------------------------------------------------------------- 20测量数据采集周期的设定-------------------------------------------------------------------------- 25出现多重回波时参数的设定----------------------------------------------------------------------- 27传感器的快速反应----------------------------------------------------------------------------------- 29测量回波的合并与分离----------------------------------------------------------------------------- 30结束----------------------------------------------------------------------------------------------------- 33调试设备及连线调试设备:●安装了PACTWARE软件的PC;----------------------------------●VEGA的通讯接口转换器CONNECT3;----------------------连线:●可以在安装物位传感器的现场,利用专用“I2C”插头插入传感器的“I2C”插座(见下图)用安装了PACTWARE软件的PC和通讯接口转换器CONNECT3对传感器进行调试。
白象食品集团现代终端操作指导手册白象食品集团销售管理本部二零一零年一月第 1 页共97 页目录前言 (6)第一章、现代终端的概念 (7)第二章、现代终端的分类 (7)第三章、现代终端的运营特点 (10)3.1、KA系统的运营特点 (10)3.1.1、GKA的运营特点: (10)3.1.2、NKA的运营特点: (10)3.1.3、DKA的运营特点: (11)3.2、小型连锁终端的运营特点 (12)3.2.1、B/C类连锁终端 (12)3.2.2、连锁便利 (13)第四章、现代终端人员职能与营销组织 (14)4.1、人员职责 (14)4.1.1、经销商 (14)4.1.2、驻场导购 (14)4.1.3、现代终端理货员 (15)4.1.4、现代终端业务员 (15)4.1.5、区域经理/营业所所长 (16)4.1.6、大区销售部长 (17)4.2、营销组织职能 (18)4.2.1、集团销售部KA部 (18)4.2.2、分公司KA部 (19)第五章、现代终端规划 (20)5.1、现代终端进入战略规划 (20)第 2 页共97 页5.1.1、城市层级的规划 (21)5.1.2、终端升级的进程规划 (21)5.1.3、区域的进程规划 (21)5.2、现代终端产品规划 (22)5.3、营销策略组合规划 (23)5.4、人员配备规划 (24)5.5、现代终端信息管理系统规划 (24)第六章、现代终端厂商合作模式 (25)6.1、地采地供地结完全地服模式 (25)6.2、白象直营,经销商地供模式 (25)6.3、经销商经营,统配异服模式 (26)6.4、经销商经营,地供统结模式 (26)6.5、经销商经营,地供地结模式 (27)6.6、白象直营,地采地供联结模式 (28)6.7、白象直营,地采地供地结模式 (28)6.8、现代终端联营模式 (29)第七章、现代终端的开发 (30)7.1、现代终端调研 (30)7.1.1、单店终端的调研 (30)7.1.2、系统终端的调研 (32)7.2、终端评估 (32)7.2.1、终端评估 (32)7.2.2、终端选择 (33)7.3、谈判准备 (33)7.4、终端谈判 (33)7.4.1、初步接触,了解意向 (34)7.4.2、细节磋商 (35)第 3 页共97 页7.4.3、攻克瓶颈,达成共识 (36)7.4.4、谈判中注意事项 (37)7.5、现代终端合作 (37)第八章、终端维护 (38)8.1、维护计划 (38)8.2、维护准备 (40)8.3、店内检查 (40)8.4、生动化陈列 (42)附:现代终端产品陈列生动化攻略 (44)8.5、品牌形象化 (45)8.6、业务交流 (46)8.7、拜访跟进 (47)8.8、维护总结 (48)8.9、终端维护需要注意的关键事项 (51)第九章、现代终端管理 (55)9.1、促销管理 (55)9.2、现代终端的会议管理 (55)9.3、现代终端的人员管理 (56)9.3.1、现代终端的人员招聘 (56)9.3.2、现代终端的人员绩效管理 (57)附录:现代终端知识必备 (59)1、K/A内部规则 (59)1.1卖场人员 (59)1.2KA常用术语 (60)1.2.1卖场基本业务术语 (60)1.2.2卖场陈列术语 (64)第 4 页共97 页1.2.3卖场运营术语 (66)1.2.4卖场促销术语 (67)1.2.5卖场财务术语 (69)1.2.6相关卖场专用术语 (70)1.3订单 (70)1.4开票、对帐及回款 (71)1.5促销 (72)1.6退货与管理 (72)2、KA操作与管理流程 (73)2.1配送 (74)2.1.1区域配送商接单及配送流程 (74)2.1.2DC流程说明 (75)2.1.3总部接单、区域配送流程说明 (75)2.1.4主要KA系统配送权限与流程对比 (75)2.2退货 (80)2.3对帐 (82)2.4开票与结算 (88)2.5促销 (93)2.5.1总部促销流程说明 (93)2.5.2门店促销流程说明 (93)第 5 页共97 页前言现状:现代终端在零售业中的占比越来越大,对品牌产品的营销具有重大的意义,它不仅提供主要的销售量,而且通过终端陈列等对品牌形象的提升具有重大的作用。

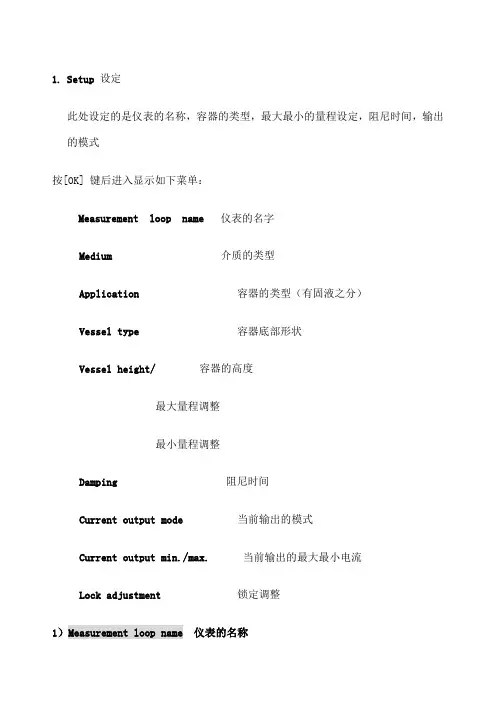
1.Setup 设定此处设定的是仪表的名称,容器的类型,最大最小的量程设定,阻尼时间,输出的模式按[OK] 键后进入显示如下菜单:Measurement loop name 仪表的名字Medium 介质的类型Application 容器的类型(有固液之分)Vessel type 容器底部形状Vessel height/ 容器的高度最大量程调整最小量程调整Damping 阻尼时间Current output mode 当前输出的模式Current output min./max. 当前输出的最大最小电流Lock adjustment 锁定调整1)Measurement loop name 仪表的名称按[OK] 键进入显示如下Measurement loop nameSensor 可以更改的名称按一下[OK] 键和[ ?]选择需要更改的字符位置。
按[+]输入需要的名称按一下[OK] 键确认。
完成输入按【ESC】退出2) Medium 选择介质类型应用的模式按[OK] 键进入显示如下MediumLiquid ▼选择介质类型介质名称键和[ ?]确认输入的信息固体液体选择液体显示如下信息选择固体显示如下信息Solvent 溶剂 Powder/dust 粉末/灰尘化学混合物 Gramules/pellets 固体小球Water based 普通水场 Ballast/pebbles 石块、鹅卵石按一下[OK] 键和[ ?]键输入需要的信息后完成按【ESC】退出)选择固体后出现如下信息Application 选择容器的类型按[OK] 键进入显示如下Application选择容器的类型按[OK] 键显示如下Silo 筒仓Bunker 煤仓Bunker quick filling 物位变化快的煤仓Heap 堆料Crusher 压碎器Demonstration 演示按[ ?]键选择以上显示类型按[OK] 键完成选择按【ESC】退出)选择液体后出现如下信息Application 选择容器的类型按[OK] 键进入显示如下Application选择容器的类型Storage tank 储存罐Storage tank with product agitation 储存罐带搅拌Storage tank on ships (cargo tank) 轮船上的储存罐 Stirrer vessel /Reactor 反应器Dosing vessel 定量给料器Stilling tube 导波管Bypass 旁通管Plastic vessel (measurement through the vessel 穿透测量Open water(gauge measurement) 开放水池Open glume(flow measurement) 开放水池Rain water overflow(weir) 水槽 Demonstration/test 演示[ ?]键选择以上显示类型按[OK] 键完成选择按【ESC】退出4) Vessel type 选择容器底部的类型按[OK] 键进入显示如下Vessel typeVessel bottom 容器底部的类型Angular ▼可以选择的类型按[OK] 键显示顶部类型Straight竖直的Comtical圆弧的Angular 有尖角的按[ ?]键选择以上显示类型按[OK] 键完成选择按【ESC】退出5)选择容器的高度按[OK] 键进入显示如下Vessel height/可以按照实际高度更改的数值按一下[OK] 键和[ ?]选择和更改的量程位置。
使用 PACT ware TM VEGA DTM 调试FLEX60 PULS60 SON60(仅供参考)一、VEGA-DTM 的窗口格对所有的VEGA 仪表的 DTM 由一条菜单条和三个区域组成:1、导航区域显示被连的接仪表和打开的 DTM 的一些数据和状态。
在导航中对于参数部分,依靠被连接的仪器一个树状参数被显示。
通过选择进入树状参数,想要的参数将会在参数区域中显示出来。
可以对参数进行修改。
(在左下角有测量值的显示)。
123导航区域菜单栏的前面如果有+ 号,标志该菜单栏还有下一级菜单用鼠标左键点击+ 号,使之变为–号,就会展开相关的下一级菜单2、参数区域在这里,可以显示所有仪器的数据并且能对传感器的参数调整做必要的修改。
在左下角有测量值的显示。
通过选择参数部分的功能块按钮或选择导航部分的树状菜单栏调整参数页面。
.3、信息区域信息区域由经过挑选的几个文件卡片部分组成。
确定传感器连接的显示部分二、参数调整(修改过的参数用保存到传感器上)1、“Basic adjustment”基本调整在Sensor tag栏,可以为传感器做一个标记,如:“1#原煤仓”。
在Units of measurement测量单位栏,保留默认值m 。
1.1 Min./Max. adjustment (量程调整)" Basic adjustment – Min-Max Adjustment" (设置物位百分比的距离)VEGAPULS、VEGASON、VEGAFLEX 传感器是距离测量仪表,它们测量的是(传感器)到产品之间的距离而并不是直接的物位。
为了显示这个物位,测量距离对应物位百分比的分配必须进行。
借助这一调整,物位被计算出来。
同样传感器的工作范围是从最大限制到所需的范围。
这些设置的始点是"Sensor reference plane"(传感器基准面),例如FLEX62传感器安装螺纹的根部。
1 测量原理及产品简介测量原理发射能量很低的极短的微波脉冲通过天线系统发射并接收。
雷达波以光速运行。
运行时间可以通过电子部件背转换成物位信号。
一种特殊的时间延伸方法可以确保极短时间内稳定和精确的测量。
雷达传感器的发射功率非常小,分C频段和K频段。
即使在存在虚假反射的时候,最新的微处理技术和独一无二的ECHOFOX-软件也可以准确地分析出物位回波。
仪表可以空仓调试。
液体测量应用对于这种应用,可以提供两种不同的发射频率。
一体式的高频传感器(K频段)适用于高精度测量。
开口尺寸小的喇叭口天线聚焦效果更好。
低频传感器(C频段),适用于泡沫、冷凝水等困难的测量条件。
测量不受蒸汽、混合气体、压力和温度变化的影响。
输入端参数测量参数是过程连接和被测介质表面之间的距离。
根据传感器类型不同,基准面可以是六角螺母的密封面或法兰的下边缘。
1 基准面2 测量参数,最大测量范围3 天线长度4 可用的测量范围2 仪表类型一览表VEGAPULS61VEGAPULS62 VEGAPULS63VEGAPULS65VEGAPULS62VEGAPULS WL 613 仪表选型应用范围VEGAPULS 61适用于测量小容器内的液体,几乎可以用于各个工业领域。
塑封的天线非常适用于测量小容器内的腐蚀性液体。
塑料天线还特别适用于测量开口渠的流量或河流的水面。
VEGAPULS 62适用于在恶劣的过程条件下测量储罐或过程容器中的液体。
可以用于化工行业、石化行业或环保和循环行业等等。
喇叭口型天线特别适用于测量储罐或过程容器内的介质,比如:溶剂、碳氢化合物、动力燃料等。
抛物线式天线适于在测量范围较大的条件下测量介电常数小的介质。
VEGAPULS 63适用于腐蚀性液体测量或特殊的卫生要求。
特别适用于化工行业、食品行业和制药行业等。
VEGAPULS 65适用于在一般测量条件下,测量液体。
可以用于较小的过程连接。
VEGAPULS 66适用于在复杂的测量条件下测量液体。
VEGA 雷达一些说明一、连接:把适配器的插针插入雷达表的两插孔内,串口联到电脑的COM1口。
电脑运行VEGA 软件,几秒钟之后画面将显示连接的传感器图1 (现在已设好超级用户不用登录), 如果重装软件,就要重设:在跳出窗口中选Planning(计划编制、最高级别能编辑系统参数),输入用户名:Service 、密码:Schiltach ,登录,再选中configration ——program ——user access 中的项目Skip entry password 即可。
二、一些说明:1、参数调整都在Instrument data/Parameter adjustment(仪表数据/参数调整)内进行。
2、min/max adjustment 零位量程调整与measuring(operating) range 测量(操作)量程的区别跟DCS 中的实际量程和扩展量程区别一样。
前一项调整中选带介质调量程时要非常谨慎,此时要先放空和加满容器才能调零位量程,盲目调整会调乱参数。
3、conditioning ——scaling 项目调的是就地液晶显示的量程。
4、measuring conditions 测量条件选固体(solids)高粉尘场合,脉冲速率(pulsevelocity)选没有导波管的系数Correction factor 。
5、Sensor optimisation(传感器优化)——Echo curve(回波曲线)中能看到满量程的回波,包括产品波和干扰波,并在曲线左上方的小窗口中能看到所有波的位置和强度(图2)。
虚假回波存储(false echo storage)中的选项showecho curve(显示回波曲线)也能看到回波曲线,但小窗口中不能看到所有波的位置和强度。
图1图2产品波干扰波空高空高数值上面选中反显与下面虚线对应三、以后的主要工作:(一)、等雷达设定好后,如遇到测量不准则可能是干扰太强所致,此时就需要做“盖帽”把虚假波盖掉。
Vega Systems Inc. 9/3/2019Milestone and Partner servers at a siteManagementServerEvent ServerSQL ServerRecordingServersAnalyticsServers Mobile ServerIdeallyFunctionally Redundant Architecture with seamless behavior during component or site failure.Server A with function XSite 1Site 2Server A’ with function Functions X, Y are OKServer B with function YServer B’ with function YServer A with function XSite 1Site 2Server A’ with Functions X, Y are OKServer B with function YServer B’ with functionTwo Options●Option 1: Ideal, needs co-ordination from different vendors.●Option 2: Good, checks most boxes, ready to go, known limitations.Option I: Component Smart ClusteringServers with same functions are added to the same cluster. Clustering software ensures functional availability as long as one of the machines in the cluster is up.Server C with function ZServer C’ with function ZCluster with single virtual IP1.2.Site 1Site 2Option I: Clustering for multi-functionalitiesCluster1with virtualIP 1Cluster2with virtualIP 21.2.Site 2Site 1Option I: ArchitectureC l u s t e r e d M a n a g e m e n t S e r v e rSite 1Site 2C l u s t e r e d S Q L S e r v e rC l u s t e r e d M o b i l e S e r v e rC l u s t e r e d E v e n t S e r v e rC l u s t e r e d A n a l y t i c s S e r v e r 1C l u s t e r e d A n a l y t i c s S e r v e r 2R e c o r d i n g S e r v e r s N O T c l u s t e r e dAll recording servers are added to the clustered management server during XProtect setup.Option I: RMF provides video redundancyintelligence to other components such as AnalyticsC l u s t e r e d M a n a g e m e n t S e r v e rRMF Web APICamera ID Rec 1Rec2hjt87....ji89kl...RMF Redundancy IntelligenceAnalytics Software uses this information for video sourcingOption 2: FederationTwo sites are in a federated XProtect architecture.Site 1: ParentSite 2: ChildSQLServerMobileServerEventServerAnalyticsServer1AnalyticsServer2RecordingServersChildsiteSQLServerManagementServerLimitations of FederationWhile using federation with dependent components, there is no way to recover functionality when different components fail at each siteFunctionsare OK Site 1Site 2Functionnot OK Site 1Site 2Option Comparison11#Requirement Component Smart ClusteringFederation1Automatic Live view switch over in the Smart Client upon recording server failureYes, by RMF Yes, by RMF2Automatic Playback switchover to recording server that has contentYes, by RMF Yes, by RMF3Automatic PTZ preset Duplication Yes, by RMF Yes, by RMF4Automatic Alarm Filtering Yes, by RMF Yes, by RMF5Automatic Bookmark redundant storage/retrieval Yes, by RMF Yes, by RMF6Management server failure is transparent to User Yes to one server failure Partial. Only to child managementserver failure. If parentmanagement server fails, SmartClients will need to manuallyreconnect7Event server failure is transparent to User.Yes, by Clustering Yes, by RMFOption Comparison12#Requirement Smart Component ClusteringFederation8Automatic analytics functionality switch over when recording server and/or analytics server at the same site fail.Yes, by analytics integration with RMF API, Clustering No, Smart Client user needsto manually login to therunning site to run analytics.9Automatic analytics functionality switch over - Rec x in site 1 AND analytics server in site 2 that depends on the same cameras as Rec x fail at the same time.Yes, by analytics integration with RMF API, Clustering. Check with Analytics vendor.No, even a manual solutionis not possible.10Alarms unaffected when rec x in site 1, that is generating events and event server in site 2 fail at the same timeYes, unaffected because of RMF and Clustering Events and correspondingalarms lost.11Total failure of site1 or site2 is transparent to Smart Client user.Yes Parent site failure is nottransparent. User needs tologin to child site12Third party dependency needed to achieve this Analytics vendor integration to RMF API = time and commitment from analytics vendors No dependence on freshintegration from analyticsvendors.Option Comparison13#Requirement Component Smart ClusteringFederation13Remote user is transparent to Mobile server failure.Yes through clustering No, user needs to manuallyreconnect to the othermobile server’s IP .14Impact of recording server failure on remote user RMF does not support remote client RMF does not supportremote client15 A single SQL Server failure does not affect operation Yes, through clustering Parent Site SQL serverfailure requires Smart Clientsto login manually to the childsite.Contact***************1999 S Bascom Ave #700,Campbell, CA 9500814。