压力表说明
- 格式:doc
- 大小:297.50 KB
- 文档页数:2
压力表的操作说明书操作说明书一、产品概述压力表是一种常用的测量仪器,用于测量液体或气体的压力大小。
本操作说明书详细介绍了压力表的使用方法和注意事项。
二、产品结构1. 压力表外观:压力表通常由表头、表身和连接装置组成。
2. 表头:显示压力数值,并设有刻度盘和指针。
3. 表身:固定表头和连接装置,通常采用金属材料制成。
4. 连接装置:与被测介质连接,通常是螺纹接口或法兰接口。
三、操作步骤1. 准备工作在进行压力测量之前,请确保以下准备工作已完成:- 将压力表与被测介质连接,确保连接牢固。
- 检查压力表是否正常运作,并确保指针在零刻度位置。
2. 测量压力(根据实际情况选择合适的测量方法,以下是一种常用方法的步骤)- 确定被测压力介质的性质(液体或气体)和量程范围。
- 打开被测压力介质供应,使其充满压力表。
- 观察压力表指针的位置,根据刻度盘上的刻度读取压力数值。
- 记录压力数值,可以根据需要进行多次测量以提高精确度。
3. 压力表的维护- 使用结束后,及时将压力表从被测介质中取出,并用清洁软布轻轻擦拭表面。
- 避免压力表受到外界冲击或水分侵入,以防止损坏或影响准确度。
- 定期检查压力表的准确度,并根据需要进行校正或更换。
四、注意事项1. 避免超过压力表的量程范围进行测量,以免损坏仪器。
2. 避免过大的冲击或振动,以保持压力表的准确度。
3. 注意压力表的工作温度范围,避免在超出范围的温度下使用。
4. 如遇到故障或不正常情况,请及时停止使用并咨询专业人士。
五、常见问题解答1. 问:为什么压力表指针不动?答:可能是压力表与被测介质连接松动或存在堵塞,请检查连接状态并进行清洗。
2. 问:为什么压力表指针不稳定?答:可能是被测介质存在脉动或压力波动,请检查被测介质的稳定性。
3. 其他问题请咨询售后服务。
六、总结本操作说明书详细介绍了压力表的使用方法和注意事项,希望能帮助用户正确操作压力表,确保测量的准确性和使用的安全性。
压力表的正确使用方法说明书一、前言压力表是一种常见的测量仪器,广泛应用于各个行业中。
正确使用压力表可以保证测量结果的准确性,并且可以延长仪器的使用寿命。
本说明书将详细介绍压力表的正确使用方法。
二、压力表的结构和组成部分1. 刻度盘:用于显示压力值的刻度盘,通常以MPa或Psi为单位。
2. 指针:指示当前的压力值。
3. 进气口:将压力传递到压力表的入口接口。
4. 出气口:将测量过的压力释放出去,以免影响下次的测量。
三、使用前的准备1. 检查压力表是否完好无损,如果有任何损坏或异物,请不要使用。
2. 确保压力表的刻度盘清晰可见,指针灵活运动。
3. 检查进气口和出气口是否畅通无阻。
四、正确使用方法1. 将进气口与待测的压力系统相连接,确保连接紧固可靠,不漏气。
2. 慢慢打开压力系统的阀门,使气体缓慢进入压力表。
3. 观察刻度盘上指针的运动,当指针稳定在一个数值时,即可读取压力值。
注意,读取压力值时要与刻度盘的最上层刻度对齐,以保证准确度。
4. 操作完成后,关闭压力系统的阀门,并将出气口打开,释放压力,然后将进气口与出气口分别拧紧。
五、使用注意事项1. 在测量前要检查压力表的刻度盘是否清晰可见,以免造成测量误差。
2. 使用前要确认进气口和出气口是紧闭的,以免泄漏导致不准确的测量结果。
3. 避免压力表受到剧烈震动或撞击,以免损坏仪器。
4. 不要将压力表暴露在过高或过低的温度环境中,以免影响其性能。
5. 定期校准压力表,确保其准确度和可靠性。
六、维护保养1. 每次使用后,使用清洁软布擦拭压力表的外表面。
2. 定期检查和更换压力表的密封圈和维修部件。
3. 不要将压力表存放在潮湿或有腐蚀性气体的环境中。
七、故障排除1. 如果压力表指针无法运动或运动不灵活,可能是内部零件出现故障,请联系售后服务部门进行维修。
2. 如果压力表显示的数值异常或不稳定,可能是测量系统存在问题,需要检查压力系统的阀门和管道连接。
八、总结本说明书详细介绍了压力表的正确使用方法,包括使用前的准备、正确使用方法、使用注意事项、维护保养和故障排除等内容。
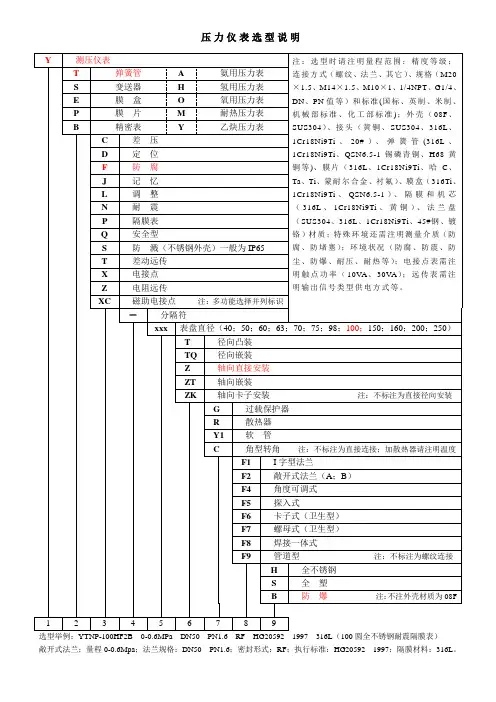
压力表规格及型号含义压力表是一种常用的测量工具,用于测量液体或气体中的压力,并将其转化为对应的指示值。
压力表的规格和型号通常由一串数字和字母组成,这些代号意味着不同的特性和功能。
以下是常见的压力表规格及型号含义:1. 测量范围:压力表的规格中通常会标识测量的压力范围。
例如,0-100 psi表示该压力表适用于测量0到100磅力/平方英寸的压力。
不同规格的压力表适用于测量不同范围的压力,因此在选择压力表时要确保其测量范围符合需求。
2. 精度等级:压力表的规格中可能会标明其精确度等级。
精度等级表示压力表在测量过程中的准确性。
常见的精度等级有±1%、±0.5%和±0.25%等。
较高的精度等级通常意味着更准确的测量结果,但相应地也会增加成本。
3. 接头尺寸:压力表的规格中还会标注其接头尺寸,即适用于连接压力表的管道或设备的尺寸。
常见的接头尺寸有1/4英寸、1/2英寸等。
选择适合的接头尺寸是确保正确安装和连接压力表的关键。
4. 型号含义:压力表的型号通常由一串数字和字母组成,代表着不同的特性和功能。
这些型号在不同厂家之间可能会有所差异,因此购买压力表时要仔细阅读说明书或咨询厂家以了解具体含义。
一些常见的型号含义可能涉及到压力单位、特殊功能或材料选择等。
总结起来,压力表的规格和型号含义对于选择正确的压力表非常重要。
需要注意的是,不同的压力表适用于不同的应用场景和压力范围,因此在选择时要根据具体需求进行合理搭配。
在购买压力表时,了解型号含义和规格参数,确保选购到适合的压力表,这样才能满足实际测量需求。
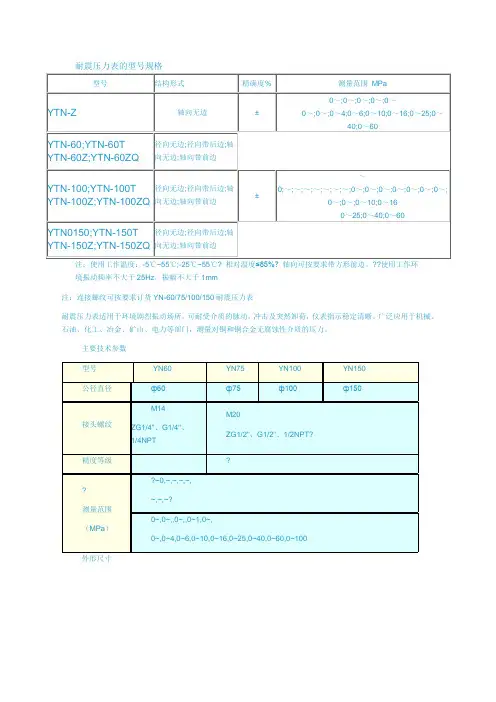
耐震压力表的型号规格
注:使用工作温度:-5℃~55℃;-25℃~55℃? 相对温度≤85%? 轴向可按要求带方形前边。
??使用工作环境振动频率不大于25Hz,振幅不大于1mm
注:连接螺纹可按要求订货YN-60/75/100/150耐震压力表
耐震压力表适用于环境剧烈振动场所,可耐受介质的脉动,冲击及突然卸荷,仪表指示稳定清晰。
广泛应用于机械、石油、化工、冶金、矿山、电力等部门,测量对铜和铜合金无腐蚀性介质的压力。
主要技术参数
外形尺寸
结构型式对照表
使用与订货须知
使用中若环境温度高,仪表指示不能回零,可用细针在仪表橡皮塞上通一小孔,使仪表内腔与大气相通即可. 使用环境温度:-25℃~70℃
使用工作频率不大于25Hz,振幅不大于1mm。
压力表操作说明书操作说明书:压力表一、前言压力表是一种用于测量和显示流体系统中压力的仪表。
本操作说明书旨在向用户提供有关压力表的详细操作指南,帮助用户正确使用和维护压力表。
二、产品概述压力表是由表壳、压力连接口、指针、刻度盘和调节装置等组成。
它可以准确地测量系统中的压力,并通过指针和刻度盘来显示压力数值。
三、安装与调试1. 选择合适的安装位置:根据需求和环境条件,选择一个稳固、光线充足的位置来安装压力表。
2. 连接压力管道:将压力表的压力连接口与待测流体系统的压力管道连接紧密,并确保连接牢固、密封完好。
3. 缓慢加压:在安装完毕后,缓慢逐渐加压,观察压力表的指针是否随着压力的增加而逐渐上升。
4. 校准:如果发现压力表显示的数值与实际压力存在较大偏差,可以使用专业的校准设备进行调整,确保准确度。
四、操作步骤1. 开始测量前,请确保压力表的指针停在刻度盘上的零刻度位置。
2. 打开待测流体系统的阀门,使其与压力表连接起来。
过程中注意观察压力表的指针变化。
3. 等待一段时间,直到压力稳定下来。
此时,读取压力表上指针所指示的数值。
4. 完成测量后,关闭待测流体系统的阀门,释放压力,并将压力表上的指针归零。
五、注意事项1. 在操作压力表时,应注意保持清洁,并避免受到剐蹭、振动或过度冲击。
2. 请勿将压力表暴露在高温、腐蚀性或易爆环境中,以免影响其正常使用寿命。
3. 定期检查压力表的密封性能,确保连接口不漏气。
4. 如需更换压力表,请按照厂家提供的技术要求进行操作,并遵循相关安全规程。
六、维护与保养1. 定期检查压力表的表面和连接口,如发现任何破损或异常情况,请立即停止使用,并进行修理或更换。
2. 清洁压力表时,请使用温水和中性清洁剂轻轻擦拭,切勿使用有机溶剂或腐蚀性清洁剂。
3. 不使用时,建议将压力表放置在干燥、通风良好的环境中,并避免直射阳光。
七、故障排除1. 如果压力表的指针无法运动或运动不灵敏,请检查是否有异物堵塞或损坏的部件,如有需要,请联系厂家或专业人员进行维修。
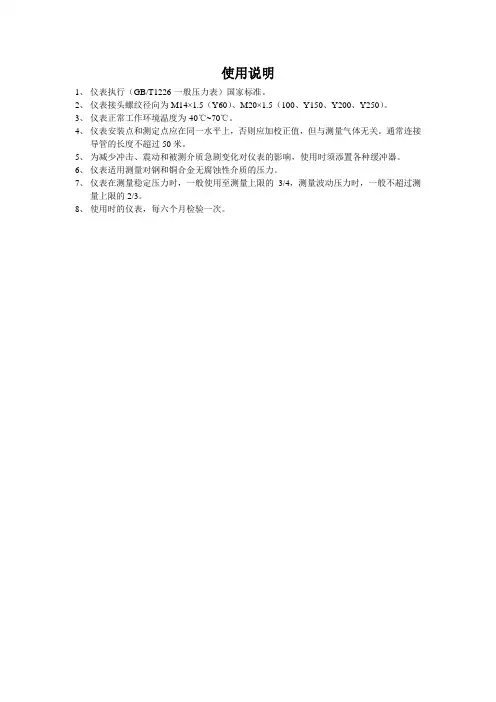
使用说明
1、仪表执行(GB/T1226-一般压力表)国家标准。
2、仪表接头螺纹径向为M14×1.5(Y60)、M20×1.5(100、Y150、Y200、Y250)。
3、仪表正常工作环境温度为-40℃~70℃。
4、仪表安装点和测定点应在同一水平上,否则应加校正值,但与测量气体无关。
通常连接
导管的长度不超过50米。
5、为减少冲击、震动和被测介质急剧变化对仪表的影响,使用时须添置各种缓冲器。
6、仪表适用测量对钢和铜合金无腐蚀性介质的压力。
7、仪表在测量稳定压力时,一般使用至测量上限的3/4,测量波动压力时,一般不超过测
量上限的2/3。
8、使用时的仪表,每六个月检验一次。
压力表使用说明书欢迎您购买并使用我们的压力表。
本使用说明书将为您提供关于压力表的详细信息以及正确的操作步骤,以确保您能够正确使用和维护该设备。
请您仔细阅读以下内容。
一、产品概述我们的压力表主要用于测量液体或气体系统中的压力。
它广泛应用于许多领域,如工业制造、化学工程、石油化工、医药制造等。
该压力表具有以下特点:1. 高精度测量:本压力表采用先进的传感技术,具有高精度的压力测量能力,可满足各种精确测量需求。
2. 耐用可靠:采用优质材料和精密工艺制造,确保了产品的耐用性和可靠性。
3. 易于安装和使用:本压力表结构简单、尺寸小巧,安装方便。
操作简单明了,用户只需按照正确的步骤进行操作即可。
二、使用须知1. 安装位置:在安装压力表之前,请确保选择合适的位置。
应选择远离震动和高温的位置,避免压力表受到外力干扰。
2. 连接方法:使用合适的工具将压力表与管道连接,确保连接牢固、密封良好,避免泄露问题。
3. 测量范围:在使用压力表之前,请确保该压力表的测量范围符合您所测量液体或气体系统的压力要求。
超过压力表的测量范围可能导致设备损坏或测量不准确。
4. 充气和排气:在测量气体系统中的压力时,先将压力表中的气体排空,确保压力表内部没有气泡存在。
同时,若需要对系统进行充气,请按照正确的充气流程进行操作,避免压力过高而导致损坏。
5. 清洁维护:请定期清洁压力表,并避免使用腐蚀性物质接触该设备。
如有损坏或故障,请联系售后服务人员进行修理和更换。
三、操作步骤1. 打开阀门:在测量液体或气体压力之前,请先打开管道的阀门,确保系统中的液体或气体能够流通。
2. 连接压力表:使用合适的工具将压力表与管道连接,确保连接牢固、密封良好。
3. 读取压力值:打开压力表的观察窗,您将能够看到压力表上显示的压力数值。
请注意,读取压力值时,视线应垂直于压力表的观察窗,以确保读取准确。
4. 关闭阀门:在测量完毕后,请关闭管道的阀门,避免不必要的泄露。
数字电接点压力表使用说明书一、产品概述数字电接点压力表是一种用于测量流体压力,并具有电接点输出功能的工业仪表。
该仪表采用数字技术进行压力传感和信号处理,具有高精度、稳定性好、易于设置和配置等优点。
数字电接点压力表广泛应用于石油、化工、电力、环保等行业的压力控制和监测。
二、产品特点1.高精度测量:采用先进的压力传感器和信号处理技术,实现高精度的压力测量,误差范围小。
2.电接点输出:配置一组电接点,用户可根据需要设定上下限压力,实现自动控制或报警输出。
3.直观显示:采用高清晰度数码管显示,用户可直接读出测量压力值,同时了解电接点的状态。
4.配置灵活:可根据用户需求配置不同规格的传感器、电接点数量及输出类型,满足多种应用需求。
5.稳定性好:采用独特的防水设计和密封技术,保证仪表在恶劣环境下稳定工作。
6.易于操作和维护:操作面板简洁明了,方便用户设置和调整;同时,维护工作相对简单,降低使用成本。
三、使用说明1.安装与接线:a. 按照产品安装说明书的指导正确安装数字电接点压力表。
确保安装位置便于观察和操作,同时考虑必要的防护措施。
b. 正确连接电源线和电接点输出线,确保连接牢固可靠,以防发生意外事故。
2.参数设置:a. 通过操作面板或配套的软件工具,根据实际应用需求设定上下限压力值。
b. 调整电接点的控制范围和动作模式,以满足系统的控制要求。
3.运行与观察:a. 确保流体管道中充满介质,并处于正常工作状态。
b. 观察数字电接点压力表的显示值,确保其与实际压力值相符。
如有异常,应检查传感器和连接线路,必要时进行校准或维修。
4.报警与控制:a. 当实际压力超过设定的上下限时,数字电接点压力表会自动切换电接点的状态,触发报警或控制动作。
b. 根据系统要求,对数字电接点压力表的报警和控制功能进行测试和验证。
5.日常维护:a. 定期检查数字电接点压力表的外观和安装情况,确保无损坏和松动。
b. 对仪表进行定期的压力校准,以确保其测量的准确性和稳定性。
PY500/PY500H/PY500S智能数字压力表使用说明书一、概述(一)功能介绍:PY500/PY500H/PY500S型智能数字压力表是我公司最新开发的新产品,融汇了多项国际上先进的电子技术、单片计算机技术、电擦除技术、抗干扰技术等,从而保证了仪表具有测控精度高,抗干扰性能强等优点。
整机选用96×96×100(PY500)/96×48×100(PY500H)/ 48×96×100(PY500S)外壳,具有整机体积小、重量轻、耗电省、功能齐全、工作可靠、使用方便灵活,配用我公司PT100-系列高温熔体压力传感器或PT200-系列常温压力传感器,作为高精度压力测量与控制,可广泛地使用于液压、石油、塑料、橡胶、印染、纺织等行业的压力显示和自动化控制场合,还可与其他厂家的电阻应变式压力传感器配套使用;可以设定上下限值报警,具有发光管报警指示、继电器触点输出控制外部执行机构;具有高精度的电压输出模块、电流输出模块、继电器输出控制模块以及通讯模块供用户选择;本机采用人性化的操作方法,操作简单易学。
(二)主要技术指标及性能:⑴.显示器双层四位高亮度绿色和红色发光数码管⑵.显示分辨率0001⑶.显示数值范围0001-9999 Mpa(小数点可变)⑷.仪表精度0.2%FS ±1位⑸.指示灯显示效准指示灯、OUT输出指示灯、AL1,AL2报警指示灯⑹.输入信号2/3.3 mV/V 0-20mA/4-20mA/0-5V/0-10V(定货时说明)⑺.采样速度 4 次/ 秒⑻.供电+9V 高精度直流电源(配压力传感器)/24V电源(配变送器)⑼.输出控制与满量程信号成线性的电压或电流输出⑽.主报警输出上限报警具有继电器输出(220V 1A)上限报警指示灯(OUT)亮⑾.辅助输出辅助输出可通过配以不同的功能模块并通过仪表设定来达到不同的输出要求。
⑿.报警范围0001-9999 MPa (小数点可变)⒀.效准指示显示传感器满量程80%值(传感器应空载),效准指示(CAE)亮⒁.使用温度及湿度 0-55 ℃ ,≤ 80% RH ⒂.电源要求 85-265 V AC 50Hz - 60Hz⒃.外型尺寸 96×96×100mm/96×48×100 mm 48×96×100mm ⒄.开孔尺寸 92×92mm /92×46mm /46×92mm ⒅.自身重量约 400克/200克//200克(三)模块功能说明PY500/PY500H/PY500S 智能数字压力表有2个功能模块插座,通过安装不同的模块可以实现不同的功能及类型输出。
数显真空压力表说明书
1、在用户使用前,应仔细阅读说明书,理解操作规则和使用方法,以确保安全使用。
2、把电源插头插入电源插座,按开关,以便使表盘上的指针指向零点。
3、将真空探头与被测介质相连接。
4、真空表示,当真空探头的指针指向的位置大于零,则表示压力大小,即越靠近零点,压力越大。
5、当目测压力达到设定的最大值或最小值时,应立即停止使用,检查真空探头,排除故障。
6、使用完毕后,请关闭开关,拔下电源插头,以免给用户造成可能的危险。
CWY122 Precision Pressure Gauge Instruction Manual陕西创威科技有限公司Shaanxi Creat Wit Technology Co., LtdInstruction manual-CWY122 Content1Product Selection (1)2Specification (7)3Notes (9)4Button Description (9)5Basic Functions (10)5.1 S TARTUP/S HUTDOWN (10)5.2 P RESSURE M EASUREMENT (10)5.3 P RESSURE C LEARANCE (11)5.4 UNIT CONVERSION (11)5.5 D OUBLE-R ANGE S WITCH (12)5.6 B ACKLIGHT (12)5.7 B ASIC P ARAMETER D ISPLAY (12)6Usage as External Module of CWY Series Automatic Pressure Calibrator (13)7Use Softare TMMS-2000 to do calibration (13)8Pressure Sensor Calibration (14)8.1 CALIBRATION CONDITIONS (14)8.2 S TART C ALIBRATION (14)8.3 C ALIBRATION P ROCESS (15)8.4 C HANGE S ETTINGS (17)8.5 E XIT C ALIBRATION (17)8.6 N OTICE (18)9Battery Charging And Repalacement (18)10Fault Analysis And Solution (18)11Order List (19)Instruction manual-CWY122 OverviewCWY122 digital pressure gauge is an intelligent micro-power consumption product, which adopts international leading measurement circuit, realizing precise and reliable temperature compensation function. It can truly and continuously measure the pressure values, very suitable for field and laboratory uses to complete precision pressure measurement and calibration of general pressure gauges, precision pressure gauges and other pressure gauges. It can also be widely used in occasions requiring precision pressure measurement.Product selection1.Gauge pressure rangesPressure range Accuracy Medium Bursting pressure (-2.5~0)kPa 0.05 gas 3x(0~2.5)kPa 0.05 gas 3x(-3.5~0)kPa 0.05 gas 3x(0~3.5)kPa 0.05 gas 3x(-4~0)kPa 0.05 gas 3x(0~4)kPa 0.05 gas 3x(-6~0)kPa 0.05 gas 3x(0~6)kPa 0.05 gas 3x(-7~0)kPa 0.05 gas 3x(0~7)kPa 0.05 gas 3x(-10~0)kPa 0.05 gas 3x(0~10)kPa 0.05 gas 3x(-16~0)kPa 0.05 gas 3x(0~16)kPa 0.05 gas 3xInstruction Manual-CWY122 Pressure range Accuracy Medium Bursting pressure (-25~0)kPa 0.05 gas 3x(0~25)kPa 0.05 gas 3x(-35~0)kPa 0.05 gas 3x(0~35)kPa 0.05 gas 3x(-40~0)kPa 0.05 gas 3x(0~40)kPa 0.05 gas 3x(-50~0)kPa 0.02(0.05)gas 3x(0~50)kPa 0.02(0.05)gas 3x(-60~0)kPa 0.02(0.05)gas 3x(0~60)kPa 0.02(0.05)gas 3x(-70~0)kPa 0.02(0.05)gas 3x(0~70)kPa 0.02(0.05)gas 3x(-100~0)kPa 0.02(0.05)gas 3x(0~100)kPa 0.02(0.05)gas 3x(0~160)kPa 0.02(0.05)gas 3x(0~200)kPa 0.02(0.05)gas 3x(0~250)kPa 0.02(0.05)gas 3x(0~350)kPa 0.02(0.05)gas 3x(0~400)kPa 0.02(0.05)gas 3x(0~600)kPa 0.02(0.05)gas 3x(0~700)kPa 0.02(0.05)gas 3x(0~1000)kPa 0.02(0.05)gas 3x(0~1600)kPa 0.02(0.05)gas 3x(0~2000)kPa 0.02(0.05)gas 3x(0~2500)kPa 0.02(0.05)gas 3x(0~3.5)MPa 0.02(0.05)gas /liquid 3xInstruction Manual-CWY122 Pressure range Accuracy Medium Bursting pressure (0~4)MPa 0.02(0.05)gas /liquid 2x(0~6)MPa 0.02(0.05)gas /liquid 2x(0~7)MPa 0.02(0.05)gas /liquid 2x(0~10)MPa 0.02(0.05)gas /liquid 2x(0~16)MPa 0.02(0.05)gas /liquid 2x(0~20)MPa 0.02(0.05)gas /liquid 2x(0~25)MPa 0.02(0.05)gas /liquid 2x(0~35)MPa 0.02(0.05)gas /liquid 2x(0~40)MPa 0.02(0.05)gas /liquid 1.5x(0~60)MPa 0.02(0.05)gas /liquid 1.5x(0~70)MPa 0.02(0.05)gas /liquid 1.1x Compound pressure rangePressure range Accuracy Medium Bursting pressure ±1kPa 0.05 gas 10x±2kPa 0.05 gas 10x±2.5kPa 0.05 gas 10x±3.5kPa 0.05 gas 10x±4kPa 0.05 gas 5x±6kPa 0.05 gas 5x±7kPa 0.05 gas 5x±10kPa 0.05 gas 3x±16kPa 0.05 gas 3x±20kPa 0.05 gas 3x±25kPa 0.05 gas 3x±35kPa 0.02(0.05)gas 3xInstruction Manual-CWY122 Pressure range Accuracy Medium Bursting pressure ±40kPa 0.02(0.05)gas 3x±50kPa 0.02(0.05)gas 3x±60kPa 0.02(0.05)gas 3x±70kPa 0.02(0.05)gas 3x±100kPa 0.02(0.05)gas 3x (-100~160)kPa 0.02(0.05)gas 3x(-100~200)kPa 0.02(0.05)gas 3x(-100~250)kPa 0.02(0.05)gas 3x(-100~350)kPa 0.02(0.05)gas 3x(-100~400)kPa 0.02(0.05)gas 3x(-100~600)kPa 0.02(0.05)gas 3x(-100~700)kPa 0.02(0.05)gas 3x(-100~900)kPa 0.02(0.05)gas 3x(-100~1000)kPa 0.02(0.05)gas 2x(-100~1600)kPa 0.02(0.05)gas 2x(-100~2000)kPa 0.02(0.05)gas 2x(-100~2500)kPa 0.02(0.05)gas 2x Double-rangePressure range Accuracy Medium Bursting pressure ±100kPa/±50kPa 0.02(0.05)gas 3x-100kPa/-50kPa 0.02(0.05)gas 3x100kPa/50kPa 0.02(0.05)gas 3x160kPa/80kPa 0.02(0.05)gas 3x200kPa/100kPa 0.02(0.05)gas 3x250kPa/120kPa 0.02(0.05)gas 3xInstruction Manual-CWY122 Pressure range Accuracy Medium Bursting pressure 350kPa/160kPa 0.02(0.05)gas 3x400kPa/200kPa 0.02(0.05)gas 3x600kPa/300kPa 0.02(0.05)gas 3x700kPa/350kPa 0.02(0.05)gas 3x1000kPa/500kPa 0.02(0.05)gas 3x1600kPa/800kPa 0.02(0.05)gas 3x2000kPa/1000kPa 0.02(0.05)gas 3x2500kPa/1200kPa 0.02(0.05)gas 3x3.5MPa/1.6MPa 0.02(0.05)gas/liquid 3x4MPa/2MPa 0.02(0.05)gas/liquid 2x6MPa/3MPa 0.02(0.05)gas/liquid 2x7MPa/3.5MPa 0.02(0.05) gas/liquid 2x10MPa/4MPa 0.02(0.05) gas/liquid 2x16MPa/8MPa 0.02(0.05) gas/liquid 2x20MPa/10MPa 0.02(0.05) gas/liquid 2x25MPa/12MPa 0.02(0.05) gas/liquid 2x35MPa/16MPa 0.02(0.05) gas/liquid 2x40MPa/20MPa 0.02(0.05) gas/liquid 1.5x60MPa/30MPa 0.02(0.05) gas/liquid 1.5x70MPa/35MPa 0.02(0.05) gas/liquid 1.1xInstruction Manual-CWY122 Differential pressure rangePressure range Accuracy Medium Bursting pressure ±100Pa 0.5 gas 5x±160Pa 0.5 gas 5x±250Pa 0.2 gas 5x±600Pa 0.1 gas 5x±1kPa 0.05 gas 5x±2kPa 0.05 gas 5x±2.5kPa 0.05 gas 5x±3.5kPa 0.05 gas 5x±4kPa 0.05 gas 5x±6kPa 0.05 gas 5x±7kPa 0.05 gas 5x±10kPa 0.05 gas 5x±16kPa 0.05 gas 3x±20kPa 0.05 gas 3x±25kPa 0.05 gas 3x±35kPa 0.02(0.05)gas 3x±40kPa 0.02(0.05)gas 3x±50kPa 0.02(0.05)gas 3x±60kPa 0.02(0.05)gas 2x±70kPa 0.02(0.05)gas 2xInstruction Manual-CWY122 Absolute pressure rangePressure range Accuracy Medium Bursting pressure (0~110)kPa.a 0.1 gas 3x(0~160)kPa.a 0.05(0.1) gas 3x(0~200)kPa.a 0.05(0.1) gas 3x(0~250)kPa.a 0.05(0.1) gas 3x(0~350)kPa.a 0.05(0.1) gas 3x(0~400)kPa.a 0.05(0.1) gas 3x(0~600)kPa.a 0.05(0.1) gas 3x(0~700)kPa.a 0.05(0.1) gas 3x(0~1000)kPa.a 0.05(0.1) gas 3x(0~1600)kPa.a 0.05(0.1) gas 3x(0~2000)kPa.a 0.05(0.1) gas 3x(0~2500)kPa.a 0.05(0.1) gas 3x(0~3.5)MPa.a 0.02(0.05) gas/liquid 3x(0~4)MPa.a 0.02(0.05) gas/liquid 3x(0~6)MPa.a 0.02(0.05) gas/liquid 3x(0~7)MPa.a 0.02(0.05) gas/liquid 3x(0~10)MPa.a 0.02(0.05) gas/liquid 2x(0~16)MPa.a 0.02(0.05) gas/liquid 2x(0~20)MPa.a 0.02(0.05) gas/liquid 2x(0~25)MPa.a 0.02(0.05) gas/liquid 2x(0~35)MPa.a 0.02(0.05) gas/liquid 2x(0~40)MPa.a 0.02(0.05) gas/liquid 1.5x(0~60)MPa.a 0.02(0.05) gas/liquid 1.5x(0~70)MPa.a 0.02(0.05) gas/liquid 1.5xInstruction Manual-CWY122 Caution: It is forbidden to enter liquid, especially the high viscosity oil for gas medium calibrator, or it will affect return difference and accuracy.2 SpecificationPressure range:-100kPa~70MPa,Accuracy: 0.02, 0.05, 0.1, 0.2O, mmHg, mmH2O, MPa, Pressure units (12 units): kPa, psi, inHg, inH2bar, mbar, atm, kg/cm2, Pa. (According to the full range to judge which unitcan be converted to display, because the display is not more than 5 digits).Pressure overload: When the pressure measurement value exceeds 105%FS, overpressure and alarm are displayed.Ambient conditions:a. Ambient temperature: (-5~50)℃;b. Relative humidity: ﹤95%;c. Atmospheric pressure: (86~106)kPa.Compensated temperature:(-5~50)℃(accuracy guarantee).Storage temperature:(-30~80)℃.Display: LCD screen, backlight, 5 digits.Power supply:1x3.7V replaceable Lithium ion battery or 1x9V batteryAuto power-off: Automatic shutdown occurs when no keyboard is pressed and pressure changes are less than 1% of the range within 1minute.Communication series port configuration: Baud rate: 57600; Calibration bits: no, data bits: 8 bits, stop bits: 1 bit; it can be used for CWY automaticpressure calibrator as its external pressure module and be connected withTMMS2000 to print verification report automatically.Dimension: Φ107mm×37mm, total length:165mmWeight: approx. 0.48kg;Instruction Manual-CWY122 Connection: M20×1.5(or user defined e.g.NPT).Additional function: temperature measurement resolution is ±0.1℃3 NotesInstallation should comply with the relevant provisions of electrical installations (except coal mines) in hazardous sites.Low power warning: if there is an automatic shutdown, please replace new battery; battery replacement should be carried out in well ventilated and nogas leak condition, and use the same model battery.It is prohibited to connect RS232 communication in the explosive gas environment.Forbidden to change or remove any components and structures which may affect the safe explosion-proof, such as the electronic batteries and therelated components.It should not be used for long period if overload to avoid pressure sensor damage.In order not to damage CWY series mechanical part, don't apply torque between the shell and pressure connection.4 Button description“”power on/off:Power on/off the pressure gauge;“”mode/calibration key: short press the key to switch display module, pressure display mode and basic parameter, ambient temperature display mode;Long press “”to enter “calibration”, then correct accuracy; under this status, short press the key to calibrate pressure.“”confirm button: In the "calibration status" short press the key toInstruction Manual-CWY122 calibrate the pressure;“” Plus and minus button: In "verification state", the pressure unit can be switched; In the "calibration status" short press the key to change the calibration set value;“”: “Zero” key: clear pressure data;“”: “Backlight” key: Turn on/off backlight.5 Basic functions5.1 Power on/offMake a long press “”for 3 seconds to power on; in the state of power-on, long press it for 3 seconds to power off. The gauge will buzz when it powers on or off.5.2 Pressure measurementAfter startup, the instrument will display pressure measurement as following picture:pressure gaugebattery power iconpressure measuring valuePressure unit5.3 Pressure clearancePlace the pressure connection toward air. If the current pressureInstruction Manual-CWY122 measured value is within (-10% ~ 10%) of the full range, press "ZERO" button to clear the measured value.5.4 Pressure unit conversionPress “” button to convert pressure units.①Precision digital pressure gauges(<2.5MPa)units are converted in thefollowing order: kPa, psi、inHg, inH2O, mmHg, mmH2O, MPa, bar, mbar, atm, kg/cm2,Pa.②Precision digital pressure gauges(>4MPa)units are converted in thefollowing order: MPa, psi, inHg, inH2O, mmHg, mmH2O, kPa, bar, mbar, atm, kg/cm2, Pa.Notice:In order to ensure that under each optional unit, pressure measurement is not shortage or overflow of digits in length, so different range gauges have different pressure unit configuration, not all pressure units.The conversion between units is as following table:1 kPa 1 7 MPa 0.0012 psi 0.1450377 8 bar 0.013 inHg 0.2953 9 mbar 104 inH2O 4.01463 10 atm 0.00986925 mmHg 7.50061 11 kg/cm20.0101976 mmH2O 102.047 12 Pa 10005.5 Double range switchFor double range digital pressure gauge, press "ZERO" button to switch two ranges. The current range is displayed in the top left corner of the screen.Instruction Manual-CWY122 If the pressure range is switched to a lower range status, the input pressure exceeds the low range, and then the high range is automatically switched to protect the sensor.5.6 BacklightPress button to turn on backlight, and then press to adjustbrightness, press again to turn it off. The backlight will turn on automatically when it is external module connected to CWY automatic pressure calibrator.5.7 Basic parameter displayPress “” button to display basic parameter: Model, serial no., production date, battery voltage.Press "" button again to switch to temperature and version as following photo at right.6 Usage as external module of CWY series automatic pressure calibratorThe precision digital pressure gauge is installed on the left side of the pressure connection on the calibrator, using specialized communicationInstruction Manual-CWY122 lines to connect to the left side of the external standard communication port of the calibrator; the gauge will automatically power on and turn on the backlight and automatic shutdown when the calibrator is powered off.7 Use software TMMS-2000 to do calibrationCWY model precision pressure gauge can be connected with TMMS-2000 (automatic calibration software) to do real-time calibration, and then the data will be uploaded to computer and print calibration report automatically.Automatic pressure calibrator can be used as pressure generation, and other hand pump or equipment will also be workable.About calibration data uploading, please check data memory function.8 Pressure sensor calibration8.1 Calibration permissible condition1)Ambient condition:Ambient temperature: 20℃±2℃Relative humidity: (45~75)%Atmospheric pressure: (86~106)kPa2)Standard pressure generationIt should meet requirement of verification regulation of digital pressure gauge JJG875.8.2 Start calibrationLong press "" button to enter the calibration status, as shown below, the top row is set value, positive-negative pressure range using three pointInstruction Manual-CWY122 to calibrate., use""button to change Settings: the lower limit, 0,upper limit; Other ranges are calibrated at 2 points, and use""button to change Settings : 0%, 100%. The bottom line displays reading value of actual pressure.8.3 Calibration process8.3.1 Positive and negative pressure range calibration process.The following working steps are assumed: the range of calibration is (-60 ~ 60) kPa, and the pressure calibration points are -60kpa, 0kPa and60kPa. The calibration can only be completed when the actual pressure value and the pressure setting value are 10 percent difference.1)Preparation: turn on the power to warm up for 10 minutes.Zero calibration:Set the pressure setting value to "0.000kPa"and confirm the system pressure as "0", after the ""calibration key and""confirm key, the" pressure set value "is 60.000kPa and" actual pressure value "is 0.000kPa (It indicates that the system has saved zero information. After calibration, the pressure value is still 0.000kpa, indicating thatInstruction Manual-CWY122 the system does not accept calibration data. The error of actual pressure value and pressure setting value may exceed 10% of the range, and the other points are the same condition.).2)Upper limit of calibration:Adjust the pressure setting to the upper limit (60 kPa), add pressure accurately to the maximum pressure value (60 kPa), press "" "" button, then the “pressure setting” displays 0.00 kPa, "actual pressure value" displays 60.00 kPa. Now, calibration is done.3)Lower limit of calibration:Adjust the pressure setting to the lower limit value (-60 kPa), add the accurate pressure to the minimum pressure value (-60 kPa), press "" "" button, then the pressure setting displays 0.00 kPa, "actual pressure value" displays -60.00 kPa, the calibration is done.8.3.2 Calibration instructions for other rangesThe following working steps are assumed: the range of calibration is (0~400) kPa, and the pressure calibration points are 0kpa, 400kPa. The calibration can only be completed when the actual pressure value and the pressure setting value are 10 percent difference.1)Preparation: turn on the power to warm up for 10 minutes.Zero calibration:Set the pressure setting value to "0.000kPa"and confirm the system pressure as "0", after pressing the ""calibration key and""confirm key, the" pressure set value "is 400.000kPa and" actual pressure value "is 0.000kPa (ItInstruction Manual-CWY122 indicates that the system has saved zero information.After calibration, the pressure value is still 0.000kpa,indicating that the system does not accept calibration data.The error of actual pressure value and pressure setting value may exceed 10% of the range, and the other points are thesame condition.).2)Calibration range: Adjust the pressure setting to scale value (400 kPa), add pressure accurately to pressure value (400 kPa), press "" "" button, then the “pressure setting” displays 0.00 kPa, "actual pressure value" displays 400.00 kPa. Now, calibration is done.8.3.3 Double range switchFor double-range digital pressure gauges, in the calibration mode, short press "ZERO" key can switch two ranges. The current range is displayed in top right corner of the screen.8.4 Change settingsWhen calibrating the pressure, sometimes it is necessary to modify the set value. For example, when the vacuum cannot be drawn to -100kPa inInstruction Manual-CWY122 a place, it is impossible to calibrate the -100kPa, and the setting value must be set artificially. If you want to modify settings, long press "" button to enter modify Settings status, as the picture below (left), whereabove the set value, there is " "indicating the digit can be modified, press""button, the corresponding figures will add 1, if you want to minus 1, then press "" button to change the direction of valuechanges, as the picture on the right,"",and"", The calibration data of the set value is saved.8.5 Exit calibrationLong press "" to exit the calibration status, and then enter the measurement condition.Instruction Manual-CWY122 8.6 NoticeThis function is used to modify the accuracy of pressure measurement, and the arbitrary operation of calibration function will affect the measurement accuracy, which can lead to the failure of normal work, possibly. If the measurement accuracy is deviated during the periodic verification, the calibration can be carried out. The calibration personnel must be the professional metrological verification personnel. In calibrating pressure measurement, the pressure should be pressurized to full range, then directly reduced to zero, and repeat the operation three times to make the pressure measurements to the optimum and then calibrate them.Caution: Calibration must be operated in calibration condition!9 Battery charging and replacementWhen the instrument appears automatic shutdown, please charge in time, if it is rechargeable battery,The instrument can use 9V battery or rechargeable battery with 9V charger. Replace the battery if the battery failed. When replacing the battery, remove the battery cover and place the new battery.When replacing the battery, please note that if the positive and negative electrode of the battery is in accordance with the installation direction;If the battery fails, it can be powered directly with a 4.2v-9v power adapter.Instruction Manual-CWY122 10 Fault analysis and solution1)If the external pressure exceeds 5% of the full range, the overpressure alarms, and the pressure should be reduced immediately to avoid damaging the pressure sensor.2)Replace the battery in time if the battery is abnormal.11 Order listNo. Description Quantity1 Precision digital pressure gauge 1pc2 9V battery 1pc3 Certification of approval 1pc4 Delivery inspection report 1pc5 Operating manual 1pc6 Warranty card 1pc陕西创威科技有限公司Shaanxi Creat Wit Technology Co., LtdAddress: No. 80, Gaoxin Road, Hi-Techzone, Xi’an, ChinaTel: +86 029********Fax: +86 89250364Mobile:+86182****6927Email:******************19Tel:+8602986690023Email:******************。
Digital Pressure GaugeInstruction GuideHigh Accuracy — PressureBattery OperatedHigh Accuracy — VacuumBattery OperatedHigh Accuracy—Pressure4/20mA OutputIndustrial—PressureBattery OperatedON/UNIT/OFF∙ Press ON / UNIT / OFF to turn unit on.∙ Press again when the unit is on to change the unit of measure from PSI, BAR or MPA.∙ Hold the ON / UNIT / OFF for three seconds and release to turn the unit off.LIGHT/P-H∙ Press the LIGHT / P-H to turn on the back light.∙ Hold the LIGHT / P-H for three seconds to display the maximum pressure that the device has measured.“OL” is greater than the maximum range of the unit. The maximum number will be blinking.∙ Hold the RESET / CLEAR button for three seconds to clear the maximum number.∙ Hold the LIGHT / P-H button for three seconds to go back to the normal display.High AccuracyDigital Pressure GaugeBattery OperatedRESET/CLEAR∙ In a normal function if you press the RESET/CLEAR the display will not change.∙If you hold the RESET/CLEAR for three seconds it will reference the gauge to whatever pressure is currently ap-plied to the unit.For example; if you have 20psi on the display and you hold down RESET/CLEAR then the display will show0.0 and a measurement of 30psi would then read as 10psi on the display.∙Hold RESET/CLEAR for three seconds to reset unit to original setting. Unit must be disconnected or have an input of 0psi.ON/OFF∙Short press to power on, long press to power off.UNIT CHANGE∙Short press to switch units.(Different pressure ranges have different units available )ZERO CLEARING∙Without pressure, long press ‘ZERO’ button for 4 seconds to zero clearing.BACK -LIGHT∙Short press back -light button, back -light on for 20 seconds. Long press back -light button for 3 seconds, the back -light will keep on.ADJUST OF FILTER CONSTANT∙Short press ‘back -light’and ‘ZERO’ buttons together, it shows ‘r -03', and means the filter constant is 03. Then change the value through pressing ‘ZERO’ button, the value is between 01~10. After setting, press back -light button to save and quit.High Accuracy Digital Vacuum Gauge Battery OperatedBUTTON GUIDE:∙ Change pressure reading units by pressing the UNIT/SET button until the arrow point to the units of preference. ∙ Check low pressure setting by pressing and releasing the → button (Displayed for 30 seconds) ∙ Check high pressure setting by pressing and releasing the ↑ button. (Displayed for 30 seconds) ∙ See maximum peak pressure by pressing and holding the → button for 3 seconds (Display will blink) ∙ Reset maximum peak pressure by pressing and holding the ↑ button for 3 seconds.∙ Return to pressure measurement mode by holding the → button for 3 seconds (Display will not blink)∙Reference the MG -MD to the input port by pressing and holding both the → button and the ↑ button simultane-ously for 3 seconds∙Reset the MG -MD reference by either disconnecting the input port or attaching a 0 psi input then press and hold down the → button and the ↑ button simultaneously for 3 SecondsPROGRAMMING THE HIGH AND LOW PRESSURE SET POINTS:1. Enter Programmable Set Point Mode by pressing and holding the UNIT/SET button for 3 seconds. The screenshows ↑ on the top, left hand side indicating high pressure setting, and the first digit will be flashing. 2. Set the first digit value by pressing the ↑ Button (select from 0 to 9). Then press the → Button, which shifts to thesecond digit. Again use the ↑ Button to select 0 thru 9 followed by the → Button to complete the third and forth digits. 3. After all 4 digits of the high pressure settings are done press the → Button one more time, the screen will show ↓on the top, left hand side indicating low pressure setting. Repeat step 2 above to set the 4 digits of the low pres-sure settings. 4. After all 4 digits of the low pressure settings are done press the → Button one more time, the screen will show“Load”, indicating your pressure settings have been saved into memory. 5. To make sure that the settings are correct, you can press the → Button to check the value of the low pressuresetting and press the ↑ Button to check the value of the high pressure setting.High Accuracy Digital Pressure Gauge 4/20mA OutputON/UNIT/OFF∙ Press ON / UNIT / OFF to turn unit on.∙ Press again when the unit is on to change the unit of measure from PSI, BAR or MPA. ∙Hold the ON / UNIT / OFF for three seconds and release to turn the unit off.LIGHT/P -H∙ Press the LIGHT / P -H to turn on the back light.∙Hold the LIGHT / P -H for three seconds to display the maximum pressure that the device has measured.“OL” is greater than the maximum range of the unit. The maximum number will be blinking. ∙ Hold the RESET / CLEAR button for three seconds to clear the maximum number. ∙Hold the LIGHT / P -H button for three seconds to go back to the normal display.Wiring Instructions:∙Power to the unit: There is no ON/OFF button on the MediaGauge™ MG -MD model. The MG -MD unit is powered on and off via the external 12V supply voltage source. ∙ Electrical Interface: (MG -MD harness connections) ∙ White wire: Power Lead for supply input (12 Vdc) ∙ Black wire: Return Lead∙ Brown wire: Limit Switch output (NPN Transistor output)∙ Blue Wire: 4-20 mA output for meter. (Must be loop grounded with black wire)∙Note: The 4-20mA (Blue Wire) must be connected directly to ground when not being used for monitoring pur-poses.IndustrialDigital Pressure Gauge Battery OperatedRESET/CLEAR∙ In a normal function if you press the RESET/CLEAR the display will not change.∙If you hold the RESET/CLEAR for three seconds it will reference the gauge to whatever pressure is currently ap-plied to the unit.For example; if you have 20psi on the display and you hold down RESET/CLEAR then the display willshow 0.0 and a measurement of 30psi would then read as 10psi on the display.∙Hold RESET/CLEAR for three seconds to reset unit to original setting. Unit must be disconnected or have an input of 0psi.Part Number Guide。
压力表的进度等级的解释说明
压力表的精度等级,是以允许误差占压力表量程的百分率来表示的,一般分为0。
5、1、1.5、2、2。
5、3、4七个等级(锅炉上不用3级和4级),数值越小,其精度越高。
例如,表盘量程0~2.5 MPa精度2。
5级的压力表,它的指针所示压力值与被测介质的实际压力值之间的允许误差,不得超过上2.5MPa×2。
5%=±0。
062 5 MPa;当压力表指示压力为0。
8MPa时,实际气压在0.737 5~0。
862 5MPa之间。
由此可见,压力表实际误差的大小,不但与精度有关,而且还与压力表的量程大小有关.
量程相同时,精度越高(即数字越小),压力表的允许误差越小。
精度相同时,量程越大,压力表的误差越大。
0。
25级别
压力图形记录仪。
压力表的进度等级的解释说明
压力表的精度等级,是以允许误差占压力表量程的百分率来表示的,一般分为0。
5、1、1。
5、2、2。
5、3、4七个等级(锅炉上不用3级和4级),数值越小,其精度越高。
例如,表盘量程0~2。
5 MPa精度2。
5级的压力表,它的指针所示压力值与被测介质的实际压力值之间的允许误差,不得超过上2。
5MPa×2。
5%=±0.062 5 MPa;当压力表指示压力为0.8MPa时,实际气压在0.737 5~0。
862 5MPa之间.
由此可见,压力表实际误差的大小,不但与精度有关,而且还与压力表的量程大小有关。
量程相同时,精度越高(即数字越小),压力表的允许误差越小.精度相同时,量程越大,压力表的误差越大。
0.25级别
压力图形记录仪。
智能数显压力表使用说明书U-P3.1-MKCN 3第3版杭州美控自动化技术有限公司前言感谢您购买我公司产品!本手册是关于产品的功能、操作方法和故障处理方法等的说明书。
在操作之前请仔细阅读本手册,正确使用产品。
在您阅读完后,请妥善保管在便于随时取阅的地方,以便操作时参照。
注意本手册内容如因功能升级等有修改时,恕不通知。
本手册内容我们力求正确无误,如果您发现有误,请与我公司联系。
本产品属于非防爆设备,请勿在防爆场合使用。
版本U-P3.1-M K CN3第三版2019年02月I确认包装内容开箱之后请先确认产品和附件,一旦产品有误、数量不对或外观受损,请与我公司联系。
产品清单序号物品名称数量1数显压力表1台2说明书1本3合格证1份47号电池(AAA)2节使用注意事项1、在不需要使用背光的情况下,请关闭背光,以延长电池使用时间。
2、长期不使用产品的情况下,请取出电池。
3、如需对产品校准,请与我公司联系,非专业人士不得进行校准。
II目录一、产品简介 (1)二、技术参数 (3)三、显示与按键 (4)四、压力表校准 (6)五、峰值保存功能 (6)六、尺寸结构与安装 (7)七、注意事项 (8)八、质保及售后服务 (9)III一、产品简介一、产品简介高精度数显压力表,内置高精度压力传感器,能够准确的实时显示压力,并且具有精度高,长期稳定性好的特点。
本产品配备段式液晶显示屏,具有清零、背光、开关机、单位切换和低电压报警等多项功能,操作简单,安装方便。
本产品采用优质304不锈钢壳体和接头,抗震性好,能够测量气体、水、油等对不锈钢无腐蚀的介质。
本产品适合于便携式压力测量、设备配套、校验设备等压力测量应用。
产品特点一键清零,使用方便。
优质304不锈钢壳体和接头,抗震耐用。
多种测量单位,一键切换,使用更省心。
具有温度补偿,温度系数小,测量更精准。
最大1.1倍量程过载显示,更有峰值记录功能,使1一、产品简介用更可靠。
四位半段式显示,读数准确直观。
压力表标示贴使用说明
一、根据设备上压力表的量程和设备正常工作时的
压力范围划分颜色区域。
例如:右图中压力表量程为0-
1.6MPa,该压力表使用在化糖锅上。
化糖锅正常工作时,
压力范围在:0.4-0.8MPa(即4-8公斤压力)。
那么,
0-0.4MPa为黄色区域,表示压力偏低。
0.4-0.8MPa 为绿色区域,表示压力正常。
0.8-1.6MPa为红色区域,表示压力过高。
(此事例仅供参考,以现场实际情况为准)
二、根据上面的颜色区域,将标示贴裁剪
合适长度。
三、将裁减好的标示贴贴到压力表对应的量程上。
注:1、压力表表面直径为10cm。
2、压力表使用在熬糖锅,化糖锅,储气罐等压力容器上。
符合上述两条的压力表可用此标示贴。
冷媒高压表 冷媒低压表
压力表说明
一、冷媒压力表:
冷媒压力可分为高压表和低压表,高
压表主要显示系统高压端的压力,低压表主
要显示系统低压端的压力。
通过观察压力表
可直观的了解系统的运行情况,冷媒高压、
低压压力表里面的刻度主要由压力、温度所
组成。
表中的psi 和Kg/cm 2、℃分别代表其
单位值。
读取压力数值时指针所对应的刻度
值加上其相对应的单位值即可。
观察蒸发温度时可通过根据铭牌上冷媒的种类对应表上冷媒的种类来读取相对应温度值。
psi 为英制单位称为表压力,公制单位为
Kg/cm 2、或Mpa 其换算公式为 1
Kg/cm 2=0.0986Mpa≈0.1Mpa =14.2psi
℃为摄氏温度单位,工程上应用的还有华氏单位
(0F )或开氏单位(0K )换算单位公式为:0F=(℃
× 9/5)+32 、0K=℃+273 二、冷媒正常范围压力值:
R-22冷媒:
高压表正常范围压力值:140~280 psi
低压表正常范围压力值:60~85 psi
R-134a冷媒:
高压表正常范围压力值:120~240 psi
低压表正常范围压力值:25~45 psi
三、空气压力表:
空气出入口压力表主要用于显示机台压
缩空气出入口的压力。
表上由若干刻度组成,
表中的Mpa和Kg/cm2为压力单位。
读取压力数
值时指针所对应的刻度值加上其相对应的单
位值即可。