挂车使用说明书
- 格式:doc
- 大小:4.04 MB
- 文档页数:26
挂车双释放阀使用说明
挂车双释放阀是一种用于挂车制动系统的重要部件,其作用是
在制动系统失效时保证挂车的安全。
挂车双释放阀的使用说明如下:
1. 安装位置,挂车双释放阀通常安装在挂车的制动系统中,一
般位于气压储气罐和制动气缸之间。
2. 工作原理,挂车双释放阀在正常情况下处于关闭状态,当制
动系统失效时,双释放阀会自动打开,释放气压并使挂车制动系统
处于释放状态,从而保证挂车的安全。
3. 操作方法,在正常情况下,无需特别的操作,双释放阀会根
据制动系统的压力自动控制释放气压。
在日常使用中,需要定期检
查双释放阀的工作状态,确保其正常运行。
4. 注意事项,在安装和维护双释放阀时,需要严格按照制造商
的要求进行操作,确保安装正确并且密封良好。
另外,定期检查双
释放阀的工作状态,确保其在紧急情况下能够可靠地释放气压。
5. 维护保养,定期对挂车双释放阀进行检查和维护,包括清洁
阀体、检查密封件和连接件的状态,确保其在紧急情况下能够可靠地发挥作用。
总之,挂车双释放阀是挂车制动系统中不可或缺的重要部件,正确的安装和定期的维护对于保证挂车行驶安全至关重要。
希望以上信息能够帮助你更好地了解挂车双释放阀的使用说明。
半挂车升顶怎么操作方法
半挂车升顶的操作方法如下:
1. 首先,找到半挂车的控制盘,通常位于驾驶座旁边或者靠近车辆前部的中央控制台上。
2. 在控制盘上找到顶部升降按钮,通常是一个上下箭头或者一个标有"UP"和"DOWN"的按钮。
3. 将车辆停稳后,确保手刹已经拉紧,并且发动机已熄火。
4. 打开半挂车的后舱门,通常是通过旋转门把手或按下按钮打开。
5. 确保半挂车内部没有任何阻碍物,以免顶部升降过程中造成损坏或伤害。
6. 按下控制盘上的顶部升降按钮的"UP"方向,使半挂车的顶部开始升高。
7. 在升高过程中,始终保持观察车辆周围的安全,以防止意外碰撞或伤害。
8. 等到半挂车顶部抬升到所需高度后,停止按压控制盘上的升降按钮。
9. 升顶完成后,确保半挂车的顶部已经牢固地锁定,以防止其在行驶过程中移
动或晃动。
10. 关闭半挂车的后舱门,确保门锁牢固。
请注意,操作具体步骤可能因车型和厂家而有所差异,请根据您所使用的具体半挂车类型和相关说明书进行操作。
此外,在进行任何车辆操作之前,请确保您拥有合法的驾驶证,并遵守交通规则和安全操作。
挂车驾驶操作方法挂车驾驶是一项专业的技术活,需要掌握一定的技巧和基本知识。
下面是挂车驾驶的操作方法。
一、做好前期准备1. 检查挂车的整体情况,包括轮胎、制动器、照明设备等是否正常。
2. 检查挂车连接点的牢固程度,确保挂车与牵引车连接处无松动。
二、上车准备1. 调整座椅和后视镜,确保能够清晰地看到后方情况。
2. 穿戴好安全带,确保自身安全。
三、发动车辆1. 启动牵引车引擎,松开手刹。
2. 缓慢踩下牵引车的离合器,放松刹车踏板,等待车辆启动。
四、起步1. 在起步前,先观察当地交通情况,确保安全起步。
2. 缓慢踩下离合器,将挂车与牵引车分离。
3. 注意提前观察转弯处、坡道等特殊路况,调节挂车转向以及速度。
五、行驶1. 注意与前车保持安全距离,不要跟车过近,以防发生紧急情况。
2. 注意观察挂车的后方以及两侧的情况,保持警觉。
3. 切勿急刹车或急转向,以免引发挂车翻车或滑行等危险情况。
六、变道1. 提前观察左右两侧的情况,确保没有来车后,打开转向灯。
2. 缓慢转动方向盘,将挂车转向到目标车道。
3. 等挂车完全转向后,稳定车速,回正方向盘,保持在目标车道上行驶。
七、超车1. 提前观察超车道路的情况,确保没有来车后,打开转向灯。
2. 缓慢加速,超车过程中保持稳定的速度。
3. 在超车完成后,提前观察后方情况,恢复到原车道行驶。
八、减速和停车1. 提前观察道路情况,减速时打开转向灯,示意其他车辆。
2. 缓慢踩下刹车踏板,逐渐减速。
3. 注意与前车保持足够的安全距离,确保安全停车。
九、下车准备1. 关闭车窗和车门。
2. 施加手刹,关闭车辆引擎。
3. 下车之前,再次检查挂车连接点的牢固程度。
十、总结挂车驾驶需要经验和技巧,并且一切操作都要以安全为首要前提。
此外,还需要根据挂车型号和车况的不同,灵活调整操作方法。
不断实践和学习可以提高挂车驾驶的技能水平,确保行车安全。
W A B C O C o n f i d e n t i a l a n d P r o p r i e t a ry WABCO 挂车EBS 使用说明Trailer EBS System Instructions for useW A B C O C o n f i d e n t i a l a n d P r o p r i e t a ry注意事项注意事项!!Attention!1, 先进的EBS 控制系统能够显著提高车辆的安全性能控制系统能够显著提高车辆的安全性能。
但是驾驶员的正确使用和按交通规则谨慎驾驶对车辆的安全有决定性的作用规则谨慎驾驶对车辆的安全有决定性的作用!!1. Advanced EBS control system can greatly improve the safety performance of the vehicle ,but it makes the decisive role what the driver's correct use and according to the rules of the traffic to careful driving for the vehicle's safety.请驾驶员按交通规则谨慎驾驶请驾驶员按交通规则谨慎驾驶!!Please according to the rules of traffic to careful driving!2, 发现驾驶室内的挂车ABS 警告灯常亮时警告灯常亮时,,请尽快联系相关人员进行检测2.If you find the ABS or EBS warning lamp keep flashing, please contact related person to check the system.3, 定期清洁管路滤清器3. Regular cleaning the line filterW A B C O C o n f i d e n t i a l a n d P r o p r i e t a ryEBS 挂车的使用说明Instructions for use1, 必须正确的连接电源Must connection power cable correctlyEBS 正常工作正常工作!!EBS work normally!EBS 不能正常工作正常工作!!EBS can’t work normally!W A B C O C o n f i d e n t i a l a n d P r o p r i e t a ry2, 清洁管路滤清器Clean line filter这两个握手接头在挂车前部, 滤清器内置其中滤清器内置其中,,需要定期清洁需要定期清洁!!The two hose coupling with integrated filter at the front of trailer, need regular cleaning!建议每2~3个月清理一次个月清理一次!!Suggest cleaning by every 2~3 months !EBS 挂车的使用说明Instructions for useW A B C O C o n f i d e n t i a l a n d P r o p r i e t a ry1, 使用内六角拆卸此零件Use socket remove the parts2, 取出滤网取出滤网,,清洁即可Remove screen and clean 2, 清洁管路滤清器Clean line filterEBS 挂车的使用说明Instructions for useW A B C O C o n f i d e n t i a l a n d P r o p r i e t a ry 3, 紧急继动紧急继动--双释放组合阀PREV行车制动释放Release parking brake1, 长时间停车长时间停车,,尤其是坡道停车时尤其是坡道停车时,,应拉出红色按钮以实施储能气室制动应拉出红色按钮以实施储能气室制动。
纯电半挂车操作方法
纯电半挂车的操作方法与传统燃油半挂车有一些不同,主要包括以下几个方面:
1. 充电操作:纯电半挂车需要在充电站或充电桩进行充电。
将充电枪与车辆的充电接口相连接,然后按照充电设备的说明进行操作,启动充电过程。
2. 驾驶操作:纯电半挂车启动时与传统半挂车类似,通过启动电源按钮或转动钥匙启动车辆。
但在行驶时,纯电半挂车没有变速器,只有加速踏板和制动踏板。
加速踏板控制车辆的加速和减速,而制动踏板用于制动车辆。
3. 能耗管理:为了更好地利用电能,纯电半挂车通常配备了能耗管理系统。
驾驶员需要通过仪表盘上的显示信息,了解电池的剩余电量、预计行驶里程等信息,以确保充电满足行驶需求,并在行驶过程中根据能耗情况进行合理的驾驶操作。
4. 路线规划:由于纯电半挂车的续航里程有限,驾驶员需要提前规划好行驶路线,尽量选择有充电设施的路线,以确保在需要时能够及时进行充电。
5. 充电设备维护:纯电半挂车的充电设备需要定期维护,以确保其正常运行。
驾驶员需要按照充电设备使用说明书建议的周期进行维护,如清理充电接口、检查充电线路等。
需要注意的是,纯电半挂车的具体操作方法可能因车型和品牌而有所不同,建议
在使用前详细阅读使用说明书并接受相关培训。
兴扬牌挂车说明书
仓栅顶部离地板高度2350mm。
后悬为2280mm,轴距为7000+1310+1310mm时,对应的离去角为12.8°。
后悬为2200mm,轴距为6800+1310+1310mm时,对应的离去角为13.7°。
后悬为1880mm,轴距为7000+1310+1310mm时,对应的离去角为15.4°。
插桩可选用外插式和内插式,对应的货箱宽分别为2280mm,2390mm。
后部可选装三开门结构。
ABS系统生产厂家为广州市科密汽车制动技术开发有限公司、型号为CMFKX(4S/2M)。
侧、后防护所用材料材质为Q235A,侧面防护装置连接方式:螺栓连接。
后部防护装置连接方式:焊接。
后部防护装置的断面尺寸为160×50,离地高度为520mm。
该车运输40英尺集装箱或普通罐箱.牵引销处车架总高度90mm. 选装轻量化支架及铝合金轮辋时整备质量为4500kg.ABS系统型号为:CM2XL-4S/2K(4S/2M);ABS系统生产厂家为:广州市科密汽车制动技术开发有限公司.侧防护所用材料为铝合金5083,也可以为Q235;后防护所用材料为Q235A,连接方式为:侧防护装置与整车螺栓连接,后防护装置与整车焊接.后部防护装置的断面尺寸为140mm×60mm,离地高度500mm.选装挡泥板。
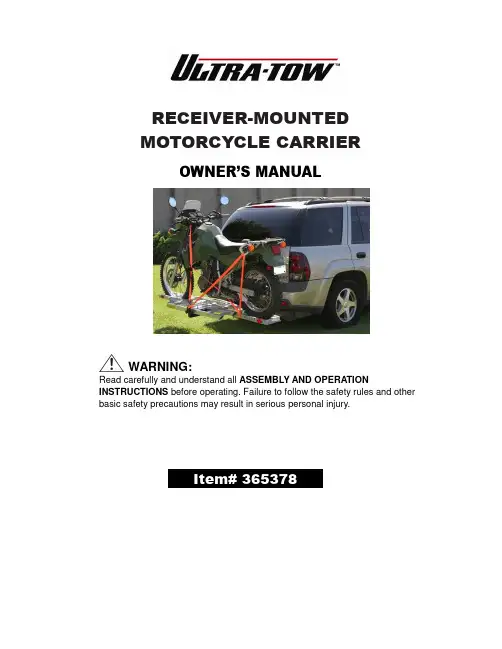
RECEIVER-MOUNTEDMOTORCYCLE CARRIEROWNER’S MANUALWARNING:Read carefully and understand all ASSEMBLY AND OPERATION INSTRUCTIONS before operating. Failure to follow the safety rules and other basic safety precautions may result in serious personal injury.Thank you very much for choosing a NORTHERN TOOL + EQUIPMENT CO., INC. Product! For future reference, please complete the owner’s record below:Model: _______________ Purchase Date: _______________Save the receipt, warranty and these instructions. It is important that you read the entire manual to become familiar with this product before you begin using it.This machine is designed for certain applications only. Northern Tool + Equipment cannot be responsible for issues arising from modification. We strongly recommend this machine not be modified and/or used for any application other than that for which it was designed. If you have any questions relative to a particular application, DO NOT use the machine until you have first contacted Northern Tool + Equipment to determine if it can or should be performed on the product.For technical questions please call 1-800-222-5381.TECHNICAL SPECIFICATIONSCapacity: 400 lbs. (182kg)Motorcycle Platform Size: 78 3/4in.L x 8 5/8in.W (200 x 22cm)Ramp Size: 41in.L x 8 5/8in.W (104 x 22cm)Receiver Size: 2in. (5cm) (Requires Class III or IV rating)GENERAL SAFETY RULESWARNING: Read and understand all instructions. Failure to follow all instructions listed below may result in serious injury.CAUTION: Do not allow persons to operate or assemble this Motorcycle Carrier until they have read this manual and have developed a thorough understanding of how the Motorcycle Carrier works.WARNING:The warnings, cautions, and instructions discussed in this instruction manual cannot cover all possible conditions or situations that could occur. It must be understood by the operator that common sense and caution are factors which cannot be built into this product, but must be supplied by the operator.SAVE THESE INSTRUCTIONSWORK AREA•Keep work area clean, free of clutter and well lit.Cluttered and dark work areas can cause accidents.•Keep children and bystanders away while operating a Motorcycle Carrier. Distractions can cause you to lose control, so visitors should remain at a safe distance from the work area.•Be aware of all power lines, electrical circuits, water pipes and other mechanical hazards in your work area, particularly those hazards below the work surface hidden from the operator’s view that may be unintentionally contacted and may cause personal harm or property damage.PERSONAL SAFETY•Stay alert, watch what you are doing and use common sense when using a Motorcycle Carrier.Do not use a Motorcycle Carrier while you are tired or under the influence of drugs, alcohol or medication. A moment of inattention while operating a Motorcycle Carrier may result in serious personal injury.•Dress properly. Do not wear loose clothing, dangling objects, or jewelry. Keep your hair, clothing and gloves away from moving parts. Loose clothes, jewelry or long hair can be caught in moving parts.•Use safety apparel and equipment. Use safety goggles or safety glasses with side shields which comply with current national standards, or when needed, a face shield. Use as dust mask in dusty work conditions. This applies to all persons in the work area. Also use non-skid safety shoes, hardhat, gloves, dust collection systems, and hearing protection when appropriate.MOTORCYCLE CARRIER USE AND CARE•Do not modify the Motorcycle Carrier in any way. Unauthorized modification may impair the function and/or safety and could affect the life of the equipment. There are specific applications for which the Motorcycle Carrier was designed.•Always check of damaged or worn out parts before using the Motorcycle Carrier. Broken parts will affect the Motorcycle Carrier operation. Replace or repair damaged or worn parts immediately.•Do not exceed the Motorcycle Carrier load capacity.•Distribute the load evenly. Uneven loads may cause the Motorcycle Carrier to tip, resulting in personal injury to the operator or others.•Use the Motorcycle Carrier on flat and level surfaces capable of supporting the Motorcycle Carrier and its maximum load. Pulling or pushing a load on a slanted or uneven surface can result in loss of control.•Store idle Motorcycle Carrier. When Motorcycle Carrier is not in use, store it in a secure place out of the reach of children. Inspect it for good working condition prior to storage and before re-use.•Secure motorcycle frame and wheels securely using ratcheting tie downs (not included) and included pins (#8).•Push, never drive, the motorcycle onto the carrier.•Obey all D.O.T. regulations pertaining to mounting the carrier onto a vehicle.•Only use this product with a vehicle that has a 2in. square receiver hitch, rated to at least Class III, and can bear the additional weight of both the carrier and motorcycle.•NEVER sit on motorcycle while loading, unloading, or while supported on carrier.•Do not exceed the maximum load of 400 lbs. Loading a heavier object on this product can result in dangerous conditions to both the operator and the item loaded.•Do not allow anyone to stand upon or climb into the carrier. This item is not for carrying people or animals.ASSEMBLY1. Align the two Platforms (1) and connect by two Joint Brackets (28), using four Bolts (24) and Lock Nuts (25) on each Joint Bracket (28) to secure two Platform (1).2. Attach the two Arc Bars (26) to both sides of the Platform (1), using two Bolts (24) and Lock Nuts (25) on two end of each Arc Bar (26) to secure it on the Platform (1).3. Screw the two Bolts (27) into the bushing on the Joint Bracket (28) and tighten fully.4. Attach the two Wheel Clamps (23) to the Platform (1), using two Bolts (21) and Lock Nuts (22) each Clamp.5. Remove all Bolts (11,12,20), Washers (14,18), Nuts (13,15,19), Pins (5,7) and Brackets (4,17) from Tube (3), as shown in photo #3.6. Insert Tube into Platform (1) and secure with two Bolts (12), Washers (14), and Nuts (13).7. Attach Tie Down Brackets (4) to Tube with Bolt (11) and Nut (15). 8. Insert Tube into Class III (or better) 2in. receiver of a vehicle and lock itwith Hitch Pin (5). Insert R-Pin (7) through hole in Hitch Pin to hold itin place.9. Attach Stabilizers (17) to Tube using Bolt (20), Washer (18), and Nut (19).Tighten Stabilizers in place to reduce vibration of the Carrier.REFER TO ABOVE PHOTO FORSTEPS 1, 2 and 3PHOTO #2 PHOTO #3OPERATIONWARNING:Read ENTIRE IMPORTANT SAFETY INFORMATION section at beginning of this manual including all text under subheadings therein before set up or use of this product.Loading Motorcycle1. Remove LEFT Wheel Lock Pin (8), Adjustment Pin (16) and their R-pins (6).2. Move Adjustment Pin (16) so that motorcycle’s weight will be centered on Platform. Some largerwheels will require Adjustment Pin to be left off completely. If used, secure Adjustment Pin in place with an R-pin (6).3. Remove Wing nut (10), Press Plate (9) and Ramp (2).4. Hook Ramp (2) to lip on RIGHT side of platform.The Ramp must be properly secured to Platform.5. Put motorcycle in neutral and, with assistance,push it up Ramp. Stop when front wheel reachescenter of Platform (1) and have second personhelp support motorcycle.6. Remove right Wheel Lock Pin (8), and R-pin (6).7. Push motorcycle completely onto carrier. Installboth Wheel Lock Pins through motorcycle wheelsand secure with R-pins (6).NOTE: If a wheel cannot be secured with Wheel Lock Pins, use properly rated ratchet tie-downs (not included) to firmly secure it to its end of platform.8. Put motorcycle in gear.9. Tie down motorcycle, as shown in left (view fromoutboard side):a. Connect a ratcheting tie-down from bracket on endof Tube (3), over front frame of motorcycle and toPlatform (1) on the inboard side.b. Connect a second ratcheting tie-down from bracketon end of Tube (3), over rear frame of motorcycle andto Platform (1) on the inboard side.c. Connect a third ratcheting tie-down from Tie DownBracket (4), over front frame of motorcycle and to Platform (1) on the outboard side.d. Connect a fourth ratcheting tie-down from Tie Down Bracket (4), over rear frame of motorcycleand to Platform (1) on the outboard side.10. Use ratcheting tie-downs to compress motorcycle’s suspension evenly until there is no possibilityof motorcycle coming loose.11. Turn knob on each Wheel Clamp (23) to secure motorcycle’s front wheel.12. Return Ramp (2) to mounted position and secure with Wing nut (10) and Press Plate (9).13. Attach any needed markers and/or lights to carrier and motorcycle as required by vehicle codes.Unloading MotorcycleWARNING:Keep away from motorcycle parts that may suddenly move as tension is released.1. Remove Wing nut (10), Press Plate (9) and Ramp (2).2. Hook Ramp (2) to lip on LEFT side of platform. The Ramp must be properly secured to Platform.3. Release motorcycle’s front wheel from Wheel Clamps (23).4. Have an assistant support motorcycle while carefullyreleasing tension on all tie-downs.5. Remove both Wheel Lock Pins (8) and their R-pins(6).6. Set motorcycle into Neutral gear. With assistance, pushmotorcycle off Ramp until rear wheel is halfway acrossPlatform (1). Have assistant support motorcycle.7. Replace front Wheel Lock Pin (8) and its R-pin (6).8. Push motorcycle down Ramp and off Carrier.9. Replace all Pins to their positions for storage.10. Return Ramp (2) to mounted position and secure with Wing nut (10) and Press Plate (9).MAINTENANCE•Maintain your Motorcycle Carrier. It is recommended that the general condition of any Motorcycle Carrier be examined before it is used. Keep your Motorcycle Carrier in good repair by adopting a program of conscientious repair and maintenance. If any abnormal vibrations or noise occurs, have the problem corrected before further use. Have necessary repairs made byqualified service personnel.• 1. BEFORE EACH USE,inspect the general condition of the carrier. Check for loose screws, misalignment or binding of moving parts, cracked or broken parts and any other conditionthat may affect its safe operation.• 2. AFTER USE, clean surfaces with clean cloth.DIAGRAM & PARTS LISTPart# Description Qty. Part# Description Qty.For replacement parts and technical questions, please call 1-800-222-5381.Part Description Qty Part Description Qty1 Platform2 15 Nut M8 12 Ramp 1 16 Adjustment Pin 13 2in. Tube w/ Bracket 1 17 Stabilizer 24 Tie Down Bracket 2 18 Spring Washer 12 15 Hitch Pin 5/8in. 1 19 Nut M12 16 R-Pin 3 3 20 Bolt M12*110 17 R-Pin 4 1 21 Bolt M6*70 48 Wheel Lock Pin 2 22 Lock Nut M6 49 Press Plate 1 23 Wheel Clamp 210 Wing Nut 1 24 Bolt M8*75 1211 Bolt M8*65 1 25 Lock Nut M8 1212 Bolt M10*70 2 26 Arc Bar 213 Nut M10 2 27 Bolt M8*30 214 Spring Washer 10 2 28 Joint Bracket 2WARRANTYOne-year limited warrantyDistributed byNorthern Tool + Equipment Co., Inc.Burnsville, Minnesota 55306-6936Made in China。


挂车底盘使用说明书福建华泰电力实业有限公司通用双轴挂车底盘外形图1.产品用途、使用条件1.1 产品用途通用挂车底盘系列主要用于承载电站、空压机、泵站、通讯、维修、医疗、农林机械等装备,也可用于一般货物的拖挂运输。
该车可变型为平板、栏板、厢式等各种车辆。
该系列挂车底盘选用国内外成熟的先进总成,精心设计合理配置而成,可以灵活地与各种越野、非越野机动车辆组成列车。
具有性能可靠、制动安全、机动性高、制造精良、外形美观、适用范围广等特点。
制动系统有气制动和惯性制动两种形式。
1.2 使用条件1.2.1 工作环境温度:-25~+45℃1.2.2 相对湿度:95%(+25℃时)1.2.3 海拔高度:满足牵引车要求1.2.4 挂车可在下列路况速度下行驶:a.三级公路b.速度:在不平整的土路及坎坷不平的碎沙石路面上为25km/h,柏油(或水泥)路面上为40km/h。
1.2.5 最小转弯半径:≤7m,具体参见铭牌2.主要结构概述及作用本系列底盘主要由车架、悬架、承载轴、支承装置、制动系统、电气系统等组成。
2.1车架车架材质为钢板,经压形,焊接成框架结构,其节点选择合理、强度高、刚性好。
2.2悬架本挂车底盘系列采用钢板弹簧悬架结构形式。
2.3承载轴无缝钢管焊接直通式。
2.4车轮选用标准或特种轮辋和普通断面子午线轮胎或斜交轮胎。
2.5支承装置车架四角可设有机械支承装置。
长期停放或车载装备工作时将其升起,以便减轻轮胎负荷使工作平稳。
行车时将其收起,并固定可靠。
2.6牵引转向装置牵引车与挂车的连接为钩环式机械连接装置。
牵引装置上下灵活,左右与前轮连接可实现挂车转向,挂车最小转弯半径不大于7m(具体见拖车铭牌)。
*注意选择牵引车时,其最小转弯半径应大于挂车的最小转弯半径。
严禁使用最小转弯半径小于挂车的牵引车!2.7制动系统制动系统由制动器及制动传动装置组成。
2.7.1行车制动a.气动制动:由气接头、管路、管接头、贮气筒、两通开关、紧急继动阀、制动器和制动气室等组成的双管路制动系。
挂车驾驶室操作方法
驾驶挂车的驾驶室操作方法如下:
1. 上车前,确认挂车是否连接好,并检查车身是否有任何损坏或异响。
2. 上车后,调整座椅和方向盘的位置以适应个人合适的驾驶姿势。
3. 系好安全带,并确认各个仪表板上的指示灯是否正常。
4. 启动发动机,踩下离合器同时切换到适当的挡位。
5. 缓慢松开离合器,并给予足够的油门,使挂车开始缓慢移动。
6. 在行驶过程中,使用转向盘来控制挂车的行驶方向。
7. 根据需要,适时刹车,使用脚踏刹车和手刹来控制车辆的减速和停车。
8. 在行驶过程中,时刻留意挂车的后方情况,注意保持安全距离。
9. 在需要通过转弯或变道时,提前打转向灯并慢慢变换车道。
10. 当需要停车时,使用合适的停车位,并拉起手刹。
11. 在车辆停稳后,关闭发动机,并确认车辆完全停止后才可下车。
以上仅为基本的挂车驾驶室操作方法,具体操作还需根据不同挂车型号和具体情况来调整。
同时,驾驶员还需遵守相应的交通法规和安全规定。
前言请仔细阅读本使用说明书及其补充内容,以加深对本车的了解。
除了对本车进行定期保养和维护之外,正确的操作也将有助于实现车辆保值。
为了安全起见,请注意有关附件、改装和零部件更换的信息。
如果您要销售本车,请将所有随车资料交给新车主,这些资料应与车辆一并交付。
目录说明书结构 . . . . . . . . . . . . . .5内容 . . . . . . . . . . . . . . . . . .6安全第一 . . . . . . . . . . . . . . .7安全行驶 . . . . . . . . . . . . . . . . .7简介 . . . . . . . . . . . . . . . . . .7车内人员的正确坐姿 . . . . . . . . . . .9踏板区域 . . . . . . . . . . . . . . . .14存放物品 . . . . . . . . . . . . . . . .14安全带 . . . . . . . . . . . . . . . . . .16简介 . . . . . . . . . . . . . . . . . .16为何必须系上安全带? . . . . . . . . . .17安全带 . . . . . . . . . . . . . . . . .20安全带拉紧器 . . . . . . . . . . . . . .24安全气囊系统 . . . . . . . . . . . . . . .25简介 . . . . . . . . . . . . . . . . . .25前排正面安全气囊 . . . . . . . . . . . .28侧面安全气囊* . . . . . . . . . . . . . .32头部安全气囊 . . . . . . . . . . . . . .34关闭安全气囊* . . . . . . . . . . . . . .37儿童安全 . . . . . . . . . . . . . . . . .39简介 . . . . . . . . . . . . . . . . . .39儿童座椅 . . . . . . . . . . . . . . . .41固定儿童座椅 . . . . . . . . . . . . . .44操作说明 . . . . . . . . . . . . . . .47驾驶室 . . . . . . . . . . . . . . . . . .47概述 . . . . . . . . . . . . . . . . . .47仪表 . . . . . . . . . . . . . . . . . .49数字式组合仪表显示器 . . . . . . . . . .51组合仪表菜单* . . . . . . . . . . . . . .58指示灯 . . . . . . . . . . . . . . . . .66方向盘控制装置 . . . . . . . . . . . . .77简介 . . . . . . . . . . . . . . . . . .77音频系统 . . . . . . . . . . . . . . . .78无线电导航系统 . . . . . . . . . . . . .81解锁和闭锁系统 . . . . . . . . . . . . .83门锁控制 . . . . . . . . . . . . . . . .83钥匙 . . . . . . . . . . . . . . . . . .88射频遥控钥匙 . . . . . . . . . . . . . .90防盗报警系统* . . . . . . . . . . . . . .91行李厢盖 . . . . . . . . . . . . . . . .93车窗 . . . . . . . . . . . . . . . . . .95滑动天窗* . . . . . . . . . . . . . . . .97车灯和视野 . . . . . . . . . . . . . . . .100车灯 . . . . . . . . . . . . . . . . . .100车内照明灯 . . . . . . . . . . . . . . .107视野 . . . . . . . . . . . . . . . . . .108车窗玻璃刮水器 . . . . . . . . . . . . .109后视镜 . . . . . . . . . . . . . . . . .112座椅和杂物箱 . . . . . . . . . . . . . . .115正确调节座椅的重要性 . . . . . . . . . .115头枕 . . . . . . . . . . . . . . . . . .116前排座椅 . . . . . . . . . . . . . . . .117后排座椅 . . . . . . . . . . . . . . . .119杂物箱 . . . . . . . . . . . . . . . . .120烟灰缸*、点烟器*和电源插座 . . . . . . .122急救包、三角警示牌、灭火器 . . . . . . .125行李厢 . . . . . . . . . . . . . . . . .125空调系统 . . . . . . . . . . . . . . . . .127暖风 . . . . . . . . . . . . . . . . . .127Climatic半自动空调系统* . . . . . . . .1292C-Climatronic全自动双区空调系统* . . .132一般说明 . . . . . . . . . . . . . . . .136起步行驶 . . . . . . . . . . . . . . . . .137转向系统 . . . . . . . . . . . . . . . .137安全性 . . . . . . . . . . . . . . . . .138点火开关 . . . . . . . . . . . . . . . .139起动和关闭发动机 . . . . . . . . . . . .140手动变速箱 . . . . . . . . . . . . . . .142自动变速箱*/DSG 自动变速箱* . . . . . . .143手制动器 . . . . . . . . . . . . . . . .147带声音信号的驻车辅助系统* . . . . . . . .149巡航车速*(定速巡航控制系统) . . . . . .151实用技巧 . . . . . . . . . . . . . . .155智能化技术 . . . . . . . . . . . . . . . .155制动器 . . . . . . . . . . . . . . . . .155防抱死制动系统和牵引力控制 M-ABS [ ABS 和ASR(TCS)] . . . . . . . . . . . . . . .156电子稳定控制系统 ESC(ESP)* . . . . . .157驾驶与环境 . . . . . . . . . . . . . . . .161汽车磨合 . . . . . . . . . . . . . . . .161废气净化系统 . . . . . . . . . . . . . .162经济行驶与环保行驶 . . . . . . . . . . .162国外驾驶 . . . . . . . . . . . . . . . .164挂车牵引 . . . . . . . . . . . . . . . . .165操作说明 . . . . . . . . . . . . . . . .165挂车牵引装置的球节* . . . . . . . . . . .165 行驶技巧 . . . . . . . . . . . . . . . .166安装挂车牵引装置* . . . . . . . . . . . .166车辆保养和清洁 . . . . . . . . . . . . .169一般说明 . . . . . . . . . . . . . . . .169车辆外部保养 . . . . . . . . . . . . . .169车辆内部保养 . . . . . . . . . . . . . .174附件、零部件更换和改装 . . . . . . . . .177附件和备用件 . . . . . . . . . . . . . .177技术改装 . . . . . . . . . . . . . . . .177车顶天线* . . . . . . . . . . . . . . . .177手机和对讲机 . . . . . . . . . . . . . .178检查和添加燃油 . . . . . . . . . . . . .179添加燃油 . . . . . . . . . . . . . . . .179汽油 . . . . . . . . . . . . . . . . . .180发动机舱内作业须知 . . . . . . . . . . .181发动机机油 . . . . . . . . . . . . . . .183冷却液 . . . . . . . . . . . . . . . . .186车窗清洗液和挡风玻璃刮水片 . . . . . . .188制动液 . . . . . . . . . . . . . . . . .191车辆蓄电池 . . . . . . . . . . . . . . .192车轮和轮胎 . . . . . . . . . . . . . . . .194车轮 . . . . . . . . . . . . . . . . . .194自己动手 . . . . . . . . . . . . . . . . .201工具、轮胎修补套件和备用车轮 . . . . . .201更换车轮 . . . . . . . . . . . . . . . .202保险丝 . . . . . . . . . . . . . . . . .207更换灯泡 . . . . . . . . . . . . . . . .211跨接起动 . . . . . . . . . . . . . . . .220牵引和牵引起动 . . . . . . . . . . . . .222技术规格 . . . . . . . . . . . . . . .225规格说明 . . . . . . . . . . . . . . . . .225重要信息 . . . . . . . . . . . . . . . .225油耗信息 . . . . . . . . . . . . . . . .227牵引挂车 . . . . . . . . . . . . . . . .227车轮参数 . . . . . . . . . . . . . . . .228技术规格 . . . . . . . . . . . . . . . . .229检查液位 . . . . . . . . . . . . . . . .229汽油发动机 1.8 L 118 kW (160 PS) . . . .230汽油发动机 2.0 L 155 kW (211 PS) . . . .231尺寸和容量 . . . . . . . . . . . . . . .232索引 . . . . . . . . . . . . . . . . . .233 说明书结构本说明书阅前须知本说明书在刊印时即对随车装备进行了介绍。
电动乐高积木大挂车说明书一、产品介绍电动乐高积木大挂车是一款由乐高公司研发的电动玩具积木,适合儿童玩耍和学习。
该产品采用了最新的电动技术,具有丰富的功能和创造力。
它的外观设计精美,色彩鲜艳,吸引力极高。
大挂车的尺寸适中,拼装过程中锻炼了孩子的动手能力和逻辑思维能力。
二、产品特点1. 电动功能:大挂车内置电动机,可以通过遥控器控制前进、后退、转弯等动作,增加了玩耍的趣味性和互动性。
2. 多功能挂车:大挂车上配备了各种功能模块,包括车厢、起重机、货物等,可以模拟真实的运输场景,激发孩子的想象力和创造力。
3. 可拆装设计:大挂车的各个部件都采用乐高积木的拼装方式,可以随意拆卸和重新组合,培养孩子的动手能力和空间想象力。
4. 紧凑结构:大挂车的设计紧凑,占用空间小,方便携带和收纳,适合在家中或户外进行玩耍。
三、产品配件1. 电动机:大挂车配备了一台高性能的电动机,可以提供强劲的动力支持。
2. 遥控器:大挂车配备了一个简易的遥控器,可以方便地控制车辆的运动和功能。
3. 挂车车厢:大挂车的车厢部分可以用来装载各种积木模块和货物,增加了玩耍的趣味性和互动性。
4. 起重机:大挂车上配备了一个起重机模块,可以通过电动机的驱动实现上升、下降和转动等动作。
5. 货物:大挂车还提供了一些货物积木模块,可以用来装载和卸载,模拟真实的运输场景。
四、拼装说明1. 按照说明书提供的拼装步骤,逐步组装车身框架。
2. 将电动机和遥控器安装到指定位置。
3. 组装车厢和起重机模块,确保其可以自由运动。
4. 安装货物积木模块,调整其位置和数量。
5. 完成拼装后,确保各个部件安装牢固,可以正常运作。
五、使用方法1. 将大挂车放置在平坦的地面上,确保没有障碍物。
2. 打开遥控器的电源,将电动机和遥控器进行配对。
3. 使用遥控器控制大挂车的运动,可以前进、后退、转弯等。
4. 通过遥控器控制起重机的动作,可以实现起升、下降和转动等功能。
5. 可以通过拆卸和重新组装来改变大挂车的功能和外观。
目录 前言............................................................................................................................................................ 2 一、车辆外型图 ....................................................................................................................................... 3 二、车辆主要技术参数 .......................................................................................................................... 7 三、车辆主要结构................................................................................................................................... 9 1.车架 ................................................................................................................................................ 9 2.锁栓装置 ....................................................................................................................................... 9 3.备胎升降器 ................................................................................................................................... 9 4.防护栏 ............................................................................................................................................ 9 5.车轴、轮胎、钢圈 ....................................................................................................................... 9 6.悬架系统 .................................................................................................................................... 10 7.升降支腿 .................................................................................................................................... 10 8.牵引销 ......................................................................................................................................... 11 9.气路系统 .................................................................................................................................... 11 10. ABS系统 ................................................................................................................................ 12 11.电路系统 .................................................................................................................................. 12 四、车辆使用和操作 ........................................................................................................................... 13 1.牵引车与半挂车的连接 ........................................................................................................... 13 2.载货 ............................................................................................................................................. 14 3.行驶 ............................................................................................................................................. 14 4.分离 ............................................................................................................................................. 15 2
5. 确保车辆在行驶中的安全而必须注意或采取的事项如下 ............................................... 15 五、车辆标识 ........................................................................................................................................ 16 1.铭牌 ............................................................................................................................................. 26 2.车辆识别代码 ............................................................................................................................ 26 六、车辆日常及定期维护 ................................................................................................................... 28 七、车辆检查保养要领 ....................................................................................................................... 19 1.检查时注意事项 ........................................................................................................................ 19 2.检查全部管道 ............................................................................................................................ 19 3.检查紧急继动阀 ........................................................................................................................ 18 4.检查制动气室 ............................................................................................................................ 19 5.检查储气筒 ................................................................................................................................ 19 6.检查管道和接头 ........................................................................................................................ 20 7.制动调整臂及制动器的调整 ................................................................................................... 20 8.连接螺栓螺母的调整 ................................................................................................................ 20 9.轮胎保养 .................................................................................................................................... 20 10.悬挂装置 .................................................................................................................................. 20 11.牵引销及牵引销板 ................................................................................................................. 20 八、润滑 ................................................................................................................................................ 21 九、常见故障原因及其排除方法....................................................................................................... 22 十、保修卡 ............................................................................................................................................ 23