FS15挡板式流量开关开关说明书
- 格式:doc
- 大小:81.00 KB
- 文档页数:2


流量开关说明书安全操作及保养规程流量开关是一种常见的流量控制装置,其作用是根据流量的大小来控制液体或气体的流动。
通过对流量开关的正确使用和保养,可以达到提高设备稳定性、提高生产效率、延长设备寿命的目的。
安全操作规程1. 选用合适的流量开关在选择流量开关时,应根据实际需求来确定合适的型号和规格。
同时还需考虑流体的压力、温度等参数,以确保选择的流量开关能够适用于实际工作环境。
2. 安装位置在安装流量开关时,应选择合适的位置,避免在高温、腐蚀等特殊环境下使用,同时应尽量避免安装在缺乏通风、易产生震动等环境中。
3. 连接方式在连接流量开关时,应按照说明书中的连线方式进行连接,保证电气连接良好,避免出现短路或者其他电气故障;同时还需密封连接处,避免液体或气体泄漏。
4. 操作注意事项在正常使用流量开关时,应注意以下几点:•不得超过流量开关的额定流量范围,以免损坏设备;•不得在流量开关工作过程中频繁开关,以免造成过度磨损;•不得在流量开关连续工作时间过长,避免过度损耗。
5. 维护保养定期进行维护保养是保证流量开关正常工作的重要措施,以下是常见的保养规程:•定期进行清洗,避免灰尘等污物附着在器件上,影响设备散热;•检查连接方式和电气连接是否正常,避免出现电气故障;•定期检查设备的运行状态,发现问题及时处理。
保养规程对于流量开关的保养工作,需要注意以下几点:1. 定期清洗长时间运行会导致流量开关表面积累尘,影响散热或者其他机械效应。
所以在日常保养时需要对流量开关进行清洗,除去积尘,以保证机器的正常运转。
2. 定期检查连接方式及电气连接是否正常在使用流量开关时,需要定期检查连接方式及电气是否正常,避免出现电气故障的情况。
同时还需要关注气流及液流的通畅与否,以保障液体或气体的正常通道。
3. 定期检查设备的运行状态为了避免流量开关在工作中出现问题,我们需要定期检查设备的运行状态,确保设备正常开启及关闭,避免过度损耗,并且能够及时发现设备的问题并进行维修处理。


Serial No. H-V031-E-8Diaphragm Valves Type 15User’s ManualContents(1) Be sure to read the following warrantyclauses of our product 1(2) General operating instructions 2(3) General instructions for transportation,unpacking and storage 3(4) Name of parts 4(5) Working pressure vs. temperature 6(6) Specification of limit switch 7procedure7Installation(7)(8) Connection of limit switch procedure 8(9) Operating procedure 9(10) Adjustment procedure for stopper 10(11) Diaphragm replacement procedure 11Inspectionitems 12(12)Troubleshooting12(13)(14) Handling of residual and12wastematerialsThis user’s guide contains information important to the proper installation, maintenance and safe use of an ASAHI AV Product. Please store this manual in an easily accessible location.<Warning & Caution Signs>This symbol reminds the user to take caution due to the potential for serious injury or death.This symbol reminds the user to take caution due to the potential for damage to the valve if used in such a manner.<Prohibited & Mandatory Action Signs>Prohibited: When operating the valve, this symbol indicates an action that should not be taken.Mandatory action: When operating the valve, this symbol indicates mandatory actions that must be adhered to.(1) Be sure to read the following warranty clauses of our product- Always observe the specifications of and the precautions and instructions on using our product.- We always strive to improve product quality and reliability, but cannot guarantee perfection. Therefore, should you intend to use this product with any equipment or machinery that may pose the risk of serious or even fatal injury, or property damage, ensure an appropriate safety design or take other measures with sufficient consideration given to possible problems. We shall assume no responsibility for any inconvenience stemming from any action on your part without our written consent in the form of specifications or other documented approval.- The related technical documents, operation manuals, and other documentation prescribe precautions on selecting, constructing, installing, operating, maintaining, and servicing our products. For details, consult with our nearest distributor or agent.- Our product warranty extends for one and a half years after the product is shipped from our factory or one year after the product is installed, whichever comes first. Any product abnormality that occurs during the warranty period or which is reported to us will be investigated immediately to identify its cause. Should our product be deemed defective, we shall assume the responsibility to repair or replace it free of charge.- Any repair or replacement needed after the warranty period ends shall be charged to the customer. - The warranty does not cover the following cases:(1) Using our product under any condition not covered by our defined scope of warranty.(2) Failure to observe our defined precautions or instructions regarding the construction, installation, handling,maintenance, or servicing of our product.(3) Any inconvenience caused by any product other than ours.(4) Remodeling or otherwise modifying our product by anyone other than us.(5) Using any part of our product for anything other than the intended use of the product.(6) Any abnormality that occurs due to a natural disaster, accident, or other incident not stemming fromsomething inside our product.WarningCaution(2) Generaloperating instructions- Using a positive-pressure gas with our plastic piping may pose a dangerous condition due to the repellent force particular to compressible fluids even when the gas is under similar pressures used forliquids.Therefore, be sure to take the necessary safety precautions such as covering the piping with protective material. For inquiries, please contact us. For conducting a leak test on newly installed piping, be sure to check for leaks under water pressure. If absolutely necessary to use a gas in testing, please consult your nearest service station beforehand.- Do not step on or apply excessive weight on valve. (It can be damaged.)- Do not use the valve in conditions where the fluid may have crystallized.(The valve will not operate properly.) - Keep the valve away from excessive heat or fire. (It can be damaged, or destroyed.)- Always operate the valve within the pressure vs. temperature range.(The valve can be damaged or deformed by operating beyond the allowable range.)- Allow sufficient space for maintenance and inspection.- Select a valve material that is compatible with the media. For chemical resistance information, refer to “CHEMICAL RESISTANCE ON ASAHI AV VALVE”. (Some chemicals may damage incompatible valve materials.)- Keep the valve out of direct sunlight, water and dust. Use cover to shield the valve. (The valve will not operate properly.)- Perform periodic maintenance.(Leakage may develop due to temperature changes or periods of prolonged storage, rest, or operation.) - The travel stop may have to be adjusted if media leakage is detected between the upstream & downstream sides of the valve.- Bonnet bolt torque should be checked before installation, as they may become loose after long-term storage. A periodic check of the valve condition as well as bonnet & flange bolt torque should be made part of preventative maintenance program properly re-tightening the bolts as necessary. It is especially important to re-tighten all bolts during the first shutdown.Nom. Size mm (inch)Bonnet tightening torque valueN ・m {kgf ・cm} [lb ・inch]Rubber PTEF 125 (5)45.0 {459} [400] 45.0 {459} [400] 150 (6)45.0 {459} [400]45.0 {459} [400]WarningCaution(3) General instructions for transportation, unpacking and storage- When suspending and supporting a valve, take care and do not stand under a suspended valve.- This valve is not designed to handle impacts of any kind. Avoid throwing or dropping the valve. - Avoid scratching the valve with any sharp object.- Do not over-stack cardboard shipping boxes. Excessively stacked packages may collapse. - Avoid contact with any coal tar creosote, insecticides, vermicides or paint. (These chemicals may cause damage to the valve.) - When transporting a valve, do not carry it by the handle. - Store products in their corrugated cardboard boxes. Avoid exposing products to directsunlight, and store them indoors (at room temperature). Also avoid storing products in areas with excessive temperatures. (Corrugated cardboard packages become weaker as they become wet with water or other liquid. Take care in storage and handling.)- After unpacking the products, check that they are defect-free and meet the specifications.Warning Caution(4) Name of partsNominal Size: 125, 150mm (5”, 6”)No. DESCRIPTION No. DESCRIPTION No. DESCRIPTION[20] Nut[1] Body [9] Sleeve(A)[1a] Inserted Nut [10] Thrust bearing(A) [21] Gauge cover[2] Bonnet [11] O-ringliner(A) [22] BonnetNipple [23] Stud bolt・nut[3] Diaphragm [12] Grease[3a] Inserted metal of DIA [13] Hand wheel [24] Bolt・Nut[4] Cushion [14] Name Plate [26] Body liner[4a] Cushion cover [15] Cap [27] Rib linerring [28] U-bolt・nut[5] Compressor [17] SheetConicalwasherspring[18] Stopper [29]Pin[7]Compressorwasher[8] Stem [19]Spring[22], [26], [27], [28], [29] are used with special specification.Nominal Size: 125, 150mm (5”, 6”) with Limit Switch (Option)No. DESCRIPTION No.DESCRIPTION[36] Limit Switch [38]Nut (A)[37] Bracket (A) [40]Limit Switch Rod(6) Specification of limit switch (option)Nominal Size Type CodeProtection Grade125, 150mm (5”, 6”)1LS1-J IP67Limit Switch Rating Connection Rate Voltage (V) Resistive Load (A) Inductive Load (A)AC125 10 6 AC250 10 6 DC115 0.8 0.2 DC230 0.4 0.1(7) Installation procedure- When suspending and supporting a valve, take care and do not stand under a suspended valve.- Be sure to conduct a safety check on all hand and power tools to be used before beginning work. - Wear protective gloves and safety goggles as fluid remain in the valve even if the pipeline is empty. (You may be injured.)- When installing a pipe support by means of a U-band or something similar, take care not to over-tighten. (Excessive force may damage the pipe.)- When installing pipes and valves, ensure that they are not subjected to tension, compression, bending, impact, or other excessive stress.- When installing, disassembling, or reassembling the piping, fix the End Connector.- When connecting an ASAHI AV Valve to metal piping, take care not to let the pipe stress on the ASAHI AV Valve.- Be sure to use sealing gaskets (AV Gasket), bolts, nuts, and washers and tighten them to specified torques. (When a non-AV gasket is used, a different tightening torque specification should be followed.)Procedure1) Set the AV gasket between the flanges.2) Insert washers and bolts from the pipe side, insert washers and nuts from the valve side, then temporarily tightenthem by hand.WarningCaution3) Using a torque wrench, tighten the bolts and nuts gradually to the specified torque in a diagonal manner (Refer to fig.1.)Specified torque value Unit : N ・m {kgf ・cm }[lb ・inch]Nom. Size 125mm (5”) 150mm (6”) Torque value40.0{408} [355]40.0{408} [355]- Tighten the bolts and nuts gradually with a torque wrench to the specifiedtorque level in a diagonal manner.(8) Connection of limit switch procedure (option)- Shut down the power on the equipment before connecting wires. There are risks of electrical shock depending on the level of operating voltage.- Be sure that the terminal cover and body cover are put on during the operation. - If you use the limit switch at 1mA-100mA or 5-30V, consult near Asahi dealer.CautionCautionCautionWarningProcedure1) Loosen the three screws used to attach the limit switch cover with ascrewdriver (+) and remove the cover from the limit switch. *These screws are captive.2) Pull and remove the protective cap, made of resin, from the cover.3) Draw the cable through the connector.4) Strip the cable with a wire stripper.5) Install a crimp-style terminal on the lead wire with a terminalcrimping tool.6) Connect the terminal screw with a screwdriver (+) according to the internal circuit diagram show in page 7.* Tighten the screws.(If not, electric leaks or shocks may occur.)7) Tighten the above three screws with a screw driver (+) to install the cover on the limit switch.8) Tighten the cable by connector.(9) Operating procedure- Do not exert excessive force in closing the valve.- Do not use the valve to fluid containing slurry. (The valve will not operate properly.)- The installed valve must never be opened or closed when foreign matter such as sand is present in the pipeline.- When operating the handle, be sure to do so with your hand. (Using a tool may damage the handle.) - If a stopper is loose, adjust it. (To learn how to adjust it, see the operation manual.)○ ○Caution(10) Adjustment procedure for stopper- If a stopper is loose, adjust it. (To learn how to adjust it, see the operation manual.) - Tighten the stoppers securely. (Too weak a torque on a stopper may cause it to loosen.)Travel stop adjustment1) Loosen the gauge cover [21] with hand.3) Loosen the stopper [20].fluid stops.(counter-clockwise) 180°.6) Tighten the nut [18] to the stopper [20] with spanner wrench.7) Tighten the gauge cover [21].Tightening torque of the screw Unit : N ・m {kgf ・cm} [lb ・inch]Nom. Size 125mm (5”), 150mm(6”)Torque valve 10.0 {102} [89]Caution(11) Diaphragm replacement procedure- I f you do work with the piping installed, drain the piping of all its fluid. Some fluid will remain in the valve. Therefore wear protective goggles and protective gloves. (You may otherwise get injured.)1) Drain fluid completely from the pipeline.2) Remove valve bonnet from the body.3) Turn handle of valve clockwise until it stops. (Do not force it).The compressor should be fully extended out of the bonnet.4) Turn the diaphragm clockwise to remove the diaphragm and mount the new diaphragm by reversing step.5) Mount the bonnet to the valve by reversing step 2. Tighten bonnet bolts by hand only.6) Rotate the handle 360°counter-clockwise.7) Using a torque wrench, tighten the bonnet bolts in a diagonal, cross-cross pattern.8) Re-adjust the stopper if necessary.CautionProblem Cause TreatmentFluid is leaking past the fully closed position. The travel stop is not set correctly. Adjust the travel stop.Solid particles have lodged in the valve.Clear the solid particles from the valve.Media has worn diaphragm and / orweir. Replace.Valve can not be fully open. The diaphragm has pulled off the stem.Replace diaphragm. If the valve is invacuum service, special vacuumvalves may be required.Consult factory.The metal joint failed. Remove diaphragm & compressorand replace joint.The handle spins freely. The stem is broken. Disassemble bonnet and replace thestem.The metal joint failed. Remove diaphragm & compressorand replace joint.Valve leaks between body and bonnet. Bonnet bolts have loosened. Re-tighten.Media has crystallized on thediaphragm. Disassemble and clean on a regularbasis. Replace failed diaphragm, ifnecessary.The diaphragm has failed due tofatigue. Replace.Valve leaks from stem. The diaphragm has failed. Replace.(14) Handling of residual and waste materials- Make sure to consult a waste treatment dealer for recommendations on the proper disposal of plastic valves. (Poisonous gas is generated when the valve is burned improperly.)Caution WarningDiaphragm Valve Type 15Information in this manual is subject to change without notice.2016.4。

FS-□□K 系列流量开关使用说明书1、概述:FS 系列流量开关是利用一种活塞型设计对液体或气体介质流量的过多或不足进行检测,有良好的重复性,很小的压力损失。
活塞磁钢激励一个密封簧片开关。
开关动作点在线可调。
机械活动部分与电器部分完全隔离。
开关有LED 指示,能显示开关动作状态。
本体材质可选塑料、黄铜、不锈钢等。
2、机械参数:工作压力:0-10MPa工作温度:-20到+120℃精 度:设定点±5% (有流量刻度) 管道连接方式:内管螺纹连接3、流量范围及外形尺寸:注:流量和机械尺寸均可定制型号公称通径公称压力MPa 最大流量L/min报警点设置范围L/minL mm A mm B mm mmGFS-08K 81/4”内螺纹10 8 0-8 90 25 28 FS-10K 10 3/8”内螺纹 10 10 0-10 90 25 28 FS-15K 15 1/2”内螺纹 10 20 0-10/20 90 25 28 FS-20K 20 3/4”内螺纹 10 40 0-20/40 100 33 33 FS-25K 25 1” 内螺纹 10 60 0-40/60 100 40 40 FS-32K 32 11/4”内螺纹 4 100 0-60/100 140 50 50 FS-40K 40 11/2”内螺纹 4 250 0-200/250 160 70 70 FS-50K50 2” 内螺纹44000-300/40016080804、流量开关外形图:5、电气指标及接线图:开关类型:簧片开关,两线制电气功率:5-24V/ 200 mA(AC/DC)250V/120mA(AC/DC)电气接线:1.5m聚合物导线防护等级:IP67电气连接图:如图所示6、产品应用:润滑系统、冷却系统、化工耐腐泵密封监测、半导体行业、激光头、焊接头、电源、X射线管、半导体设备、水净化和过滤、热水器、工业冷水机。
其优越性能可确保关键轴承或齿轮上有适当的润滑油流动,以防止诸如印刷、旋转设备、传送装置、加工工具、机器人系统发生停工现象。

热式流量开关使用说明书一、概述流量开关是一种可对管道中的液体流动情况进行实时监控,并提供信号输出的测量仪表。
本产品采用全金属外壳,无活动部件,开关量现场可连续可调,压力损失小,结构紧凑,多个LED实时显示流动状态和开关状态。
安装方便,产品适合多种管径要求,可用于监控管道内流体流速大小、断流监测或防止泵的空转保护。
广泛应用于水电行业、工业液压行业等需要对管道流体流速监控的地方。
二、性能参数◆测量范围:1~150cm/s(水),3~300c(油);◆工作电压:24±20%VDC;◆消耗电流:<90mA;◆信号输出:继电器(SPDT),PNP,NPN晶体管;◆晶体管特征:◆开关电压: 24±20%VDC;◆开关电流:≤;◆继电器特征:◆开关电压:≤250VAC/30VDC;◆开关电流:≤3A;◆初始化时间:典型值8s(2~15s);◆响应时间:典型值2s(1~15s);◆温度梯度:最大250℃/min;◆防护等级:IP67◆介质温度:-20~80℃;◆环境温度:-10~70℃;◆存储温度:-20~85℃;◆耐压等级:10MPa;◆探头材料:304不锈钢◆外壳材料:304不锈钢三、产品应用本产品的感应部件和信号处理单元为一体结构,流速的监控设置连续调节,监测范围与流速有关,而与流量或总体流速无关。
本产品用于以下方面的监控功能:(1)介质流动/降低流速;(2)介质存在/不存在;(3)介质流动/静止。
本产品用位于面板上排成一行的6个不同颜色的指示灯来显示报警状态及流速的趋势,并通过单个继电器输出开关量信号,6个指示灯的含义如下:1个红色指示灯:当点亮时,未达到设定流速;1个黄色指示灯:当点亮时,达到设定流速/超过设定流速,继电器开始动作;4个绿色指示灯:超过设定流速,依次点亮,点亮数越多表示流速越大,当流速降低时按相反顺序依次熄灭。
四、外形结构及电气定义流量开关采用电缆或接插件连接方式。


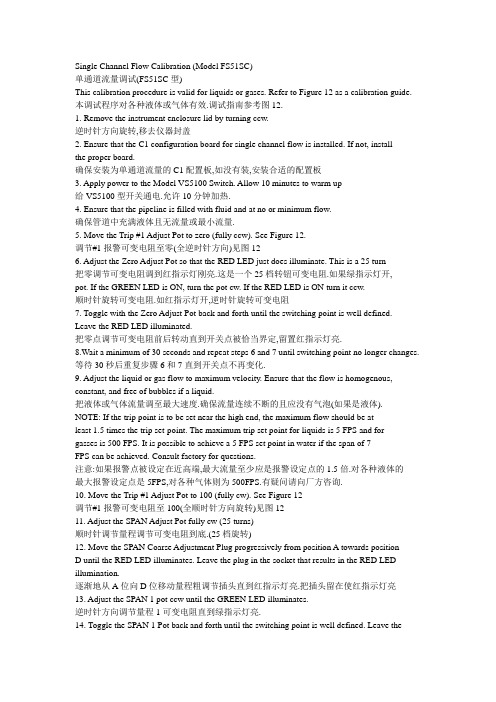
Single Channel Flow Calibration (Model FS51SC)单通道流量调试(FS51SC型)This calibration procedure is valid for liquids or gases. Refer to Figure 12 as a calibration guide. 本调试程序对各种液体或气体有效.调试指南参考图12.1. Remove the instrument enclosure lid by turning ccw.逆时针方向旋转,移去仪器封盖2. Ensure that the C1 configuration board for single channel flow is installed. If not, installthe proper board.确保安装为单通道流量的C1配置板,如没有装,安装合适的配置板3. Apply power to the Model VS5100 Switch. Allow 10 minutes to warm up给VS5100型开关通电.允许10分钟加热.4. Ensure that the pipeline is filled with fluid and at no or minimum flow.确保管道中充满液体且无流量或最小流量.5. Move the Trip #1 Adjust Pot to zero (fully ccw). See Figure 12.调节#1报警可变电阻至零(全逆时针方向)见图126. Adjust the Zero Adjust Pot so that the RED LED just does illuminate. This is a 25 turn把零调节可变电阻调到红指示灯刚亮.这是一个25档转钮可变电阻.如果绿指示灯开,pot. If the GREEN LED is ON, turn the pot cw. If the RED LED is ON turn it ccw.顺时针旋转可变电阻.如红指示灯开,逆时针旋转可变电阻7. Toggle with the Zero Adjust Pot back and forth until the switching point is well defined.Leave the RED LED illuminated.把零点调节可变电阻前后转动直到开关点被恰当界定,留置红指示灯亮.8.Wait a minimum of 30 seconds and repeat steps 6 and 7 until switching point no longer changes. 等待30秒后重复步骤6和7直到开关点不再变化.9. Adjust the liquid or gas flow to maximum velocity. Ensure that the flow is homogenous, constant, and free of bubbles if a liquid.把液体或气体流量调至最大速度.确保流量连续不断的且应没有气泡(如果是液体).NOTE: If the trip point is to be set near the high end, the maximum flow should be atleast 1.5 times the trip set-point. The maximum trip set point for liquids is 5 FPS and forgasses is 500 FPS. It is possible to achieve a 5 FPS set point in water if the span of 7FPS can be achieved. Consult factory for questions.注意:如果报警点被设定在近高端,最大流量至少应是报警设定点的1.5倍.对各种液体的最大报警设定点是5FPS,对各种气体则为500FPS.有疑问请向厂方咨询.10. Move the Trip #1 Adjust Pot to 100 (fully cw). See Figure 12调节#1报警可变电阻至100(全顺时针方向旋转)见图1211. Adjust the SPAN Adjust Pot fully cw (25 turns)顺时针调节量程调节可变电阻到底.(25档旋转)12. Move the SPAN Coarse Adjustment Plug progressively from position A towards positionD until the RED LED illuminates. Leave the plug in the socket that results in the RED LED illumination.逐渐地从A位向D位移动量程粗调节插头直到红指示灯亮.把插头留在使红指示灯亮13. Adjust the SPAN 1 pot ccw until the GREEN LED illuminates.逆时针方向调节量程1可变电阻直到绿指示灯亮.14. Toggle the SPAN 1 Pot back and forth until the switching point is well defined. Leave theGREEN LED illuminated.把量程1可变电阻前后转动直到开关点被恰当界定.留置绿指示灯亮.15. If the switch is to be used for flow-no flow detection, set the trip #1 adjust pot to 50% andgo to step number 18.如果开关是用于测量流量-无流量,把#1报警可变电阻设定在50%,且进入到步骤1816. A more exacting flow rate setting may be made by establishing the flow at the desiredrate with a separate flow meter and proceeding to step 17.用独立的流量计来建立要求的比例流量可以做较为精确的流量率的设定,且进行步骤17以建立报警点.17. Adjust the Trip #1 Adjust Pot to obtain a trip as exhibited by an LED illumination. If a tripon decreasing flow is desired set for RED LED illumination. If a trip on increasing flow is desired set for GREEN LED illumination.调节#1报警可变电阻以获得如指示灯亮所展示的报警.如要求流量下降的报警,设定红指示灯亮.如要求增加流量的报警,设定绿指示灯亮.18. V erify that the switch will reset by returning the actual product flow to the maximum or minimum rates.验证通道报警将消失当调节真实流量回归至最大或最小19. If the time delay feature is needed in the application, refer to Section 4.1.2.如在应用中需要延时特征,参考4.1.2节。

目录1 概述 (1)1.1用图及适用范围 (1)1.2型号的组成及代表意义 (1)1.3使用环境及条件 (1)1.4工作条件 (1)1.5产品特点 (2)2主要技术参数 (2)2.1基本技术参数 (2)2.2综合保护装置技术参数 (3)3结构特征 (3)3.1进线腔 (4)3.2主腔 (4)3.3接线腔 (4)4基本工作原理 (4)4.1 保护系统 (4)4.2 控制原理 (5)4.3显示 (6)5 使用、维护 (6)5.1使用前的准备和检查 (6)5.2整定值的调整 (7)5.3接线 (7)5.4 维护与检查 (7)6 标志、包装、运输、贮存 (8)6.1标志 (8)6.2 包装、运输注意事项 (9)6.3 贮存条件及注意事项 (9)7执行标准 (9)8定货须知 (9)1 概述1.1用途及适用范围QJZ5-1800/1140(660)-15矿用隔爆兼本质安全型多回路组合开关(以下简称组合开关)适用于含有爆炸性危险气体(甲烷)和煤尘的矿井中,在额定电压为1140V供电线路中,对三相鼠笼式异步电动机或三相双绕组鼠笼式异步电动机的起动、停止进行控制和保护,并可在停止时进行换向。
该组合开关主要用于皮带传送系统设备的控制与保护。
1.2 型号的组成及其代表意义组合开关的型号及其代码含义如下:Q J Z 5-1800 / 1140(660)-15十五回路(补充代号)额定电压(主参数)总电流(主参数)设计序号(顺序号)真空、组合(第二特征代号)隔爆兼本安型(第一特征代号)起动器(产品类型代号)1.3 使用环境及条件1.3.1 海拔高度不超过2000m。
1.3.2 运行环境温度-5℃~+40℃。
1.3.3 周围空气相对湿度不大于95%(相当于+25℃时)。
1.3.4 在无明显破坏绝缘的气体和蒸汽的环境中。
1.3.5 在有沼气、爆炸性混合物的矿井中。
1.4工作条件1.4.1 在无显著摇动和冲击振动的地方。
1.4.2 与垂直面的安装倾斜度不超过150。

目录仪表的键盘和前面板-------------------------------------2 仪表功能----------------------------------------------------4 仪表程序----------------------------------------------------4 仪表键盘和中控方式的转换----------------------------6 仪表的启动和停止----------------------------------------7 仪表重量和容积方式的转换----------------------------8 给定量的输入----------------------------------------------8 显示事件信息----------------------------------------------8 服务数据----------------------------------------------------9 标定功能----------------------------------------------------9 调零-----------------------------------------------------14 计数器1或2的复位-------------------------------------13 安装与调整-------------------------------------------------13 维护与保养-------------------------------------------------14 事件信息----------------------------------------------------16(一)仪表的键盘1各按键的作用如下:启动键和停止键。

ML4-25系列流量开关应用:本开关为单刀双掷(SPDT)的流量开关,用于检测、观察液体流量的继动器,一般用于空气调节,供水设备方面的用途,用于感应流经管道的液体流量变化,如水、乙烯、乙二醇或其它非危害性液体,其典型应用在需要有连锁作用或“断流”保护的场所。
尺寸规格:● 外壳64×64×48mm (TC20A 型) ● 外壳52×52×48mm (TC20B 型) ● 外壳64×64×48mm (TC20S 型)●外壳64×64×48mm (TC20P 型增强尼龙接口) 本系列已获得CE 认证电气参数: 开关接点额定值: 5A, 1/4HP, 125VAC~250VAC 10A, 1/4HP, 125VAC~250VAC 15A, 1/4HP, 125VAC~250VAC 微动开关有认证标准。
接线图:ML4-25型接线请阅产品上的电路图如TC20B 型: “1”接头—红线 “2”接头—黄线 “4”接头—蓝线 典型流量值(标准型) 表1特殊要求可配8寸流向片国家专利号:ZL02216612.2 03008435.7参数规格:ML4-25型最大工作压力 1.6MPa (TC20A 型:特制3.0MPa ) ML4-25P 型最大工作压力1.1Mpa, ML4-25S 型最大工作压力3.0Mpa (特制4.0MPa )接头尺寸1”NPT, 3/4”NPT, 1/2”NPT, 1-1/4”NPT流量调节范围及介质温度范围:● 18升/分~2000升/分(标准型) ● 5升/分~3000升/分(非标准型) ●-15℃~100℃(TC20A, TC20B ) ● -15℃~80℃(TC20P)●-45℃~120℃(TC20S 不锈钢型) ●120℃~245℃(TC20S 不锈钢型特制)PRESSURE DROP CHARACTERISTICS (压力损失特性):标准安装与调节:流向Pressure Drop (dgf/cm 2)1”Paddle (1”流向片)2”Paddle (2”流向片) 3”Paddle (3”流向片)注意:为使开关能感应流量的变化,流向片不得与管道接触,也不得与管道中的任何节流装置接触。

流量开关用途流量开关就是依据流量来指令系统的开关的。
给流量开关设定上限或者下限,当流量达到此次限定值时,流量开关发出信号或报警,系统将运行或停止。
一般要求流量的系统会采纳流量开关。
依据系统的不同,以及流量开关型号等因素的不同,使用的地方也不同,要依据详细状况而定。
流量开关工作原理水流量开关工作原理当水流开关内有水流淌,水流量≥1.0L/min 时,水流开关内的磁芯受水流推动产生位移,磁芯位移带动磁源产生磁控作用使水流开关输出“通”信号。
流量开关快易优自动化选型有收录,该信号输入设备掌握系统,经掌握系统实现掌握作用,当水流量小于启动流量时,水流开关输出“断”的信号。
掌握系统产生与上述相反的掌握作用。
换句话说就是:水流开关当管路中的水流量大于1L/min流量时,磁芯在水流作用下产生位移并带动磁源产生磁控作用使传感器输出"1"开关信号,该信号输入到设备掌握系统,经功率扩放大后实现以水流量掌握的目的。
当管路中的水流量小于1L/min流量后,磁芯在复位弹簧推力作用下带动磁源回位,使传感器输出"0"开关信号,停止系统的工作。
流量开关具有灵敏度高、耐久性强等优点。
流量开关的优点(一)水流开关低流速(量)动作(二)水流开关结构简洁,动作接触面小(三)水流开关低含量杂物水流也可适用(四)水流开关特别杂物堵塞时可在线清除 [1]分类挡板式别名挡板式流量开关或插入式流量开关又称机械式流量开关。
特点1、挡板式流量开关的机械部分与电子部分平安隔离。
2、挡板式流量开关不含简单导致故障发生的波纹管。
3、挡板式流量开关的电器部件不与温差大的金属部件直接接触,不会发生电器部件产生冷凝水导致锈蚀的问题。
4、挡板式流量开关使用进口磁敏开关作为电气动作部件,它具有较小的断开和复位流量。
安装位置挡板式流量开关的安装位置一般安装在水泵出水口到设备出水口的这段管路中,不能安装在水泵的吸入口的管路上,这样会使水泵无法正常吸水,水流开关也无法打开,对于这点需要特殊留意。

流量开关维护检修规程1、总则1.1主题内容与适用范围本规程规定了流量开关流量计的维护、检修、投运及其安全注意事项的具体技术要求和实施程序。
流量开关主要是在水、气、油等介质管路中在线或者插入式安装监控水系统中水流量的大小。
在水流量高于或者低于某一个设定点时候触发输出报警信号传递给机组,系统获取信号后即可作出相应的指示动作。
避免或减少主机“干烧”。
流量开关主要是在水、气、油等介质管路中在线或者插入式安装监控水系统中水流量的大小。
在水流量高于或者低于某一个设定点时候触发输出报警信号传递给机组,系统获取信号后即可作出相应的指示动作。
避免或减少主机“干烧”。
根据系统的不同,以及流量开关型号等因素的不同,使用的地方也不同,要根据具体情况而定。
1.2基本工作原理水流量开关工作原理当水流开关内有水流动,水流量≥1.0L/min时,水流开关内的磁芯受水流推动产生位移,磁芯位移带动磁源产生磁控作用使水流开关输出“通”信号。
流量开关快易优自动化选型有收录,该信号输入设备控制系统,经控制系统实现控制作用,当水流量小于启动流量时,水流开关输出“断”的信号。
控制系统产生与上述相反的控制作用。
换句话说就是:水流开关当管路中的水流量大于1L/min流量时,磁芯在水流作用下产生位移并带动磁源产生磁控作用使传感器输出"1"开关信号,该信号输入到设备控制系统,经功率扩放大后实现以水流量控制的目的。
当管路中的水流量小于1L/min流量后,磁芯在复位弹簧推力作用下带动磁源回位,使传感器输出"0"开关信号,停止系统的工作。
流量开关具有灵敏度高、耐久性强等优点。
1.3构成及功能在线式安装,机械式流量开关,用于液体或气体介质。
坚固的塑料,铝或不锈钢外壳可选。
流量开关就是根据流量来指令系统的开关的。
给流量开关设定上限或者下限,当流量达到此次限定值时,流量开关发出信号或报警,系统将运行或停止。
一般要求流量的系统会采用流量开关。
FS15挡板式流量开关使用说明
详细介绍:
一、概述
FS15是一种挡板式流量开关,挡板由不锈钢制成,本体为H59黄铜(可选不锈钢)其性能优于普通的流量开关。
全部以插入式结构供货,连结螺纹为G1/2"或其它尺寸。
根据用户要求,可以用各种耐腐蚀性材料制作。
根据用户要求,可以配上三通,以流通式结构供货。
二、主要技术指标
◆环境温度: -40-90℃
◆安装位置: 外壳上箭头与流动方向一致
◆介质温度: -40-150℃
◆安装管道:DN15~DN50
◆触点容量: AC250V 0.2A (阻性),0.1(感性),一对常开常闭结点 。
◆耐压: 10Mpa
◆连接螺纹: G1/2"锥形管螺纹或其它尺寸
◆防护标准: IP65
三、安装
1.连结螺纹为1/2”锥形管螺纹。
注意安装时在锥形螺纹上绕聚四氟乙烯生料带。
2.挡片和介质流动方向一致。
3.流量开关前后应有较长的直管段,大于5倍管径。
4.须现场切割挡片的,应注意三通的管经,确保大于2/3挡片插入管道。
四、开关点的设定
如果用户要求精确设定开关点,请在购买时向厂方提出,由工厂标定。
当干簧管开关(黑色塑料部分)逆水流方向移动时,动作值提高(即需要更大的流量打开开关),反之,动作值减小。
调整完后将螺丝锁死。
用户取得流量开关后,可以先熟悉一下开关的动作过程,然后再设定。
当开关还没有安装在现场时,用手移动挡板,调整好后再重复一次以验证开关点设定是否准确。
为了监示开关是否动作,可以用万用表接在开关电路中来判断动作是否发生。
五:流量表 单位;升/分
管道尺寸
接通 切断 备注 DN15
3.3 3 挡片入水长度为管径的三分之二
DN20
4.6 4.2 DN25
7,3 7 DN32
15 14.2 DN40
25.3 24 DN50 36 34.4
六:尺寸图
线100cm
NPT。