全自动一体式气压型 液压型 烙饼机 压饼机
- 格式:docx
- 大小:576.70 KB
- 文档页数:1

自动压饼机安全操作规程
一、操作前
1.熟悉自动压饼机的操作手册和安全说明。
2.检查设备外观,确保无损坏、变形或松动的部件。
3.确认电源线无破损,插头连接牢固。
4.清理工作区域,移除与操作无关的物品。
二、开机
1.打开电源总开关,等待设备初始化完成。
2.检查控制面板上的指示灯和显示屏,确保设备无故障报警。
3.调节压饼机的压力、温度和时间等参数,根据生产需求进行设置。
三、运行中
1.保持注意力集中,观察设备运行状况,如声音、振动等。
2.禁止将手或其他身体部位伸入压饼机的工作区域。
3.如有物料堵塞或异常情况,应先停机,再进行处理。
4.严禁在设备运行时进行维修或调试。
四、关机
1.按下停止按钮,待设备完全停止运行后,关闭电源总开关。
2.清理设备内部和外部的残留物料,保持设备清洁。
五、维护与保养
1.定期对设备进行润滑、紧固和清洁。
2.按照规定的时间间隔检查电气部件和机械部件的性能。
3.更换磨损的部件时,应使用原厂配件。
六、紧急情况处理
1.如发生紧急情况,立即按下紧急停止按钮。
2.发生人员受伤时,应及时进行急救并送医治疗。
3.设备出现故障时,应及时报告上级并联系维修人员进行维修。

Series 8, Built-in oven, 60 x 60 cm,Stainless steelHBG636ES1Included accessories 1 x enamel baking tray 1 x combination grid 1 x universal panThe built-in oven with PerfectBake and PerfectRoast: you get perfect baking and roasting results – automatically.4D hotair: even heat distribution for perfect results – on any level.TFT-touchdisplay: easy-to-use thanks to the control ring with clear text and images.EcoClean Direct: less cleaning effort thanks to a special coating of the rear wall that automatically absorbs grime.Flap door with SoftOpen and SoftClose: the oven door opens and closes especially gently and quietly.Dampened Hinges Softly and Quietly Guide the QuietClose®Door Shut.Technical DataGross weight : 38.1 kgColor / Material Front : Stainless steel Built-in / Free-standing : Built-inIntegrated Cleaning system : Catalytic partial, Hydrolytic Min. required niche size for installation (HxWxD) : 585-595 x 560-568 x 550 mmDimensions : 595 x 594 x 548 mmDimensions of the packed product (HxWxD) : 670 x 680 x 670mmControl Panel Material : Stainless steel Door Material : Glass Net weight : 35.7 kgUsable volume of cavity : 71 lHeating modes: : , 4D hotair, Bottom heat, Conventional heat,Defrost, Full width grill, Half width grill, Hot Air-Eco, Hot air grilling, low temperature cooking, Pizza setting, pre-heating,warmingNumber of interior lights : 1Length electrical supply cord : 120.0 cm Interior Lights - cavity 1 : 1Pull-out system : Accessory Clock function : Alarm, Off, OnIncluded accessories : 1 x enamel baking tray, 1 x combination grid, 1 x universal panBroil Element Wattages cavity 1 : 2800 WConvection Element Wattages cavity 1 : 2200 W Energy efficiency rating : A+Energy consumption per cycle conventional (2010/30/EC) : 0.87kWh/cycleEnergy consumption per cycle forced air convection (2010/30/EC) : 0.69 kWh/cycleEnergy efficiency index (2010/30/EC) : 81.2 % Connection Rating : 3600 W Fuse protection : 16 A Voltage : 220-240 VPlug type : Gardy plug w/ earthing Color / Material Front : Stainless steel Energy input : ElectricRequired cutout/niche size for installation (in) : xDimensions of the packed product : 26.37 x 26.37 x 26.77Net weight : 79.000 lbs Gross weight : 84.000 lbsLength electrical supply cord : 120.0 cm Net weight : 35.7 kgIncluded accessories : 1 x enamel baking tray, 1 x combination grid, 1 x universal pan'!2E 20A C -i a i f a !1/3Series 8, Built-in oven, 60 x 60 cm, StainlesssteelHBG636ES1The built-in oven with PerfectBake andPerfectRoast: you get perfect baking androasting results – automatically.Type of oven / heating system:-Oven with 13 heating methods: 4D hotair, Hotair Eco,,Conventional heat, Conventional heat ECO, Hot air grilling,Full width grill, Half width grill, Pizza setting, Bottom heat,Low temperature cooking, Defrost, Preheating, Keep warm-Temperature range 30 °C - 300 °C-Cavity volume: 71 lDesign:Cleaning:-EcoClean Direct: coating of back panelComfort:-3x 2,5“-TFT color and graphics display with direct touchfunction-Supporting systems: Dish Assist-PerfectBakePerfectRoast-Electronic clock-Automatic rapid heating up-Halogen interior lighting, Switch for oven illumination-Integral cooling fanHook-in racks / railsAccessory:-universal pan, combination grid, enamel baking trayEnvironment and Safety:-Child lockAutomatic switch off Residual heat indicator Start-/Stopbutton Door contact switchTechnical Information-Length of mains cable: 120 cm-Total connected load electric: 3.6 KW-Appliance dimension (hxwxd): 595 mm x 594 mm x 548 mm-Niche dimension (hxwxd): 585 mm - 595 mm x 560 mm - 568mm x 550 mm-“Please reference the built-in dimensions provided in theinstallation drawing”2/3Series 8, Built-in oven, 60 x 60 cm, StainlesssteelHBG636ES13/3。
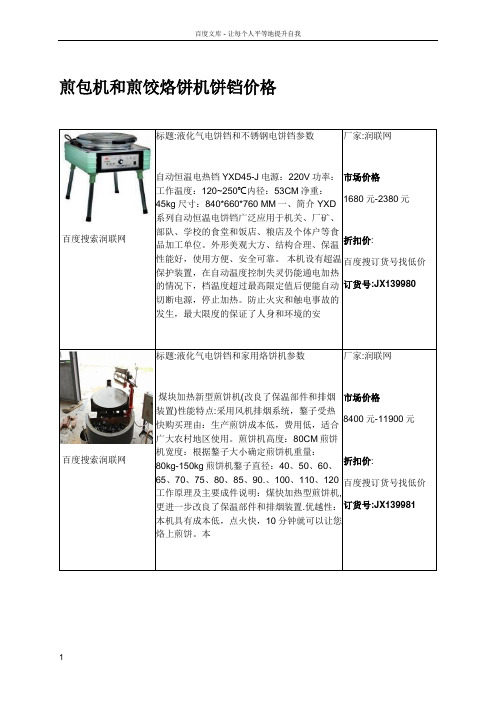
煎包机和煎饺烙饼机饼铛价格百度搜索润联网标题:液化气电饼铛和不锈钢电饼铛参数自动恒温电热铛YXD45-J电源:220V功率:工作温度:120~250℃内径:53CM净重:45kg尺寸:840*660*760 MM一、简介 YXD系列自动恒温电饼铛广泛应用于机关、厂矿、部队、学校的食堂和饭店、粮店及个体户等食品加工单位。
外形美观大方、结构合理、保温性能好,使用方便、安全可靠。
本机设有超温保护装置,在自动温度控制失灵仍能通电加热的情况下,档温度超过最高限定值后便能自动切断电源,停止加热。
防止火灾和触电事故的发生,最大限度的保证了人身和环境的安厂家:润联网市场价格1680元-2380元折扣价:百度搜订货号找低价订货号:JX139980百度搜索润联网标题:液化气电饼铛和家用烙饼机参数煤块加热新型煎饼机(改良了保温部件和排烟装置)性能特点:采用风机排烟系统,鏊子受热快购买理由:生产煎饼成本低,费用低,适合广大农村地区使用。
煎饼机高度:80CM煎饼机宽度:根据鏊子大小确定煎饼机重量:80kg-150kg煎饼机鏊子直径:40、50、60、65、70、75、80、85、90.、100、110、120工作原理及主要成件说明:煤快加热型煎饼机,更进一步改良了保温部件和排烟装置.优越性:本机具有成本低,点火快,10分钟就可以让您烙上煎饼。
本厂家:润联网市场价格8400元-11900元折扣价:百度搜订货号找低价订货号:JX139981百度搜索润联网标题:烙饼机和烤鸭饼机价格产品介绍:自动双温双控,精制铝锅,高效导热。
节能省时上下温独立控制,数字显示仪表,精准控温,省电节能。
本产品可采用220V、380V两种电源,如果用220V电源只要按上图将黑色接电源的零线,三条相线合并接到电源的火线。
如用380V电源,按下图黑色接电源的零线,其它三条线分别接能电源的A、B、C相线。
用220V电源时应当选用电流在40A以上的空开,用380V电源时选用20A以上的空开!安装时请专业电工安装。

更多产品信息请打开企业网站: 产品介绍:
自动烙馍机又称半自动烙馍(饼)成型机,主要是开发代替手工擀饼的,原理是有上下2(或者1个)加热的模具挤压面团(面糊),形成圆形烙馍(饼)
1、销售市场广阔,可在市场,学校,工厂等场所经营,也可配送超市,宾馆,饭店,食堂等。
2、压面辊,烙辊,出饼辊,切刀辊,构成自动烙饼生产线。
上方进面,下面出饼。
3、用现代化手段,方便快捷地烙制多种风味薄饼;饼味独特,筋而不腻,最薄可达0.6MM;
4、根据客户不同需求定制的可生产圆形方形长方形椭圆形各种饼,可以生产厚度0.3mm---0.8mm,大小可以控制10-50cm的皮。
5、成品饼可做多种形饼,与手工饼相比,具有优质高雅,文明卫生,高效节能,降低成本,操作简便等优点。
6、小生意大市场,投资该项目,利润高,本产品价格合理,效率高,维修简单,使用寿命长。
7、适用范围:茶餐厅设备、蛋糕房设备、咖啡店设备、面包房设备、西餐厅设备、饮品店设备、冷冻食品厂设备、休闲食品厂设备。
8、一人即可操作,最大程度节省劳力。
9、采用先进的温度控制系统,让温度达到无误差,无热量浪费,从而达到节能的目的,生产成本更低,大大提高的收入。
生产出的产品,色泽自然,手感柔软,口感劲道,卖相好。
10、1小时能生产5百--7千张春卷皮,重量是根据您需要的春卷皮大小,厚度来确定,也可以根据客户需求定制。

烙馍是一种传统的面食,至今已有2000多年的历史。
传统的手工做法是用擀面杖擀成厚度约0.1厘米的薄饼,再放到铁板上烙熟。
随着科技的发展,烙馍机器逐渐走进了千家万户,代替了手工烙馍。
那么,烙馍机一天能生产多少烙馍呢?
就拿现在比较先进的全自动烙馍机来说:
烙馍/单饼直径:10-40cm(可据需求定制不同大小)
生产效率:600-1400张/小时
按照这个标准,一小时能生产600-1400张饼,一天工作8小时的话,一天大约生产4800-11200张饼。
按照面粉的重量来算,1斤面能生产出10张饼,如果饼的尺寸再小一点的话,1斤面能生产出十几张饼。
因此,机器的型号不同、烙馍的直径不同,生产效率也就不同,也就是说生产效率可以根据用户的需要进行定制。
河南万年红机械设备有限公司创建于1999年3月,是一家集科研、生产、应用、销售、服务为一体的综合公司,主营食品加工机械、轻工机械等产品。
20多年来,公司结合每个客户的具体情况,推荐合适的产品,并且有专业的技术人员上门指导机器安装,保教做饼技术,深受国内外消费者的信赖。

更多产品信息请打开企业网站: 产品信息:
1、烙饼机是采用电热、燃气加热从而产生热量烙饼的一种机器。
结构上为模具化生产,箱体巨头喷塑涂覆、四条电镀腿,加热部分刚采取大面积全封闭形式,在控温方面,则采用了电饼铛专用控温仪,全部原器件采用插接联接,并可互换。
2、烙饼机包括机架,其特征是:机架的后部设有进料输送装置,机架上还装有位于进料输送装置的出料端下方的至少两组平行间隔设置的烙饼输送装置,相邻两组烙饼输输送装置的前后两端分别前后错开设置,烙饼输送装置包括转动连接在机架上且由动力装置驱动的两输送辊,两输送辊横向平行设置且其两端部分别装有链轮,位于两输送辊同一侧端部的两链轮之间装有输送链条,两条输送链条之间装有多条烙饼板,机架上还装有位于紧近烙饼板内表面的电加热丝。
3、烙饼机可用于机关、厂矿、部队、学校、饭店、糖食加工部门及个体餐馆。
4、压饼机出产可根据您的需要做出各种类型的面类食品、油盐饼、春卷皮、酥饼、鸡蛋饼、烧饼、千层饼等。
5、本机采用铁制铛体,在烙制过程中释放出的铁元素有益人体健康。
性能特点:
1.不粘锅:容易脱模,产品废品率低,脱模不用食用油,生产成本小。
2.食品没有黑底和油腻。
3.烙饼机能烙制大饼、烧饼、煎饼、驼机贴、烤鸭饼。
4.也可用于炒饼饼丝饼条的配套设备,克服了手工擀面费时费力的缺点,降低劳动成本,提供工作效率。


随着经济的发展和科技的进步,越来越多传统的手工业被高效的机械化生产所替代。
面条有专业的面条机,包子有专业的包子机,凉皮有专业的凉皮机,就连北方餐桌上常见的烙馍都有烙馍机。
想吃什么都不用再费心准备食材制作了,那么这种自动烙馍机一般多少钱可以买到呢?
一般小型烙馍机几千元都可以买到,稍微大规模的大概在万元以上,但大多数价格也与具体的规格有关。
馍机有如下优势:
1.集分切、成型、熟化为一体,自动化程度高,生产效率高,机型紧凑,占地面积小,操作简单,维护方便。
2.采用机械试压成型机构,无噪音,无故障;解决了传统机械的噪音磨损问题。
3.每小时可以生产900-1200张成品烙馍。
一人即可操控,降低了人工费用。
4.采用先进电加热技术,温控准确。
5.温控准确,热能利用率高,温升速度快,节电效果百分之50以上。
以上就是烙馍机价格的相关内容,希望对您有所帮助!。

全自动铝屑压饼机安全操作及保养规程铝屑压饼机是一种常见的机械设备,广泛应用于各种铝屑压缩、压块和压缩成型等工艺流程中。
在使用铝屑压饼机时,必须注意安全操作和保养维护,以确保设备的长期正常运行。
该文将介绍全自动铝屑压饼机的安全操作和保养规程。
安全操作规程1.在操作铝屑压饼机之前,必须戴上手套、安全眼镜和耳罩。
这些装备将保护您的手部、视力和听力。
2.在操作铝屑压饼机时,必须佩戴工作服、紧身衣或工作衬衫。
这些衣服将保护您免受意外的伤害。
3.在开机前,必须检查铝屑压饼机的内部和外部是否有铝屑碎片,如有必须清理掉。
4.在使用铝屑压饼机时必须避免穿着悬垂的衣服,以免意外卷入机器中而造成伤害。
5.在使用铝屑压饼机时,必须保持清晰的头脑,不要饮酒、吸烟或嗑药等影响判断的行为,以确保您的安全和和他人的安全。
6.在维护铝屑压饼机时,必须排除电源和其他热源。
减少意外触电和火灾等事故事故。
7.在操作铝屑压饼机时,不要从不安全的角度或位置观察其运行,以免被飞出的碎片或波动的部件击中。
8.在使用铝屑压饼机时,必须严格按照其说明手册的要求进行操作和维护,以确保设备能够高效、安全的运行。
9.在使用铝屑压饼机时,如果发现异样声响或其他故障,则必须立即停机检查,并对故障进行处理。
保养规程1.在操作铝屑压饼机之前,必须对设备进行清洗,清除铝屑碎片以免对设备的正常工作造成影响。
2.在使用铝屑压饼机时,必须严格按照其说明手册的要求进行维护和保养。
3.在每次使用铝屑压饼机后,必须对其进行检查和维护,并对其进行清理和保养,以确保设备的长期正常运行。
4.在维护铝屑压饼机时,必须注意不要让其吸入尘粒和污垢,以保证机器的清洁和健康运行。
5.在使用铝屑压饼机时,必须注意润滑油的使用量和质量,以保证机器的正常工作和长寿命。
6.在每次使用铝屑压饼机后,必须对其进行彻底清洗,并对其进行保养和维护,以保障下次使用时的正常运行。
7.在维护铝屑压饼机时必须严格按照其说明手册的要求进行维护和保养,以免出现错误的维护方法而对设备造成损害。

北方人一般都比较喜欢吃面食,尤其是饼类的,符合很多地方的口味,一般经常吃的烙馍或者烙饼除了手工之外,很多是机器生产的,有些人想往这方面创业的话就需要采购烙饼机设备,事先我们先一起了解下设备的相关内容。
优势:
一、采用自动温控系统和时间系统,可根据需要来设定温度和时间,在0-99.99秒内完成压制工作,节能环保。
二、微电脑数控系统,在做饼过程中,能随时对饼的参数进行调整,灵活方便。
三、接触食品部位跟机体全部采用新型号不锈钢材料制作,干净卫生,寿命长。
数控机箱上仪表显示控温,数字化准确控制每次烙饼时长,并采用一键式升降上铛按钮,操作更简单准确。
更省电,每袋面粉仅需3度电。
部分参数:
产品报价:
全自动烙饼机价格三万多到六万多不等,特殊尺寸可以定制。
河南万年红机械设备有限公司经过长期市场考察,多年研发,终于开发出以小麦、玉米、高粱、大米等多种粮食为原料,机械化生产的烙馍设备,该机从上料到烙熟、分离、分切、控温全部自动化。

更多产品信息请打开企业网站: 产品优点
1、液压式烙饼机速度快,无噪音,占地面积小。
(省去气泵)
2、可做出薄饼,最薄0.1mm左右,厚度可调,只需旋转液压缸按钮,就可以做出厚薄理想的圧饼。
克服了空压式烙饼机因压力不够,圧饼厚的缺点。
3、使用方便,调整上下模温度后,设定时间,打开开关,饼机开始工作。
设备具体有以下特点:
1.代替手工擀饼,大大节省人力;
2.产量高,能达到300-400张每小时。
(最高可达到600张每小时)
3.原料不同,可压不同的薄饼或者厚饼,如:烤鸭饼、卤肉卷饼、单饼、麻辣串卷饼、朝天锅卷饼、荷叶饼、鸡蛋饼、水烙馍、烙馍、春卷、杂粮烙馍、饼、千层饼、大饼及加工成饼丝等等。
4.改机采用自动温控系统和时间系统,可根据需要来设定温度和时间,在0-99.99秒内自动完成压制工作,节能环保效率高。
型号按照模具大小来划分,模具直径有:20厘米25厘米、30厘米、35厘米、40厘米、45厘米50厘米、60厘米;大于60厘米的可以定做。
60型烙饼机速度快每小时可做近千张烤鸭饼(相当于人工30人以上)成本低每千张耗电量不足1元钱,成型好由极其制作的烤鸭饼厚薄均匀,光滑圆润好操作不需要技术含量,老人、女人一人即可操作省和面机自动和面,不需要人力,冷水热说都行,无污染代替传统明火有烟加热,环保卫生占地少,体积较小,节约占地面积免清洗。

什么是液压压饼机工作原理
液压压饼机是一种利用液压驱动和控制的设备,用于压制饼状物(如饼干、饼片、药片等)的机械。
其基本工作原理如下:
1. 液压系统:液压压饼机通过一个液压系统来提供压力。
液压系统由一个液压泵、液压油箱、传动管路和液压缸组成。
2. 液压泵:液压泵通常由一个电动机驱动,将低压液压油吸入油箱,然后通过液压泵进入液压系统。
液压泵可根据需要提供不同的压力和流量。
3. 传动管路:液压泵将压力液压油送入传动管路。
传动管路由各种阀门、控制元件和连接管道组成,用于控制液压油的流向和压力。
4. 液压缸:液压缸是液压压饼机的执行元件,由一个活塞和一个活塞杆组成。
液压泵提供的液压压力通过传动管路传送到液压缸中,推动活塞杆向前或向后移动。
5. 压制物品:活塞杆前端固定一个压制模具,用于将原料(如面团、粉末)压制成饼状物。
当液压缸收缩时,活塞杆会推动压制模具施加压力到原料上,形成饼状物。
6. 控制系统:液压压饼机还配备了一个控制系统,用于控制液压系统的压力、流量和动作顺序。
通过控制系统,可以调整压制过程中的压力和速度,以满足不同的压制要求。
总之,液压压饼机的工作原理是通过液压系统提供的压力,使液压缸推动压制模具对原料进行压制,从而形成饼状物。
通过控制系统可以调整和控制压制过程中的各种参数,以实现精确的压制效果。

全自动煎饼馃子制作贩售一体机【摘要】全自动煎饼馃子制作贩售一体机是一种在煎饼馃子行业中应用广泛的机器设备,通过自动化的设计实现了煎饼馃子的制作和销售。
该机器具有高效率、节省成本、操作简单等特点,使得煎饼馃子行业得以快速发展。
全自动煎饼馃子制作贩售一体机的工作原理是通过预设程序控制机器完成煎饼馃子的制作和销售,操作流程简单易懂。
优势和应用场景包括节约人力成本、提高产量、适用于各类场合等。
市场前景广阔,未来发展方向是更加智能化、个性化,对煎饼馃子行业具有重大意义,推动了该行业的发展。
全自动煎饼馃子制作贩售一体机将成为煎饼馃子行业的重要推动力,为行业的繁荣发展起到至关重要的作用。
【关键词】全自动煎饼馃子制作贩售一体机、工作原理、操作流程、优势、应用场景、市场前景、发展、意义、未来、煎饼馃子行业。
1. 引言1.1 什么是全自动煎饼馃子制作贩售一体机全自动煎饼馃子制作贩售一体机是一种集煎饼和馃子制作、贩卖于一体的自动化设备。
它可以实现从生产到销售的全程自动化操作,大大提高了生产效率和产品质量。
这种设备结合了现代化技术和传统烹饪工艺,使传统的煎饼馃子行业得到了革新和提升。
全自动煎饼馃子制作贩售一体机的外观简洁美观,操作简单快捷,适用于各种场所的使用,如餐饮店、食品加工厂、商场等。
它采用先进的智能控制系统和高效的加热设备,可以根据客户需求自动调节温度和时间,确保产品口感和色泽一致。
全自动煎饼馃子制作贩售一体机是一种创新的设备,对于煎饼馃子行业的发展具有重要的推动作用。
它不仅提高了生产效率,还提升了产品质量,为消费者提供了更加便捷、美味的煎饼馃子产品。
随着科技的不断进步和市场需求的增长,全自动煎饼馃子制作贩售一体机有着广阔的发展前景,将成为煎饼馃子行业的新宠。
1.2 全自动煎饼馃子制作贩售一体机的功能和特点1. 自动化生产:全自动煎饼馃子制作贩售一体机采用先进的自动化技术,可以实现从煎饼馃子的制作到销售的全自动化生产流程。

Operations ManualApex Pro X1 Hydraulic Automatic Dough PressModel #: DP1350Congratulations on your selection of the Apex Pro X1 Automatic Dough Press. Proluxe is a leading manufacturer of food preparation and cooking equipment designed for the most demanding commercial kitchens. Proluxe equipment is a result of the highest quality engineering and time-tested design.This manual includes installation, operation, and maintenance procedures for your new Apex Pro X1 Dough Press. Please read this manual carefully and keep it with your machine for proper operation and lasting service.I N S T A L L A T I O NDomesticUse a separate 15 amp AC circuit. Only industrial extension cords with proper wire size should be used; size 16/3 wire for distance up to 25 feet, and size 14/3 for distance up to 50 feet.InternationalUse a designated 16 amp AC circuit. Only industrial extension cords with proper wire size (2.5 sq. mm) shall be used. Make sure there is a proper electrical wall outlet located within reach of the cord and plug attached to the press.Then place the press in an area which allows for “swing clearance” of the lower platen plus vertical and horizontal clearance of the press itself.Limited Machine WarrantyProluxe warrants this dough press machine, when operated under normal conditions, to be free from manufacturing defects in material and workmanship for a period of one year on parts and labor from the invoice date.This warranty will be effective only when Proluxe authorizes the original purchaser to return the product to the factory in Perris, California freight prepaid and only when the product, upon examination, has proven to be defective. This warranty does not apply to any machine that has been subjected to misuse, negligence or accident. Proluxe shall not be liable for the injury, loss or damage, direct or consequential, arising out of the use or the inability to use the product. No claim of any kind shall be greater in amount than the sale price of the product or part to which claim is made.This is the sole warranty given by the company, it is in lieu of any other warranties, expressed or implied, in law or in fact, including the warranties of merchantability and fitness for a particular use, and is accepted such by the purchaser in taking delivery of this product.S P E C I F I C A T I O N SElectrical:120V/50-60Hz/1450W/12.5Amps/AC Also available; specify when ordering:Also available; specify when ordering:●Voltage : 120/208/240 ●Amps : 12.5/11.1/16.5 ●Watts : 1500/2300/1500Includes: 72” cord and NEMA approved plug.Shipping Weight:200lbs. (91kg.) – DP1350S A F E T Y S U M M A R YWarningIn case of power cord damage, do notattempt to repair or replace the power cord. Please contact the manufacturer or the local distributor.Avoid touching hot surfaces while operating the machine.CautionDuring normal operation, the base of the machine must be installed or placed above the wall socket.When servicing or cleaning the machine, make sure that the power cord is removed from the wall socket.O P E R A T I O N T E M P E R A T U R E & T I M E R C O N T R O LFIG. ASolid State ControllerThis controller has three (3) control features: 1. T emperature – May be set from 100°-425°F (38°-163°C)2. T ime – Time may be set from 1 second to 10 minutes.3. C ounter – Cycle counter counts thenumber of applications from 1 to 9999 (see additional Notes – Counter).4. “2 Lower” (Fig. A) Refers to models using upper and lower heated surfaces.Controller Operation1. V iewing the Modes of Operation :To view the set points of temperature, timer and counter, press MODE button to view the desired mode of operation.2. C hanging Temperature:Press MODE button until temperature is displayed.Press and hold SET button while pressing the UP (↑) and DOWN (↓) arrow buttons to desired temperature setting.3. C hanging Time:Press MODE button until time is displayed.Press and hold SET button while pressing the UP (↑) and DOWN (↓) arrow buttons to desired timer setting.4. R esetting the Counter:Press MODE button until thecounter is displayed.To reset the counter (# of cycles), simultaneously push UP (↑) or DOWN (↓) arrow buttons (approx. 5 seconds).Pressing Dough:For best results, your dough should be proofed before pressing, but it will also press directly out of your refrigerator. Flour is not required to press a crust and s hould not be dusted on any part of the machine.2. Press the On/Off button.Note:Initial temperature setting of 150°F has been shown to be acceptable for most dough formulations; however, you may have to determine the best temperature for your own dough by trial and error testing of your product at different temperature settings.3. Set the timer in accordance with the following information:2-4 seconds–For warm dough with moderate yeast content.2-6 seconds– For room temperature dough with moderate yeast content.6-8 seconds– For cold dough right out of the refrigerator with low yeast content.*Remember that the timer does not actuate until the upper platen mates with the lower platen and resistance is felt.4. Swing open the lower platen andapply a quick spray of a goodwater based food release on the lower platen. Proluxe offers its own food release spray NATURALLY CLEAR Model No. DPPC1. (See our catalog and price list for information.) This spray will not affectthe taste of your crust in any way.5. Place your pre-portioned ball of dough in the approximate center of the lower platen. Add another dash of spray to the top of the dough ball.6. Close the platen and, with both hands, press the two green buttons on each side of the machine simultaneously.7. Hold the buttons until resistance is felt then release at once. The timer will actuate and, when the time cycle is completed, the upper platen will rise automatically (timer is preset at the factory for six seconds, but this is easily changed by following the upcoming instructions.)8. Remove the crust, place on a pan or peel, add toppings and bake.R E C O M M E N D E D S E A S O N I N G & C L E A N I N G P R O C E D U R E SBefore use you must properly season your platens to prevent your dough from sticking.Tools Required:●Food release●Soapy water solution●Washcloth●Paper towelsDO NOT u se s teel wool or harsh abrasives, it will you will cause costly damage.1.Before cleaning make sure theunit is turned off.2.Spray lower platen with approvedfood release/oil spray.3. Wipe oil across lower platen withpaper towel.4.Wipe oil across upper platen.5.Mix a warm dish soap and watersolution.6.Soak washcloth and wring toremove excess water.7.Wipe lower and upper platen withdamp cloth.P R E V E N T A T I V EM A I N T E N A N C EProluxe machines are relatively maintenance free. For a long lifespan, the following preventative maintenance should be followed:Daily Care:1.Platens:Turn your machine off and allowto cool down before attempting to clean.These platens should only be cleaned withmild soap and warm water then wiped offwith a clean, soft cloth or soft sponge.2. E xterior surfaces:Wipe daily with mildsoap and warm water will do the job quitenicely.Service Problems:Contact our factory at (800) 624-6717 (U.S.only) or approved service agency. Whencontacting the factory for information, parts or service instructions, please provide theserial number of the machine be provided.This number can be found on the serial plate located on the rear of the machine.Apex Pro X1 Troubleshoot Guide - Model #: DP1350Problem Cause Action Ref #Power button on digital controller face is depressed but doesn’t turn on. 1. Power cord is not plugged in.2. Circuit breaker is tripped off in thesite's breaker box.3. Transformer has taken anelectrical surge and is damaged.4. Check voltage on the secondaryside of the Transformer. If you read12VDC then you are receivingvoltage to the controller.5. Possible blown fuse.1. Plug the power cord into wallreceptacle and power button.2. Reset circuit breaker that thegrill is plugged into. Depresspower button to turn on.3. Replace Transformer after youcheck secondary side oftransformer. If working properly,you should receive 12vdc.4. Replace controller. Controllershould be on once the powerbutton is depressed.5. Replace fuse.60-----667639Digital controller's LED's are scrambled or randomly erratic. If when turning on, the display will first go to segment check 1. Possibly a component on theDigital controller is damaged.2. Control needs to reset.Replace digital controller.While unit is on unplug unit, waitfor 1 min. Then plug machine onagain and depress power button.-----76Digital controller on startup goes through LED segment check (8888) then to version # and then loops back to to the above reboot. The relay driver on the digital controlmay be blown.Replace digital controller. 76Digital display shows PROB. No heat on upper platen.Sensor lost it's continuity as shownon a muti-meter.Disconnect prob that is open (nocontinuity as shown on a multi-meter. Must replace sensor(RTD). Do not cut and splice newsensor. Install new 2000 ohmRTD sensor to under side of heatplaten and reconnect to thecontroller.A1.10When depressing the tactile button The tactile buttons under the overlaymay be not close enough to activate.Carefully (no too much at onetime----on digital controller, nothing happens. Same goes if the buttons are alreadypressed by overlay withoutdepressing button.to avoid fracturing the traces onthe controller) tighten the nuts onthe back of the controller untilbutton activate. Same goes inreverse if buttons are held downby the overlay.Press does not close when pressing the two, green, start buttons 1. Did not simultaneously press thestart buttons exactly at the sametime.2. The Lower Platen switch mountedon the base is not in contact tocomplete circuit.Try pressing both buttons exactlyat the same time. This is aanti-tiedown safety feature.2. Make sure the roller plungercomes into contact (clickingnoise). This is also a safety featurethat both platens are alignedbefore.82Digital display shows relay and particular zone is overheating. 1. The relay on the switched side isnot opening to regulate temperature.1. Replace the relay. 92Beeper not functioning or intermittent beeper sound. 1. Beeper on digital control boardfailed.1. Replace digital controllerboard76If setpoint is reached but slightly off in temperature. Offset may need to be calibrated andadjusted.Call (800) 624-6717 ext. 129 forinstructions.Heater platen overheating If the relay (depending on the year ofthe model) on the coil side arereceiving 12vdc indicates thecontroller is functioning properly. Onthe switching side of the relay, isthere 120 vac going to the heater inquestion. If there is no voltage onthe to the switching side of the relayto the heaters, the relay is notworking properly.Replace relay If the controller'sheat-on LED is not lit indicatingthe controller is workingproperly.55Both upper and lower platen not aligned when activating. You may experience a shifting of the platens when coming into contact, or striking noise. Upper and lower platen aremisaligned.On the left side of the post collar(#35) are back-to-back setscrews. Remove the first lockingset screw. Adjust stopping setscrew to align platen*IMPORTANT* must reduceair pressure to a minimum as notto damaging closing platens. Afteralignment is complete, re-installlocking set screw as not to movethe alignment set screw.17Dough not having same thickness across the press dough.Adjust upper platen for level press Underneath the housing there is4 stacked hex bolts sitting overthe upper platen attached to thearm. The top bolts are calledlocking bolts. The 4 larger hexbolts below are adjustment bolts.Break free the 4 locking bolts.With an open end wrench adjustthe bolts (1/8 turn at a time).After testing, tighten the lockingbolts making sure not to movethe larger adjustment bolts11And12Apex Pro X1 Part List - Model #: DP1350ITEM #DESCRIPTION DP1350 - 120 ~ AC QTY.1DP1350 BASE AND POST WELDING ASSEMBLY DP13104 1 2PISTON GUIDE WELDING ASSEMBLY DP131021 3HYDRAULIC RAM DP131191 4MOUNTING PLATE DP131051 5POWER SUPPLY DP131101 6ELECTRICAL BOX MOUNTING BRACKET DP131072 7SWING, PIVOT ARM, DP1300110301 8SST SET SCREW 3/8-16 x 1.00SST381612 9SWING ARM/LOWERPLATEN BUMPER1105034501 10BEARING, DP130062042NSL2 11SWING AWAY WASHER1102490491 12STUD, LOWER PLATEN, DP13001102490651 13BREARING SLEEVE SPACER110461 14NUT, JAM (PIVOT ARM) MACHINED1101025701 15SCREW, SET 10-32 X 3/16SST10323161 16WASHER, SAE #8WSAE811 17SCREW, PHILLIPS PAN HEAD 8-32 X 1/4SP832146 18MOUNTING BRACKET DP131081 19RELAY, 30amp 240~AC, POTTER BRUMFIELD1109425202 20TERMINAL BLOCK STAGE #760172 21SCREW, PAN HEAD PHILLIPS 6-32 X 3/8SP632384 22SCREW, PHILLIPS PAN HEAD 8-32 X 3/8SP8323814 23SCREW, SOCKET HEAD 3/8-16 X 1SSH381615 24WASHER, SAE 3/8"WSAE386 25WASHER, LOCK 3/8WL383 26NUT, HEX 3/8-16NH38162 27LOWER PLATEN MACHINED110321 28SCREW, FLAT HEAD SOCKET 1/2-20 X 2SF122021 29SCREW, SET 1/4-20X3/8" CONE POINT SST142038CP1 30HEX BOLT 1/4-20 X 1-1/2"BH14201121 31NUT, HEX 1/4-20NH14202 32GUIDE, LOWER PLATEN110441 33WASHER, LOCK INTERNAL TOOTH 5/16"WLIT5163 345/16 - 18 x 1 SS., BOLT HEX HEAD BH516181S3 35HANDLE BRACKET (RED)110453363XX136KNOB, PRESSURE ALUMINUM MPSK2151 37SPLIT LOCK WASHER WL38S1 38SCREW, BUTTON HEAD 3/8-16 X 1SB381611 39WASHER, SPLIT LOCK 1/4"WLIT142 40BOLT, HEX 1/4-20 x 1" S.S.BH14201S2 41BOLT, HEX 1/4-20 X 1-1/4"BH14201141 42ANTI ROTATION BAR ARM-PIZZA MACHINE1101481 44ARM MACHINED11021XX1 45THRUST PLATE110581 ITEM #DESCRIPTION DP1350 - 120 ~ AC QTY. 46THRUST WASHER110591 47SCREW, ADJUSTMENT POST, DP1300110421 48NUT, HEX JAM 1-14NHJ1141 49STOP ADJUSTMENT CONTROL110611 50LOCKING JAM NUT110701 51SCREW, SET 1/4-20 X 3/8SST1420381 521/4-20 x 1" SOCKET HEAD CAP, DOMESTIC FASTENER SSH14201D4 53BOLT, U.P. ADJUSTMENT110674 545/16-18 X 2-1/2" HEX BOLT GR5, DP1300BH51618212G54 55SCREW, BUTTON HEAD 1/4-20X3/4SB1420344 56HOUSING, MACHINING1101025221 57GREEN MUSHROOM BUTTON SCREW ON P9ARB3V2 58SWITCH, MOM P/S OP SCREW ON GE P9XPLOSO3 59CRANK SPACER110641 60CRANK HANDLE, ADJUSTMENT11060XX161SCREW, SET 5/16-18 X 3/8 SET SCREW KNURLED CUPPOINT SST5161838KN262ASSEMBLY, CONTROL FACIA110860271 63WASHER, INTERNAL TOOTH LOCK #6WLIT68 64NUT, HEX 6-32NH6328 65MARKER STRIP #7MS60171 66SCREW, PAN HEAD PHILLIPS 8-32 X 1/2SP832122 67FUSE HOLDER 1 AMP MPPF7081 68FUSE BUSS 1 AMP MPPF701R1 69SCREW, PHILLIPS PAN 2-56x1/4SP256141 70TRANSFORMER110969751 71CLAMP, CABLE 1/2CC121 72CONTROL PANEL OVERLAY ODP13001 73DIGITAL CONTROL REV. 5.06DP131052174BOTTOM COVER DP131541 75FEET, RUBBER RF2094 76NYLON SPACER, 1/4 X .141 X 9/32 LONG1109691114 77WASHER, STEEL3111500194 78SWTICH, PROXIMITY SENSOR110174523771 79SCREW, SET 8-32X1SST83211 80WASHER, INTERNAL TOOTH LOCK #8WLIT83 ITEM #DESCRIPTION DP1350 - 120 ~ AC QTY. 81HOUSING, SWITCH PROXIMITY SENSOR1101031 82SCREW, SET CONE POINT 3/8-16 X 1/2SST381612CP2 83RELAY, SOLID STATE MPR902171 84NUT, HEX 8-32NH8322 85SCREW, SOCKET FLAT HEAD 1/4-20 X 3/4SF1420341 86SCREW, SET 3/8-16 X 1/2SST3816121 87PISTON ALIGNMENT PIN DP131091 88NUT, HEX 3/4-16NH34161 89TERMINAL, #6 RING 18-22 GA22023 90NIPPLE, BRASS 1/4 x 2N1423 91BUTTON BLACK MUSHROOM SCREW ON GE P9ARB3N1 92UPPER HEAT SHROUD11093361 93DP INSULATION1101171251195WIRE, TGGT, 14 GA. (HEATER)1100694.25 FT96TFE, SHRINK TUBING 7AWG110131.33 FT 97TERMINAL, RING #6 14-16 GA HIGH TEMP1601HT1 98TERMINAL, RING #8 14-16 GA16043 99TERMINAL, QD 3/16 X 18-22 GA22802 100WASHER, SAE #6WSAE61 101SCREW, PAN HEAD 6-32 X 1/4SP632141 102WIRE, TFE 14GA. GREEN WTFE14G 1.5 FT 103RTD, SENSOR ASSEMBLY1109491101 104SLEEVING, PVC WIRE OPVC1050.16 FT 105WASHER, SAE 5/16"WSAE5164 106SCREW BUTTON HEAD 3/8-16 X 1/2SB3816124 107HYDRAULIC MOTOR HOSES DP131202 108HYDRAULIC MOTOR DP131181 109HYDRAULIC OIL RESERVOIR DP131161 110POWER CORD1105731751 111STRAIN RELIEF32311112WIRE HARNESS110170692501 113CABLE, POWER DISTRIBUTION11010250681 A1KITTED, UPPER PLATEN COMPLETE ASSEMBLY110074120AK1 A2KITTED, UPPER PLATEN WITH WIRING ONLY110074120K1 A2KITTED, LOWER PLATEN ASSEMBLY11032A1 A3SWITCH, PROXIMITY SENSOR, KIT110103K1Warranty & Return PolicyProluxe warrants all products manufactured by it against defects in workmanship or materials from the date of purchase for a period of 1 year on parts and labor. This warranty applies to only equipment purchased and used in the United States.Warranty period shall begin when equipment ships. Warranty travel will only be covered for 60 miles.ALL WARRANTY SERVICE CALLS MUST BE APPROVED BY PROLUXE. IF THIS PROCEDURE IS NOT FOLLOWED, WARRANTY SERVICE WILL NOT BE COVERED. WARRANTY SERVICE WILL BE PAID ON STRAIGHT TIME, OVERTIME WILL NOT BE COVERED.E X C L U S I O N SWood & Gas Fired OvensWarranty applies to the main body of the oven being steel / refractory and insulation shall be free from defects in materials and workmanship for a period of four years from the date of purchase. The gas equipment shall be free from defects in materials and workmanship for a period of one (1) year from the date of purchase. Lifetime warranty against cracks on the oven floor.Air CompressorsAre excluded from this warranty, but Proluxe may act as a warranty expeditor in certain instances regarding these compressors. The air compressor manufacturer provides a limited warranty and a copy of this warranty is furnished with all compressors sold by Proluxe. For prompt handling of compressor warranty claims the instructions of the compressor manufacturer must be adhered to.Special Order Equipment and AccessoriesCannot be canceled and are not returnable unless defective within the terms of this warranty.In no event shall Proluxe be liable for consequential damages arising out of the failure of any of its products if operated improperly or caused by normal wear or damaged by operator abuse.Limited Lifetime Warranty on Heating ElementsIf replacement is needed, Proluxe will send the new part at no charge but labor will not be covered unless the unit is still under the 1 year manufacturer warranty.R E T U R N E D M E R C H A N D I S EP O L I C YShould it become necessary to return any of the company’s products, the following instructions must be adhered to: First, contact our customer service department for approval and a return authorization number. Please have the serial number of your item available at that time. All merchandise must be shipped freight prepaid by customer orservice agency. Subject to the inspection of the product by the company, a restocking charge of 20% of the Net purchased price paid to Proluxe will be assessed. Merchandise may not be returned for credit without prior written approval of Proluxe.Collect shipments will not be accepted. No returns after 60 days of original shipment date on machines. Purchased parts may not be returned after 30 days. If upon inspection by Proluxe or its authorized agent it is determined the equipment has not been used in an appropriate manner, has been modified, or has not been properly maintained, or has been subject to misuse, misapplication, neglect, abuse, accident, unauthorized modification, damage during transit, delivery, fire, flood, act or war, riot or act of God, then this warranty shall be deemed null and void.T E R M S & C O N D I T I O N S1. P rice List prices are suggested retail prices and are shown in U.S. Dollars.2. T erms of Payment: 1% 10 days, NET 30 days.3. N ew Accounts: Satisfactory credit information must be provided before open account status can be extended.Unless agreed otherwise, all shipments will be made C.O.D., Cash in advance.4. P ricing: Prices, specifications, model numbers, capacities and accessories are subject to change without notice.5. F r eight/Routing: Method of shipment will be determined by Proluxe unless otherwise advised by purchaser.6. D amaged Claims: All merchandise shipped at purchaser’s risk. Inspection must be made by purchaser at time goods are received. If goods are damaged, the PURCHASER shall request that the agent of the transportation company make a written notation on the proper shipping documents immediately and then file a claim for damages.Note: Goods damaged in shipping arenon-returnable.7. R eturns: Machines may not be returned after 60 days. Purchased parts may not be returned after 30 days. A restocking fee of 20% will be assessed on non-warranty returns.8. T axes: Prices indicated herein DO NOT include State, Federal, Local or foreign taxes or duties, nor do they include fees, permits, insurance or other levies, all of which are the responsibility of the purchaser.9. All orders are subject to acceptance by Proluxe.10. Possession of this price list shall not be considered an offer to sell.。

全自动煎饼馃子制作贩售一体机全自动煎饼馃子制作贩售一体机是一种新型的自动化设备,可以实现煎饼馃子的全自动化制作和贩卖。
它集煎饼和馃子的制作、烘烤、包装和售卖于一体,大大提高了煎饼馃子的生产效率和质量,并且可以满足不同地区和人群的口味需求。
该设备的问世,不仅改变了传统手工制作的模式,也为煎饼馃子行业注入了新的活力。
全自动煎饼馃子制作贩售一体机的外观设计时尚美观,结构紧凑,占地面积小。
整机采用不锈钢材料制造,耐磨、易清洗,符合卫生标准,能够放心使用。
设备配备了先进的智能控制系统,操作简便,人性化设计,不需要专业技能人员即可操作,大大降低了用工成本和生产成本。
全自动煎饼馃子制作贩售一体机的生产过程全自动化,从原料的搅拌、酿制、烘烤、包装到售卖一气呵成。
将面粉、水等原料加入料斗中,设定好比例后,设备会自动搅拌并酿制成煎饼馃子的面团。
然后,面团会在烤盘上经过预定时间的烘烤,煎饼馃子成品形状美观、味道香酥。
煎饼馃子会自动包装,形成统一的包装规格,方便售卖。
全自动煎饼馃子制作贩售一体机的适用范围广泛,可以满足不同地区和人群的口味需求。
设备可以根据市场需求进行定制,如不同口味的煎饼馃子、大小规格的煎饼馃子等,满足消费者的个性化需求。
这也为创业者和投资者带来了商机,可以根据当地市场情况进行灵活经营。
全自动煎饼馃子制作贩售一体机还可以设置智能化售卖系统,支持多种支付方式,如微信支付、支付宝支付等,方便顾客购买。
全自动煎饼馃子制作贩售一体机的推广和应用也为社会经济发展做出了积极贡献。
设备的问世不仅改变了传统手工制作的模式,也提高了煎饼馃子的生产效率和质量,降低了生产成本,能够满足大规模生产和批量销售的需求。
全自动化生产方式还能够减少对人力资源的需求,提高了生产企业的竞争力,促进了行业的良性发展。

压茶饼机器的工作原理
压茶饼机器的工作原理是将茶叶经过加工后放入特制的模具中,然后施加高压力来压制茶叶成为饼状。
具体工作原理如下:
1. 准备茶叶:首先,将精选好的茶叶经过烘焙、揉捻等工序,使其形成具有一定湿度的茶叶片。
2. 模具准备:准备特制的模具,一般为金属或塑料材质制成。
模具的底部会有凸起的凸点或纹路,以便在压制时形成特定的花纹。
3. 茶叶装入模具:将准备好的茶叶均匀地放入模具中,填满整个模具的容积。
茶叶的放置要均匀,避免出现空隙或堆积过多。
4. 施加压力:将已装满茶叶的模具放入压茶饼机器中。
机器通过压力系统,施加持续的高压力于模具上。
高压力会使茶叶受到挤压和压缩,同时也会增加茶叶之间的黏合力。
5. 固化及除湿:获得适当压力后,机器会保持一段时间,以确保茶叶充分固定和结合在一起。
同时,机器也会排除茶叶中的多余湿气,以减小饼状茶叶的含水量。
6. 释放压力和取出饼状茶叶:压制完成后,机器会释放压力。
通过打开模具,将压制完成的饼状茶叶取出。
通过以上工作原理,压茶饼机器可以将茶叶均匀地压制成饼状,增强茶叶的密度和持久性,方便储存和运输,并为茶叶赋予独特的外观和口感。
更多产品信息请打开企业网站: 烙饼机可生产的食品类型:面类食品、油盐饼、酥饼、烧饼、千层饼等。
烙饼机设计合理,在电饼铛生产的基础上,对铛体表面进行不粘涂料处理,具有上、下铛双面烙制食品的功能。
铁质铛体,在烙制过程中释放出的铁元素有益人体健康,具有以下特点:
1、不粘锅:容易脱模,产品废品率大大减低,脱模不用食油,减少生产成本;
2、食品没有黑底和油腻,在色泽和口感方面有明显的改进;
3、减少工场油烟,改善工作环境,减低火灾可能性,提高产品质量;
4、烙饼机不但能烙制大饼、烧饼,还能烙制煎饼、驼机贴、水煎包、烧鸭薄饼等食品。