化工之星(ECSS)网络版安装指南.doc
- 格式:doc
- 大小:541.00 KB
- 文档页数:5
中国石化扬子石油化工有限公司油品质量升级及原油劣质化改造项目ECS-700系统操作手册目录DCS通用操作手册 (3)1、总体说明 (3)1.1、系统硬件 (3)1.2、系统软件 (3)1.3、注意事项 (3)1.4、本规程提及的术语 (3)1.5、操作员基本职责: (3)1.6、系统异常情况处理 (3)1.7、报警处理 (3)1.8、检测控制点 (3)2、监控画面 (3)2.1、操作员键盘 (3)2.2、画面操作介绍 (4)2.3、位号仪表功能块 (9)2.4、调节阀的操作 (18)3、报警信息 (18)3.1、报警显示 (18)3.2、过程报警表 (19)3.3、系统报警表 (20)3.4、历史报警表 (21)3.6、报警面板 (25)3.7、报警消音 (26)4、工艺参数修改 (26)5、趋势曲线查询 (27)5.1、趋势控件的基本功能介绍 (27)5.2、趋势画面位号信息栏 (29)5.3、趋势画面工具条 (29)5.4、自由趋势页查询 (31)5.5、画面跳转功能 (33)6、报表打印及历史报警打印 (34)DCS通用操作手册1、总体说明1.1、系统硬件本规程所涉及的操作均在操作节点或者服务器上实现,具体的硬件构成参见相关技术资料。
1.2、系统软件系统的所有操作均在VisualFiled软件下实现,具体的VisualFiled操作参见相关技术手册。
1.3、注意事项1.3.1系统的开启与停止、操作人员口令等系统维护工作由专职维护人员完成,未经授权人员不得进行此操作。
1.3.2操作节点和服务器计算机、键盘和鼠标为专用设备,严禁挪用。
特别注意:为保证系统正常运行,不许在操作节点和服务器计算机上运行任何其它非本公司系统所提供的软件,否则将可能造成严重后果。
1.3.3系统供电用的UPS为DCS系统专用设备,只能用于系统的各操作节点和控制站供电,不能用于其它用途。
1.3.4本系统对操作人员主要规定了四种权限,规定如下:观察:只能观察数据,不能作任何修改和操作。
化工自动化控制仪表的安装与操作一、前言作为化工生产过程中不可或缺的一环,自动化控制仪表是保证生产过程质量的关键。
本文将为读者介绍化工自动化控制仪表的安装和操作方法。
二、安装1. 前期准备在安装前,需要进行一些必要的准备工作。
首先需要确定该自动化控制仪表的具体型号和参数,以便进行正确的安装。
其次,需要通过对现场进行排查,保证安装的环境符合要求。
最后,还需要检查所需工具和材料是否齐备。
2. 安装步骤化工自动化控制仪表的安装步骤一般包括以下几个方面:2.1 固定支架将控制仪表的支架放置在安装位置上,使用膨胀螺栓或夹紧型螺母将其固定。
2.2 接线根据控制仪表的型号和参数,在支架上预留好接线孔,然后将仪表的接线端子与控制柜的接线板连接。
注意在连接过程中,要根据接线表进行正确接线,以免出现错误。
2.3 配管依据控制仪表的要求,将控制仪表的进出口管路和输送管路通过管件连接起来,并进行相应的密封处理。
注意要保证管路的通畅。
3. 现场测试安装完成后,进行现场测试。
首先进行零点检测和满量程检测,然后对控制仪表进行调整和校准,校准结束后进行可靠性测试,确保所有功能正常。
三、操作1. 开机前的准备工作在启动化工自动化控制仪表之前,需要对其中的元器件进行检查,并确认控制仪表的各个指示灯是否正常。
此外,应对工艺系统进行检查,以便保证系统中的所有设备都处于正常工作状态。
2. 常规操作在启动控制仪表后,应注意对其密切关注,及时观察仪表的数据变化,以确保生产过程的正常进行。
在操作时,应遵循操作手册,正确操作控制板或触摸屏,同时进行必要的数据记录,便于后续的数据分析和工艺的优化。
3. 维护保养对化工自动化控制仪表进行定期的维护保养,可有效延长设备的寿命,保证其高效稳定运行。
维护保养包括定期清洁设备、更换易损件、检查设备内接线等工作,同时还要定期进行漏电、接地和绝缘测试。
四、通过本文的介绍,我们了解了化工自动化控制仪表的安装和操作方法。
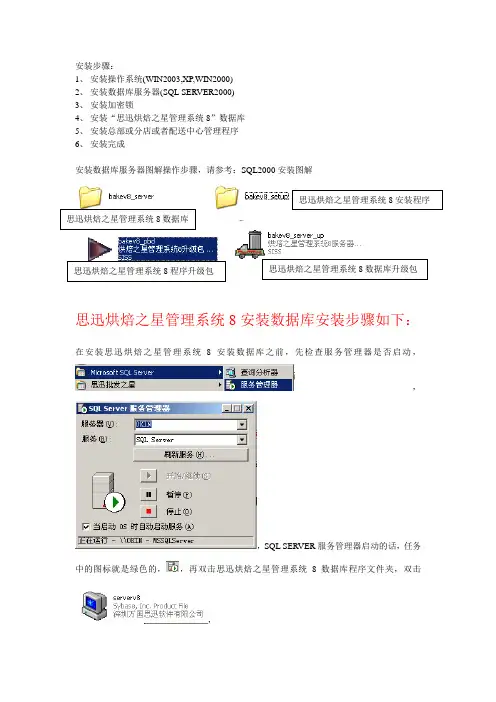
安装步骤:1、 安装操作系统(WIN2003,XP,WIN2000)2、 安装数据库服务器(SQL SERVER2000)3、 安装加密锁4、 安装“思迅烘焙之星管理系统8”数据库5、 安装总部或分店或者配送中心管理程序6、 安装完成安装数据库服务器图解操作步骤,请参考:SQL2000安装图解思迅烘焙之星管理系统8安装数据库安装步骤如下:在安装思迅烘焙之星管理系统8安装数据库之前,先检查服务管理器是否启动,,,SQL SERVER 服务管理器启动的话,任务中的图标就是绿色的,,再双击思迅烘焙之星管理系统8数据库程序文件夹,双击,选中好版本类型,点击:下一步选中好数据库系统版本类型,点击:下一步思迅烘焙之星管理系统8安装程序安装步骤如下:双击思迅烘焙之星管理系统8安装程序文件夹,双击,如果有SA 口令的话,则输入SA 密码,点击:下一步点击安装后台服务,直至数据库安装成功,再点退出即可。
点击:下一步选中对应的版本,点击:下一步输入对应的数据库服务器IP,本机则输入:127.0.0.1点击:下一步选择好目的地文件夹,点击:下一步点击:下一步点击:下一步思迅烘焙之星管理系统8安装程序升级包操作步骤如下:双击,点击:完成,完成烘焙8程序安装。
点击:运行点击:继续输入密码:9876,点击:继续点击:继续点击:继续思迅烘焙之星管理系统8安装数据库升级包操作步骤如下:双击去掉立即上传新版本程序勾选,点击:完成,这样就完成烘焙之星管理系统8程序升级包操作。
点击:重试点运行点继续输入密码:9876,点继续点继续更新程序自动定位到之前到之前已安装好的程序文件夹下,直接点继续程序正在安装中选择对应的机构类型,例如:单店或连锁总部或连锁分部,点 开始(S)注明:如果局域网中其他机器上需要安装总部程序或者连锁分部程序,则不需要再次安装总部数据库和连锁分部数据库以及SQL2000 服务器了,只需安装总部程序或者连锁分部程序和SQL2000客户端程序,如图:选中仅客户端工具,点击下一步,直至完成SQL客户端程序安装。

网络版安装步骤:
一、服务器安装
1. 在充当服务器的计算机上运行光盘“ECSS服务器版安装程序”下的setup.exe文件,安装ECSS化工之星服务器程序。
安装完成后在桌面显示图标如下图:
2.打开“我的电脑”找到ECSS化工之星安装目录,如下图:
3.选择安装目录,右键显示菜单:
选择“共享和安全”显示窗口:
选择“共享此文件夹”,点击“确定”完成服务端的共享;
4.把随盘附带的“ECSS化工之星”专备的加密狗插在服务器计算机的打印口上,或者将
随系统带的USB加密狗插在服务器计算机的USB端口上。
5.双击“ECSS化工之星服务器端”图标,在状态栏显示:,双击
服务器图标显示:服务器窗口:此时可进行客户端连接计算。
如果没有插入加密狗将显示错误信息,如图:
二、客户端安装
1.在客户机上运行光盘“ECSS客户机版安装程序”下的setup.exe文件,安装ECSS化工
之星客户机程序。
2.初次使用客户端程序时应指服务器端位置,操作如下:点击“开始”->“程序”->“化工之星”
选择“ECSS化工之星客户端”显示窗口
点击“浏览”按键,显示打开窗口:
在打开窗口中找安装服务器端的机器名,双击联结,并打开服务器端共享的“化工之星”安装目录,如下图:
选择Cstar.Exe文件,点击“打开”
在客户程序窗口中显示服务器端地址,完成指定服务器端操作。
3. 运行客户机上的“ECSS化工之星
4.21”即可开始使用。
以后再在客户机上使用“ECSS 化工之星”直接执行即可,不必在执行第5步的内容。
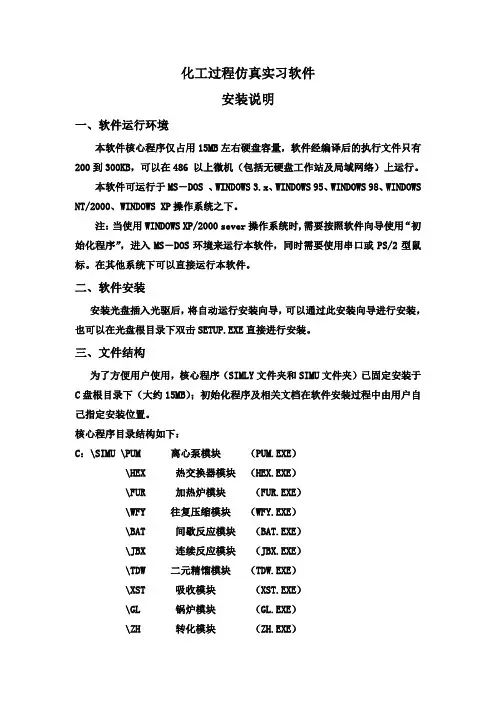
化工过程仿真实习软件安装说明一、软件运行环境本软件核心程序仅占用15MB左右硬盘容量,软件经编译后的执行文件只有200到300KB,可以在486 以上微机(包括无硬盘工作站及局域网络)上运行。
本软件可运行于MS-DOS 、WINDOWS 3.x、WINDOWS 95、WINDOWS 98、WINDOWS NT/2000、WINDOWS XP操作系统之下。
注:当使用WINDOWS XP/2000 sever操作系统时,需要按照软件向导使用“初始化程序”,进入MS-DOS环境来运行本软件,同时需要使用串口或PS/2型鼠标。
在其他系统下可以直接运行本软件。
二、软件安装安装光盘插入光驱后,将自动运行安装向导,可以通过此安装向导进行安装,也可以在光盘根目录下双击SETUP.EXE直接进行安装。
三、文件结构为了方便用户使用,核心程序(SIMLY文件夹和SIMU文件夹)已固定安装于C盘根目录下(大约15MB);初始化程序及相关文档在软件安装过程中由用户自己指定安装位置。
核心程序目录结构如下:C:\SIMU \PUM 离心泵模块(PUM.EXE)\HEX 热交换器模块(HEX.EXE)\FUR 加热炉模块(FUR.EXE)\WFY 往复压缩模块(WFY.EXE)\BAT 间歇反应模块(BAT.EXE)\JBX 连续反应模块(JBX.EXE)\TDW 二元精馏模块(TDW.EXE)\XST 吸收模块(XST.EXE)\GL 锅炉模块(GL.EXE)\ZH 转化模块(ZH.EXE)C:\SIMLY \ CJ 常减压蒸馏模块(CJ.EXE)\FCC 催化裂化模块(FCC.EXE)四、运行仿真软件成功安装软件后,双击桌面相应快捷方式即可启动软件向导。
第一个界面为欢迎界面,第二个界面为操作系统选择画面,如下图所示:当使用WINDOWS NT/2000以下操作系统时,选中“其他windows系统”,单击“下一步”进入如下画面,可以通过鼠标左键单击进入相应模块。
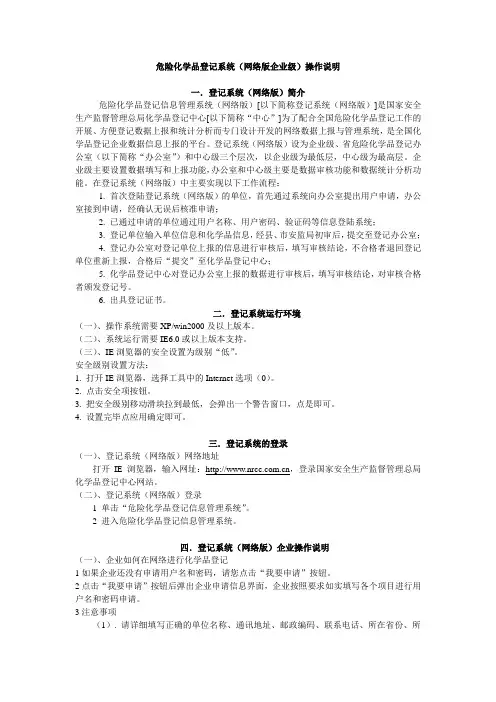
危险化学品登记系统(网络版企业级)操作说明一.登记系统(网络版)简介危险化学品登记信息管理系统(网络版)[以下简称登记系统(网络版)]是国家安全生产监督管理总局化学品登记中心[以下简称“中心”]为了配合全国危险化学品登记工作的开展、方便登记数据上报和统计分析而专门设计开发的网络数据上报与管理系统,是全国化学品登记企业数据信息上报的平台。
登记系统(网络版)设为企业级、省危险化学品登记办公室(以下简称“办公室”)和中心级三个层次,以企业级为最低层,中心级为最高层。
企业级主要设置数据填写和上报功能,办公室和中心级主要是数据审核功能和数据统计分析功能。
在登记系统(网络版)中主要实现以下工作流程:1. 首次登陆登记系统(网络版)的单位,首先通过系统向办公室提出用户申请,办公室接到申请,经确认无误后核准申请;2. 已通过申请的单位通过用户名称、用户密码、验证码等信息登陆系统;3. 登记单位输入单位信息和化学品信息,经县、市安监局初审后,提交至登记办公室;4. 登记办公室对登记单位上报的信息进行审核后,填写审核结论,不合格者退回登记单位重新上报,合格后“提交”至化学品登记中心;5. 化学品登记中心对登记办公室上报的数据进行审核后,填写审核结论,对审核合格者颁发登记号。
6. 出具登记证书。
二.登记系统运行环境(一)、操作系统需要XP/win2000及以上版本。
(二)、系统运行需要IE6.0或以上版本支持。
(三)、IE浏览器的安全设置为级别“低”。
安全级别设置方法:1. 打开IE浏览器,选择工具中的Internet选项(0)。
2. 点击安全项按钮。
3. 把安全级别移动滑块拉到最低,会弹出一个警告窗口,点是即可。
4. 设置完毕点应用确定即可。
三.登记系统的登录(一)、登记系统(网络版)网络地址打开IE浏览器,输入网址:,登录国家安全生产监督管理总局化学品登记中心网站。
(二)、登记系统(网络版)登录1 单击“危险化学品登记信息管理系统”。


化工专业知识服务系统使用手册中国化工信息中心2018年3月目录1. 系统运行环境 (5)2. 登录 (6)2.1 中国工程科技知识中心首页登录 (6)2.2 化工专业知识服务系统首页登录 (7)3. 首页 (8)3.1首页框架介绍 (8)3.2首页介绍 (9)4. 栏目介绍 (10)4.1 新闻资讯 (10)4.1.1 栏目介绍 (10)4.1.2 资源列表页介绍 (11)4.1.3 信息详情页介绍 (11)4.2 化工速报 (12)4.2.1 栏目介绍 (13)4.2.2 资源列表页介绍 (13)4.2.3 信息详情页介绍 (14)4.3 文献资源 (15)4.3.1 栏目介绍 (16)4.3.2 资源列表页介绍 (16)4.3.3 信息详情页介绍 (16)4.4 咨询报告 (17)4.4.1 栏目介绍 (18)4.4.2 资源列表页介绍 (18)4.4.3 信息详情页介绍 (18)4.5 科技成果 (19)4.5.1 栏目介绍 (20)4.5.2 资源列表页介绍 (20)4.5.3 信息详情页介绍 (20)4.6 统计数据 (21)4.6.1 栏目介绍 (22)4.6.2 资源列表页介绍 (25)4.6.3 信息详情页 (25)4.7 产品&厂家 (25)4.7.1 栏目介绍 (25)4.7.2 资源列表页介绍 (27)4.6.3 信息详情页介绍 (27)4.8 会展信息 (27)4.8.1 栏目介绍 (27)4.8.2 资源列表页介绍 (28)4.8.3 信息详情页介绍 (28)4.9 专题 (29)4.9.1 栏目介绍 (29)4.9.2 资源列表页介绍 (30)4.9.3 信息详情页介绍 (31)4.10 用户中心 (31)4.10.1 个人资料 (31)4.10.2 原文请求 (32)4.10.3 我的收藏 (33)4.10.4 搜索历史 (33)5. 检索 (34)5.1 简单检索 (34)5.2 高级检索 (34)5.3 二次检索 (35)5.4 检索结果 (35)1. 系统运行环境客户端运行环境:浏览器建议浏览器使用建议浏览器使用IE9+ , Safari , Firefox 43.x , Google Chrome 46.x , 360 7.x(非兼容模式)2. 登录平台有两种登录方式,1是通过中国工程科技知识中心首页登录,2是通过化工专业知识服务系统登录。

中国石化油品销售企业实验室信息管理系统(LIMS)Web操作手册中国石油化工股份有限公司油品销售事业部二零一二年叁月目录1系统简介 (3)1.1系统结构 (3)1.2数据结构 (3)1.3安全机制 (3)1.4界面介绍 (4)2功能模块介绍 (6)2.1入库 (6)2.1.1任务下达页 (6)2.1.2未接收页面 (8)2.1.3检验中的页面 (9)2.1.4待处理的页面 (9)2.1.5已处理的页面 (10)2.2出库 (11)2.2.1任务下达页面 (11)2.2.2未接收页面 (13)2.2.3检验中页面 (13)2.2.4待处理页面 (14)2.2.5已处理页面 (15)1系统简介LIMS_WEB是实验室信息管理系统(LIMS Laboratory Information Management System) 的一个子系统,主要功能有分析任务下达到质检室,相关报告单查询,各分析部门的分析数据进行提取、整理,由用户进行查询、统计以及一些辅助业务的实现。
1.1系统结构LIMS_WEB为B/S(浏览器/服务器)两层结构的软件系统。
系统服务器端采用的是IIS7.5+ 4.0+Oracle11gr2的运行模式。
服务器保存了LIMS_WEB程序、数据文件和所有客户使用的程序。
服务器管理数据库,运行客户端发出请求的程序。
LIMS_WEB系统提供了可由用户编写.net程序并嵌入到系统的接口,用户可以二次开发自己的应用程序,并采用系统的安全性环境,以满足特殊的应用要求。
采用Oracle关系数据库作为系统的数据仓库,来为用户存储和提供数据。
1.2数据结构LIMS_WEB系统所查询和操作应用的数据均是要连接到LIMS的Oracle数据库,系统允许用户使用储存在数据库表里的信息。
每个数据库由很多数据项组成,称为记录。
一条记录由多个字段组成。
标识符或ID字段用来唯一标识表中每条记录。
某个表中的所有记录具有相同的结构,包含相同的字段。

SEPM客户端安装操作手册赛门铁克软件(北京)有限公司2010年1月第 1 页共 22 页文档属性属性内容文档主题SEP客户端安装操作手册文档版本V1.0版本日期2009-12-25文档状态作者崔文秀文档变更版本修订日期修订人描述1。
0 2009-12—25 崔文秀创建文档2。
0 2010—01—13 夏雄修改文档3。
0 2010-03-11 夏雄修改文档第 2 页共 22 页第1章客户端安装综述 (4)第2章客户端安装要求 (5)2.1客户端运行系统/硬件要求 (5)2。
2客户端安装软件环境要求 (6)2。
3权限要求 (7)2。
4SEP安装包功能及系统要求 (7)第3章客户端安装步骤(全新安装) (9)3.1检查客户端系统配置状况 (9)3.2获取客户端安装包 (10)3。
3安装客户端 (11)3.4客户端安装验证 (13)第4章客户端安装步骤(替换原非SEP防病毒软件) (15)4.1检查客户端配置状况 (15)4.2卸载第三方防病毒或者防火墙软件 (16)4。
3获取客户端安装包 (17)4。
4安装客户端 (18)4。
5客户端安装验证 (20)第5章问题处理 (22)第 3 页共 22 页由于辽宁移动防病毒系统部署的现状不同,此次 SEP客户端的部署安装方式针对不同情况有不同的安装部署方式。
具体有下面两种方式:➢全新安装o适用于原来没有防病毒系统➢替换原非SEP防病毒软件o适用于原来使用非Symantec防病毒的省份。
下面各个章节将依次阐述客户端的安装过程,请各终端实施技术人员依照实际情况采用相应的客户端安装方式。
第 4 页共 22 页2.1客户端运行系统/硬件要求为保障Symantec Endpoint Protection 11、系统和其他应用程序的顺利运行,建议计算机终端使用较高的配置,下列表格为计算机终端硬件建议配置:编号需求组件32位64位1 处理器安装最小需求1G,推荐1.8G及以上支持64 位CPU2 操作系统■ Windows 2000(带 Service Pack 4)■ Windows XP■ Windows Server 2003■ Windows Vista (x86)■ Windows Server 2008■ Windows 7(x86)■Windows XP Professionalx64 Edition■ Windows Server 2003 x64Edition■ Windows Compute ClusterServer 2003■ Windows Storage Server2003■ Windows Vista x64 Edition■ Windows 7 (x64 )■ Windows Server 2008 x64Edition第 5 页共 22 页3 内存大于等于 512MB 大于等于 512MB4 硬盘剩余安装最小需求 600MB ,推荐1G以上安装最小需求 600MB ,推荐1G以上5 显示器SVGA(分辨率1024*768及以上)SVGA(分辨率1024*768及以上)6 其他要求Internet Explorer 6.0 及以上Internet Explorer 6。
网络版安装步骤:一、服务器安装1. 在充当服务器的计算机上运行光盘“ECSS服务器版安装程序”下的setup.exe文件,安装ECSS化工之星服务器程序。
安装完成后在桌面显示图标如下图:2.打开“我的电脑”找到ECSS化工之星安装目录,如下图:3.选择安装目录,右键显示菜单:选择“共享和安全”显示窗口:选择“共享此文件夹”,点击“确定”完成服务端的共享;4.把随盘附带的“ECSS化工之星”专备的加密狗插在服务器计算机的打印口上,或者将随系统带的USB加密狗插在服务器计算机的USB端口上。
5.双击“ECSS化工之星服务器端”图标,在状态栏显示:,双击服务器图标显示:服务器窗口:此时可进行客户端连接计算。
如果没有插入加密狗将显示错误信息,如图:二、客户端安装1.在客户机上运行光盘“ECSS客户机版安装程序”下的setup.exe文件,安装ECSS化工之星客户机程序。
2.初次使用客户端程序时应指服务器端位置,操作如下:点击“开始”->“程序”->“化工之星”选择“ECSS化工之星客户端”显示窗口点击“浏览”按键,显示打开窗口:在打开窗口中找安装服务器端的机器名,双击联结,并打开服务器端共享的“化工之星”安装目录,如下图:选择Cstar.Exe文件,点击“打开”在客户程序窗口中显示服务器端地址,完成指定服务器端操作。
3. 运行客户机上的“ECSS化工之星4.21”即可开始使用。
以后再在客户机上使用“ECSS 化工之星”直接执行即可,不必在执行第5步的内容。
情感语录1.爱情合适就好,不要委屈将就,只要随意,彼此之间不要太大压力2.时间会把最正确的人带到你身边,在此之前,你要做的,是好好的照顾自己3.女人的眼泪是最无用的液体,但你让女人流泪说明你很无用4.总有一天,你会遇上那个人,陪你看日出,直到你的人生落幕5.最美的感动是我以为人去楼空的时候你依然在6.我莫名其妙的地笑了,原来只因为想到了你7.会离开的都是废品,能抢走的都是垃圾8.其实你不知道,如果可以,我愿意把整颗心都刻满你的名字9.女人谁不愿意青春永驻,但我愿意用来换一个疼我的你10.我们和好吧,我想和你拌嘴吵架,想闹小脾气,想为了你哭鼻子,我想你了11.如此情深,却难以启齿。
Smart Weather Electronic Ignition System (SWEIS)OWNER’S OPERATION AND INSTALLATION MANUAL110V Models:TOP-500EIS-100-110TOP-500EIS-200-110TOP-500EIS-300-110110VELECTRONIC IGNITION SYSTEMDANGER - FIRE OR EXPLOSION HAZARDIf you smell gas:1. Shut off gas to appliance.2. Extinguish any open fl ame.3. If odor continues, leave the area immediately.4. After leaving the area, call your gas supplier or Fire department.Failure to follow these instructions could result in fi re or explosion, which could cause property damage, personal injury, or death.C WARNING: Do not store or use gasoline or other fl ammable vapors and liquids, In the vicinity of this or any other appliance.An LP-Cylinder not connected for use shall not be stored in the vicinity of this or any other appliance.WARNING: If the information in this manual is not followed exactly, a fi re or explosion may result causing property damage, personal injury, or loss of life.WARNING: FOR OUTDOOR USE ONLYI nstallation and service must be performed by a qualifi ed installer, service agency, or the gas supplier.TABLE OF CONTENTSSYSTEM OVERVIEW (3)ELECTRONICS (3)GAS VALVE AND PILOT COMPONENTS (3)GAS REQUIREMENTS (4)IGNITION CONTROL SPECIFICATIONS (4)INSTALLATION (5)GAS CONNECTION (6)PILOT ASSEMBLY CONNECTIONS (6)PROPER VENTING (7)ACCEPTABLE MEDIA (7)OPERATION (7)MAINTENANCE (8)HELPFUL TIPS FOR PROPER OPERATION (9)110V WIRING DIAGRAMS (11)110V SYSTEM CLEARANCE FROM COMBUSTIBLES (14)TROUBLESHOOTING (15)PARTS LIST & ACCESSORIES (17)WARRANTY (18)The Smart Weather Electronic Ignition System utilizes CSA certified components to be added to an outdoor product.Installation must conform with local codes or, in the absence of local codes, with the National Fuel Gas Code, ANSI Z223.1 / NFPA , or International Fuel Gas Code .The appliance, when installed, must be electrically grounded in accordance with local codes or, in the absence of local codes, with the National Electric Code, ANSI/NFPA 70, if applicable.»Components are CSA Certified ANSI Z21.97-(2017) / CSA 2.41-(2017) certified. »-20° to 175° temperature range.»Durable connections designed to resist outdoor conditions. »TC Flame-sense system.»Hot Surface Igniter (HSI). »LED diagnostics.»CSA Certified ANSI Z21.97-(2017) / CSA 2.41-(2017) certified »12 or 14 VAC for installations within 5 feet of water. »110V for installations farther than 5 feet from water. »Potted control module to protect against moisture and damage.»Hot Surface Ignition (HSI), provides stable burner ignition in harsh conditions. »Thermocouple Flame Sense, fast responding and resistant to wind, moisture and corrosion. »LED diagnostics for field service and troubleshooting.»All connectors are water resistant.»Certified CSA ANSI Z21.97-(2017) / CSA 2.41-(2017) certified. »Coils are encapsulated to protect against moisture. »Pilot has robust flame pattern, wind resistant. »Pilot injectors are stainless steel.»Thermocouple is nickel plated for durability. »Hot Surface Igniter (HSI) with protective cage. »Hot Surface Igniter (HSI) connection is waterproof. »The Power Wire connector is waterproof.GAS VALVE AND PILOT COMPONENTSELECTRONICSSYSTEM OVERVIEWVIEWGAS REQUIREMENTSFUEL TYPEPrior to making gas connections, ensure appliance being installed is compatible with the available gas type. Check the label on the appliance to confirm appliance gas type requirement.GAS PRESSURE Proper input gas pressures are required foroptimum appliance performance.GAS PRESSURE REQUIREMENTSPressure Natural Gas Propane Gas Minimum 3.5” W.C. 1/8 PSI 8” W.C. 1/3 PSI Nominal 7” W.C. 1/4 PSI 11” W.C. 1/3 PSI Maximum14” W.C. 1/2 PSI14” W.C. 1/2 PSIIGNITION CONTROL SPECIFICATIONSRECOMMENDED WIRE SIZENote: There are numerous electrical devices that can be used to turn the fire feature on and off. Devices such as wall switches and remote control devices that are used should be UL listed and approved devices for turning high voltage (110v electrical power) on and off.SWEIS IGNITION CONTROL TIMINGELECTRICAL REQUIREMENTSELECTRICAL CONNECTIONSPre-Purge 3.25 Seconds HSI Warm-Up 5 Seconds Trial for Ignition 20 Seconds Flame Failure Response 10 Seconds Max Inter-Purge5 Seconds Flame Loss Recycles 15 Seconds Flame Loss Recycles DelayNoneAcceptable Input Voltages to Supplied 12 Volt ACTransformer are 110 / 120 Volt AC (Only 12V systems include the transformer)Read label on supplied transformer forproper connection information.The SWEIS has a red and a black wire protruding from it. These are the power wires. When multiple SWEIS are connected, the polarity between them must be the same. To achieve this, all of the red wires must be connected to the same wire from the transformer and all of the black wires connected to the other wire from the transformer.THE PROVIDED TRANSFORMER IS CAPABLE OF PROVING POWER TO UP TO 4 12V SWEIS UNITSThe SWEIS is supplied with an external 12 VAC Transformer (Only 12V systems include this).It is highly recommended to use dielectric grease or silicon to fill any and all wire nuts used in installation ofthe SWEIS.INSTALLATIONGAS TYPEBefore making gas connections ensure appliance being installed is compatible with the available gas type.GAS PRESSUREProper input pressures are required for optimum appliance performance. Gas line sizing requirements need to be made following NFPA51.PRESSURE REQUIREMENTS FOR APPLIANCE(Natural Gas or Propane)Maximum Inlet Pressure:1/2 psiTYPICAL PRESSURE REQUIREMENTS FOR APPLIANCE:Minimum Inlet Pressure:1/4 psi Nominal Operating Inlet Pressure:7” WC (NG) / 11” WC (LP)GAS CONNECTIONHave the gas supply line installed in accordance with local building codes, if any. If not, follow ANSI 223.1. Installation should be done by a qualified installer approved and/or licensed as required by the locality. Note: A listed manual gas shutoff device must be installed prior to the location of the appliance.PILOT ASSEMBLYThe pilot is configured for natural gas. A propane gas injector is provided in the kit. Additional injector sizes are available to provide proper flame pattern. Please contact The Outdoor Plus for assistance.STARTUPA small amount of air will be in the gas supply lines. When first lighting appliance it will take a short time for air to purge from lines. Subsequent lighting of the appliance will not re-quire such purging. Pilot must be clear of all media.»Check all fittings and connections.»Do not use open flame to check for leaks. »Check for leaks with a commercially available, noncorrosive leak check solution.MUST READ! BURNING MEDIA INSTALLTIONDO NOT COVER PILOTS WITH SAND! USE ONLY FIRE-RATED MEDIACORRECT INSTALLATION»ONLY FIRE-RATED MEDIA »PAN TO HOLD MEDIA»PROPER VENTING & CAVITYWRONG INSTALLATION»NO PAN TO HOLD MEDIA »IMPROPER VENTING »COVERS PILOT IGNITERInstallation or repair should be performed by a qualified service technician who is locally licensed. The appliance should be inspected before use and at least annually by a qualified technician.DO NOT remove any decal/rating plates from the SWEIS. A gas shut off must be installed outside the exterior of the fire feature for emergency shut off and maintenance. A sediment trap is highly recommended to alleviate any problems from debris or sediment in the gas line. It is the installers responsibility to ensure the fuel supply and line are adequate to supply the maximum BTU for the burner used. Note: a heat sheild/plate MUST be installed between the SWEIS and the burner ring to avoid over heating.The SWEIS box may now be mounted to the burner or burner & pan combination. Thread sealant must be used on all pipe thread connections. The Outdoor Plus recommends you use a 2” stainless steel nipple or longer to help protect the SWEIS from radiant heat from the burner.The SWEIS is designed to automatically close the gas valve and shut down should temperatures exceed 175° Fahrenheit. To keep the unit cool, proper ventilation and a heat sheild must be provided.The Outdoor Plus Recommends a Stainless Steel Whistle-Free Flex Hose to eliminate the noise.GAS CONNECTIONPILOT ASSEMBLY CONNECTIONSWe recommend mounting the pilot on top of the burner pan and in that configuration, the pilot line, thermocouple and igniter lead should be lowered through a hole in the pan prior to connecting to the control box. The pilot comes pre-assembled from the factory, so the installer can simply connect the assembly to the main control box. The igniter has a “shaped” push on waterproof connector ensuring that is can only be connected the correct way. Push this black plastic connector parts firmly together until it locks in place. Gently tug on wires to assure connection is secure. The flexible corrugated pilot tube has a flare fitting that should be connected 1/4 turn past hand tight. Please double check to ensure the fitting is snug both into the control box and the flare connection. The thermocouple should now be connected. It screws onto the 11/32” brass fitting on the control box closest to the black connector. It should be snug, but do not over-tighten.Next, you may mount the pilot to the burner pan. The shield is designed with perforated material which you can use to secure to the pan with self tapping screws. The installer can determine the best placement for the pilot depending on the burner configuration keeping the pilot within 1” from a burner port for quick ignition. Once all connections are complete, it is highly recommended to perform a leak test. Turn on the gas supply and using gas test solution or soapy water solution, spray the gas connections on the SWEIS including the pilot connector to ensure it is leak free.PILOT ASSEMBLYBURNER PAN/PLATE110V ELECTRICAL SUPPLY110V PLUG N PLAY ELECTRONIC IGNITIONTIONCertain fire pit enclosures may require extra ventilation depending on size, material or extended use.1 Square Inch of ventilation is REQUIRED for every 10,000 BTUs.This is especially important for propane units, as propane gas is heavier than air and can pool in the bottom of an enclosure.»Media smaller than 1/2" is not recommended for liquid propane applications.»1/2" to 3/4" Fire glass specifically designed and approved for fire features. »Stones of man made materials (refractory) designed for fire pits. »DO NOT USE SAND, DO NOT FILL HOLLOW AREAS.Media used in the fire feature enhances the look of the flame and improves the fire pit performance. As gas is emitted from the burner, the media helps mix air with fuel resulting in a more uniform flame and a cleaner burn. The media will also help spread the flame across all areas of the burner resulting in faster and more even ignition.The media covering the burner should never exceed 2". If using fire glass, we recommend you use 1/2" diameter minimum and only cover the burner 1/2" to 3/4". With all media, the pilot burner MUST be left open to the air for proper ignition. When the media is placed correctly, you should see the top of the pilot burner shield. If ignition is delayed or inconsistent, you may need to remove some media from the pilot burner area. When using propane gas it is important to check for back pressure created by excessive use of media that could result in gas being forced back through the air mixer.FIRE FEATURE START UP1. Before turning appliance on, visually inspect fire feature to ensure combustible materials have not collected inside the feature which could burn once the fire feature is turned on. Be sure anyone standing near the fire feature is aware you will be turning the fire feature on before actually turning it on.2. Turn fire feature on by turning on the electrical device used to power the fire feature.SEQUENCE OF OPERATION DURING IGNITIONWhen powered, indicating a call for heat, the unit will wait for Pre-Purge time. The HSI will be energized for warm up time, then the pilot gas valve will energize for Trial-for-Ignition time. The HSI will turn off after Ignition Time. If the flame is detected on the thermo-couple before the end of the trial for ignition time, the HSI will turn off. The main valve will turn on and the pilot valve will remain on until power is removed or flame signal is lost. If flame is lost, the control will turn off the gas valve, and after the flame loss recycle delay, restart the ignition sequence. If a flame is not detected during the Trial-for-Ignition time and Trials-for-Ignition remain, the pilot and HSI will turn off and wait for Inter-Purge time before starting the next ignition attempt. If a flame is detected prior to turning on the gas valve, the control will stop sequence and remain in safety shutdown until the flame signal is below minimum threshold, or drops continuously by minimum threshold value before continuing. »Power is applied.»Hot Surface Igniter (HSI) becomes hot and 4 seconds later the pilot gas valve opens. »Within 10 seconds of power application pilot flame should be visible »Within 10 seconds of pilot flame ignition, the burner (fire ring/burner bar) should ignite.FIRE FEATURE SHUTDOWNTurn fire feature off by turning off the electrical device used to power the fire feature.PRIOR TO EACH USEInspect for debris in fire feature – remove debris prior to use.SEMI-ANNUALLY»Visually inspect pilot igniter for debris/insect infestation (spider webs).»Visually inspect burner holes to ensure they are clear. »Clean either of the above as necessary using compressed air.ANNUALLY»Visually inspect pilot igniter for excess corrosion due to heat and moisture. »Turn fire feature on to ensure proper operation.MAINTENANCEMAINTENANCE INSTRUCTIONSREMOVAL OF DEBRIS»Do NOT perform the maintenance until surfaces of the fire feature are cool to the touch, The Outdoor Plus recommends leaving the fire pit off for at least 1 hour prior to servicing. »Remove any debris on or around the fire feature such as spider webs, dirt, etc. by using a dry brush or compressed air. »Pilot debris removal: Unscrew the pilot cover from the igniter. Use a dry brush or compressed air to clean out the pilot igniter. Place the pilot cover back on with the screw, after pilot igniter is cleaned.HELPFUL TIPS FOR PROPER OPERATION1. C ross ventilation is REQUIRED! A minimum of 1 square inch of ventilation is required for every 25,000 BTUs oneach side of the installation. Air flow is your friend!2. Media (lava rock and glass) minimum of 1/2" and no larger than 2" in diameter.3. Media must not cover the pilot. The pilot needs air. Avoid packing media against the pilot.4. Media must be approved by the appliance manufacturer.5. Large BTU applications (above 150,000 BTU’s) could require a large injector.6. A heat shield should be applied between the burner pan and SWEIS7. The SWEIS has a temperature safety shutoff at 175° F.8. Be sure the gas shut off valve is open.9. If using wire nuts, be sure they are weather proof and use dielectric grease on the wires.10. The unit is water resistant. NOT water proof! DO NOT PUT IN WATER OR SUBMERGE.LED DIAGNOSTIC CODESOFF NO POWER / INTERNAL FAULT ON NORMAL OPERATION1 FLASH HOT START, THERMOCOUPLE HOT AT POWER UP2 FLASHES TRIAL LOCKOUT, MAXIMUM IGNITION TRIALS EXCEEDED WITHOUT FLAME DETECTION3 FLASHES FLAME LOSS LOCKOUT, EXCEEDED MAXIMUM LOSSES OF FLAME AFTER PROVING BURNER ON.4 FLASHES FLAME SENSE FAULT5 FLASHES VALVE FAULT FAST FLASHSAFETY SHUTDOWNLED DIAGNOSTIC CODESWIRING GAUGE CHART110V ELECTRONIC IGNITION SYSTEMWIRING DIAGRAMS110V Leads110V - INUsing a Emergency Stop ButtonBurner PanBurnerPilot Burner AssemblyUsing a Dial Timer110V - INAir Mixer for Propane Is Recommended for Propane Burners. See Instructions included with the applianceHot / 110V Ground NeutralLEGENDUsing an Emergency Stop & Dial Timer110V - IN110V - INBurner PanBurnerPilot Burner Assembly110V LeadsUsing a Standard Light Switch110V - IN1 square inch of ventilation required for every 25,000 BTUsMINIMUM 12" CLEARANCE FROM BURNER TO FLOORTHE SWEIS IS INSTALLED BUT WHEN TURNED ON NOTHING HAPPENS:The most common cause is an electrical wiring or power issue. Inspect all electrical connections carefully to confirm all wires from the transformer to the fire feature are connected properly. If wiring is properly connected, disconnect the wires at the fire feature and use a multimeter to confirm a minimum of 12 volts when the fire feature is turned on. If there is not a minimum of 12 volts at the fire feature, conduct the same test at the transformer to determine if the transformer is truly producing a minimum of 12 volts. If you do have a minimum of 12 volts at the fire feature contact us for further assistance.THE SWEIS IS TURNED ON, THE IGNITER GLOWS ORANGE AND GAS CAN BE HEARD FLOWING, BUT DOES NOT IGNITE:The two most common causes to this fault are; Air in the Gas Line or low Electrical Current to the fire feature.Air in the Gas Line:New gas line installations often have air trapped inside that must be removed or purged prior to installing the SWEIS. If the line has not been properly purged, it may take several cycles of turning the fire feature on and off before the all the air is purged from the gas line.Understanding how the SWEIS operates will help you go through the purging process. When you turn on the SWEIS, the igniter will begin to glow, followed by the pilot gas valve opening 4 seconds later. During next 3 minutes the igniter will cycle on and off every 30 seconds while the pilot gas valve will remain on the entire time. Accordingly, if you are attempting to purge air from the gas line, engage the system and leave it on for approximately 3 minutes. Next turn it off and then back on. Let the system run for an additional 3 minutes. When purging air from a new gas line, you may need to cycle the power several times as described above before gas begins to flow. If at any point you smell gas and still don't have ignition, you should attempt to light the pilot flame with a hand held lighter. If ignition occurs when you light it by hand, go to the section, see Electrical Current in column 2.Electrical Current:If purging the gas line does not solve the problem, the ignition failure is most likely that the igniter is not getting hot enough to light the gas. The main reason an igniter will not reach full temperature is low amperage.Electricians will commonly check the electrical power, note there are a minimum of 12 volts and think everything is fine electrically, so there must be a problem with the SWEIS.The deficiency is not in the volts but rather the amps. Amperage reaching the fire feature is dependent on the gauge wire used between the transformer and the fire feature. Our installation instructions require no less than 12 gauge wire up to 50 feet and 10 gauge for installs over 50 feet. Smaller wire size will often be the problem in ignition. Steps to check for sufficient amperage:»CAUTION: Turn off the gas supply before proceeding.»Utilizing clamp on ammeter, clamp the ammeter around one of the wires providing power to the SWEIS.»Turn on the fire feature.»Amperage should range between 1.4 to 1.6 amps initially. Four seconds after being turned on the amperage will jump to approximately 2.0 amps.If the amperage listed previously is not present AND the wire gauge used was less than listed above, change the wiring. Otherwise contact us for further assistance.THE FIRE FEATURE WAS TURNED OFF, BUT SMALL FLAMES CAN STILL BE SEEN FLICKERING FROM THE FIRE FEATURE.Turn the fire feature back on, let the main burner light and then turn it off again. You may need to do this several times. Small pieces of debris in the gas line may get caught in the main or pilot valve preventing it from completely closing. This is common a new gas line. By cycling power you can often dislodge the debris. If cycling power does not rectify the problem, turn the gas off using the manual gas shutoff and contact us for further assistance.TROUBLESHOOTINGTROUBLESHOOTING GUIDEPARTS LIST & ACCESSORIES24" PILOT IGNITERASSEMBLYT OP-500PIRMINI & STANDARD CAPACITY UNITST OP-500PIRHCHIGH CAPACITY UNITSPILOT IGNITERCOVERTOP-PICPILOT IGNITERGLOW PLUGTOP-PIGPBLUETOOTHCONTROLLERTOP-500BLUPILOTORIFICE(S)T OP-PI23 | #23 ORIFICEMINI CAPACITY UNITST OP-PI30 | #30 ORIFICESTANDARD & HIGH CAPACITY UNITS235 E MAIN ST. ONTARIO, CA 91761 U.S.A PHONE: 909.460.5579 | FAX: 909.460.5530The Outdoor Plus Company (TOP) warranties fi re pits against manufacturing defects that prevent safe and correct function as follows:»Stainless Steel or Brass Burner Rings: Lifetime Warranty »Stainless Steel Pan, Electronics, Gas Valves, Pilot Assembly: Commercial – 6 Months; Residential – 12 Months»This commences from the date of original sale / shipment from The Outdoor Plus»This warranty is for the parts and in-house (TOP) labor. The defective product must be sent back to TOP with a Return Merchandise Authorization (RMA) issued by TOP for that specifi c product and any other additional information for the nature of the defect or warrant claim»The warranty does not cover items that have been damaged by overheating, modifi cation, abuse, or improper storage.»Any labor involving installation or maintenance with the unit is not covered.»This warranty excludes claims for consequential, indirect-collateral expenses arising from the products defects or warranty recovery.»This warranty is only applied to original purchases.WARRANTY110VELECTRONIC IGNITION SYSTEM。
“多乙苯精馏塔仿真操作多媒体课件”安装说明
第一步:安装加密锁
1 在网络中任何一台计算机(包括服务器)的打印机通信口上安装软件加密锁。
2 运行光盘中Driver子目录下的setup.exe,驱动加密锁,并重新启动计算机。
3 将光盘中Server子目录下的nsrvgx999.exe文件拷入该计算机的硬盘。
4 运行nsrvgx999.exe,会出现图1界面,稍候,该界面消失,在屏幕底部任务栏中可看到图2标志,点击图2,将出现图3界面,在图3第5行有Key1显示,表明加密锁已经安装成功。
这时如果不需运行应用程序,可将nsrvgx999.exe程序关闭。
图1
图2
图3
第二步:安装应用程序
1 在光盘上dyb子目录运行setup.exe,即可实现自动安装!
2 为了保证程序的运行速度,请在网络中各计算机上分别安装该程序!
第三部:运行应用程序
1 在安装加密锁的计算机上运行nsrvgx999.exe程序,这是一个Server程序,运行此程序,网络中未安装加密锁的计算机上的应用程序才能正常运行。
2 在安装了应用程序的计算机上,在Windows的“开始”菜单中点击“程序”,找到“化工仿真实习系列多媒体课件----多乙苯精馏塔仿真操作多媒体课件”,并执行。
网络版安装步骤:
一、服务器安装
1. 在充当服务器的计算机上运行光盘“ECSS服务器版安装程序”下的setup.exe文件,安装ECSS化工之星服务器程序。
安装完成后在桌面显示图标如下图:
2.打开“我的电脑”找到ECSS化工之星安装目录,如下图:
3.选择安装目录,右键显示菜单:
选择“共享和安全”显示窗口:
选择“共享此文件夹”,点击“确定”完成服务端的共享;
4.把随盘附带的“ECSS化工之星”专备的加密狗插在服务器计算机的打印口上,或者将
随系统带的USB加密狗插在服务器计算机的USB端口上。
5.双击“ECSS化工之星服务器端”图标,在状态栏显示:,双击
服务器图标显示:服务器窗口:此时可进行客户端连接计算。
如果没有插入加密狗将显示错误信息,如图:
二、客户端安装
1.在客户机上运行光盘“ECSS客户机版安装程序”下的setup.exe文件,安装ECSS化工
之星客户机程序。
2.初次使用客户端程序时应指服务器端位置,操作如下:点击“开始”->“程序”->“化工之星”
选择“ECSS化工之星客户端”显示窗口
点击“浏览”按键,显示打开窗口:
在打开窗口中找安装服务器端的机器名,双击联结,并打开服务器端共享的“化工之星”安装目录,如下图:
选择Cstar.Exe文件,点击“打开”
在客户程序窗口中显示服务器端地址,完成指定服务器端操作。
3. 运行客户机上的“ECSS化工之星
4.21”即可开始使用。
以后再在客户机上使用“ECSS 化工之星”直接执行即可,不必在执行第5步的内容。