德生2P3收音机套件说明书
- 格式:doc
- 大小:8.97 MB
- 文档页数:34

一、选择波段收音机开机后,您可以按调频/中波转换按键(15),选择调频或中波波段,按短波·米波段转换键(16)可选择短波波段,屏幕上会显示您按键后选择的波段。
在选择短波波段后,可用短波·米波段转换键 (16)选择不同的短波米波段,每按一下此键,则从当前米波段跳到下一个米波段的最低频率。
当利用短波·米波段转换键切换到短波米波段后,并在 3 秒钟内按上、下(9、10)调节键,可向上或向下选择短波米波段。
利用短波·米波段选择按键(16)切换到短波米波段时,显示屏右上方同时显示米波段数字,停止米波段切换操作 3 秒钟后,自动返回到时间显示状态。
这时,上、下键也从短波米波段选择切换状态返回到调整频率状态。
本机短波米波段频率扫描范围,比国际标准短波米波段范围稍宽。
二、搜索电台PL-550 有七种搜索电台的方法:1.手动搜索电台;2.自动搜索电台;3.直接输入电台频率;4.调频/中波的自动存台(ATS)功能;5.直接输入2位存储地址数字,调出当前页面下的地址频率;6.进入搜索存储器状态,手动或自动搜索已存储的电台频率;7.用旋转式调谐钮调出已存储的电台。
(1)手动搜索【方法一】手动搜索电台:利用向上或向下调节键(9或10)或用旋转式调谐旋钮(28)搜索电台,搜索过程中,可按调台快慢键(8)选择快速或慢速调谐步进,各波段频率按下表规定的步长标准变化,直到找到电台为止。
手动调谐适合于:——搜索那些比较弱的电台信号;——搜索密集拥挤的强电台信号;——搜索那些频率不在米波段范围内的短波电台信号,而且可以从1711到29999 kHz 频率范围内逐点搜索电台信号。
旋转式频率微调旋钮的其它重要用途:当相邻的频率有很强电台,其声音隐隐约约地串入您正在收听的电台频率时,您可以利用旋转式调谐旋钮,把频率故意微调偏离正常收听的频率,以避开干扰,FM微调0.05MHz,MW和SW微调1-2kHz。

TECSUNPL-600高性能全波段数字调谐立体声收音机使用说明东莞市德生通用电器制造有限公司中国制造感谢您购买了 二次变频TECSUN PL-600立体声收音机。
开始使用前,请阅读本说明书。
高性能全波段数字调谐外接天线立体声耳机稳压电源镍氢充电电池附件:使用说明、快速操作指南、保护套、售后服务保证书、合格证 外观与功能指示........................ 1 显示屏显示符号的说明 (3)PL-600快速操作指南 (4)PL-600使用说明一. 开机 (6)二. 收听电台节目 (7)1.选择波段2.搜寻电台3.调整音量及音调4.使用天线 三. 关机…………………………… 10 四. 充电…………………………… 11 五. 存取电台……………………… 12 1.存储电台 2.收听预存电台 六. 自动搜台存储(ATS)………… 14 七. 改变当前存储页面…………… 15 八. 时间设置……………………… 16 1.调整时钟 2.调整定时A 或B 开机时间和定时 开机后的自动关机时间九. 预设定时开机的电台............19 十. 使用定时功能 (20)十一. 使用贪睡功能 (21)十二. 睡眠定时自动关机功能……22 十三. 删除电台……………………23 1. 删除单个电台 2. 删除整页电台十四. 其它选台方式………………25 1. 直接输入地址收听已存电台 2. 浏览预存电台十五. 锁定按键........................26 十六. 使用夜间照明功能 (26)十七. 使用复位键 (27)目录十八. 广播收听技巧 (27)手动搜寻电台 自动搜寻电台 灵敏度选择 调频立体声转换接收校园调频广播输入数字选择短波米波段调幅宽窄带/接收单边带信号(SSB) 提高调频和短波接收能力的 简易方法十九. 系统码设置..................... 30二十. 选择充电电池容量............ 32二十一. 充电注意事项............... 34二十二. 使用电池注意事项......... 34二十三. 广播知识简介............... 35二十四. 常见问题及解决方法...... 39二十五. PL-600主要性能指标 (41)外观与功能指示电源/睡眠开关键 Power / Sleep Button (见第6、10、22、26、27页) 1调频/短波拉杆天线 Antenna (见第9页)5液晶显示屏 LCD Display (见第3页) 69向上调节/自动搜索键 Up / Auto Scan Button(见第7、9、13、14、15、16、17、22、23、25、27、32页)2 时钟设置键 Time Button (见第16、18页) 10 向下调节/自动搜索键 Down / Auto Scan Button(见第7、9、13、14、15、16、17、22、23、25、27、32页)调台快慢切换/锁定键 T uning Mode / Lock Button (见第8、26页) 83定时A 键 Timer A Button (见第17、18、19页) Frequency / Preset Mode Selector(见第13、23、24、25页)11 页面转换键 Page Button (见第15页) 12调频/中波/长波转换及调频/中波自动搜台存储键FM / MW / LW Band Selector & FM / MW ATS Button (见第7、8、9、14页) 15短波及短波米波段键 SW(SW Meter) Band Button (见第7、28页) 16 0...9数字键 Numeric Keypad (见第8、18、24、25、28、31页) 17 充电开关 Charge On / Off Button (见第11页)19 存储电台/系统设置键 Memory / Sys. Set Button (见第12、15、30、31、32页) 20 调频/短波外接天线插孔 FM / SW ANT . Jack (见第29页) 22 灵敏度选择拨钮 ANT . Gain (DX / Normal / Local) (见第28页) 23 确认/ 删除键 Enter / Delete Button (见第23、24页) 1821 手挽带 Hand Carry Belt音调选择拨钮 T one Control (见第9页) 24 耳机插孔 Earphone Jack25单边带拍频旋钮 SSB BFO Knob (见第29页) 2914 调频立体声及调幅宽/窄带键 FM. ST & AM Bandwidth Button (见第28页) 外接电源插孔 DC 6V Jack (见第6、11页) 2627 竖立支架 Vertical Stand 音量调节旋钮 Volume Knob (见第9页) 307照明/贪睡/ 删除数字键 Light / Snooze / Cancel Button (见第8、21、25、26页)28 多功能调节旋钮 T uning Knob(见第8、9、13、14、15、16、17、22、23、26、32页) 4定时B 键 Timer B Button (见第17、19页) 13 单边带键 SSB Button (见第29页)复位键(在底部) Reset Button (见第27页)31显示屏显示符号的说明开机状态下:显示电台频率、错误操作提示PL-600快速操作指南一. 时钟设置1.长按 [键],“小时”时间闪烁,旋转 [钮]调整小时;TIME TUNING 2.调整小时后,马上短按 [键],“分钟”时间闪烁,旋转 TIME [钮]调整分钟;TUNING 3.最后要短按 [键]确认。

东莞市德生通用电器制造有限公司 地址广东省东莞市东城区莞长路189号德生大楼电话**************传真**************邮编: 523071 E-mail:*****************.cn :TECSUN原理方框图ET PL-300本机采用了数字调谐和数字解调(DSP)技术,对模拟调频/调幅广播信号进行数字化转换,并利用现代软件无线电原理进行处理和解调,极大地提高了收听灵敏度、选择性、信噪比和抗干扰能力。
附:世界主要城市或地区所处时区十七.保养收音机………………………………………………………… 十六.使用电池注意事项………………………………………………… 十八.按键提示音与功能对照一览表…………………………………… 十九.常见问题及解决方法………………………………………………二十.PL-300ET 主要性能指标…………………………………………目录外观与功能示意图…………………………………………………… 显示屏符号的说明…………………………………………………… 功能示意简图………………………………………………………… 一. 开机和关机…………………………………………………………… 手动调出预存电台自动浏览预存电台四. 收听存储的电台………………………………………………………五. 删除电台………………………………………………………………手动删除单个电台手动删除所在波段内的全部预存电台半自动删除电台一指删 () 六. 设置自动关机时间……………………………………………………七. 设置本地时间和闹响时间……………………………………………设置正常时间 设置闹响时间九.屏幕显示模式转换……………………………………………………十.锁定按键………………………………………………………………十一.智能照明……………………………………………………………十二.收听调频立体声广播………………………………………………十三.功能设置…………………………………………………………… 十四.智能充电…………………………………………………………… 十五.复位键……………………………………………………………… 半自动存储电台(一指存)三. 存储电台……………………………………………………………… 手动存储电台 自动搜索存台(ATS)二. 收听广播………………………………………………………………利用便捷调谐方法搜索电台(ETM)自动浏览电台手动搜索电台 世界时区对照表……………………………………………………… 蜂鸣闹响功能广播闹响功能贪睡功能八. 使用定时闹响功能……………………………………………………开始使用前,请仔细阅读本说明书。
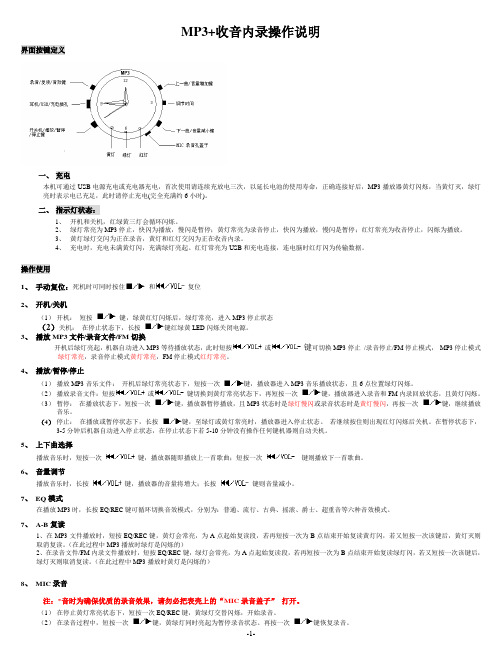
MP3+收音内录操作说明界面按键定义一、充电本机可通过USB电源充电或充电器充电,首次使用请连续充放电三次,以延长电池的使用寿命,正确连接好后,MP3播放器黄灯闪烁,当黄灯灭,绿灯亮时表示电已充足,此时请停止充电(完全充满约6小时)。
二、指示灯状态:1、开机和关机,红绿黄三灯会循环闪烁。
2、绿灯常亮为MP3停止,快闪为播放,慢闪是暂停;黄灯常亮为录音停止,快闪为播放,慢闪是暂停;红灯常亮为收音停止,闪烁为播放。
3、黄灯绿灯交闪为正在录音,黄灯和红灯交闪为正在收音内录。
4、充电时,充电未满黄灯闪,充满绿灯亮起。
红灯常亮为USB和充电连接,连电脑时红灯闪为传输数据。
操作使用1、手动复位:死机时可同时按住和复位2、开机/关机(1)开机:短按键,绿黄红灯闪烁后,绿灯常亮,进入MP3停止状态(2)关机:在停止状态下,长按键红绿黄LED闪烁关闭电源。
3、播放MP3文件/录音文件/FM切换开机后绿灯亮起,机器自动进入MP3等待播放状态,此时短按或键可切换MP3停止/录音停止/FM停止模式,MP3停止模式绿灯常亮,录音停止模式黄灯常亮,FM停止模式红灯常亮。
4、播放/暂停/停止(1)播放MP3音乐文件:开机后绿灯常亮状态下,短按一次键,播放器进入MP3音乐播放状态,且6点位置绿灯闪烁。
(2)播放录音文件:短按或键切换到黄灯常亮状态下,再短按一次键,播放器进入录音和FM内录回放状态,且黄灯闪烁。
(3)暂停:在播放状态下,短按一次键,播放器暂停播放,且MP3状态时是绿灯慢闪或录音状态时是黄灯慢闪,再按一次键,继续播放音乐。
(4)停止:在播放或暂停状态下,长按键,至绿灯或黄灯常亮时,播放器进入停止状态。
若继续按住则出现红灯闪烁后关机。
在暂停状态下,3-5分钟后机器自动进入停止状态,在停止状态下若5-10分钟没有操作任何键机器则自动关机。
5、上下曲选择播放音乐时,短按一次键,播放器随即播放上一首歌曲;短按一次键则播放下一首歌曲。

ads3212 收音机说明书使用
1.插上电源适配器,并连接到收音机。
2.旋动功能开关,再旋TIME或MINUTE钮,分别可以设置时钟或闹钟时间。
3.功能开关旋到CLK档位,按RADIO键,开机并收听上次关机时电台。
4.按SOURCE键,转换FM/DAB功能。
5.在收音模式,长按UP/DOWN键,向上或向下自动搜索电台并停台;短按UP/DOWN键,向上或向下微调。
6.旋转hour/tuning,向上或向下微调电台频率,旋动
minute/vol,可调节音量。
7.按info键,查看电台相关信息。
8.按Menu键,进入系统设置,配合UP/DOWN键进行选择,按SEL 键确认。
9.按RAEPEAT/SELSET键,确认存储搜到的电台。
10.按SLEEP键,选择睡眠时间,对应图标显示。
11.按SCAN键,全频段自动搜台并存储签10个电台。
12.短按Preset,配合UP/DOWN,可以呼出预存电台。
13.存台:长按UP/DOWN搜索电台,停台后再长按Preset键,配合UP/DOWN,找到存储位,按REPEAT/SELSET即可。
14.闹铃响起,按ALON/OFF可关闭铃声。
15.按RADIO键,显示“standby”并关机。

▲產品特色▲功能鍵及控制鍵位置圖▲液晶顯示幕功能顯示及符號▲安裝電池▲按鍵功能介紹▲錄音功能操作介紹▲ MP3功能操作介紹▲ FM功能操作介紹▲特殊其他功能操作介紹▲簡易故障排除▲問與答▲立體錄音筆檔案系統▲規格表▲注意事項▲外部電源使用方法目錄2467817202124252728313333中文VT-32|1VT-32 / VT-32F (含FM功能)▲產品特色1. 全數位IC立體錄音模式,音質清晰自然。
2. MP3錄音格式,具有單聲道 LQ/MQ/HQ/SHQ 雙聲道ST1/ST2可供選擇。
(立體聲錄音VT-32F配備)3. LCD液晶顯示及夜間背光開啟/關閉功能。
(VT-32F配備)4. 五種音效 (MONO、ROCK、JAZZ、CLASS、PIANO) 播放模式。
5. 六個資料夾 A、B、C、D、E、F方便管理及搜尋錄音資料。
6. FM立體廣播收音。
(VT-32F配備)7. FM廣播同步立體錄音。
(VT-32F配備)8. VOR 聲控錄音功能,麥克風靈敏度微調。
9. 連續自動播放資料夾,每個訊息前10秒內容。
10. 單曲播放一次、單曲循環、單一資料夾循環一次、單一資料夾全部循環。
11. A→B重覆播放功能。
12. 錄音檔案名稱月、日顯示功能,確認錄音日期。
(VT-32F配備)13. 重要訊息鎖定,操作功能鎖定。
14. 檔案夾、電池容量、錄音時間、日期、時間的顯示。
(日期、時間顯示為VT-32F配備)15. 一分鐘自動關閉電源,省電功能。
16. 快速切換口述/會議模式。
VT-32|217. 快速啟動錄音鍵,待機省電中按下錄音鍵可自動開機後直接進入錄音狀態。
18. USB隨插即用隨身碟功能。
(WIN98 SE需安裝驅動程式,請上網站 下載)19. 遠距錄音可搭配無線麥克風(選購)。
20. 可使用一般充電電池。
(建議使用鹼性電池)(注意:充電池充飽電壓僅1.4V較一般鹼性電壓1.5V低,故使用時間相對較短)*(VT-32F配備)表示僅限此機種有此項功能!VT-32|3VT-32F :內建左聲道麥克風耳機輸出麥克風/音源輸入LCD 液晶顯示器口述 /會議模式切換VT-32:單聲道麥克風錄音資料夾(A,B,C,D,E,F)/ 音效鍵刪除鍵放音 / 停止 /前進 / 後退;開關機 / 目錄四向鍵模式選擇鍵/循環模式喇叭VT-32:擴充鍵 - 無功能VT-32F :無線麥克風切換鍵VT-32| 4▲ 功能鍵及控制鍵位置圖電池蓋HOLD 按鍵鎖錄音鍵/A-B 重複鍵音量大小 +-VT-32F :內建右聲道 麥克風未來升級鍵USB 連接孔VT-32| 5音樂或錄音之目前曲數電池容量音量頻譜狀態目前狀態( / / )日期檔案名稱例如:12月/ 12日/ 001第一筆目前模式(FM, Music, Record)循環模式音效目前資料夾總數目取樣值錄音 / 播放時間狀態剩餘容量音量狀態VT-32| 6▲ 液晶顯示幕功能顯示及符號▲安裝電池注意事項:■換裝電池時務必把電源關上。
故障排除目錄關於歌曲播放順序音樂播放問題注意事項FM收音及錄音操作語音模式操作電子書操作功能設定操作組件本機主要功能按鍵及功能位置基本功能音樂播放操作安全及使用耳機使用須知電源使用須知FM收音FM錄音錄制語音檔播放語音檔下載電子書閱讀電子書1515899341056722213141112播放列表設定錄音模式選擇錄音設定軟體版本開機動畫選擇自動關機設定螢幕保護時間設定定時關機設定對比度設定語言設定16161717171718181818 ……………………… ……………………………………………………………………………………………………………………………………………………………………………………………………………………………………………………………………… …………………………………………………………… …………………………………… ………………………………………………………………………… ………………………… ………………………… ………………………… ………………………… ……………………………… …………………………………………………………………………………………………………………正面側面側面開/關機鎖定功能顯示幕說明本機主要功能………………………………………………………………………………………………組件播放音樂目錄檔案搜尋模式格式化鋰電池充電故障排除規格按鍵操作索引表更新韌體的使用連接電腦按鍵操作索引表故障排除規格鋰電池充電格式化韌體更新安裝驅動程式檔案上傳/下載和更新檔案搜尋模式檔案播放編輯播放列表檔案刪除313433302723212219192020……………………………………………………………………………………………………………………………………………………………………………………………………………………………………………………………………………………………………………………………………………………………故障排除功能操作問題檔案上傳/下載問題按鍵無動作我的電腦為什麼不能識別MP3?規格規格注意事項項目音樂模式音場模式播放方式顯示幕LCD 錄音隨身碟功能PC介面方式支援軟體系統更新硬體信噪比頻響範圍總諧波失真錄音採樣率不失真輸出功率FM接收範圍預置電臺軟體支援MP3、WMA等音樂格式播放六種音場模式:正常、搖滾、爵士、經典、流行、低音七種播放模式:一般、單曲重複、全部重複、隨機重複、播放列表單曲重複、播放列表所有歌曲重複、A-B重複超細密結晶奈米玻璃,不會劃傷採用ADPCM專業錄音取樣和直錄MP3壓縮編碼功能標準USB2.0介面,高速傳輸快速方便的播放器管理軟體Windows 98/me/2000/2003/XP(Windows 98/ME/2000/2003/XP無須驅動程式)通過網上升級改善用戶操作環境,使產品具有最新功能20Hz-20KHz <=0.05%8KHz-48KHz >=5MW×288KHz-108KHz 30個132×64LED顯示幕可作隨身碟(U盤)>90dB若有規格變化及技術更改,恕不另行通知安全及使用請不要在多塵、潮濕、高溫、磁性很強的環境下使用及存放本機。
AZ1303User Manual中文控制鍵隨機附件–交流電源線右面板(見圖1)1聲源選擇器:CD (光碟), TUNER (收音機),OFF (關)–選擇CD/MP3 光碟或收音機聲源–關機2MONO•STEREO– 選擇單聲或立體聲FM 接收頂面板和前面板(見圖1)3VOLUME – 調節音量4LIFT TO OPEN – 在此揭開CD 門蓋5顯示屏– 顯示本機的狀態6PROGCD/MP3:編輯曲目及查看曲目播放清單;收音機:預設電台7DBB–開啟/關閉低音增強功能8ALBUM/PRESET -祗用於MP3:選擇曲目集(向下);收音機:選擇預設電台(向下);9SEARCH ∞, §CD/MP3:– 在一首曲目中向後和向前搜索;– 跳至當前曲目/前面或後面曲目的開頭。
收音機:調諧選台。
0STOP/BAND 9CD/MP3:– 停止播放;– 刪除一個曲目播放清單。
收音機:選擇波段!PLAY/PAUSE 2/;– 開始/ 暫停CD播放。
@MODE– 選擇不同的播放模式:即如REPEAT(重複播放)或RANDOM(亂序播放)#ALBUM/PRESET +祗用於MP3:選擇曲目集(向上);收音機:選擇預設電台(向上)。
背面板(見圖2)$拉桿天線-增強接收FM波段的能力。
%AC ~ - 電源線插座。
^RESET– 如果本機或顯示屏對任何控制鍵無反應,可使用一支圓珠筆按壓該小孔。
&p PHONES- 3.5mm 立體聲耳筒插孔。
*電池蓋- 打開後放入八個1.5V R-14/ UM2/C-型電池。
電源供給基本功能電源供給方便時請盡可能使用交流電源供電,以保存電池的壽命。
放入電池之前,請務必將電源線插頭從牆上的交流電源插座中拔出。
電池(不隨本機供給)•按正確極性放入八個R-14, UM2或C-型電池(最好是鹼性電池)(見圖2)。
電池含有化學物質,因此用完後應予以適當的棄置處理。
不正確使用電池會造成電解質漏泄進而腐蝕電池盒,甚至引起電池爆炸。
6 x R14 • UM-2 • C-CELLS890!#$124@%3AC MAINS~AUX IN56741XUSBDISC DISC DISCDISC DISC WMAUSB mass storage deviceUSB cable28367459Congratulations on your purchase and wel-come to Philips!T o fully benefit from the support that Philipsoffers,register your product at/welcome.Supplied accessories– AC power cord– Line in cableT op and front panels (See 1) 1Source selector:CD/USB/AUX,FM, MW,OFF–selects CD/MP3-CD,USB,AUX or radio–switches off the set22;–starts or pauses disc/USB playback ∞§–For disc/ USB play:–skips to the beginning of a current/previous/ later track–fast searches backwards and forwardswithin a track9–stops disc/USB playback;–erases a programPROG –programs tracks and reviews theprogram3Display–shows disc/USB play functions4 ALBUM +/-–For MP3-CD/ WMA/USB play:selectalbums5USB–enters USB mode6CD– enters disc mode7MODE– selects different play modes:e.g.REPEAT or SHUFFLE (random order)8OPEN•CLOSE– opens/ closes the CDdoor9TUNING– tunes to radio stations0 VOLUME–adjusts volume level!USB DIRECT–connects an external USBmass storage deviceBack panel (See 1)@T elescopic antenna–improves FMreception# AUX IN jack –connects to external audio source$ AC~ MAINS–inlet for power cord%Battery door –open to insert 6 x 1.5VR-14/UM2/C-cells Power SupplyWhenever convenient,use the power supplycord if you want to conserve battery life.Make sure you remove the plug from the set and wall outlet before inserting batteries.BatteriesMain set (See1)•Insert 6batteries,type R-14,UM2or C-cells(not included,preferably alkaline) withthe correct polarity.•Incorrect use of batteries can cause elec-trolyte leakage and will corrode the compart-ment or cause the batteries to burst:•Do not mix battery types:e.g.alkaline with carbon zinc.Only use batteries of the sametype for the set.•When inserting new batteries,do not try to mix old batteries with the new ones.•Remove the batteries if the set is not to be used for a long time.Batteries contain chemical substances,so they should be disposed of properly.Using AC power1Check if the power/mains voltage,as shown on the type plate located on thebottom of the set,corresponds to yourlocal power supply.If it does not,consult your dealer or service center.2Connect the power cord to theAC~ MAINS inlet and the wall socket.Theset is now ready for use.English Controls / Power Suppy3T o switch the set off completely,withdraw the power cord from the wall socket.4Install the unit near the AC outlet and where the AC power plug can be easily reached.•Disconnect the power cord from the wall socket to protect your set during heavy thun-derstorms.Children could seriously injurethemselves as the free end of the cable maystill be live if only the connector is removedfrom the MAINS socket at the back of theunit.The type plate is located on thebottom of the set.Helpful hints:–T o avoid unnecessary energy consumption, always adjust the source selector to OFFafter using the set.CAUTIONUse of controls or adjustmentsor performance of proceduresother than herein may result inunsafe operation.For users in the U.K.,please followthe boxed instructions ‘Importantnotes for users in the U.K.’.This set complies with the radiointerference requirements of theEuropean Community.Basic functionsSwitching on/off the set and selectingfunction1T o switch on,adjust the source selector to CD/USB/AUX,FM or MW as desired.2T o switch off,adjust the source selector to OFF.Adjusting volumeAdjust the volume with the VOLUMEcontrol.Radio reception1Push the source selector to FM or MW. 2Turn TUNING to tune in a radio station. 3T o switch off the radio,adjust the source selector to OFF.Helpful hints:T o improve reception•For FM,extend,incline and turn the telescopic antenna.Reduce its length if thesignal is too strong.•For MW,uses a built-in antenna.Direct this antenna by turning the whole set.Power Supply Basic Function / RadioAbout MP3The music compression technology MP3(MPEG1 Audio Layer 3) significantly reducethe digital data of an audio CD whilemaintaining CD quality sound.•Getting MP3 files:you can either download legal music files from the internet to yourcomputer hard disc,or create such files byconverting audio CD files in your computerthrough appropriate encoder software.(128kbps bit rate or higher is recommendedfor MP3 files.)•Creating a MP3 CD:burn the music files from your computer hard disc on a CDR orCDRW using your CD burner.Helpful hints:– Make sure that the file names of the MP3 files end with.mp3or.wma.– Number of albums:maximum 256– Number of tracks:maximum 511– The length of file names affects the number oftracks for playback.With shorter file names,more files can be burned on a disc.Playing a discThis player plays Audio Discs including CD-R/ CD-RW,MP3 CD and WMA.Do not try toplay a CD-ROM,CD-I,CDV,VCD,DVD orcomputer CD.IMPORT ANT!•CDs encoded with copyright protection technologies by some record companies may be unplayable by this product.•DRM-protected WMA disc is not supported. 1Adjust the source selector toCD/USB/AUX.➜Display shows - - - with “DISC”(see 2),or - - - with “USB”(see 3)2Press CD to enter CD mode if USB is dis-played.➜Display will show --- with “DISC”(See 2). 3Open the disc door.4Insert a disc with the printed side facing up and press the disc door gently to close.➜Display:The total number of tracksappears.5Press2;to start playback.➜Display:2and the current track number.For MP3-CD/ WMA only:➜The current track number “XXX“ andalbum number “ALB XXX“ will bedisplayed interchangeably (See45).6T o pause playback press 2;.➜Display:2and the current track numberflash.7Press2;again to resume playback.8T o stop playback,press 9.Helpful hints:The disc playback will also stop when:–you open the disc compartment door;–you select FM,MW or OFF position;–the disc has reached the end of the playback.Selecting a different track •Press∞or§once or repeatedly until the desired track number appears in the display.For MP3-CD/WMA:First pressALBUM+/-once or more to find youralbum.•In the pause/stop position,press2;to start playback.Finding a passage within atrack1During playback,press and hold down ∞or§.➜The disc is played at high speed and low volume.2When you recognize the passage you want, release∞or§.➜Normal playback resumes.Programming tracksY ou may store up to 20 tracks in the desired sequence.If you like,store any track morethan once.1In the stop position,press PROG to activate programming.➜Display shows P01indicating the start of the program and PROG flashes.(See6)2Press∞or§to select your desired track number.For MP3-CD/WMA:First pressALBUM+/-once or more to find your album. 3Press PROG to store the desired track.➜Display shows P02,indicating the next program location available.4Repeat steps 2to3to select and store all desired tracks.5Press2; to play the program.T o review your programIn the stop position,press and hold PROG3 seconds.➜The display shows all the stored tracks insequence.Helpful hints:–Display shows P01 if no track isprogrammed.–If you try to store more than 20 tracks,no track can be stored and the display will show --- with “PROG”.T o erase a programY ou can erase a program by:– pressing 9(twice during playback or oncein the stop position);– selecting FM,MW or OFF position;– opening the disc door.➜ Display:PROG disappears.Selecting different playmodes (See 7)Y ou can select and change the various playmodes before or during playback,andcombine REP or REP ALL play modes with PROG.REP– plays the current track continuously.REP ALL– plays the entire disc/programcontinuously.SHUF– plays all tracks in random order(not available with PROG).1T o select play modes,press MODE once or more.2Press2;to start playback if in the stop position.3T o select normal playback,press MODE repeatedly until the various modes are nolonger displayed.–Y ou can also press9to cancel your playmodes.USB ConnectionUsing USB connectivity •AZ1833 is fitted with a USB port in the front panel,offering a plug and play feature whichallows you to play,from your AZ1833,digitalmusic and spoken contents stored on a USBmass storage device.•Using a USB mass storage device,you can also enjoy all the features offered by AZ1833 which are explained and instructed in thesections of disc operation.Compatible USB mass storage devices With the AZ1833,you can use–USB flash memory (USB 2.0 or USB 1.1)– USB flash player (USB 2.0 or USB 1.1)• USB device which requires driverinstallation under Windows XP is notsupported.Note:In some USB flash players (or memorydevices),the stored contents are recordedusing copyright protection technology.Suchprotected contents will be unplayable on any other devices (such as AZ1833 device).Supported formats:–USB or memory file format FAT12,FAT16,FAT32 (sector size:512 - 4096 bytes)–MP3 bit rate (data rate):32-320 kbps andvariable bit rate–WMA v9 or earlier–Directory nesting up to a maximum of 8levels–Number of albums:maximum 500–Number of tracks:maximum 999–ID3 tag v2.0 or later–File name in Uicode UTF8 (maximumlength:30 bytesThe system will not play or supportthe following:• Empty albums:an empty album is an album that does not contain MP3/WMA files,andwill not be shown in the display.• Non-supported file formats are skipped.This means that e.g.:Word documents .docor MP3 files with extension.dlf are ignoredand will not be played.• AAC,WAV,PCM.NTFS audio files• DRM protected WMA files• WMA files in Lossless formatPlaying a USB mass storage device1Make sure that your AZ1833 is being powered by AC mains or specified batteries. 2Adjust the source selector toCD/USB/AUX.➜Display shows - - - with “DISC”(see 2), or - - - with “USB”(see 3)3Press USB to enter USB mode if USB is NOT displayed.➜Display will show “USB”(see 3).4As shown in figure 9,plug a compatible USB mass storage device to AZ1833’s USBport marked.If needed,use a suitableUSB cable to connect between the deviceand AZ1833’s USB port.➜The device will automatically power on.•If the device is not powered on,turn on the power manually,then re-connnect it.➜AZ1833’s display shows USB and the total number of playable audio files (Max.displayed track number is 999) stored onthe device.5Press2;on your AZ1833 to start play.➜AZ1833’s display will show USB and share the display information illustrated in thedisc operation.Helpful hints:– Make sure that file names of MP3 files endwith .mp3.and the file names of WMA files end with .wma.– For DRM protected WMA files,use WindowsMedia Player 10 (or later) for conversion.Visit for details about WindowsMedia Player and WM DRM (Windows MediaDigital Rights Management).– For USB device playing,if the display shows"OL",it means that the USB device is electrically overloading AZ1833.You need to change a USB device.INFORMA TION REGARDING USB DIRECT:patibility of the USB connection on this product:a) This product supports most USB Mass storage devices (MSD) that these devices are compli-ant to the USB MSD standards.i) Most common Mass storage class devices are flash drives,memory sticks,jump drives andetc.ii) If you see a "Disc Drive" showing up on your computer after you have plugged the massstorage device into your computer,most likely it is MSD compliant and it will work with this product.b) If your Mass storage device requires a battery/power source,please make sure you have afresh battery in it or charge the USB device first and then plug it into this product again.2.Supported Music type:a) This device only supports unprotected music with file extension:.mp3 .wmab) Music bought from on-line music stores are not supported because they are secured byDigital Rights Management protection (DRM).c) File name extensions that ended with the following are not supported:.wav;.m4a;.m4p;.mp4;.aac and etc.3.No Direct connection can be made from a Computer USB port to this product even you haveeither or both mp3 or wma file in your computer.Safety information•Place the set on a hard,flat and stable surface so that the system does not tilt.•Do not expose the set,batteries,CDs to humidity,rain,sand or excessive heat causedby heating equipment or direct sunlight.•Where the MAINS plug or an appliance cou-pler is used as the disconnect device,the dis-connect device shall remain readily operable.•The apparatus shall not be exposed to dripping or splashing.•Adequate ventilation with a minimum gap of15 cm between the ventilation holes and sur-rounding surfaces is necessary to preventheat build-up.•The ventilation should not be impeded by covering the ventilation openings with items,such as newspapers,table-cloths,curtains,etc..•No objects filled with liquids,such as vases, shall be placed on the apparatus.•No naked flame sources,such as lighted can-dles,should be placed on the apparatus.•The mechanical parts of the set contain self-lubricating bearings and must not be oiled or lubricated.•T o clean the set,use a dry cloth.Do not use any cleaning agents containing alcohol,ammonia,benzene or abrasives as these mayharm the housing.CD player and CD handling •If the CD player cannot read CDs correctly, use a cleaning CD to clean the lens beforetaking the set to repair.•The lens of the CD player should never be touched!•Sudden changes in the surroundingtemperature can cause condensation on thelens of your CD player.Playing a CD is thennot possible.Do not attempt to clean thelens but leave the set in a warm environment until the moisture evaporates.•Always close the CD door to avoid dust on the lens.•T o clean the CD,wipe in a straight line from the center towards the edge using a soft,lint-free cloth.Do not use cleaning agents asthey may damage the disc.•Never write on a CD or attach any stickers to it.Safety & Maintenance (See8)No sound/ power–Volume not adjusted•Adjust the VOLUME–Power cord not securely connected•Connect the AC power cord properly–Batteries dead/ incorrectly inserted•Insert (fresh) batteries correctly–Disc contains non-audio files•Insert a suitable disc or press ∞or§once or more skip to an audio track,instead of the data files.Display does not function properly/No reaction to operation of any of the controls–Electrostatic discharge•Switch off and unplug the set.Reconnect after a few seconds.no indication–It is set in the USB mode.•Press CD to select CD mode.–No disc inserted•Insert a suitable disc–Disc badly scratched or dirty•Replace/clean CD (See Maintenance)–CD-R(W) is blank or the disc is not finalized.•Use a finalized CD-R(W)–Laser lens steam up•Wait until lens has cleared.Note:Make sure the CD is not encoded with Copyright protection technologies,as some do not conform to the CompactDisc standard.The disc skips tracks–Disc damaged or dirty•Replace or clean disc–Shuffle or program is active•Quit shuffle/program Sound skips during MP3 playback–MP3 file made at compression level exceeding 320kbps•Use a lower compression level to record CD tracks into MP3 format–Disc damaged or dirty•Replace or clean disc.Note:DRM-protected WMA disc is not supported. The USB device doesn’t play on myAZ1833–It is not set in the USB mode.•Press USB to select USB mode.–The device is not securely connected to AZ1833’s USB port.•Re-connect the device,and make sure that the device is powered on.–The device is not supported by AZ1833,or the audio file format stored on the device is not supported by AZ1833.•Use a compatible device/ playable audio file format.T roubleshootingIf a fault occurs,first check the points listed below before taking the set for repair.If you are unable to remedy a problem by following these hints,consult your dealer or service centre. WARNING:Do not open the set as there is a risk of electric shock.Under no cir-cumstances should you try to repair the set yourself,as this will inval-idate the guarantee.Printed in China JW-0732WCLASS 1LASER PRODUCTAZ1833EnglishFrançaisEspañolDeutsch Meet Philips at the Internet 。