台湾伟斯A770二维条形码扫描枪
- 格式:ppt
- 大小:219.00 KB
- 文档页数:5
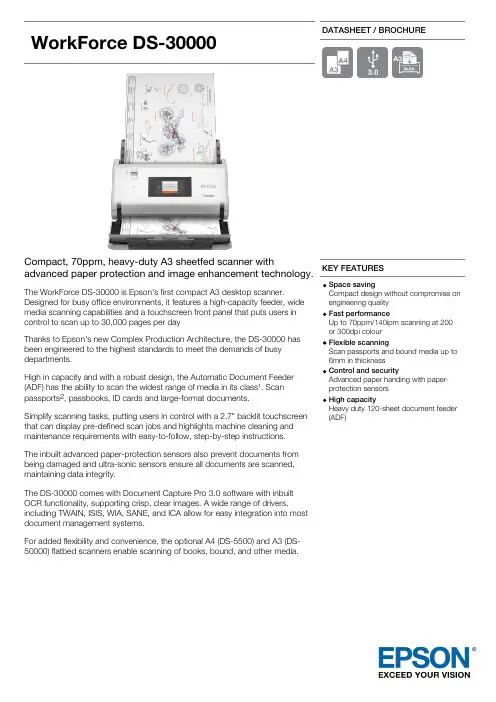
WorkForceDS-30000DATASHEET / BROCHURECompact, 70ppm, heavy-duty A3 sheetfed scanner withadvanced paper protection and image enhancement technology.The WorkForce DS-30000 is Epson's first compact A3 desktop scanner.Designed for busy office environments, it features a high-capacity feeder, wide media scanning capabilities and a touchscreen front panel that puts users in control to scan up to 30,000 pages per dayThanks to Epson's new Complex Production Architecture, the DS-30000 has been engineered to the highest standards to meet the demands of busy departments.High in capacity and with a robust design, the Automatic Document Feeder (ADF) has the ability to scan the widest range of media in its class¹. Scan passports 2, passbooks, ID cards and large-format documents.Simplify scanning tasks, putting users in control with a 2.7" backlit touchscreen that can display pre-defined scan jobs and highlights machine cleaning and maintenance requirements with easy-to-follow, step-by-step instructions.The inbuilt advanced paper-protection sensors also prevent documents from being damaged and ultra-sonic sensors ensure all documents are scanned, maintaining data integrity.The DS-30000 comes with Document Capture Pro 3.0 software with inbuilt OCR functionality, supporting crisp, clear images. A wide range of drivers,including TWAIN, ISIS, WIA, SANE, and ICA allow for easy integration into most document management systems.For added flexibility and convenience, the optional A4 (DS-5500) and A3 (DS-50000) flatbed scanners enable scanning of books, bound, and other media.KEY FEATURESSpace savingCompact design without compromise on engineering quality Fast performanceUp to 70ppm/140ipm scanning at 200 or 300dpi colour Flexible scanningScan passports and bound media up to 6mm in thickness Control and securityAdvanced paper handing with paper-protection sensors High capacityHeavy duty 120-sheet document feeder (ADF)TECHNOLOGYScanner Type Sheetfed ScannerOptical Resolution (ADF)600 DPI x 600 DPI (Horizontal x Vertical)Optical Resolution50 DPI x 1,200 DPI (Horizontal x Vertical)Optical Resolution Main 600 DPI x Sub 600 DPIADF Minimum Document Size50.8 mm x 69 mm (Horizontal x Vertical)ADF Maximum Document Size304.8 mm x 5,588 mm (Horizontal x Vertical)Paper Formats A3, A4, A5, A8, A7, A6, Business cards, Postcard, Legal, B5, B6, B4, Tabloid, Plastic cards Scanning color depth Input: 10 Bits Color / 30 Bits Monochrome , Output: 8 Bits Color / 24 Bits Monochrome Ultrasonic Sensor YesCategory High Capacity, General OfficeSCANNEROptical Sensor CIS (Contact Image Sensor)Light Source ReadyScan LED technologyOutput Resolution600 DPISCAN SPEEDScanning Speed Monochrome: 70 pages/min - Color: 70 pages/min measured with Size: A4 , Resolution: 300dpi, Monochrome: 140 image/min - Color: 140 image/min measured with Size: A4 , Resolution:300 dpiPAPER / MEDIA HANDLINGPaper Setting Capacity120 SheetsPaper weight Auto loading: 27 - 413 g/m², Manual loading:27 - 413 g/m²Automatic Document FeederTypeSingle pass dual scanningReliability Daily Duty Cycle30,000 pagesPaper Tray Capacity120 Sheets StandardAutomatic Document Feed120 pagesDuplex Scan YesSCANNING FEATURESFeatures Advanced Colour Dropout / Enhance, Skip blank page, Punch holes removal, Automatic de-skew, RGB colour enhance, Auto-rotation, Text enhancement, Descreening, BarcodeRecognitionOutput formats BMP, JPEG, TIFF, multi-TIFF, PDF, searchable PDF, secure PDF, PDF/A,JPEG(Colour/Greyscale), PNG, docx, xlsx, pptxFile compression features TIFF Compression (JPEG(7) , CITT G4, LZW), PDF Compression, JPEG compressionAdvanced document integration Scan to Email, Scan to FTP, Scan to Microsoft SharePoint®, Scan to Print, Scan to Web folders, Scan to Network folders, Scan to USB, Computer (Epson Document Capture Pro), Microsoft SharePoint with Epson Document Capture ProImage Improvement Dust removal, Color correction, Unsharp Mask with Noise Reduction Scanning Volume40,000 Pages per dayCONNECTIVITYInterfaces USB - compatible with USB 2.0 specification, USB 3.0WHAT'S IN THE BOXAC AdaptorUSB 3.0 cableMain unitUser guideUser manual (CD)GENERALSupply Voltage AC 100 V - 240 VEnergy Use17 Watt (Operation), 9 Watt (Ready), 1.4 Watt (sleep mode), 0.1 Watt (Power off)Product dimensions371 x 208 x 219 mm (Width x Depth x Height)Product weight 5.8 kgDrivers TWAIN, WIA, ISIS (Web download), Epson Scan2 (TWAIN), ICA (Mac)Included Software Epson Document Capture (Mac only), Epson Document Capture Pro (Windows only), EpsonDocument Capture Pro Server (on free download), Epson Scan 2Compatible Operating Systems Mac OS 10.6+, Windows 10, Windows 7, Windows 8, Windows 8.1, Windows Server 2003, Windows Server 2008 (32/64bit), Windows Server 2012 R2, Windows Server 2016, Windows Vista, Windows XP SP3Sound Power Operation: 6.4 B (A)Noise Operation: 51 dB (A)Noise Level Operation: 64 dB (A)Supported Humidity Operation 15% - 80%, Storage 15% - 85% Supported Temperature Operation 5° C - 35° C, Storage 60° C - 25° C Options Roller Assembly KitLCD AND MEMORY CARDSPanel Type: Color, Touchscreen, Diagonal: 6.8 cmSCANOptical Resolution600 DPI x 600 DPI (Horizontal x Vertical)OTHERWarranty12 months Carry inOptional warranty extension available WHAT'S IN THE BOXAC AdaptorUSB 3.0 cableMain unitUser guideUser manual (CD)LOGISTICS INFORMATIONWorkForce DS-30000SKU B11B256401BYEAN code87159466765791. ¹When comparing against the market leader's ownwebsite – Epson has the capability to scan the widestrange of media through the Automatic Document Feeder(ADF). From 27-413gsm and bound media up to 6mm thickincluding passports. Up to raw A3 media (RA3) thatFor more information please contact:features a width of 305mm. 2To scan passports, theoptional passport carrier sheet is required at extra cost. Homeusers************Web: 。
二维扫描枪用户设置手册2D Area Image Barcode ScannerUser’s ManualVer:2.3外观及功能/Appearance and function通讯接口/Communication interface:二维码扫描枪通过USB通讯。
/The communication interface of the reader is USB.读码/Reading:1、确保二维码扫描枪已经正确连接主机。
/To ensure that the reader has the right to connect the host2、按住触发键不放,照明灯和瞄准灯被激活,出现红色瞄准线和白色照明区域。
照明区域是用来照亮条码,瞄准线是用来定位,帮助您找到最佳识读位置。
将瞄准线大致对准条码。
Hold down the trigger button to activate the red line and the white light area.The lighting area is used to illuminate the barcode,the line of sight is used to locate,help you find the best reading distance.Keep red aiming line in the center of a bar code。
3、听到成功提示音响起,同时红色瞄准线和白色照明区域熄灭,则读码成功,二维码扫描枪将解码后的数据传输至主机。
/On a successful reading,there’ll be a beep sound,illumination&aiming patterns die out.The reader then transmits barcode message to the Host.注意:在识读过程中,对同一批次的条码,您会找到一段距离内读码成功率都很高。
FM8413-LC 条码扫码引擎硬件使用手册2019. 12本资料是为了让用户根据用途选择合适的上海复旦微电子集团股份有限公司(以下简称复旦微电子)的产品而提供的参考资料,不转让属于复旦微电子或者第三者所有的知识产权以及其他权利的许可。
在使用本资料所记载的信息最终做出有关信息和产品是否适用的判断前,请您务必将所有信息作为一个整体系统来进行评价。
采购方对于选择与使用本文描述的复旦微电子的产品和服务全权负责,复旦微电子不承担采购方选择与使用本文描述的产品和服务的责任。
除非以书面形式明确地认可,复旦微电子的产品不推荐、不授权、不担保用于包括军事、航空、航天、救生及生命维持系统在内的,由于失效或故障可能导致人身伤亡、严重的财产或环境损失的产品或系统中。
未经复旦微电子的许可,不得翻印或者复制全部或部分本资料的内容。
今后日常的产品更新会在适当的时候发布,恕不另行通知。
在购买本资料所记载的产品时,请预先向复旦微电子在当地的销售办事处确认最新信息,并请您通过各种方式关注复旦微电子公布的信息,包括复旦微电子的网站(/)。
如果您需要了解有关本资料所记载的信息或产品的详情,请与上海复旦微电子集团股份有限公司在当地的销售办事处联系。
商标上海复旦微电子集团股份有限公司的公司名称、徽标以及“复旦”徽标均为上海复旦微电子集团股份有限公司及其分公司在中国的商标或注册商标。
上海复旦微电子集团股份有限公司在中国发布,版权所有。
目录目录1产品综述 (4)1.1产品简介 (4)1.2产品特点 (4)1.3外观及结构 (4)1.4典型应用 (5)2使用注意事项 (6)2.1ESD防护 (6)2.2镜头防护 (6)2.3工作条件 (6)2.4散热 (6)3电气特性 (7)3.1工作电源要求 (7)3.2直流特性 (7)3.2语音特性 (7)4接口说明 (8)4.1FPC柔性软排线接口 (8)4.2线到板连接器 (9)4.3USB连接器 (9)4.4通讯接口 (10)4.4.1串口 (10)4.4.2 USB (10)4.5状态指示输出 (10)4.5.1蜂鸣器输出 (10)4.5.2指示灯输出 (10)4.6触发信号输入 (11)4.7语音输出接口 (11)版本信息 (12)上海复旦微电子集团股份有限公司销售及服务网点 (13)1产品综述1.1产品简介FM8413条码扫码引擎是复旦微提供的条码识读解决方案,用于识别常用的纸张以及手机屏幕显示的主流QR码,模组分为嵌入式模块和整机集成模块,嵌入式模块体积小巧,装配灵活,对外提供丰富的接口以满足用户的定制化需求,可满足大部分嵌入式设备的应用场景;集成模块结构更加完整,提供统一的接口,增强了设备的安全防护特性,用于对结构尺寸限制较少,快速应用的场景。
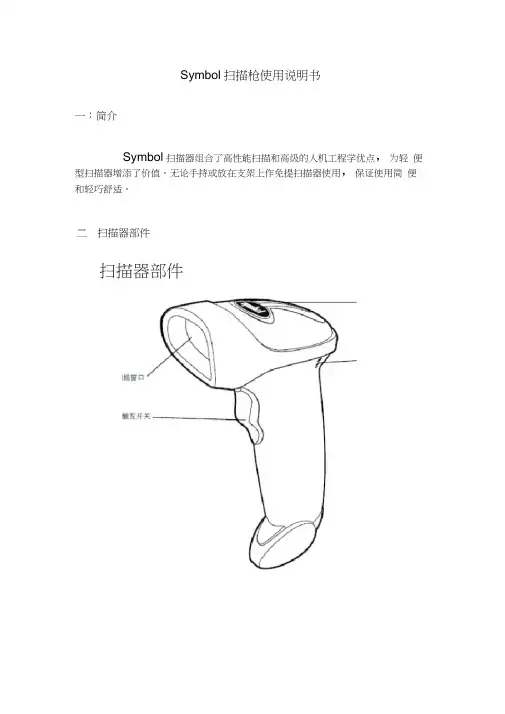
Symbol扫描枪使用说明书一:简介Symbol扫描器组合了高性能扫描和高级的人机工程学优点,为轻便型扫描器增添了价值。
无论手持或放在支架上作免提扫描器使用,保证使用简便和轻巧舒适。
扫描器部件扫描器部件:安装接口电缆1.将接口电缆方型连接器插入扫描器柄底部的电缆接口端口2.将接口电缆的另一端连接到主机。
3.将电缆接至电源(如有必要)。
四:扫描姿势1•请确保所有连接的牢固。
2.将扫描器对准条码。
3•请确保扫描线扫过符号的所有条形及空格。
电诡捲口端口撥口电鐵4.成功解码后,扫描器会发出蜂鸣声且发光管发出绿光。
五:蜂鸣器的定义扫描器通过发出不同的蜂鸣器顺序和模式来指示状态。
如下表所示六:LED指示器的定义七:疑难解答八:扫描枪重新设置步骤1: SYMBOL条码扫描器设置默认值:请扫描下面设置默认值(也叫恢复出厂设置),将所有参数都设为默认值2:SYMBOL LS4208扫描器的扫描模式:请扫描下面适当的条码,确定扫描模式。
1 )仅限单线-不进行上下扫描线移动(非光栅扫描)。
2)多线智能光栅扫描 -扫描线开始为单线,但在检测到部分条码扫描或在拉动触发开关后500毫秒内未对条码解码时上下移动(光栅扫描)。
3)多线始终光栅扫描(默认)一立即开始光栅扫描(进行上下扫描线移动)。
IIIIIIIIIIIIIIIIIIIIIIIIIIIIII务螳鶴熔光41扫描(KU)3:增加回车换行功能。
依次扫描如下条码直到发出嘀嗒的响声,条码如下:Carriage Return/Line FeedTo append a carriage return/line feed to all transmitted data, sean the following bar codes in the order shown. To cancel this operation, scan the “Set Defaults ' bar code on page 65, or refer to the LS 2208 Product Reference Guide. IllllllllllllllllllllllllllllllSCAN OPTIONS直到听到扫描枪有滴滴响两声。
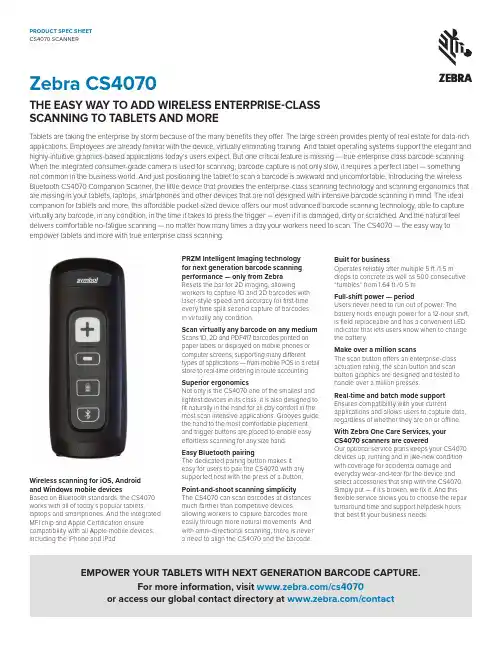
Zebra CS4070THE EASY WAY TO ADD WIRELESS ENTERPRISE-CLASSSCANNING TO TABLETS AND MORETablets are taking the enterprise by storm because of the many benefits they offer. The large screen provides plenty of real estate for data-rich applications. Employees are already familiar with the device, virtually eliminating training. And tablet operating systems support the elegant and highly-intuitive graphics-based applications today’s users expect. But one critical feature is missing — true enterprise class barcode scanning. When the integrated consumer-grade camera is used for scanning, barcode capture is not only slow, it requires a perfect label — something not common in the business world. And just positioning the tablet to scan a barcode is awkward and uncomfortable. Introducing the wireless Bluetooth CS4070 Companion Scanner, the little device that provides the enterprise-class scanning technology and scanning ergonomics that are missing in your tablets, laptops, smartphones and other devices that are not designed with intensive barcode scanning in mind. The ideal companion for tablets and more, this affordable pocket-sized device offers our most advanced barcode scanning technology, able to capture virtually any barcode, in any condition, in the time it takes to press the trigger — even if it is damaged, dirty or scratched. And the natural feel delivers comfortable no-fatigue scanning — no matter how many times a day your workers need to scan. The CS4070 — the easy way to empower tablets and more with true enterprise class scanning.Wireless scanning for iOS, Androidand Windows mobile devicesBased on Bluetooth standards, the CS4070 works with all of today’s popular tablets, laptops and smartphones. And the integrated MFI chip and Apple Certification ensure compatibility with all Apple mobile devices, including the iPhone and iPad.PRZM Intelligent Imaging technologyfor next generation barcode scanning performance — only from ZebraResets the bar for 2D imaging, allowing workers to capture 1D and 2D barcodes with laser-style speed and accuracy for first-time every time split second capture of barcodesin virtually any condition.Scan virtually any barcode on any medium Scans 1D, 2D and PDF417 barcodes printed on paper labels or displayed on mobile phones or computer screens, supporting many different types of applications — from mobile POS in a retail store to real-time ordering in route accounting. Superior ergonomicsNot only is the CS4070 one of the smallest and lightest devices in its class, it is also designed to fit naturally in the hand for all day comfort in the most scan intensive applications. Grooves guide the hand to the most comfortable placement, and trigger buttons are placed to enable easy effortless scanning for any size hand.Easy Bluetooth pairingThe dedicated pairing button makes iteasy for users to pair the CS4070 with any supported host with the press of a button. Point-and-shoot scanning simplicityThe CS4070 can scan barcodes at distances much farther than competitive devices, allowing workers to capture barcodes more easily through more natural movements. And with omni-directional scanning, there is nevera need to align the CS4070 and the barcode.Built for businessOperates reliably after multiple 5 ft./1.5 m drops to concrete as well as 500 consecutive “tumbles” from 1.64 ft./0.5 m.Full-shift power — periodUsers never need to run out of power. The battery holds enough power for a 12-hour shift, is field replaceable and has a convenient LED indicator that lets users know when to change the battery.Make over a million scansThe scan button offers an enterprise-class actuation rating, the scan button and scan button graphics are designed and tested to handle over a million presses.Real-time and batch mode support Ensures compatibility with your current applications and allows users to capture data, regardless of whether they are on or offline. With Zebra One Care Services, yourCS4070 scanners are coveredOur optional service plans keeps your CS4070 devices up, running and in like-new condition with coverage for accidental damage and everyday wear-and-tear for the device and select accessories that ship with the CS4070. Simply put — if it’s broken, we fix it. And this flexible service allows you to choose the repair turnaround time and support helpdesk hours that best fit your business needs.EMPOWER YOUR TABLETS WITH NEXT GENERATION BARCODE CAPTURE.For more information, visit /cs4070 or access our global contact directory at /contactUSER ENVIRONMENT (CONTINUED)Ambient Lighting ToleranceTolerant to typical artificial indoor and natural outdoor (direct sunlight) lighting conditions.Fluorescent, Incandescent, Mercury Vapor, Sodium Vapor, LED1: 450 ft. candles (4,844 Lux) Sunlight: 8,000 ft. candles (86,111 Lux)BLUETOOTHBluetooth Radio Bluetooth, Class 1/Class 2, Version 2.1 + Enhanced Data Rate (EDR)Bluetooth Range 300 ft./100 m when configured for Class 1 or 30 ft./10 m when configured for Class 2Bluetooth ProfilesHID keyboard wedge and Serial Port Profile (SPP) and Wireless SS I (proprietary)ACCESSORIESCHS5000-1000CR Charge Cradle charges one scanner and one batterysimultaneously; CHS5000-8000CR Charge Cradle charges up to eight scanners; SAC5000-8000CR Charge Cradle charges up to eight batteries; neck lanyard; wrist lanyard with neoprene case; belt clip reel with neoprene caseREGULATORYLaser Safety IEC62471:2006 (Ed.1.0); EN62471:2008 (LED)EMC FCC Part 15 Class B, ICES 003 Class B, EN 55022, EN 55024, EN 301 489-1, EN 301 489-17RadioEN 300 328Electrical Safety UL 60950-1, C22.2 No. 60950-1, EN 60950-1, IEC 60950-1Environmental EN50581WarrantyWarranted against defects in workmanship and materials for a period of:Scanner: thirty-six (36) months, Battery: one (1) month. For the complete Zebra hardware product warranty statement, go to: /warrantyDECODE RANGE4 mil Code 39 2.9 in./7.4 cm — 8.4 in./21.4 cm5 mil Code 128 2.4 in./6.1 cm — 7.8 in./19.8 cm 5 mil 39 1.6 in./4.1 cm — 13.1 in./33.3 cm 5 mil PDF417 2.7 in./6.9 cm — 8.0 in./20.3 cm 10 mil Data Matrix 2.5 in./6.4 cm — 9.7 in./24.7 cm 100% UPCA 1.4 in./3.6 cm* — 25.6 in./65.0 cm 20.0 mil Code 391.6 in./4.1 cm* — 29.6 in./75.2 cm*Minimum distance determined by symbol length and scan angleSERVICESEnjoy easy access to fast repair and expert support with Service from the Start. Add “next business day” replacement with Advanced Exchange.PHYSICAL CHARACTERISTICSDimensions 4.39 in. L x 1.79 in. W x 1.02 in. H 11.15 cm L x 4.55 cm W x 2.6 cm H Weight With batteries: 3.28 oz./93.2 g Scan Engine SE4710 image engine Memory 512 MB FlashMemory Capacity Over 1 million barcodes (UPC with time date stamp)LEDsScan LED (Green, Red, and Amber) and Bluetooth® LED (Blue); Four LED battery status indicator ButtonsScan, remove scan (batch mode only), enable Bluetooth (RF scanners only), battery status; scan button tested to a million depressions, all other buttons tested to 250,000 depressionsOPERATING MODESBatch Scans recorded with optional time/date stamp Open BluetoothReal time wireless data transmissionBATTERYBattery 950 mAh Lithium ion Charge Time3 hours 40 minutesBattery LifeBatch: 24 hours use or 8,500 scans (6 scans per minute on full charge)Standby: 3 months Bluetooth 12 hours use or 4,250 scans(6 scans per minute on full charge)PERFORMANCE CHARACTERISTICSDecode Capability 1D and 2D symbologies Interfaces Supported USB (micro jack): BluetoothReal Time Clock A date/time stamp can be recorded with each barcode scanned (batch mode operation only)BatchCommunicationUSB 2.0USER ENVIRONMENTDrop Specification Multiple 5 ft./1.5 m drops to concrete Tumble Specification ****************./0.5m(500drops)Sealing IP42Operating Temperature 32° to 104° F/0° to 40° C Storage Temperature -40° to 158° F/-40° to 70°C Humidity10 to 95% non-condensingThe CS4070 is at home in:Retail• Mobile point-of-sale • Inventory/cycle count Transportation & Logistics• End-to-end track and trace • Distributor order management Field Sales/Service • Route accounting • Merchandising/re-order • RepairCS4070 Specifications©2017 ZIH Corp and/or its affiliates. All rights reserved. ZEBRA and the stylized Zebra head are trademarks of ZIH Corp, registered in many jurisdictions worldwide. All other trademarks are the property of their respective owners. Part number: SS-CS4070 01/2017NA and Corporate Headquarters +1 800 423 0442******************Asia-Pacific Headquarters +65 6858 0722**********************EMEA Headquarters /locations ******************Latin America Headquarters +1 847 955 2283**********************。

Magic Wand™ Portable ScannerPDS-ST470-VPUser ManualTable of ContentsFeatures (3)1. KeyParts (3)2. Functional3. Explanation of the Status Icons (5)4. Using the Scanner (5)4.1. Charging up the Battery (5)4.2. Inserting a microSD Memory Card (not included) (6)4.3. Turn on/off the Scanner (6)4.4. HowScan (7)to4.5. How to Playback Image (9)File (10)4.6. DeleteSingleMenu (10)4.7. SetupFormat (11)ScanScanQuality (11)Color (11)ScanLanguage (11)Date/Time (11)Preview (11)InstantAuto Off (Auto Power Off) (11)Delete All (Delete All Files) (11)Format the MicroSD Memory Card (11)Information (11)Device4.8. How to Calibrate the Scanner (12)5. Connecting to Computer (12)6. Specifications (13)7. Computer System Minimum Requirements (14)8. Troubleshooting (14)Getting to know your ST470 Portable Scanner1. Key Featuresy JPEG, PDF-A4 or PDF-Letter scan-format selection. y Color or Monochromatic (mono) scan selection.y 300 (LO) /600 (MI) /1050 (HI) DPI scan quality selection.yDirectly save JPG (JPEG)/PDF files to the microSD/microSDHC card. y Support the microSD/microSDHC memory card up to 32GB. y Color display to playback the scanned images yCompatible to Windows® XP, Windows® Vista™, Windows® 7, Windows® 8, and Mac OS® 10.5 or above (direct plug-in, driver installation not required)2. Functional Parts1Power On/ Off: Press and hold this key for 3 seconds to turn power on or off.When the scanner is powered on, press this button to start scanning, pressthis button again to stop.In Setup mode, press this button to confirm changes.In Playback mode, press this button to change the magnification between 4x,8x and normal zoom.2Press this button to enter Playback mode;Press this button to return to the previous screenIn Setup mode: Press this button to exit Setup mode.3Press this button to enter Setup MenuIn Playback mode: Press this button to enter single file delete option.When zooming in under Playback mode: press this button to shift thefunctions of and between UP/DOWN and LEFT/RIGHT.4 LCD screen Display scanning status, scanned image and scanner settings.5 Press this button to select JPG (JPEG), PDF-A (PDF-A4) or PDF-L(PDF-Letter) file format. The icon of the selected mode will be displayed onthe LCD screen.In Setup mode: Press this button to move up the selection bar.In Playback mode: Press this button to preview the pervious image.When zooming in under Playback mode: press it to move to the upper/leftportion of the image.6 Press this button to select LO (300dpi), MI (600dpi) or HI (1050dpi) scanquality in DPI. The icon of the selected quality will be displayed on the LCDscreen.In Setup mode: Press this button to move down the selection bar.In Playback mode: Press this button to preview the latter image.When zooming in under Playback mode: press it to move to the lower/rightportion of the image.7 USB interface Connect to a computer with the USB cable provided to view and transfer files.To charge the built-in battery with an optional AC/DC power adapter8 Reset Press to reset the scanner (Hardware reset)9 microSD card slot The microSD/microSDHC card storage location.3. Explanation of the Status IconsItem Function Description1 FileFormat JPG/PDF-A/PDF-L2 Scan Resolution LO: 300 DPI /MI: 600 DPI / HI: 1050 DPI3 Battery Power IndicatorFully chargedLow battery. Recharge needed4 ScanColor COLOR/MONO5 FileCounter Shows the number of scanned files in the microSD card 4. Using the Scanner4.1 Charging the BatteryCharge the built-in battery before using the scanner.Charge time (while scanner is off): Approx. 2.5 hours.Two charging methods:1. By connecting to an AC/DC power adapter via the USB interface (Not included).2. By connecting to a computer via USB cable (supplied).Note:Once the battery is fully charged while the scanner is off, battery indicator will display on LCD screen for ashort time and will turn off automatically.4.2 Inserting a microSD Memory Card (not included)To operate the scanner, you must insert a microSD Card (not supplied) to record and store your pictures. To insert the microSD memory card:1. Turn OFF the scanner.2. Insert the microSD card into the microSD card slot (with metal side facing upwards). Gently press in untilthe card is clicked in and latched.4.3 Turn on/off the ScannerTurn on/off the scanner by pressing and holding.Note:If the scanner is turned on for the first time, it will enter Date & Time/Language setup mode. Once the Date & Time/ Language setting is completed, scanner will enter into standby mode.By default, Auto-off feature is set to 3 minutes. If the Auto-off feature is set at "3 Min" (refer to section 4.7), the scanner will automatically turn off if scanning action is not detected within 3 minutes.To set Date & Time/Language: 1.Press to jump to next setting option: YEAR ÆMONTH ÆDATE ÆHOUR Æ MINUTE. When setting up the value for MINUTE, press to switch to the previous setting option until it reaches the YEAR option.2. Press or to set the figure corresponding to each setting.3. Press to confirm and move to next setting.4. After completing the setting for MINUTE, it will enter Language setup screen.5. Press or to select English, Spanish or French.6.Press to confirm and enter into standby status.4.4 How to ScanNote: To scan, make sure your scanner is not connected to the computer. 1. Turn on your scanner by pressing and holding for 3 seconds.2.Place the document on a flat surface and hold down the document with one hand.3.Place the scanner on the edge of the paper approximately 5/8 to 3/4 of an inch onto the edge of the paper to ensure the whole document can be scanned. Make sure to keep the scanning area within the scanning width indicators marked on the side of the scanner.4.Hold the scanner flat against the material and then pressonce to start the scanning process.5.Slide the scanner across the document slowly, keeping your hand stable to get the best picture quality. During scanning, the scanning status icon will be displayed on the LCD screen to indicate scanning is inprogress.Once the scanner has reached the end of the document, pressagain to stop scanningNotes: yIf the scan is done too quickly or when there is any abnormal operation, “Scan Error" icon will display on the LCD screen. The image will still be saved afterthe scanning stops.y If Instant Preview feature is set to "on", scan result will shortly be displayed on the LCD screen before the scanner returns to standby mode.yWhen the memory card is full, the scanner is unable to scan more images. If you press the scan button under such situation, “Full” will flash rapidly on the File Counter of the LCD screen for 2 seconds.4.5 How to Playback Image1. Press to enter Playback mode. The last scanned image will be displayed.2.Press or to select your desired image. Pressto zoom into the image.andnavigational indicators will appear on the screen.3.Press to change the magnification between 4x, 8x and normal zoom.4. Press to view the upper portion of the image; Press to view the lower portion of the image.5.Press to shiftand navigational functions toandPress or button toview the left or right portion of the image. Press to change directions anytime.OR6.Press to return to the previous Playback screen, press it again to return to standby mode.Note: Images that exceeds 9MB file size cannot be magnified.4.6 Delete Single File1. Press to enter Playback mode. 2 Press or to select the file you want to delete. 3.Pressto enter Delete File setting.4.Press or to select Yes or No.Select “Yes” to delete the current file in the microSD card. Select “No” to return to previous Playback screen.5.Pressto confirm your selection and return to the previous Playback screen.4.7 Setup Menu1. Press to enter Setup menu2.Press or to exit Setup menu.Follow the below three steps to enter setup screen for each Menu item: 1. Press to enter setup mode.2. Press or to select the Menu item you want to set.3.Press to enter the setup screen.Menu itemsDescriptionOptionsJPG/PDF Scan Format y JPGy PDF - A (A4)y PDF - L (Letter) QualityScan Quality (DPI)y Lo (300 DPI) y Mi (600 DPI) y Hi (1050 DPI)Color Scan Colory Colory Mono Language Menu language y Englishy Spanishy French Date/Time Date and Time y Year y Monthy Datey Hour y Minute Inst. PreviewInstant previewy On y Off Auto Off Auto Power Offy Off y 3 Min Delete All Delete All Filesy No y Yes Format Format the microSD Memory Card Note: All contents on microSD card will be erased during formatingy No y YesDevice InfoDevice Information/4.8 How to Calibrate the ScannerNote: If the scanned images are too dark or too bright, you may need to calibrate your scanner by adjusting the white balance. Follow the below steps to perform calibration: 1. Wipe off any dirt on the surface of the scanning lens with the clean dry cloth provided.2. Press turn on the scanner. Place the scanner on the white area of the White Balance Calibration paper provided.3.Press and hold button. While holding the button, press the button and then release both buttons to enter into auto-calibration mode. The message “1. Calibration starts. Do not move the device!” will appear on LCD screen.4.Do not move the scanner until “2. Scan the calibration sheet!” appears on the LCD screen. Start scanning the white area of the calibration paper by sliding the scanner across the paper (slide the scanner backwards if necessary).5. “3. Calibration completed!” message will appear on the LCD screen when calibration is completed.6.Press any button to power off the scanner.5.Connecting to ComputerView your scanned files on your comptuerYou may also connect your scanner to your computer and view pictures on the computer monitor 1. Press and hold to turn on your scanner, connect your scanner to your computer to enter into USB mode. “USB” icon will display on LCD screen. 2.Your computer will recognize the scanner as a “Removable Disk”. Click “Open folder to view files” to view, import, copy, move or to delete scanned files.Note: If the Removable Device window did not launch automatically, go to your “My Computer/Computer” (PC) and find the device under Removable Storage.6.SpecificationsImage sensor Color Contact Image SensorResolution Low resolution : 300x300 dpi Medium resolution: 600x600 dpi High resolution: 1050x1050 dpiMinimum scanning speed for Letter size document Color High resolutionMono High resolutionColor Medium resolutionMono Medium resolutionColor Low resolutionMono Low resolution12.0 Seconds10.0 Seconds8.0 Seconds6.0 Seconds3.0 Seconds2.0 SecondsCapacity (Based on 1GB microSD card. Scan Letter size file, the quantity of scans varies depending on the content complexity) Color High resolutionMono High resolutionColor Medium resolutionMono Medium resolutionColor Low resolutionMono Low resolution140 Scans (Min.)150 Scans (Min.)550 Scans (Min.)600 Scans (Min.)1580 Scans (Min.)1600 Scans (Min.)Scanner photo size A4、A5、5R、4R、3R and smallerScan width Approx. 8.5”Scan length 300DPI:125"(max);600DPI:60";(max);1050DPI:50"(max)File format JPEG/PDFLCD Approx 1.5” Class* TFT LCDZoom 4x,8xDimensions (L×H×W) mm 10.5”×1.1”×1.5”Auto power off 3 MinutesUSB port USB 2.0 high speed External memory microSD/microSDHC cardStandard battery Built-in 700mAH Lithium-PolymerBattery charge time Approx. 2.5 hours7. C omputer System Minimum RequirementsOperating System Windows® XP, Windows® Vista™, Windows® 7,Windows® 8, and Mac OS® 10.5 or above (direct plug-in, driver installation not required)CPU Pentium III or aboveRAM At least 256MBInterface USBport8.TroubleshootingProblem Cause Solution Cannot turn on thescannerLow battery power Recharge the batteryPictures cannot be saved while you are scanning them 1. The microSD card has not beeninstalled2. Memory is full3. The microSD card has not beenformatted properly1. Insert a microSD card2. Transfer the pictures from the scannerto the computer to create storagespace in the memory card3. Please refer to section4.7Computer does notrecognize your scanner when connected(You cannot find your device Connection failure1. Make sure all cable connectionsare secured2. Restart the computer if necessaryunder removable disk)Blurry images1. The lens of scanner is dirty2. Contact Image Sensor aged 1. Clean the lens with soft and dry cloth 2. Recalibrate the scanner. Refer to section 4.8 Black Images/Black or white vertical lines1. Scanner sensor's protective glass is dirty2. Calibration data is off-set1. Clean the sensor’s protective glass with clean and soft dry cloth.2. Recalibrate the scanner. Refer to section 4.8Note: Model Number and Serial Number (S/N) is located on the packaging, instruction manual, on the product or inside the battery compartment. Please have this information ready before contacting tech support.FCC (Federal Communications Commission)This device complies with Part 15 of the FCC Rules. Operation is subject to the following two conditions:(1) This device may not cause harmful interference, and(2) this device must accept any interference received, including interference that may cause undesiredoperation.*Measured diagonally. Actual size is 1.48”; viewable area is 1.44”Windows® XP, Windows® Vista™, Windows® 7, Windows® 8 are registered trademarks of Microsoft Corporation. Mac OS® 10.5 is a registered trademark of Apple Inc. microSD and microSDHC logo is a trademark of SD-3C, LLC. All trademarks are the property of their respective owner.PDS-ST470-VP_Manual_13-0308AM-N470-GB-VPS-1。
如何正确使用条码扫描器:1、条码扫描器和条码保持一定的倾角,以达到最佳效果。
2、条码扫描器和条码间的角度不能为 90 度,否则不能正常读码。
3、务必让条码被完整扫描,确定扫描器能正确扫读。
介绍说明:该条码扫读设备为计算机信息系统提供精确,易用和快速的数据录入和存入的完备的解决方案。
本产品提供完整的接口方式以适应各类主机的计算机系统包括:KeyboardWandRS-232Dual RS-232USB OTHERS所有译码器的参数设定都可通条码的扫描来完成,并保存在存储记忆体中,在关闭电源后仍保留设置。
产品各项功能未全部在本手册中列出,请您与供应商联系以获得更多详细资料。
所有权利,包括本说明手册最终解释权由本公司保留。
目录自动感应条码扫描器使用说明 (4)扫描功能 (5)输出模式 (5)蜂鸣器 (5)条码正反图像设定 (6)添加条码ID(条码辨别号) (6)条码读取触发模式 (6)键盘接口 (7)PC传输模式 (7)键盘传送速度 (7)世界各国键盘语言 (7)RS-232接口 (8)波特率 (8)握手协议 (8)数据位 (9)停止位 (9)校验位 (9)光笔接口 (10)传送速度 (10)条码正反图像设定 (10)条形码开启与关闭 (10)Code11 (10)Code39 (10)Code93 (11)Code128 (11)Code bar (11)交叉25码 (11)工业25码 (11)MSI/Plessey (12)UPC/EAN (12)条形码符号设定 (13)Code11 (13)Code39 (13)Code93 (14)Code128 (14)Code bar (14)交叉25码 (15)工业25码 (15)MSI/Plessey (16)UPC/EAN (16)编辑设定条形码 (19)条码字符一般/特别设定 (20)条形码末端字符设定 (21)使用高级设定模式设置条码阅读器 (22)设置种类 (23)编辑键值 (24)选项编号和描述 (25)F1-接口选项 (25)F2-Code39选项 (25)F2-UPC/EAN选项 (26)F2-UPC/EAN补充选项 (26)F2-Code93选项 (27)F2-Code128选项 (27)F2-CodeBar选项 (27)F2-交叉25码选项 (28)F2-工业25码选项 (28)F2-MSI选项 (28)F2-Code11选项 (29)F2-激光器/CCD选项 (29)F2-其它译码选项 (29)F2-定义蜂鸣器和LED选项 (29)F4-定义一般按键区表选项 (30)F3-条码编辑设定 (31)F4-格式组合设定码 (32)F5-字符串设定码 (33)附录-A 特殊字符和ALT组合键表格 (34)附录-B ALT组合键的表格 (35)附录-C 故障问题及解决方案 (36)自动感应条码扫描器使用说明:1、自动感应条码扫描器通电时默认为自动感应模式。
ScanHome扫码器详细设置手册上海斯恳赫科技有限公司版本信息用户设置手册目录版本信息 (I)目录I一、基本信息 (1)1.出厂配置 (1)2.当前配置为默认配置 (1)3.默认配置(客户配置) (1)4.设置码开关 (1)5.允许发送设置码信息 (2)6.产品信息 (2)二、通讯接口 (3)1.串口 (3)(1)波特率 (3)(2)奇偶校检位 (4)(3)停止位 (5)(3)软件握手 (5)B KBW (5)B COM键盘 (5)三、工作模式 (5)1.电源模式 (5)2.手动模式 (6)(1)按键保持模式 (6)(2)按键触发模式 (6)3.连续模式 (6)(1)识读间隔时长 (7)4.感应模式 (7)(1)稳定感应时间 (7)(2)灵敏度等级设置 (8)5.主机模式 (8)(1)单次扫描时长快速设置 (9)7.相同读码时间间隔 (9)(1)同码识读快捷设置 (10)四、照明和瞄准 (10)1.照明 (10)2.瞄准 (11)五、输出提示 (12)1.键盘 (12)(1)多国键盘 (12)(2)键盘类型 (17)(3)键盘输出字符时间间隔 (17)(4)ASCII控制字符输出方式选择 (18)2.提示音 (19)(1)蜂鸣器类型 (19)(2)静音模式 (19)(3)音量等级 (20)(4)解码成功提示音 (20)(5)开机提示音 (21)(6)设置码提示音 (21)3.解码成功提示灯 (21)4.解码提示灯工作方式 (22)5.解码状态提示 (22)6.输出强制字母大小写转换 (23)7.输出数据编码格式 (23)8.输入数据编码格式 (24)9.增值税发票自动识别输出功能 (25)10.增值税发票类别 (25)六、数据编辑 (26)1.条码ID (26)2.结束字符 (26)3.结束字符转换 (27)4.添加前后缀 (28)(1)前缀 (28)5.根据条码类型添加前后缀(非通用版本) (30)(1)前缀操作 (30)(2)后缀操作 (30)(3)根据条码类型清除前缀 (30)(4)根据条码类型清除后缀 (31)(5)前、后缀开关设置(数据格式) (31)6.隐藏头、中、尾部字符 (32)(1)隐藏头部数据 (32)(2)中部数据隐藏 (33)(3)隐藏尾部数据 (33)7.根据条码类型隐藏头尾数据(非通用版本) (34)(1)根据条码类型隐藏头部数据 (34)(2)使能/禁止隐藏头部数据 (34)(3)根据条码类型隐藏尾部数据 (35)(4)使能/禁止隐藏尾部数据 (35)8.插入自定义数据(非通用版本) (35)(1)使能/禁止插入自定义数据 (35)(2)设置插入数据的位置 (36)(3)设置插入的数据 (36)(4)退出设置自定义数据 (37)9.STX和ETX设置 (37)10.任意字符替换功能 (37)(1)设置被替换的对象 (38)(2)设置替换的数据 (38)(3)完成设置 (38)(4)使能替换 (38)11.控制字符"GS"快速替换 (39)12.支持GS1规则 (40)七、条码类型使能/禁止配置 (41)1.全局使能开关 (41)2.一维码全局使能开关 (41)3.二维码全局使能开关 (41)7.UPC-A附加码 (43)8.UPC-E (43)9.UPC-E 附加码 (44)10.UPC-E 转UPC-A (44)11.UPC-A 转EAN-13 (45)12.UPC-E1 (45)13.EAN-8 (45)14.EAN-8附加码 (45)15.EAN-13 (46)16.Bookland EAN (ISBN) (46)17.ISSN (47)18.EAN-13附加码 (47)19.CODE 128 (47)20.GS1-128(原UCC/EAN-128) (48)21.Interleaved 2 of (48)22.Matrix 2 of 5 (49)23.Industrial 2 of 5 (50)24.Standard 2 of 5 (50)25.Code 39 (51)26.Code 39 Full ASCII (52)27.Code 32 (52)28.Code 93 (52)29.Code 11 (53)30.Codabar (53)31.MSI (54)32.GS1-Databar (55)33.GS1 composite code (55)34.QR Code (55)35.Data Matrix (56)36.PDF 417 (56)37.Aztec code (56)附录1:数字设置码 (58)附录2:取消条形码 (59)附录3:Code ID (59)附录4:字符对照比表 (60)附录5:支持的条码类型 (64)附录6:串口指令 (65)一、基本信息1. 出厂配置* 通信方式:USB KBW* 触发方式:按键保持* 结束符:回车(\r)。