HYP-3系列消化炉说明书.
- 格式:doc
- 大小:346.50 KB
- 文档页数:20

沛欧红外消化炉X M T P 段程序控制仪表使用说明 The final edition was revised on December 14th, 2020.一、概述:SKD-08S2红外智能消化炉可用于农业、林业、环保、地质、化工、食品等部门以及高等院校、科研部门对植株、种子、饲料、食品、土壤、矿石等消化。
二、使用注意事项:1. 请使用有可靠接地的电源!并使用独立插座!仪器后的漏电保护器请定期开关一次(黄色开关),并按一下漏电指示开关(蓝色的开关)!2.请先把准备消化的样品放在消化架上,再端到消化炉上3.请先打开“电源开关”(红开关)4.温度的设定(出厂前已设定为:420度或450度)5.再打开“启动”开关(绿开关)举例:消煮植株:硫酸溶液回流高度应控制在消化管高的三分之二以下,种子等生物试样消煮时,一定要做到加入消化剂后放置4至6个小时,或过夜后才能进行消煮,实在做不到此点时,在消煮过程中,应先将炉温控制在100℃以下,消煮半小时后再升至高温进行消煮,以防消煮过程中的巨沸或飞溅。
三、技术指标:型号:SKD—08S2加热方式:红外石英加热管炉孔数量: 8孔控制方式: 数显设计温度:室温--600℃升温速度:6分钟(400℃空载预热)温度波动:±2℃输入方式:电热偶 K输出方式:固态继电器(SSR)电压:AC220V功率:2KW四、特点:1、加热体(模块)采用红外石英管,耐强酸强碱、防爆裂、寿命长2、炉孔温度连续可调,升温速度快,使用范围广3、消化管受热面积大、温差小,样品消化一致性好,热效率高,有利于样品的消煮4、仪器具有过载保护和漏电保护5、采用双开关,电源和加热单独控制,便于安全参数设置,节约能源。
6、采用新一代数显控温仪,PID智能控制技术,控温精度高,简单易学五、面板各部分说明1.开关(红):电源开关2.开关(绿):加热开关3.温控仪(如下图)XMT 908P64段程序控制仪表使用说明仪表由单片机控制,具有热电阻、热电偶、电压、电流等多种信号自由输入,手动自动切换,主控方式除常规两位式外,在传统PID控制算法基础上,结合模糊控制理论创建了新的人工智能调节PID控制算法,在各种不同的系统上,经仪表自整定的参数大多数能得到满意的控制效果,具有无超调,抗扰动性强等特点。
高压灭菌锅 -- Hirayama本页导航:·HV系列高压灭菌锅·高压灭菌锅HVE-50·高压灭菌锅HG-50·高压灭菌锅HPV-50·高压灭菌锅HVN-50/85·高压灭菌锅HPM-16·高压灭菌锅HVA-85/110·高压灭菌锅HA-300P·高压灭菌锅HRH-110·HRM系列高压灭菌锅·高压灭菌锅HLM/HCM-36·高压灭菌锅HA-MIV·高压灭菌锅HA-300MD·高压灭菌锅HB-305M·HL系列高压灭菌锅日本Hirayama公司是一家研究、制造高压灭菌锅的专业厂家,成立于1924年,其生产的高压灭菌锅种类齐全,性能稳定,已经广泛应用于微生物学、医学和科研等领域的实验室。
该公司长期秉承研究创新的传统,产品在同类产品中始终处于领先地位。
高压灭菌锅HV系列●主要特点:·电动锁系统:仅用触摸控制器就可以轻易和安全地开启箱盖·安全双向检测(显示)联锁装置:通过检测内压力和箱内温度,该安全系统才能锁住箱盖;该系统确保使用时,具有更大的安全性·双向传感系统监控空气排除状态:为了避免残留空气影响到灭菌结果,本仪器采用双向传感器检测灭菌器内是否有残留空气·自动排气装置:采用最新的自动排除蒸汽的装置以达到不用沸腾就能对液体基质进行灭菌;在灭菌完成后,蒸汽可以预先设定速率逐渐地释放蒸汽·琼脂处理方法:允许使用者更大幅度地加快融化琼脂或对箱内进行预热·自动编排启动程序:内置定时器可设定一段时间程序,以使高压灭菌锅自动启动一个灭菌周期(最长可维持一个星期)·记忆(储存)支持系统:可以改变各种参数(如灭菌、排气、加热等参数),且一旦发生改变(甚至发生停电故障)上述参数仍能被保留下来·节省空间的设计:采用垂直向上打开箱盖,节省空间(相对铰链式水平打开箱盖的型号而言)·多种任选附件:提供多种相关附件供选购(如SUS灭菌吊筐,药物废物处理筐)·过程状况显示:通过一组闪光灯指示出当前灭菌过程的多种情况·功能延伸选配件:有浮标感应器、数字打印机、自动供水单元和冷却单元。
一、概述:SKD-08S2红外智能消化炉可用于农业、林业、环保、地质、化工、食品等部门以及高等院校、科研部门对植株、种子、饲料、食品、土壤、矿石等消化。
二、使用注意事项:1. 请使用有可靠接地的电源!并使用独立插座!仪器后的漏电保护器请定期开关一次(黄色开关),并按一下漏电指示开关(蓝色的开关)!2.请先把准备消化的样品放在消化架上,再端到消化炉上3.请先打开“电源开关”(红开关)4.温度的设定(出厂前已设定为:420度或450度)5.再打开“启动”开关(绿开关)举例:消煮植株:硫酸溶液回流高度应控制在消化管高的三分之二以下,种子等生物试样消煮时,一定要做到加入消化剂后放置4至6个小时,或过夜后才能进行消煮,实在做不到此点时,在消煮过程中,应先将炉温控制在100℃以下,消煮半小时后再升至高温进行消煮,以防消煮过程中的巨沸或飞溅。
三、技术指标:型号:SKD—08S2加热方式:红外石英加热管炉孔数量: 8孔控制方式: 数显设计温度:室温--600℃升温速度:6分钟(400℃空载预热)温度波动:±2℃输入方式:电热偶 K输出方式:固态继电器(SSR)电压:AC220V功率:2KW四、特点:1、加热体(模块)采用红外石英管,耐强酸强碱、防爆裂、寿命长2、炉孔温度连续可调,升温速度快,使用范围广3、消化管受热面积大、温差小,样品消化一致性好,热效率高,有利于样品的消煮4、仪器具有过载保护和漏电保护5、采用双开关,电源和加热单独控制,便于安全参数设置,节约能源。
6、采用新一代数显控温仪,PID智能控制技术,控温精度高,简单易学五、面板各部分说明1.开关(红):电源开关2.开关(绿):加热开关3.温控仪(如下图)XMT 908P64段程序控制仪表使用说明仪表由单片机控制,具有热电阻、热电偶、电压、电流等多种信号自由输入,手动自动切换,主控方式除常规两位式外,在传统PID控制算法基础上,结合模糊控制理论创建了新的人工智能调节PID控制算法,在各种不同的系统上,经仪表自整定的参数大多数能得到满意的控制效果,具有无超调,抗扰动性强等特点。

目录一、概述二、工作原理三、技术指标四、安装使用五、控温仪操作说明六、消化炉示意图七、消化炉接线图八、故障及处理方法九、消化建议十、注意事项十一、随机附件版本号:20121126一、概述上海纤检仪器有限公司生产的“华烨”牌定氮仪,是依据经典凯氏定氮法设计的样品消化装置和自动测氮蒸馏装置,该仪器安装、操作简单;使用安全、可靠、省时、省力;自动化程度高,适用于植物养份、水、沉淀物测试、粮油、食品、饲料、氮肥,医药、制糖、乳制品、化工、煤炭、橡胶等行业的分析、教学和研究,也可以作为提取其他元素的仪器,是实验室操作人员的理想工具。
HYP-3系列消化炉有两种导热方式,一种为陶瓷炉芯,一种为铝锭。
陶瓷炉芯的有4孔8孔两种,可单排分组使用,省电节能。
本产品特点:炉内温度连续可调,控温精度高,控温稳定。
铝锭一体加热,温差小,样品消化均匀。
控制面板与炉体散热隔离,杜绝炉体高温辐射对控制系统的影响。
过热保护:铝锭超温自动切断加热电源并报警。
限温保护:可设置温度上限,若实际温度超过上限温度,仪器会自动报警并切断加热电源,防止控温系统失灵后温度不断上升而报废样品。
2.5寸蓝屏显示:同时显示实际温度与保温时间,并倒计时,到时后自动停止加热并报警。
一定范围内可调节升温速度,适用范围更广。
毒气罩排气,可不用将仪器置于通风橱中使用。
完善的周边附件配置,方便使用者称样,摆放等工作。
“华烨”品牌的产品还有脂肪测定仪、粗纤维测定仪、黄曲霉毒素测定仪;详细内容请访问公司主站二、工作原理蛋白质是含氮的有机化合物。
样品与硫酸和催化剂一同加热消化,使氮分解,分解的氮与硫酸结合生成硫酸铵,然后碱化蒸馏使氨游离,用硼酸吸收,再用已知摩尔浓度盐酸的标准溶液滴定,根据酸的消耗量计算氮的含量,再乘以换算系数,即为蛋白质含量。
注解:消化过程的目的是要打破样品中的氮的有机结合, 并使所有类型的氮都转换成铵离子。
硫酸是最佳选择,但是当单独使用硫酸时,消化速度很慢。
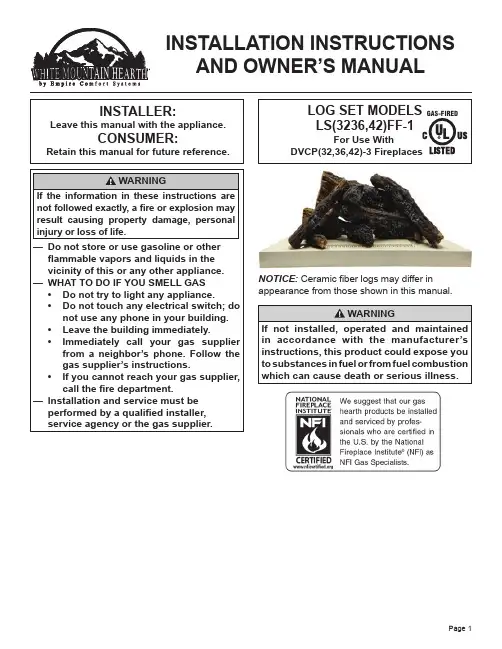
Page 1INSTALLATION INSTRUCTIONSAND OWNER’S MANUALINSTALLER:Leave this manual with the appliance.CONSUMER:Retain this manual for future reference.NOTICE: Ceramic fiber logs may differ in appearance from those shown in this manual.Page 237708-1-061737708-1-0617Page 3LOG PLACEMENTThe positioning of logs is critical to safe and clean operation of this fireplace. Sooting and other problems may result if the logs are not properly and firmly positioned in the fireplace. BEFORE BEGINNING THE INSTALLATION:1. Remove barrier screen and glass door on fireplace usinginstructions from the fireplace manual.2. Remove the burner cover. Using a screwdriver push up pins6, 7 and 8 for both model applications. See Figures 2 and 3.3. Place burner cover into fireplace.4. Place logs in position as shown in Figure 1 and the followingpages. DO NOT force holes into the logs. Install using theholes located in each log.NOTICE:Log Index Letter (G) only used on LS42. See Figure 1.EMBER AND COAL PLACEMENTAfter placing logs into position, place dime-sized pieces of glowing embers over the burner surface. A single layer is sufficient; do not over-apply. See Figure 4.PIN LOCATIONS FOR THE LS3236FFFigure 2PIN LOCATIONS FOR THE LS42FFFigure 3GLOWING EMBERS (place in shaded area only)Figure 4COAL PLACEMENT (place in shaded area only)Figure 5NOTICE: For step by step instructions with images for model LS3236FF (See Pages 5-12). For step by step instructions with images for model LS42FF (See Pages 13-21).12345786ABCGEFDFigure 1 - LS(3236,42)FF1234578637708-1-0617 Page 4STEP 1.Push up pins 6, 7 and 8 as shown in Figure 2. Replace burner cover inside fireplace.Top ViewFront View37708-1-0617Page 5STEP 2.Place (Log Index Letter B) onto pins 1 and 2 on the burner. See image below.Top ViewFront ViewPage 637708-1-0617STEP 3.Place (Log Index Letter F) onto pins 6 and 8 on the burner. See image below.Top ViewFront View37708-1-0617Page 7STEP 4.Place (Log Index Letter C) onto pin 3 and pin on log B. See image below.Top ViewFront ViewPage 837708-1-0617STEP 5.Place (Log Index Letter D) onto pin on log C and to left side of pilot. See image below.Top ViewFront View37708-1-0617Page 9STEP 6.Place (Log Index Letter A) onto pins 4 and 5 on the log support bracket. See image below.Top ViewFront ViewPage 1037708-1-0617STEP 7.Place (Log Index Letter E) onto pin 9 and the pin on log A. See image below.Top ViewSTEP 8.This completes the placement of the logs. Place Glowing Embers in locations indicated in Figure 4 along the circular ports. Use dime-shaped size embers. Place ember sticks and coal in area shown in Figure 5. Replace glass door and barrier screen as indicated in fireplace manual.Top ViewSTEP 1.Push up pins 6, 7 and 8 as shown in Figure 3. Replace burner cover inside fireplace.Top ViewSTEP 2.Place (Log Index Letter B) onto pins 1 and 2 on the burner. See image below.Top ViewSTEP 3.Place (Log Index Letter F) onto pin 6 on the burner. See image below.Top ViewSTEP 4.Place (Log Index Letter C) onto pin 3 and pin on log B. See image below.Top ViewSTEP 5.Place (Log Index Letter D) onto pin on log C and to left side of pilot. See image below.Top ViewSTEP 6.Place (Log Index Letter G) onto pin 7 and on to the side of log D. See image below.Top ViewSTEP 7.Place (Log Index Letter A) onto pins 4 and 5 on the log support bracket. See image below.Top ViewSTEP 8.Place (Log Index Letter E) onto pin 8 and the pin on log A. See image below.Top ViewTop ViewFront ViewSTEP 9. This completes the placement of the logs. Place Glowing Embers in locations indicated in Figure 4 along thecircular ports. Use dime-shaped size embers. Place ember sticks and coal in area shown in Figure 5. Replaceglass door and barrier screen as indicated in fireplace manual.To Order Parts Under Warranty, please contact your local Empire dealer. See the dealer locator at . To provide warranty service, your dealer will need your name and address, purchase date and serial number, and the nature of the problem with the unit.To Order Parts After the Warranty Period, please contact your dealer or one of the Master Parts Distributors listed below. This list changes from time to time. For the current list, please click on the Master Parts button at .Please note: Master Parts Distributors are independent businesses that stock the most commonly ordered Original Equipment repair parts for Heaters, Grills, and Fireplaces manufactured by Empire Comfort Systems Inc. Parts Not Under WarrantyParts can be ordered through your Service Person, Dealer, or a Master Parts Distributor. See this page for the Master Parts Distribu-tors list. For best results, the service person or dealer should order parts through the distributor. Parts can be shipped directly to the service person/dealer .Warranty PartsWarranty parts will need a proof of purchase and can be ordered by your Service Person or Dealer. Proof of purchase is required for warranty parts.All parts listed in the Parts List have a Part Number. When ordering parts, first obtain the Model Number and Serial Number from the name plate on your equipment. Then determine the Part Number (not the Index Number) and the Description of each part from the fol-lowing illustration and part list. Be sure to give all this information . . .Appliance Model NumberPart Description Appliance Serial NumberPart Number Type of Gas (Propane or Natural)Do not order bolts, screws, washers or nuts. They are standard hardware items and can be purchased at any local hardware store. Shipments contingent upon strikes, fires and all causes beyond our control.Dey Distributing 1401 Willow Lake BoulevardVadnais Heights, MN 55101Phone: 651-490-9191Toll Free: 800-397-1339Website: Parts: Heater, Hearth and Grills F. W. Webb Company 200 Locust Street Hartford, CT 06114Phone: 860-722-2433Toll Free: 800-243-9360Fax: 860-293-0479Toll Free Fax: 800-274-2004Websites: & Parts: Heater, Hearth and GrillsEast Coast Energy Products 10 East Route 36West Long Branch, NJ 07764Phone: 732-870-8809Toll Free: 800-755-8809Fax: 732-870-8811Website: Parts: Heater, Hearth and GrillsEmpire Comfort Systems Inc.Belleville, ILIf you have a general questionabout our products, please e-mail**************************.If you have a service or repairquestion, please contact your dealer.。
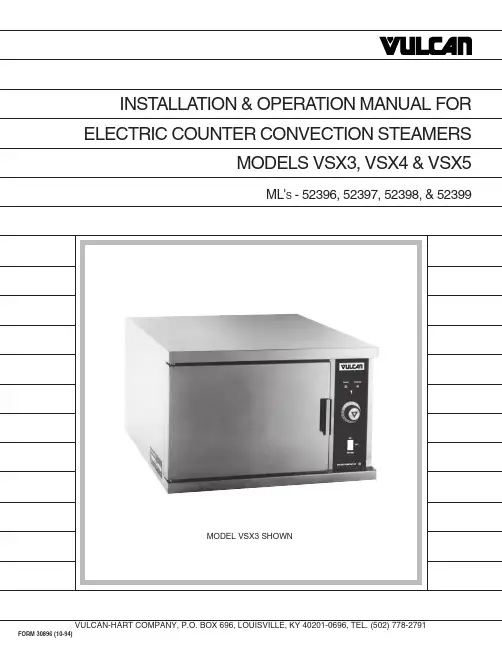
Installation, Operation, and Care ofMODELS VSX3, VSX4, VSX5ELECTRIC COUNTER CONVECTION STEAMERSKEEP THIS MANUALGENERALThe VSX 3, 4, and 5 Steamers are single compartment electric pressureless steam cookers with an internal electric steam generator that maintains water temperature at approximately 205°F. VSX3 is rated 7.5kw as standard; 10kw is optional. VSX4 is rated 10kw. VSX5 is rated 15kw.At high altitude locations a lower temperature is required to achieve atmospheric steaming. Contact your Vulcan-authorized service office to have the thermostat adjusted if the steamer will be operated at high altitudes.INSTALLATIONUNPACKINGImmediately after unpacking the steamer, check for possible shipping damage. If the steamer is found to be damaged, save the packaging material and contact the carrier within 15 days of delivery.Prior to installation, verify that the electrical service agrees with the specifications on the machine data plate which is located on the left side panel.LOCATIONAllow space for plumbing and electrical connections. Minimum clearances are 2" on the sides and 6" on the back for proper air circulation. Allow adequate access for operating and servicing the steamer (36" at the front of the steamer and 15" above the steamer).LEVELING FEET (Standard) OR 4"ADJUSTABLE LEGS (Optional)Thread the four 2" leveling feet shipped in a bag inside the steamer cabinet into the threaded holes on the bottom corners of the steamer. Or, thread the four optional 4" adjustable legs into the threaded holes on the bottom corners of the steamer.LEVELINGUsing a spirit level or pan of water in the bottom of the steamer, adjust the leveling feet or the feet on the adjustable legs to level the steamer front-to-back and side-to-side. After the drain is connected, check for level by pouring water onto the floor of the compartment. All water should drain through the opening at the back of the compartment cavity.1.Place steamer in the desired location on theleveled counter top and mark four corners.Remove the steamer and drill 1/2" holes asindicated in Fig. 1.2.Apply a bead of RTV or other equivalent sealantaround the bottom perimeter edge of the steamer.If anchoring the steamer, this bottom seal isnecessary to meet NSF requirements.3.Set steamer on counter and bolt down securelywith 3/8 - 16 bolts (not supplied).STACKING KITFollow instructions in the stacking kit when installingstacked convection steamers.Fig. 1ELECTRICAL CONNECTIONWARNING: ELECTRICAL AND GROUNDING CONNECTIONS MUST COMPLY WITH APPLICABLE PORTIONS OF THE NATIONAL ELECTRICAL CODE AND/OR OTHER LOCAL ELECTRICAL CODES. WARNING:DISCONNECT ELECTRICAL POWER SUPPLY AND PLACE A TAG AT THE DISCONNECT SWITCH INDICATING THAT YOU ARE WORKING ON THE CIRCUIT.PLUMBING CONNECTIONSWARNING: PLUMBING CONNECTIONS MUST COMPLY WITH APPLICABLE SANITARY, SAFETY AND PLUMBING CODES.Connect the water supply line to the 3/8" NPT (internal thread) copper tube inlet. The 3/8" water line supplies water to both the generator tank and the cooling system where steam is condensed before entering the drain line. Install the line strainer provided. A manual shutoff valve must be provided convenient to the steamer.DRAIN CONNECTIONSThe drain connection (Fig. 2) must be 1" IPS down, preferably with one elbow only, maximum length of 6 feet, and piped to an open gap type drain. CAUTION: In order to avoid any back pressure in the steamer, do not connect solidly to any drain connection.PL-50880GAP DRAINBY CUSTOMER DRAIN VENTFig. 2WATER QUALITYThe water supply connected to this steamer should contain no more than 2.0 grains of hardness per gallon with pH from 6.5 to 8.0. This degree of hardness and pH can easily be obtained with the use of a properly maintained water softener.Water supplies vary from one location to another. A local water treatment specialist should be consulted before installing any steam generating equipment.Untreated water contains scale producing minerals which can precipitate onto the surfaces in the boiler. Due to the temperatures in the boiler, the minerals can bake onto the surfaces and components. This can result in early component failure and reduced product life.Mineral scale on components causes several problems:1.The surfaces of the heating devices become coated with scale, reducing the heat transferefficiency. This can produce hot spots on the heating elements and result in premature failure.2.The water level probes become coated with scale. Scale will bridge across the probe insulator fromthe metal extension which senses the water level in the boiler shell. Once this scale becomes wet, the water level control is unable to maintain the proper water level in the boiler. This situation may cause an electric heating element to fail if the element is not adequately covered by water. Strainers and filters will NOT remove minerals from the water.Refer to REMOVAL OF LIME SCALE DEPOSITS, page 12.VENT HOODSome local codes may require the steamer to be located under an exhaust hood. Information on the construction and installation of ventilating hoods may be obtained from Vapor Removal from Cooking Equipment, NFPA standard No. 96 (latest edition).TESTING PROCEDUREWARNING:THE STEAMER AND ITS PARTS ARE HOT. USE CARE WHEN OPERATING, CLEANING OR SERVICING THE STEAMER. THE COOKING COMPARTMENT CONTAINS LIVE STEAM. STAY CLEAR WHILE OPENING THE DOOR.Once the steamer is installed and all mechanical connections have been made, thoroughly test the steamer before operation.1.Check that proper water, drain, and electrical connections have been made.2.Open water valve. Turn main power switch ON. After approximately 15 minutes, the READY lightshould come on, indicating that the water temperature is 205°F.3.When the READY light comes on, turn the dial timer to 5 minutes. With door open, observe thatno steam is entering the compartment and the COOKING light is not lit.4.Close compartment door. The COOK ING light is lit and steam should be heard entering thecompartment.5.Check drain line to ensure that water from the cold water condenser is flowing through the drainline.6.Open compartment door and observe that steam supply to the chamber is cut off. The READY lightshould come on; the COOKING light goes off.7.Close compartment door and let cooking cycle finish. When timer returns to 0, a buzzer will soundsignalling the end of the cooking cycle. To silence the buzzer, turn the dial timer to OFF.8.To turn the steamer off, turn the main power switch OFF — the steam generator will drain. Leavethe door open to allow the inside to dry out.OPERATIONWARNING: THE STEAMER AND ITS PARTS ARE HOT. USE CARE WHEN OPERATING, CLEANING OR SERVICING THE STEAMER. THE COOKING COMPARTMENT CONTAINS LIVE STEAM. STAY CLEAR WHEN OPENING DOOR.CONTROLSMain Power switchON The boiler will automatically fill and begin heating to the preset temperature.OFF The boiler will drain.DELIME Closes the drain valve while CLR liquid is being poured into the generatorduring the Delime procedure.Ready light Indicates the temperature has reached 205°F and that the steamer is readyto begin cooking.Cooking light Indicates that a cooking cycle is in progress.Timer Set the cooking time (0 to 60 minutes) — steam cooking will begin when thedoor is closed. The cooking cycle will be interrupted if the door is openduring the cooking cycle; resume cooking by closing the door.When done, a buzzer sounds and steam stops being supplied to the cookingchamber. Turn the timer OFF to stop the buzzer.Delime Generator light Indicates that lime scale deposits have accumulated in the steam generatorand that a DELIME procedure should be performed at the next convenientopportunity. See Maintenance, page 12.PREHEATTurn the main power switch ON. When the READY light comes on, set the timer to 1 minute to preheat the compartment. This should be done when the steamer is first used for the day or whenever the chamber is cold. The door should be closed during the preheat cycle. COOKING light is lit.When the buzzer sounds, turn the timer to OFF. The steamer is now ready to cook.COOKAfter the preheat cycle, the READY light should be ON.Place pans of food in the cooking chamber. Close the door. Set the timer. Steam flows into the compartment and the COOKING light is lit. Opening the door will interrupt cooking; resume by closing the door.At the end of the cooking cycle, the COOKING light goes off, the buzzer sounds and steam stops being supplied to the cooking chamber. To stop the buzzer, turn the timer to OFF.SHUTDOWNTurn the main power switch OFF — the boiler will automatically blow down. Leave the compartment door open to allow the inside to dry out.For an extended shutdown, turn the main power switch OFF; turn power and water supply OFF.COOKING HINTSThe steamer efficiently cooks vegetables or other foods for immediate serving. Steam cooking should be carefully time controlled. Keep hot food holding-time to a minimum to produce the most appetizing results. Prepare small batches, cook only enough to start serving, then cook additional amounts to meet demand.PreparationPrepare vegetables, fruits, meats, seafood and poultry normally by cleaning, separating, cutting, removing stems, etc. Cook root vegetables in a perforated pan. Other vegetables may be cooked in a perforated pan unless juices are being saved. Liquids can be collected in a solid 12" x 20" pan placed under a perforated pan.Perforated pans are used for frankfurters, wieners and similar items when juices do not need to be preserved. Solid pans are good for cooking puddings, rice, and hot breakfast cereals. Vegetables and fruits are cooked in solid pans in their own juice. Meats and poultry are cooked in solid pans to preserve their juice or retain broth.Canned foods can be heated in their opened cans (cans placed in 12" x 20" solid pans) or the contents may be poured into solid pans. DO NOT place unopened cans in the steamer.Frozen Food ItemsSeparate frozen foods into smaller pieces to allow more efficient cooking.Use a pan cover for precooked frozen dishes that cannot be cooked in the covered containers in which they are packed if they require more than 15 minutes of cooking time. When a cover is used, approximately one-third additional cooking time is necessary.Cooking time for frozen foods depends on the amount of defrosting required. If time permits, allow frozen foods to partially thaw overnight in a refrigerator. This will reduce their cooking time. Acceptable Pan SizesThe steamer accommodates combinations of 12 x 20" pans, solid or perforated.Model Number of Pans AccommodatedDepth of Pan1" 2.5"4"6"VSX3 VSX4 VSX56810345223122DRAINING THE BOILERDrain the boiler after each day's use to flush out minerals and minimize scale build-up. The boiler drains automatically for approximately 4 – 6 minutes after the main power switch is turned OFF.CLEANINGAt the end of each day, or between cooking cycles if necessary . . .Turn main power switch OFF.Remove pans and racks from compartment and wash in sink.Wash compartment interior with clean water. Never use steel wool or abrasive scouring pads as they will scratch and ruin the general surface appearance of the steamer.Use warm soapy water with a cloth or sponge to clean the door gasket, rinse with warm clear water, and wipe with a dry cloth.Wipe surfaces which touch the door gasket with a cloth or sponge and warm soapy water, rinse with warm clear water and wipe with a dry cloth. CAUTION: Do not allow the door gasket to come in contact with food oils, petroleum solvents, or lubricants.Keep the cooking compartment drain working freely. After cooking grease producing foods, operate the steamer with the compartment empty for 30 minutes at the end of the day, or pour 1/2 gallon of warm soapy water down the drain, followed by 1/2 gallon of warm clear water.Use a clean damp cloth to wipe down the exterior of your steamer.Leave the door slightly open when the steamer is not in use to allow the inside to dry out. Weekly, or more often if necessary . . .Clean exterior with a damp cloth and polish with a soft dry cloth.Use a non-abrasive cleaner to remove discolorations.COOKING GUIDELINESThe steamer steam cooks vegetables, frankfurters, eggs in their shells, and certain other meats or food items at atmospheric pressure.These cooking guidelines are suggestions only. You should experiment with your food products to determine the cooking times that will give you the best results. Variables which affect cooking time include size, weight, thickness of foods, temperature, density, previous condition of the foods (fresh, pre-blanched or frozen) and degree of doneness desired.COOK IN SOLID PANSPRODUCT TIME (minutes)WEIGHT PER PANEggs, Scrambled10 – 128 Doz.Rice, Long Grain25 2 Lb.(Cover with 4 cups water per pound.)Pasta (Place perforated pan insidesolid pan, cover pasta with cold water)Spaghetti, Regular/Vermicelli12 – 15Macaroni, Shells/Elbows15 – 18Noodles, 1/2" wide12 – 15Lasagna Noodles15 – 18Frozen Casseroles, Lasagna35Full PanMeat Loaf, 3 – 5 pound each4015 Lb.BeefGround Chuck20 – 2510 Lb.Sliced as Purchased35 – 4010 Lb.Shrimp, Frozen, 10 per pound5 4 Lb.BeansBaked910 Lb. Can Refried910 Lb. CanCanned Vegetables610 Lb. CanPrunes, Dried12 – 15COOK IN PERFORATED PANSPRODUCT TIME (minutes)WEIGHT PER PAN SEAFOODClamsFrozen10 – 12 3 Doz. Fresh, Cherrystone 5 – 6 3 Doz.King Crab, FrozenClaws421/2 Lb.Legs 4 –641/2 Lb.Lobster Tail, Frozen610 Lb.Lobster, Live, 10 – 12"5 4 Per PanSalmon Fillets, Frozen, 8 ounce each571/2 Lb.Scallops, Fresh4 3 Lb.Scrod Fillets, Fresh 3 – 5 4 Lb.EggsHard Cooked15 4 Doz.Soft Cooked9 – 10 4 Doz.Soft Yoke for Caesar Salad 6 – 8 4 Doz.Chicken — Breasts, Legs, Thighs2015 Lb.Turkey, FrozenBreasts (2)90 6 – 7 Lb. Each Cut Lengthwise5520 – 25 Lb.Corned Beef40 – 75 6 – 8 Lb.Hot Dogs or Wieners380 – 100 Count VEGETABLESAsparagus SpearsFrozen10 – 12 3 Doz. Fresh5 5 Lb.BeansGreen, 2" Cut, Frozen / Fresh6 5 Lb. Lima, Frozen8 5 Lb.Baby Lima, Frozen5 5 Lb.Brussel Sprouts, Frozen6 5 Lb.COOK IN PERFORATED PANSPRODUCT TIME (minutes)WEIGHT PER PAN VEGETABLES, (Cont'd.)BroccoliSpears, Frozen8 4 Lb. Spears, Fresh6 5 Lb. Flowerettes, Frozen6 5 Lb.Cabbage, Fresh, 1/6 Cut8 5 Lb.CarrotsBaby Whole, Frozen87 Lb. Crinkle Cut, Frozen7–8 4 Lb. Sliced, Fresh119 Lb .Cauliflower, FlowerettesFrozen6 4 Lb.Fresh7–8 5 Lb.Celery, 1" Diagonal Cut7 5 Lb.CornYellow Whole Kernal, Frozen5 5 Lb. Cobbettes, Frozen827 Ears16–1880 EarsCorn-On-Cob, Fresh10–1218 Ears16–1854 EarsPeas, Green6 5 Lb.Potatoes, Whole Russet5540 Lb.SpinachChopped, Frozen17 6 Lb. Defrosted5 6 Lb.Fresh Cut3 2 Lb.Squash, Acorn Halves2510 HalvesZucchini, Slices810 Lb.Frozen Mixed Vegetables6–7 5 Lb.FRUITFruit, Blanch for Peeling,Grapefruit, Oranges3Pineapple, Whole for Cutting4MAINTENANCEWARNING: THE STEAMER AND ITS PARTS ARE HOT. USE CARE WHEN OPERATING, CLEANING OR SERVICING THE STEAMER. THE COOKING COMPARTMENT CONTAINS LIVE STEAM. STAY CLEAR WHEN OPENING DOOR.REMOVAL OF LIME SCALE DEPOSITSThe steamer should be delimed at a convenient time after the DELIME GENERATOR light comes on. Use the CLR TREATMENT K IT available from your Vulcan-authorized service office. Follow the instructions in the Kit to delime the steam generator.COLD WATER CONDENSERThe steamer is equipped with a cold water condenser in the rear of the cooking chamber which helps to condense the steam prior to discharge into the drain. The steamer freely vents itself by the negative pressure created by the condensate water drainage. This negative pressure prevents steam leakage around the door gasket and helps draw the steam through the cooking compartment. Steam leakage at the door may indicate a plugged or improperly installed drain.SERVICEContact your local Vulcan-authorized service office for any repairs or adjustments needed on this equipment.。
D 型石墨消化炉使用说明书浙江托普仪器有限公司ZHEJIANG TOP INSTRUMENT Co.,Ltd.本公司已通过ISO9001:2008质量管理体系认证公司简介浙江托普仪器有限公司坐落于美丽的西子湖畔,国家重点旅游城市——杭州市,是一家集科、工、贸为一体的综合型高新技术企业。
公司主营业务是研发、生产和销售应用于土壤、气象、种子、植物生理、环境、粮油食品等农业生态和食品领域检测仪器仪表,以先进的检测、信息化软件技术和丰富细致的具体产品以及系统集成为核心,为农业、林业、气象、水利、环境、农产品检测等相关领域提供综合解决方案。
多年来公司研发生产了百余种农业专用仪器和相关系统集成方案,产品销往全国各地并远销欧洲、东南亚,非洲等地。
在农业、林业、气象、水利、环境、农产品检测等领域得到了广泛的应用和普遍的好评!在国内已形成系列产品最齐全、专业化程度最高、系统软件集成最丰富,并具有多项自主知识产权的农业专用仪器研发、生产基地。
公司时刻关注着国内外相关行业内的先进技术,已拥有大量完全自主知识产权的技术和产品。
公司已率先通过ISO9001:2008质量管理体系认证,并始终坚持以“质量第一、诚信至上、服务为本”的经营理念,除了为客户提供优质的产品外,还提供更多的增值服务,根据客户需求,为客户提供全程方案咨询、产品选型、专业采购、行业动态等各种优质完善的服务。
在网络的建设和应用上,公司也一直走在行业前列。
在继中国种子检验仪器网(/)和中国粮油仪器网(/)后,于2003年建立中国农业仪器网(/),为农业工作者建立了网上信息获取和交流的平台。
业精于专,方显卓越!我们将进一步集中企业和高校科研优势,以更先进的产品,更过硬的质量,更优惠的价格,更全面的服务来赢得您长久的青睐!与时俱进,开拓创新,浙江托普仪器有限公司必将为中国农业仪器行业作出更大的贡献!公司24公司售后服务专线:400-672-1817为提高蛋白质含量测定的检测速度,其关键首先要加速样品消化煮解时间。
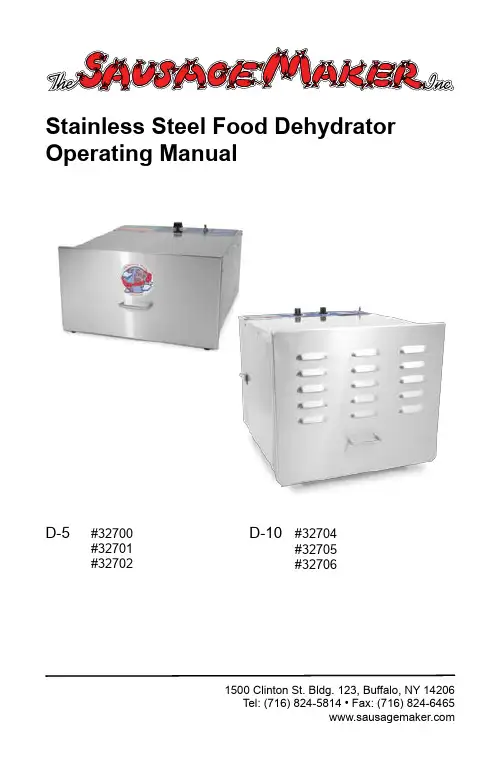
Stainless Steel Food Dehydrator Operating ManualD-5#32700 #32701#327021500 Clinton St. Bldg. 123, Buffalo, NY 14206Tel: (716) 824-5814 • Fax: (716) 824-6465D-10 #32704#32705#32706D-5 and D-10 Dehydrator Operating ManualTable of Contents Page Introduction 1Dehydration 2Important Safeguards 2Preparation of Food (Pre-Treatment) 2Operating Instructions 3Food Drying Guides 4Food Storage 7Reconstitution 7Cleaning 7Reviewing the Dehydrating Process 8Warranty 8D-5 Parts List 9D-10 Parts List 10IntroductionDrying food for presearvation dates back to the ancient Egyptians. TheSpaniards were the first explorers known to use dehydration to prepare food for their ex-peditions. The method was used extensively in the days of the Lewis and Clark expedition as they charted the expanse of the Louisiana Land Purchase. Buffalo, elk and deer were plentiful, but their success relied heavily upon the proper use of this preserving method.The D-5 and D-10 Dehydrators were designed and constructed to help you get the best results possible. The shell is made of durable stainless steel so it can be easily cleaned and maintained. When used properly, it will not rust or crack. All electrical components used are UL listed for safety and reliability. The information in this manual is intended to help you get the best results from this equipment. Please read this booklet carefully and call the manu-facturer if you have any questions.DehydrationThere are no exact rules that apply to food dehydration because your results can be af-fected by room temperature, relative humidity and moisture levels in the food that you are drying. To become proficient, it will be necessary to experiment with your drying techniques. If you use too much heat, food may harden on the outside while still being moist inside. However, with too little heat, your drying times will be very long. With a little practice you will be creating tasty, ready to eat snacks in no time.Important Safeguards1. Read ALL of these instructions thoroughly before using your dehydrator.2. Save these instructions for future reference.3. Never leave your dehydrator unattended.4. Close supervision is required if the unit will be used around children.5. Only for use indoors in a clean, dry location, free of flammable objects.6. This unit gets hot. Do not touch surfaces while operating.7. Continuous operation above 155° F is not recommended as surfaces willbecome very hot.8. This unit may scratch household surfaces.9. Do not use if the cord or controls have been damaged in any way. Contactthe manufacturer before attempting to make any repairs.10. Do not use sharp utensils inside the unit.11. Turn off unit before plugging into or unplugging from an electrical outlet.12. Unplug the unit when not in use.13. Allow unit to cool before cleaning.14. Clean with a damp cloth and mild detergent.15. Never immerse unit or cord in water or other liquids.16. Never plug unit into a damaged electrical outlet.17. Do not allow the cord to contact the edge of a counter, table or hot surface.18. The use of attachments or accessories is not recommended by themanufacturer and will void the warranty.19. Do not attempt to move this unit while it is operating.Preparation of Foods (Pre-Treatment)For best results, select the freshest foods available to dehydrate. Note thatimmature fruits and vegetables do not have as much color and flavor as do those that are fully matured. Foods should be dehydrated as soon after purchase as possible. Foods high in sugar such as apples, pears, peaches and bananas are prone to darkening as a result of oxidation of the sugars. Below are somepre-treatments that will help reduce this effect.Lemon and pineapple juice are natural antioxidants. Place the sliced produce in the juice for a few minutes. Remove, drain and place on the dehydrator shelf. For extra flavor, try sprinkling on cinnamon, Jello powders or other sweeteners.Preparation of Foods (Pre-Treatment), cont’dAscorbic acid mix, a form of vitamin C which is available at most health food stores, comes in either tablet or powder form. Use about 2-3 tablespoons of powder or ground tablets per quart of water. Stir to completely dissolve powder. Place fruit into the solution for 2-3 minutes. Remove, drain and place on the dehydrator shelf.Sodium Bisulfite can be purchased at your local pharmacy. If you or anyone who will be eating the food has any known chemical allergies, you should check with yourphysician before using this chemical. Be certain to ask for food grade (safe) product only. Mix 1 teaspoon of sodium bisulfite in 1 quart of water. Dip the sliced fruit in the solution for a few minutes. Remove, drain and place on the dehydrator shelf.Blanching is used primarily to prepare fruits and vegetables for dehydrating that have skins that will toughen during drying. This process helps lock in the color and flavor as well as soften the skin of grapes, cherries, prunes and plums. There are two blanching methods: water and steam.Water blanching - Fill a large pan about half full of water. Bring water to a boil.Use tongs to place food directly into the water, cover the pan and blanch forabout 3 minutes. Remove, drain and place on the dehydrator shelf.Steam blanching - Using a steamer pot such as one used in Chinese cooking,put 2-3 inches of water in the pan and bring to a boil. Place food into the steamerbasket, place in pan and cover. Steam food for about 5 minutes. Remove andplace on the dehydrator shelf.Operating InstructionsFor the safest results, read all of the instructions first.1. Examine the carton and the unit for any damage that may have occurred duringshipping. Contact the manufacturer and the carrier to report any damage.2. Fill out and return the product warranty card. The card must be on file for yourwarranty to take effect.3. Make sure the power switch is turned off. Place the unit on a clean, dry surface away from children and pets. Plug into an undamaged electrical outlet. Warning: Do not use an extension cord with your dehydrator.4. Turn on the unit. The unit will begin to heat up. You may hear the heating elementcycle on and off depending on the temperature you have selected.5. Lift the door up 2-3” and heat the unit at 90° F for 45 minutes to remove any moisture.6. If the unit stops for any reason, turn off, unplug and then repeat Steps 3 and 4. If the unit does not operate normally, turn off, unplug and call the manufacturer.7. Follow your recipe to prepare the food that you wish to dehydrate. Place the prepared food evenly on the shelves provided. We recommend using cooking spray on theshelves to prevent sticking. Do not overlap the food.8. Using oven mitts, remove the front panel by sliding it straight up. Set it aside on a heat resistant surface.Operating Instructions, cont’d9. Carefully place shelves onto the rails inside the unit and slowly slide them in. Forcing the shelves in may damage the heating assembly.10. Slide the cover into place.11. To monitor the internal temperature of the unit, slide the optional thermometer into the hole on the front panel. THIS THERMOMETER MUST BE REMOVED BEFOREYOU CAN OPEN THE FRONT PANEL. FAILURE TO REMOVE IT WILL DAMAGETHE SHELVES AND THE THERMOMETER.12. Set the temperature by turning the knob on top of the unit. Monitor the internaltemperature and adjust as needed.13. Monitor the unit to ensure that the proper temperature is maintained. If the internaltemperature exceeds 155° F, it may damage the unit. If the temperature of the unitreaches 155° F, turn off and allow it to cool.14. If drying is uneven, use oven mitts to rotate the shelves 180°.15. For very moist foods, such as tomatoes, it may be necessary to prop open the front cover 1 1/2 to 2” with a small block of wood for the first 2 hours of operation. This will increase the air flow and help drive excess moisture out of the unit.16. Note: Moisture may collect on the bottom of the unit during operation and can bewiped out with a paper towel. Avoid touching the walls and shelves with your barehands as a burn may result.Food Drying GuidesThe following charts are guidelines for the preparation of various fruits, vegetables and meats. Drying times will vary depending on the room temperature, relative humidity and moisture levels in the food that you are drying. If the moisture level is low, the drying time will be on the low end of the range. However, if the moisture level is high, the drying time will be on the high end of the range.Keep in mind that drying times are also affected by the amount of food placed on the shelves. Over loading the shelves will slow the drying time and may produce poorer results. When dehydrating foods, it is important to check on the dryness of the product. If the prod-uct is not thoroughly dried, mold may form during storage (see Food Storage). To test for dryness, remove a piece of food from the dehydrator and allow to cool to room tempera-ture. Bend and tear the piece to check for internal moisture.Vegetables at 125° FFood Preparation Test Time Asparagus Wash and cut into 1” pieces Crunchy4-6 hoursBeans, Green orWaxed Wash, remove ends and cut into1” pieces or French styleCrunchy9-12 hoursBeets Remove 1/2” of the top, scrubthoroughly, steam blanch untiltender. Peel and cut into 1/4” thickslices.Pliable9-12 hoursBroccoli Wash and trim. Cut stems into 1/4”pieces. Dry florets whole.Crunchy10-14 hours Cabbage Wash and trim. Cut into 1/8” strips.Crunchy8-11 hours Carrots Wash and trim tops. Peel orscrape if desired. Cut into 1/8”thick slices.Pliable7-11 hoursCelery Wash, separate leaves and stalks.Cut stalks into 1/4” strips.Crunchy3-10 hoursCorn Shuck corn and trim silk. Steamuntil milk is set. Cut kernels fromcob and spread on plastic screen.Stir several times during drying.Crunchy7-10 hoursCucumber Wash and trim. Cut into 1/8” slices.Pliable4-8 hours Eggplant Wash and peel. Cut into 1/4”slices.Pliable4-8 hours Mushroom Wash and cut into 3/8” slices.Pliable4-7 hoursParsnips Scrub thoroughly, steam blanchuntil tender. Peel if desired andcut into 3/8” thick slices.Pliable/Tough7-11 hoursPeppers Wash and remove stems, seedsand white section. Pat dry. Cutinto 1/4” thick strips or rings.Pliable4-8 hoursPotatoes Use new potatoes. Wash, peel ifdesired. Steam blanch 4-6minutes. Cut french style, 1/4”slices, 1/8” thick circles or grate.Crunchy/Pliable7-13 hoursSummer Squash Wash and peel. Cut into 1/4”slices.Pliable10-14 hoursTomatoes Wash and remove stems. Sliceinto 1/4” circles. For cherrytomatoes, slice in half, dry skinside down.Pliable5-9 hoursZucchini Wash, peel if desired. Cut into 1/4”slices or chips.Crunchy7-11 hoursFruits at 135° FFood Preparation Test TimeApples Wash, core and peel if desired.Cut into 1/4” slices. Dust withcinnamon if desired.Pliable7-15 hoursApricots Wash, halve and remove pit. Sliceif desired and dry skin side down.Pliable21-29 hoursBananas Wash, peel and slice into 1/8”slices.Pliable7-10 hoursFigs Wash, cut out blemishes, quarter.Dry skin side down.Pliable22-30 hours Kiwi Wash, peel and slice in 1/4” slices.Crisp8-15 hours Nectarines Wash, halve and remove pit. Sliceif desired and dry skin side down.Pliable8-17 hoursPeaches Wash, halve and remove pit. Sliceif desired and dry skin side down.Pliable8-16 hoursPears Wash, core and peel if desired.Cut into 1/4” slices or quarter.Pliable8-16 hoursPineapple Peel, remove fibrous eyes,remove core. Cut into 1/4” slices orwedges.Pliable11-18 hoursRhubarb Wash, cut into 1” lengths.Pliable6-10 hours Strawberries Wash, cut out caps, slice 1/4” thick.Crisp7-15 hoursWatermelon Cut off rind, cut into wedges andremove seeds.Pliable andSticky8-10 hoursJerky at 145-150° FFood Preparation Test TimeJerky Use lean meat and remove asmuch fat as possible. Fat turnsrancid with time. Cut uniform 1/4”thick or less slices. Do not overlapslices on the shelves.Pliable3-4 hoursMeattemperatureshould reach145-150° FFood StorageDried foods should be allowed to condition before being placed into a storage container. Generally, let stand about 1 week in a dry, well ventilated and protected area. The conditioning time allows for further drying and removes most of the remaining moisture in the food. Dried foods can be placed into clean, dry, insect resistant containers, preferably glass jars. Heavy gauge plastic freezer bags can also be used. Eliminate as much air as possible before sealing the bag.When properly used, vacuum sealers provide ideal storage. The less air present, the less potential for the formation of molds. Stored foods should be checked monthly for insects and mold. If mold is present, you can scrape it off, place the food on a cookie sheet and heat in the oven at 175° for 15 - 25 minutes. Re-pack into a clean, air tight container.ReconstitutionDried foods do not need to be reconstituted for consumption. Many people prefer to eat them in their dried state. If you want to reconstitute your food, here are some basic guidelines. Soak food in unsalted water for 3 - 7 minutes and then prepare as usual. If you are boiling them, use the same water they soaked in to preserve nutrients.If you plan to soak foods for more than 1 hour, they should be placed in the refrigerator to prevent bacterial growth. One cup of dried vegetables will reconstitute to about 2 cups. One cup of dried fruit will reconstitute to about 1 1/2 cups. Reconstitution times will vary depending on the thickness of the food and the water temperature used. Warm water will speed reconstitution but may result in some flavor loss.CleaningTo clean the unit, remove the shelves and wash separately. Wipe off both the exterior and interior surfaces of the unit with a damp cloth and mild detergent. Do not use scouring pads or abrasive cleaners as this may mar the finish.NEVER IMMERSE THE UNIT OR POWER CORD IN WATER OR OTHER LIQUIDSReviewing the Dehydrating ProcessTo obtain the best results:1. Use high quality food: the better the food the better the results2. Wash food, use clean utensils and keep work area clean.3. Pre-treat foods to prevent discoloration.4. Do not overlap food on shelves.5. Drying times will vary depending on food thickness, moisture in the food, relativehumidity and temperature of the room.6. Cool food before testing for dryness.7. Rotate trays 180° if you notice uneven drying.8. Let food condition in a clean, dry, ventilated area for a week before placing them in air tight containers.9. Reconstitute as needed.10. And last but not least, ENJOY!Warranty InformationThe Sausage Maker, Inc., through its Distributors, warrants each new product sold by it to the initial user to be free of defects in material and workmanship for a period of one year from the date of sale of the equipment. With respect to the sale of parts, such warranty period shall be three (3) months from the date of sale.The Sausage Maker, Inc. will provide a new part or repaired part, at its election, in place of any part which is found upon inspection to be defective in material and workmanship during the period described above. Purchaser must present proof of purchase and purchase date at the time of exercising this warranty.This warranty does not apply to failures occurring as a result of abuse, misuse, negligent repairs, corrosion, erosion and normal wear and tear, alterations or modifications made to the product without express written consent of The Sausage Maker, Inc. or failure to follow the recommended operating practices and maintenance procedures as provided in the products operating and maintenance publications. The warranty provided herein does not apply to equipment sold hereunder but manufactured by others as they are warranted by their respective manufacturers directly to the user.This warranty is in lieu of all other warranties (except of title) expressed or implied and there are no warranties of merchantability or of fitness for a particular purposeD-5 Parts ListPart Name Part # Box P32700-01 Heater Box P32700-02 Door P32700-03 Thermostat/Knob P32700-04 Rubber Feet P32700-05 Toggle Switch P32700-06 Heating Element P32700-07 Thermal Fuse (Thermodisc) P32700-08 Motor P32700-09 Fan Blade P32700-10 Power Cord P32700-11 Screen Guard P32700-12 Bottom Bracket P32700-13 Top Bracket P32700-14 Door Handle with Screw P32700-15 Male/Female Insulator P32700-16 Grooved Insulator P32700-17 Complete Back Panel Assembly - D5 32500-BPA Shelving:Chrome Shelf (3/4” holes) 32731 Stainless Steel Shelf (3/8” holes) 32733 Non-Stick Shelf (3/8” holes) 32732 Plastic Drying Screen (1/4” holes) 32737 Non Stick Drying Sheets 32735D-10 Parts ListPart Name Part # Box P32704-01 Heating Panel P32704-02 Door P32704-03 Shelving Unit P32704-04 Latch P32704-05 Timer P32704-06 Terminal Block P32704-07 Thermostat P32704-08 Pilot Light P32704-09 Toggle Switch P32704-10 Thermal Fuse (Thermodisc) P32704-11 Power Cord P32704-12 Heating Element P32704-13 Motor P32704-14 Fan Blade P32704-15 Screen Guard P32704-16 Legs P32704-17 Door Handle with Screw P32704-18 Male/Female Insulator P32704-19 Grooved Insulator P32704-20 Complete Back Panel Assembly 32213 Shelving:Chrome Shelf (3/4” holes) 32731 Stainless Steel Shelf (3/8” holes) 32733 Non-Stick Shelves (3/8” holes) 32732 Plastic Drying Screen (1/4” holes) 32734 Non Stick Drying Sheets 3273510The Sausage Maker, Inc.1500 Clinton St. Bldg. 123, Buffalo, NY 14206 Tel: (716) 824-5814 • Fax: (716) 824-6465 。
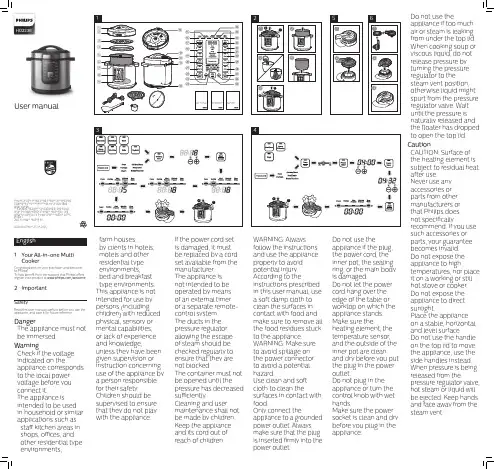
HD2238User manual• Always put the inner pot in the appliance before you put the plug in the power outlet and switch it on.• Do not place the inner pot directly over an open fire to cook food.• Do not use the inner pot if it is deformed.• Make sure that the sealing ring is clean and in good condition.• The accessible surfaces may become hot when the appliance is operating. Take extra caution when touching the surfaces.• Beware of hot steam coming out of the floating valve and pressure regulator valve during cooking or when you open the lid. Keep hands and face away from the appliance to avoid the steam.• Do not lift and move the appliance while it is operating.• Do not exceed the maximum water level indicated in the inner pot to prevent overflow.• Do not place the cooking utensils inside the pot while cooking.• Only use the cooking utensils provided. Avoid using sharp utensils.• To avoid scratches, itis not recommendedto cook ingredients with crustaceans and shellfish. Remove the hard shells before cooking.• Do not place a magnetic substanceon the lid. Do not use the appliance near a magnetic substance.• Always let the appliance cool downto room temperature before you clean or move it.• Always clean theappliance after use. Donot clean the appliancein dishwasher.• Always unplug theappliance if not usedfor a longer period.• If the appliance isused improperly orfor professional orsemi-professionalpurposes, or if it isnot used accordingto the instructions inthis safety leaflet, theguarantee becomesinvalid and Philipsrefuses liability for anydamage caused.• Visit /support to downloadthe user manual.Electromagnetic fields (EMF)This appliance complies with the applicablestandards and regulations regarding exposure toelectromagnetic fields.2 What’s in the box (fig. 1)Main unit Power cordRice & Soup ladle Steaming plateMeasuring cup Glass lidUser manual Recipe bookletWarranty card3 Overview (fig. 1)Product overviewa Lid handle h Control Panelb Top lid i Heating elementc Detachable inner lid j Power socketd Sealing ring k Locking pineWater levelindications l Floaterf Side handle m Pressure regulatorg Inner pot n Safety valveControls overviewo Heating indicator z Increase buttonp Power indicator{Cooking time buttonqKeep warm/Cancelbutton|Bake buttonr Slow cook button }Yogurt buttons Sauté/sear button ~Kaya buttontSauce thickeningbutton Display panelu Fried rice button€Stew buttonv Preset time button Start/Reheat buttonw Decrease button‚Keep warm indicatorxTemperature/Pressure indicatorƒMaintain pressureindicatoryTemperature/Pressure button…Start pressureindicatorFunctions overviewPressure cooking functionsCookingfunctionDefaultpressurekeeping time(minute)Pressure keepingtime regulatingrange (minute)Soup2020-59Porridge1515-59Rice14Not adjustableSteam83-20Chicken/Duck1515-59Beaf/Lamb3030-59Beans/Tendons3030-59Normal cooking functions(non-pressure)CookingfunctionDefaultcooking timeCooking timeregulating rangeSlow cook 6 hours 2 - 12 hoursSauté/sear(low /mid/hightemperature)3 minutes 2 - 59 minutesSaucethickening(low /mid/hightemperature)8 minutes 5 - 59 minutesFried rice11 minutes7 - 59 minutesBake45 minutes10 - 59 minutesYogurt8 hours 6 - 12 hoursKaya18 minutes 5 - 59 minutesStew 1 hour35 minutes -10 hoursReheat25 minutes20 - 59 minutes4 Using the All-in-one MultiCookerBefore first use1 Remove all packaging materials from theappliance.2 Take out all the accessories from the inner pot.3 Clean the parts of the All-in-one Multi Cookerthoroughly before using it for the first time (seechapter "Cleaning and Maintenance").Note•Make sure all parts are completely dry beforeyou start using the All-in-one Multi Cooker.Preparations before cooking(fig. 2)Before using the All-in-one Multi Cooker to cookfood, follow below preparation steps:1 Hold the lid handle and turn it anti-clockwiseuntil the top lid cannot move any more, then liftup the top lid.2 Take out the inner pot from the All-in-one MultiCooker and put the pre-washed food in the innerpot.3 Wipe the outside of the inner pot dry, then put itback into the All-in-one Multi Cooker.4 Place the top lid onto the All-in-one MultiCooker and turn it clockwise. You will hear a“click” sound when the top lid is properly locked.Note•Make sure the sealing ring is properlyassembled around the edge of the detachableinner lid.•Make sure the pressure regulator valve andfloating valve are clean and not blocked.•Make sure the outside of the inner pot is dryand clean, and that there is no foreign residueon the heating element.•Make sure the inner pot is in proper contactwith the heating element.Cooking food (fig. 3)Note•Do not fill the inner pot with less than 1/3 ormore than 2/3 full of food and liquid.•For food that expands during cooking, do notfill the inner pot with more than 1/2 full of foodand liquid.•For rice cooking, follow the water levelindications on the inside of the inner pot. Youcan adjust the water level for different types ofrice and according to your own preference. Donot exceed the maximum quantities indicatedon the inside of the inner pot.•Make sure the floater on the top lid dropsdown before cooking.•After the cooking process is started, you canpress Cancel/Warm to deactivate the currentwork, and the appliance goes to standbymode.Pressure cooking1 Follow the steps in “Preparations beforecooking”.2 Turn the pressure regulator to seal.3 Put the plug in the power socket.»The power indicator starts flashing.4 Press Pressure cook to choose one of thepressure cooking functions - Soup, Porridge,Rice, Steam, Chicken/Duck, Beaf/Lamb orBeans/Tendons.»The default pressure keeping time is displayedon the screen.Note•The pressure keeping time is not adjustablefor Rice.•You can adjust the pressure(Low. High) bypressing the Temp/kPa button.•When cooking 2 cups of rice (small amount),for better result, spread the rice evenly in theinner pot before cooking.•When cooking 14 cups of rice (maximumamount), the bottom layer of rice may getovercooked.5 To set a different pressure keeping time, pressCooking time.6 Press or to set the pressure keeping time.7 Press Start/Reheat to start the cooking process.8 When the All-in-one Multi Cooker reaches theworking pressure:»Maintain Pressure lights up;9 When the pressure keeping time has elapsed,the All-in-one Multi Cooker automaticallyswitches to keep warm mode.»The keep warm indicator (Keep warm) lightsup.10 Turn the pressure regulator to vent.»The All-in-one Multi Cooker starts releasingpressure.»The floater drops down when the pressure isreleased sufficiently.11 Hold the top lid handle and turn the lid anti-clockwise until it cannot move any more, then liftit up.Note•When cooking soup or viscous liquid, donot release pressure by turning the pressureregulator to vent, otherwise liquid might spurtfrom the pressure regulator valve. Wait untilthe pressure is naturally released and thefloater has dropped down to open the top lid.•The pressure keeping timer will start countingdown when the working pressure is reached.•After the cooking is finished and the pressureis released, you can press the cancel button(Warm/Cancel) and unplug the All-in-oneMulti Cooker to turn off the keep warmfunction or when not in use.Normal cookingNote•For normal cooking, you can cook foodwithout adding water in the inner pot. In thiscase, make sure to turn the pressure regulatorto bake.•Make sure to keep the top lid open for theentire time when you cook food in the Sauté/sear mode.•To choose the Reheat function, press Start/Reheat when the appliance is in standbymode.•You can press the Temp/kPa button to adjusttemparature (Low, Mid, High) for the followingfunctions: Sauté/sear and Sauce thickening.•The glass lid shall be used for non-pressurecooking functions.To cook food with normal pressure, press thecooking buttons and choose Slow cook, Sauté/sear, Fried rice, Sauce thickening, Stew, Yogurt,Kaya or Bake.1 Follow the steps in “Preparations beforecooking”.2 Turn the pressure regulator to bake or seal.• For Slow cook, Stew and Yogurt, turn thepressure regulator to seal.• For Bake, turn the perssure regulator to bake.3 Put the plug in the power socket.»The power indicator (Power) starts flashing.4 Press the desired cooking function button tochoose a cooking mode.5 To set a different cooking time, press Cookingtime.»The cooking time flashes on the screen.6 Press or to set the cooking time.7 Press Start/Reheat to start the cooking process.8 When the cooking time has elapsed, the All-in-one Multi Cooker automatically switches to keepwarm or standby mode.9 Turn the pressure regulator to vent.10 Hold the top lid handle and turn the lid anti-clockwise until it cannot move any more, then liftit up.Preset time for delayed cooking(fig.4)You can preset the delayed cooking time fordifferent cooking functions. The preset timer isavailable up to 24 hours.1 After the cooking function is selected, pressPreset timer.»The hour unit starts flashing on the display.2 Press or to set the hour unit.3 After the hour unit is set, press Preset timeragain.»The minute unit starts flashing on the display.4 Press or to set the minute button.5 Press Preset timer to confirm the preset time.6 Press Start/Reheat to start the cooking process.7 When the preset time has elapsed, the All-in-one Multi Cooker starts working automatically.Note•The preset function is not available in thefollowing modes: Sauté/Sear (both low andhigh temperatures), Reheat and Warm.Assembling and disassemblingthe pressure regulatorWarning•Do not disassemble the pressure regulatorduring cooking. Always unplug the All-in-oneMulti Cooker and wait until the pressure hasbeen released sufficiently to do so.• To disassemble the pressure regulator:1 Turn the lower screw anticlockwise until itbecomes loose.2 Pull it up and take out the pressure regulator.• To assemble the pressure regulator:1 Assemble the lower screw back to the regulator.2 Make sure the regulator points at the sealedposition ( ) and put it back to the steam valve.3 Turn the screw clockwise until it is fastened.5 Cleaning andMaintenanceNote•Unplug the All-in-one Multi Cooker beforestarting to clean it.•Wait until the All-in-one Multi Cooker hascooled down sufficiently before cleaning it.InteriorInside of the top lid, glass lid, and the main body:• Wipe with wrung out and damp cloth.• Make sure to remove all the food residuesstuck to the All-in-one Multi Cooker.Heating element:• Wipe with wrung out and damp cloth.• Remove food residues with wrung out anddamp cloth.Sealing ring:• Soak in warm water and clean with sponge.Inner lid:• Remove the detachable inner lid. Soak it inwarm water and clean with sponge.ExteriorSurface of the top lid, glass lid and outside of themain body:• Wipe with a cloth damped with soap water.• Only use soft and dry cloth to wipe the controlpanel.• Make sure to remove all the food residuesaround the pressure regulator valve andfloating valve.Pressure regulator valve and floating valve:• Disassemble the pressure regulator, soak it inwarm water, and clean with sponge.• Remove food residues in the pressureregulator valve and floating valve.AccessoriesMeasuring cup, rice & soup ladle, and inner pot:• Soak in hot water and clean with sponge.6 SpecificationsModel Number HD2238Rated voltage220-240VRated frequency50-60HzRated power input1370-1630WRated capacity8.0LWarm keeping temperature60-80°CNote•Always unplug the appliance if not used for alonger period.7 RecyclingDo not throw away the product with the normalhousehold waste at the end of its life, but hand it inat an official collection point for recycling. By doingthis, you help to preserve the environment.Follow your country's rules for the separatecollection of electrical and electronic products.Correct disposal helps prevent negativeconsequences for the environment and humanhealth.8 Warranty and supportVersuni offers a two-year warranty after purchaseon this product. This warranty is not valid if a defectis due to incorrect use or poor maintenance. Ourwarranty does not affect your rights under law as aconsumer. For more information or for invoking thewarranty, please visit our website/support.9 TroubleshootingIf your All-in-one Multi Cooker does not function properly or if the cooking quality is insufficient, consult thetable below. If you are unable to solve the problem, contact a Philips service center or the Consumer CareCenter in your country.Problem Cause SolutionI have difficultiesopening the lid aftercooking.Need to release thepressure.PressureControl ValveFloater bakeventsealSet the pressure control valve to 'Vent'.And wait until the floater has dropped.Floater stuck in upposition.Set the pressure control valve to 'Vent'.And wait until the floater has dropped.I have difficultiesclosing the top lid.The sealing ring is not wellassembled.Make sure the sealing ring is well assembledaround the inside of the top lid.The floater stuck in upposition.The floater blocks the locking pin. Push down thefloater so that it does not block the locking pin.Leaking from under lid.Sealing ring missing.Sealing ringInner lidSealing ringInner lidPut sealing ring in place correctly on inner lid.Food or debris undersealing ring.Remove the sealing ring, clean and replace.Lid not correctly closed.Open and reclose the lid, checking for correctclosing.The pressure level insideof the appliance isabnormal.In this case the safety valve will be releasingsteam. Take the appliance to your Philips dealeror a service center authorized by Philips.Leaking from floaterSealing ring broken.Replace the sealing ring.Food or debris undersealing ring.Remove the sealing ring, clean and replace.Floater does not riseup after the appliancestarts pressurizing.Food&water are belowminimum level.Add food/water. Make sure there is enough foodand water in the inner pot.Leaking from lid orpressure control valve.Take the appliance to a Philips service dealer.E3 displays on thescreen.The temperature insidethe inner pot is too high.Wait until it falls down to room temperature.E1, E2, or E4 displayson the screen.The All-in-one MultiCooker has malfunction.Take the appliance to a Philips service center.。
PM/ IS 8749/ 1/ May 2020PRODUCT MANUAL FORBIOGAS STOVEACCORDING TO IS 8749: 2002This Product Manual shall be used as reference material by all Regional/Branch Offices & licensees to ensure coherence of practice and transparency in operation of certification under Scheme-I of Bureau of Indian Standards (Conformity Assessment) Regulations, 2018 for various products. The document may also be used by prospective applicants desirous of obtaining BIS certification licence/certificate.BUREAU OF INDIAN STANDARDSManak Bhawan, 9, Bahadur Shah Zafar Marg,New Delhi 110 0021PM/ IS 8749/ 1/ May 2020ANNEX AList of Test EquipmentMajor test equipment required to test as per the Indian Standard2PM/ IS 8749/ 1/ May 2020ANNEX BScheme of Inspection and Testing1. LABORATORY– A laboratory shall be maintained which shall be suitably equipped and staffed, where different tests given in the specification shall be carried out in accordance withthe methods given in the specification.1.1 The manufacturer shall prepare a calibration plan for the test equipment.2. TEST RECORDS – The manufacturer shall maintain test records for the tests carried outto establish conformity.3. LABELLING AND MARKING– As per the requirements of IS 8749:2002.3.1Each stove shall also be accompanied by an instruction sheet, card or leaflet as per Clause 27 of IS 8749:2002.4. CONTROL UNIT - Gas stoves having same design and material of burners, total gas consumption in 1/h at STP and rating of individual burners in 1/h at STP, manufactured in aday shall constitute a control unit.5. LEVELS OF CONTROL – The tests as indicated in column 1 of Table 1 and the levels of control in column 3 of Table 1, shall be carried out on the whole production of the factory which is covered by this plan and appropriate records maintained in accordance with paragraph 2 above.5.1 All the production which conforms to the Indian Standard and covered by the licence shouldbe marked with Standard Mark.6. REJECTIONS –Disposal of non-conforming product shall be done in such a way so as to ensure that there is no violation of provisions of BIS Act, 2016.3TABLE 1456Note-1: Sub-contracting is permitted to a laboratory recognized by the Bureau or Government laboratories empanelled by the Bureau.Note-2: Levels of control given in column 3 are only recommendatory in nature. The manufacturer may define the control unit/batch/lot and submit his own levels of control in column 3 with proper justification for approval by BO Head.7PM/ IS 8749/ 1/ May 2020ANNEX CScope of Licence8。
目录一、概述 ....................................................................................................... - 1 -二、工作原理 ............................................................................................... - 2 -三、技术指标 ............................................................................................... - 2 -四、安装使用 ............................................................................................... - 3 -五、操作说明 ............................................................................................... - 5 -1. 面板介绍:...................................................................................... - 5 -2. 按键介绍:...................................................................................... - 6 -3. 操作举例:...................................................................................... - 7 -4. 自整定:.......................................................................................... - 9 -5. 菜单列表.......................................................................................... - 9 -六、HYP-3系列消化炉示意图 .................................................................. - 10 -七、HYP-3系列消化炉接线图 .................................................................. - 11 -八、故障及处理方法 ................................................................................. - 15 -九、样品消化建议 ..................................................................................... - 15 -十、注意事项 ............................................................................................. - 18 - 十一、随机附件 ......................................................................................... - 18 -一、概述上海纤检仪器有限公司生产的“华烨”牌定氮仪,是依据经典凯氏定氮法设计的样品消化装置和自动测氮蒸馏装置,该仪器安装、操作简单;使用安全、可靠、省时、省力;自动化程度高,适用于植物养份、水、沉淀物测试、粮油、食品、饲料、氮肥,医药、制糖、乳制品、化工、煤炭、橡胶等行业的分析、教学和研究,也可以作为提取其他元素的仪器,是实验室操作人员的理想工具。
30"DUAL-FUEL FREESTANDING RANGE MODELS:KFDC500JMB01(Misty Blue)Illus.No.Part No.Description1Literature PartsW11114331Guide,Use And CareW11114334Instructions,InstallationW11184759Guide,InternetConnectivityW11202391Diagram,Wiring(Cooktop)W11202385Diagram,Wiring(Oven)W11202289Sheet,TechW11114332Guide,Quick Start Illus.No.Part No.Description2W10892994Assembly,ValveManifold(Left Front,Left Rear)W10892997Assembly,ValveManifold(Right Front,RightRear)3W10903728Switch,Harness4W11121194Bracket,Manifold5W11121317Module,Spark64453116Adapter,Male77101P426-60Screw8W10892281Tube,Manifold Supply(Left)W10892292Tube,Manifold Supply(Right)9Box,Burner(NotServiced)Illus.No.Part No.Description10W10115843Cover,Ignition11W11121361Filler,CooktopFOLLOWING PARTSNOT ILLUSTRATEDW11200301Harness,Main(30")W11200328Harness,CooktopW10780278Harness,Door LockW11200325Harness,CommunicationW11242785Harness,WIFIW11212216Cord,Power9759877Retainer,Strain ReliefW10253333Bracket,Anti-Tip7101P485-60Screw,Anti-Tip KitW11238042Kit,LP ConversionIllus.No.Part No.Description1W11106881Panel,Cabinet Side(Left)W11106880Panel,Cabinet Side(Right)2W10892774Assembly,OrificeHolder(Left Front)W10892484Assembly,OrificeHolder(Left Rear)W10892479Assembly,OrificeHolder(Right Front)W10892735Assembly,OrificeHolder(Right Rear)3W10892422Orifice,Main(17.4K)(Left Front,RightFront)W10892419Orifice,Main(15K)(Left Rear)W10892435Orifice,Simmer(2.6K)(Left Front,RightFront)W10892438Orifice,Simmer(5K)(Right Rear)4W11238757Igniter(Left Front,RightFront)W10892340Igniter(Left Rear)W11114379Igniter(Right Rear)Illus.No.Part No.Description5W11291183Burner,Grate(WithWok Ring)6W11291179Burner,Grate7W11323261Screw(8-18X1")W11323309Screw(8-18X1/2")8W11281269Barrier,ApplianceManager9W11436334Interface,User10W11205795Cover,WIFI Outer11W10883433Bezel(Rear Burners)12W10881642Bezel(Front Burners)13Cap,BurnerW11121389Black(Set Of4)14W10891746Spreader,Flame(High)(Left Front,RightFront)W10891974Spreader,Flame(Low)(Left Rear)W10891978Spreader,Flame(AUX)(Right Rear)15W11036559Spring Clip,Range16Knob,Oven ModeW11249667Stainless17W11100279Manager,Appliance(Powermax)18Panel,CooktopW11038235Black(Left)W11038245Black(Right)Illus.No.Part No.Description19W11130078Antenna,WIFI20W10568405Assembly,Speaker21W10130760Bracket,MovingConsole(Left)W10130759Bracket,MovingConsole(Right)22W11328357Screw23W10877949Panel,Console24Knob,SingleW10912166Stainless25Knob,DualW10883172Stainless26W10896366Assembly,Light Pipe27Bezel,OvenW10913810Stainless28Knob,OvenTemperatureW11429269Stainless29W11205794Cover,WIFI Inner30W11241511Button Assembly,Oven Light31W11156414Trim,Island32Trim,T-StripW10271524Black337101P426-60Screw34W11241510Button Assembly,Oven Start353400814Screw36W11291178Kit,Grate Filler37W11042504Bumper,Grate38W11110768Assembly,WIFIModule397101P624-60ScrewIllus.No.Part No.Description1W11394778Kickplate2W11324989Back,Chassis3W10138054Assembly,Roller4W11109583Duct,Bottom(30")57101P426-60Screw69760860Leveler7W10908710Base,Leveling Leg84449743Screw9W11369237Cabinet,ApplianceManager10W10115869Shaft,Long11W10115793Shaft,Short Illus.No.Part No.Description12489504E-Ring13W11106963Tube,PressureRegulator14W11087491Support,Channel15W11115328Gasket,Oven(30")16W11050145Duct-Chassis,Rear17W11368831Channel,Wire18W11362015Retainer,Gasket(9"Long)19W11324986Top,Chassis20W11040802Chassis,Bottom21W11103334Panel,Back TopIllus.No.Part No.Description22W11034134Panel,Back Bottom23W11096823Bracket,PressureRegulator24W10449140Regulator,Pressure25W11036559Spring Clip,Range26W11106341Drawer,ApplianceManager27W11199181Cover,Foot(Left)W11199178Cover,Foot(Right)Illus.No.Part No.Description14449751Thermostat(TOD)2W10622170Probe,Sensor3W10351278Bumper&Screw4W10830016Latch,Motorized5W11290663Tube,Vent6W10169756Lens,Light7W11223932Assembly,Oven Light8W10169757Bulb,Light9W11096294Receiver,Hinge(Left)Illus.No.Part No.Description10W11096293Receiver,Hinge(Right)11Liner,Oven(NotServiced)12W11102297Chassis,Side(Left)W11102296Chassis,Side(Right)137101P426-60Screw14W10160858Cover,LatchIllus.No.Part No.Description153196176Screw16W11192755Frame,FrontFOLLOWING PARTSNOT ILLUSTRATEDW10282810Insulation,Wrap,30"W10282818Insulation,Back,30"3400968NutVENTING PARTSVENTING PARTSIllus.No.Part No.Description1W10818234Slope,Exhaust Vent(30")2W11105223Vent,Cooling Top(30")3W11200129Blower4W11105222Vent,Cooling Bottom(30")Illus.No.Part No.Description5W11109518Plate,Cooling Latch6W11353392Box,Terminal7W10919715Gasket8W11047754Bracket,Blower Mount9W10270397Seal,Vent Slope(30")Illus.No.Part No.Description10W10270396Seal,Chimney119761958Block,Terminal12112432Nut,Hex13W11106956Cover,ChannelIllus.No.Part No.Description1W11036771Liner,Door2W11413190Insulation,Door(30")3W11184409Glass,Inner4W11194821Retainer,Glass5W11390105Hinge,Door(Left)6W10607120Screw Illus.No.Part No.Description7W10272594Frame,Glass8W10898280Screw9W10656499Screw10W11389286Assembly,Outer Door(Includes Handle)11W11362706Handle Assembly12W11197830Bracket,HandleIllus.No.Part No.Description13W10518672Badge14W10276043Screw15W11361074Medallion,Handle16W10162096Screw17W11390124Hinge,Dual(Right)Illus.No.Part No.Description1W10115994Element,Broil2W10282821Insulation,ConvectionCover3W10570887Rack,Oven4W11108461Rack,Oven(Sliding)5W10160856Shield,Element Broil6W11212180Baffle,Convection7W10722667Fan,Convection8W10631503Blade,Fan Illus.No.Part No.Description9W10261523Plate,Fan10W10631504Nut,Acorn(LH)119762242Element,ConvectionSteam12W11109421Tray,Hidden Bake139755542Probe,Temperature144449154Screw159755543Jack,Meat Probe16W11033111Nut,LockingIllus.No.Part No.Description17W10739592Screw18W10115995Element,Hidden Bake19W10720084ScrewOPTIONAL PARTS(NOT INCLUDED) Illus.No.Part No.DescriptionACCESSORY PARTS4396920Stainless SteelCleaner&PolishW10160195Cover,Grill/GriddleW10216179Ring,WokBacksplashW1028544948"With Shelves31464Cleaner,CooktopW10123240Rack,Broiler Pan&Roasting8284755Backsplash(Adjustable)JXA9001CDPStainless SteelWallsplashW11238043Kit,High AltitudeMedallion,HandleW11368841SI.SilverW11368841BO.Black ANOW11368841RE.Red ANOW11368841MP.Marscapone(Cream)W11368841NE.New GoldW11368841CF.CopperW11368841BN.BronzeW11368841DD.Dark Blue。