linux驱动模型
- 格式:pdf
- 大小:257.73 KB
- 文档页数:10
linux驱动开发(⼀)1:驱动开发环境要进⾏linux驱动开发我们⾸先要有linux内核的源码树,并且这个linux内核的源码树要和开发板中的内核源码树要⼀直;⽐如说我们开发板中⽤的是linux kernel内核版本为2.6.35.7,在我们ubuntu虚拟机上必须要有同样版本的源码树,我们再编译好驱动的的时候,使⽤modinfo XXX命令会打印出⼀个版本号,这个版本号是与使⽤的源码树版本有关,如果开发板中源码树中版本与modinfo的版本信息不⼀致使⽆法安装驱动的;我们开发板必须设置好nfs挂载;这些在根⽂件系统⼀章有详细的介绍;2:开发驱动常⽤的⼏个命令lsmod :list moduel 把我们机器上所有的驱动打印出来,insmod:安装驱动rmmod:删除驱动modinfo:打印驱动信息3:写linux驱动⽂件和裸机程序有很⼤的不同,虽然都是操作硬件设备,但是由于写裸机程序的时候是我们直接写代码操作硬件设备,这只有⼀个层次;⽽我们写驱动程序⾸先要让linux内核通过⼀定的接⼝对接,并且要在linux内核注册,应⽤程序还要通过内核跟应⽤程序的接⼝相关api来对接;4:驱动的编译模式是固定的,以后编译驱动的就是就按照这个模式来套即可,下⾯我们来分下⼀下驱动的编译规则:#ubuntu的内核源码树,如果要编译在ubuntu中安装的模块就打开这2个#KERN_VER = $(shell uname -r)#KERN_DIR = /lib/modules/$(KERN_VER)/build# 开发板的linux内核的源码树⽬录KERN_DIR = /root/driver/kernelobj-m += module_test.oall:make -C $(KERN_DIR) M=`pwd` modulescp:cp *.ko /root/porting_x210/rootfs/rootfs/driver_test.PHONY: cleanclean:make -C $(KERN_DIR) M=`pwd` modules cleanmake -C $(KERN_DIR) M=`PWD` modules这句话代码的作⽤就是到 KERN_DIR这个⽂件夹中 make modules把当前⽬录赋值给M,M作为参数传到主⽬录的Makefile中,实际上是主⽬录的makefile中有⽬标modules,下⾯有⼀定的规则来编译驱动;#KERN_VER = $(shell uname -r)#KERN_DIR = /lib/modules/$(KERN_VER)/build我们在ubuntu中编译内核的时候⽤这两句代码,因为在ubuntu中为我们保留了⼀份linux内核的源码树,我们编译的时候直接调⽤那个源码树的主Makefile以及⼀些头⽂件、内核函数等;了解规则以后,我们设置好KERN_DIR、obj-m这两个变量以后直接make就可以了;经过编译会得到下⾯⼀些⽂件:下⾯我们可以使⽤lsmod命令来看⼀下我们ubuntu机器现有的⼀些驱动可以看到有很多的驱动,下⾯我们使⽤insmod XXX命令来安装驱动,在使⽤lsmod命令看⼀下实验现象可以看到我们刚才安装的驱动放在了第⼀个位置;使⽤modinfo来打印⼀下驱动信息modinfo xxx.ko这⾥注意vermagic 这个的1.8.0-41是你⽤的linux内核源码树的版本号,只有这个编译的版本号与运⾏的linux内核版本⼀致的时候,驱动程序才会被安装注意license:GPL linux内核开元项⽬的许可证⼀般都是GPL这⾥尽量设置为GPL,否则有些情况下会出现错误;下⾯使⽤rmmod xxx删除驱动;-------------------------------------------------------------------------------------5:下⾯我们分析⼀下驱动。
Linux的电源管理架构Linux的源代码里,大部分都属于设备驱动程序的代码,因此,大多数电源管理(PM)的代码也是存在于驱动程序当中。
很多驱动程序可能只做了少量的工作,另外一些,例如使用电池供电的硬件平台(移动电话等)则会在电源管理上做了大量的工作。
这份文档对驱动程序如何与系统的电源管理部分交互做了一个大概的描述,尤其是关联到驱动程序核心中的模型和接口的共享,建议从事驱动程序相关领域的人通过本文档可以了解相关的背景知识。
设备电源管理的两种模型===================================驱动程序可以使用其中一种模型来使设备进入低功耗状态:1. 系统睡眠模型:驱动程序作为一部分,跟随系统级别的低功耗状态,就像”suspend”(也叫做”suspend-to-RAM”),或者对于有硬盘的系统,可以进入”hibernation”(也叫做”suspend-to-disk”)。
这种情况下,驱动程序,总线,设备类驱动一起,通过各种特定于设备的suspend和resume 方法,清晰地关闭硬件设备和各个软件子系统,然后在数据不被丢失的情况下重新激活硬件设备。
有些驱动程序可以管理硬件的唤醒事件,这些事件可以让系统离开低功耗状态。
这一特性可以通过相应的/sys/devices/…/power /wakeup文件来开启和关闭(对于Ethernet驱动程序,ethtool通过ioctl接口达到同样的目的);使能该功能可能会导致额外的功耗,但他让整个系统有更多的机会进入低功耗状态。
2. Runtime 电源管理模型:这种模型允许设备在系统运行阶段进入低功耗状态,原则上,他可以独立于其他的电源管理活动。
不过,通常设备之间不能单独进行控制(例如,父设备不能进入suspend,除非他的所有子设备已经进入suspend状态)。
此外,依据不同的总线类型,可能必须做出一些特别的操作来达到目的。
如果设备在系统运行阶段进入了低功耗状态,在系统级别的电源状态迁移时(suspend或hibernation)就必须做出特别的处理。
linux的bus、device、driver介绍 linux 通过device和driver分别管理系统中的设备和驱动,⽤bus将设备和驱动关联起来,bus可以看成是设备和驱动的媒介,可以匹配设备和驱动。
这样设备和驱动可以独⽴加载,互不影响。
sysfs是⼀个基于内存的⽂件系统,它的作⽤是将内核信息以⽂件的⽅式提供给⽤户程序使⽤。
我们都知道设备和对应的驱动都是由内核管理的,这些对于⽤户空间是不可见的。
现在通过sysfs,可以在⽤户空间直观的了解设备驱动的层次结构。
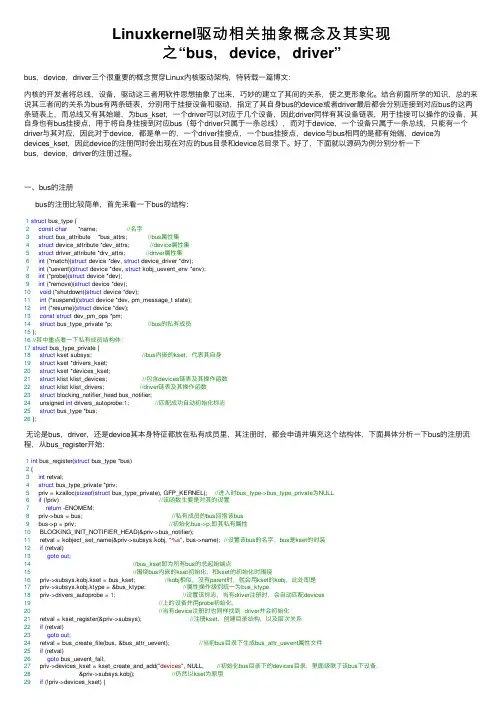
⼀、bus注册过程bus_type结构体代表⼀条总线,如下所⽰:struct bus_type {const char *name; //名称const char *dev_name;struct device *dev_root;struct device_attribute *dev_attrs; /* use dev_groups instead */const struct attribute_group **bus_groups;const struct attribute_group **dev_groups;const struct attribute_group **drv_groups;int (*match)(struct device *dev, struct device_driver *drv); //device和driver的匹配函数int (*uevent)(struct device *dev, struct kobj_uevent_env *env);int (*probe)(struct device *dev);int (*remove)(struct device *dev);void (*shutdown)(struct device *dev);int (*online)(struct device *dev);int (*offline)(struct device *dev);int (*suspend)(struct device *dev, pm_message_t state);int (*resume)(struct device *dev);const struct dev_pm_ops *pm;const struct iommu_ops *iommu_ops;struct subsys_private *p; struct lock_class_key lock_key;};struct subsys_private {struct kset subsys; //对应/sys/bus⽬录struct kset *devices_kset; //对应/sys/bus/devices⽬录struct list_head interfaces;struct mutex mutex;struct kset *drivers_kset; //对应/sys/bus/drivers⽬录struct klist klist_devices; //该bus下的所有devicestruct klist klist_drivers; //该bus下的所有driverstruct blocking_notifier_head bus_notifier;unsigned int drivers_autoprobe:1;struct bus_type *bus;struct kset glue_dirs;struct class *class;};向系统添加⼀条bus_type总线时,改总线会⾃动添加到/sys/bus⽬录下,bus⽬录是系统⾃动创建的,这个bus⽬录为static struct kset *bus_kset,定义在kernel/drivers/base/bus.c中。
Linux设备驱动程序原理及框架-内核模块入门篇内核模块介绍应用层加载模块操作过程内核如何支持可安装模块内核提供的接口及作用模块实例内核模块内核模块介绍Linux采用的是整体式的内核结构,这种结构采用的是整体式的内核结构,采用的是整体式的内核结构的内核一般不能动态的增加新的功能。
为此,的内核一般不能动态的增加新的功能。
为此,Linux提供了一种全新的机制,叫(可安装) 提供了一种全新的机制,可安装) 提供了一种全新的机制模块” )。
利用这个机制“模块”(module)。
利用这个机制,可以)。
利用这个机制,根据需要,根据需要,在不必对内核重新编译链接的条件将可安装模块动态的插入运行中的内核,下,将可安装模块动态的插入运行中的内核,成为内核的一个有机组成部分;成为内核的一个有机组成部分;或者从内核移走已经安装的模块。
正是这种机制,走已经安装的模块。
正是这种机制,使得内核的内存映像保持最小,的内存映像保持最小,但却具有很大的灵活性和可扩充性。
和可扩充性。
内核模块内核模块介绍可安装模块是可以在系统运行时动态地安装和卸载的内核软件。
严格来说,卸载的内核软件。
严格来说,这种软件的作用并不限于设备驱动,并不限于设备驱动,例如有些文件系统就是以可安装模块的形式实现的。
但是,另一方面,可安装模块的形式实现的。
但是,另一方面,它主要用来实现设备驱动程序或者与设备驱动密切相关的部分(如文件系统等)。
密切相关的部分(如文件系统等)。
课程内容内核模块介绍应用层加载模块操作过程内核如何支持可安装模块内核提供的接口及作用模块实例内核模块应用层加载模块操作过程内核引导的过程中,会识别出所有已经安装的硬件设备,内核引导的过程中,会识别出所有已经安装的硬件设备,并且创建好该系统中的硬件设备的列表树:文件系统。
且创建好该系统中的硬件设备的列表树:/sys 文件系统。
(udev 服务就是通过读取该文件系统内容来创建必要的设备文件的。
)。
Linuxkernel驱动相关抽象概念及其实现之“bus,device,driver”bus,device,driver三个很重要的概念贯穿Linux内核驱动架构,特转载⼀篇博⽂:内核的开发者将总线,设备,驱动这三者⽤软件思想抽象了出来,巧妙的建⽴了其间的关系,使之更形象化。
结合前⾯所学的知识,总的来说其三者间的关系为bus有两条链表,分别⽤于挂接设备和驱动,指定了其⾃⾝bus的device或者driver最后都会分别连接到对应bus的这两条链表上,⽽总线⼜有其始端,为bus_kset,⼀个driver可以对应于⼏个设备,因此driver同样有其设备链表,⽤于挂接可以操作的设备,其⾃⾝也有bus挂接点,⽤于将⾃⾝挂接到对应bus(每个driver只属于⼀条总线),⽽对于device,⼀个设备只属于⼀条总线,只能有⼀个driver与其对应,因此对于device,都是单⼀的,⼀个driver挂接点,⼀个bus挂接点,device与bus相同的是都有始端,device为devices_kset,因此device的注册同时会出现在对应的bus⽬录和device总⽬录下。
好了,下⾯就以源码为例分别分析⼀下bus,device,driver的注册过程。
⼀、bus的注册bus的注册⽐较简单,⾸先来看⼀下bus的结构:1struct bus_type {2const char *name; //名字3struct bus_attribute *bus_attrs; //bus属性集4struct device_attribute *dev_attrs; //device属性集5struct driver_attribute *drv_attrs; //driver属性集6int (*match)(struct device *dev, struct device_driver *drv);7int (*uevent)(struct device *dev, struct kobj_uevent_env *env);8int (*probe)(struct device *dev);9int (*remove)(struct device *dev);10void (*shutdown)(struct device *dev);11int (*suspend)(struct device *dev, pm_message_t state);12int (*resume)(struct device *dev);13const struct dev_pm_ops *pm;14struct bus_type_private *p; //bus的私有成员15 };16//其中重点看⼀下私有成员结构体:17struct bus_type_private {18struct kset subsys; //bus内嵌的kset,代表其⾃⾝19struct kset *drivers_kset;20struct kset *devices_kset;21struct klist klist_devices; //包含devices链表及其操作函数22struct klist klist_drivers; //driver链表及其操作函数23struct blocking_notifier_head bus_notifier;24 unsigned int drivers_autoprobe:1; //匹配成功⾃动初始化标志25struct bus_type *bus;26 };⽆论是bus,driver,还是device其本⾝特征都放在私有成员⾥,其注册时,都会申请并填充这个结构体,下⾯具体分析⼀下bus的注册流程,从bus_register开始:1int bus_register(struct bus_type *bus)2 {3int retval;4struct bus_type_private *priv;5 priv = kzalloc(sizeof(struct bus_type_private), GFP_KERNEL); //进⼊时bus_type->bus_type_private为NULL6if (!priv) //该函数主要是对其的设置7return -ENOMEM;8 priv->bus = bus; //私有成员的bus回指该bus9 bus->p = priv; //初始化bus->p,即其私有属性10 BLOCKING_INIT_NOTIFIER_HEAD(&priv->bus_notifier);11 retval = kobject_set_name(&priv->subsys.kobj, "%s", bus->name); //设置该bus的名字,bus是kset的封装12if (retval)13goto out;14//bus_kset即为所有bus的总起始端点15//围绕bus内嵌的kset初始化,和kset的初始化时围绕16 priv->subsys.kobj.kset = bus_kset; //kobj相似,没有parent时,就会⽤kset的kobj,此处即是17 priv->subsys.kobj.ktype = &bus_ktype; //属性操作级别统⼀为bus_ktype18 priv->drivers_autoprobe = 1; //设置该标志,当有driver注册时,会⾃动匹配devices19//上的设备并⽤probe初始化,20//当有device注册时也同样找到 driver并会初始化21 retval = kset_register(&priv->subsys); //注册kset,创建⽬录结构,以及层次关系22if (retval)23goto out;24 retval = bus_create_file(bus, &bus_attr_uevent); //当前bus⽬录下⽣成bus_attr_uevent属性⽂件25if (retval)26goto bus_uevent_fail;27 priv->devices_kset = kset_create_and_add("devices", NULL, //初始化bus⽬录下的devices⽬录,⾥⾯级联了该bus下设备,28 &priv->subsys.kobj); //仍然以kset为原型29if (!priv->devices_kset) {30 retval = -ENOMEM;31goto bus_devices_fail;32 }33 priv->drivers_kset = kset_create_and_add("drivers", NULL, //初始化bus⽬录下的drivers⽬录,⾥⾯级联了该bus下设备的driver34 &priv->subsys.kobj);35if (!priv->drivers_kset) {36 retval = -ENOMEM;37goto bus_drivers_fail;38 }39 klist_init(&priv->klist_devices, klist_devices_get, klist_devices_put); //初始化klist_devices⾥的操作函数成员40 klist_init(&priv->klist_drivers, NULL, NULL); //klist_drivers⾥的操作函数置空41 retval = add_probe_files(bus); //增加bus_attr_drivers_probe和bus_attr_drivers_autoprobe42if (retval) //属性⽂件43goto bus_probe_files_fail;44 retval = bus_add_attrs(bus); //增加默认的属性⽂件45if (retval)46goto bus_attrs_fail;47 pr_debug("bus: '%s': registered/n", bus->name);48return0;49 bus_attrs_fail: //以下为错误处理50 remove_probe_files(bus);51 bus_probe_files_fail:52 kset_unregister(bus->p->drivers_kset);53 bus_drivers_fail:54 kset_unregister(bus->p->devices_kset);55 bus_devices_fail:56 bus_remove_file(bus, &bus_attr_uevent);57 bus_uevent_fail:58 kset_unregister(&bus->p->subsys);59out:60 kfree(bus->p);61 bus->p = NULL;62return retval;63 }由此可见,bus⼜是kset的封装,bus_register主要完成了其私有成员bus_type_private的初始化,并初始化了其下的两个⽬录devices和drivers,及其属性⽂件,bus有个⾃⼰的根⽬录也就是bus有个起始端点,是bus_kset,经过此番的注册,bus⽬录下将会出现我们注册的bus,并且其下会有device和driver两个⼦⽬录,代表它下⾯的driver和device链表。
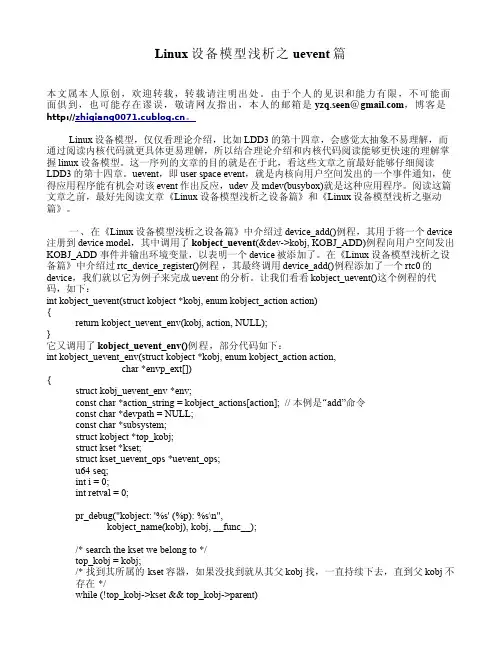
Linux设备模型的关键之一:Uevent1. Uevent的功能Uevent是Kobject的一部分,用于在Kobject状态发生改变时,例如增加、移除等,通知用户空间程序。
用户空间程序收到这样的事件后,会做相应的处理。
该机制通常是用来支持热拔插设备的,例如U盘插入后,USB相关的驱动软件会动态创建用于表示该U盘的device结构(相应的也包括其中的kobject),并告知用户空间程序,为该U盘动态的创建/dev/目录下的设备节点,更进一步,可以通知其它的应用程序,将该U盘设备mount到系统中,从而动态的支持该设备。
2. Uevent在kernel中的位置下面图片描述了Uevent模块在内核中的位置:由此可知,Uevent的机制是比较简单的,设备模型中任何设备有事件需要上报时,会触发Uevent提供的接口。
Uevent模块准备好上报事件的格式后,可以通过两个途径把事件上报到用户空间:一种是通过kmod模块,直接调用用户空间的可执行文件;另一种是通过netlink通信机制,将事件从内核空间传递给用户空间。
注1:有关kmod和netlink,会在其它文章中描述,因此本文就不再详细说明了。
3. Uevent的内部逻辑解析3.1 Source Code位置Uevent的代码比较简单,主要涉及kobject.h和kobject_uevent.c两个文件,如下:include/linux/kobject.hlib/kobject_uevent.c3.2 数据结构描述kobject.h定义了uevent相关的常量和数据结构,如下:kobject_action1: /* include/linux/kobject.h, line 50 */2: enum kobject_acTIon {。
Linux摄像头驱动学习之:(四)UVC-摄像头驱动框架分析UVC: USB Video ClassUVC驱动:drivers\media\video\uvc\uvc_driver.c分析:1. usb_register(&uvc_driver.driver);2. uvc_probeuvc_register_videovdev = video_device_alloc();vdev->fops = &uvc_fops;video_register_device在下载 uvc specification,UVC 1.5 Class specification.pdf : 有详细描述USB_Video_Example 1.5.pdf : 有⽰例通过VideoControl Interface来控制,通过VideoStreaming Interface来读视频数据,VC⾥含有多个Unit/Terminal等功能模块,可以通过访问这些模块进⾏控制,⽐如调亮度分析UVC驱动调⽤过程:const struct v4l2_file_operations uvc_fops = {.owner = THIS_MODULE,.open = uvc_v4l2_open,.release = uvc_v4l2_release,.ioctl = uvc_v4l2_ioctl,.read = uvc_v4l2_read,.mmap = uvc_v4l2_mmap,.poll = uvc_v4l2_poll,};1. open:uvc_v4l2_open2. VIDIOC_QUERYCAP // video->streaming->type 应该是在设备被枚举时分析描述符时设置的if (video->streaming->type == V4L2_BUF_TYPE_VIDEO_CAPTURE)cap->capabilities = V4L2_CAP_VIDEO_CAPTURE| V4L2_CAP_STREAMING;elsecap->capabilities = V4L2_CAP_VIDEO_OUTPUT| V4L2_CAP_STREAMING;3. VIDIOC_ENUM_FMT // format数组应是在设备被枚举时设置的format = &video->streaming->format[fmt->index];4. VIDIOC_G_FMTuvc_v4l2_get_format // USB摄像头⽀持多种格式fromat, 每种格式下有多种frame(⽐如分辨率)struct uvc_format *format = video->streaming->cur_format;struct uvc_frame *frame = video->streaming->cur_frame;5. VIDIOC_TRY_FMTuvc_v4l2_try_format/* Check if the hardware supports the requested format. *//* Find the closest image size. The distance between image sizes is* the size in pixels of the non-overlapping regions between the* requested size and the frame-specified size.*/6. VIDIOC_S_FMT // 只是把参数保存起来,还没有发给USB摄像头uvc_v4l2_set_formatuvc_v4l2_try_formatvideo->streaming->cur_format = format;video->streaming->cur_frame = frame;7. VIDIOC_REQBUFSuvc_alloc_buffersfor (; nbuffers > 0; --nbuffers) {mem = vmalloc_32(nbuffers * bufsize);if (mem != NULL)break;}8. VIDIOC_QUERYBUFuvc_query_buffer__uvc_query_buffermemcpy(v4l2_buf, &buf->buf, sizeof *v4l2_buf); // 复制参数9. mmapuvc_v4l2_mmap10. VIDIOC_QBUFuvc_queue_bufferlist_add_tail(&buf->stream, &queue->mainqueue);list_add_tail(&buf->queue, &queue->irqqueue);11. VIDIOC_STREAMONuvc_video_enable(video, 1) // 把所设置的参数发给硬件,然后启动摄像头/* Commit the streaming parameters. */uvc_commit_videouvc_set_video_ctrl /* 设置格式fromat, frame */ret = __uvc_query_ctrl(video->dev /* 哪⼀个USB设备 */, SET_CUR, 0,video->streaming->intfnum /* 哪⼀个接⼝: VS */,probe ? VS_PROBE_CONTROL : VS_COMMIT_CONTROL, data, size,uvc_timeout_param);/* 启动:Initialize isochronous/bulk URBs and allocate transfer buffers. */uvc_init_video(video, GFP_KERNEL);uvc_init_video_isoc / uvc_init_video_bulkurb->complete = uvc_video_complete; (收到数据后此函数被调⽤,它⼜调⽤video->decode(urb, video, buf); ==>uvc_video_decode_isoc/uvc_video_encode_bulk => uvc_queue_next_buffer => wake_up(&buf->wait);)usb_submit_urb12. polluvc_v4l2_polluvc_queue_pollpoll_wait(file, &buf->wait, wait); // 休眠等待有数据13. VIDIOC_DQBUFuvc_dequeue_bufferlist_del(&buf->stream);14. VIDIOC_STREAMOFFuvc_video_enable(video, 0);usb_kill_urb(urb);usb_free_urb(urb);分析设置亮度过程:ioctl: VIDIOC_S_CTRLuvc_ctrl_setuvc_ctrl_commit__uvc_ctrl_commit(video, 0);uvc_ctrl_commit_entity(video->dev, entity, rollback);ret = uvc_query_ctrl(dev /* 哪⼀个USB设备 */, SET_CUR, ctrl->entity->id /* 哪⼀个unit/terminal */,dev->intfnum /* 哪⼀个接⼝: VC interface */, ctrl->info->selector,uvc_ctrl_data(ctrl, UVC_CTRL_DATA_CURRENT),ctrl->info->size);总结:1. UVC设备有2个interface: VideoControl Interface, VideoStreaming Interface2. VideoControl Interface⽤于控制,⽐如设置亮度。
Linux驱动中,probe函数何时被调⽤最近看到linux的设备驱动模型,关于Kobject、Kset等还不是很清淅。
看到了struct device_driver这个结构时,想到⼀个问题:它的初始化函数到底在哪⾥调⽤呢?以前搞PCI驱动时⽤pci驱动注册函数就可以调⽤它,搞s3c2410驱动时只要在mach-smdk2410.c中的struct platform_device *smdk2410_devices {}中加⼊设备也会调⽤。
但从来就没有想过具体的驱动注册并调⽤probe的过程。
于是打开SourceInsight追踪了⼀下:从driver_register看起:int driver_register(struct device_driver * drv){klist_init(&drv->klist_devices, klist_devices_get, klist_devices_put);init_completion(&drv->unloaded);return bus_add_driver(drv);}klist_init与init_completion没去管它,可能是2.6的这个设备模型要做的⼀些⼯作。
直觉告诉我要去bus_add_driver。
bus_add_driver中:都是些Kobject 与 klist 、attr等。
还是与设备模型有关的。
但是其中有⼀句:driver_attach(drv);单听名字就很像:void driver_attach(struct device_driver * drv){bus_for_each_dev(drv->bus, NULL, drv, __driver_attach);}这个熟悉,遍历总线上的设备并设⽤__driver_attach。
在__driver_attach中⼜主要是这样:driver_probe_device(drv, dev);跑到driver_probe_device中去看看:有⼀段很重要:if (drv->bus->match && !drv->bus->match(dev, drv))goto Done;明显,是调⽤的驱动的总线上的match函数。
linux的驱动调用方法Linux驱动调用方法Linux是一种广泛使用的开源操作系统,它具有稳定、安全、高效和可定制的特点。
作为开源系统,Linux支持各种硬件设备,但要让硬件设备能够正常工作,我们需要使用对应的设备驱动程序。
本文将详细介绍Linux 的驱动调用方法,从加载和安装驱动到使用驱动,一步一步回答你的问题。
第一步:了解设备驱动设备驱动程序是操作系统内的一类软件,它通过与硬件设备交互来实现操作系统与硬件之间的通信。
设备驱动程序为应用程序提供了一系列接口,使其可以访问和控制硬件设备。
Linux设备驱动程序通常包括两个部分:设备驱动模块和设备驱动文件。
设备驱动模块是驱动程序的实现代码,它以动态链接库的形式存在。
设备驱动模块可以被加载到内核中,从而成为内核的一部分。
设备驱动文件则是一些特殊的文件,它们代表了系统中的具体硬件设备。
第二步:加载设备驱动在使用设备驱动之前,我们需要将它加载到内核中。
在Linux系统中,可以使用modprobe命令或insmod命令来加载设备驱动模块。
modprobe 命令会自动解析依赖关系,并加载相关的模块。
例如,如果我们要加载名为"mydriver"的设备驱动模块,可以使用以下命令:sudo modprobe mydriver或者,如果设备驱动程序没有被自动加载,可以使用insmod命令来手动加载:sudo insmod /path/to/mydriver.ko需要注意的是,加载设备驱动需要系统管理员权限。
第三步:安装设备驱动在加载设备驱动之前,我们需要确定设备驱动文件的位置。
通常,设备驱动文件位于/sys/class目录下的一个子目录中。
例如,设备驱动文件可能位于/sys/class/mydriver目录中。
为了安装设备驱动,我们需要创建一个符号链接到设备驱动文件。
在Linux 系统中,可以使用udev服务来自动创建符号链接。
首先,我们需要创建一个udev规则文件。
Linux驱动总结3-unlocked_ioctl和堵塞(waitqueue)读写函数的实现学习了驱动程序的设计,感觉在学习驱动的同时学习linux内核,也是很不错的过程哦,做了几个实验,该做一些总结,只有不停的作总结才能印象深刻。
我的平台是虚拟机,fedora14,内核版本为2.6.38.1.其中较之前的版本存在较大的差别,具体的实现已经在上一次总结中给出了。
今天主要总结的是ioctl和堵塞读写函数的实现。
一、ioctl函数的实现首先说明在2.6.36以后ioctl函数已经不再存在了,而是用unlocked_ioctl和compat_ioctl两个函数实现以前版本的ioctl函数。
同时在参数方面也发生了一定程度的改变,去除了原来ioctl中的struct inode参数,同时改变了返回值。
但是驱动设计过程中存在的问题变化并不是很大,同样在应用程序设计中我们还是采用ioctl实现访问,而并不是unlocked_ioctl函数,因此我们还可以称之为ioctl函数的实现。
ioctl函数的实现主要是用来实现具体的硬件控制,采用相应的命令控制硬件的具体操作,这样就能使得硬件的操作不再是单调的读写操作。
使得硬件的使用更加的方便。
ioctl函数实现主要包括两个部分,首先是命令的定义,然后才是ioctl函数的实现,命令的定义是采用一定的规则。
ioctl的命令主要用于应用程序通过该命令操作具体的硬件设备,实现具体的操作,在驱动中主要是对命令进行解析,通过switch-case 语句实现不同命令的控制,进而实现不同的硬件操作。
ioctl函数的命令定义方法:int (*unlocked_ioctl)(struct file*filp,unsigned int cmd,unsigned long arg)虽然其中没有指针的参数,但是通常采用arg传递指针参数。
cmd是一个命令。
每一个命令由一个整形数据构成(32bits),将一个命令分成四部分,每一部分实现具体的配置,设备类型(幻数)8bits,方向2bits,序号8bits,数据大小13/14bits。
Linux设备驱动之USB hub驱动Linux设备驱动之USB hub驱动------------------------------------------本文系本站原创,欢迎!请注明出处:------------------------------------------一:前言继UHCI的驱动之后,我们对USB Control的运作有了一定的了解.在接下来的分析中,我们对USB设备的驱动做一个全面的分析,我们先从HUB的驱动说起.关于HUB,usb2.0 spec上有详细的定义,基于这部份的代码位于linux-2.6.25/drivers/usb/core下,也就是说,这部份代码是位于core下,和具体设备是无关的,因为各厂商的hub都是按照spec的要求来设计的.二:UHCI驱动中的root hub记得在分析UHCI驱动的时候,曾详细分析过root hub的初始化操作.为了分析方便,将代码片段列出如下:usb_add_hcd() à usb_alloc_dev():struct usb_device *usb_alloc_dev(struct usb_device *parent,struct usb_bus *bus, unsigned port1){…………//usb_device,内嵌有struct device结构,对这个结构进行初始化device_initialize(&dev->dev);dev->dev.bus = &usb_bus_type;dev->dev.type = &usb_device_type;…………}一看到前面对dev的赋值,根据我们对设备模型的理解,一旦这个device进行注册,就会发生driver和device的匹配过程了.不过,现在还不是分析这个过程的时候,我们先来看一下,USB子系统中的两种驱动.三:USB子系统中的两种驱动linux-2.6.25/drivers/usb/core/driver.c中,我们可以找到两种register driver的方式,分别为usb_register_driver()和usb_register_device_driver().分别来分析一下这两个接口.usb_register_device_driver()接口的代码如下:int usb_register_device_driver(struct usb_device_driver *new_udriver,struct module *owner){int retval = 0;if (usb_disabled())return -ENODEV;new_udriver->drvwrap.for_devices = 1;new_udriver-> = (char *) new_udriver->name;new_udriver->drvwrap.driver.bus = &usb_bus_type;new_udriver->drvwrap.driver.probe = usb_probe_device;new_udriver->drvwrap.driver.remove = usb_unbind_device;new_udriver->drvwrap.driver.owner = owner;retval = driver_register(&new_udriver->drvwrap.driver);if (!retval) {pr_info(“%s: registered new device driver %s\n”,usbcore_name, new_udriver->name);usbfs_update_special();} else {printk(KERN_ERR “%s: error %d registering device ““ driver %s\n”,usbcore_name, retval, new_udriver->name);}return retval;}首先,通过usb_disabled()来判断一下usb是否被禁用,如果被禁用,当然就不必执行下面的流程了,直接退出即可.从上面的代码,很明显可以看到, struct usb_device_driver 对struct device_driver进行了一次封装,我们注意一下这里的赋值操作:new_udriver->drvwrap.for_devices = 1.等等.这些在后面都是用派上用场的.usb_register_driver()的代码如下:int usb_register_driver(struct usb_driver *new_driver, struct module *owner, const char *mod_name){int retval = 0;if (usb_disabled())return -ENODEV;new_driver->drvwrap.for_devices = 0;new_driver-> = (char *) new_driver->name;new_driver->drvwrap.driver.bus = &usb_bus_type;new_driver->drvwrap.driver.probe = usb_probe_interface;new_driver->drvwrap.driver.remove = usb_unbind_interface;new_driver->drvwrap.driver.owner = owner;new_driver->drvwrap.driver.mod_name = mod_name;spin_lock_init(&new_driver->dynids.lock);INIT_LIST_HEAD(&new_driver->dynids.list);retval = driver_register(&new_driver->drvwrap.driver);if (!retval) {pr_info(“%s: registered new interface dr iver %s\n”,usbcore_name, new_driver->name);usbfs_update_special();usb_create_newid_file(new_driver);} else {printk(KERN_ERR “%s: error %d registering interface ““ driver %s\n”,usbcore_name, retval, new_driver->name);}return retval;}很明显,在这里接口里,将new_driver->drvwrap.for_devices设为了0.而且两个接口的porbe()函数也不一样.其实,对于usb_register_driver()可以看作是usb设备中的接口驱动,而usb_register_device_driver()是一个单纯的USB设备驱动.四: hub的驱动分析4.1: usb_bus_type->match()的匹配过程usb_bus_type->match()用来判断驱动和设备是否匹配,它的代码如下:static int usb_device_match(struct device *dev, struct device_driver *drv){/* 整理by *///usb device的情况if (is_usb_device(dev)) {/* interface drivers never match devices */ if (!is_usb_device_driver(drv))return 0;/* TODO: Add real matching code */ return 1;}//interface的情况else {struct usb_interface *intf;struct usb_driver *usb_drv;const struct usb_device_id *id;/*整理by */if (is_usb_device_driver(drv))return 0;intf = to_usb_interface(dev);usb_drv = to_usb_driver(drv);id = usb_match_id(intf, usb_drv->id_table);if (id)return 1;id = usb_match_dynamic_id(intf, usb_drv);if (id)return 1;}return 0;}这里的match会区分上面所说的两种驱动,即设备的驱动和接口的驱动. is_usb_device()的代码如下:static inline int is_usb_device(const struct device *dev){return dev->type == &usb_device_type;}很明显,对于root hub来说,这个判断是肯定会满足的.static inline int is_usb_device_driver(struct device_driver *drv){return container_of(drv, struct usbdrv_wrap, driver)->for_devices;}回忆一下,我们在分析usb_register_device_driver()的时候,不是将new_udriver->drvwrap.for_devices置为了1么?所以对于usb_register_device_driver()注册的驱动来说,这里也是会满足的.因此,对应root hub的情况,从第一个if就会匹配到usb_register_device_driver()注册的驱动.对于接口的驱动,我们等遇到的时候再来进行分析.4.2:root hub的驱动入口既然我们知道,root hub会匹配到usb_bus_type->match()的驱动,那这个驱动到底是什么呢?我们从usb子系统的初始化开始说起.在linux-2.6.25/drivers/usb/core/usb.c中.有这样的一段代码:subsys_initcall(usb_init);对于subsys_initcall()我们已经不陌生了,在很多地方都会遇到它.在系统初始化的时候,会调用到它对应的函数.在这里,即为usb_init().在usb_init()中,有这样的代码片段:static int __init usb_init(void){…………retval = usb_register_device_driver(&usb_generic_driver, THIS_MODULE);if (!retval)goto out;……}在这里终于看到usb_register_device_driver()了. usb_generic_driver会匹配到所有usb 设备.定义如下:struct usb_device_driver usb_generic_driver = {.name = “usb”,.probe = generic_probe,.disconnect = generic_disconnect,#ifdefCONFIG_PM.suspend = generic_suspend,.resume = generic_resume,#endif.supports_autosuspend = 1,};现在是到分析probe()的时候了.我们这里说的并不是usb_generic_driver中的probe,而是封装在struct usb_device_driver中的driver对应的probe函数.在上面的分析, usb_register_device_driver()将封装的driver的probe()函数设置为了usb_probe_device().代码如下:static int usb_probe_device(struct device *dev){struct usb_device_driver *udriver = to_usb_device_driver(dev->driver);struct usb_device *udev;int error = -ENODEV;dev_dbg(dev, “%s\n”, __FUNCTION__);//再次判断dev是否是usb deviceif (!is_usb_device(dev)) /* Sanity check */return error;udev = to_usb_device(dev);/* TODO: Add real matching code *//* The device should always appear to be in use* unless the driver suports autosuspend.*///pm_usage_t: autosuspend计数.如果此计数为1,则不允许autosuspendudev->pm_usage_t = !(udriver->supports_autosuspend);error = udriver->probe(udev);return error;}首先,可以通过container_of()将封装的struct device, struct device_driver转换为struct usb_device和struct usb_device_driver.然后,再执行一次安全检查,判断dev是否是属于一个usb device.在这里,我们首次接触到了hub suspend.如果不支持suspend(udriver->supports_autosuspend为0),则udev->pm_usage_t被设为1,也就是说,它不允许设备suspend.否则,将其初始化为0. 最后,正如你所看到的,流程转入到了usb_device_driver->probe().对应到root hub,流程会转入到generic_probe().代码如下:static int generic_probe(struct usb_device *udev){int err, c;/* put device-specific files into sysfs */usb_create_sysfs_dev_files(udev);/* Choose and set the configuration.This registers the interfaces* with the driver core and lets interface drivers bind to them.*/if (udev->authorized == 0)dev_err(&udev->dev, “Device is not authorized for usage\n”);else {//选择和设定一个配置c = usb_choose_configuration(udev);if (c >= 0) {err = usb_set_configuration(udev, c);if (err) {dev_err(&udev->dev, “can’t set config #%d, error %d\n”,c, err);/* This need not be fatal.The user can try to* set other configurations. */}}}/* USB device state == configured ... usable */usb_notify_add_device(udev);return 0;}usb_create_sysfs_dev_files()是在sysfs中显示几个属性文件,不进行详细分析,有兴趣的可以结合之前分析的>来看下代码.usb_notify_add_device()是有关notify链表的操作,这里也不做详细分析.至于udev->authorized,在root hub的初始化中,是会将其初始化为1的.后面的逻辑就更简单了.为root hub 选择一个配置然后再设定这个配置.还记得我们在分析root hub的时候,在usb_new_device()中,会将设备的所有配置都取出来,然后将它们放到了usb_device-> config.现在这些信息终于会派上用场了.不太熟悉的,可以看下本站之前有关usb控制器驱动的文档.Usb2.0 spec上规定,对于hub设备,只能有一个config,一个interface,一个endpoint.实际上,在这里,对hub的选择约束不大,反正就一个配置,不管怎么样,选择和设定都是这个配置.不过,为了方便以后的分析,我们还是跟进去看下usb_choose_configuration()和usb_set_configuration()的实现.实际上,经过这两个函数之后,设备的probe()过程也就会结束了.4.2.1:usb_choose_configuration()函数分析usb_choose_configuration()的代码如下://为usb device选择一个合适的配置int usb_choose_configuration(struct usb_device *udev){int i;int num_configs;int insufficient_power = 0;struct usb_host_config *c, *best;best = NULL;//config数组c = udev->config;//config项数num_configs = udev->descriptor.bNumConfigurations;//遍历所有配置项for (i = 0; istruct usb_interface_descriptor *desc = NULL;/* It’s possible that a config has no interfaces! *///配置项的接口数目//取配置项的第一个接口if (c->desc.bNumInterfaces > 0)desc = &c->intf_cache[0]->altsetting->desc;/** HP’s USB bus-powered keyboard has only one configuration * and it claims to be self-powered; other devices may have* similar errors in their descriptors.If the next test* were allowed to execute, such configurations would always* be rejected and the devices would not work as expected.* In the meantime, we run the risk of selecting a config* that requires external power at a time when that power* isn’t available.It seems to be the lesser of two evils.** Bugzilla #6448 reports a device that appears to crash* when it receives a GET_DEVICE_STATUS request!We don’t * have any other way to tell whether a device is self-powered,* but since we don’t use that information anywhere but here,* the call has been removed.** Maybe the GET_DEVICE_STATUS call and the test below can* be reinstated when device firmwares bee more reliable.* Don’t hold your breath.*/#if 0/* Rule out self-powered configs for a bus-powered device */ if (bus_powered && (c->desc.bmAttributes &USB_CONFIG_ATT_SELFPOWER))continue;#endif/** The next test may not be as effective as it should be.* Some hubs have errors in their descriptor, claiming* to be self-powered when they are really bus-powered.* We will overestimate the amount of current such hubs* make available for each port.** This is a fairly benign sort of failure.It won’t* cause us to reject configurations that we should have* accepted.*//* Rule out configs that draw too much bus current *///电源不足.配置描述符中的电力是所需电力的1/2if (c->desc.bMaxPower * 2 > udev->bus_mA) {insufficient_power++;continue;}/* When the first config’s first interface is one of Microsoft’s* pet nonstandard Ethernet-over-USB protocols, ignore it unless* this kernel has enabled the necessary host side driver.*/if (i == 0 && desc && (is_rndis(desc) || is_activesync(desc))) {#if !defined(CONFIG_USB_NET_RNDIS_HOST) && !defined(CONFIG_USB_NET_RNDIS_HOST_MODULE)continue;#elsebest = c;#endif}/* From the remaining configs, choose the first one whose* first interface is for a non-vendor-specific class.* Reason: Linux is more likely to have a class driver* than a vendor-specific driver. *///选择一个不是USB_CLASS_VENDOR_SPEC的配置else if (udev->descriptor.bDeviceClass !=USB_CLASS_VENDOR_SPEC &&(!desc || desc->bInterfaceClass !=USB_CLASS_VENDOR_SPEC)) {best = c;break;}/* If all the remaining configs are vendor-specific,* choose the first one. */else if (!best)best = c;}if (insufficient_power > 0)dev_info(&udev->dev, “rejected %d configuration%s ““due to insufficient available bus power\n”,insufficient_power, plural(insufficient_power));//如果选择好了配置,返回配置的序号,否则,返回-1if (best) {i = best->desc.bConfigurationValue;dev_info(&udev->dev,“configuration #%d chosen from %d choice%s\n”,i, num_configs, plural(num_configs));} else {i = -1;dev_warn(&udev->dev,“no configuration chosen from %d choice%s\n”,num_configs, plural(num_configs));}return i;}Linux按照自己的喜好选择好了配置之后,返回配置的序号.不过对于HUB来说,它有且仅有一个配置.4.2.2:usb_set_configuration()函数分析既然已经选好配置了,那就告诉设备选好的配置,这个过程是在usb_set_configuration()中完成的.它的代码如下:int usb_set_configuration(struct usb_device *dev, int configuration){int i, ret;struct usb_host_config *cp = NULL;struct usb_interface **new_interfaces = NULL;int n, nintf;if (dev->authorized == 0 || configuration == -1) configuration = 0;else {for (i = 0; i descriptor.bNumConfigurations; i++) {if (dev->config.desc.bConfigurationValue ==configuration) {cp = &dev->config;break;}}}if ((!cp && configuration != 0))return -EINV AL;/* The USB spec says configuration 0 means unconfigured. * But if a device includes a configuration numbered 0,* we will accept it as a correctly configured state.* Use -1 if you really want to unconfigure the device.*/if (cp && configuration == 0)dev_warn(&dev->dev, “config 0 descriptor??\n”);首先,根据选择好的配置号找到相应的配置,在这里要注意了, dev->config[]数组中的配置并不是按照配置的序号来存放的,而是按照遍历到顺序来排序的.因为有些设备在发送配置描述符的时候,并不是按照配置序号来发送的,例如,配置2可能在第一次GET_CONFIGURATION 就被发送了,而配置1可能是在第二次GET_CONFIGURATION才能发送.取得配置描述信息之后,要对它进行有效性判断,注意一下本段代码的最后几行代码:usb2.0 spec上规定,0号配置是无效配置,但是可能有些厂商的设备并末按照这一约定,所以在linux 中,遇到这种情况只是打印出警告信息,然后尝试使用这一配置./* Allocate memory for new interfaces before doing anything else,* so that if we run out then nothing will have changed. */n = nintf = 0;if (cp) {//接口总数nintf = cp->desc.bNumInterfaces;//interface指针数组,new_interfaces = kmalloc(nintf * sizeof(*new_interfaces),GFP_KERNEL);if (!new_interfaces) {dev_err(&dev->dev, “Out of memory\n”);return -ENOMEM;}for (; nnew_interfaces[n] = kzalloc(sizeof(struct usb_interface),GFP_KERNEL);if (!new_interfaces[n]) {dev_err(&dev->dev, “Out of memory\n”);ret = -ENOMEM;free_interfaces:while (--n >= 0)kfree(new_interfaces[n]);kfree(new_interfaces);return ret;}}//如果总电源小于所需电流,打印警告信息i = dev->bus_mA - cp->desc.bMaxPower * 2;if (idev_warn(&dev->dev, “new config #%d exceeds power ““limit by %dmA\n”,configuration, -i);}在这里,注要是为new_interfaces分配空间,要这意的是, new_interfaces是一个二级指针,它的最终指向是struct usb_interface结构.特别的,如果总电流数要小于配置所需电流,则打印出警告消息.实际上,这种情况在usb_choose_configuration()中已经进行了过滤./* Wake up the device so we can send it the Set-Config request */ //要对设备进行配置了,先唤醒它ret = usb_autoresume_device(dev);if (ret)goto free_interfaces;/* if it’s already configured, clear out old state first.* getting rid of old interfaces means unbinding their drivers.*///不是处于ADDRESS状态,先清除设备的状态if (dev->state != USB_STATE_ADDRESS)usb_disable_device(dev, 1); /* Skip ep0 *///发送控制消息,选取配置ret = usb_control_msg(dev, usb_sndctrlpipe(dev, 0),USB_REQ_SET_CONFIGURATION, 0, configuration, 0,NULL, 0, USB_CTRL_SET_TIMEOUT);if (ret/* All the old state is gone, so what else can we do?* The device is probably useless now anyway.*/cp = NULL;}//dev->actconfig存放的是当前设备选取的配置dev->actconfig = cp;if (!cp) {usb_set_device_state(dev, USB_STA TE_ADDRESS);usb_autosuspend_device(dev);goto free_interfaces;}//将状态设为CONFIGUREDusb_set_device_state(dev, USB_STA TE_CONFIGURED);接下来,就要对设备进行配置了,首先,将设备唤醒.回忆一下我们在分析UHCI驱动时,列出来的设备状态图.只有在ADDRESS状态才能转入到CONFIG状态.(SUSPEND状态除外). 所以,如果设备当前不是处于ADDRESS状态,就需要将设备的状态初始化.usb_disable_device()函数是个比较重要的操作,在接下来再对它进行详细分析.接着,发送SET_CONFIGURA TION的Control消息给设备,用来选择配置最后,将dev->actconfig指向选定的配置,将设备状态设为CONFIG/* Initialize the new interface structures and the* hc/hcd/usbcore interface/endpoint state.*///遍历所有的接口for (i = 0; istruct usb_interface_cache *intfc;struct usb_interface *intf;struct usb_host_interface *alt;cp->interface = intf = new_interfaces;intfc = cp->intf_cache;intf->altsetting = intfc->altsetting;intf->num_altsetting = intfc->num_altsetting;//是否关联的接口描述符,定义在minor usb 2.0 spec中intf->intf_assoc = find_iad(dev, cp, i);kref_get(&intfc->ref);//选择0号设置alt = usb_altnum_to_altsetting(intf, 0);/* No altsetting 0?We’ll assume the first altsetting.* We could use a GetInterface call, but if a device is* so non-pliant that it doesn’t have altsetting 0* then I would n’t trust its reply anyway.*///如果0号设置不存在,选排在第一个设置if (!alt)alt = &intf->altsetting[0];//当前的配置intf->cur_altsetting = alt;usb_enable_interface(dev, intf);intf->dev.parent = &dev->dev;intf->dev.driver = NULL;intf->dev.bus = &usb_bus_type;intf->dev.type = &usb_if_device_type;intf->dev.dma_mask = dev->dev.dma_mask;device_initialize(&intf->dev);mark_quiesced(intf);sprintf(&intf->dev.bus_id[0], “%d-%s:%d.%d”,dev->bus->busnum, dev->devpath,configuration, alt->desc.bInterfaceNumber);}kfree(new_interfaces);if (cp->string == NULL)cp->string = usb_cache_string(dev, cp->desc.iConfiguration);之前初始化的new_interfaces在这里终于要派上用场了.初始化各接口,从上面的初始化过程中,我们可以看出:Intf->altsetting,表示接口的各种设置Intf->num_altsetting:表示接口的设置数目Intf->intf_assoc:接口的关联接口(定义于minor usb 2.0 spec)Intf->cur_altsetting:接口的当前设置.结合之前在UHCI中的分析,我们总结一下:Usb_dev->config,其实是一个数组,存放设备的配置.usb_dev->config[m]-> interface[n]表示第m个配置的第n个接口的intercace结构.(m,bsp; dev->bus->busnum, dev->devpath,configuration, alt->desc.bInterfaceNumber);dev指的是这个接口所属的usb_dev,结合我们之前在UHCI中关于usb设备命名方式的描述.可得出它的命令方式如下:USB总线号-设备路径:配置号.接口号.例如,在我的虚拟机上:[rootlocalhost devices]# pwd/sys/bus/usb/devices[rootlocalhost devices]# ls1-0:1.0usb1[rootlocalhost devices]#可以得知,系统只有一个usb control.1-0:1.0:表示,第一个usb cont意思上看来,它是标记接口为停止状态.它的”反函数”是mark_active().两个函数如下示:static inline void mark_active(struct usb_interface *f){f->is_active = 1;f->dev.power.power_state.event = PM_EVENT_ON;}static inline void mark_quiesced(struct usb_interface *f){f->is_active = 0;f->dev.power.power_state.event = PM_EVENT_SUSPEND; }从代码看来,它只是对接口的活动标志(is_active)进行了设置./* Now that all the interfaces are set up, register them* to trigger binding of drivers to interfaces.probe()* routines may install different altsettings and may* claim() any interfaces not yet bound.Many class drivers* need that: CDC, audio, video, etc.*///注册每一个接口?for (i = 0; istruct usb_interface *intf = cp->interface;dev_dbg(&dev->dev,“addi ng %s (config #%d, interface %d)\n”,intf->dev.bus_id, configuration,intf->cur_altsetting->desc.bInterfaceNumber);ret = device_add(&intf->dev);if (ret != 0) {dev_err(&dev->dev, “device_add(%s) --> %d\n”,intf->dev.bus_id, ret);continue;}usb_create_sysfs_intf_files(intf);}//使设备suspendusb_autosuspend_device(dev);return 0;}最后,注册intf内嵌的device结构.设备配置完成了,为了省电,可以将设备置为SUSPEND状态.这个函数中还有几个比较重要的子函数,依次分析如下:1: usb_disable_device()函数.顾名思义,这个函数是将设备disable掉.代码如下:void usb_disable_device(struct usb_device *dev, int skip_ep0){int i;dev_dbg(&dev->dev, “%s nuking %s URBs\n”, __FUNCTION__, skip_ep0 ? “non-ep0” : “all”);for (i = skip_ep0; iusb_disable_endpoint(dev, i);usb_disable_endpoint(dev, i + USB_DIR_IN);}dev->toggle[0] = dev->toggle[1] = 0;/* getting rid of interfaces will disconnect* any drivers bound to them (a key side effect)*/if (dev->actconfig) {for (i = 0; i actconfig->desc.bNumInterfaces; i++) {struct usb_interface *interface;/* remove this interface if it has been registered */interface = dev->actconfig->interface;if (!device_is_registered(&interface->dev))continue;dev_dbg(&dev->dev, “unregistering interface %s\n”,interface->dev.bus_id);usb_remove_sysfs_intf_files(interface);device_del(&interface->dev);}/* Now that the interfaces are unbound, nobody should* try to access them.*/for (i = 0; i actconfig->desc.bNumInterfaces; i++) {put_device(&dev->actconfig->interface->dev);dev->actconfig->interface = NULL;}dev->actconfig = NULL;if (dev->state == USB_STATE_CONFIGURED)usb_set_device_state(dev, USB_STATE_ADDRESS);}}第二个参数是skip_ep0.是表示是否跳过ep0.为1表示跳过,为0表示清除掉设备中的所有endpoint.这个函数可以分为两个部份,一部份是对usb_dev中的endpoint进行操作,一方面是释放usb_dev的选定配置项.对于第一部份:从代码中可能看到,如果skip_ep0为1,那就是从1开始循环,所以,就跳过了ep0.另外,一个端点号对应了两个端点,一个IN,一个OUT.IN端点比OUT端点要大USB_DIR_IN.另外,既然设备都已经被禁用了,那toggle也应该回归原位了.因些将两个方向的toggle都设为0. usb_disable_endpoint()是一个很有意思的处理.它的代码如下:void usb_disable_endpoint(struct usb_device *dev, unsigned int epaddr){unsigned int epnum = epaddr & USB_ENDPOINT_NUMBER_MASK;struct usb_host_endpoint *ep;if (!dev)return;//在dev->ep_out和dev->ep_in删除endpointif (usb_endpoint_out(epaddr)) {ep = dev->ep_out[epnum];dev->ep_out[epnum] = NULL;} else {ep = dev->ep_in[epnum];dev->ep_in[epnum] = NULL;}//禁用掉此ep.包括删除ep上提交的urb 和ep上的QHif (ep) {ep->enabled = 0;usb_hcd_flush_endpoint(dev, ep);usb_hcd_disable_endpoint(dev, ep);}}在dev->ep_in[]/dev->ep_out[]中删除endpoint,这点很好理解.比较难以理解的是后面的两个操作,即usb_hcd_flush_endpoint()和usb_hcd_disable_endpoint().根据之前分析的UHCI的驱动,我们得知,对于每个endpoint都有一个传输的qh,这个qh上又挂上了要传输的urb.因此,这两个函数一个是删除urb,一个是删除qh.usb_hcd_flush_endpoint()的代码如下:void usb_hcd_flush_endpoint(struct usb_device *udev,struct usb_host_endpoint *ep){struct usb_hcd *hcd;struct urb *urb;if (!ep)return;might_sleep();hcd = bus_to_hcd(udev->bus);/* No more submits can occur *///在提交urb时,将urb加到ep->urb_list上的时候要持锁//因此,这里持锁的话,无法发生中断和提交urbspin_lock_irq(&hcd_urb_list_lock);rescan://将挂在ep->urb_list上的所有urb unlink.注意这里unlink一般只会设置urb->unlinked的//值,不会将urb从ep->urb_list上删除.只有在UHCI的中断处理的时候,才会调用//uhci_giveback_urb()将其从ep->urb_list中删除list_for_each_entry (urb, &ep->urb_list, urb_list) {int is_in;if (urb->unlinked)continue;usb_get_urb (urb);is_in = usb_urb_dir_in(urb);spin_unlock(&hcd_urb_list_lock);/* kick hcd */unlink1(hcd, urb, -ESHUTDOWN);dev_dbg (hcd->self.controller,“shutdown urb %p ep%d%s%s\n”,urb, usb_endpoint_num(&ep->desc),is_in ? “in” : “out”,({char *s;switch (usb_endpoint_type(&ep->desc)) {case USB_ENDPOINT_XFER_CONTROL:s = ““; break;case USB_ENDPOINT_XFER_BULK:s = “-bulk”; break;case USB_ENDPOINT_XFER_INT:s = “-intr”; break;default:s = “-iso”; break;};s;}));usb_put_urb (urb);/* list contents may have changed *///在这里解开锁了,对应ep->urb_list上又可以提交urb. //这里释放释的话,主要是为了能够产生中断spin_lock(&hcd_urb_list_lock);goto rescan;}spin_unlock_irq(&hcd_urb_list_lock);/* Wait until the endpoint queue is pletely empty *///等待urb被调度完while (!list_empty (&ep->urb_list)) {spin_lock_irq(&hcd_urb_list_lock);/* The list may have changed while we acquired the spinlock */urb = NULL;if (!list_empty (&ep->urb_list)) {urb = list_entry (ep->urb_list.prev, struct urb,urb_list);usb_get_urb (urb);}spin_unlock_irq(&hcd_urb_list_lock);if (urb) {usb_kill_urb (urb);usb_put_urb (urb);}}}仔细体会这里的代码,为什么在前一个循环中,要使用goto rescan重新开始这个循环呢?这是因为在后面已经将自旋锁释放了,因此,就会有这样的可能,在函数中操作的urb,可能已经被调度完释放了.因此,再对这个urb操作就会产生错误.所以,需要重新开始这个循环.那后一个循环又是干什么的呢?后一个循环就是等待urb被调度完.有人就会有这样的疑问了,这里一边等待,然后endpoint一边还提交urb,那这个函数岂不是要耗掉很长时间?在这里,不要忘记了前面的操作,在调这个函数之前, usb_disable_endpoint()已经将这个endpoint禁用了,也就是说该endpoint不会产生新的urb.因为,在后一个循环中,只需要等待那些被unlink的urb调度完即可.在usb_kill_urb()中,会一直等待,直到这个urb被调度完成为止.可能有人又会有这样的疑问:Usb_kill_urb()中也有unlink urb的操作,为什么这里要分做两个循环呢?另外的一个函数是usb_hcd_disable_endpoint().代码如下:void usb_hcd_disable_endpoint(struct usb_device *udev,struct usb_host_endpoint *ep){struct usb_hcd *hcd;might_sleep();hcd = bus_to_hcd(udev->bus);if (hcd->driver->endpoint_disable)hcd->driver->endpoint_disable(hcd, ep);}从上面的代码可以看到,操作转向了hcd->driver的endpoint_disable()接口.以UHCI为例.在UHCI中,对应的接口为:static void uhci_hcd_endpoint_disable(struct usb_hcd *hcd,struct usb_host_endpoint *hep){struct uhci_hcd *uhci = hcd_to_uhci(hcd); struct uhci_qh *qh;spin_lock_irq(&uhci->lock);qh = (struct uhci_qh *) hep->hcpriv;if (qh == NULL)goto done;while (qh->state != QH_STA TE_IDLE) { ++uhci->num_waiting;spin_unlock_irq(&uhci->lock);wait_event_interruptible(uhci->waitqh, qh->state == QH_STATE_IDLE); spin_lock_irq(&uhci->lock);--uhci->num_waiting;}uhci_free_qh(uhci, qh);done:spin_unlock_irq(&uhci->lock);}这个函数没啥好说的,就是在uhci->waitqh上等待队列状态变为QH_STATE_IDLE.来回忆一下,qh在什么情况下才会变为QH_STATE_IDLE呢? 是在qh没有待传输的urb的时候.然后,将qh释放.现在我们来接着看usb_disable_device()的第二个部份.第二部份主要是针对dev->actconfig进行的操作, dev->actconfig存放的是设备当前的配置,现在要将设备设回Address状态.就些东西当然是用不了上的了.释放dev->actconfig->interface[]中的各元素,注意不要将dev->actconfig->interface[]所指向的信息释放了,它都是指向dev->config[]-> intf_cache[]中的东西,这些东西一释放,usb device在Get_ Configure所获得的信息就会部丢失了.就这样, usb_disable_device()函数也走到了尾声.2: usb_cache_string()函数这个函数我们在分析UHCI的时候已经接触过,但末做详细的分析.首先了解一下这个函数的作用,有时候,为了形象的说明,会提供一个字符串形式的说明.例如,对于配置描述符来说,它的iConfiguration就表示一个字符串索引,然后用Get_String就可以取得这个索引所对应的字串了.不过,事情并不是这么简单.因为字符串对应不同的编码,所以这里还会对应有编码的处理.来看具体的代码:char *usb_cache_string(struct usb_device *udev, int index){char *buf;char *smallbuf = NULL;int len;if (indexreturn NULL;//不知道字符到底有多长,就按最长256字节处理buf = kmalloc(256, GFP_KERNEL);if (buf) {len = usb_string(udev, index, buf, 256);//取到字符了,分配合适的长度if (len > 0) {smallbuf = kmalloc(++len, GFP_KERNEL);if (!smallbuf)return buf;//将字符copy过去memcpy(smallbuf, buf, len);}//释放旧空间kfree(buf);}return smallbuf;}这个函数没啥好说的,流程转入到usb_string中.代码如下:int usb_string(struct usb_device *dev, int index, char *buf, size_t size) {unsigned char *tbuf;int err;unsigned int u, idx;if (dev->state == USB_STATE_SUSPENDED)return -EHOSTUNREACH;if (sizereturn -EINV AL;buf[0] = 0;tbuf = kmalloc(256, GFP_KERNEL);if (!tbuf)return -ENOMEM;/* get langid for strings if it’s not yet known *///先取得设备支持的编码IDif (!dev->have_langid) {//以0号序号和编码0,Get_String就可得到设备所支持的编码列表err = usb_string_sub(dev, 0, 0, tbuf);//如果发生了错误,或者是取得的数据超短(最短为4字节)if (errdev_err(&dev->dev,“string descriptor 0 read error: %d\n”,err);goto errout;} else if (errdev_err(&dev->dev, “string desc riptor 0 too short\n”);err = -EINV AL;goto errout;}//取设备支持的第一个编码else {dev->have_langid = 1;dev->string_langid = tbuf[2] | (tbuf[3]/* always use the first langid listed */dev_dbg(&dev->dev, “default language 0x%04x\n”,dev->string_langid);}}//以编码ID和序号Index作为参数Get_String取得序号对应的字串err = usb_string_sub(dev, dev->string_langid, index, tbuf);if (errgoto errout;//空一个字符来用来存放结束符size--; /* leave room for trailing NULL char in output buffer */ //两字节一组,(Unicode编码的)for (idx = 0, u = 2; uif (idx >= size)break;//如果高字节有值,说明它不是ISO-8859-1编码的,将它置为? //否则,就将低位的值存放到buf中if (tbuf[u+1]) /* high byte */buf[idx++] = ‘?’;/* non ISO-8859-1 character */elsebuf[idx++] = tbuf;}//在最后一位赋0,字串结尾buf[idx] = 0;//返回字串的长度,(算上了最后的结尾字符)err = idx;//如果该描述符不是STRING描述符,打印出错误提示if (tbuf[1] != USB_DT_STRING)dev_dbg(&dev->dev,“wrong descriptor type %02x for string %d (\”%s\”)\n”,tbuf[1], index, buf);。
U-BootDriverMode驱动模型U-Boot DM 三要素DM 是 U-Boot 中的驱动框架,全称 Driver Mode。
像 Linux Kernel 中的驱动三要素 device 、bus 、driver ⼀样,DM 也有⾃⼰的三要素:udevice、uclass、driver。
udevice 描述具体的某⼀个硬件设备。
driver 是与这个设备匹配的驱动。
uclass 是同⼀类设备的抽象,提供管理同⼀类设备的抽象接⼝。
udevice通过三种途径⽣成:dts 设备节点UBOOTDEVICE(__name) 宏申明主动调⽤device_bind_xxx系列 API根据当前 U-Boot 的编程哲学,基本⼤部分设备都是通过 dts 来描述,还有少部分设备因为特殊原因,可以通过U_BOOT_DEVICE(_name)宏申明。
在UBoot DM 初始化阶段(initfdm 和 initrdm),通过调⽤ dm_init_and_scan(boolpre_reloc_only)根据名称 (UBOOT_DEVICE 中和 driver 的 name,或者 dts 和 driver 的 compatible) 匹配到对应的 driver,然后调⽤device_bind_common函数⽣成 udevice,udevice 会和 driver 绑定,并根据driver 中的uclass id 找到对应的 uclass driver,并⽣成相应的 uclass,并把该设备挂到 uclass 的设备节点之下。
最后调⽤ driver 的 bind 函数。
还有部分特殊的驱动,他们并不存在实际意义上的设备,⽐如 MMC ⼦系统中的 mmcblk 驱动,该驱动主要是把所有的 mmc 设备注册到更上⼀层的 blk ⼦系统中,向 blk 层提供操作 mmc 设备的 blkops,向下通过mmc uclass 提供的统⼀接⼝控制 mmc 设备。
1.Platform驱动在ASoC中的作用前面说过,ASoC被分为Machine、Platform和Codec三大部分,Platform驱动的主要作用是完成音频数据的管理,最终通过CPU的数字音频接口(DAI)把音频数据传送给codec进行处理,最终由codec输出驱动耳机或者喇叭的音频信号。
在具体的实现上。
ASoC把platform驱动分为两个部分:snd_soc_platform_driver和snd_soc_dai_driver。
其中。
Paltform_driver负责管理音频数据,把音频数据通过dma或者其他操作传送到cpu dai中,dai_driver主要完成cpu的dai的参数配置,同时会通过一定的途径把必要的dma 等参数与snd_soc_platform_driver进行交互2.snd_soc_platform_driver的注册通常,ASoC把snd_soc_platform_driver注册为一个系统的platform_driver,不要被这两个术语锁迷惑,前者是针对ASoC子系统,后者是来自linux的设备驱动模型,我们要做的就是. 定义一个snd_soc_platform_driver结构的实例. 在platform_driver的probe回调中利用ASoC的API:snd_soc_register_platform()注册上面定义的实例;. 实现snd_soc_pllatform_driver中的各个回调函数以kernel2.6.37中的/sound/soc/davinci/davinici-pcm.c为例Snd_soc_register_platform()该函数用于注册一个snd_soc_platform,只有注册以后,它才可以被Machine驱动使用,它的代码已经清晰的表达了它的实现过程. 为snd_soc_platform实例申请内存. 从platform_device中获取他的名字,用于Machine驱动的匹配工作;. 初始化snd_soc_platform的字段. 把snd_soc_platform实例链接到全局链表platform_list中. 调用snd_soc_instantiate_cards,触发声卡的machine、platform、codec、dai等的匹配工作3.cpu的snd_soc_dai driver驱动的注册dai驱动通常对应cpu的一个或者几个I2S/PCM接口,与snd_soc_platform一样,dai 驱动也就实现为一个platform driver,实现一个dai驱动大致可以分为以下几个步骤:. 定义一个snd_soc_dai_driver结构的实例;. 在对应的platform_driver中的probe回调中通过API:snd_soc_register_dai或者snd_soc_register_dais,注册snd_soc_dai实例;. 实现snd_soc_dai_driver结构中的probe、suspend等回调;. 实现snd_soc_dai_driver结构中的snd_soc_dai_ops字段中的回调函数;Snd_soc_register_dai这个函数在上一篇codec驱动总有介绍Snd_soc_dai该结构在snd_soc_register_dai函数中通过动态内存申请获得,有如下几个重要字段:. driver 指向关联的snd_soc_dai_sriver结构,由注册时通过参数传入;. Playback_dma_data用于保存该dai播放stream的dma信息,例如dma的目标地址,dma传送单元大小和通道号. Capture_dma_data同上,用于录音stream;. Platform 指向关联的snd_soc_platform结构;Snd_soc_dai_driver该结构需要自己根据不同的soc芯片进行定义,关键字段如下. probe、remove回调函数,分别在声卡加载和预卸时被调用;. suspend、resume 电源管理回调函数. Ops 指向snd_soc_dai_ops结构,用于配置和控制该dai;. Playback snd_soc_pcm_stream结构,用于指出该dai支持的声道数,码率,数据格式等. Capture snd_soc_pcm_stream结构,用于指出该dai支持的声道数,码率,数据格式4.Snd_soc_dai_driver中的ops字段Ops字段指向一个snd_soc_dai_ops结构,该结构实际上是一组回调函数的集合,dai的配置和控制几乎都是通过这些回调函数来实现的,这些回调函数基本可以分为3大类,驱动程序可以根据实际情况实现其中的一个部分工作始终配置函数通常由machine驱动调用:. set_sysclk 设置dai的主时钟. set_pll 设置PLL参数. set_clkdiv 设置分频系数. dai的格式配置函数通常由machine驱动调用:. set_fmt 设置dai的格式. set_tdm_slot 如果dai支持时分复用,用于设置时分复用的slot;. set_channel_map 声道的时分复用映射设置;. set_tristate 设置dai引脚的状态,当与其他dai并联使用同一个引脚时需要使用该回调标准的snd_soc_ops回调通常由soc-core在进行PCM操作时调用:. startup. Shutdown. Hw_params. Hw_free. Prepare. Trygger抗pop,pop声由soc-core调用;.digital_mute以下这些api通常被machine驱动使用,machine驱动在他的snd_pcm_ops字段中的hw_paarams回调中使用这些api:. Snd_soc_daiPset_fmt() 实际上会调用snd_soc_dai_ops或者codec driver中的set_fmt回调. Snd_soc_dai_set_pll() 实际上会调用snd_soc_dai_ops或者codec driver中的set_pll回调. Snd_soc_dai_set_sysclk() 实际上会调用snd_soc_dai_ops或者codec driver中的set_sysclk回调. Snd_soc_dai_set_clkdiv() 实际上会调用snd_soc_dai_ops或者codec driver中的set_clkdiv回调Snd_soc_dai_set_fmt(struct snd_soc_dai *dai, unsigned int fmt)的第二个参数fmt在这里特别说一下,ASoC目前只是用了它的低16位,并且为它专门定义了一些宏来方便我们使用:Bit 0-3用于设置接口的格式:Bit 4-7用于设置接口时钟的开关特性:Bit 8-11用于设置接口时钟的相位Bit 12-15用于设置接口的主从格式5.snd_soc_platform_driver中的ops字段该字段是一个snd_pcm_ops结构,实现该结构中的各个回调函数式soc platform驱动的主要工作,他们基本都涉及dma操作以及dma buffer的管理等工作。
linux中编译驱动的方法
在Linux中编译驱动的方法通常涉及以下步骤:
1. 编写驱动代码:首先,您需要编写适用于Linux内核的驱动代码。
这通常是在内核源代码树之外编写的。
驱动代码通常以C语言编写,并遵循内核编程约定。
2. 获取内核源代码:为了编译驱动,您需要获得Linux内核的源代码。
您可以从Linux官方网站或镜像站点下载内核源代码。
3. 配置内核:在编译驱动之前,您需要配置内核以包含您的驱动。
这可以通过运行`make menuconfig`命令来完成。
在配置菜单中,您可以选择要编译的驱动以及相关的内核选项。
4. 编译驱动:一旦您配置了内核并选择了要编译的驱动,您可以使用`make`命令来编译驱动。
这将在内核源代码目录下生成可执行文件或模块文件。
5. 加载和测试驱动:一旦驱动被编译,您可以将其加载到Linux 内核中以进行测试。
您可以使用`insmod`命令将模块加载到内核,然后使用`dmesg`命令检查内核日志以查看驱动是否正确加载。
这些是基本的步骤,但具体的步骤可能会因您的环境和需求而有所不同。
在编译和加载驱动时,请确保您具有适当的权限和知识,因为这可能需要管理员权限,并且错误的操作可能会导致系统不稳定或损坏。
sysfs - _The_ filesystem for exporting kernel objects. sysfs - 用于导出内核对象(kobject)的文件系统Patrick Mochel<mochel@>翻译: tekkamanninja <tekkamanninja@>10 January 20032003年1月10日翻译时间:2007年12月29日What it is:简介:~~~~~~~~~~~sysfs is a ram-based filesystem initially based on ramfs. It providessysfs 是一个最初基于ramfs的位于内存的文件系统。
它提供a means to export kernel data structures, their attributes, and the一些方法以导出内核的数据结构、他们的属性和linkages between them to userspace.他们与用户空间的连接。
sysfs is tied inherently to the kobject infrastructure. Please readsysfs 始终与kobject的底层结构紧密相关。
请阅读Documentation/kobject.txt for more information concerning the kobjectDocumentation/kobject.txt 文档以获得更多关于 kobject 接口的信息。
interface.Using sysfs使用~~~~~~~~~~~sysfs is always compiled in. You can access it by doing:sysfs 通常被编译进内核。
你可以通过使用以下命令访问它:mount -t sysfs sysfs /sys(此命令含义是挂载 sysfs 到根目录下的sys目录)Directory Creation创建目录~~~~~~~~~~~~~~~~~~For every kobject that is registered with the system, a directory is一旦有 kobject 在系统中注册,就会有一个目录在sysfs中被创建。
created for it in sysfs. That directory is created as a subdirectory这个目录是作为 kobject 的 parent 下的子目录创建的,of the kobject's parent, expressing internal object hierarchies to以准确的传递内核的对象层次到userspace. Top-level directories in sysfs represent the common用户空间。
sysfs中的顶层目录代表着内核对象层次的共同祖先;ancestors of object hierarchies; i.e. the subsystems the objects例如:某些对象属于某个子系统。
belong to.Sysfs internally stores the kobject that owns the directory in theSysfs内部存储着 kobject ,这些 kobject 在 d_fsdata 指针(在 kobject->d_fsdata pointer of the directory's dentry. This allows sysfs to do的dentry结构体中)中拥有目录。
这使得 sysfs 可以在文件reference counting directly on the kobject when the file is opened and打开和关闭时,直接在 kobject 上实现引用计数。
closed.Attributes属性~~~~~~~~~~Attributes can be exported for kobjects in the form of regular files inkobject 的属性能在文件系统中以普通文件的形式导出。
the filesystem. Sysfs forwards file I/O operations to methods definedSysfs 为属性定义了面向文件 I/O 操作的方法,for the attributes, providing a means to read and write kernel以提供对内核属性的读写。
attributes.Attributes should be ASCII text files, preferably with only one value属性应为 ASCII 码文本文件,以一个文件只存储一个属性值为宜。
per file. It is noted that it may not be efficient to contain only但一个文件只包含一个属性值可能影响效率,value per file, so it is socially acceptable to express an array of所以一个包含相同数据类型的属性值数组也是被广泛接受的。
values of the same type.Mixing types, expressing multiple lines of data, and doing fancy混合类型、表达多行数据以及一些怪异的数据格式是会遭强烈反对。
formatting of data is heavily frowned upon. Doing these things may get这样做是很丢脸的,而且you publically humiliated and your code rewritten without notice.你的代码会在未通知你的情况下被重写。
An attribute definition is simply:一个简单的属性结构定义如下:(到2.6.22.2已添加了struct module * owner;)struct attribute {char * name;mode_t mode;};int sysfs_create_file(struct kobject * kobj, struct attribute * attr);void sysfs_remove_file(struct kobject * kobj, struct attribute * attr);A bare attribute contains no means to read or write the value of the一个裸的属性并不包含读写其属性值的方法。
attribute. Subsystems are encouraged to define their own attribute最好为子系统定义自己的属性structure and wrapper functions for adding and removing attributes for和 为了增删特殊对象类型的属性而 包装过的函数。
a specific object type.For example, the driver model defines struct device_attribute like:例如:驱动程序模型定义的device_attribute 结构体如下:struct device_attribute {struct attribute attr;ssize_t (*show)(struct device * dev, char * buf);ssize_t (*store)(struct device * dev, const char * buf);};int device_create_file(struct device *, struct device_attribute *);void device_remove_file(struct device *, struct device_attribute *);It also defines this helper for defining device attributes:它为了定义设备的属性也定义了辅助的宏:#define DEVICE_ATTR(_name, _mode, _show, _store) \struct device_attribute dev_attr_##_name = { \.attr = {.name =.show = _show, \.store = _store, \};For example, declaring例如:声明static DEVICE_ATTR(foo, S_IWUSR | S_IRUGO, show_foo, store_foo);is equivalent to doing:等同于这样的代码static struct device_attribute dev_attr_foo = {.attr= {.name = "foo",.mode = S_IWUSR | S_IRUGO,},.show = show_foo,.store = store_foo,};Subsystem-Specific Callbacks子系统特有的调用~~~~~~~~~~~~~~~~~~~~~~~~~~~~When a subsystem defines a new attribute type, it must implement a当一个子系统定义一个新属性类型时,set of sysfs operations for forwarding read and write calls to the一系列的sysfs操作必须被执行,以帮助读写函数实现show and store methods of the attribute owners.属性所有者的显示和储存的方法。
struct sysfs_ops {ssize_t (*show)(struct kobject *, struct attribute *, char *);ssize_t (*store)(struct kobject *, struct attribute *, const char *); };[ Subsystems should have already defined a struct kobj_type as a[子系统应已经定义了一个kobj_type 结构体作为descriptor for this type, which is where the sysfs_ops pointer is这个类型的描述符,存储 sysfs_ops 的指针。