CASEAR2简易操作手册
- 格式:doc
- 大小:402.76 KB
- 文档页数:38

ENCLAVE(昂科雷产品)操作手册2 ENCLAVE 操作手册2欢迎使用 ENCLAVE (昂科雷产品)!本操作手册将为您提供关于ENCLAVE 的详细信息和使用指南。
请仔细阅读以下内容,并按照说明进行正确操作。
1. 概述ENCLAVE 是一款功能强大的昂科雷产品,具备高效的处理能力和先进的技术特点。
它提供了多种功能和选项,以满足用户的各项需求。
2. 快速入门在开始使用 ENCLAVE 前,您需要进行以下基本设置:a) 将 ENCLAVE 连接至电源,并确保电源线连接稳固。
b) 按下电源按钮,等待 ENCLAVE 启动并显示屏幕亮起。
c) 通过触摸屏或键盘输入系统密码以解锁 ENCLAVE。
3. 系统界面ENCLAVE 的界面设计简洁直观,用户可以通过触摸屏或键盘与系统进行交互。
主要界面包括:a) 主屏幕:显示主要功能模块和快捷方式的图标。
b) 菜单栏:提供各种系统设置和选项的入口。
c) 应用程序:包括各种预装的应用程序和用户自定义应用程序。
d) 设置:用于调整系统设置、网络连接和其他个性化选项。
4. 功能模块ENCLAVE 提供了多个功能模块,涵盖了各种使用场景和需求。
以下是其中几个常用模块的介绍:a) 娱乐中心:通过 ENCLAVE,您可以享受高品质的音乐、视频和游戏体验。
b) 通讯工具:ENCLAVE 支持多种通讯方式,包括电子邮件、即时通讯和社交媒体等。
c) 文件管理:您可以使用 ENCLAVE 进行文件的存储、管理和共享。
d) 安全保护:ENCLAVE 配备了先进的安全系统,可保护您的个人信息和设备安全。
5. 常见问题解答在使用 ENCLAVE 过程中,您可能会遇到一些常见问题。
以下是其中几个常见问题及解决方法:a) 如何连接 Wi-Fi?- 在菜单栏中找到“设置”选项,选择“网络设置”,然后选择您要连接的 Wi-Fi 网络并输入密码即可。
b) 如何调节屏幕亮度?- 在主屏幕上向上或向下滑动手指,在下拉菜单中找到亮度调节滑条,滑动滑条即可调节屏幕亮度。


Controlling the roll axisControlling the pan axisB: Focus motor connection status. Icon will be displayed after connection,otherwise it won’t be displayed. Up to two focus motors can be connected at the same time.C: Camera connection status. Icon will be displayed after USB connection, otherwise it won’t be displayed.D: Battery level. Each grid represents 25% battery level. When the battery is empty, please charge the battery in time.E: Follow speed value: 0-100. Turn the dial to adjust the valueF: Follow statusL: Lock. The axis locks and doesn’t follow.F: Follow. The axis follows.QMenu DescriptionL1L2L3L4L5Value Function Shutter Cable *set the connection type to universal shutter cable MCSC-Multi *set the connection type to Sony-Multi port MCSC-Multi/C *set the connection type to Sony-Multi port and power supply MCSC-Remote *set the connection type to Panasonic-Remote port M3C-USB *set the connection type to USB port ISO 32--106400Set the camera ISO TV 30--1/8000Set the camera shutter AV F1--F22Set the camera aperture ?/ok turn on/off motor?/ok tuning/tunedultra light *set motor level to the minimum light *set motor level to lightmedium *set motor level to mediumheavy *set motor level to heavyultra heavy set motor level to ultra heavy tilt 0-100 set tilt motor powerset roll motor power set pan motor powerroll 0-100pan 0-100 0-100set tilt motor filter0-100set roll motor filter0-100set pan motor filter on/off enter/exit tilt follow mode on/off enter/exit roll follow mode on/off enter/exit pan follow mode 0-100set the following speed of tilt motor 0-100set the following speed of roll motor 0-100set the following speed of pan motor 0-100set the following initiation angle of tilt motor0-100set the following initiation angle of roll motor0-100set the following initiation angle of pan motorleft-right tilt/rol/pan move the joystick left/right to control the tilt/roll/pan rotationup-down tilt/rol/pan move the joystick up/down to control the tilt/roll/pan rotation left-right 0-100 set sensitivity level of left-right movementup-down 0-100 set sensitivity level of up-down movement left-right +/-set the control habit of joystick left/right movementup-down +/-set the control habit of joystick up/down movementfocus-1*control the external focus motor 1focus-2*control the external focus motor 2focus-e *control the electronic focustilt *control the pan axisroll *control the tilt axis pan *control the roll axis0-100wheel sensitivity +/-set the control direction of wheel rotationnone *none follow *enter pan-tilt follow modelock *enter all lock modequick *enter sport gear mode FPV *enter FPV mode none *noneshutter *take photofocus *auto focus non e *nonedouble-click re-center *re-centerselfie *rotate the gimbal 180° for selfie none *nonere-center *re-centerselfie *rotate the gimbal 180° for selfie switch speed deadband joystickwheelcameramotorfollowhabits triggerhold click triple-click pan tilt roll pan sensitivity functionsensitivity habitsfunctiontilt roll pan tilt roll switchautotune tilt roll pan power filter level custom gimbaloperation*1. The Air 2 is in pan follow mode by default.2. In addition to controlling the follow mode by the switches of each axis independently, follow modes can be also enabled by the trigger, please refer to Page 8 ‘Button Functions’ for more details.3. The angle of the roll follow is 45°. For a larger following angle, please triple click the left button to enter the FPV mode to achieve 360° follow of three4. If faster following speed is required, please click the right button to enter the sport gear mode. (Currently only supports the pan axis)Shenzhen Gudsen Technology Co., LtdWeb: Twitter Facebook YouTubeInstagramOfficial WebsiteSina Weibo WeChat。

CASSIA X2000蓝牙路由器快速入门指南版权所有 © 2020 北京桂花网科技有限公司I. 包装清单2. 抱杆安装箍 (2)3. 螺丝硅胶塞 (2)1. X2000蓝牙路由器 (1)4. 防水接头 (2)5. USB硅胶塞 (1)6. 安装支架 (1)7. 拆网线专用螺丝刀 (1)8. 安装螺丝和膨胀管 (2*4)9. 快速入门指南 (1)19II. 面板说明步骤2:用十字螺丝刀拧下螺丝,打开顶盖步骤3: 将4G上网卡插入USB接口步骤4: 安装顶盖,拧紧螺丝,塞上螺丝硅胶塞步骤3: 将USB延长线插入USB接口步骤2:使用一字螺丝刀拧下顶盖上的塞子(M20X1.5,请勿与ETH/PoE的塞子混淆)步骤4: 将USB延长线穿过顶盖上的孔,安装顶盖,将硅胶塞套在USB延长线上并塞入顶盖上的孔。
最后,将4G上网卡插入USB延长线的另一头注意:安装支架面向墙和杆的一侧比较锋利,请小心安装,以免伤到您的手。
壁挂安装抱杆安装壁挂安装抱杆安装3) 将X2000安装支架固定在平整的墙面上,或者使用抱箍拧在垂直的抱杆上4) 把X2000连接到安装支架上注意:为了拆下安装好的以太网线,请用X2000包装盒中提供的一字螺丝刀或其它小工具按下水晶头上的塑料卡舌,参见下图:5) 连接以太网线和PoE取下以太网接口塞(M22X1.5,请勿与顶盖上的塞子混淆),将以太网线穿过防水接头,把网线水晶头插入X2000的以太网接口,并按照a、b、c的顺序拧紧防水接头。
步骤c的力度应该小于步骤a的力度,避免损坏X2000的内部器件注意:拆除防水接头时,必须按照c、b、a的顺序,否则会损坏X2000内部器件7) 对于室外安装的X2000,建议在接地标志位置的螺钉上连接地线,确保X2000的安全支持蓝牙低功耗协议4.0/4.1/4.2/5.0集成Wi-Fi 802.11 a/b/g/n/ac, 支持2.4GHz and 5GHz ISM频段支持10/100 BASE-T以太网支持USB 2.0(可用于插3G/4G上网卡)可选外接蓝牙天线接口:50欧姆N型母头复位按钮:恢复出厂设置。
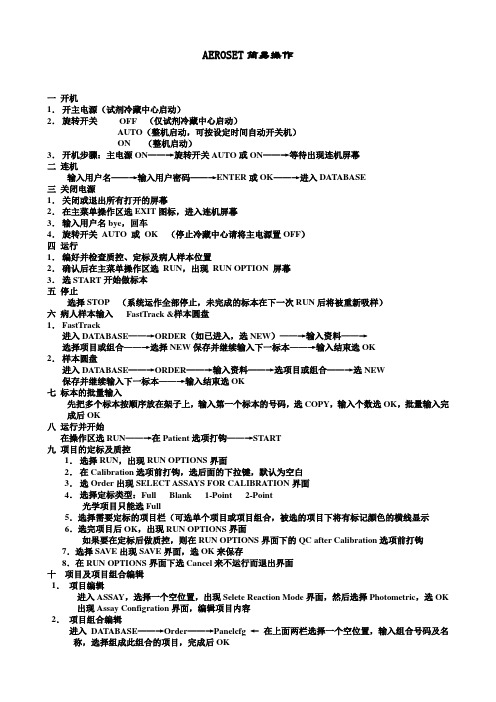
AEROSET简易操作一开机1.开主电源(试剂冷藏中心启动)2.旋转开关OFF (仅试剂冷藏中心启动)AUTO(整机启动,可按设定时间自动开关机)ON (整机启动)3.开机步骤:主电源ON——→旋转开关AUTO或ON——→等待出现连机屏幕二连机输入用户名——→输入用户密码——→ENTER或OK——→进入DAT ABASE三关闭电源1.关闭或退出所有打开的屏幕2.在主菜单操作区选EXIT图标,进入连机屏幕3.输入用户名bye,回车4.旋转开关AUTO 或OK(停止冷藏中心请将主电源置OFF)四运行1.编好并检查质控、定标及病人样本位置2.确认后在主菜单操作区选RUN,出现RUN OPTION 屏幕3.选ST ART开始做标本五停止选择STOP (系统运作全部停止,未完成的标本在下一次RUN后将被重新吸样)六病人样本输入FastT rack &样本圆盘1.FastT rack进入DAT ABASE——→ORDER(如已进入,选NEW)——→输入资料——→选择项目或组合——→选择NEW保存并继续输入下一标本——→输入结束选OK2.样本圆盘进入DAT ABASE——→ORDER——→输入资料——→选项目或组合——→选NEW保存并继续输入下一标本——→输入结束选OK七标本的批量输入先把多个标本按顺序放在架子上,输入第一个标本的号码,选COPY,输入个数选OK,批量输入完成后OK八运行并开始在操作区选RUN——→在Patient选项打钩——→ST ART九项目的定标及质控1.选择RUN,出现RUN OPTIONS界面2.在Calibration选项前打钩,选后面的下拉键,默认为空白3.选Order出现SELECT ASSAYS FOR CALIBRATION界面4.选择定标类型:Full Blank 1-Point 2-Point光学项目只能选Full5.选择需要定标的项目栏(可选单个项目或项目组合,被选的项目下将有标记颜色的横线显示6.选完项目后OK,出现RUN OPTIONS界面如果要在定标后做质控,则在RUN OPTIONS界面下的QC after Calibration选项前打钩7.选择SA VE出现SA VE界面,选OK来保存8.在RUN OPTIONS界面下选Cancel来不运行而退出界面十项目及项目组合编辑1.项目编辑进入ASSAY,选择一个空位置,出现Selete Reaction Mode界面,然后选择Photometric,选OK 出现Assay Configration界面,编辑项目内容2.项目组合编辑进入DAT ABASE——→Order——→Panelcfg ←在上面两栏选择一个空位置,输入组合号码及名称,选择组成此组合的项目,完成后OK十一查看结果1.进入DAT ABASE,选定要查看的结果,用←和→来查看2.进入DAT ABASE,选定要查看的结果,选右边的Result来查看结果状态:I——Incomplete——未完成A——Accepted——已接受V——Validated——已生效R——Rerun——重新运行L——Linked——与原样本相关R——Replicate——重复做过可通过选择Pending,Incompl,Rerun,Complete,Valid来查看各组处于不同状态的标本十二查看系统状态及运行过程:1.运行过程区域:Database界面左下脚的长条区域,绿色——定标粉红色——急冷灰色——病人样本黄色——质控2.系统状态在主操作菜单:READY——系统准备好运行RUNNING——系统正在吸样和处理样本SAMPLING END——系统完成吸样,正在处理样本CUVETTE FILL——系统完成吸样,正往比色杯里加水SUSPEND——系统准备执行新的运作PAUSED——操作员选择了PAUSED使系统处于暂停状态3.数据库结果颜色显示粉红色——悬挂棕色——运行兰色——完成,但未生效或未完成黑色——完成,且结果生效十三查看反应曲线1.查看单个标本的反应曲线:进入DAT ABASE,选择要查看的标本,选RxnGraph来查看曲线2.查看多个标本的反应曲线:进入DAT ABASE,选择一批要查看的标本(最多8个,用Shift+↓来选),选择RxnGraph来显示曲线十四打印结果1.打印单个结果:进入DAT ABASE,选要打印的标本,选Print出现Print Options界面,选择适当的格式,然后OK 或进入DAT ABASE,选要打印的标本,选Result,选Print,然后OK2.打印多个结果:进入DAT ABASE,选一批要打印的标本(Shift+↓,跳过某个标本用Ctrl键),选Print出现Print Options界面,选择适当的格式,然后选OK。

与尺寸安装S O D 菜单S 菜单O D 机菜单摄像16.8V RUNCAM 01:08·高级菜单界面快速设置:· 长按上按键2秒进入高级OSD设置界面。
· 长按左按键2秒进入校准电压,当电压闪烁, 按上下调整。
· 长按下按键5秒复位OSD设置。
· 长按右按键2秒切换摄像头预设场景。
· CLR:清除飞手名称· ALARM:设置低压提示值。
· POS:按中键进入调整上下左右位置。
· SHARP VIEW:高锐度,打开可以增加画面的细节, 不过也会相应增加噪点。
· WIDESCREEN:宽屏,打开会动态适配16:9显示屏,画面中间不会变形,但是左右两侧物体会拉宽。
· SYSTEM:按中键切换NTSC/PAL电视制式, 退出菜单才会自动重启生效。
· EXIT:保存并退出。
参数表· LANGUAGE ( ENGLISH / DEUTSCH / FRANCAIS / PYCCKNN / PORTUGUES / ESPANOL / 中文 )· 白平衡 (ATW / 单按 / 用户1 / 用户2 / 手动/ 单按锁定· 翻转(关闭 / 水平翻转 / 垂直翻转 / 垂直水平翻转)· 亮度 (128 / 0-255)· 对比度 (138 / 0-255)· 锐度 (128 / 0-255)· 色度 (90 / 0-180)· 彩色增益 (138 / 0-255)型号图像芯片水平分辨率镜头屏幕比例视频制式镜像/翻转内置OSD 一键场景信噪比最低照度宽动态日夜切换菜单控制电源工作电流外壳材质净重尺寸RunCam超级宽动态CMOS芯片700线1.8mm FOV 160°2.1mm FOV 145°可切换 4:3/宽屏可切换 NTSC/PAL 支持支持自定义/灯光赛道/室外/室内/多云/微光>50dB 电子快门 自动***********光圈超级宽动态自动可以切换按键板控制/串口控制直流5-36伏110毫安@5伏/40毫安@12伏工程塑料5.5克长19毫米*宽19毫米*高18毫米M8 Lens8mm 10mm18mmRunCam Racer 2用户手册远程串口调参模式:2.BetaFlight 端口设置界面1.飞控连接示意图注意:用串口3举例3.串口控制(遥控器操作,方向标识打杆动作,圆点表示居中)飞控如果有蜂鸣器,哔哔哔三声表示串口连接成功;断开连接则只会哔哔两声来提示.连接成功之后,遥控器就可以模拟按键的快捷设置。
Kentmaster Rajin 2 Restraining Box.Operations Manual.SafetyMake sure the swing door is secure prior to the animal entering the box.Make sure the head catch is in the open position prior to the animal entering the box.Make sure the rear slide gate is closed properly after the animal has entered the box.OperationsThis box is an all manual operation.As the animal enters the box catch the head in the head restraint.Shut rear slide gate as soon as possible after entry by the animal.Raise the Chin lift and Brisket support.Stun / cut the animals throat / stick ASAPOnce the animal is deemed dead, release the brisket support and the chin lift.Release the head restraintOpen the swing door which will allow the animal to roll out of the box.Ensure to close the swing door properly and open the rear slide gate.MaintenanceMaintenance is minimal and low cost as all the moving parts are manual and onlyneed to be smeared with food grade grease to ensure correct operation and care.All moving parts are stainless steel.Spare parts if ever required are available.Note: this box can be used for camels and horses after an interchangeable chin lift and head restraint are fitted.。
Operators Manual••••PartsFLOOR JACKModel 950524 - 2-1/4 Ton CapacitySears, Roebuck and Co., Hoffman Estates, IL 60179Visit our Craftsman website: /craftsmanPrinted in ChinaBEFORE using this product, read this manual and follow all its Safety and Operating instructions. Failure to do so may result in personal injury and/or property damage.Warranty.....P. 2Save these instructions.....P. 2Safety instructions.....P. 3Assembly instructions.....P. 4Operation.....P. 4 & P. 5Maintenance.....P. 6Troubleshooting.....P. 7Parts.....P. 7Service.....Back coverCRAFTSMAN ONE YEAR FULL WARRANTYIf this Craftsman product fails due to a defect in material or workmanship within one year from the date of purchase, return it to any Sears store or other Craftsman outlet in the United States for free replacement.This warranty applies for only 90 days from the date of purchase if this product is ever used for commercial or rental purposes.This warranty gives you specific legal rights, and you may also have other rights which vary from state to state.Sears, Roebuck and Co., Hoffman Estates, IL 60179For your safety, read, understand, and follow the information provided with and on this jack.•The owner and operator of this equipment shall have an understanding of this jack and safe operating procedures before attempting to use. The owner and operator shall be aware that use and repair of this product may require special skills and knowledge. Instructions and safety information shall be conveyed in the operators native language before use of this product is authorized. If any doubt exists as to the safe and proper use of this jack, remove from service immediately.•Inspect before each use. Do not use if broken, bent, cracked, or damaged parts (including labels) are noted. Any jack that appears damaged in any way, operates abnormally or is missing parts, shall be removed from service immediately.•If the jack has been or suspected to have been subjected to a shock load (a load dropped suddenly, unexpectedly upon it), immediately discontinue use until jack has been checked by a Sears or other qualified service center. It is recommended that an annual inspection be done by qualified personnel.• Labels and Operators Manual are available from Sears (see PARTS section on page 7).! SAFETY MESSAGE !Be sure all tools and personnel are clear before lowering load. No alterations shall be made to this device. Only attachments a n d /o r a d a p t e r s s u p p l i e d b y t h e manufacturer shall be used. Lift only on areas of the vehicle as specified by the vehicle manufacturer.NOTE: Jack stands are rated per pair unless otherwise noted.Use 1 matched pair per vehicle only.OPERATIONKNOW YOUR JACKCompare Fig. 2 illustration with your jack BEFORE operation to become familiar with the location of various jack components.SPECIFICATIONSRated Capacity: 2-1/4 Ton/4500 Lbs Jack Dimensions: 21” x 8-1/2” x 5-1/2”Lifting Range:5-1/2” ~ 15” (Approx.)(140mm - 381mm)Oil Capacity: 90 cc ± 5 ccNet Weight: 27.1 lbs. (Approx.)BEFORE USE•Read the operator's manual completely and familiarize yourself thoroughly with the product, its components and recognize the hazards associated with its use.•Occasionally during shipment and/or handling air can get trapped in the system,which can interfere with the jacks lifting performance.•It is recommended to cycle the jack a few times without applying load:•Engage release valve with notched end of jack handle. Close release valve by turning the jack handle clockwise until tight.•Insert jack handle into handle sleeve.Pump the handle until the jack saddle reaches its maximum height.•Engage release valve with notched end of jack handle. Open release valve by turning jack handle counterclockwise, but no more than 1/2 full turn. Allow the saddle to reach its lowest position.•Repeat the above procedure a few times.•To release air from the hydraulic system:•Engage release valve with notched end of jack handle. Open the release valve b y t u r n i n g t h e j a c k h a n d l e counterclockwise, but never by more than 1/2 full turn.•Remove the oil filler plug from the cylinder.(see Fig. 3)•Insert jack handle into handle sleeve.Rapidly pump jack handle through several full strokes.•Reinstall the oil filler plug into the cylinder again and jack is now ready to use.FIG. 2oil filler plug (not shown,on reservoir)TO ASSEMBLE THE CARRY HANDLE ONTO THE JACKSnap the carry handle onto the nuts of jack’s middle axle. (see Fig. 1)OPERATING PRINCIPLES•With release valve closed, an upward stroke of the jack handle draws oil from the reservoir tank into the plunger cavity. Hydraulic pressure holds a valve closed, which keeps the oil in the plunger cavity.• A downward stroke of the jack handle releases oil into the cylinder, which forces the ram out. This raises the saddle. (NOTE: T o avoid damage to the cylinder if the load exceeds the rated capacity of the jack, oil is automatically released back into the reservoir through the safety overload valve.)•When the ram reaches maximum extension, oil is bypassed back into the reservoir to prevent an over-extended ram stroke and possible damage to the jack.•Opening the release valve allows oil to flow back into the reservoir. This releases hydraulic pressure on the ram, which results in lowering the saddle.HOW TO USE YOUR JACK RAISING THE JACK•With notched end of the jack handlle (see Fig. 2) close release valve by turning the handle clockwise.•Chock the vehicle’s wheel with appropriate devices to ensure lifting stability.•Refer to the vehicle manufacturer’s owners manual to locate approved lifting points on the vehicle. Position jack so that the saddle is centered under the load at an appropriate lift point.•Insert jack handle into handle sleeve. Pump jack handle until saddle almost contacts the vehicle. Check to see that the saddle is centered and will contact the load lifting point firmly.•Continue to pump the jack handle to lift the vehicle to the desired height. After lifting, support the load with appropriately rated jack stands BEFORE working on theRated capacity of jack stands is per, it is NOT the sum of individual capacities unless specifically noted to the contrary by the jack stand manufacturer.Do Not exceed rated capacity. Ensure that the vehicle support points are fully captured between the outer lugs of both jack stands.Use a matched pair of jack stands per vehicle to support 1 end only. Use 1 pair per vehicle only. Failure to do so may result in sudden loss of load, which may cause personal injury and/or property damage.area when lowering load.•Raise load high enough to clear the jack stands, then carefully remove jack stands (always used in pairs).•With notched end of jack handle, SLOWLY open the release valve by turning the handle counterclockwise, but never more than 1/2 full turn. If the load fails to lower:e another jack to raise the vehiclehigh enough to reinstall jack stands.b.Remove the affected jack and then thestands.ing the other jack, lower the load byturning the operating handle counter-clockwise, but no more than 1/2 full turn.•After removing jack from under the load, push saddle down to reduce ram exposure to rust and contamination.MAINTAINING OIL LEVELImportant: When adding or replacing oil,ALWAYS use a good grade Hydraulic Jack oil. We recommend M obil DTE13M or equivalent. DO NOT use Hydraulic Brake Fluid, Alcohol, Glycerine, Detergent, Motor Oil or dirty oil. Use of an improper fluid can cause serious internal damage to your jack.ADDING OIL•Position the jack on level ground and fully lower the saddle. (Ram will be all the way in). Remove oil filler plug located under cover plate (see Fig. 3).•Oil should be filled to the level of about 3/16” above the inner cylinder as seen from the oil filler hole. If low, add oil as needed.•Re-install oil filler plug and cover plate. The jack is now ready to use.LUBRICATION•Add lubricating oil to all moving parts as needed.PREVENTING RUST•Check ram and pump plunger (see Fig. 3)every few months for any signs of rust or corrosion. Clean as needed by wiping with an oily cloth.FIG. 3•When not in use, ALWAYS store jack with saddle lowered all the way down.ANNUAL INSPECTIONTo ensure that it is in optimum condition,annual inspection of the jack at a Sears Service Center is recommended.REPLACING OIL•T o drain oil, remove cover plate and oil filler plug and open release valve. Turn jack over and drain old oil out through the oil filler hole and into a suitable container.Note: Dispose of hydraulic oil in accordance with local regulations.•Refill with new oil through the oil filler hole.DO NOT allow dirt or foreign material to enter the hydraulic system when filling.•After refilling, remove any air from the hydraulic system by opening the release valve and rapidly pumping the jack handle several times.•Re-install oil filler plug and cover plate and the jack is ready to use.Ram all the way inPlunger DownRelease ValveOil Filler PlugProper Oil LevelPROBLEM-SOLVING HINTSMODEL NUMBER: 50524The Model Number and Serial Number are found on the lifting arm and handle sleeve respectively. Always mention the Model Number and Serial Number when requesting service or repair parts for your jack.INDIVIDUAL PARTS ARE NOT AVAILABLE FOR REPLACEMENT ASSEMBLIESSymptom Possible CausesCorrective ActionJack does not lift load Jack bleeds off (starts to lower) after lift Jack does not lower afterunloadingPoor lift performance•Release valve not tightly closed•Overloaded - too much weight on jack • Release valve not tightly closed • Hydraulic unit malfunction •Oil reservoir overfilled •Linkages binding •Ensure release valve is tightly closed •Reduce weight on jack•Ensure release valve is tightly closed •Replace power unit assembly •Drain fluid to proper level•Clean and lubricate moving parts •Ensure proper fluid level•With ram fully retracted, open release valve, pump handle several times to expel trapped air Does not lift to fullextension•Fluid level low•Fluid level low•Air trapped in system•Ensure proper fluid levelKey Description 1Saddle2Power Unit Assembly 3Handle Assembly 4Front Wheel Assembly 5Rear Castor Assembly 6Cover Plate 7Oil Filler Plug —Operators Manual ––Warning LabelFIG. 41234567For after sale support and assistance:Call 1-888-332-6419, 8:00 AM - 4:45 PM CST., Monday - Friday© Sears Brands, LLC® Registered Trademark / TM Trademark / SM Service Mark of Sears Brands, LLC® Marca Registrada / TM Marca de Fábrica / SM Marca de Servicio de Sears Brands, LLCMCMarque de commerce / MD Marque déposée de Sears Brands, LLCwww.sears.ca。
目录版权所有翻印必究录目1程序功能及性能简介…………………………………第一章2程序安装………………………………………………第二章6调用程序………………………………………………第三章8建立模型………………………………………………第四章22静力计算………………………………………………第五章30静力计算结果…………………………………………第六章1北京市艾思弗计算机软件技术有限公司.CAESARII-管道应力分析简版使用手册程序功能及性能简介CAESARII4.0具备如下计算功能:从静力学角度而言,、涉及所有静力荷载,如管道自重、内外压力、温度、附加位移、预拉伸(冷紧)?沉陷、集中荷载。
分类计算荷载,结果可以相互叠加。
?计算设备嘴子的刚度。
可根据?WRC297 准确模拟各种形式的波纹膨胀节。
?……ANSI B31.1、ANSI B31.3?提供多种设计规范,如:计算设备嘴子应力条件。
可根据WRC107?可验算设备嘴子受力条件。
?可计算风荷载、地震荷载。
?钢结构可与管道系统混合计算。
?还具备相当优良的使用性能,突出表现在输入输出方面。
工具条菜单输CAESARII 4.0入采用全屏幕填表方式,辅以求助信息、编辑命令和图形显示,使用户感到十分方便。
输出方面也很具特点,融入许多编辑命令,诸如翻页、查找、打印等,图形显示直观明了。
命令,也不必死记程序操作具备这样的性能就使得用户无需掌握太多DOSCAESARII 4.0 该程序在解题能力方面没有严格限制,只须保证有足够的外存容量。
步骤和数据输入格式。
CAESARII4.0的配置要求:Intel Pentium Processor?或更高)操作系统,NT4.095Mincrosoft Windows(,98? 32MB内存(推荐)? 76MB硬盘空间?驱动器?CD-ROM (使用大字体)。
分辨率1024×(使用小字体)600要求注:CAESARII 4.0800×分辨率或7682北京市艾思弗计算机软件技术有限责任公司.CAESARII-管道应力分析简版使用手册程序安装第一章NT4.0以上的操作环境。
具体安装步骤如下:,Win98或安装程序需要Microsoft Win95驱动器中,安装程序将自动开始。
如CD-ROM 软件的CD盘放入把装有1CAESARII步。
如果安装程序不能自动开始,用户应该手动完成以下的2果这样的话,用户可跳过第步骤。
出现添加,删除程序>从控制面板中选择<添加/>><开始—<设置>—<控制面板。
2单击,开始安装程序。
接着提示用户选择目录一安装安装>/删除程序对话框,然后点击<<Browse>来改变安装目录。
CAESARII,也可通过选择,用户选择安装类型。
缺省的选项为“安全安装”建议多数用户使用>下一步3单击<这个选项。
,用户选择语言类型。
<下一步>4单击>下一步,用户选择定义程序快捷方式的文件夹。
5单击<。
,用户定义所使用的>ESL颜色(白色)单击6<下一步CAESARII安装开始。
下一步7单击<>,CRC检查,以证实所有的文件已经正确释放安装。
将进行一旦安装完成后,CAESARII3北京市艾思弗计算机软件技术有限责任公司.CAESARII-管道应力分析简版使用手册调用程序第二章用户调用该程序的步骤如以CAESARII程序已被装入硬盘CAESAR子目录的情况下,下:<开始>按纽。
1点击任务栏的,显示所有可用的程序。
根据设置不同,也许需要搜索多级菜单。
程序>2指向< 软件,屏幕显示CAESARII3当看到CAESARII 时,单击CAESARII4.0从而启动所示。
CAESARII程序主菜单,如图3—11CAESARII Main Menr—3图,目录下的C2.exe文件)双击注:CAESARII快捷键(但必须注意此快捷键是CAESARII CAESARII软件。
也可启动配置动态分析新文件管道模型结构模型加密锁打开文件埋地管静态分析静态结果材料帮助用户可以从菜单中选择文件(File),输入数据(Input),分析类型(Analysis),输出4北京市艾思弗计算机软件技术有限责任公司.管道应力分析简版使用手册CAESARII-结果(Output)等菜单。
所有的CAESARII分析都要求输入一个文件名,以便数据的输入,模型的分析和对所定义的文件的输出绍果进行分析。
文件名用File菜单来定义,具体操作方法如下:用户开始一个新的分析时,选择File菜单中的New(或者单击New图标),输入一个文件名和文件名所在的路径如图3—2所示。
为了快速进入程序,用户应该输入文件名,然后选择Piping Input。
图3—2New Job Name Specification注意:选择File菜单中的Open(或都单击Open图标)表明用户用一个对话框来选择已存在的文件。
经常使用的文件也可以从File菜单中的“Most Recently Used”中选择。
选择一个文件名并不能打开该文件,它仅表示可以对该文件进行输入,分析,结果评价或进行其它的操作,但是用户仍需从菜单中选择这些操作。
5北京市艾思弗计算机软件技术有限责任公司.管道应力分析简版使用手册CAESARII-第三章建立模型1总述管道系统静力分析需要将诸如计算条件(温度、压力等)、管子材料特性(杨氏弹性模量、线膨胀系数、基本许用应力等)、管子尺寸(直径、壁厚、长度)空间走向、约束方式等作为基本数据输入。
这些数据沿管道有所变化,在发生变化的地方设立节点,这样,整个管系被划分成许多单元,每个单元由两个节点组成。
CAESARII 4.0采用逐个单元输入的方法,单元的输入以填表的方式完成,该表格在程序中称为Spreadsheet,一个单元对应一页Spreadsheet。
调出Spreadsheet 的具体操作步骤是:(1)进入CAESARII主菜单,定义文件名(作法见第三章)。
(2)选择主菜单Input中的Piping,Piping-Input表格式输入菜单—Spreadsheet 形式如4—1所示。
图4—1Piping Input Spreadsheet注意:在选择Input之前应留意主菜单上的Current jobname是否是所要编辑的文件,执行jobname选择项可更换当前文件。
6北京市艾思弗计算机软件技术有限责任公司.CAESARII-管道应力分析简版使用手册其中栏内提示符含义:From 当前单元起始节点To 当前单元终止节点DX 当前单元在X方向上的投影当前单元在YDY 方向上的投影当前单元在ZDZ 方向上的投影Offsets 当前单元是否有偏差值,有则双击,然后输入有关数据Diameter 当前单元管子直径当前单元管子壁厚Wt/Sch当前单元管子腐蚀裕量CorrosionInsul Thk 当前单元保温层厚度Temp 1 当前单元第一个计算温度当前单元第二个计算温度Temp2当前单元第三个计算温度Temp3Pressure1 当前单元第一个计算压力Pressure2 当前单元第二个计算压力当前单元终止节点是否有弯管,有则双击,然后在现弯管定义栏Bend当前单元是否是刚性元件,是则双击,然后出现刚性元件定义栏Rigid Expansion Joint当前单元是否是波纹膨胀节,是则双击,然后出现波纹膨胀节定义栏当前单元终止节点是否有应力增强件或三通,有则双击,然后出现SIF&Tees 应力增强件或三通定义栏Restraints 是否有约束,有则双击,然后出现约束定义栏Displacements 是否有位移荷载,有则双击,然后出现位移荷载定义栏Hangers 是否有弹簧支吊架,有则双击,然后出现弹簧支吊架定义栏Nozzles 是否有管嘴,有则双击,然后出现管嘴定义栏Forces/Moments 是否有集中荷载,有则双击,然后出现集中荷载定义栏Uniform Loads 是否有分布荷载,有则双击,然后出现分布荷载定义栏Wind 是否有风荷载,有则双击,然后出现风荷载定义栏Material 当前单元材料序号Allowable Stress 是否输入当前单元基本许用应力,是则双击,然后出现许用应力定义栏Elastic Modulus 当前单元杨氏弹性模量Poisson's Ratio 当前单元泊松比Pipe Density 当前单元管子质量密度Fluid Density 当前单元管内流体质量密度Insulation 当前单元隔温层质量密度文件加密批运算插入单元整体坐标节点增量显示输入列表显示距离结束循环搜索节点删除单元运算7北京市艾思弗计算机软件技术有限责任公司.CAESARII-管道应力分析简版使用手册继续弯管SIF 包括管文件膨胀节库画图弹簧设计标准上一个分支SIF 特殊选项包括结构文件阀门法兰库标题Spreadsheet键可上翻或下翻动按Page Up和PageDown安装温度1.1℃。
此值可以修改,具体操作方法是:程序中安装温度的缺省值是21Special Execution 下,点击Kaux 菜单下的Special Execution Parameters,调出1.在Spreadsheet Parameters子菜单。
Ambient Temperature处,键入新安装温度。
2.移动光标至1.2计算温度处输Temp3,Temp2,CAESARII4.0允许定义三种计算温度,在Spreadsheet的Temp1 入,此处也可输入安装温度至计算温度和膨胀率。
1.3计算压力处输入。
可以考虑布的Pressure允许定义两种计算压力,在CAESARII4.0Spreadsheet ),具体操作步骤是:尔登压力效应(Bourdon Pressure EffectsSpecial Execution 菜单下的在Spreadsheet下,点击KauxSpecial Execution Parameters,调出1. Parameters 子菜单。
1后填或22.移动光标至Activate Bourdon 1.4管内流体密度输入此值是为了计入流体的质量。
当存在气液两相流体时,应输入平均密度。
在Fluid Density处输入。
Spreadsheet的腐蚀裕量1.5认为腐蚀量降低管道承受持续荷载的能力,而并不啬管道柔性。
此值在CAESARII SpreadsheetCorrosion处输入。
的 1.6保温层InsulSpreadsheet对保温层,输入厚度和质量密度,在的和Insulation处输入。