S3000-CDS软件操作手册
- 格式:pdf
- 大小:2.31 MB
- 文档页数:11

S300标准型 快速快速指引指引目录目录 (2)1.S300标准型与UE10接线 (3)2.S300标准型与UE48接线 (3)3.参数设置 (4)1. S300标准标准型与型与UE10接线S300标准型与UE10(手动复位)接线方法如下:2. S300标准型与UE48接线S300标准型与UE48接线(手动复位)如果需要自动复位,在UE48上,去掉S1,S34改到S35位置,即S33与S35间串联K1、K2(接触器接触器))的常闭点的常闭点。
3. 参数设置系统参数设置:图3S300安全扫描仪的参数需要通过CDS软件来设置,上图为S300通过串口与电脑连接后双击S300图标后打开的参数设置界面,在这个界面中我们可以进行系统参数设置、分辩率和扫描距离设置、OSSD设置、复位设置、应用诊断输出设置、区域保护设置、事件设置、模拟显示等。
在图3所示的界面中我们可以进行应用名称、设备名称、使用者名称的设置。
在这里可以根据实际情况进行相应的设定。
分辩率和扫描距离设置:图4在图4所示的界面中我们可以进行应用场合、扫描分辩率的设置。
在第一项的选项中是用来进行应用场合的设置,在这里有两种选择,一种是应用在移动设备上,另一种是应用在固定设备上。
在第二项的选项中是用来进行扫描分辩率的设置,在这里有四种选择,分别为30、40、50、70,30、40为对手的保护,50、70为对腿的保护,下面分别对应相应时间和最多的保护区域。
OSSD设置:图5在图5所示的界面中我们可以进行OSSD安全输出的设置。
在第一项的选项中是用来进行OSSD的设置,在这里如果没有外接设备这里可以不用设置。
复位设置:图6在图6所示的界面中我们可以进行复位的设置。
在第一项的选项中是用来进行复位的设置,在这里有三种选择,可以选择自动复位、手动复位、延时复位,如果选择自动复位就选择第一项,如果选择手动复位就选择第二项,如果选择延时复位就选择第三项,并且输入延时时间,单位为秒。

CDS软件的使用及步骤本次使用的是CDS7.1版本,正版软件需要用狗来解锁。
1软件介绍软件翻开界面,我们需要点击软件的三叶草形状的基站,然后会出现下面的界面然后点击“文件“下面的csu出现这个画面这个是将工参导入,点击翻开小区文件会让你选择工参,〔一般都放在桌面上,首次需要导入,以后就不需要的,除非工参更新〕选择好工参以后会出现下面的情况将ENB ID ENB NAME 小区号点上点击导入会出现导入成功,然后点击cdb会出现以下界面打击翻开然后点击第五个“创立小区图层〞点击“生成图层〞并“保存模板〞然后关闭即可。
然后点击上面一排菜单的工具一栏选择第一个“小区数据选择〞出现该界面将工参激活确定即可。
然后点击设备,将gps和测试机连接好,再点击“连接/断开设备〞.连接完成之后再下列图的右面就会有gps信号〔前提在能搜到卫星的情况下〕在右侧小区图层小窗口上点击+号添加工参将工参打上对号即可关闭。
这时右面就会出现小区所在位置。
配合测试的软件还有FileZilla Client这个下载软件,这个大家都知道怎么用,我就不详细介绍了,到每个地区所用的效劳器不同,这个去地势都会给。
以上连接成功后就可以测试了.2Log录制的介绍从上图可以看见dt indoor 一个是切换一个是室分Dt界面在右上角可以看见经纬度〔每次都需要采集经纬度,本次没有搜到卫星,未能显示〕Indoor界面这两个见面都能看见小区名称 rsrp sinr等一些相关数据〔我的截图是在屋里gps没信号所以没显示小区名称〕在用户家里录 log的时候在indoor界面的右侧竖排第三个点击导入一张白图〔事先准备好的〕箭头标注的即是。
导入白图之后点击log录制的图标〔上面带+号的〕点击之后出现一下界面,这个界面是让你起名并将long保存在什么位置。
点击保存之后log就开始录了,这时我们点击右面一列的第四个,然后再白板上打点,并在用户家里走动〔测量信号的不同地方的好坏,打点只需打一个正方形即可,每个角点一下,一共点5下,两个点之间需要一段时间,根据你的速度而定〕先面试点5个点的图这时可以点击log的图标停止了。

S300 CDS操作指南
Step 1 软件连接
使用编程电缆将S300与电脑连接
打开CDS后,如果电脑驱动安装准确的话,在串口选项下面会出现当前使用的Com口,点击Com口,然后点击望远镜图标,电脑会自动搜索S300
Step2 电脑与S300连接成功
成功连接上设备后,Com口下面会出现S300,单击S300,右面的窗口会出现当前连接S300设备的设备信息等内容,双击S300,进入编程画面
Step 3 确定S300分辨率
Resolution----检测设备的分辨率
Step 4 确认S300 I/O点功能定义
S300 I/O中Pin13 Pin14 Pin15 是输出端,可以根据上面的选项来输出需要的信息,如果需要上面的内容信息输出的话,需要打勾
S300 I/O中Pin5 Pin6是输入端,可以选择EDM功能和Reset功能
Step 6 确定S300的复位方式
自动复位/手动复位/延迟时间自动复位Step 7 设定区域
Step 8 区域使能
Field Set----下拉菜单里面选择所画的区域名称
Multiple sampling---当物体在区域内被检测到次数,达到设定值时,S300认定区域内有物体存在
Step 9 下载参数
密码是 SICKSAFE 注意需要大写
下载过程中,有许多选项弹出,选择OK/下一步,一直到画面会出现一个像文档一样的诊断画面,这个时候需要点击 release. 直到这步完成,设备才会将参数下载到S300里面.
S300电气接线图:。

目录第1章交换机管理 (1)1.1 管理方式 (1)1.1.1 带外管理 (1)1.1.2 带内管理 (5)1.2 CLI界面 (10)1.2.1 配置模式介绍 (10)1.2.2 配置语法 (13)1.2.3 支持快捷键 (13)1.2.4 帮助功能 (13)1.2.5 对输入的检查 (14)1.2.6 支持不完全匹配 (14)第2章交换机基本配置 (15)2.1 基本配置 (15)2.2 远程管理 (15)2.2.1 Telnet (15)2.2.2 SSH (17)2.3 配置交换机的IP地址 (18)2.3.1 配置交换机的IP地址任务序列 (18)2.4 SNMP配置 (20)2.4.1 SNMP介绍 (20)2.4.2 MIB介绍 (21)2.4.3 RMON介绍 (22)2.4.4 SNMP配置 (22)2.4.5 SNMP典型配置举例 (24)2.4.6 SNMP排错帮助 (26)2.5 交换机升级 (26)2.5.1 交换机系统文件 (26)2.5.2 BootROM模式升级 (27)2.5.3 升级 (29)第3章集群网管配置 (37)3.1 集群网管介绍 (37)3.2 集群网管基本配置 (37)3.3 集群网管举例 (40)3.4 集群网管排错帮助 (41)第1章交换机管理1.1 管理方式用户购买到交换机设备后,需要对交换机进行配置,从而实现对网络的管理。
交换机为用户提供了两种管理方式:带外管理和带内管理。
1.1.1 带外管理带外管理即通过Console进行管理,通常情况下,在首次配置交换机或者无法进行带内管理时,用户会使用带外管理方式。
例如:用户希望通过远程Telnet来访问交换机时,必须首先通过Console给交换机配置一个IP地址。
用户用Console管理的步骤如下:第一、搭建环境:通过串口线连接图1-1 交换机Console管理配置环境按照图1-1所示,将PC的串口(RS-232接口)和交换机随机提供的串口线连接,下面是连接中用到的设备说明:设备名称说明PC机有完好的键盘和RS-232串口,并且安装了终端仿真程序,如Windows 系统自带超级终端等。

TD-LTE路测工具CDS介绍一、工作模式和状态CDS软件集成了路测需要的前、后台所有功能,主要工作于两种模式:数据采集模式、数据分析模式。
两种工作模式之间需要通过“空闲”状态进行过渡。
如下图所示(注意:连接设备采集数据前必须先关闭已打开的日志文件,打开日志文件进行回放或分析前必须先断开不实际设备的连接。
)工作状态 Idle (空闲) 状态:当测试软件启动,但没有不测试设备进行通讯,也没有打开日志文件时处于的Idle状态。
Connected(连接)状态:此状态软件采集设备上报的数据并通过测试视图实时显示,但测试数据不会记录到日志文件中。
Recording(录制)状态:此状态不Connected状态的区别在于采集的数据同时会被记录到指定的日志文件中。
LogOpened(日志打开)状态:当用户打开一个或多个测试日志,但没有对日志文件进行其他操作时,软件处于LogOpened状态。
ReplayPause(回放暂停)状态:当用户打开测试日志文件后,且没有处于动态回放时则为此状态。
此时所有视图的显示不回放进度区间指示保持同步。
Replaying(普通回放)状态:当用户打开了日志文件后,点击“回放”按钮进入此状态,此时软件动态显示采集的测试数据。
FastReplaying(快速回放)状态:当用户打开了日志文件后,点击“快速回放”按钮进入此状态。
在此时数据将以数十倍于采集速度进行快速回放,用户可以使用“+”和“-”按钮来调节回放的速度。
二、CDS文件管理CDS使用两种专用的文件格式:日志文件(.log)和工作区文件(.wks)和日志文件用途:此文件用来保存采集的测试数据,用户可打开日志文件进行回放和后处理工作。
CDS支持用户同时打开多个日志文件,并可随时在打开的多个文件中进行切换回放工作区文件用途:此文件用来保存用户对CDS的配置信息,用户可根据需求建立多个工作区文件来快速恢复使用场景。
可存储三类配置信息:1、硬件配置2、自动测试计划配置3、视图配置三、CDS界面整体介绍CDS用户界面可以分为操作界面和视图界面两个部分:操作界面:图中蓝色箭头部分,包括标题栏、工具栏、导航栏以及资源管理器,大部分的CDS配置和控制操作从此部分收起。


This chapter attempts to simplify and standardise the verification process at the ADM. To this end, Depository sets out the list of people, termed “acceptable witnesses”, who may perform, among others, witnessing and certification functions for the depositor / Authorised Direct Member.Any one of these acceptable witnesses may witness / certify relevant CDS forms and supporting documents which are required by Depository. These may include:-a.Witnessing / certification of certain CDS forms and supporting documents, except asotherwise stated in this procedures manualb.Certified translated copies of documents in a foreign languageWhere a supporting document in a foreign language has been provided, it must be accompanied with an English translated copy. Both documents, i.e. the foreign document and the English copy, must be certified by an acceptable witness prior to submission to the ADM / Depository.Please note that the examples cited above are for illustration purposes only and are not meant to be exhaustive in nature. Depository may, from time to time, introduce new procedures which require the witnessing and certification functions of an acceptable witness.9.1 List Of Acceptable Witnesses9.1.1The following are a list of acceptable witnesses who may witness/certify relevantCDS forms and supporting documents submitted by depositor / authorisedsignatory(ies) except as otherwise stated in this procedures manual:-a.Authorised officer of the ADA/ADMb.Individual who holds a Capital Markets Services Representative’slicence pursuant to section 59(1) of the Capital Markets and ServicesAct 2007 to act as a representative for dealing in securities;c.Authorised officer of a Malaysian Embassy / High CommissionConsulated.Notary Public in any jurisdiction;e. Lawyer in any jurisdiction who has a valid licence to practice law in thatjurisdiction;f. In relation to a stockbroking company licenced or approved to trade on arecognised stock exchange as defined in the Rules of the StockExchange, any person who holds a licence held by a dealer’srepresentative or any other person authorised by such licencedstockbroking company;g. Authorised officer ofa. a licenced bank as defined in the Financial Services Act 2013;orb. an Islamic bank licenced under the Islamic Financial ServicesAct 2013,and with which the individual holds an account;h. Registered Representative registered pursuant to the Guidelines forRegistered Person (Registered Representative) issued by the SecuritiesCommission;i. Officer of a registered person referred to under the third column of Item1(b) of Part 1 of Schedule 4 to the Capital Markets and Services Act2007, who is authorised by such registered person to perform theactivities referred to under the second column of the said item 1(b);J District Officer / Assistant District Officerk. Such other person as may be approved by Depository from time to time.9.1.2The name and designation of the witness must be stated by the person witnessingthe depositor / authorised signatory(ies)’ signature(s).。

Modify Safety Area With SICKSoftware使用SICK软件修改安全区域Identify Device And Read DataIdentify Device And Read Data•打开项目文件,右键Ethernet Communication,选择identify,弹出对话框。
勾选需要操作的设备,开始识别。
•Open our document, click Ethernet Communication with right button, dialog box will open. Select devices which you need, start identifying.Identify Device And Read DataIdentify Device And Read Data •完成识别后,系统会提示是否读取设备组态信息。
•After finish identifying, system will mention if you want to read the configuration.Identify Device And Read Data•完成读取后,图标会变亮。
•Relevent icons of scanner will be light.Identify Device And Read DataIdentify Device And Read Data•双击需要操作的Scanner图标,然后点击需要操作的区域,安全区域将会显示。
•Double click the scanner icon which you need, then click safety area which need to be operated, the area will be displayed on the main screen.View And Modify Safety AreaView And Modify Safety Area•如图,粉色区域为当前的安全区域。


MSO/UPO3000CS系列示波器使用手册REV32023.11尊敬的用户:您好!感谢您选购全新的优利德仪器,为了正确使用本仪器,请您在本仪器使用之前仔细阅读本说明书全文,特别有关“安全注意事项”的部分。
如果您已经阅读完本说明书全文,建议您将此说明书进行妥善的保管,与仪器一同放置或者放在您随时可以查阅的地方,以便在将来的使用过程中进行查阅。
优利德科技(中国)股份有限公司版权所有。
如果原购买者自购买该产品之日起一年内,将该产品出售或转让给第三方,则保修期应为自原购买者从UNI-T或授权的UNI-T分销商购买该产品之日起一年内。
探头及其他附件和保险丝等不受此保证的保护。
如果在适用的保修期内证明产品有缺陷,UNI-T可自行决定是修复有缺陷的产品且不收部件和人工费用,或用同等产品(由UNI-T决定)更换有缺陷的产品。
UNI-T作保修用途的部件、模块和更换产品可能是全新的,或者经修理具有相当于新产品的性能。
所有更换的部件、模块和产品将成为UNI-T的财产。
以下提到的“客户”是指据声明本保证所规定权利的个人或实体。
为获得本保证承诺的服务,“客户”必须在适用的保修期内向UNI-T通报缺陷,并为服务的履行做适当安排。
客户应负责将有缺陷的产品装箱并运送到UNI-T指定的维修中心,同时预付运费并提供原购买者的购买证明副本。
如果产品要运送到UNI-T 维修中心所在国范围内的地点,UNI-T应支付向客户送返产品的费用。
如果产品送返到任何其他地点,客户应负责支付所有的运费、关税、税金及任何其他费用。
本保证不适用于由于意外、机器部件的正常磨损、在产品规定的范围之外使用或使用不当或者维护保养不当或不足而造成的任何缺陷、故障或损坏。
UNI-T根据本保证的规定无义务提供以下服务:a)修理由非UNI-T服务代表人员对产品进行安装、修理或维护所导致的损坏;b)修理由于使用不当或与不兼容的设备连接造成的损坏;c)修理由于使用不符合本说明书要求的电源而造成的任何损坏或故障;d)维修已改动或者与其他产品集成的产品(如果这种改动或集成会增加产品维修的时间或难度)。
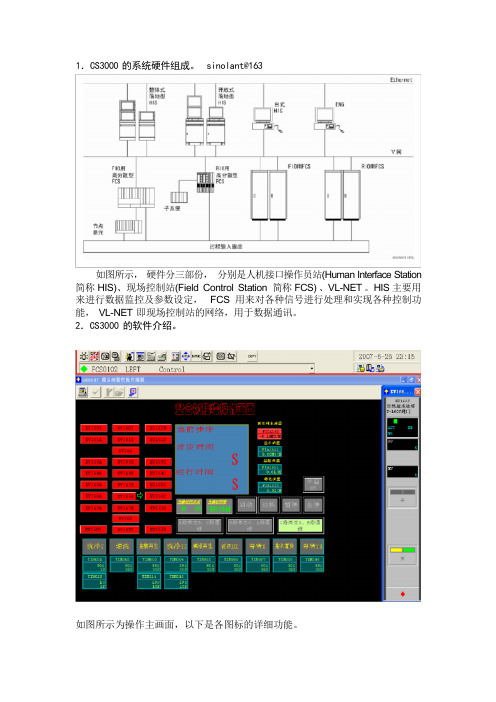
1.CS3000 的系统硬件组成。
sinolant@163如图所示,硬件分三部份,分别是人机接口操作员站(Human Interface Station 简称HIS)、现场控制站(Field Control Station 简称FCS) 、VL-NET 。
HIS 主要用来进行数据监控及参数设定,FCS 用来对各种信号进行处理和实现各种控制功能,VL-NET 即现场控制站的网络,用于数据通讯。
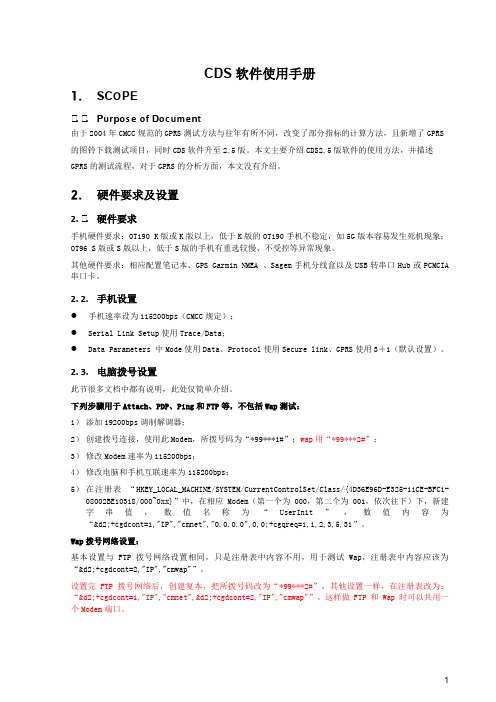
2.CS3000 的软件介绍。
如图所示为操作主画面,以下是各图标的详细功能。
过程报警系统报警信息操作指导打印用户进入系统的信息(操作级别切换)功能调用圖操作菜单预设菜单工具箱回导航窗口调用(流程图、系统总貌、趋势图等)窗口直接调用(窗口名工位)窗口消除(清屏)蜂鸣器复位2.1 报警确认CS3000 系统软件将时时对所有的硬件进行检测,包括网络,卡件等,一旦发现某个硬件发生故障,将进行声音报警,同时将报警信息及时反映在画面上。
告知操作员,以便做出及时处理。
点击进入“系统报警信息”,如图:红色方块表示报警信息。
点击对勾,表示确认报警,同时消除报警声。
2.2 操作员键盘上图为操作员键盘及键盘上的各种功能调用,此外,在操作员键盘上部,还有 32 个快捷键,根据用户需要,每一个快捷键对应相关的功能,如系统总貌,流程图,趋势图,报警信息等。
2.3 操作监视窗口2.3.1 流程图窗口流程图窗口是通过丰富的图素,将装置从视觉上做成易于理解的操作窗口。
流程图窗口有流程图属性、控制属性。
■ 流程图属性可以将装置以流程图形式显示,进行直观流程图窗口上还可以调出各种窗口。
窗口的示例如下。
■控制属性用仪表图表示出功能块的状态,对其进行操作监视。
仪表图有两个规格,使用大尺寸的仪表,最多排8个;使用小尺寸的仪表,最多排16个进行操作监视。
尺寸不同大小的仪表也可以混用。
此外,各个仪表图也可以作为面板窗口单独调出来使用。
窗口示例如下。
●仪表图仪表图是将功能块、接点输入等的状态或者数据紧凑而形象地显示在窗口上的窗口显示的重要要素。

S 3000- 快速启动 –SICK-CDS 软件的介绍开始注:此文档是针对S3000系列标准型扫描仪S30A S30A--X011BA 而制作而制作,,操作人员需要对SICK 激光扫描仪有一定了解激光扫描仪有一定了解..参数配置=Restart, EDM, Monitoring cases, field sets 等等.现在我们以常用版本CDS 3.51版本为例来说明软件的功能及其使用方法.Step1打开CDS 3.51版本软件,其界面如左图所示2打开软件如左图所示 1.标题栏 2.菜单栏 3.工具栏 4.导航栏 5.日志窗口 2 13 453工具栏意义(从上到下)当有些符号为灰色时,表示此功能当前不能使用,不能使用的原因可能是您没有连接到传感器或者是您没有足够的权限使用此功能1.创建项目 2.打开项目 3.保存项目 4.识别传感器 5.连接传感器6.断开与之相连的传感器 7.增加传感器 8.删除传感器9.打开传感器的操作窗口 10.显示诊断报告 11.下载参数配置 12.上载参数配置 13.改变用户组4在相对就的COM 口里,您可以识别到已连接的传感器。
上述符号的意思由上到下: 1. 项目通讯的协议2. 当前的连接状态(未连接) 3. 当前的连接状态(已连接) 4. 传感器符号(如S3000)上述符号的意思由上到下: 1. 显示/隐藏传感器的型号 2. 显示/隐藏循环冗余校验 3. 显示/隐藏用户组 4. 显示/隐藏在线状态5上述符号的意思由上到下: 1. 显示/隐藏信息2. 显示/隐藏警告信息 3. 显示/隐藏错误4. 显示/隐藏调试信息 5. 显示/隐藏时间 6. 保存日志 7. 删除日志15 4. RestartWithout restart interlock:当您的S3000为自动复位时(也就是物体退出保护区时,S3000自动变为绿灯),请选择此项With restart interlock:当您的S3000为手动复位时(也就是物体退出保护区时,S3000需要人工按下复位按钮才能复位),请选择此项Time delayed by___S当您的S3000需要延时自动复位时,您可以选择此项注:手动/自动复位的选择需要经过专业人员的风险评估后才能作出选择作出选择!!16 5. Application diagnosticoutput此选项的功能是针对S3000第7脚的功能来描述的Inactive: 此脚不输出任何信号On contamination:当S3000前镜有污染时输出信号On error: 当S3000有内部故障时输出信号On contamination or error:当S3000前镜有污染或内部故障时输出信号17 6. Field sets在Field sets选项,双击您所命名的传感器,如S3000进入下一页区域编辑页面187. Field set 1请看左图所示的常用工具栏 1. 保护区域 2. 报警区域3. 显示传感器周围轮廓 4. 笔画线形的选择198. 画一个保护区域我们选择1中的保护区域在4里选择直线在左图中描绘出如图所示的保护区209. 画一个报警区我们选择2中的报警区在4里选择直线,并在左图中描绘出如图所示的报警区至此,基本的参数已经修改完成,可将参数下载到S3000中点击,1 2 3 421 10. 弹出一个对话框我们点击Yes22 11. 弹出一个对话框此时会叫您登陆为某个用户,我们登陆为:Authorized client密码为(全大写):SICKSAFES23 12. 此时又会弹出另外一个对话框软件提示您需要谨慎核对您所设置的参数及保护区域是否能充分的保护您的危险区域继续点Continue24 13. 此时弹出一个参数配置的窗口请您仔细核对您所配置的参数后点击release25 14. 参数下载完成参数下载完成,,弹出窗口弹出窗口,,点击Continue26 15. 观察激光扫描仪所视区域点击data recorder如左图所示,周围蓝色的轮廓线为S3000所探测到的物体若在扫描仪保护区内没有物体侵入,则此时S3000显示绿灯。

变电站综合自动化系统软件系列DVPS-3000数据综合查询分析使用说明书V 4.3北京德威特电力系统自动化有限公司目录目录 (1)注:本文档适用于DVPS3000版本4.0 (2)第一章概述 (1)1.1关于DVPS3000系统数据综合查询分析系统 (1)1.2 报表制作与查询系统简介 (3)1.3 图表制作与查询系统简介 (3)1.4 数据库维护简介 (3)第二章通用操作 (5)2.1 如何使用口令管理 (5)2.2 如何管理窗口 (5)2.3 如何关闭、打印当前窗口 (5)2.4 如何使用电子表格 (5)第三章报表系统 (9)3.1 报表样单是什么,如何制作 (9)3.2 如何制作一个新报表 (9)3.3 如何修改表格体,得到您所希望的报表式样 (10)3.4 如何在报表中定义历史数据,建立报表与数据库的连接 (10)3.5 在报表中应用公式,定能获得您所需要的数据结果 (11)3.6 如何查看报表效果 (12)3.7 如何查看您需要的报表 (13)3.8 在您的报表中插入图形、图表,使报表更加生动 (14)3.9 如何使报表按照您所希望的格式打印输出 (14)3.10 如何使用定时打印功能 (15)3.11 报表名称是什么,如何修改 (15)3.12 如何删除不需要的报表 (15)3.13 VTS与XLS格式的区别,如何选用报表存储格式 (16)3.14 利用XLS格式实现报表的传递,实现报表传递的无纸化 (16)3.15 如何直接在报表中修改历史库数据 (16)第四章图表系统 (17)4.1 DVPS3000图表包含些什么内容 (17)4.2 如何制作一个新图表 (20)4.3 如何改变图表的外观 (20)4.4 如何定义图表中的曲线 (21)4.5如何观察图表的效果 (23)4.6 如何查看您需要的图表 (23)4.7曲线打印功能 (26)4.8 图表名称是什么,如何修改 (27)4.9 如何删除不需要的图表 (28)4.10 如何操作图表 (28)第五章数据库查询及维护 (30)5.1 使用历史数据检索框 (30)5.2 如何选择查看日期 (30)5.3 如何查看历史数据并对数据进行修正 (30)5.4 如何查看历史事件并对数据进行修正 (31)第六章常见问题及处理 (36)注:本文档适用于DVPS3000版本4.3第一章 概述1.1关于DVPS3000系统数据综合查询分析系统DVPS3000 数据库综合查询分析系统是一个集成的历史数据分析、查询及维护工具。


CDS软件使用手册1.SC O PE1.1.P ur p ose of D ocume n t由于2004年CMCC规范的GPRS测试方法与往年有所不同,改变了部分指标的计算方法,且新增了GPRS的图铃下载测试项目,同时CDS软件升至2.5版。
本文主要介绍CDS2.5版软件的使用方法,并描述GPRS的测试流程,对于GPRS的分析方面,本文没有介绍。
2.硬件要求及设置2.1.硬件要求手机硬件要求:OT190 K版或K版以上,低于K版的OT190手机不稳定,如5G版本容易发生死机现象;OT96 S版或S版以上,低于S版的手机有重选较慢、不受控等异常现象。
其他硬件要求:相应配置笔记本、GPS Garmin NMEA 、Sagem手机分线盒以及USB转串口Hub或PCMCIA 串口卡。
2.2.手机设置●手机速率设为115200bps(CMCC规定);●Serial Link Setup使用Trace/Data;●Data Parameters 中Mode使用Data、Protocol使用Secure link、GPRS使用3+1(默认设置)。
2.3.电脑拨号设置此节很多文档中都有说明,此处仅简单介绍。
下列步骤用于Attach、PDP、Ping和FTP等,不包括Wap测试:1)添加19200bps调制解调器;2)创建拨号连接,使用此Modem,所拨号码为“*99***1#”;wap用“*99***2#”;3)修改Modem速率为115200bps;4)修改电脑和手机互联速率为115200bps;5)在注册表“HKEY_LOCAL_MACHINE/SYSTEM/CurrentControlSet/Class/{4D36E96D-E325-11CE-BFC1-08002BE10318/000~0xx}”中,在相应Modem(第一个为000,第二个为001,依次往下)下,新建字串值,数值名称为“UserInit”,数值内容为“&d2;+cgdcont=1,"IP","cmnet","0.0.0.0",0,0;+cgqreq=1,1,2,3,5,31”。

Service NoteSubject: S3000区域安全防护装置设置与检测方法Product: S3000 SerialAuthor: Climber wang Ref No.:Date: 2007-6-22 Version: 1.01. 使用对象1.1 技术人员现场服务,对S3000系列产品测试一般指导文件1.2 设备检修人员,对S3000系列产品进行功能检测的一般流程2. 测试软件准备。
对应于S3000产品,对应的测试软件版本为CDS 2.36以上版本.3. 接线。
3.1 S3000 接线端子定义3. 2 标准接线4. 参数设置一般步骤及需保存文件。
4.1 打开设置软件,测试软件版本为CDS2.36及以上.User category: Authorized Client Password :SICKSAFE4.2 配置参数,设置扫描仪的各项功能.4.3 设置保护区域的大小,包括保护区域和警告区域.4.4 参数以及区域设置完成后,下载S3000 System->Configuration Draft->Transmit4.5 在出现故障时,需要下载并保存的文件.4.5.1 记录Sensor Head Error history4.5.2 I/o module error history 4.5.3 记录当前参数设置在对S3000进行检测后,故障历史记录需与现场服务报告一起保存。
************************************************** - 在服务现场,未经培训的人员不允许打开前镜。
End - ***************************************************。

CDS软件测试操作说明CDS 测试操作说明(以5.0为例)⽬录⼀、软件安装 (3)⼆、设备连接 (4)三、测试步骤和测试⽅法 (17)四、数据回放 (30)五、⽣成统计报告 (36)⼀、软件安装1. 硬件要求1. 计算机应保证 1.2G 以上主频,256M 以上内存2.重新安装 Window XP SP1 或 SP2 操作系统,不能安装与测试⽆关的其它软件,尤其是⽹络相关软件。
3.将系统中的任何与⽹络通讯相关的程序关闭,如 MSN 等。
4.关闭 Windows 的⾃动更新功能,在我的电脑上右键点击选择“属性”,在弹出的对话框中的“⾃动更新”栏中去除⾃更新功能。
5. Sagem ⼿机为 OT490 或 OT498,串⼝速率为 115200(默认不⽤设置),⾃由双频模式, 3+1时隙。
6.商⽤⼿机使⽤ Nokia6230、7610 或 N70,以及 DUK-2 数据线7.为 Sagem ⼿机添加 Modem 并建⽴两个拨号⽹络:Sagem cmnet 和 Sagem cmwap 并⼿动验证拨号连接可以使⽤。
详细⽅法参见 Sagem 调制解调器与拨号配制说明。
2. 安装步骤及注意事项1. 安装 Nokia 调制解调器并建⽴ Nokia cmwap 拨号连接,注意 APN 必须设置为 cmwap。
2.安装 CDS4.0 测试软件。
3.全部安装成功后使⽤ Windows 的系统还原功能创建⼀个还原点,已防⽌将来系统被病毒感染等异常情况后快速恢复系统。
单击“开始、所有程序、系统⼯具、系统还原”,在弹出的对话框中选择“创建⼀个还原点”,然后根据提⽰操作。
如果需要进⾏系统还原前,注意应将已测试的⽇志⽂件备份出来。
或将系统做 GHOST 备份。
⼆、设备连接1. SAGEM ⼿机设置设置⼿机⽀持⽹络版本1. 按▲或▼键,选择 Test tool, 按 Select 键;2. 按▲或▼键,选择 Info & settings, 按 Select 键;3. 按▲或▼键,选择 Release, 按 OK 键;4. 按▲或▼键,选择 Release 97, 按 OK 键;如果测试 EDGE 则选择Release 4设置⼿机的时隙配置2. 按▲或▼键,选择 Info & settings, 按 Select 键;3. 按▲或▼键,选择 Mobile info, 按 Select 键;4. 按▲或▼键,选择 Multislot classes, 按 Select 键;5. 按 Modify 设置 GPRS multislot class [4(3+1)] 和E-GPRS multislot class[8(4+1)]时隙关闭彩信⾃动提取:1.按▲或▼键,选择短信息, 按选择键;2.按▲或▼键,选择选项, 按选择键;3.按▲或▼键,选择多媒体信息, 按选择键;4.按▲或▼键,选择⾼级设定, 按选择键;5.按▲或▼键,进⼊忽略 MMS, 选项选择.SMS 消息模式选择1. 按▲或▼键,选择 Test tool, 按 Select 键;2.按▲或▼键,选择 Info&Settings, 按 Select 键;3.按▲或▼键, 选择 GPRS settings , 按 Select 键;4. 按▲或▼键, 选择 SMS mode , 按 Select 键;5. 按▲或▼键,选择 GSM only , 按 Select 键;SAGEM OT490 连接设置1. 按▲或▼键,选择 Connectivity, 按 Select 键;2.按▲或▼键,选择 Info&Settings, 按 Select 键;3.按▲或▼键, 选择 USB Mode , 按 Select 键;4. 按▲或▼键, 选择 Modem , 按 Validate 键;2. SAGEM ⼿机连接及设置打开 sagem 数据线驱动程序 20070131_Sagem_USB_Drivers_setup 双击安装如图:插⼊ SAGEM OT490 、498 的 USB 数据线,等系统发现硬件以后点击下⼀步下⼀步重新拔插数据线,系统将⾃动安装驱动完成!打开‘设备管理器’安装后会⾃动添加两个调制解调器,分别做为trace 和Modem 的⽤途双击 Sagem USB Mobile pseudo CDC Trace 调制解调器,在‘属性’的‘调制解调器’⾥⾯查看端⼝,该端⼝就是 CDS4.0 软件在连接 SAGEM ⼿机所⽤的端⼝。

Section: 3.1 Authorised Signatory For System AccessThis chapter stipulates the procedures to be complied with by the ADM with respect to authorised signatory for system access, CDS data entry supervisors list, application for User ID, application for CDS task, activate / deactivate / remove CDS User ID, change printer location, reset password, submission of reports to Bursa Malaysia Depository Sdn Bh d [“Bursa Depository”] and application to use CDS terminal/printer at Bursa Depository.The requirements of this chapter and its related appendices must be complied with at all times by the ADM.3.1Authorised Signatory For System Access3.1.1 ADM is required to submit an Authorised Signatories For System Access List(Appendix 1) to Bursa Depository.3.1.2The List should contain the following:-(s) of the authorised signatory(ies)b.Designation of the authorised signatory(ies)c.Specimen signature(s) of the authorised signatory(ies)d.E-mail address of the authorised signatory(ies).Note:ADM is allowed to furnish a maximum of five (5) authorised signatories only.3.1.3The List must be signed by the Executive Director or General Manager of theADM.3.1.4Submit the original List to Bursa Depository and a copy to Bursa Malaysia’sGroup Technology – Access Control team.3.1.5The effective date will be the date of receipt of the List from ADM or the effectivedate stated in the List, whichever is later.3.1.6If there are changes to the authorised signatory(ies), submit a fresh List to BursaDepository. The new List will supersede the previous List submitted to BursaDepository.Section: 3.2 CDS Data Entry Supervisors List3.2 CDS Data Entry Supervisors List3.2.1ADM is required to submit a CDS Data Entry Supervisors List (Appendix 2) toBursa Depository.3.2.2The responsibilities of the CDS Data Entry Supervisors are as follow:-a.Administer and monitor access(es) to WebCDSb.Supervise data entry(ies) at WebCDSc.Report erroneous entry(ies) to Bursa Depositoryd.Monitor communication with Bursa Depository through WebCDSe.Perform such other function(s) as may be directed by Bursa Depositoryfrom time to time.3.2.3The List should contain the following:-a.Primary Data Entry Supervisor’s name, designati on, direct telephonenumber and specimen signatureb.Alternate Data Entry Supervisor’s name, designation, direct telephonenumber and specimen signature.3.2.4The List must be signed by one (1) of the authorised signatories appearing in theAuthorised Signatories For System Access List.3.2.5Submit the original List to Bursa Depository.3.2.6The effective date will be the date of receipt of the List from ADM or the effectivedate stated in the List, whichever is later.3.2.7If there are changes to the Primary Data Entry Supervisor or Alternate Data EntrySupervisor, submit a fresh List to Bursa Depository. The new List will supersedethe previous List submitted to Bursa Depository.3.3 Application For User ID3.3.1Applicant duly completes and signs the User ID Application Form (Appendix 3).and converts it into PDF format, of which guidance is outlined in the User Manualfor CDS User ID Forms Entry (“CDS User Guide Manual”) (Appendix 6). Hand-written and scanned forms will be rejectedNote:(i) A user can only have one User ID / Password maintained in the systemat any point in time(ii) Username cannot be numeric or in the form of a code such as UT4088.It should be reflective of the applicant’s name.3.3.2ADM’s Authorised Signatory duly completes and signs at the approval column ofthe User ID Application Form digitally as per the CDS User Guide Manual(Appendix 6)Note:The Backdated form should not exceed one (1) month from the date received byBursa Depository.3.3.3ADM’s Authorised Signatory submits the User ID Application Form in PDFformat as per the guideline outlined in the CDS User Guide Manual (Appendix 6).3.3.4If the PDF form is not in order, Bursa Depository will reject the form to the ADMfor rectification.3.3.5Upon successful assignment of the User ID by Bursa Depository, the applicantand the ADM’s Authorised Signatory will receive an e-mail notification of UserID and password.3.3.6The ADM’s Authorised Signatory who approved the application mustacknowledge the User ID/Password Application e-mail by replying to the GroupTechnology –Access Control e-mail account with a copy to Bursa Depositorywithin 2 (two) days from the date when said email is received.3.3.7Upon receiving the User ID and password, the applicant is required to login intothe system to change the password as soon as possible.3.4 Application For CDS Task3.4.1Applicant duly completes the Task Assignment Sheet (Appendix 6a and Appendix6b) and converts into PDF format, of which guidance is outlined in the UserManual for CDS User ID Forms Entry (“CDS User Guide Manual”) (Appendix 6).Hand-written and scanned forms will be rejected.3.4.2ADM’s Authorised Signatory duly completes and signs at the approval column ofthe form digitally as per the CDS User Guide Manual (Appendix 6).3.4.3ADM’s Authorised Signatory submits the PDF form to Bursa Depository as perthe guideline outlined in the CDS User Guide Manual (Appendix 6).3.4.4If the form is not in order, Bursa Depository will reject the form to the ADM forrectification.3.4.5Ensure that the task assigned do not violate the Task Grouping as set out inAppendix 7.Note:i Group 1 task is assigned to personnel who perform monitoring andapproval functions; andii Group 2 task is assigned to personnel who perform data entry.3.4.6User having tasks from Group 1 is not allowed to have any tasks from Group 2and vice versa. Other tasks not specified in the grouping may be assigned to anyof the groups.3.4.7Applicant may check the status of his/her request from the system, two (2) marketdays after the Bursa Depository received the form.Section: 3.5 Application To Activate / Deactivate / Remove CDS User ID3.5 Application To Activate / Deactivate / Remove CDS User ID3.5.1ADM’s Authorised Signatory duly completes and signs the Application toActivate/Deactivate/Remove CDS User ID Form (Appendix 8) at the approvalcolumn of the form digitally as per the User Manual for CDS User ID FormsEntry (“CDS User Guide Manual”) (Appendix 6). Hand-written and scannedforms will be rejected.3.5.2ADM’s Authorised Signatory submits the PDF form to Bursa Depository as perthe guideline outlined in the CDS User Guide Manual (Appendix 6).3.5.3The PDF is to reach Bursa Depository at least two (2) market days before theeffective date.Note: The effective date to activate, deactivate or remove CDS User ID can bepostdated.3.5.4If the PDF form is not in order, Bursa Depository will reject the form to the ADMfor rectification.3.5.5If the form is faxed to Bursa Depository, ensure the original copy reaches BursaDepository within three (3) market days for Klang Valley’s ADM and one (1)week for outstation ADM.Note:The System Administrator will suspend the user’s User ID if the or iginalform is not received within the stipulated time.3.5.6The ADM’s Authorised E-mail Account will receive automated e-mailnotifications for activation, deactivation, and removal of CDS User ID.Section: 3.6 Application To Reset Password3.6 Application To Reset Password3.6.1Applicant duly completes Reset Password Application Form (Appendix 11) andconverts into PDF format, which guidance is outlined in the User Manual for CDSUser ID Forms Entry (“CDS User Guide Manual”) (Appendix 6). Hand-writtenform and scanned form will be rejected.3.6.2ADM’s Authorised Signatory duly completes and signs at the approval column ofthe form digitally as per the CDS User Guide Manual (Appendix 6).3.6.3ADM’s Authorised Signatory submits the PDF form as per the guideline outlinedin the CDS User Guide Manual (Appendix 6).3.6.4If the form is faxed to Bursa Depository, ensure the original copy reach BursaDepository within three (3) market days for Klang Valley’s ADM and one (1)week for outstation ADM.Note:The System Administrator will suspend the user’s User ID if the originalform is not received within the stipulated time.3.6.5Call System Administrator in order for him/her to authenticate the applicant’sidentity.3.6.6System Administrator will assign a new password and inform the applicantimmediately.Section: 3.12 Printing And Submission Of Report To Bursa Depository3.12 Printing And Submission Of Report To Bursa Depository3.12.1.ADM is required to print the Tasks Assigned To A User Report (UT520RA) onhalf-yearly basis, in the months of June and December.3.12.2.ADM is to verify the report for accuracy of tasks assigned to correct and validpersonnel.3.12.3.Ensure ADM’s Authorised Signatory has signed the report and affix the company’srubber-stamp prior to submission.Note:Failure to do so will result in the report being rejected by BursaDepository.3.12.4.The report is to reach Bursa Depository latest by 30th June and 31st Decemberrespectively.Note: Failure to do so will result in ADM’s User IDs being suspended.3.12.5.Receive acknowledgement from Bursa Depository.。
S 3000
- 快速启动 –
SICK-CDS 软件的介绍
开始
注:此文档是针对S3000系列标准型扫描仪S30A S30A--X011BA 而制作而制作,,操作人员需要对SICK 激光扫描仪有一定了解激光扫描仪有一定了解..
参数配置=
Restart, EDM, Monitoring cases, field sets 等等.
现在我们以常用版本CDS 3.51版本为例来说明软件的功能及其使用方法.
Step
1
打开CDS 3.51版本软件,其界面如左图所示
2
打开软件如左图所示 1.标题栏 2.菜单栏 3.工具栏 4.导航栏 5.日志窗口 2 1
3 4
5
3
工具栏意义(从上到下)
当有些符号为灰色时,表示此功能当前不能使用,不能使用的原因可能是您没有连接到传感器或者是您没有足够的权限使用此功能
1.创建项目 2.打开项目 3.保存项目 4.识别传感器 5.连接传感器
6.断开与之相连的传感器 7.增加传感器 8.删除传感器
9.打开传感器的操作窗口 10.显示诊断报告 11.下载参数配置 12.上载参数配置 13.改变用户组
4
在相对就的COM 口里,您可以识别到已连接的传感器。
上述符号的意思由上到下: 1. 项目通讯的协议
2. 当前的连接状态(未连接) 3. 当前的连接状态(已连接) 4. 传感器符号(如S3000)
上述符号的意思由上到下: 1. 显示/隐藏传感器的型号 2. 显示/隐藏循环冗余校验 3. 显示/隐藏用户组 4. 显示/隐藏在线状态
5
上述符号的意思由上到下: 1. 显示/隐藏信息
2. 显示/隐藏警告信息 3. 显示/隐藏错误
4. 显示/隐藏调试信息 5. 显示/隐藏时间 6. 保存日志 7. 删除日志
15 4. Restart
Without restart interlock:
当您的S3000为自动复位时(也就是物体退出保护区时,
S3000自动变为绿灯),请选择此项
With restart interlock:
当您的S3000为手动复位时(也就是物体退出保护区时,
S3000需要人工按下复位按钮才能复位),请选择此项
Time delayed by___S
当您的S3000需要延时自动复位时,您可以选择此项
注:手动/自动复位的选择需要经过专业人员的风险评估后才能作出选择
作出选择!
!
16 5. Application diagnostic
output
此选项的功能是针对S3000第7脚的功能来描述的Inactive: 此脚不输出任何信号On contamination:当S3000前镜有污染时输出信号
On error: 当S3000有内部故障时输出信号
On contamination or error:
当S3000前镜有污染或内部故障时输出信号
17 6. Field sets
在Field sets选项,双击您所命名的传感器,如S3000进入下一页区域编辑页面
18
7. Field set 1
请看左图所示的常用工具栏 1. 保护区域 2. 报警区域
3. 显示传感器周围轮廓 4. 笔画线形的选择
19
8. 画一个保护区域
我们选择1中的保护区域
在4里选择直线在左图中描绘出如图所示的保护区
20
9. 画一个报警区
我们选择2中的报警区
在4里选择直线,并在左图中描绘出如图所示的报警区
至此,基本的参数已经修改完成,可将参数下载到S3000中
点击,
1 2 3 4
21 10. 弹出一个对话框我们点击Yes
22 11. 弹出一个对话框
此时会叫您登陆为某个用户,我们登陆为:Authorized client
密码为(全大写):SICKSAFES
23 12. 此时又会弹出另外一个对话框
软件提示您需要谨慎核对您所设置的参数及保护区域是否能充分的保护您的危险区域
继续点Continue
24 13. 此时弹出一个参数配置的窗口
请您仔细核对您所配置的参数后点击release
25 14. 参数下载完成
参数下载完成,,弹出窗口
弹出窗口,,点击Continue
26 15. 观察激光扫描仪所视区域
点击data recorder
如左图所示,周围蓝色的轮廓线为S3000所探测到的物体
若在扫描仪保护区内没有物体侵入,则此时S3000显示绿灯。
Quickstart S 3000 page 11 of 11
若您在使用中遇到任何问题若您在使用中遇到任何问题,,欢迎与我们联系欢迎与我们联系::
Tel: 020- 3830 3155 Fax: 020- 3830 3248 Wing.huang@
。