在RedHat Advance Server上安装Oracle 9204 RAC参考手册
- 格式:doc
- 大小:134.50 KB
- 文档页数:20
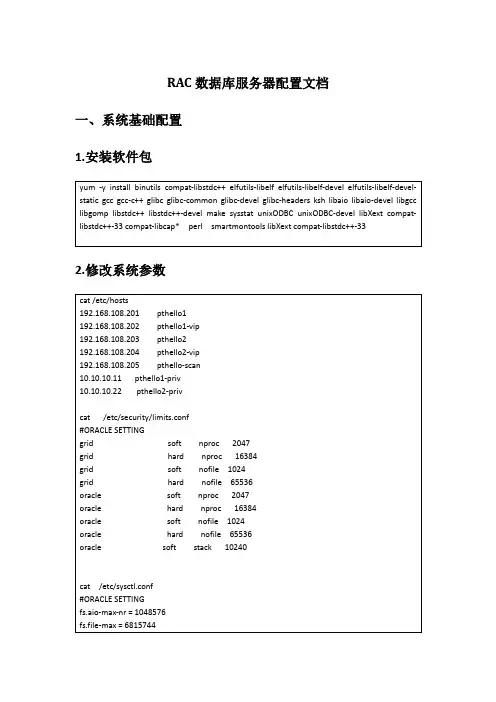
RAC数据库服务器配置文档一、系统基础配置1.安装软件包2.修改系统参数3.添加用户和组4 修改用户环境变量Grid用户5 通过ASMLIB管理磁盘二、安装集群软件密码:system123[root@pthello1 ~]# /u01/app/oraInventory/orainstRoot.sh Changing permissions of /u01/app/oraInventory.Adding read,write permissions for group.Removing read,write,execute permissions for world.Changing groupname of /u01/app/oraInventory to oinstall.The execution of the script is complete.[root@pthello1 ~]# /u01/app/11.2.0/grid/root.shPerforming root user operation for Oracle 11gThe following environment variables are set as:ORACLE_OWNER= gridORACLE_HOME= /u01/app/11.2.0/gridEnter the full pathname of the local bin directory: [/usr/local/bin]: Copying dbhome to /usr/local/bin ...Copying oraenv to /usr/local/bin ...Copying coraenv to /usr/local/bin ...Creating /etc/oratab file...Entries will be added to the /etc/oratab file as needed by Database Configuration Assistant when a database is createdFinished running generic part of root script.Now product-specific root actions will be performed.Using configuration parameter file: /u01/app/11.2.0/grid/crs/install/crsconfig_params Creating trace directoryInstalling Trace File AnalyzerOLR initialization - successfulroot walletroot wallet certroot cert exportpeer walletprofile reader walletpa walletpeer wallet keyspa wallet keyspeer cert requestpa cert requestpeer certpa certpeer root cert TPprofile reader root cert TPpa root cert TPpeer pa cert TPpa peer cert TPprofile reader pa cert TPprofile reader peer cert TPpeer user certpa user certAdding Clusterware entries to upstartCRS-2672: Attempting to start 'ora.mdnsd' on 'pthello1'CRS-2676: Start of 'ora.mdnsd' on 'pthello1' succeededCRS-2672: Attempting to start 'ora.gpnpd' on 'pthello1'CRS-2676: Start of 'ora.gpnpd' on 'pthello1' succeededCRS-2672: Attempting to start 'ora.cssdmonitor' on 'pthello1'CRS-2672: Attempting to start 'ora.gipcd' on 'pthello1'CRS-2676: Start of 'ora.cssdmonitor' on 'pthello1' succeededCRS-2676: Start of 'ora.gipcd' on 'pthello1' succeededCRS-2672: Attempting to start 'ora.cssd' on 'pthello1'CRS-2672: Attempting to start 'ora.diskmon' on 'pthello1'CRS-2676: Start of 'ora.diskmon' on 'pthello1' succeededCRS-2676: Start of 'ora.cssd' on 'pthello1' succeededASM created and started successfully.Disk Group OCR created successfully.clscfg: -install mode specifiedSuccessfully accumulated necessary OCR keys.Creating OCR keys for user 'root', privgrp 'root'..Operation successful.CRS-4256: Updating the profileSuccessful addition of voting disk a6bad62405144f4bbf5ff6551ea45a59.Successful addition of voting disk 538bba4d8aa14f8dbf111803543072a8.Successful addition of voting disk 59db1c91b1f04fb9bf6454344c5774e4.Successfully replaced voting disk group with +OCR.CRS-4256: Updating the profileCRS-4266: Voting file(s) successfully replaced## STATE File Universal Id File Name Disk group-- ----- ----------------- --------- ---------1. ONLINE a6bad62405144f4bbf5ff6551ea45a59 (ORCL:OCR_VOL1) [OCR]2. ONLINE 538bba4d8aa14f8dbf111803543072a8 (ORCL:OCR_VOL2) [OCR]3. ONLINE 59db1c91b1f04fb9bf6454344c5774e4 (ORCL:OCR_VOL3) [OCR]Located 3 voting disk(s).CRS-2672: Attempting to start 'ora.asm' on 'pthello1'CRS-2676: Start of 'ora.asm' on 'pthello1' succeededCRS-2672: Attempting to start 'ora.OCR.dg' on 'pthello1'CRS-2676: Start of 'ora.OCR.dg' on 'pthello1' succeededConfigure Oracle Grid Infrastructure for a Cluster ... succeeded1:pdksh ########################################### [100%] [root@pthello2 ~]# /u01/app/oraInventory/orainstRoot.shChanging permissions of /u01/app/oraInventory.Adding read,write permissions for group.Removing read,write,execute permissions for world.Changing groupname of /u01/app/oraInventory to oinstall.The execution of the script is complete.[root@pthello2 ~]# /u01/app/11.2.0/grid/root.shPerforming root user operation for Oracle 11gThe following environment variables are set as:ORACLE_OWNER= gridORACLE_HOME= /u01/app/11.2.0/gridEnter the full pathname of the local bin directory: [/usr/local/bin]:Copying dbhome to /usr/local/bin ...Copying oraenv to /usr/local/bin ...Copying coraenv to /usr/local/bin ...Creating /etc/oratab file...Entries will be added to the /etc/oratab file as needed byDatabase Configuration Assistant when a database is createdFinished running generic part of root script.Now product-specific root actions will be performed.Using configuration parameter file: /u01/app/11.2.0/grid/crs/install/crsconfig_paramsCreating trace directoryInstalling Trace File AnalyzerOLR initialization - successfulAdding Clusterware entries to upstartCRS-4402: The CSS daemon was started in exclusive mode but found an active CSS daemon on node pthello1, number 1, and is terminatingAn active cluster was found during exclusive startup, restarting to join the clusterConfigure Oracle Grid Infrastructure for a Cluster ... succeeded[root@pthello1 ~]# /u01/app/oracle/product/11.2.0/db_1/root.shPerforming root user operation for Oracle 11gThe following environment variables are set as:ORACLE_OWNER= oracleORACLE_HOME= /u01/app/oracle/product/11.2.0/db_1Enter the full pathname of the local bin directory: [/usr/local/bin]:The contents of "dbhome" have not changed. No need to overwrite.The contents of "oraenv" have not changed. No need to overwrite.The contents of "coraenv" have not changed. No need to overwrite.Entries will be added to the /etc/oratab file as needed byDatabase Configuration Assistant when a database is createdFinished running generic part of root script.Now product-specific root actions will be performed.Finished product-specific root actions.[root@pthello1 ~]#[root@pthello2 ~]# /u01/app/oraInventory/orainstRoot.shChanging permissions of /u01/app/oraInventory.Adding read,write permissions for group.Removing read,write,execute permissions for world.Changing groupname of /u01/app/oraInventory to oinstall.The execution of the script is complete.[root@pthello2 ~]# /u01/app/oracle/product/11.2.0/db_1/root.sh Performing root user operation for Oracle 11gThe following environment variables are set as:ORACLE_OWNER= oracleORACLE_HOME= /u01/app/oracle/product/11.2.0/db_1Enter the full pathname of the local bin directory: [/usr/local/bin]: The contents of "dbhome" have not changed. No need to overwrite. The contents of "oraenv" have not changed. No need to overwrite. The contents of "coraenv" have not changed. No need to overwrite.Entries will be added to the /etc/oratab file as needed by Database Configuration Assistant when a database is created Finished running generic part of root script.Now product-specific root actions will be performed.Finished product-specific root actions.[root@pthello2 ~]#三、安装数据库软件[root@pthello1 ~]# /u01/app/oracle/product/11.2.0/db_1/root.sh Performing root user operation for Oracle 11gThe following environment variables are set as:ORACLE_OWNER= oracleORACLE_HOME= /u01/app/oracle/product/11.2.0/db_1Enter the full pathname of the local bin directory: [/usr/local/bin]: The contents of "dbhome" have not changed. No need to overwrite. The contents of "oraenv" have not changed. No need to overwrite. The contents of "coraenv" have not changed. No need to overwrite.Entries will be added to the /etc/oratab file as needed by Database Configuration Assistant when a database is created Finished running generic part of root script.Now product-specific root actions will be performed.Finished product-specific root actions.[root@pthello2 ~]# /u01/app/oracle/product/11.2.0/db_1/root.sh Performing root user operation for Oracle 11gThe following environment variables are set as:ORACLE_OWNER= oracleORACLE_HOME= /u01/app/oracle/product/11.2.0/db_1Enter the full pathname of the local bin directory: [/usr/local/bin]: The contents of "dbhome" have not changed. No need to overwrite. The contents of "oraenv" have not changed. No need to overwrite. The contents of "coraenv" have not changed. No need to overwrite.Entries will be added to the /etc/oratab file as needed by Database Configuration Assistant when a database is created Finished running generic part of root script.Now product-specific root actions will be performed.Finished product-specific root actions.四、配置数据库密码:system123五、集群状态验证。

1 安装oracle1.1安装服务1)双击oracle安装程序,开始安装,单击下一步2)选择安装路径,单击下一步3)选择安装的产品(此处选Oracle Database 9.2.0.1.0),单击下一步4)选择安装的版本(默认选企业版),单击下一步5)选择数据库配置(默认选择通用),单击下一步6)设置端口号(默认2030),单击下一步7)设置数据库名及SID名称,单击下一步(sywebserver)8)选择数据库文件目录的路径,单击下一步9)设置数据库字符集(默认),单击下一步10)单击“安装”,开始安装数据库11)安装过程中会提示插入磁盘2,选择磁盘2的路径,单击“确定”继续安装12)之后还会提示插入磁盘3,选择磁盘3的路径,单击“确定”继续安装13)安装程序对数据库进行配置并创建数据库14)设置数据库的管理员SYS、System的密码,此处分别设为sys、system。
1.2创建用户及数据库1)在开始->程序->Ora92->Enterprise Manager Console打开oracle的管理界面2)选择独立启动,单击确定3)打开数据库,输入用户名、口令(system、system)登陆4)打开安全性->用户,右键单击,在菜单中选择创建5)在弹出的窗口输入名称及口令(syportal、syportal)6)切换到角色选项卡,选择DBA角色,单击下箭头添加7)将DBA的管理选项勾选,单击创建8)提示用户创建成功9)重复步骤4)~8),分别创建用户syprivilege(用户/密码:syprivilege/syprivilege)、usm(用户/密码:usm/usm)1.3 导入数据1)开始菜单——运行——cmd2)进入到数据文件的存放路径3)执行数据恢复语句imp syportal/syportal fromuser=hljportal touser=syportal file=portaldata0115.dmp (imp 登陆用户/密码fromuser=原数据库用户名touser=现数据库用户file=数据数据文件名log=log.text)4)执行imp syprivilege/syprivilege fromuser=hljsyprivilege touser=sysyprivilege file=portaldata0115.dmp5)执行imp ums/ums fromuser=ums touser=ums file=portaldata0115.dmp。
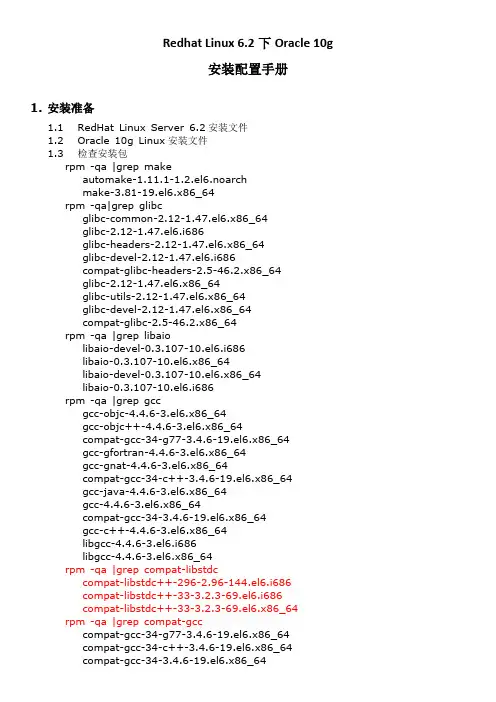
Redhat Linux 6.2下Oracle 10g安装配置手册1.安装准备1.1RedHat Linux Server 6.2安装文件1.2Oracle 10g Linux安装文件1.3检查安装包rpm -qa |grep makeautomake-1.11.1-1.2.el6.noarchmake-3.81-19.el6.x86_64rpm -qa|grep glibcglibc-common-2.12-1.47.el6.x86_64glibc-2.12-1.47.el6.i686glibc-headers-2.12-1.47.el6.x86_64glibc-devel-2.12-1.47.el6.i686compat-glibc-headers-2.5-46.2.x86_64glibc-2.12-1.47.el6.x86_64glibc-utils-2.12-1.47.el6.x86_64glibc-devel-2.12-1.47.el6.x86_64compat-glibc-2.5-46.2.x86_64rpm -qa |grep libaiolibaio-devel-0.3.107-10.el6.i686libaio-0.3.107-10.el6.x86_64libaio-devel-0.3.107-10.el6.x86_64libaio-0.3.107-10.el6.i686rpm -qa |grep gccgcc-objc-4.4.6-3.el6.x86_64gcc-objc++-4.4.6-3.el6.x86_64compat-gcc-34-g77-3.4.6-19.el6.x86_64gcc-gfortran-4.4.6-3.el6.x86_64gcc-gnat-4.4.6-3.el6.x86_64compat-gcc-34-c++-3.4.6-19.el6.x86_64gcc-java-4.4.6-3.el6.x86_64gcc-4.4.6-3.el6.x86_64compat-gcc-34-3.4.6-19.el6.x86_64gcc-c++-4.4.6-3.el6.x86_64libgcc-4.4.6-3.el6.i686libgcc-4.4.6-3.el6.x86_64rpm -qa |grep compat-libstdccompat-libstdc++-296-2.96-144.el6.i686compat-libstdc++-33-3.2.3-69.el6.i686compat-libstdc++-33-3.2.3-69.el6.x86_64 rpm -qa |grep compat-gcccompat-gcc-34-g77-3.4.6-19.el6.x86_64compat-gcc-34-c++-3.4.6-19.el6.x86_64compat-gcc-34-3.4.6-19.el6.x86_64rpm -qa |grep libXplibXp-1.0.0-15.1.el6.x86_64libXp-devel-1.0.0-15.1.el6.x86_64libXpm-3.5.8-2.el6.i686libXpm-devel-3.5.8-2.el6.x86_64libXp-devel-1.0.0-15.1.el6.i686libXpm-3.5.8-2.el6.x86_64libXpm-devel-3.5.8-2.el6.i686libXp-1.0.0-15.1.el6.i686rpm -qa |grep openmotifopenmotif-devel-2.3.3-4.el6.x86_64openmotif-2.3.3-4.el6.x86_64openmotif22-2.2.3-19.el6.x86_64openmotif22-2.2.3-19.el6.i686rpm -qa |grep compat-dbcompat-db43-4.3.29-15.el6.x86_64compat-db43-4.3.29-15.el6.i686compat-db42-4.2.52-15.el6.i686compat-db-4.6.21-15.el6.i686compat-db-4.6.21-15.el6.x86_64compat-db42-4.2.52-15.el6.x86_642.硬件要求1.1物理内存至少2G查看命令:grep MemTotal /proc/meminfo1.2交换分区:至少1G,最好是物理内存的2倍查看命令:grep SwapTotal /proc/meminfo1.3硬盘空闲区至少4G查看命令:df –h3.创建安装oracle 所需的组和用户以下操作需要使用root账户创建。
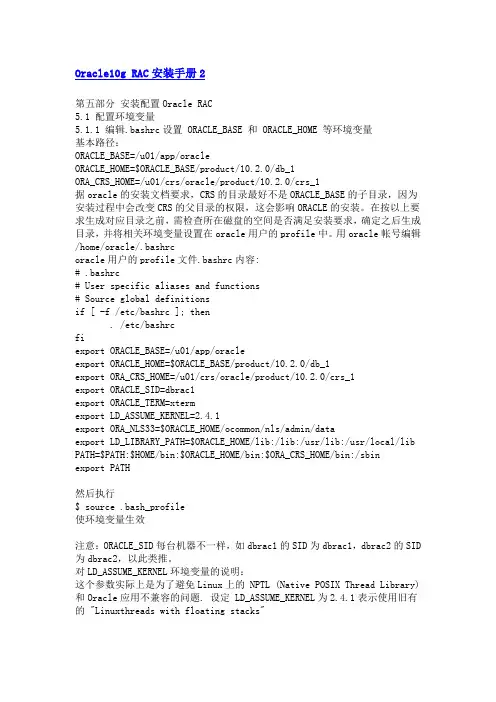
Oracle10g RAC安装手册2第五部分安装配置Oracle RAC5.1 配置环境变量5.1.1 编辑.bashrc设置 ORACLE_BASE 和 ORACLE_HOME 等环境变量基本路径:ORACLE_BASE=/u01/app/oracleORACLE_HOME=$ORACLE_BASE/product/10.2.0/db_1ORA_CRS_HOME=/u01/crs/oracle/product/10.2.0/crs_1据oracle的安装文档要求,CRS的目录最好不是ORACLE_BASE的子目录,因为安装过程中会改变CRS的父目录的权限,这会影响ORACLE的安装。
在按以上要求生成对应目录之前,需检查所在磁盘的空间是否满足安装要求,确定之后生成目录,并将相关环境变量设置在oracle用户的profile中。
用oracle帐号编辑/home/oracle/.bashrcoracle用户的profile文件.bashrc内容:# .bashrc# User specific aliases and functions# Source global definitionsif [ -f /etc/bashrc ]; then. /etc/bashrcfiexport ORACLE_BASE=/u01/app/oracleexport ORACLE_HOME=$ORACLE_BASE/product/10.2.0/db_1export ORA_CRS_HOME=/u01/crs/oracle/product/10.2.0/crs_1export ORACLE_SID=dbrac1export ORACLE_TERM=xtermexport LD_ASSUME_KERNEL=2.4.1export ORA_NLS33=$ORACLE_HOME/ocommon/nls/admin/dataexport LD_LIBRARY_PATH=$ORACLE_HOME/lib:/lib:/usr/lib:/usr/local/lib PATH=$PATH:$HOME/bin:$ORACLE_HOME/bin:$ORA_CRS_HOME/bin:/sbinexport PATH然后执行$ source .bash_profile使环境变量生效注意:ORACLE_SID每台机器不一样,如dbrac1的SID为dbrac1,dbrac2的SID 为dbrac2,以此类推。
在RedHat AS4.0(X86)上安装Oracle9iR2数据库(整理)昨天晚上把服务器重新装了一遍。
系统是RedHat AS4.0(X86),主要是为了安装Oracle9i,结合网上的一些资料总结一下,整理出来,希望对大家有用。
由于网上的资料很多,但由于大家的传阅转载,有不少都有些误差了,我在这里也算是校对一下吧,对这些原始资料的创作人表示敬意。
一,准备工作1,先安装好RedHat AS4.0,保持系统的干净。
在oracle官方网站上下载Oracle9i的安装文件:ship_9204_linux_disk1.cpio.gzship_9204_linux_disk2.cpio.gzship_9204_linux_disk3.cpio.gz打3238244补丁同时要下载三个补丁:p4198954_21_linux.zip在运行runInstaller之前打p2617419_220_GENERIC.zip修复agent错误的补丁p3238244_9204_LINUX.zip打3238244补丁由于安装oracle需要很多系统软件包,少一样都不行,真是一个都不能少。
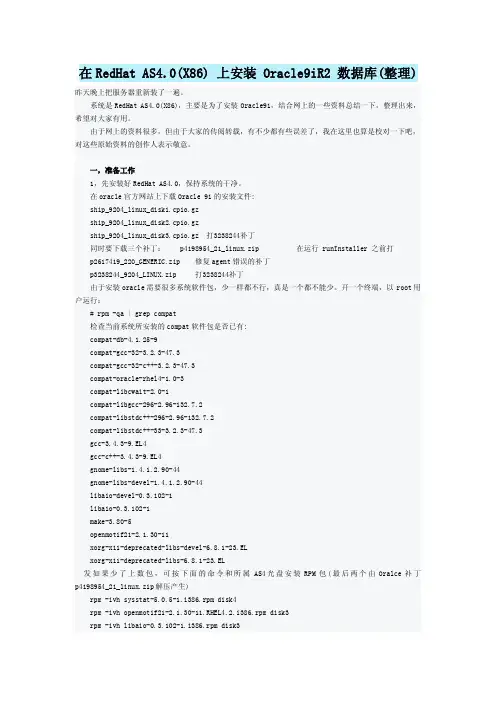
开一个终端,以root用户运行:#rpm-qa|grep compat检查当前系统所安装的compat软件包是否已有:compat-db-4.1.25-9compat-gcc-32-3.2.3-47.3compat-gcc-32-c++-3.2.3-47.3compat-oracle-rhel4-1.0-3compat-libcwait-2.0-1compat-libgcc-296-2.96-132.7.2compat-libstdc++-296-2.96-132.7.2compat-libstdc++-33-3.2.3-47.3gcc-3.4.3-9.EL4gcc-c++-3.4.3-9.EL4gnome-libs-1.4.1.2.90-44gnome-libs-devel-1.4.1.2.90-44libaio-devel-0.3.102-1libaio-0.3.102-1make-3.80-5openmotif21-2.1.30-11xorg-x11-deprecated-libs-devel-6.8.1-23.ELxorg-x11-deprecated-libs-6.8.1-23.EL发如果少了上数包,可按下面的命令和所属AS4光盘安装RPM包(最后两个由Oralce补丁p4198954_21_linux.zip解压产生)rpm-ivh sysstat-5.0.5-1.i386.rpm disk4rpm-ivh openmotif21-2.1.30-11.RHEL4.2.i386.rpm disk3rpm-ivh libaio-0.3.102-1.i386.rpm disk3rpm-ivh libaio-devel-0.3.102-1.i386.rpm disk3rpm-ivh freetype-devel-2.1.9-1.i386.rpm disk3rpm-ivh fontconfig-devel-2.2.3-7.i386.rpm disk3rpm-ivh xorg-x11-devel-6.8.1-23.EL.i386.rpm disk3rpm-ivh xorg-x11-deprecated-libs-devel-6.8.1-23.EL.i386.rpm disk3rpm-ivh glib-devel-1.2.10-15.i386.rpm disk4rpm-ivh ORBit-devel-0.5.17-14.i386.rpm disk4rpm-ivh gtk+-devel-1.2.10-33.i386.rpm disk4rpm-ivh alsa-lib-devel-1.0.6-4.i386.rpm disk3rpm-ivh audiofile-devel-0.2.6-1.i386.rpm disk3rpm-ivh esound-devel-0.2.35-2.i386.rpm disk3rpm-ivh libjpeg-devel-6b-33.i386.rpm disk3rpm-ivh libtiff-devel-3.6.1-7.i386.rpm disk3rpm-ivh libungif-devel-4.1.3-1.i386.rpm disk3rpm-ivh imlib-devel-1.9.13-23.i386.rpm disk3rpm-ivh gnome-libs-devel-1.4.1.2.90-44.1.i386.rpm disk4rpm-ivh compat-oracle-rhel4-1.0-5.i386.rpm(p4198954_21_linux.zip)rpm-ivh compat-libcwait-2.0-2.i386.rpm(p4198954_21_linux.zip)二,创建相关安装目录和环境变量1,创建user/group;#groupadd dba#groupadd oinstall#useradd oracle-g oinstall-G dba#passwd oracle2,建立oracle安装文件夹;#mkdir-p/opt/ora9/product/9.2.0.4#mkdir/var/opt/oracle#chmod oracle.dba/var/opt/oracle#chown-R oracle.dba/opt/ora93,配置环境变量;以root用户登录,设置root用户的环境打开.bash_profile文件,将如下内容加入:export ORACLE_BASE=/opt/ora9export ORACLE_HOME=/opt/ora9/product/9.2.0.4export PATH=$PATH:$ORACLE_HOME/bin:$ORACLE_HOME/Apache/Apache/binexport ORACLE_OWNER=oracleexport ORACLE_SID=oradb//此处为你的sid使用Oracle用户登陆:#su–oracle$vi.bash_profile以下是配置文件的内容#.bash_profile#Get the aliases and functionsif[-f~/.bashrc];then.~/.bashrcfi#User specific environment and startup programsPATH=$PATH:$HOME/binexport ORACLE_BASE=/opt/ora9export ORACLE_HOME=/opt/ora9/product/9.2.0.4export PATH=$PATH:$ORACLE_HOME/bin:$ORACLE_HOME/Apache/Apache/binexport ORACLE_OWNER=oracleexport ORACLE_SID=oradbexport ORACLE_TERM=xtermexport LD_ASSUME_KERNEL=2.4.19export THREADS_FLAG=nativeexport LD_LIBRARY_PATH=$LD_LIBRARY_PATH:$ORACLE_HOME/libexport NLS_LANG=”American_america.utf8”export ORA_NLS33=$ORACLE_HOME/ocommon/nls/admin/dataexport PATHunset USERNAME4,设置系统参数;#su–root切换到root用户a)修改#vi/etc/sysctl.conf,以下是配置文件的内容(其中红色字体为添加的内容):#Kernel sysctl configuration file for Red Hat Linux##For binary values,0is disabled,1is enabled.See sysctl(8)and#sysctl.conf(5)for more details.#Controls IP packet forwardingnet.ipv4.ip_forward=0#Controls source route verificationnet.ipv4.conf.default.rp_filter=1#Controls the System Request debugging functionality of the kernelkernel.sysrq=0#Controls whether core dumps will append the PID to the core filename.#Useful for debugging multi-threaded applications.kernel.core_uses_pid=1kernel.shmmax=536870912kernel.shmmni=4096kernel.shmall=2097152kernel.sem=25032000100128fs.file-max=65536net.ipv4.ip_local_port_range=102465000修改后运行#sysctl–p命令使得内核改变立即生效;(译者注:一般情况下可以设置最大共享内存为物理内存的一半,如果物理内存是2G,则可以设置最大共享内存为1073741824,如上;如物理内存是1G,则可以设置最大共享内存为512*1024*1024=536870912;以此类推。

ORACLE11g R2 RAC FOR REDHAT6.2安装实施报告文档控制修改记录审阅分发软硬件现状硬件清单●数据库服务器IBM3850-2台,主要配置如下:➢CPU 4个➢内存64G●数据库服务器磁盘阵列–V7000➢RAID 5●安装产品如下:rac01 安装数据库RAC的一个实例,并升级到11.2.0.3rac02 安装数据库RAC的一个实例,并升级到11.2.0.3 软件清单●操作系统:REDHAT 6.2●群集软件:ORACLE Grid Infrastructure 11.2.0.3●数据库:ORACLE 11g DATABASE RELEASE2●数据库补丁集:11.2.0.3系统环境需求安装前的系统环境准备●检查REDHAT服务器安装完成并打上最新的补丁集●网络环境连通并调试正常。
●磁盘阵列安装完成并按ORACLE系统进行磁盘裸设备的划分。
硬件要求●内存:> 2G。
●SWAP区:2G。
通常等于物理内存,最低不少于1G。
●硬盘容量:数据库软件> 4G。
数据库> 2G。
●/tmp:临时目录空间大于500M。
●CDROM:支持ISO 9660。
软件要求●操作系统及Patches:Redhat 6.2 x64一.安装准备工作1.检查系统要求# uname –r2.6.32-220.el6.x86_642.内存容量# grep MemTotal /proc/meminfo MemTotal: 67108864kB 3.操作系统位数检查# uname -aX86_644.交换空间#f r e e–m|g r e p S w a pS w a p81925.空间检查#d f-h6.建立grid、oracle用户和oinstall、dba组指定grid、oracle用户的组是oinstall、dba,两边GID,UID相同#groupadd –g 5001 grid#groupadd –g 5002 dba#useradd –u 6001 –g grid –G dba grid#useradd –u 6002 –g grid –G dba oracle设置密码:Passwd grid这里输入gridPasswd oracle这里输入oracle7.设置系统参数fs.aio-max-nr = 1048576fs.file-max = 6815744kernel.shmall = 2097152kernel.shmmax = 536870912kernel.shmmni = 4096kernel.sem = 250 32000 100 128net.ipv4.ip_local_port_range = 9000 65500net.core.rmem_default = 262144net.core.rmem_max = 4194304net.core.wmem_default = 262144net.core.wmem_max = 1048586设置安全权限/etc/security/limits.confgrid soft nproc 2047grid hard nproc 16384grid soft nofile 1024grid hard nofile 65536grid soft stack 10240oracle soft nproc 2047oracle hard nproc 16384oracle soft nofile 1024oracle hard nofile 65536oracle soft stack 102408.IP地址私有IP地址必需与公网分离,两个节点可互相访问可以ping通,必须在 /etc/hosts里有;虚拟IP地址同公网IP地址是一个网段的,如果有DNS就注册在DNS 中,如果没有DNS就写在/etc/hosts文件里;公网IP地址,是主机真正的IP地址,主机管理员预先分配,如果有DNS就注册在DNS中,如果没有DNS就写在/etc/hosts文件里),并且保证写入每个客户系统中的hosts文件。
Oracle10gRAC在IBM-AIX5.3上的安装手册一、安装概述Oracle10gRAC的软件版本号为10.2.0.1,补丁版本号为10.2.0.2。
AIX操作系统版本号为5300-05。
Oracle10g的安装介质为三个tar文件:crsinstall.tar、oracle10g.tar和p10202_AIX64-5L.tar。
请联系工程部陈晓静获取安装介质。
全部安装,包括安装crs软件,安装oracle软件,安装10202补丁和创建数据库,大约需要3个小时左右。
在安装过程中,操作系统和硬件的厂方工程师最好在场,如果出现问题,大家一起解决会比较容易。
二、硬件需求1、机器需求CPU数目不低于2个,内存不低于2G,硬盘空间不小于20G。
这些要求目前的工程机器一般都能满足。
需要注意的是以下几点:●SWAP虚拟内存对换区不低于物理内存的两倍,如果物理内存大于8G,则虚拟内存可以配置成和物理内存相同大小。
●临时空间目录/tmp不低于500M,建议为1G以上●需要为Oracle软件建立单独的分区/users/oracle,大小建议为20G。
最少应为10G。
●机器名称不能超过8位,最好不要包含“-”号。
上面的要求在两台库服务器上都需要满足,如果有不满足的,请让厂方工程师协助解决。
2、网络需求两个光纤网口,用于连光纤交换机和阵列连接。
至少三个,最好四个千兆网口(电口、光口均可),用于外网连接和心跳连接。
建议将机器主板上的内置网卡用于心跳连接,将PCI插槽上的外接网卡用于外网连接。
为了满足OracleRAC中vip的需求,需要将连接外网的两个网口使用etherchannel技术虚拟成一个虚网口,vip的地址需要和这个虚网口配置在同一个网段。
如果有四个网口,建议将剩余的两个网口也使用etherchannel技术虚拟成一个虚网口,用于心跳连接。
Oracle建议心跳使用单独的交换机连接,或者使用交换机上一个单独的vlan连接,避免使用交叉线直接连接。

Oracle 10g RAC 教程第一部分 Oracle10g RAC数据库简介在硬件级别上,RAC 集群中的各节点共享三种功能:1.对共享磁盘存储的访问2.与专用网络的连接3.对公共网络的访问。
共享磁盘存储Oracle RAC 依赖于一个共享磁盘体系结构。
数据库文件、联机重做日志和数据库的控制文件必须都能为集群中的每个节点所访问。
共享磁盘还存储 Oracle Cluster Registry 和 Voting Disk(稍后讨论)。
配置共享存储有多种方法,包括直接连接磁盘(通常是使用铜缆或光纤的 SCSI)、存储区域网 (SAN) 和网络连接存储 (NAS)。
专用网络每个集群节点通过专用高速网络连接到所有其他节点,这种专用高速网络也称为集群互联或高速互联 (HSI)。
Oracle 的 Cache Fusion 技术使用这种网络将每个主机的物理内存 (RAM) 有效地组合成一个高速缓存。
Oracle Cache Fusion 通过在专用网络上传输某个 Oracle 实例高速缓存中存储的数据允许其他任何实例访问这些数据。
它还通过在集群节点中传输锁定和其他同步信息保持数据完整性和高速缓存一致性。
专用网络通常是用千兆以太网构建的,但是对于高容量的环境,很多厂商提供了专门为 Oracle RAC 设计的低延迟、高带宽的专有解决方案。
Linux 还提供一种将多个物理 NIC 绑定为一个虚拟 NIC 的方法(此处不涉及)来增加带宽和提高可用性。
公共网络为维持高可用性,为每个集群节点分配了一个虚拟 IP 地址 (VIP)。
如果主机发生故障,则可以将故障节点的 IP 地址重新分配给一个可用节点,从而允许应用程序通过相同的 IP 地址继续访问数据库。
Oracle 集群就绪服务(CRS)Oracle RAC 10g 引进了 Oracle 集群就绪服务 (CRS) —一组用于集群环境的与平台无关的系统服务。
在 RAC 和 Oracle 并行服务器先前版本中,Oracle 依靠厂商提供的集群管理软件来提供这些服务。

ORACLE RAC 安装总结SOLARIS 10 环境软件安装操作系统SOLARIS 10 集群软件PrimeCluster由于本次rac实施未采用ASM,因此在安装前在当前环境下运行sdxinfo 查看相关的卷的状态是否为active.1、配置操作系统内核,划分相应存储的裸设备空间2、建立oracle用户组和对应宿主,设置裸设备的权限(此步骤注意一定要在两台主机上同时设置)3、建立ssh主机之间的信任关系。
(也可以考虑采用rlogin的方式进行验证)这是找到节点的必须条件4、验证操作系统环境,安装相关的补丁软件。
具体需要软件包如下Check: Package existence for "SUNWarc"Node Name Status Comment------------------------------ ------------------------------ ----------------rac2 SUNWarc:11.10.0 passedrac1 SUNWarc:11.10.0 passedResult: Package existence check passed for "SUNWarc".Check: Package existence for "SUNWbtool"Node Name Status Comment------------------------------ ------------------------------ ----------------rac2 SUNWbtool:11.10.0 passedrac1 SUNWbtool:11.10.0 passedResult: Package existence check passed for "SUNWbtool".Check: Package existence for "SUNWhea"Node Name Status Comment------------------------------ ------------------------------ ----------------rac2 SUNWhea:11.10.0 passedrac1 SUNWhea:11.10.0 passedResult: Package existence check passed for "SUNWhea".Check: Package existence for "SUNWlibm"Node Name Status Comment------------------------------ ------------------------------ ----------------rac2 SUNWlibm:5.10 passedrac1 SUNWlibm:5.10 passedResult: Package existence check passed for "SUNWlibm".Check: Package existence for "SUNWlibms"Node Name Status Comment------------------------------ ------------------------------ ----------------rac2 SUNWlibms:5.10 passedrac1 SUNWlibms:5.10 passedResult: Package existence check passed for "SUNWlibms".Check: Package existence for "SUNWsprot"Node Name Status Comment------------------------------ ------------------------------ ----------------rac2 SUNWsprot:5.10 passedrac1 SUNWsprot:5.10 passedResult: Package existence check passed for "SUNWsprot".Check: Package existence for "SUNWsprox"Node Name Status Comment------------------------------ ------------------------------ ----------------rac2 ERROR: information for "SUNWsprox" was not found passedrac1 ERROR: information for "SUNWsprox" was not found passedResult: Package existence check passed for "SUNWsprox".Check: Package existence for "SUNWtoo"Node Name StatusComment------------------------------ ------------------------------ ----------------rac2 SUNWtoo:11.10.0 passedrac1 SUNWtoo:11.10.0 passedResult: Package existence check passed for "SUNWtoo".Check: Package existence for "SUNWi1of"Node Name Status Comment------------------------------ ------------------------------ ----------------rac2 SUNWi1of:6.6.2.7400 passedrac1 SUNWi1of:6.6.2.7400 passedResult: Package existence check passed for "SUNWi1of".Check: Package existence for "SUNWi1cs"Node Name Status Comment------------------------------ ------------------------------ ----------------rac2 SUNWi1cs:2.0 passedrac1 SUNWi1cs:2.0 passedResult: Package existence check passed for "SUNWi1cs".Check: Package existence for "SUNWi15cs"Node Name Status Comment------------------------------ ------------------------------ ----------------rac2 SUNWi15cs:2.0 passedrac1 SUNWi15cs:2.0 passedResult: Package existence check passed for "SUNWi15cs".Check: Package existence for "SUNWxwfnt"Node Name Status Comment------------------------------ ------------------------------ ----------------rac2 SUNWxwfnt:6.6.2.7400 passedrac1 SUNWxwfnt:6.6.2.7400 passedResult: Package existence check passed for "SUNWxwfnt".Check: Package existence for "SUNWlibC"Node Name Status Comment------------------------------ ------------------------------ ----------------rac2 SUNWlibC:5.10 passedrac1 SUNWlibC:5.10 passedResult: Package existence check passed for "SUNWlibC".Check: Package existence for "SUNWscucm:3.1"Node Name Status Comment------------------------------ ------------------------------ ----------------rac2 ERROR: information for "SUNWscucm" was not found failedrac1 ERROR: information for "SUNWscucm" was not found failedResult: Package existence check failed for "SUNWscucm:3.1".Check: Package existence for "SUNWudlmr:3.1"Node Name Status Comment------------------------------ ------------------------------ ----------------rac2 ERROR: information for "SUNWudlmr" was not found failedrac1 ERROR: information for "SUNWudlmr" was not found failedResult: Package existence check failed for "SUNWudlmr:3.1".Check: Package existence for "SUNWudlm:3.1"Node Name Status Comment------------------------------ ------------------------------ ----------------rac2 ERROR: information for "SUNWudlm" was not found failedrac1 ERROR: information for "SUNWudlm" was not found failedResult: Package existence check failed for "SUNWudlm:3.1".Check: Package existence for "ORCLudlm:Dev_Release_06/11/04,_64bit_3.3.4.8_reentrant"Node Name Status Comment------------------------------ ------------------------------ ----------------rac2 ERROR: information for "ORCLudlm" was not found failedrac1 ERROR: information for "ORCLudlm" was not found failedResult: Package existence check failed for "ORCLudlm:Dev_Release_06/11/04,_64bit_3.3.4.8_reentrant".Check: Package existence for "SUNWscr:3.1"Node Name Status Comment------------------------------ ------------------------------ ----------------rac2 ERROR: information for "SUNWscr" was not found failedrac1 ERROR: information for "SUNWscr" was not found failedResult: Package existence check failed for "SUNWscr:3.1".Check: Package existence for "SUNWscu:3.1"Node Name Status Comment------------------------------ ------------------------------ ----------------rac2 ERROR: information for "SUNWscu" was not found failedrac1 ERROR: information for "SUNWscu" was not found failedResult: Package existence check failed for "SUNWscu:3.1".Check: Group existence for "dba"Node Name Status Comment------------ ------------------------ ------------------------rac2 exists passedrac1 exists passedResult: Group existence check passed for "dba".Check: Group existence for "oinstall"Node Name Status Comment------------ ------------------------ ------------------------rac2 exists passedrac1 exists passedResult: Group existence check passed for "oinstall".Check: User existence for "oracle"Node Name Status Comment------------ ------------------------ ------------------------rac2 exists passedrac1 exists passedResult: User existence check passed for "oracle".Check: User existence for "nobody"Node Name Status Comment------------ ------------------------ ------------------------rac2 exists passedrac1 exists passedResult: User existence check passed for "nobody".如果相关的补丁缺失,请用pkgadd . 补丁名命令安装相对应的补丁,打部分软件包在操作系统的第一张安装盘上。
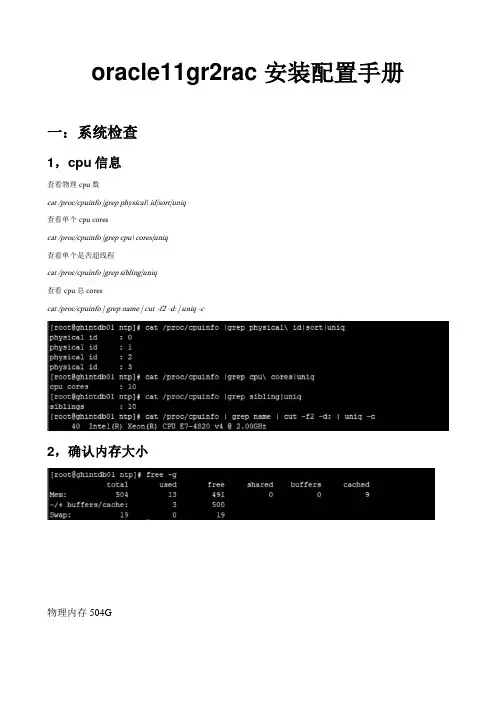
oracle11gr2rac 安装配置手册一:系统检查1,cpu信息查看物理cpu数cat /proc/cpuinfo |grep physical\ id|sort|uniq查看单个cpu corescat /proc/cpuinfo |grep cpu\ cores|uniq查看单个是否超线程cat /proc/cpuinfo |grep sibling|uniq查看cpu总corescat /proc/cpuinfo | grep name | cut -f2 -d: | uniq -c2,确认内存大小物理内存504G3,检查文件系统/var和/tmp空间至少2G,建议10G/dev/shm共享空间应当为物理内存/2二:配置系统1,主机正名1节点2节点<记得重新登陆>2,本地hosts解析vi /etc/hosts#public address172.18.62.21 ghintdb01172.18.62.23 ghintdb02#public vip address172.18.62.22 ghintdb01-vip172.18.62.24 ghintdb02-vip172.18.62.25 ghintdb-cluster-scan#private group172.21.44.21 ghintdb01-priv1172.21.44.22 ghintdb02-priv13,修改内核参数shell>vi /etc/sysctl.conf#ORACLE SETTINGfs.aio-max-nr = 1048576fs.file-max = 6815744#{shmall}单位pages,命令"echo $((物理内存/$(getconf PAGESIZE)))" kernel.shmall = 132299730#{shmmax},单位bytes,为物理内存一半,echo $((504*1024*1024*1024/2)) kernel.shmmax = 270582939648kernel.shmmni = 4096kernel.sem = 250 32000 100 128net.ipv4.ip_local_port_range = 9000 65500net.core.rmem_default = 262144net.core.rmem_max = 4194304net.core.wmem_default = 262144net.core.wmem_max = 1048586net.ipv4.ipfrag_high_thresh=524288net.ipv4.ipfrag_low_thresh=393216net.ipv4.tcp_rmem=4096 524288 16777216net.ipv4.tcp_wmem=4096 524288 16777216net.ipv4.tcp_timestamps=0net.ipv4.tcp_sack=0net.ipv4.tcp_window_scaling=1net.core.optmem_max=524287dev_max_backlog=2500 net.ipv4.tcp_mem=16384 16384 16384生效shell>modprobe sunrpcshell>sysctl -p4,关闭防火墙服务chkconfig --level 2345 iptables off chkconfig --level 2345 ip6tables off service iptables stopservice ip6tables stop关闭selinuxset enforce 0vi /etc/selinux/configSELINUX=disabled5,配置ntp同步<主机实施人员步骤,略>增加ntpd启动选项-xvi /etc/sysconfig/ntpdSYNC_HWCLOCK=yesOPTIONS="-x -u ntp:ntp -p /var/run/ntpd.pid"重启ntpdchkconfig --level 2345 ntpd onservice ntpd start6,创建用户groupadd -g 10501 oinstallgroupadd -g 10502 asmadmingroupadd -g 10503 asmdbagroupadd -g 10504 asmopergroupadd -g 10505 dbagroupadd -g 10506 operuseradd -m -u 10501 -g oinstall -G asmadmin,asmdba,asmoper,dba -d /home/grid -s /bin/bash -c "Grid Infrastructure Owner" griduseradd -m -u 10502 -g oinstall -G dba,oper,asmdba -d /home/oracle -s /bin/bash -c "Oracle Software Owner" oracle7,设置用户进程运行资源上限shell>vi /etc/security/limits.conf#ORACLE SETTINGroot soft nproc 2047root hard nproc 16384root soft nofile 1024root hard nofile 65536root soft stack 10240root hard stack 32768grid soft nproc 2047grid hard nproc 16384grid soft nofile 1024grid hard nofile 65536grid soft stack 10240grid hard stack 32768oracle soft nproc 2047oracle hard nproc 16384oracle soft nofile 1024oracle hard nofile 65536oracle soft stack 10240oracle hard stack 32768三:配置存储1,要求:同一个lun/vdisk在每个节点上设备名一致通过scsi_id确认每一个 lun/vdisk是根据方案从存储上划分正确的共享存储在每个节点能同时读写设备名的属主grid,组主asmadmin,权限660多路径软件配置<主机层实施,略>2,udev绑定参考本文以scsi磁盘为例查看系统识别的scsi盘(sd)fdisk -l|grep Disk\ /dev/sd根据系统人员告知,sda盘是本地硬盘,我们不去动它,剩下的是共享磁盘查看scsi_id命令:scsi_id -gvu /dev/sdN3,编辑udev的rule文件vi /etc/udev/rules.d/99-oracle.rulesKERNEL=="dm-*", PROGRAM=="/sbin/scsi_id --whitelisted --replace-whitespace --device=/dev/$name",RESULT=="36a08cf81005732a1e7c0cacf000000a1", NAME="asm-data01", OWNER="grid", GROUP="oinstall", MODE="0660"KERNEL=="dm-*", PROGRAM=="/sbin/scsi_id --whitelisted --replace-whitespace --device=/dev/$name",RESULT=="36a08cf81005732a1e7c0caeb000000a2", NAME="asm-data02", OWNER="grid", GROUP="oinstall", MODE="0660"KERNEL=="dm-*", PROGRAM=="/sbin/scsi_id --whitelisted --replace-whitespace --device=/dev/$name",RESULT=="36a08cf81005732a1e7c0cb07000000a3", NAME="asm-data03", OWNER="grid", GROUP="oinstall", MODE="0660"KERNEL=="dm-*", PROGRAM=="/sbin/scsi_id --whitelisted --replace-whitespace --device=/dev/$name",RESULT=="36a08cf81005732a1e7c16f91000000a4", NAME="asm-fra01", OWNER="grid", GROUP="oinstall", MODE="0660"KERNEL=="dm-*", PROGRAM=="/sbin/scsi_id --whitelisted --replace-whitespace --device=/dev/$name",RESULT=="36a08cf81005732a1e7c16fab000000a5", NAME="asm-fra02", OWNER="grid", GROUP="oinstall", MODE="0660"KERNEL=="dm-*", PROGRAM=="/sbin/scsi_id --whitelisted --replace-whitespace --device=/dev/$name",RESULT=="36a08cf81005732a10f5b0dc3000000dc", NAME="asm-crs01", OWNER="grid", GROUP="oinstall", MODE="0660"KERNEL=="dm-*", PROGRAM=="/sbin/scsi_id --whitelisted --replace-whitespace --device=/dev/$name",RESULT=="36a08cf81005732a10f5b35c5000000dd", NAME="asm-crs02", OWNER="grid", GROUP="oinstall", MODE="0660"KERNEL=="dm-*", PROGRAM=="/sbin/scsi_id --whitelisted --replace-whitespace --device=/dev/$name",RESULT=="36a08cf81005732a10f5b461a000000de", NAME="asm-crs03", OWNER="grid", GROUP="oinstall", MODE="0660"启动udevstart_udev我们发现原来的磁盘设备名没有了,变成了需要的名字,可以用”fdisk -l /dev/设备名“验证大小,接下来的安装将直接使用该设备名,不需要做fdisk分区4,配置SSH通信:./sshUserSetup.sh -user grid -hosts "ghintdb01 ghintdb02" -advanced -noPromptPassphrase ./sshUserSetup.sh -user oracle -hosts "ghintdb01 ghintdb02" -advanced -noPromptPassphrase5,准备目录和权限(所有节点)mkdir -p /u01/media/oraclechown -R grid:oinstall /u01chmod -R g+w /u016三:上传安装介质使用grid账户登陆,解压前面3个包即可unzip p1*******_112040_Linux-x86-64_1of7.zipunzip p1*******_112040_Linux-x86-64_2of7.zipunzip p1*******_112040_Linux-x86-64_3of7.zip运行安装程序runInstaller(在1节点操作)cd grid./runInstaller提示:为了把x-windows程序的界面投射到终端上,需要执行2个步骤1.启动本地X11Forward程序,推荐x-manager中的xpassive(端口默认6000,注意firewall)2.在服务器上设定shell环境变量:export DISPLAY=YourIP:0.03.执行xclock测试本方案只有一个scan IP,不需要配置GNS,也不需要DNS服务器这3个,可以忽略可以忽略继续了以root身份在所有节点运行指定的脚本一个节点运行完后,再运行其他节点,不可同时运行点击“ok”,最后点“close”关闭编辑~grid/.bash_profile文件,设置grid用户环境变量vi ~grid/.bash_profileexport ORACLE_BASE=/u01/app/gridexport ORACLE_HOME=/u01/app/11.2.0/gridexport PATH=$PATH:$ORACLE_HOME/bin:$ORACLE_HOME/OPatchexport NLS_DATE_FORMAT='yyyy-mm-dd hh24:mi:ss'安装数据库软件(在1节点操作)设置/u01/app目录的group组可写chmod g+w /u01/app使用oracle登陆,运行runInstallercd /u01/media/oracle/linux_x64/database export DISPLAY=YourIP:0.0./runInstaller不配置NTP同步,当节点之间的时间有差异时,会影响时间类型数据,RAC也会不稳定确认可以忽略后,选择”next”,然后点击”install“安装啦按照提示,使用root用户执行脚本运行结束后,点击”ok”,然后点击”close”完成安装增加oracle用户的软件环境变量vi ~oracle/.bash_profileexport ORACLE_BASE=/u01/app/oracleexport ORACLE_HOME=$ORACLE_BASE/product/11.2.0/dbhome_1 export PATH=$PATH:$ORACLE_HOME/bin:$ORACLE_HOME/OPatch export LD_LIBRARY_PATH=${LD_LIBRARY_PATH}:$ORACLE_HOME/lib export NLS_DATE_FORMAT='YYYY-MM-DD HH24:MI:SS'注:sid为实例名,rac中为数据库名加节点序列号(重新登陆后生效)创建数据库创建asm diskgroup使用grid用户登陆,执行asmcaexport DISPLAY=yourIP:0.0asmca创建闪回磁盘组(用于存放归档,闪回日志)创建数据库磁盘组,存放数据库文件登陆oracle账户,执行dbca export DISPLAY=YourIP:0.0dbca除非使用者要求,请关闭OEM根据应用要求选择组件oracle text:大文本存取功能oracle olap:联机分析处理oracle spatial:空间数据库,如地图展示数据oracle label security:数据标签安全sample schemas:开发样本enterprise manager repository:oracle企业管理器OEM的资料库oracle warehouse builder:数据仓库综合工具oracle database vault:敏感数据门禁oracle jvm:oracle java虚拟机,在数据库运行javaoracle xml db:支持xml功能oracle mutimedia:图像多媒体等类型数据oracle application express:快速web应用程序开发工具重要!根据应用要求选择字符集,中文一般性是ZHS16GBK缺省区域可以用united states,本例是china,影响时间、数字、币种等本地化表示法默认只有4组日志,每个实例(thread #)2组,每组大小50MB ,会影响性能,需要修改大小和create 更多的日志组,建议每个实例至少5组,每组256MB 或512MB 方案: 1-5组日志分配给thread 1 6-10组日志分配给thread 2每组大小512MB四:应用累计补丁更新程序PSU升级补丁工具opatch在所有节点,使用grid用户登陆,解压opatch升级包p6880880_112000_Linux-x86-64.zip,并整体覆盖$ORACLE_HOME/OPatch目录在所有节点,使用opatch升级包p6880880_112000_Linux-x86-64.zip 并整体覆盖$ORACLE_HOME/OPatch目录补丁1节点软件解压psu补丁包有些补丁需要一些先决条件,oracle一直在努力简化补丁过程,打补丁前务必参考README.html文件创建ocm相应文件(opatchauto模式)运行升级程序root登陆加载grid环境变量(. ~grid/.bash_profile)运行opatch工具。
RAC安装与配置-图文一、准备工作1、安装包文件:操作系统:OracleEnterprieLinu某6.5数据库软件:linu某.某64_11gR2_grid.ziplinu某.某64_11gR2_databae.zip2、安装VMwareTool,点控制台上面虚拟机->客户机->安装/升级VMwareTool,然后执行以下操作mkdir/mnt/cdromchmod-R775/mnt/cdrommount/dev/cdrom/mnt/cdromcd/mnt/cdromcpVMwareTool-9.4.10-2068191.tar.gz/tmp/tetcd/tmp/tettar-z某vfVMwareTool-9.4.10-2068191.tar.gzcd/tmp/tet/vmware-tool-ditrib/./vmware-intall.pl一直安回车键完成安装3、RAC架构规划IP分配:服务器机器名称公共IP地址(eth0)虚拟IP地址(eth0-1)私有IP地址(eth1)单实例SIDORACLERACSIDSCANIP软件安装目录:Oracle软件Grid软件/oracle/app/product/11.2.0/db_1/oracle/gridrac1192.168.10.80192. 168.10.8210.10.10.66orcl1orcl192.168.10.109Oracle-Linu某6.564bit,Oracle11.2.0.1rac2192.168.10.81192.168.10.8310.10.10.88orcl24、关闭防火墙及elinu某A、关闭防火墙(两个节点都要操作)erviceiptabletopchkconfigiptableofferviceiptabletatu//查看防火墙状态B、关闭elinu某(双节点)vi/etc/elinu某/config设置:SELINU某=diabled生效:etenforce0二、rac主机配置(双节点都要设置)1、修改机器名(所有节点)修改机器名服务器1:hotnamerac1vi/etc/yconfig/network服务器2:hotnamerac2vi/etc/yconfig/network2、设置ip地址(所有节点)两个网卡设置好之前规划的地址,配置过程省略3、配置hot文件vi/etc/hot三、使用CTSS配置时间同步(所有节点)/bin/ervicentpdtopchkconfigntpdoffmv/etc/ntp.conf/etc/ntp.conf.originalchkconfigntpd--litrm/var/run/ntpd.pid//如果没有这个文件则不用管oracle11g安装grid后ct会自动同步的四、配置DNS服务器(如果hot文件写了,可以不需要DNS服务器的)1、配置hot文件修改dn服务器的hot配置文件,建议删除::1这行同时修改第一行为127.0.0.1localhot否则后面检查可能会报错vi/etc/hot#node1rpm-ivhbind-9.8.2-0.30.rc1.el6.某86_64.rpm--force--nodeprpm-ivhbind-lib-9.8.2-0.30.rc1.el6.i686.rpm--force--nodeprpm-ivhbind-lib-9.8.2-0.30.rc1.el6.某86_64.rpm--force--nodeprpm-ivhbind-util-9.8.2-0.30.rc1.el6.某86_64.rpm--force--nodeprpm-ivhbind-chroot-9.8.2-0.30.rc1.el6.某86_64.rpm--force--nodep3、配置/etc/named.conf文件vi/etc/named.conf为了简单方便,将named.conf文件中的127.0.0.1、localhot全部修改为any,修改是注意左右两边留有空格,可以注释掉Ipv6那一行。
Oracle 10g RAC For Redhat AS 4 (x86-64) 安装指南目录概述 (2)第 1 部分:安装 Redhat AS 4 (2)第 2 部分:为Oracle RAC安装Redhat相关配置 (2)常用系统服务配置、启用 (2)网络配置 (2)内核参数配置 (2)安装相关程序包 (3)创建 Oracle 组和用户帐户 (4)配置 Hangcheck 计时器 (5)配置 /etc/hosts (5)为用户等效性配置SSH (5)第 3 部分:准备共享磁盘,创建、配置自动存储管理ASM (6)在原始设备上创建 Oracle CRS 文件 (7)配置存储Oracle CRS文件的数据分区与原始设备的映射 (7)为每个节点上的数据库原始设备设置所有权和权限 (7)为每个节点上的数据库原始设备创建有意义的符号连接 (7)安装配置ASMLib (7)获取ASMlib程序包 (8)安装该程序包 (8)配置 ASMLib (8)为 ASM 配置磁盘 (9)第 4 部分:安装 Oracle RAC 软件及创建RAC数据库 (10)检查集群中各节点的用户等效性 (10)安装 Oracle CRS (10)设置CRS相关环境变量 (10)运行runInstaller开始安装 (10)CRS 安装结束后验证 (11)安装 Oracle 数据库软件 (11)配置集群监听 (11)设置环境变量 (11)运行runInstaller安装Oracle软件 (12)创建Oracle RAC数据库(DBCA — Oracle ASM) (12)结论 (13)附录:Oracle RAC 集群软件、数据库日常管理命令 (14)概述该指南主要针对 Redhat AS (x86-64)平台下Oracle 10g RAC软件安装,涉及的Oracle 软件主要有 ASM(自动存储管理)工具,Oracle cluster 软件 CRS(集群就绪服务) ,Oracle 企业版数据库。
在RedHat Advance Server上安装Oracle 9204 RAC参考手册 前言
定位 本文定位在那些有了一定Linux与oracle基础的,而且对RAC也要有相关了解热人员作为参考手册,而不是所谓的安装向导。 所以本文没有详细的安装过程之类的步骤,却有详细的安装错误的解决办法。
覆盖范围 适合在Redhet AS 2.1与AS 3.0系统上 包括单节点、多节点安装 包括9201升级到9204和直接安装9204 包括文件系统(单机),OCFS文件系统,RAW设备与NFS网络文件系统的安装异同
目录结构 概述 2 第一章. RAC的机制 2 第二章. Linux上安装RAC的系统要求 3 2.1 内核需求 3 2.2 binutils需求 3 2.3 共享磁盘需求 3 第三章.安装前的准备工作 3 3.1调整Linux核心参数 3 3.2加载系统状态检查模块 3 3.3确定与配置节点 4 3.4创建oracle用户与组 4 3.5设置节点环境变量 4 3.6准备目录结构 4 第四章. 确定共享磁盘设备 4 4.1 单机文件系统上安装RAC 4 4.2 Ocfs文件系统上单机模拟与多节点共享安装 5 4.3 Raw裸设备 6 4.4 其它,如nfs文件系统 7 第五章. 安装OCM(Oracle Cluster Manager) 7 5.1生成一个CM管理文件 7 5.2 安装OCM管理软件 7 5.3配置OCM文件 8 5.4启动ocm 9 第六章. 安装Oracle软件 9 6.1开启RSH 9 6.2安装软件 10 6.3初试化共享文件 10 第七章. 创建数据库 10 7.1准备参数如下 10 7.2 创建密码文件 11 7.3创建数据库 11 7.4 创建相应的数据字典 12 第八章. 启动第二个节点实例 12 8.1 准备第二个节点的日志与重做 12 8.2 启动第二个实例 12 8.3 验证RAC 13 第九章. 测试、使用RAC 13 9.1监听的配置 13 9.2本地名称的配置 14 9.3 负载均衡测试 14 9.4失败切换(failover)测试 15 9.5 rac环境下修改为归档模式 15 第十章.从单节点数据库变为RAC 15 10.1修改参数文件 15 10.2创建cluster视图 16 10.3重新创建控制文件 16 10.4创建第二个实例的redo与undo 16 小结 16
概述 RAC的机制与运行原理 Linux上安装RAC的前提条件 各种磁盘共巷设备与文件系统 OCM软件及功能
数据库的安装过程及升级过程 数据库的创建过程与RAC的启动过程 RAC的常见功能及管理方法
第一章. RAC的机制 RAC起源于版本8的OPS(Oracle parallel Server),OPS/RAC 最原始的设计初衷就是系
统与应用的高可用性。OPS/RAC通过不同的节点使用一个(一般是一个)或多个oracle instances 与一个database 连接。RAC对早期的OPS做了众多的改进,特别是在节点的通
信与管理上。RAC在工作期间,每个节点可以单独的被使用并且被应用程序负载均衡。如果发生意外,如一个节点的失败,可以实现节点的失败切换(failover),保证数据库24*7的高可用性。 RAC的数据库要求建立在共享磁盘设备上,对于OPS,只支持RAW设备,RAC已经可以支持
文件系统(单机模拟)、OCFS、RAW、与NFS等文件系统或者设备。因为RAC是多个实例对应一个数据库,每个节点都有自己的日志,因此在备份与恢复方面,将需要一些特殊的处理。 但是,RAC并不提供容灾的功能,如共享磁盘设备的损坏,自然灾害等不可避免的损失,将导致RAC的不可使用,所以,RAC一般与其它的容灾组件配合使用,如RAC+DATA GUARD。 取代以前版本的分布式锁管理(DLM),全局缓冲服务(GCS)与全局锁服务(GES)将负责RAC的管理工作。GCS的同步层允许每个实例单独的访问数据库,通过数据库的核心层管理实例级别的一致性与锁资源。所有的以上任务将被一组特殊的后台进程来完成: LMON (Lock Monitor Process),锁监控进程
负责监控整个RAC的全局资源,管理实例与进程的过期以及全局缓冲服务与全局锁服务的恢复工作,LMON提供一个众所周知的聚族组服务(CGS)。 LMSn(The Global Cache Service Processes),全局缓冲服务进程 LMSn可以处理远程节点的全局缓冲服务的信息,LMSn也负责控制到远程节点的信息流,RAC可以提供10个这样的服务进程LMS0-LMS9,其进程的多少取决于实例之间的通信量。LMSn负责处理远程节点的全局缓冲服务获得的中断请求,保证多个实例的读一致性请求。LMSn创建块的一致性的读信息并送到远程节点的实例。 LMD(The Global Enqueue Service Daemon),全局资源服务 LMD资源代理进程,负责管理全局缓冲服务资源的管理,可以负责远程节点资源的请求与死锁的检测。
第二章. Linux上安装RAC的系统要求 2.1 内核需求
如果是AS2.1,内核2.4.9 e16以上,如 [oracle@dbrac oracle]$ uname -a Linux dbrac 2.4.9-e.37enterprise #1 SMP Mon Jan 26 11:20:59 EST 2004 i686 unknown 如果是3.0版本,则没有内核要求,内核信息一般如下 [root@ dbrac oracle]$ uname -a Linux dbrac 2.4.21-4.ELsmp #1 SMP Fri Oct 3 17:52:56 EDT 2003 i686 i686 i386 GNU/Linux 2.2 binutils需求 binutils 要求binutils-2.11.90.0.8-12以上,如 如:2.1版本 [oracle@dbrac oracle]$ rpm -qa | grep -i binutils binutils-2.11.90.0.8-12 3.0版本 [root@ dbrac oracle]$ rpm -qa | grep -i binutils binutils-2.14.90.0.4-26 2.3 共享磁盘需求 如果是单节点安装,可以是本地硬盘,文件系统即可 如果是多节点安装,需要共享磁盘系统,可以是Raw设备,Ocfs文件系统,Nfs网络文件系统等。
第三章.安装前的准备工作 3.1调整Linux核心参数
在/etc/sysctl.conf中增加 net.core.rmem_default = 262144 net.core.rmem_max = 262144 net.core.wmem_default = 262144 net.core.rmem_max = 262144 net.ipv4.tcp_sack=0 net.ipv4.tcp_timestamps=0 fs.file-max = 65535 kernel.sem = 500 64000 100 128 kernel.shmmax = 2147483648 以上值根据不同的环境可能有变化,不再描述每个值的具体意义 3.2加载系统状态检查模块
这个模块在AS2.1-E16以上的核心或者是3.0的核心中是自带的,不需要安装,它取代了数据库9201版本的watchdog,所以,我们可以不需要配置watchdog,如果OS核心不够,可以升级核心。 可以通过如下方法检测是否存在该模块 $ find /lib/modules -name "hangcheck-timer.o" /lib/modules/2.4.9-e.37enterprise/kernel/drivers/char/hangcheck-timer.o 你可以运行该模块并检查日志信息 # su - root # /sbin/insmod hangcheck-timer hangcheck_tick=30 hangcheck_margin=180 # grep Hangcheck /var/log/messages |tail -1 在/etc/rc.local下增加 #!/bin/sh touch /var/lock/subsys/local /sbin/insmod hangcheck-timer hangcheck_tick=30 hangcheck_margin=180 或者 # su - root # echo "options hangcheck-timer hangcheck_tick=30 hangcheck_margin=180" >> /etc/modules.conf 这样的话,在系统重新启动后,该模块可以自动加载 3.3确定与配置节点
如果确定在单个节点上模拟RAC,那么/etc/hosts文件内容可以类似如下 [root@dbrac root]# more /etc/hosts # Do not remove the following line, or various programs # that require network functionality will fail. 127.0.0.1 localhost 10.0.29.162 dbrac 其中dbrac是该机器的机器名称,与hostname或/etc/sysconfig/network的内容一致 如果是在多节点上安装RAC,那么/etc/hosts文件内容可以类似如下 [oracle@db205 oracle]$ more /etc/hosts # Do not remove the following line, or various programs # that require network functionality will fail. 127.0.0.1 localhost 192.168.168.205 dbrac1 192.168.168.206 dbrac2 192.168.0.205 dbrac1-eth1 192.168.0.206 dbrac2-eth1 其中分别代表公用节点名称与私有节点名称,公用节点是网卡1配置的IP地址,表示对外应用