kinect安装距离说明
- 格式:pdf
- 大小:522.34 KB
- 文档页数:1

kinectforwindows-DepthBasics-D2D详解Depth在kinect中经常被翻译为深度图,指的是图像到摄像头的距离,这些距离数据能让机器知道物理距离有多远。
kinect通过两个红外摄像头来实现这个功能的。
在这个例⼦⾥,就实现了深度图的提取和现实功能。
下⾯我们来研究下这个例⼦的代码,让我们对kinect for windows的开发包有个粗浅的认识。
代码结构:主要的代码是DepthBasic.cpp,这个代码实现了深度图的读取另外⼀个主要的代码⽂件时ImageRenderer,这个代码实现的是,将获取的深度图,展⽰在窗⼝上。
main函数:int APIENTRY wWinMain(HINSTANCE hInstance, HINSTANCE hPrevInstance, LPWSTR lpCmdLine, int nCmdShow){CDepthBasics application;application.Run(hInstance, nCmdShow);} 从main函数看,main函数只调⽤了两个函数,⼀个是CDepthBasics的构造函数,另外⼀个是CDepthBasics的Run函数。
构造函数只是初始化,我们略过,继续看Run函数。
CDepthBasics::Run函数,解释都在代码中,⼤家可以看注释int CDepthBasics::Run(HINSTANCE hInstance, int nCmdShow){MSG msg = {0};WNDCLASS wc;// Dialog custom window class win32创建窗⼝前的准备⼯作,构造窗⼝类结构ZeroMemory(&wc, sizeof(wc));wc.style = CS_HREDRAW | CS_VREDRAW;wc.cbWndExtra = DLGWINDOWEXTRA;wc.hInstance = hInstance;wc.hCursor = LoadCursorW(NULL, IDC_ARROW);wc.hIcon = LoadIconW(hInstance, MAKEINTRESOURCE(IDI_APP));wc.lpfnWndProc = DefDlgProcW;wc.lpszClassName = L"DepthBasicsAppDlgWndClass";// 注册窗⼝类if (!RegisterClassW(&wc)){return 0;}// Create main application window ⽤该窗⼝类创建对话框HWND hWndApp = CreateDialogParamW(hInstance,MAKEINTRESOURCE(IDD_APP),NULL,(DLGPROC)CDepthBasics::MessageRouter,reinterpret_cast<LPARAM>(this));// Show window 显⽰对话框ShowWindow(hWndApp, nCmdShow);// 这个⽤来检测kinect消息的eventconst int eventCount = 1;HANDLE hEvents[eventCount];// Main message loop windwos消息循环,在这个消息循环⾥,如果没有kinect,那就是简单的处理窗⼝消息即可,但是....while (WM_QUIT != msg.message){// 为什么在这⾥赋值,相当于每次循环都赋值?因为这个句柄随着消息处理会变化hEvents[0] = m_hNextDepthFrameEvent;// 检查kinect事件,第⼀个参数1表⽰等待⼀个句柄,第⼆个参数是消息数组,第三个参数指⽰是不是要等数组⾥的所有消息,参数是false// 第四个参数是等待多久,INFINITE表⽰永远,第五个参数呢,因为第四个参数说没有kinect消息这个函数就⼀直阻塞这⾥,那么它肯定可能影响正常的windows消息处理 // 所以第五个参数表⽰说有些情况下也要打断这个等待,QS_ALLINPUT就表⽰在有windows消息时,该函数也不再阻塞的继续往下执⾏DWORD dwEvent = MsgWaitForMultipleObjects(eventCount, hEvents, FALSE, INFINITE, QS_ALLINPUT);// Check if this is an event we're waiting on and not a timeout or message 返回WAIT_OBJECT_0表⽰kinect有消息来,否则表⽰没消息if (WAIT_OBJECT_0 == dwEvent){// 处理kinect的消息Update();}// 处理windows消息if (PeekMessageW(&msg, NULL, 0, 0, PM_REMOVE)){// If a dialog message will be taken care of by the dialog procif ((hWndApp != NULL) && IsDialogMessageW(hWndApp, &msg)){continue;}TranslateMessage(&msg);DispatchMessageW(&msg);}}return static_cast<int>(msg.wParam);} 从Run函数可以看出,对kinect的处理主要在Update函数中,在看Update函数之前,我们要考虑⼀点,就是对象的初始化,在构造函数中,只是赋值为NULL,像m_hNextDepthFrameEvent这样的对象,它是啥时候被初始化的呢?这个就需要读者对windows窗⼝机制要有⼀些了解了,在Run的时候,调⽤CreateDialogParamW函数时,系统会给对话框发送窗⼝初始化消息WM_INITDIALOG消息,那么这些句柄的初始化,都是在窗⼝初始化的时候做的,所以在看Update函数之前,我们先看窗⼝初始化的处理:LRESULT CALLBACK CDepthBasics::DlgProc(HWND hWnd, UINT message, WPARAM wParam, LPARAM lParam){switch (message){case WM_INITDIALOG:{// Bind application window handlem_hWnd = hWnd;// Init Direct2D 初始化DirectXD2D1CreateFactory(D2D1_FACTORY_TYPE_SINGLE_THREADED, &m_pD2DFactory);// Create and initialize a new Direct2D image renderer (take a look at ImageRenderer.h)// We'll use this to draw the data we receive from the Kinect to the screen 创建图⽚展⽰对象m_pDrawDepth = new ImageRenderer();// 初始化展⽰对象,这⾥⽤到了窗⼝,⽤到了DirectX对象,以及宽度⾼度参数HRESULT hr = m_pDrawDepth->Initialize(GetDlgItem(m_hWnd, IDC_VIDEOVIEW), m_pD2DFactory, cDepthWidth, cDepthHeight, cDepthWidth * sizeof(long));if (FAILED(hr)){SetStatusMessage(L"Failed to initialize the Direct2D draw device.");}// Look for a connected Kinect, and create it if found,连接kinect设备CreateFirstConnected();}break; 在DlgProc的消息处理函数中我们看到了WM_INITDIALOG的处理,在这⾥初始化了DirectX和ImageRenderer对象,最后调⽤了CreateFirstConnected函数去查找和初始化Kinect对象。

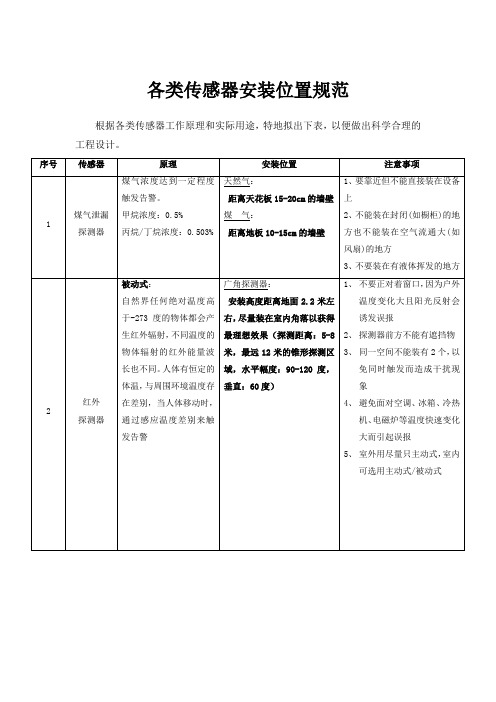
厨房幼儿园安装可燃气体报警规范可燃气体检测仪是一种固定式气体检测报警仪器,可以安装在合适的位置,长时间监测附近可燃气体的浓度,发生泄漏及时报警,避免人员伤亡。
要使用气体检测仪,您必须首先正确安装它。
可燃气体探测器一、可燃气体探测器的安装位置根据相关规定,根据被测气体的密度和风向确定探测器的安装位置,但避免将探测器安装在一个地方空气流量过大。
一般情况下,室内可燃气体探测器安装在距离释放源7.5m以内或两个探测器之间的水平距离在15m以内;有毒气体探测半径为1m。
对于过大或通风部件较多的室内空间,应根据室外情况布置探测器。
可燃气体探测器安装在室外时,宜布置在可燃气体释放源年最小频率风向的上风侧。
距源的距离不应大于15m;当探测器布置在可燃气体排放源年低频率风向背风侧时,与排放源的距离不应大于5m,有毒气体应小于2m一、可燃气体检测仪安装在被检测气体容易泄漏的地方,安装位置根据被检测气体相对于空气的比重确定。
当被测气体比重大于空气比重时,探测器应安装在离地面一定距离(30~60)cm,传感器位置朝下)。
当被测气体比重小于空气比重时,探测器应安装在距天花板一定距离处(30~60)cm,传感器位置朝下)。
二、可燃气体探测器安装高度可燃气体探测器的安装高度应根据可燃气体的比重来安装。
探测比空气重的可燃气体时,探测器安装高度应在地面以上0.3~0.6m;探测比空气轻的可燃气体时,探测器安装高度应高于释放源0.5~2m。
对于氢气等气体,应安装在屋顶等最高点。
注:气体密度大于0.97kg/m3(标准条件下)被认为比空气重,气体密度小于0.97kg/m3(标准条件下)被认为比空气轻.以上是可燃气体探测器安装位置和高度的相关规定。
需要明确的是,我们必须以正确的方式安装设备,否则将无法有效保护我们的生命财产安全。

kinect的工作原理
Kinect是由微软研发的一款基于深度感知技术的动作捕捉设备。
它主要由红外摄像机、RGB彩色摄像机、多麦克风阵列和运
动传感器组成。
Kinect工作原理是通过红外摄像机和深度感知技术来捕捉人体
姿势和动作。
红外摄像机是用来发射红外光,并接收其反射光的摄像机。
当红外光照射到人体上时,会被人体反射回来,红外摄像机可以根据反射光的强弱来计算出物体距离感知器的距离。
在物体距离感知器方面,Kinect使用了一种名为结构光的技术。
它通过发射结构化的红外光,例如以网格或点阵的形式,然后通过红外摄像机捕捉物体上反射的红外光的形状和位置。
通过分析红外光的形状和位置,Kinect可以准确地对物体进行跟踪
和测量。
RGB彩色摄像机则用来捕捉人体的颜色信息和纹理。
将RGB
图像和深度图像进行结合,可以得到更加生动的图像和更加准确的姿势和动作识别。
此外,Kinect还通过多麦克风阵列实现声音的捕捉和定位。
多
麦克风阵列可以通过对声音的接收和处理来确定声音的来源和定位,从而实现音频的捕捉和识别。
通过综合以上红外摄像机、RGB彩色摄像机、多麦克风阵列
和运动传感器的数据,Kinect可以实现对人体动作和姿势的实
时捕捉和跟踪,并将其应用于虚拟现实、互动游戏和人机交互等领域。

Kinect介绍(一)Kinect的发展历史Kinect最早是在2009年6月1日E3 2009上首次公布,当时的代号是“Projet Natal”意为初生,遵循微软以城市名作为开发代号的传统,“Projet Natal”是由来自巴西的微软董事Alex Kipman以巴西城市Natal, Rio Grande do Norte命名。
Natal在英语中还有初生的含义,这也是微软给予此计划对XBOX360带来新生的期望。
微软在2010年6月13日晚在Galen Center举行“初生计划全球首秀”发布会,在会上微软宣布“Poject Natal”正式命名为Kinect,取意为“kinetic”(运动)和“connect”(沟通)的融合,Kinect一代就此诞生。
微软在这次发布会上同时宣布,Kinect将于2010年11月4日在北美正式发售, 2012年10月9日开始在中国销售第一代Kinect for Windows感应器。
2013年五月Xbox One 发表会上Scott Evans 和Kareem Choudhry 两位Kinect专家展示了次世代Kinect(Kinect二代)那些不可思议的新功能。
新Kinect作为次世代主机必不可少的一部分,开发者们可以基于Kinect感知的语音、手势和玩家感觉信息,来给玩家带来前所未有的互动性体验。
2014年10月微软开始在中国销售第二代Kinect for Windows感应器。
(二)Kinect两代产品异同点1、Kinect组件Kinect v1及Kinect v2都拥有一个外壳、底座、散热器、4个不同类型螺钉、3部分主板及14种关键芯片;都拥有4个麦克风阵列,可过滤噪声,定位声源,识别语音内容,比较图1、图2可知,他们的摆放位置有所差异;Kinect v1有Moving Touch传动马达电动机用于仰角控制,一般是根据它与用户间的位置、距离调节,Kinect v2需要手动去控制;Kinect拥有多个摄像机,Kinect v1从左至右分别为红外投影机,颜色摄像机,红外摄像机,Kinect v1如图1所示。

kinect 工作原理
Kinect是一种类似摄像头的设备,它能够将人体的动作和声音
转化为数字信号,并通过计算机进行处理和识别。
Kinect的工
作原理主要通过以下几个组件实现:
1. 深度传感器(Depth Sensor):Kinect通过红外技术和RGB
摄像机的结合来生成深度图像。
红外光源发射红外光,然后红外摄像头捕捉反射回来的红外光,并通过红外摄像头的图像来计算物体与摄像头之间的距离。
2. RGB摄像头:Kinect内置有一台RGB彩色摄像头,用于捕
捉人体或物体的彩色图像。
RGB图像可以用于计算物体的形
状和颜色信息。
3. 声音传感器:Kinect还包含了麦克风阵列,用于捕捉周围环
境中的声音,并通过声音识别算法对声音进行分析和识别。
4. 运动追踪算法:Kinect内置了一套先进的运动追踪算法,可
以对深度图像和RGB图像进行分析,以识别人体的关节位置、姿势和动作。
通过对捕捉到的图像和声音进行实时处理和分析,Kinect能够将用户的动作和声音实时转化为数字信号。
5. 数据传输和处理:Kinect通过USB接口与计算机相连,将
捕捉到的图像和声音数据传输给计算机进行处理和分析。
计算机上的软件可以根据用户的动作和声音输出相应的指令或产生互动效果。
综上所述,Kinect的工作原理是通过深度传感器、RGB摄像头、声音传感器和运动追踪算法来捕捉和识别用户的动作和声音,从而实现与计算机的互动。
Table of ContentsAbout1 Chapter 1: Getting started with kinect2 Remarks2 Examples2 Installation or Setup2 Credits7AboutYou can share this PDF with anyone you feel could benefit from it, downloaded the latest version from: kinectIt is an unofficial and free kinect ebook created for educational purposes. All the content is extracted from Stack Overflow Documentation, which is written by many hardworking individuals at Stack Overflow. It is neither affiliated with Stack Overflow nor official kinect.The content is released under Creative Commons BY-SA, and the list of contributors to each chapter are provided in the credits section at the end of this book. Images may be copyright of their respective owners unless otherwise specified. All trademarks and registered trademarks are the property of their respective company owners.Use the content presented in this book at your own risk; it is not guaranteed to be correct nor accurate, please send your feedback and corrections to ********************Chapter 1: Getting started with kinectRemarksThis section provides an overview of what kinect is, and why a developer might want to use it.It should also mention any large subjects within kinect, and link out to the related topics. Since the Documentation for kinect is new, you may need to create initial versions of those related topics. ExamplesInstallation or SetupDetailed instructions on getting kinect set up or installed.Setting Up a Kinect SensorKinect for Windows 1.5, 1.6, 1.7, 1.8Here are some simple steps to get your Kinect sensor up and running.Step 1: Mount the Sensor on a Stable SurfacePlace the sensor on a stable surface in a location where it will not fall or be struck during use. Here are some other tips.Do not place the Kinect on or in front of a speaker or on a surface that vibrates or makes noise.Keep the Kinect out of direct sunlight.Use the Kinect within its specified operating temperature range of 41 to 95 degrees Fahrenheit (5 to 35 degrees Celsius). If the sensor is exposed to an environment outside of itsprescribed temperature range, turn it off and allow the temperature to stabilize within the specified range before you use the sensor again.Do not tilt a Kinect on its base. Manually tilting the Kinect can damage the sensor. TheKinect tilt angle is controlled by software; see Kinect Explorer - WPF C# Sample for an example.Step 2: Install the Kinect for Windows SDKIf you haven't done so already, download and install the free SDK from the Kinect for Windows download page.If you haven't done so already, download and install the free Developer Toolkit from theKinect for Windows download page.Step 3: Plug in your Kinect sensorConnect the power supply for your Kinect to an external power source.Connect the Kinect to a USB port on your PC and wait for Windows to recognize it.All the drivers, including audio, will load seamlessly.When you install the Kinect for Windows SDK, the installation package includes the Kinect drivers.When the Kinect drivers are installed on a Windows-based PC, a Kinect that is plugged into the PC's USB port appears as a multicomponent USB device.There is a known issue regarding USB host controller compatibility.After loading the drivers, you need to set up your development environment. If you are using Visual Studio, continue with Configuring the Development Environment to help you create your first C# or C++ application.Troubleshooting TipsThe following tips will help you get started using your Kinect:If a non-Microsoft driver for the Kinect is installed on your computer, the Kinect for Windows drivers might not install or function correctly. To fix this, uninstall the non-Microsoft drivers before installing the Kinect for Windows SDK.Connect the power supply for the Kinect to an external power source; if the Kinect has only power from the USB connection, it will be minimally functional and light the LED, but it must be connected to an external power source to be fully functional.No tools are required for calibration of audio and video.Your Kinect should be the only device plugged into a USB hub on your computer. If you have more than one Kinect, connect them to different USB controllers. If 2 hubs are connected tothe same controller, only 1 Kinect can work at a time.The Kinect is protected from overheating by a fan. It is controlled by the sensor's firmware, which turns off the camera at 90 degrees Celsius. There is no software interface forapplications to control the fan.Reasonable lighting, neither extremely dark nor extremely bright, is important for capturing images with the RGB camera. Incandescent, fluorescent, and natural lighting provide no special obstacles, but do not point an intense or constant light source at the camera because this can blind the RGB sensor.The depth sensor functions adequately in typical and reduced lighting, although in near darkness there is increased noise in the signal.The depth sensor reads depth information from reflected light. Objects that are highlyreflective (mirrors and shiny metal) or highly absorptive (fluffy and/or dark materials) may not be registered by the depth sensor as successfully as other objects.SourceLinuxUbuntu/Debian Official packagesStarting from Ubuntu 11.10 (Oneiric) and Debian 7 (Wheezy), Ubuntu and Debian provide official packages of libfreenect. You can install them easily in a console:$ sudo apt-get install freenectIn Ubuntu 12.04 the gspca kernel driver prevent libfreenect from claiming the Kinect device in user-mode. Either remove and blacklist the module$ sudo modprobe -r gspca_kinect$ sudo modprobe -r gspca_main$ echo "blacklist gspca_kinect" |sudo tee -a /etc/modprobe.d/blacklist.confor install a recent versions of libfreenect that can automatically detach the kernel driver by adding Florian Echtler libtisch PPA (see below) with updated libfreenect packages for Ubuntu 12.04.The freenect device is accessible to any user belonging to the group 'plugdev'. By default, a desktop user belongs to the plugdev group but if you need to add them to the group:$ sudo adduser $USER plugdevthen log out and log in again NeuroDebian repositoryIf you want a recent version of libfreenect no matter which version of Debian or Ubuntu you use, backports of the latest release of libfreenect for all supported version of Debian and Ubuntu (namely Ubuntu Lucid(10.04), Maverick (10.10), Natty (11.04), Oneiric (11.10) and Debian Squeeze and Wheezy at the time of writing) are available on NeuroDebian repository . The packages available there are created by the maintainers of the official Debian package and follows the standards of Debian/Ubuntu.To enable the NeuroDebian repository:$ wget -O- /lists/$(lsb_release -cs).us-nh | sudo tee/etc/apt/sources.list.d/neurodebian.sources.list$ sudo apt-key adv --recv-keys --keyserver 2649A5A9$ sudo apt-get updateInstalling libfreenect is the same as before:$ sudo apt-get install freenectMake sure your user belongs to the plugdev group (The default for a desktop user) to access the device without the root privileges. If it is not the case, add them by:$ sudo adduser $USER plugdevand log out and log in again libtisch PPAAn Ubuntu launchpad ppa for Lucid(10.04), Maverick (10.10), Natty (11.04), Oneiric (11.10) and Pangolin (12.04) is available at this link.to use it, open a console and execute:$ sudo add-apt-repository ppa:floe/libtisch$ sudo apt-get updateAfter that, you can use:$ sudo apt-get install libfreenect libfreenect-dev libfreenect-demosThis will install libfreenect, the development headers, and the demo applications.After that, you need to add yourself to the 'video' group and log back in. The package already includes the necessary rules for the udev daemon so that accessing the device will be possible for users in the group video.$ sudo adduser $USER videobe sure to log out and back in. You don't need to reboot, just plug in the kinect device right now (if it was already connected, unplug and plug back in).To start the demo applications use:$ freenect-glviewProblems with accessing deviceIn case of problems, run$ lsusb | grep Xboxwhich should list 3 devices> lsusb | grep Xbox Bus> 001 Device 021: ID 045e:02ae Microsoft Corp. Xbox NUI Camera Bus 001> Device 019: ID 045e:02b0 Microsoft Corp. Xbox NUI Motor Bus 001 Device> 020: ID 045e:02ad Microsoft Corp. Xbox NUI AudioIf they are not present, runecho -1 | sudo tee -a /sys/module/usbcore/parameters/autosuspendand reconnect Kinekt and Kinect Camera should be listedYou find all demo applications starting with the freenect- prefix. Ubuntu Manual InstallQuick copy-paste instructions to get up-and-running instantly:sudo apt-get install git-core cmake libglut3-dev pkg-config build-essential libxmu-dev libxi-dev libusb-1.0-0-devgit clone git:///OpenKinect/libfreenect.gitcd libfreenectmkdir buildcd buildcmake ..makesudo make installsudo ldconfig /usr/local/lib64/sudo freenect-glviewNote: If you getting an error saying apt-get cannot find libglut3, you might be on anewer version of Ubuntu that has freeglut3-* instead of libglut3-*, so your initial apt-getinstall would look like:sudo apt-get install git-core cmake freeglut3-dev pkg-config build-essential libxmu-dev libxi-dev libusb-1.0-0-devTo use Kinect as a non-root user do the following:sudo adduser $USER videoAlso make a file with rules for the Linux device manager:sudo nano /etc/udev/rules.d/51-kinect.rulesCopy and paste:# ATTR{product}=="Xbox NUI Motor"SUBSYSTEM=="usb", ATTR{idVendor}=="045e", ATTR{idProduct}=="02b0", MODE="0666"# ATTR{product}=="Xbox NUI Audio"SUBSYSTEM=="usb", ATTR{idVendor}=="045e", ATTR{idProduct}=="02ad", MODE="0666"# ATTR{product}=="Xbox NUI Camera"SUBSYSTEM=="usb", ATTR{idVendor}=="045e", ATTR{idProduct}=="02ae", MODE="0666"# ATTR{product}=="Xbox NUI Motor"SUBSYSTEM=="usb", ATTR{idVendor}=="045e", ATTR{idProduct}=="02c2", MODE="0666"# ATTR{product}=="Xbox NUI Motor"SUBSYSTEM=="usb", ATTR{idVendor}=="045e", ATTR{idProduct}=="02be", MODE="0666"# ATTR{product}=="Xbox NUI Motor"SUBSYSTEM=="usb", ATTR{idVendor}=="045e", ATTR{idProduct}=="02bf", MODE="0666"Be sure to log out and back in.If you can't access or still need root privileges to use your device: in some cases there might be conflicts between permissions of two drivers installed (libfreenect and primesense). If this is your case, try reinstalling primesense's sensor driver and keep only primesense's rules file/etc/udev/rules.d/55-primesense-usb.rule s, removing the /etc/udev/rules.d/51-kinect.rules file if you created it.Read Getting started with kinect online: https:///kinect/topic/10611/getting-started-with-kinectCredits。