航模飞机图纸精品2:滑翔机(共79张图片)
- 格式:doc
- 大小:5.10 MB
- 文档页数:47
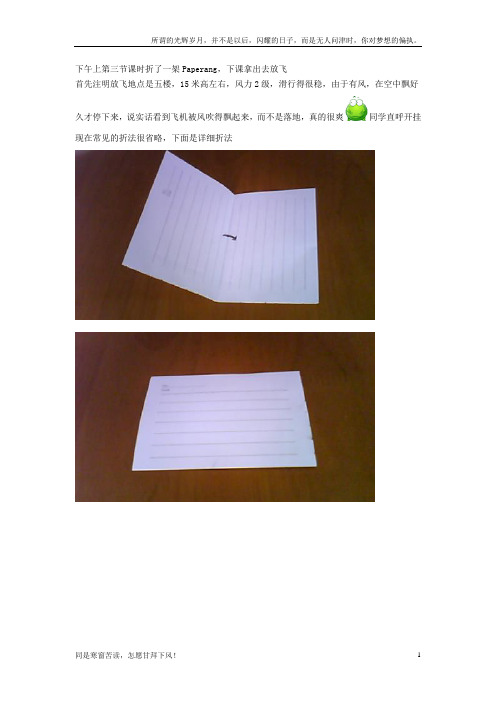
下午上第三节课时折了一架Paperang,下课拿出去放飞
首先注明放飞地点是五楼,15米高左右,风力2级,滑行得很稳,由于有风,在空中飘好
久才停下来,说实话看到飞机被风吹得飘起来,而不是落地,真的很爽同学直呼开挂现在常见的折法很省略,下面是详细折法
另一面和前面部分相同,也可以两面同步
摊开
所剪的长度等于2x或者比2x小一丝丝,如下图
接着按照刚刚的痕迹对折
沿着红线折
接着按照刚刚的方法再沿着这条红线折叠,剪开2x长的开口的原因
接着沿着红线剪开
把那个小角向上翻折
叠折下面的小角,和上面的小角方向一样
紧贴
然后将两个角摊开
整个飞机展开
两个角相扣
相扣……
上订书机,一定要观察左右平衡之后再按下订书机
所谓的光辉岁月,并不是以后,闪耀的日子,而是无人问津时,你对梦想的偏执。
机翼两边向上微微折起
背面
完工!
很稳的一架飞机(应该叫滑翔机吧?)
同是寒窗苦读,怎愿甘拜下风!11。


【轻木航模飞机图纸】TaylorcraftCompleteInstructionsand plans tobuild and flythe TaylorcraftU. S. Armycooperationplaneby EARL STAHLAS THE ressult of the brilliant performance in the war games last summer the Army placed orders with the three largest manufacturers of lightplanes, Piper, Taylorcraft and Aeronca, for a fleet of “aerial jeeps”, more popularly known as A small scale replica of the Army's latest airplane. Parasol wing and long “grasshoppers”. fuselage makeit an excellent contest model. The structure is simple, light Operating under simulated war conditions, and strong the "grasshopper fleet" proved that lightplanes are indispensable in modern warfare. Flown by civilian pilots, these planes proved their adaptability for all kinds of observation work, personnel carrying, directing traffic and troop movements, even picking-up and delivering massages, maps, and materials in flight.To further prove their value the "grasshoppers" repeatedly flew from seemingly impossible areas. In Louisiana army engineers prepared landing spots measuring a mere 400 ft. long and 100 ft. wide-and without considering wind direction. Obviously larger, faster planes could not use such bases, but these lightplanes in hands of skilled pilots made numerous takeoffs and landings. It was all in a day's work for pilots to land on highways, sometimes in open spaces between moving convoys, to complete a mission or possibly borrow a few gallons of gas. During maneuvers in Texas one pilot made several landings on the up-slope of a high mountain, then taxied around the gravel ledge rim, and took off on the down - slope. Of course there were a few accidents, but they were of a minor nature and quickly repaired. The most serious mishap resulted from a spin as a pilot cicled l ow so he could “Yoo-Hoo” to his girl friend."Grasshoppers" used in the war games were identical with ships available to civilians, all being converted tandem trainers powered by Continental 65 hp. engines. The only important additions were radio transmitters and receiver.For our model we have selected crosspiece centers under the upper formers shaft, then carve a right - hand propeller, the Taylorcraft trainer, known in the on the nose so they will not interfere with by cutting away the back, face of the Army as the O-57. This plane is similar in the rubber motor. Use the widest sheet blades until there is about 1/16" appearance, construction and performance available; cement it to the entire adjacent undercamber in each. Make each surface to other tandem trainers on the market. frame using pins and rubber bands to hold smooth and uniform with sandpaper. Available with Continental, Lycoming or it in place until dry. Extreme front of the Blade thickness is then easily determined Franklin engines of 65 hp., the nose is asolid block or laminations, as as the front is shaved away. Thin the commercial version performs as follows: shown. Roughly cut to shape, cut out hole blades as much as possible, still retaining Top speed, 102m.p.h.; landing speed, 35 for the nose plug, then cement to the desired strength. Round the tips like the m.p.h.; climb 600 ft. per min.; cruising fuselage front. When dry, cut the block to prop shown in the photos. Carefully sand range, 300 miles on 14 gallons of fuel. a smooth shape, then sand entire nose to and balance the prop as the final The model has the same fine shape. operation. Several coats of light dope, if characteristics as the real ship: Bend the two landing gear struts lightly sanded between each, will produce construction is easy and flight to shape and size shown from .040 music a smooth surface. A free - wheel gadget to performance is matched only by wire, attach to fuselage by neatly binding improve glide should be attached to the attractiveness. with thread and then applying several front and a bearing to the back.coats of cement. Join bottoms of the struts The nose plug is made fromby soldering or with thread and cement. laminated squares of 1/8" sheet with a CONSTRUCTION. -BeforeThe 1/16" sheet fill-in can be cut and 1/32" plywood front. Test flights of the starting, the fuselage plans should befitted but should not be attached until the original model showed that several joined: incidentally, if you do not want tofuselage is covered; the center struts degrees of both right and down thrust are mar your magazine, make tracings of thelikewise. desirable, so drill the hole in this manner. plans onsemi-transparent paper.Make full size plans of the right Cement washers to the front and back to First make the fuselageand left wing halves so parts call be fix the thrust line. underframe, of 3/32" sq. balsa longeronsassembled directly over them. Using the and cross-pieces, indicated by lightpatterns given, cut 18 of the regular and 2 shading. Make two side frames, one atop COVERING ANDof the tip ribs from soft 1/16" or 1/20" the other for identity; the cement will ASSEMBLY - Before the frames aresheet. Pin all like ribs together and sand to probably cause them to stick together but covered, they must be lightly butuniformity, then cut the notches with they can be separated by a razor blade. thoroughly sanded to remove all flaws andaccuracy. Pieces for the tips are cut from When dry, invert the side frames over a roughness. Colored tissue is used, banana1/8" sheet and assembled over the plan. complete top view plan and join with oil or light dope is the adhesive. CementTaper the 1/8" x 3/8" trailing edges before 3/32" sq. cross-pieces at the cabin. Next cellophane to side windows beforepinning to place over the plan. Pins keep pull the backs togetherand add remaining covering the fuselage. While performing the ribs in position. Spars are hard balsa; cross-pieces in the rear. Crack longerons the latter use numerous small pieces,the uppers being 1/16" sq. while the lower just in front of thecabin to pull sides carefully lapped, to avoid wrinkles; also are 3/32" sq. Leading edge is 1/8" x 1/4". together as shown. Check continually for cover the sheet balsa nose with tissue.Tilt the inner ribs a bit for correct correct alignment. Each sideof each wing half, stabilizer anddihedral. Cement all joints firmly, remove The various fuselage formers are rudder requires a separate piece of tissue,from plans and finish the leading edges shown; cut from each medium grade 1/16" tips, etc., require individual pieces, too.and tips by trimming with a razor and sheet. Cut the notches shown and cement Lightly spray all covered parts with watersandpapering. to place. Stringers are medium hard 1/16" to tightenthe covering - do not, howeverTail surfaces come next; both sq. strips: fit in the notches and cement apply any clear dope until later.stabilizer and rudder are of similar fast. From the cabin back stringers are Prepare to assemble parts byconstruction. Make complete frames using cemented directly to the sides of the under completing the fuselage. Cut a windshield1/16" sheet outlines, 1/16" x 1/8" strips for frame. Center section ribs, cut from 1/16" pattern from writing paper by the trial and spars and 1/16" sq. pieces for ribs. When sheet, are shown: two are needed with a error method; note the windshield extends dry, remove frames from the jigs and add third center cut as shown by the broken over the center section to the first1/16" sq. strips to every side of each rib. lines. Cement them to top longerons, crossmember. Once the pattern fitsThe ribs are later cut and sanded to against the inner edge leaving a 1/32" perfectly cut from celluloid and attachstreamline shape indicated. Taper leading ledge on which to later rest the wing with cement. The landing gear fill-in was and trailing edges to match the ribs. panels. Finish around the cabin by adding made previously and is cemented to theTo obtain fine flights from any the wedge-shaped pieces. The curved back wires. Cover the whole landing gear withflying scale model the propeller must be windows are cut from 1/16" sheet. tissue. The center landing struts areefficient. Select a hard block of proper Cover the nose with soft1/32" rounded bamboo splints with streamlinedimensions and cut the blank to shape sheet, but before installing remove the balsa covers at the top, representing shockshown. Drill the tiny hole for the propabsorber covers. Cement the bamboo to outlines, etc., etc., are all made with along the wing chord. Add weight to the the bottom of the struts but not the top so colored tissue. Tail wheel and similar nose if necessary to obtain this balance, they can spring apart. Wheels can be made parts are made from balsa scraps. since only minor, adjustments are made by from laminated discs of balsa or may be Additional details can be found on photos warping tail surfaces. Glide the model purchased. Cement bearings to the sides of of the big "grasshoppers" for those over deep grass making any further the wheels so they will revolve smoothly interested in reproducing every item. adjustments for a good glide. then place on the axles and hold in place Naturally any uncolored wood parts Power flight adjustments are with a drop of solder. should be doped to match the color made by off-setting the thrust line. Start Care must be exercised when scheme. with just a few turns - then use more assembling the surfaces to the fuselage to Bend the propeller shaft power as justified. Placing a sliver of wood keep everything in perfect alignment. First from .040 music wire. Slip the nose plug, between the tip of the nose plug and the cemet stabilizer to place; it is parallel to several washers and prop on the shaft in nose tilts the thrust line down, helping to the work bench. A tissue fillet is placed that order, then bend the shaft end as iron out stalls under power. Right or left from fuselage to stabilizer before the required for the free-wheeler. thrust helps to control the circles. rudder is set in position. Off-set the rudder Once the "bugs" that usually about 1/16" for a right circleglide. Wing show up in first tests are eliminated, use a FLYING - Depending on thetips must be dihedraled about 1-1/2" for mechanical winder to get maximum turns finished weight of the model, ten or twelve proper stability. Be sure to attach the and power from the rubber motor. Take strands of 1/8" brown rubber is requiredwings firmly. Wing struts are shown; care where you launch your for power. Lubricate the strands, hookassemble and color before cementing to "grasshopper," for the top of a tree or the them on the prop shaft and then drop theposition. The entire model is now given side of a building is hardly a suitable other end through the fuselage. As shown,one or two coats of clear dope. landing field; you have quite an a bamboo pin holds the motor in the rear.There are numerous minor details investment of time and effort in your If necessary, remove a small section ofadded to improve appearance. For the Taylorcraft - protect it with good covering to aid in getting the motor inmore ambitious builder the four - cylinder judgment. position.engine offers plenty of possibilities for The Taylorcraft "grasshopper" VICTORYdetail. Insignia, letters, control surface should balance at a point about 1/2 backA large high pitch prop gives it. long duration Scanned from April 1942Model Airplane NewsbyGarry T. Hunter。

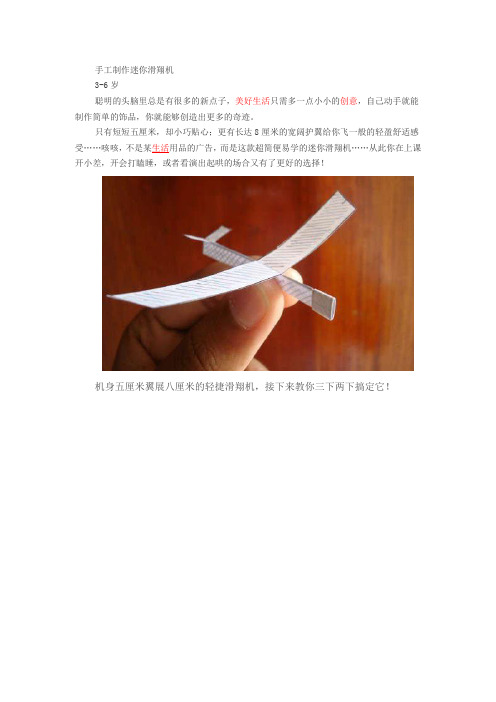
手工制作迷你滑翔机
3-6岁
聪明的头脑里总是有很多的新点子,美好生活只需多一点小小的创意,自己动手就能制作简单的饰品,你就能够创造出更多的奇迹。
只有短短五厘米,却小巧贴心;更有长达8厘米的宽阔护翼给你飞一般的轻盈舒适感受……咳咳,不是某生活用品的广告,而是这款超简便易学的迷你滑翔机……从此你在上课开小差,开会打瞌睡,或者看演出起哄的场合又有了更好的选择!
机身五厘米翼展八厘米的轻捷滑翔机,接下来教你三下两下搞定它!
●画出如图所示的图样。
这真是个对材料工具没有一点要求的项目,你可以看到纸张用的也是普通的簿子,图纸也是纯手绘……
●按照图样裁剪,并准确对折。
●用胶水粘合机身。
●把机头上的那条用于平衡重量的纸条绕着机身卷起来。
●你已经搞定了!请时刻记得,这架滑翔机对于一点点微弱的风都非常的敏感。
是的,邻座打一个喷嚏,可能它就欢乐地奔讲台上那位去了!
●现在你就可以按照相同的比例制作出属于你自己的各种尺寸的滑翔机了。
要设计出优秀的滑翔机.。

电动模型滑翔机的制作与飞行电动模型滑翔机的制作与飞行 1.制作工具与材料的准备;(刘辰昊)2.模型图纸;(刘辰昊)3.制作过程;(牛培行)4.模型的试飞与调整;(陈晨)一( 制作工具与材料的准备1. 工具502胶AB胶钢尺美工刀手术刀斜口刀台钳砂纸板2. 材料1mm桐木片,1.5mm桐木片,2mm桐木片,3mm层板,5mm层板,8*5mm桐木条,5*3mm松木条(可用桐木条代替),Ф4mm竹棒,Ф5mm竹棒二. 模型图纸三. 制作流程与注意事项1. 机翼的制作制作构架式机翼前,要先预备一个比机翼尺寸稍大的平面作为制作机翼的基准面,以确保两个机翼迎角相等,否则两个机翼迎角不一样,在空中产生的升力也会相差很大,轻则需要频繁打副翼补偿,重则无法控制,甚至不能起飞。
(1) 切割翼肋好的翼型是保证飞机性能良好的重要因素,所以翼肋的形状要保持完整,和翼型数据基本吻合。
首先,要制作翼型的模板。
先把图纸上翼根处的翼型完整的画在一块层板上,再用锯子按照画好的形状大致锯下来,然后用锉子和砂纸板按照绘制的翼型线进行精加工。
加工好的翼型应该和图纸上的翼型吻合。
这就是翼根模板。
接下来按照同样方法制作一块翼尖模板。
翼根模板和翼尖模板制作好后,把它们重叠在一起。
要保证两个翼型的翼弦线平行,两个模板的相对前后位置也要都要和图纸上的位置一样。
然后在模板合适的两个位置用1~2mm的细钻头分别钻一个孔。
接下来准备一些尺寸比翼肋稍大些的桐木片,尺寸不用很精确,但数量要和翼肋数相等,而且还要注意木纹的方向要和翼弦方向平行,这样翼肋不仅强度好,还利于加工。
把准备好的桐木片夹在两块模板之间,再用钻头按照模板上孔的位置钻出孔来。
找两根直径与孔相同的铁丝,连同模板一块从钻好的孔中穿过,夹在台钳上,然后就可以进行翼肋的加工了。
首先用斜口刀把多出模板边缘一到两毫米的木料削掉。
削制过程中要注意:刀子的前进方向要顺着木纹,如果逆着木纹的话,会造成木料开裂,如果裂纹进入被加工的部件范围之内,那么整个部件就会报废。
最近看到有几架可爱的自製小飞机(翼展大慨只有60CM),珍珠版翼面,370马达直驱(有红色散热片),速度非常快,据说飞起来非常稳定,抗风性又佳,便宜又简易,自己也想DIY 一下,不知各位是否有设计图,或是把照片POST上来,以造福飞友本帖是关于遥控飞机制作原理方面的知识,如果您需要模型飞机图纸及制作资料,可以在本版块(模型图纸)查找,这里向您提供上万张的遥控飞机制作图纸及大量的制作资料。
主翼使用1mm珍珠板及5x8mm木条製成,机身与安定面為3mm珍珠板,全配重约220~230g 300直驱马达+4025桨(也可使用4040桨,很猛但也很伤电池)+7.4V 1800 mA鋰电DIY小飞机製作目前作品概述:机身长度:35cm机翼:宽10cm 长45cm全配重:225g马达:350桨:4x2.5电池:7.4 1800速度概况:极佳无动力滑翔降落:平稳马达是用束带直接绑在木棒上电池由下方放入照片二1. 1mm珍珠版2.肋版间隔5CM,肋版下面使用双面胶,上面使用速乾型保丽龙胶(可用环氧树脂)3.下面加3mm炭纤棒,以(可使用木条代替)4.下缘使用1mm巴尔沙木加双面胶带。
原机的副翼控制是装在上方,我改為下方这是完成后的图片看看多重全配约45g此机「蚊子60」个人认為不太适合初学者。
製作机身1.接合部份使用双面胶带2.使用有顏色的「四*胶带」补强及造型3.放电池的地方加投影片补强机身组合完成1.马达使用束带绑住2.控製為升降及副翼3.马达有下偏角完成了!1.蚊子机身2.蚊子机翼3.蚊子发射机这样小小一台,走到那里带到那里!又不容易被发现组合起来的样子不含电池全部重量90CM版本,放大1.5倍。
1.全重(不含电池):300g2.动力:protime无刷+G牌400B组+9070翼展90cm,可飞得好慢好慢喔!昨天利用上班前的时间小飞一下。
小蚊子在低空中,一个不小心就狠狠的摔下,当场机身断成两截。
今天利用时间重做机身,顺便小改版一下。