
10-MDV多联机安装
- 格式:ppt
- 大小:33.42 MB
- 文档页数:114

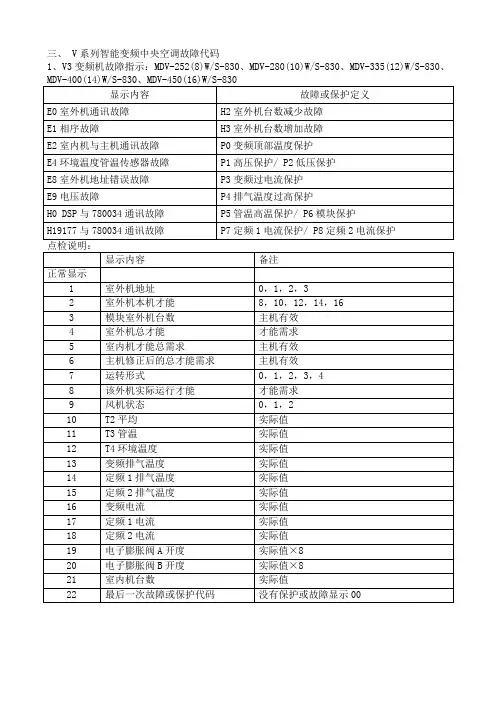


三、 V系列智能变频中央空调故障代码1、V3变频机故障指示:MDV-252(8)W/S-830、MDV-280(10)W/S-830、MDV-335(12)W/S-830、显示内容故障或保护定义E0室外机通讯故障H2室外机台数减少故障E1相序故障H3室外机台数增加故障E2室内机与主机通讯故障P0变频顶部温度保护E4环境温度管温传感器故障P1高压保护/ P2低压保护E8室外机地址错误故障P3变频过电流保护E9电压故障P4排气温度过高保护H0 DSP与780034通讯故障P5管温高温保护/ P6模块保护H19177与780034通讯故障P7定频1电流保护/ P8定频2电流保护显示内容备注正常显示1 室外机地址0,1,2,32 室外机本机能力8,10,12,14,163 模块室外机台数主机有效4 室外机总能力能力需求5 室内机能力总需求主机有效6 主机修正后的总能力需求主机有效7 运转模式0,1,2,3,48 该外机实际运行能力能力需求9 风机状态0,1,210 T2平均实际值11 T3管温实际值12 T4环境温度实际值13 变频排气温度实际值14 定频1排气温度实际值15 定频2排气温度实际值16 变频电流实际值17 定频1电流实际值18 定频2电流实际值19 电子膨胀阀A开度实际值×820 电子膨胀阀B开度实际值×821 室内机台数实际值22 最后一次故障或保护代码没有保护或故障显示002、V4直流变频机故障指示:MDV-252(8)W/DSN1-840 、MDV-280(10)W/DSN1-840、MDV-335(12)W/DSN1-840、MDV-400(14)W/DSN1-830、MDV-450(16)W/DSN1-830显示故障或保护定义备注E0 室外机通讯故障仅主机显示E1 相序故障E2 室内机与主机通讯故障E4 环境温度管温传感器故障E8 室外机地址错误故障E9 电压故障H0 IR341与780034通讯故H1 9177与780034通讯故障H2 室外机台数减少故障仅主机显示H3 室外机台数增加故障仅主机显示H4 30分钟内出现3次P6保护不能自动恢复H7 内机减少故障检测到最大台数10秒消失P0 变频顶部温度保护P1 高压保护P2 低压保护P3 变频过电流保护P4 排气温度过高保护P5 管温高温保护P6 模块保护P7 定频1电流保护P8 定频2电流保护L0 模块故障故障灯以5HZ闪8下L1 直流母线低电压保护故障灯以5HZ闪9下L2 直流母线高电压保护故障灯以5HZ闪10下L3 故障灯以5HZ闪11下L4 故障/同步/闭环故障灯以5HZ闪12下L5 零速度保护故障灯以5HZ闪13下L6 故障灯以5HZ闪14下L7 相序错误保护故障灯以5HZ闪15下L8 前一时刻和后一时刻速度变>15Hz保护故障灯以5HZ闪16下化>15Hz保护L9 设定速度和实际运转速度差>15Hz保护故障灯以5HZ闪17下3、V4+全直流变速中央空调室外机故障指示:MDV-252(8)W/DSN1-840(A)、MDV-280(10)W/DSN1-840(A)、MDV-335(12)W/DSN1-840(A)、MDV-400(14)W/DSN1-830(A)、显示故障或保护定义备注E0 室外机通讯故障仅从机显示E1 相序故障E2 室内机与主机通讯故障初次上电20分后或20分后内外通信中断2分以上E3 保留E4 T4传感器故障E5 保留E6 保留E8 室外机地址错误显示故障或保护定义备注E9 保留H0 IR341与780034通讯故障H1 0537与780034通讯故障H2 室外机台数减少故障仅主机显示H3 室外机台数增加故障仅主机显示H4 30分钟内3次P6保护不能恢复H5 30分钟内3次P2保护H6 100分钟内3次P4保护H7 内机减少故障内机丢失3分钟以上不可恢复直到恢复台数H9 风机或风机模块保护第三次P9后,需要掉电才能恢复显示故障或保护定义备注P0 变频顶部温度保护P0P1 高压保护P1P2 低压保护30分钟内出现3次P2保护不能恢复P3 变频过流保护P4 排气温度过高保护100分钟内出现3次P4保护不能恢复P5 管温高温保护P6 模块保护30分钟内出现3次P6保护,不能恢复P7 定频1电流保护P8 定频2电流保护P9 风机模块保护L0 模块故障故障灯以5HZ闪8下L1 直流母线低电压保护故障灯以5HZ闪9下显示故障或保护定义备注L2 直流母线高电压保护故障灯以5HZ闪10下L3 故障灯以5HZ闪11下L4 MCE故障/同步/闭环故障灯以5HZ闪12下L5 零速度保护故障灯以5HZ闪13下L6 故障灯以5HZ闪14下L7 相序错误保护故障灯以5HZ闪15下L8 前一刻和后一刻速度变化>15HZ故障灯以5HZ闪16下保护故障灯以5HZ闪17下L9 设定速度和实际运转速度差>15HZ保护MDV-252(8)W/DSN1-840i(A)、MDV-280(10)W/DSN1-840i(A)、MDV-335(12)W/DSN1-840i(A)、MDV-400(14)W/DSN1-830i(A)、MDV-450(16)W/DSN1-830i(A)、MDV-500(18)W/DSN1-910i(A)、显示故障或保护定义备注E0 室外机通讯故障仅从机显示E1 相序故障E2 室内机与主机通讯故障E3 保留E4 T4温度传感器故障E5 保留E6 保留E7 冷媒过多保护E8 室外机地址错误E9 保留H0 IR341与780034通讯故障H1 0537与780034通讯故障H2 室外机台数减少故障仅主机显示H3 室外机台数增加故障仅主机显示H4 30分钟内出现三次P6保护H5 30分钟内出现三次P2保护H6 100分钟内出现三次P4保护H7 内机减少故障直到检测台数最多为止H8 排气压力传感器故障H9 风机或风机模块故障第三次P9显示需掉电恢复P0 变频顶部温度保护P1 高压保护P2 低压保护P3 变频过流保护P4 排气温度过高保护P5 管温高温保护P6 模块保护P7 定频1电流保护P8 定频2电流保护P9 风机模块保护L0 模块故障L1 直流母线低电压保护L2 直流母线高电压保护L3L4 MCE故障/同步/闭环L5 零速度保护L6L7 相序错误保护L8 前一刻和后一刻速度变化>15HZ保护L9 设定速度和实际运转速度差>15HZ保护显示内容故障或保护定义——待机压缩机运行频率正常运行dF 化霜P1 高压保护P2 低压保护P3 压缩机电流保护P4 压缩机排气温度保护P5 室外冷凝器高温保护P6 模块保护E1 相序错误E2 室内外机通信故障E3 室外变频通信故障E4 室外温度传感器故障E5 电压保护E6 水位报警故障6、MDV-280W/BS点检代码故障内容99 线控制器接线端子A0 出口温度传感器 (TD1) 回路。

Virtual Switch Ignore AC In this lesson you will learn how you can set up a Multi to selectively ignore the grid toprioritise solar energy over the grid. This feature is called AC ignore. The system will run in off-grid mode most of the time and will only let grid in when thebatteries are empty or when the AC load is too big.IntroductionIn this lesson you will learn how you can set up a Multi* to selectively ignore the grid. This feature can be used to prioritize solar energy over the grid. This feature is called AC ignore.The AC ignore function can be set up so that the Multi will disconnect from the grid when the batteries are full enough and/or the AC load is not too big. The Multi will disconnect from the grid most of the time. It will only let the grid in when the batteries are empty or when you are running a big AC load. You now can use the grid like you would use a back-up generator.The mechanism behind the AC ignore function is the opening or closing the Multi’s internal AC input relay.This feature in not enabled by default. To set it up you will need to change settings in the Multi. This is done by connecting a computer to the Multi and using VE.Configure 3 software.* In this lesson Multi can mean any of our inverter/chargers like the Multiplus, MultiGrid, Quattro and EasySolarThe AC input relayHow can a Multi ignore the grid?If you look at the internal wiring diagram of a Multi you will see that it has a relay on the ACinput. This relay is called “AC input relay”. In some of our documentation the relay is calledthe “back-feed relay”.The normal function of this relay is to open as soon as the grid or generator is not there. For example, during a blackout or when a generator is off. This is a safety action. The relay prevents energy feeding into the grid during a blackout or when the generator is off.This relay can also be setup to purposefully ignore the grid. It will still perform its normal safety action but it can open and disconnect from the grid under more situations. It can ignore the grid when the batteries are still full enough. Now DC solar power can be prioritized and the grid will be used like a backup generatorWhen can the grid be ignored ?The AC input relay can be programmed to selectively ignore the grid, while looking at two parameters:It can look at battery voltage and/or at AC load parameters. (Further in this lesson we will explain these parameters in more detail.)The grid is ignored when the batteries are full enough. The grid is let in when the batteries are empty•This setting can be used to charge the batteries from the grid should the batteries get too empty. This can occur, for example, at night or during a long period of bad weather.•In this scenario the Multi will look at the battery voltage. It will let the grid in when the battery voltage is too low, for a certain amount of time. It will ignore the grid as soon as the battery voltage has increased above a certain level, for a certain amount of time.•The multi can also disconnect the grid on battery state of charge.The grid is ignored when the AC loads are low. The grid is let in when the AC loads are high•This setting can be used to allow grid in when the AC load is higher than the Multi rating . This will prevent the Multi going into overload. This setting can also be used for large loads that you do not want to run from the battery.•In this scenario the Multi will look at the AC load. As soon as it sees that the load is above a certain level, for a certain amount of time, the Multi will let the grid in. The multi will stop letting the grid in as soon as it sees that the AC load has dropped below a certain level, for a certain amount of time.Installing and running VE.Configure 3In a Multi the “Ignore AC” feature is not enabled by default. This feature can only be enabled with a software program called VE.Configure 3. VE.Configure* is part of the VE Configuration tools package. This package is available free of charge from our website.Instructions:•Download the VE Configuration tools package from https:///support-and-downloads/software •Install the VE Configuration package on your Windows computer•The package will install a number of software programs on your computer. One of these software files is the VE.Configure software program.* In the rest of this lesson we will use the terminology VE.Configure instead of VE.Configure 3The next step is to connect your computer to the Multi. For this you will need hardware, like a cable and an interface. Please follow below instructions on how to do that.Please note, that it is also possible to run VE.Configure in demo mode. Demo mode can be used if you don’t have an actual Multi to connect to. For demo mode instructions see page 8.Required items:• A MK3-USB interface (The older MK2-USB can also still be used)See: https:///accessories/interface-mk3-usb• A RJ45 UTP cableSee: https:///cables/rj45-utp-cableTo connect a Multi to a computer:•Disconnect the CCGX or Venus GX from the Multi (if present)•Connect the MK3-USB interface to a USB port on your computer•Connect the MK3-USB interface to a RJ45 UTP cable•Connect the other side of the RJ45 UTP cable to one of the RJ45 connectors in the Multiplus. It does not matter which one of the connectors you use.RJ45connectorsNow you need to make VE.Configure connect to the Multi. This is how to do that: Instructions•Open VE.Configure on your computer•Click on the [Port Selection] menu•Select [Com port]•Then select [Auto detect]•VE.Configure finds the Multi, connects to it and will retrieve the settingsYou can also run VE.Configure in “demo mode”. Demo mode allows you to practice configuration without the need to connect to an actual Multi. This is especially handy if you want to follow this lesson and you don’t have an actual Multi nearby. Use the demo mode to configure a “virtual” unit.To enter “demo mode”:•Click on the [Port Selection] menu•Select [Fake target with full options].•Select the unit of your choiceIt is also possible to view and/or make changes to a previously saved VE.Configure file.In that case:•Click on the [Port Selection]menu•Select [Fake target from file]TIP:To change the VE Configure language:•Click on the [Options] menu•Select [Language]•Select [check online for language]•Choose your preferred language.It is good practice to always save the Multis existing settings before making any changes to the settings.Thi s useful in case you need the initial configuration.Instructions:•Click on the [Get settings] button•Wait for the settings to be retrieved•Then click on the [File]menu•Select [Save settings]• A file containing the settings will be savedIt is also possible to load settings from an earlier saved file. Instructions:•Click on the [File] menu•Select [Load settings]•You will be asked which file you want to load•Click on the [Send settings]buttonProgramming AC ignore settings To program the AC ignore settings you will have to go to the “Virtual switch” tab in VE. Configure.Virtual switch (VS) is the part of VE.Configure where youcan make advanced settings. Like driving the programmable relay or set up Ignore AC.First you need to select what function you want Virtual switch to perform. In this case you want to choose “Ignore AC.”Instructions:•Go to the [Virtual switch]tab•Go to the [Usage] tab•Select the [dedicated ignore AC input] optionIn the “Ignore AC” tab you can specify the battery voltageInstructions:•Go to the [Ignore AC input] tabHint:When a time of -1 second is chosen, the condition isdeactivated. The text is grey.Accepting grid on AC load conditionsThis setting can be used to allow grid in when the AC load is higher than the Multi rating. This will prevent the Multi going into overload. This setting can also be used for large loads that you do not want to run from the battery.In this example the grid will not be ignored when the load exceeds 4000 Watt for more than 30 seconds.Do not ignore AC input means that the grid is accepted because the AC input relay is closedThe grid will be ignored when the load drops below 2999 W for more then 2 minutes.Ignore AC means that the grid is ignored because the AC input relay is open.It is important to leave a significant time interval between connecting to and disconnecting from the grid. This is so the AC input relay does not open and close to frequently.Accepting grid on battery voltage conditionsThis setting can be used to charge the batteries from the grid shouldthe batteries get too empty. This can occur, for example, at night orduring a long period of bad weather.In this example, the grid is not ignored when the battery voltage isless than 47 Volt for 60 seconds.Do not ignore AC input means that the grid is accepted because theAC input relay is closed.The grid will be ignored again when the battery voltage exceeds 51 Volt for more than 3 minutes.Ignore AC means that the grid is ignored because the AC input relay is open.Apart from “battery voltage”, there are two other options to choose from: “bulk finished” or “absorption” finished”. Choosing “absorption finished” is a good way to ensure the batteries are getting a full charge every now and then. But it can lead to a higher electricity bill. The absorption charge stage of a lead-acid battery is much less efficient than the bulk stage. This could be a reason to choose the “bulk finished” option. At the end of the bulk charge stage a lead-acid battery is about 85% full.For more information about bulk and absorption please see the Victron Energy book “Energy Unlimited”, page 25. Follow this link: https://.au/orderbookAccepting grid on state of chargeIt is also possible to let grid in when the batteries fall below a certain state of charge.IMPORTANTIn a DC coupled solar system the “state of charge” option should only be used if you have a Color Control GX or Venus GX in the system. And the Color Control GX or Venus GX is connected to both the Multi and the MPPT solar charger(s) and/or a BMV battery monitor. In addition to this a setting needs to be made in the Color Control GX or Venus GX . See this link for more information:https:///live/ccgx:start#battery_state_of_charge_soc Instructions:•Go to the [General] tab in VE.Configure•Tick the [Enable battery monitor] tick box•Fill in the battery capacity•Fill in the charge efficiency. This should be around 0.8 for lead-acid batteries •Then go to the [Virtual switch] tab•Go to the [Ignore AC input] tab•F ill in state of charge lower than 50% (for lead acid batteries)100% self-consumption by disabling the charge functionality of the MultiIt can be quite expensive to charge the batteries from the grid. Lead-acid batteries have a low charge efficiency. About 20% of the energy used to charge the batteries is lost in the form of heat. Some installers therefore prefer to disable the charger functionality of the Multi.When the charger functionality is disabled and the Multi is accepting the grid, it will supply the loads with grid power, but will not charge the batteries. The batteries will only receive charge from the MPPT charge controllers. In this type of system it is very important to have a large enough solar array. It also important that the Ignore AC battery voltage settings are set higher than you would do normally. This is to make sure that the battery has some extra charge left should there be blackout.Instructions:•Go To the [charger] tab•Untick the [Enable charger] tick box•Go to the [Virtual switch] tab•Go to the [Ignore AC input] tab•Increase the [when Udc lower than] valueWARNINGIncorrect system design can cause battery damageDisabling the charger is only recommended in systems thathave excess solar power.If the batteries get empty during the night, the systemcannot be recovered unless you connect an external batterycharger.Low battery voltage inverter shutdownThe “DC input low shut-down voltage” parameter is the battery bank voltage at which below the inverter will stop operating. This feature protects the battery bank from becoming to deeply discharged. If this value is set too low, the batteries will get discharged too deeply and they will get damaged. This will reduce the lifetime of the batteries.By default the Multi is set at a very low “DC input low shut-down” voltage. You should this value in VE.Configure. This so the batteries are better protected. We advice to set this voltage to 44V (for a 48V battery bank*). When you change the “DC input low shut-down” voltage, the “DC input low restart” voltage will automatically increase. T herefore you will need to reduce this voltage again. Set the “DC input low restart” voltage to 4V above the shut down voltage.Instructions:•Go to the [Inverter] tab•Set [DC input low shut-down] to 44V•Set [DC input low restart] to 48V•Set [DC input low pre-alarm] to 45V* For a 24V system divide these voltages by 2 and for a 12V system divide these by 4.Finished programmingWhen you have completed the VE configure settings, you will need to send those settings to the Multi. You can do this byclicking the “send settings” button.It is good practice, to also save a copy of the setting to your computer. This way you will always have a record of the settings you have made for your customer.To save the s ettings on your computer:•Go to the [File] menu•Click on [Save Settings]VE Configure 3 tutorialShould you want to learn more about VE. Configure, we have an instruction video available from our website. The video is in English, but subtitles are available for many other languages.This is the link: https://youtu.be/V1Zceq02vMAAssistants -Advanced AC ignore functionalityIt is also possible to use “Assistants” to program advanced AC ignore situations. For example AC ignore by looking at state of charge values from a BMV battery monitor. However, in this lesson we purposefully decided to just explain the AC ignore settings via Virtual switch to be used in simple systems.“Assistants” are more complex to set up or to program. For example “Assistants” are only possible after a firmware update of the Multi. For those of you that want to find out more about ‘Assistants” please contact you Victron Distributor. Warning and disclaimerThe only aim of this lesson is to help you to understand the basic principles of a Victron Energy system that selectively connects to the grid. We will not be held responsible in case of damages caused by inappropriate installation of our products.•Please be aware that incorrect grid ignore settings can discharge batteries too far and can cause irreparably battery damage.•Read and understand the safety warnings published in the product manuals.•Professional advice and instruction should always be sought before commencing any electrical work.•Electrical installations and installation work must always be compliant with the local standards and authority requirements.SummaryIn this lesson you have learned how you can set up a Multi to selectively ignore the grid, so solar energy will be prioritised over the grid. This feature is called “AC ignore”.The following was explained:•The mechanics behind the AC ignore feature•The criteria when to ignore the grid•How to download, setup and connect VE.Configure•How to program the AC ignore settings into the Multi by using VE.ConfigureEnergy. Anytime. Anywhere.。