mt7681SDK编译
- 格式:doc
- 大小:1.88 MB
- 文档页数:3
在opt文件夹下建立一个名为SDK4320的文件夹,为的是方便以后增加其他包的时候不混将MediaTek_ApSoC_SDK_4320_20150414.tar.bz2包复制到opt下的SDK4320,使用#tar jxvf 命令进行解压/opt/SDK4320# tar jxvf MediaTek_ApSoC_SDK_4320_20150414.tar.bz2。
1、Install toolchain将buildroot‐gcc463_32bits.tar.bz2复制到opt下后,回到opt下使用tar jxvf进行解压 # cp RT288x_SDK/toolchain/buildroot‐gcc463_32bits.tar.bz2 /opt#tar jxvf buildroot‐gcc463_32bits.tar.bz2解压mips‐2012.03.tar.bz2到opt下# cp RT288x_SDK/toolchain/ mips‐2012.03.tar.bz2 /opt#tar jxvf mips‐2012.03.tar.bz22、install LZMA Utility进入到SDK4320/RT288x_SDK/toolchain/,解压lzma‐4.32.7.tar.gz进入到lzma‐4.32.7 下,输入下面的指令#./configure#make#make install3、install mksquashfs utilityMT7628使用的是2.6.36的内核,所以选择3.2版本进入toolchain/mksquash_lzma‐3.2,输入下面的指令#make#make install返回上一级 cd .. ,在toollchain下会看到squashfs4.2.tar.bz2,进行解压以下好像只有用到3.10.14的内核时才会用到,可以不理会,#tar jxvf squashfs4.2.tar.bz2#cd squashfs4.2/squashfs‐tool#make#cp mksquashfs/opt/buildroot‐gcc342/bin/mksquashfs_lzma‐4.24、配置Uboot平台进入到Uboot文件下,输入make menuconfig,如果是在root下,就直接输入,如果 不是在root下,就使用sudo make menuconfig。

Get Started with the Intel® oneAPI DPC ++/C++ CompilerGet Started with the Intel® oneAPI DPC++/C++ CompilerContentsChapter 1: Get Started with the Intel® oneAPI DPC++/C++ Compiler Get Started on Linux* (4)Get Started on Windows* (7)Compile and Execute Sample Code (10)2Get Started with the Intel® oneAPI DPC++/C++ Compiler 1The Intel® oneAPI DPC++/C++ Compiler provides optimizations that help your applications run faster onIntel® 64 architectures on Windows* and Linux*, with support for the latest C, C++, and SYCL languagestandards. This compiler produces optimized code that can run significantly faster by taking advantage of the ever-increasing core count and vector register width in Intel® Xeon® processors and compatible processors.The Intel® Compiler will help you boost application performance through superior optimizations and SingleInstruction Multiple Data (SIMD) vectorization, integration with Intel® Performance Libraries, and byleveraging the OpenMP* 5.0/5.1 parallel programming model.The Intel® oneAPI DPC++/C++ Compiler compiles C++-based SYCL* source files for a wide range ofcompute accelerators.The Intel® oneAPI DPC++/C++ Compiler is part of the Intel® oneAPI Toolkits.Find MoreNotices and DisclaimersIntel technologies may require enabled hardware, software or service activation.No product or component can be absolutely secure.31 Get Started with the Intel® oneAPI DPC++/C++ CompilerYour costs and results may vary.© Intel Corporation. Intel, the Intel logo, and other Intel marks are trademarks of Intel Corporation or its subsidiaries. Other names and brands may be claimed as the property of others.No license (express or implied, by estoppel or otherwise) to any intellectual property rights is granted by this document.The products described may contain design defects or errors known as errata which may cause the product to deviate from published specifications. Current characterized errata are available on request.Intel disclaims all express and implied warranties, including without limitation, the implied warranties of merchantability, fitness for a particular purpose, and non-infringement, as well as any warranty arising from course of performance, course of dealing, or usage in trade.Get Started on Linux*Before You BeginSet Environment VariablesBefore you can use the compiler, you must first set the environment variables by sourcing the environment script using the initialization utility. This initializes all the tools in one step.1.Determine your installation directory,<install_dir>:a.If your compiler was installed in the default location by a root user or sudo user, the compiler willbe installed under/opt/intel/oneapi. In this case, <install_dir> is /opt/intel/oneapi.b.For non-root users, your home directory under intel/oneapi is used. In this case,<install_dir> will be $HOME/intel/oneapi.c.For cluster or enterprise users, your admin team may have installed the compilers on a sharednetwork file system. Check with your local admin staff for the location of installation(<install_dir>).2.Source the environment-setting script for your shell:a.bash: source <install_dir>/setvars.sh intel64b.csh/tcsh: source <install_dir>/setvars.csh intel64Install GPU Drivers or Plug-ins (Optional)You can develop oneAPI applications using C++ and SYCL* that will run on Intel, AMD*, or NVIDIA* GPUs. To develop and run applications for specific GPUs you must first install the corresponding drivers or plug-ins:•To use an Intel GPU, install the latest Intel GPU drivers.•To use an AMD GPU, install the oneAPI for AMD GPUs plugin from Codeplay.•To use an NVIDIA GPU, install the oneAPI for NVIDIA GPUs plugin from Codeplay.Option 1: Use the Command Line®4Get Started with the Intel® oneAPI DPC++/C++ Compiler 1Invoke the compiler using the following syntax:{compiler driver} [option] file1 [file2...]For example:icpx hello-world.cppFor SYCL compilation, use the -fsycl option with the C++ driver:icpx -fsycl hello-world.cppNOTE When using -fsycl, -fsycl-targets=spir64 is assumed unless the -fsycl-targets isexplicitly set in the command.51 Get Started with the Intel® oneAPI DPC++/C++ CompilerIf you are targeting an AMD or NVIDIA GPU, refer to the corresponding Codeplay plugin get started guide for detailed compilation instructions:•oneAPI for AMD GPUs Get Started Guide•oneAPI for NVIDIA GPUs Get Started GuideOption 2: Use the Eclipse* CDTFollow these steps to invoke the compiler from within the Eclipse* CDT.Install the Intel® Compiler Eclipse CDT plugin.1.Start Eclipse2.Select Help > Install New Software3.Select Add to open the Add Site dialog4.Select Archive, browse to the directory <install_dir>/compiler/<version>/linux/ide_support,select the .zip file that starts with piler, then select OK5.Select the options beginning with Intel, select Next, then follow the installation instructions6.When asked if you want to restart Eclipse*, select YesBuild a new project or open an existing project.1.Open Existing Project or Create New Project on Eclipse2.Right click on Project > Properties > C/C++ Build > Tool chain Editor3.Select Intel DPC++/C++ Compiler from the right panelSet build configurations.1.Open Existing Project on Eclipse2.Right click on Project > Properties > C/C++ Build > Settings3.Create or manage build configurations in the right panelBuild a Program From the Command LineUse the following steps to test your compiler installation and build a program.e a text editor to create a file called hello-world.cpp with the following contents:#include <iostream>int main(){std::cout << “Hello, world!\n”;return 0;}pile hello-world.cpp:icpx hello-world.cpp -o hello-worldThe -o option specifies the file name for the generated output.3.Now you have an executable called hello-world which can be run and will give immediate feedback: hello-worldWhich outputs:Hello, world!You can direct and control compilation with compiler options. For example, you can create the object file and output the final binary in two steps:6Get Started with the Intel® oneAPI DPC++/C++ Compiler 1 pile hello-world.cpp:icpx hello-world.cpp -cThe -c option prevents linking at this step.e the icpx compiler to link the resulting application object code and output an executable:icpx hello-world.o -o hello-worldThe -o option specifies the generated executable file name.Refer to Compiler Options for details about available options.© Codeplay Software Limited. Intel, the Intel logo, Codeplay, Codeplay logo and other Intel marks are trademarks of Intel Corporation or its subsidiaries. Other names and brands may be claimed as the property of others.Get Started on Windows*Before You BeginSet Environment VariablesThe compiler integrates into the following versions of Microsoft Visual Studio*:•Visual Studio 2022•Visual Studio 2019•Visual Studio 2017NOTE Support for Microsoft Visual Studio 2017 is deprecated as of the Intel® oneAPI 2022.1 release and will be removed in a future release.For full functionality within Visual Studio, including debugging and development, Visual Studio Community Edition or higher is required. Visual Studio Express Edition allows only command-line builds. For all versions, Microsoft C++ support must be selected as part of the Visual Studio install. For Visual Studio 2017 and later, you must use a custom install to select this option.You typically do not need to set the environment variables on Windows, as the compiler command-line window sets these variables for you automatically. If you need to set the environment variables, run the environment script as described in the suite-specific Get Started documentation.The default installation directory (<install_dir>) is C:\Program Files (x86)\Intel\oneAPI.Install GPU Drivers (Optional)To develop and run applications for Intel GPUs you must first install the latest Intel GPU drivers.Option 1: Use the Command Line in Microsoft Visual Studio®71 Get Started with the Intel® oneAPI DPC++/C++ CompilerInvoke the compiler using the following syntax:{compiler driver} [option] file1 [file2...]To invoke the compiler using the command line from within Microsoft Visual Studio, open a command prompt and enter your compilation command. For example:icx hello-world.cppFor SYCL compilation, use the -fsycl option with the C++ driver:icx -fsycl hello-world.cpp8Get Started with the Intel® oneAPI DPC++/C++ Compiler 1 NOTE When using -fsycl, -fsycl-targets=spir64 is assumed unless the -fsycl-targets isexplicitly set in the command.Option 2: Use Microsoft Visual StudioProject Support for the Intel® DPC++/C++ Compiler in Microsoft Visual StudioNew Microsoft Visual Studio projects for DPC++ are automatically configured to use the Intel® oneAPI DPC+ +/C++ Compiler.New Microsoft Visual C++* (MSVC) projects must be manually configured to use the Intel® oneAPI DPC++/C ++ Compiler.NOTE .NET-based CLR C++ project types are not supported by the Intel® oneAPI DPC++/C++Compiler. The specific project types will vary depending on your version of Visual Studio, for example: CLR Class Library, CLR Console App, or CLR Empty Project.Use the Intel® DPC++/C++ Compiler in Microsoft Visual StudioExact steps may vary depending on the version of Microsoft Visual Studio in use.1.Create a Microsoft Visual C++ (MSVC) project or open an existing project.2.In Solution Explorer, select the project(s) to build with the Intel® oneAPI DPC++/C++ Compiler.3.Open Project > Properties .4.In the left pane, expand the Configuration Properties category and select the General propertypage.5.In the right pane change the Platform Toolset to the compiler you want to use:•For C++ with SYCL, select Intel® oneAPI DPC++ Compiler.•For C/C++, there are two toolsets.Select Intel C++ Compiler <major version> (example 2021) to invoke icx.Select Intel C++ Compiler <major.minor> (example 19.2) to invoke icl.Alternatively, you can specify a compiler version as the toolset for all supported platforms andconfigurations of the selected project(s) by selecting Project > Intel Compiler > Use InteloneAPI DPC++/C++ Compiler.6.Rebuild, using either Build > Project only > Rebuild for a single project or Build > RebuildSolution for a solution.Select Compiler VersionIf you have multiple versions of the Intel® oneAPI DPC++/C++ Compiler installed, you can select which version you want from the Compiler Selection dialog box:1.Select a project, then go to Tools > Options > Intel Compilers and Libraries > <compiler> >Compilers, where <compiler> values are C++ or DPC++.e the Selected Compiler drop-down menu to select the appropriate version of the compiler.3.Select OK.Switch Back to the Microsoft Visual Studio C++ CompilerIf your project is using the Intel® oneAPI DPC++/C++ Compiler, you can choose to switch back to the Microsoft Visual C++ compiler:1.Select your project in Microsoft Visual Studio.2.Right-click and select Intel Compiler > Use Visual C++ from the context menu.91 Get Started with the Intel® oneAPI DPC++/C++ CompilerThis action updates the solution file to use the Microsoft Visual Studio C++ compiler. All configurations of affected projects are automatically cleaned unless you select Do not clean project(s). If you choose not to clean projects, you will need to rebuild updated projects to ensure all source files are compiled with the new compiler.Build a Program From the Command LineUse the following steps to test your compiler installation and build a program.e a text editor to create a file called hello-world.cpp with the following contents:#include <iostream>int main(){std::cout << “Hello, world!\n”;return 0;}pile hello-world.cpp:icx hello-world.cpp3.Now you have an executable called hello-world.exe which can be run and will give immediatefeedback:hello-world.exeWhich outputs:Hello, world!You can direct and control compilation with compiler options. For example, you can create the object file and output the final binary in two steps:pile hello-world.cpp:icx hello-world.cpp /c /Fohello-world.objThe /c option prevents linking at this step and /Fo specifies the name for the object file.e the icx compiler to link the resulting application object code and output an executable:icx hello-world.obj /Fehello-world.exeThe /Fe option specifies the generated executable file name.Refer to Compiler Options for details about available options.Compile and Execute Sample CodeMultiple code samples are provided for the Intel® oneAPI DPC++/C++ Compiler so that you can explore compiler features and familiarize yourself with how it works. For example:Sample Project DescriptionOpenMP Offload Sample The OpenMP* Offload sample demonstrates someof the new OpenMP Offload features supported bythe Intel® oneAPI DPC++/C++ Compiler.10Get Started with the Intel® oneAPI DPC++/C++ Compiler 1 Base: Vector Add Sample The Vector Add sample is the equivalent of a 'Hello,World!' sample for data parallel programs. Buildingand running the code sample verifies that yourdevelopment environment is set up correctly anddemonstrates the use of the core features of DPC++.Matrix Multiply Sample The Matrix Multiply sample is a simple program thatmultiplies together two large matrices and verifiesthe results. This program is implemented in twoways: Using Data Parallel C++ (DPC++) and usingOpenMP (OMP).Adaptive Noise Reduction Sample The Adaptive Noise Reduction sample is a DPC++reference design that demonstrates a highlyoptimized image sensor adaptive noise reduction(ANR) algorithm on an FPGA.Next Steps•Use the latest oneAPI Code Samples and follow along with the Intel® oneAPI Training Resources.•Explore the Intel® oneAPI DPC++/C++ Compiler Developer Guide and Reference on the Intel® Developer Zone.11。

Version:0.02Release date: 2014‐5‐17© 2014 MediaTek Inc.This document contains information that is proprietary to MediaTek Inc.Unauthorized reproduction or disclosure of this information in whole or in part is strictly prohibited.Specifications are subject to change without notice.MT7681 IoT FAQM ed i at ek Co nf i d e n t i a lRevision History Date Revision Author Description04.12.2014 First v0.01 Jinchuan Initial draft for MT7681 IoT FAQ 05.17.2014 V0.02 JinchuanM ed i at ekC on fi de n ti alContents 1Source Code Compile....................................................................................................................................................5 1.1 How to Setup AndeSight SDK............................................................................................................................5 1.2 How to create new project in AndeSight / How to import MTK7681 SDK to AndeSight..................................5 1.3 How to compile source code for Recovery FW , Sta FW, AP FW......................................................................6 1.4 SDK 编译后生成ap ,sta ,recovery ,all 等文件,哪个文件才是我最终要烧录的,..................................6 1.5 Compile Source Code fail ‐‐ .BSS is not within region SRAM. (6)2FW Upgrade...................................................................................................................................................................6 2.1 FW upgrade method.. (6)2.2 How to change AP mode and Station Mode (6)2.3 Why there is a Recovery Mode (7)2.4How to set recovery mode duration (7)3 APK Install and usage....................................................................................................................................................8 3.1手机安装IoTManager_v0.94_1_android4.0.apk ,显示是“解析包时出现问题” (8)4 System Coding...............................................................................................................................................................8 4.1 Printf_High() /DBGPRINTF_HIGH() 输出LOG 的开关........................................................................................8 4.2 flash 分区里reserved 的区域有没有其他特殊用途?可不可以拿来保存一些数据.....................................8 4.3 打开 CFG_SUPPORT_TCPIP 宏使用AT 命令的TCP 功能。
福州瑞芯微电子有限公司RK2808_ANDROID-SDK_V1.3.1_010316 版本说明 (1)1修改记录 (2)1.1内核 (2)1.2Android (2)2功能配置说明 (3)2.1 内核 (3)2.1.1 内核配置方法 (3)2.1.2具体功能配置: (3)2.2 Android (4)3. 源码编译 (5)3.1 内核 (5)3.2 Android (5)3.2.1编译前预处理 (5)3.2.2编译Android代码 (6)3.2.3编译后处理(烧写) (6)1.1内核l加入Atheros AR6102驱动支持l为适应HDMI,更改了scu,timer。
l更新SD卡部分l解决二级睡眠无法唤醒l加入HDMI支持l加入触摸屏校正支持(XPT2046)l加入camera支持l初始化时将DSP频率从500MHZ更改为550MHZl加入TvOut支持1.2 Androidl加入HDMI支持l解决DSP解析图片出错的问题l录音优化l解决G-sensor的BUGl增加容量标签,将格式化与未格式化的分区分开l更新camera相关函数,照片保存在FLASH中l解决优盘拔出后导致USB无MOUNT窗口,更正flash-优盘拔插状态l加入触摸屏校正l解决MAC地址读取错误l改进bmp图像解码流程l加入wlan_loader 固件来支持Atheros AR6102 WLAN driverl更新录音程序。
l加入USB模式选择功能l加入WCDMA模式支持。
l加入TvOut支持l修正USB挂载与卸载操作逻辑l更新vold2.1 内核2.1.1 内核配置方法内核通过源码根目录下的.config实现功能配置,可选的config 文件放在arch/arm/configs 目录下:l rk2808sdk_slave.config 为SDK的USB SLAVE ONLY配置l rk2808sdk_host.config 为SDK的USB HOST ONLY配置l rk2808sdk_host_slave.config 为SDK的USB 的SLAVE和HOST配置系统默认的CONFIG为USB SLAVE ONLY配置,要更换CONFIG 文件后要用完成以下步骤后才能编译:l make cleanl cp arch/arm/config/….. .configl make menuconfig最后编译即可。
MT7681程序下载方式实例1.准备工作软件工具:SecureCRT烧写文件:MT7681 sta header.bin电脑USB转模块TTL串口线一条2 .下载步骤(仅供参考)1.)使用USB转TTL串口线连接电脑和模块,注意上电前只需连接模块的VCC GND和TXD三根有效线,切记要把串口线接正确。
不然可能会出现乱码。
2.)解压SecureCRT.zip文件夹,找到SecureCRT.exe并打开,设置后运行。
软件的设置主要在option菜单栏下设置。
其他的不用设置的,还有刚打开的时候背景颜色是黑色的(可能)这些是可以设置的。
刚开始的时候没有对话框,自己点击右下角,选择对话框,这样才可以发命令的。
然后可以鼠标停留在对话框的时候,可以拉动鼠标更改对话的大小。
最后新建一个连接如下: 点击快速连接或者(alt+q)出现如下对话框:注意画红色的部分,波特率,自己的串口号:3.)模块仅在开机4秒内处于Recovery模式,即受程序下载的模块,并且只能在此时间内接受升级指令。
所以建议操作前新建一个记事本文件准备好需要使用到的两条AT指令:AT#Reboot重启指令和AT#U pdateFW升级指令AlffQpdate™4.操作前确认SecureCRT软件能正确收到模块的串口输出的数据,为了保证快速有效的下载升级文件,请事先准备好需要下载的文件,建议复制到桌面文件夹(如复制到桌面MT7681_DOWNLOAD文件夹),方便查找下载。
这个根据个人习惯,找到最快找到文件的方法。
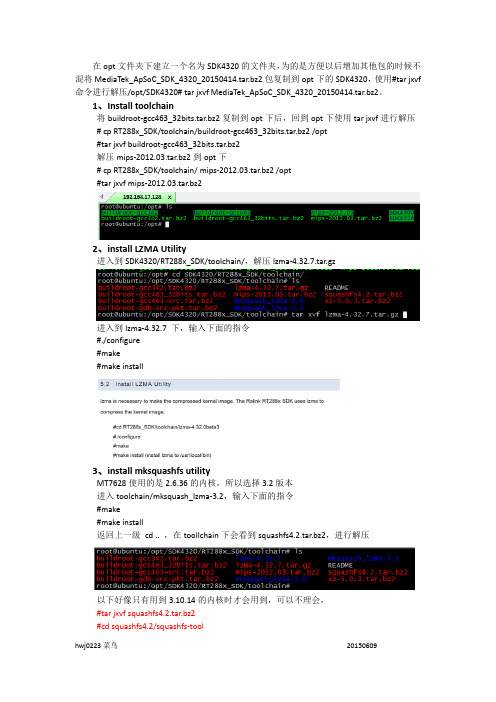
5.)下载文件准备妥当后,执行两步:首先发送AT#Reboot重启指令(发送区直接回车)(注意这个时候把按键按起,再发指令)让模块重新启动,然后在模块重启提示“ ==> Recovery Mode时迅速发送AT#U pdateFW升级指令,直到出现“ ccccC字符表示等待下载,实际操作截图如下:文如 Mm 直看湎述项口 件Km ■車冈 TAit) ,心辺D 打却-乙附3 葺痢t « -. 卜诂9 COM}负 Qg 了rhn\itk ]』』7 33 彌tbfl^asfcj4^/9S4a __ Sub^5ub-o &ub^44AJ9014492204j^9esoo4 5<M ;Se'4511055 ]4517?51 -4H3&4 945jyg0€5ul?=0Bub=m^uh=a 6. )模块进入等待下载模式后,选择“传输 ->发送Xmodem ”列",sub-oSH-0. : ■5^-1 . !HTdSkwraibcf 町曲riraskwraskSWT’i5*1=2 .:iSM 工I[臧慚则=> Recovery ”ode ccccam ■左槿肓世11。

文档版本 1.1发布日期2021/6/15TG7121B开发板快速上手手册目录1前言 (1)1.1文档目的 (1)1.2文档范围 (1)1.3预期读者 (1)1.4版本修订记录 (1)2开发板介绍 (2)2.1SOP16封装开发板 (2)2.2QFN32封装开发板 (3)3搭建开发环境 (4)3.1软件开发环境 (4)3.2烧录串口连接 (4)3.3J-Link调试 (4)3.4获取SDK (4)4应用开发 (5)4.1灯应用示例概况 (5)4.2编译灯应用示例 (5)4.3J-Flash烧录 (6)4.4串口工具烧录 (7)5例程运行 (7)5.1创建与配置产品 (7)5.2开发板上电运行 (7)5.3串口命令说明 (8)5.4配置调试日志 (9)6其他参考文档 (10)1 前言1.1 文档目的本文档介绍如何基于TG7121B开发板快速上手。
1.2 文档范围本文档适用于天猫精灵TG7121B芯片项目。
1.3 预期读者本文档适用的文档使用对象为使用天猫精灵TG7121B芯片的产品经理、软件开发人员。
1.4 版本修订记录表格1-1 版本修订记录2 开发板介绍请访问芯片开放社区TG7121B的芯片主页参考TG7121B开发板说明文档。
注意:PB14为启动选择,启动时,检测到高电平,进入串口烧录模式,否则进入正常模式。
2.1 SOP16封装开发板SOP16封装引脚定义:2.2 QFN32封装开发板QFN32封装引脚定义:3 搭建开发环境3.1 软件开发环境首先安装YoC开发环境。
TG7121B仅支持Linux开发环境。
安装和使用Linux开发环境请参考:•环境安装sudo pip install yoctools•YoCTools使用说明Yoctools会负责在编译时自动安装编译器。
3.2 烧录串口连接UART串口转接板的RXD Pin接芯片的PB00, TXD Pin接芯片的PB01, 3.3V接芯片的VDD,GND接GND。
Openwrt源码编译总结一、网上下载最新的openwrt源码,编译正常通过。
编译生成openwrt-ramips-mt76x8-mt7628-squashfs-sysupgrade.bin文件在mt7628开发板上uboot进行WEB页面强制升级:长按复位键,加电持续20秒,访问192.168.2.1升级系统页面,如下:使用编译的系统文件:串口输出:刷mt7628的固件:mt7628开发板Uboot乱码的问题:使用putty打开串口时波特率设置为117200mt7628开发板的flash分区:使用dd和mtd命令强制刷系统:dd if=/tmp/WT6271-2.21.0_181116-150835_unknown-flash.bin of=/dev/mtdblock5mtd erase firmwaremtd -r write /tmp/WT6271-2.21.0_181116-150835_unknown-flash.bin firmware测试重启系统启动不成功:正常启动:错误启动二、编译mtk原厂的openwrt-sdk网上下载openwrt---mtksdk-openwrt-3.10.14-20150311-d021c937.tar.bz2和mtk-openwrt-sdk-20151231-185ab215两个版本都可以编译通过。
在mt7628开发板刷生成的升级文件失败。
三、编译创凌智联的提供的源码源码为MTK原厂的openwrt-sdk源码,版本号为mtk-openwrt-sdk-20160324-8f8e4f1e.tar。
编译出错提示找不到sdk.version文件,解决方法是注掉/package/base-files/Makefile文件以下代码:编译完成可以正常生成相关系统文件,升级文件为openwrt-ramips-mt7628-mt7628-squashfs-sysupgrade.bin。