米家麦克风说明书
- 格式:docx
- 大小:37.22 KB
- 文档页数:2

纯麦u7pro说明书纯麦本身也是专门做这类配件的品牌,这款纯麦U7PRO麦克风一组有两支,很适合两个人用来对唱或者是PK,而且麦克风本身的操作特别简单,很容易上手,并且这款麦克风还有语音功能,可以通过语音来操作K歌应用,不需要再去找遥控。
这套麦克风的包装设计很简单,它是通过一个接收器来和电视等设备连接的,所以在使用时抗干扰能力更好,作为小米生态的产品,纯麦U7PRO麦克风很适合在小米和红米的电视上使用。
纯麦U7PRO麦克风机身为纯白色设计,看起来很干净,咪头外壳则是黑色。
主机外壳为塑料材质,咪头部分为金属材质,表面磨砂喷油处理,手感细腻防滑。
总长231mm,直径37.9mm,单支麦克风的重量非常轻巧,拿在手里的手感也很不错。
在日常使用中,纯麦U7PRO麦克风的咪头可以套上附带的海绵防喷罩,这个防喷罩同时也有防滑的作用,放在桌面上不容易掉落。
另外在日常使用中,这款麦克风戴上防喷罩之后,拾音效果也会更好一些,而且这款麦克风内置DSP微电脑处理芯片有效防止啸叫,并自带美音算法。
在纯麦U7PRO麦克风安装电池的位置,我们还可以找到一枚配对键,因为包装里的两支麦克风已经和接收器配对好了,所以这个按键用处不大,如果麦克风在使用中出现断连之类的问题,可以通过这枚按键重置一下。
现在很多的电子产品都会采用内置电池的设计,一旦电池没电,就需要花上不少时间等待充电,并不是很方便,而纯麦U7PRO 麦克风则是可拆卸电池的设计,使用的就是常见的5号电池,包装里已经预备好了4节电池,每支麦克风用两节,平时遇到没电的情况,直接换两节电池救恩那个满血复活,非常的方便,日常使用中,这款麦克风依靠两节5号电池,可以提供长达14小时的续航,唱上一整天都没什么问题。
在开始使用纯麦U7PRO麦克风之前,我们需要把它的接受器连接到电视上面,接收器上面的数据线比较长,所以连好之后很容易管理,上面也没有什么按键,不需要额外的操作,通过接收器上的LED灯,我们可以判断它的状态。

MX400SEGooseneck MicrophonesShure MX400SE Series miniature gooseneck-mounted electret condenser microphones online user guide. Version: 5 (2019-J)Table of ContentsMX400SEGooseneck Microphones3 General Description3 Model Variations 3 Interchangeable Cartridges 3 Snap-Fit Windscreen 5 Preamp Gain5RFI Filtering5 Microphone Placement5 Permanent Installation 6 Changing from Side Exit to Bottom Exit 6 Flange 6 Shock Mount 7 Specifications8 Certifications 11••••••••MX400SEGooseneck Microphones General DescriptionShure Microflex MX400SE Series microphones are miniature gooseneck-mounted electret condenser microphones designed primarily for speech and vocal pickup. Their high sensitivity and broad frequency range make them suitable for recording, as well as sound reinforcement applications.The MX400SE series can be screwed onto a mic stand or the supplied 5/8 in. 27-threaded flange. They can be easily changed from side exit to bottom exit to conceal the cabling. All models include an in-line preamplifier, a 3.66 m (12 ft.) cable.Wide dynamic range and frequency response for accurate sound reproductionInterchangeable cartridges that provide a choice of polar pattern for each application Shock mount provides over 20 dB of isolation from surface vibration noise Snap-fit foam windscreen RF filteringModel VariationsMX400 microphones are available with 305 mm (12 in.) or 457 mm (18 in.) goosenecks, with or without a mute switch. They are available in supercardioid, cardioid and omnidirectional polar patterns."S" models include a mute button and LED."D" models include a desktop base with programmable mute button and LED and logic input and output."SE" models feature a surface mount flange with side-exit cable.The polar pattern of the included cartridge is indicated by a model number suffix:/C Cardioid/S Supercardioid /O Omnidirectional/N Cartridge not included®Interchangeable CartridgesMicroflex microphones use interchangeable cartridges that allow you to choose the polar pattern for different installations.•••••••Snap-Fit WindscreenSnap into the groove below the cartridge.To remove, spread the gap with a screwdriver or thumbnail.Provides 30 dB of "pop" protection.Preamp GainIf necessary, the preamplifier gain can be reduced by 12 dB. Contact an authorized Shure service center for information.RFI FilteringImportant: Microphones must be used with the RK100PK or RK202PK plate-mounted preamp to optimize RF immunity.Microphone PlacementAim the microphone toward the desired source, such as the talker.Aim it away from any unwanted source, such as a loudspeaker.Place the microphone within 15 to 30cm (6 to 12 in.) of the desired sound source.Always use the supplied windscreen or optional metal windscreen to control breath noise.•If four or more microphones will be open at the same time, use of an automatic mixer, such as the Shure SCM810 or SCM410, is recommended.Permanent InstallationChanging from Side Exit to Bottom ExitDo not cut the cable to reroute. This will compromise RF immunity.Mount the microphone using one of the following methods.FlangeSlip the mounting flange retaining ring over the bottom of the preamplifier and slide it up until it is flush to the bottom of the flange. Then press the ring firmly into place.1.2.3.4.Shock MountDrill a 44mm(1-3/4 in.) diameter hole in desired mounting surface.Mark and drill starter holes for screws, using shock mount as a template.Secure shock mount to mounting surface with screws.Thread the supplied adapter onto the MX400SE microphone before inserting it into the shock mount.SpecificationsTypeElectret CondenserFrequency Response50 to 17000 HzPolar PatternMX412SE/C, MX418SE/C CardioidMX412SE/S, MX418SE/S SupercardioidOutput Impedance180 ΩOutput ConfigurationActive BalancedSensitivity@ 1 kHz, open circuit voltageCardioid–35 dBV/Pa(18 mV)Supercardioid–34 dBV/Pa(21 mV)1 Pa=94 dB SPLMaximum SPL1 kHz at 1% THD, 1 kΩ loadCardioid124 dBSupercardioid123 dBSelf NoiseA-weightedCardioid28 dB SPLSupercardioid27 dB SPLSignal-to-Noise RatioRef. 94 dB SPL at 1 kHzCardioid66 dBSupercardioid68 dBDynamic Range1 kΩ load, @ 1 kHz96 dBCommon Mode Rejection10 Hz to 100 kHz45 dB, minimumClipping Levelat 1% THD–6 dBV (0.5 V)PolarityPositive sound pressure on diaphragm produces positive voltage on pin 2 relative to pin 3 of output XLR connectorEnvironmental ConditionsOperating Temperature–18–57°C (0–135°F)Storage Temperature–29–74°C (–20–165°F)Relative Humidity0–95%Power Requirements11–52 V DC, 2.0 mACable3.0 m (10 ft) , attachedCertificationsMeets essential requirements of all applicable European Directives.Eligible for CE marking.The CE Declaration of Conformity can be obtained from Shure Incorporated or any of its European representatives. For contact information please visit The CE Declaration of Conformity can be obtained from: /europe/complianceAuthorized European representative:Shure Europe GmbHHeadquarters Europe, Middle East & AfricaDepartment: EMEA ApprovalJakob-Dieffenbacher-Str. 1275031 Eppingen, GermanyPhone: +49-7262-92 49 0Fax: +49-7262-92 49 11 4Email:*************。

FEATURESGooseneck microphone with Sennheisersuper-cardioid capsuleDSP limiterModern industrial design, hidden cableconnectionsHigh-performance twin loudspeakersConvenient cabling via RJ45 socketsStrain relief available for fixedinstallationsChairperson control keys to cancel/mutemicrophonesPremium quality made in GermanyARCHITECT’S SPECIFICATIONSA digital desktop discussion microphone unitis provided for use as a chairperson version for use with the a central control unit. The digital desktop discussion microphone unit connects to the central control unit via the network using industry standard Category 5 cabling (24 AWG). The unit shall provide two buttons as control keys to cancel/mute microphones. The unit shall include a 15.47” long gooseneck micro-phone with a super-cardioid capsule. A 3.5mm headphone output jack shall be included. Twin loudspeakers are provided in a top-mounted orientation. RJ45 jacks for connection are pro-vided by hidden connections beneath the unit; optional strain reliefs are provided for fixed installations. The audio signal path shall inclu-de a digital signal processor limiter. Operating voltage shall be 35vDC to 52.8vDC. Maximum power consumption shall be 3.8W. Total har-monic distortion shall be a maximum of 0.03% at 50mW/16 Ohms. Operating temperature shall be +10°C to +40°C. The unit dimensions shall be, without gooseneck microphone, 7.28” x 2.48” x 5.51” (WxHxD). Weight shall be approximately 1.5 lbs. The digital desktop chairperson discussion unit shall be manufactu-red by Sennheiser and shall be type ADN C1.The ADN C1 digital chairperson unit of theSennheiser Audio Distribution Network offers highspeech-intelligibility in a modern design. The goose-neck microphone is equipped with a super-cardioidcapsule that attenuates unwanted ambient noiseefficiently. A twin-loudspeaker system guarantees a homogenous sound level in the meeting room. Thecabling of the units, which is done by CAT5 cables andhidden connections can be optionally secured withstrain reliefs for fixed installations.TECHNICAL DATAOperating voltage ................................................35 V to 52,8 V DC Power consumption ............................................max. 3,8 WPick-up pattern ....................................................Super-cardioidTHD, total harmonic distortion .........................0,03 % at 50 mW/16 O Operating temperature ......................................+10°C to +40°C Dimensions (W x H x D) ....................................... 185 x 63 x 140 mm(without gooseneck)7,28“ x 2,48“ x 5,51“Weight ...................................................................approx. 700g / 1,5 lbs Delivery includes: ................................................. A DN C1 Chairperson unit,Quick-GuideADN C1 digital chairperson unitPRODUCT VARIANTSADN C1 Chairperson unit Cat. No. 502759 ADN D1 Delegate unit Cat. No. 502758 RECOMMENDED ACCESSORIESADN TR 1, ADN strain relief Cat.No. 504001 SDC CBL RJ45-2, Cat 5 cable 2m Cat.No. 009842 SDC CBL RJ45-3, Cat 5 cable 3m Cat.No. 009843 SDC CBL RJ45-5, Cat 5 cable 5m Cat.No. 009844 SDC CBL RJ45-10, Cat 5 cable 10m Cat.No. 009845 SDC CBL RJ45-20, Cat 5 cable 20m Cat.No. 009846 SDC CBL RJ45-50, Cat 5 cable 50m Cat.No. 009847ADN C1 digital chairperson unitSennheiser electronic GmbH & Co. KG Am Labor 1, 30900 Wedemark, Germany 0 7 / 1 0 S e n n h e i s e r i s a r e g i s t e r e d t r a d e m a r k o f S e n n h e i s e r e l e c t r o n i c G m b H & C o . K G . w w w . s e n n h e i s e r . c o m . C o p y r i g h t ©2 0 1 0 . A l l r i g h t s r e s e r v e d . E r r o r s a n d o m i s s i o n s e x c e p t e d .Contact your local Service Partner:。

mijiak歌麦克风说明书一、产品概述Mijia K歌麦克风是一款智能音频设备,专为K歌爱好者设计。
它采用了领先的音频技术,配备了高品质的麦克风,可实现高保真的录音效果。
此外,它还具有智能配对、音效调节和手机APP控制等功能,为用户带来全新的K歌体验。
二、产品特点1. 高保真录音:Mijia K歌麦克风采用了先进的音频处理技术,可实现高保真录音效果,使您的歌声更加生动逼真。
2.智能配对:麦克风支持蓝牙连接,可与手机、电脑等设备进行无缝配对,方便快捷。
3.音效调节:麦克风内置了多种音效调节模式,用户可根据自己的需求选择合适的音效模式,提升歌唱效果。
4.APP控制:用户可通过手机APP对麦克风进行控制,包括音量调节、音效选择等,方便快捷。
5.兼容性强:麦克风支持多种设备的连接,如手机、电脑、平板等,满足不同用户的需求。
三、产品规格1.频率响应范围:20Hz-20kHz2.电池容量:2000mAh,可连续使用时间约为5小时3.适用距离:最远可达10米4.蓝牙版本:4.25.音效模式:麦克风内置了多种音效模式,如卡拉OK、音乐会、录音室等6.麦克风灵敏度:-42dB±3dB7.重量:约200克四、使用方法1.开机:长按电源按钮3秒开机,指示灯亮起表示已开机成功。
2.配对:打开手机蓝牙功能,并连接麦克风的蓝牙信号。
3.音效设置:通过手机APP选择合适的音效模式,以获得最佳的音频效果。
4.歌曲选择:打开K歌软件,选择自己喜欢的歌曲进行演唱。
5.音量调节:通过手机APP或麦克风上的音量按钮,调节音量大小。
6.录音保存:麦克风支持录制歌唱过程,并将录音保存到手机或电脑中。
五、注意事项1.请勿将麦克风与水或其他液体接触,以免损坏。
2.使用过程中请注意音量大小,避免对听力造成伤害。
3.请勿将麦克风长时间暴露在高温或阳光直射下,以免影响正常使用。
4.请勿将麦克风撞击或摔落,以免损坏内部零部件。
5.请勿在使用过程中对其他人或物体进行攻击行为,以维护良好的使用环境。

mijiak歌麦克风说明书一、产品概述Mijia k歌麦克风是一款智能麦克风产品,集成了高保真录音、降噪处理、蓝牙连接等多项功能。
它能够满足用户对高质量录音以及悦耳歌声的需求,是一款非常适合KTV、录音室等场合使用的产品。
二、产品特点1. 高保真录音:Mijia k歌麦克风采用了先进的录音技术和高质量的麦克风元件,能够实现高保真的录音效果。
用户录制的音频可以还原到最真实的状态,使声音更加清晰、逼真。
2. 降噪处理:内置的降噪芯片能够有效地抑制周围环境的杂音和噪声,提高录音的质量。
无论是在嘈杂的场合还是在室内静音的环境下,Mijia k歌麦克风都能够有效地降低噪声干扰,确保录音效果的纯净。
3. 蓝牙连接:Mijia k歌麦克风支持蓝牙连接,可以和智能手机、平板电脑等设备无线连接。
用户只需要打开手机的蓝牙功能,将其与麦克风进行配对,就可以实现无线录音和播放,让用户更加自由地享受音乐。
4. 多功能按钮:Mijia k歌麦克风上配备了多功能按钮,用户可以通过按键操作来进行播放、暂停、切换歌曲等操作。
这样用户就不用频繁地操作手机,可以更加方便地进行录音和歌曲切换,提高使用体验。
5.可调节音量:麦克风上的音量按钮可以调节录音时的音量大小,让用户根据自己的需要进行调整。
用户可以根据不同场合的需求,自行调整音量大小,达到最佳录音效果。
三、产品使用方法1. 打开麦克风:长按电源键3秒,可以打开Mijia k歌麦克风。
2.连接蓝牙:打开手机的蓝牙功能,并连接麦克风的蓝牙信号,配对成功后,手机会有提示音。
3.录制歌曲:打开K歌软件,选择自己想要录制的歌曲,点击开始录制按钮。
4.调节音量:根据自己的需求,通过麦克风上的音量按钮进行音量调节。
5.播放录音:录制完成后,通过按下麦克风上的播放按钮,可以进行录音回放。
6.切换歌曲:通过按下麦克风上的切换歌曲按钮,可以切换到下一首歌曲。
四、注意事项1.使用时请确保麦克风的电量充足,以免影响正常使用。

无线麦克风A1-说明书(完整版)-中英文-中性成品:65x75mm 展开:585x75mm印色:K+K 正面反面无线麦克风A1-说明书(完整版)-中英文-中性成品:65x75mm 展开:585x75mm印色:K+K 正面反面This device complies with part 15 of the FCC Rules. Operation is subject to the following two conditions: (1) This device may not cause harmful interference, and (2) this device must accept any interference received, including interference that may cause undesired operation.Any Changes or modifications not expressly approved by the party responsible for compliance could void the user's authority to operate the equipment.Note: This equipment has been tested and found to comply with the limits for a Class B digital device, pursuant to part 15 of the FCC Rules. These limits are designed to provide reasonable protection against harmful interference in a residential installation. This equipment generates uses and can radiate radio frequency energy and, if not installed and used in accordance with the instructions, may cause harmful interference to radio communications. However, there is no guarantee that interference will not occur in a particular installation. If this equipment does cause harmful interference to radio or television reception, which can be determined by turning the equipment off and on, the user is encouraged to try to correct the interference by one or more of the following measures:-Reorient or relocate the receiving antenna.-Increase the separation between the equipment and receiver.-Connect the equipment into an outlet on a circuit different from that to which the receiver is connected.-Consult the dealer or an experienced radio/TV technician for help.。

数字无线话筒使用说明书一、手持开关机1.将两节5号电池装入手持并拧紧网头(注意电池负极朝下,电池装反将损坏手持),向上推开关打开手持,此时电源指示灯亮,手持进入开机状态。
如果电源指示灯闪烁表示电池已耗尽,请更换电池再开机。
2.向下推开关电源指示灯熄灭,手持关机。
长时间不使用话筒请将电池取出。
二、接收机连接与开关机(专业)1.将音频连接线一头插接收机音频输出2另一头插到用户的音频设备(如功放、前级等)。
将12V开关电源插入220V交流插座,输出直流12V插入接收机DCIN,蓝色电源指示灯亮,接收机进入开机状态。
2.按住电源键一秒可以开启和关闭接收机电源。
3.断电后重新通电主机将自动进入开机状态,此时无需再按电源键开机。
三、接收机与电脑的连接与开关机(个人)1.将USB连接线两头分别插入电脑和接收机的USB接口。
蓝色电源指示灯,接收机进入开机状态。
电脑自动把音频输入输出设备切换成接收机。
(首次使用接收机的时候,电脑会自动安装驱动,电脑会依次出现图3所示的画面,直到硬件安装成功)2.将音频连接线一头插接收机音频输出1另一头插到用户的桌面音响输入端。
3.此时接收机将自动成为酷我k歌或QQ等者其他应用软件的音频输入输出设备。
(如果不能使用请参见疑难解答)4.按住电源键一秒可以开启和关闭接收机电源。
5.断电后重新通电主机将自动进入开机状态,此时无需再按电源键开机。
四、对码1.接收机开机后按功能键进入A通道对码状态,电源指示灯和A通道的射频指示灯亮,此时A通道可以对码,再按功能键进入B通道对码状态,电源指示灯和B通道射频指示灯亮,此时B通道可以对码。
再按功能键又将切换到A 通道,如此循环。
2.按照上一步将接收机切换到需要对码的通道,再按电源键,该通道射频指示灯闪烁,此时打开任意一支手持,接收机将自动与手持实现连接,连接成功后该通道射频指示灯和音频指示灯同时亮起一秒。
说明这个通道的手持对码成功,即可使用。
3.重复步骤1和步骤2以实现另一个手持与对应通道的对码。

小米话筒说明书
小米话筒说明书:
一、安全提示系统注意事项请认真阅读本说明书。
保存好本说明书,如果本产品转移使用,请提供本说明书注意安全提示并参考本说明书操作使用·设备保养时请断开周边连接设备,用柔布擦拭*请使用专用的配套附件安装使用如有下列意外情况请选用专业的技术人员提供技术服务: 当发射器、接收器受到撞击或落地等损害,液晶屏破裂、掉进异物,进水或在很潮湿地方使用、非正常使用本系统等造成设备损坏。
警告:为了避免引发火灾或受到电击危险,请勿将设各靠近水源使用、勿暴露在雨中或在潮湿的环境使用。
接收器请使用务必使用随机配备的电源适配器,否则会有电子下扰声产生,以下情况时请从强电插座断开电源适配器断开接收器与后级关联设备的连接线时過到雷雨天气将会长时间不使用本系统只可使用随机匹配的电源适配器(规格参数参见附表的参数就说明)使用接收器前请确认-接收器应放置在安全便于操作的位置,正确可靠连接适配器的强电插座,在标称的湿度范围内使用。
二、设备安装及调试
1.打开包装,取出设备机柜安装时选好要安装的位置,装好相应的螺母,用固定螺丝护紧,请务必安装所有的螺丝。
零时性安装“定要选择好稳定的平整位置来放置接收器,以防偶尔失手跌落造成人员和设备的伤害。
确认接收器安装放置好后,参考相应的音频线缆和电源供电,给发射器安装合格符合国家标准的电池,请勿使用劣质电池以防发生爆炸或引起火灾。
2.发射器安装电池-于握紧味头的球网部分,一手握紧于柄,逆时针旋转手柄1圈半,于柄套管与味头部分分离;拉开手柄,按正负极性装好电池/注意:电池极性切勿装反,否则会损坏发射器造成发射器损坏或电池爆炸会造成人身伤害
3.发射器调试菜单参照安装电池旋开手柄、在LCD屏的右边有3个按健,设置键与上下键。
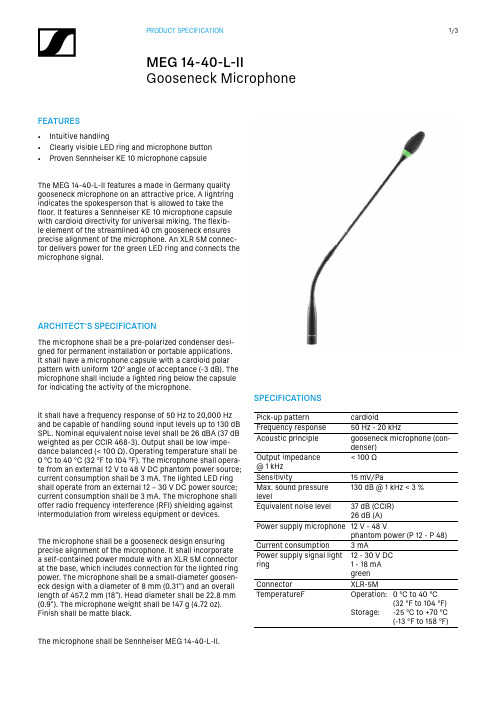
FEATURES• Intuitive handling• Clearly visible LED ring and microphone button • Proven Sennheiser KE 10 microphone capsuleThe MEG 14-40-L-II features a made in Germany quality gooseneck microphone on an attractive price. A lightring indicates the spokesperson that is allowed to take the floor. It features a Sennheiser KE 10 microphone capsule with cardioid directivity for universal miking. The flexib-le element of the streamlined 40 c m gooseneck ensures precise alignment of the microphone. An XLR 5M connec-tor delivers power for the green LED ring and connects the microphone signal.SPECIFICATIONSPick-up patterncardioidFrequency response 50 Hz - 20 k HzAcoustic principle gooseneck microphone (con-denser)Output impedance @ 1 k Hz < 100 ΩSensitivity15 m V/PaMax. sound pressure level130 d B @ 1 kHz < 3 %Equivalent noise level37 dB (CCIR)26 dB (A)Power supply microphone 12 V - 48 Vphantom power (P 12 - P 48)Current consumption 3 mAPower supply signal light ring 12 - 30 V DC 1 - 18 mAgreenConnector XLR-5M TemperatureF Operation:Storage:0 °C to 40 °C(32 °F to 104 °F)-25 °C to +70 °C(-13 °F to 158 °F)ARCHITECT‘S SPECIFICATIONThe microphone shall be a pre-polarized condenser desi-gned for permanent installation or portable applications. It shall have a microphone capsule with a cardioid polar pattern with uniform 120° angle of acceptance (-3 d B). The microphone shall include a lighted ring below the capsule for indicating the activity of the microphone.It shall have a frequency response of 50 H z to 20,000 H z and be capable of handling sound input levels up to 130 d B SPL. Nominal equivalent noise level shall be 26 d BA (37 d B weighted as per CCIR 468-3). Output shall be low impe-dance balanced (< 100 Ω). Operating temperature shall be 0 °C to 40 °C (32 °F to 104 °F). The microphone shall opera-te from an external 12 V to 48 V D C phantom power source; current consumption shall be 3 m A. The lighted LED ring shall operate from an external 12 – 30 V D C power source; current consumption shall be 3 m A. The microphone shall offer radio frequency interference (RFI) shielding against intermodulation from wireless equipment or devices.The microphone shall be a gooseneck design ensuring precise alignment of the microphone. It shall incorporate a self-contained power module with an XLR 5M connector at the base, which includes connection for the lighted ring power. The microphone shall be a small-diameter goosen-eck design with a diameter of 8 m m (0.31") and an overall length of 457.2 m m (18"). Head diameter shall be 22.8 m m (0.9"). The microphone weight shall be 147 g (4.72 o z). Finish shall be matte black.The microphone shall be Sennheiser MEG 14-40-L-II.POLAR PATTERN0°330°300°270°240°210°180°150°120°90°60°30°DIMENSIONS⌀ 0.9"[22,8 m m ]PIN ASSIGNMENT1 Microphone Ground2 Microphone +3 Microphone –4 LED Ground5 LED: 12 – 30 V32145FREQUENCY RESPONSEHz501002005001k2k5k10k20kd B V-20-30-40-50-60PRODUCT VARIANTS Product FeaturesMEG 14-40 B Art. no. 504791• Gooseneck with integrated Senn-heiser KE 10 microphone capsule• RF shielding against intermodu-lation from wireless equipment/devices• Streamlined design for seamlessintegration• Premium quality made in GermanyThe MEG 14-40 features a made in Germany qualitygooseneck microphone on an attractive price. It featuresan integrated Sennheiser KE 10 microphone capsule withcardioid directivity for universal miking and a streamlined40 c m gooseneck with a XLR 3M connector. The flexibleelement ensures precise alignment of the microphone.MEG 14-40-L B Art. no. 504792• Gooseneck with integrated Senn-heiser KE 10 microphone capsule• RF shielding against intermodu-lation from wireless equipment/devices• Streamlined design for seamlessintegration• LED ring for speech indication• AC/DC lightring powering• Premium quality made in GermanyThe MEG 14-40-L features a made in Germany qualitygooseneck microphone on an attractive price. A lightringindicates the spokesperson that is allowed to take thefloor. It features a Sennheiser KE 10 microphone capsulewith cardioid directivity for universal miking. The flexibleelement of the streamlined 40 c m gooseneck ensuresprecise alignment of the microphone. A XLR 5M connec-tor delivers power for the red LED ring and connects themicrophone signal.MEG 14-40-L-II B Art. no. 506398• Intuitive handling• Clearly visible LED ring and micro-phone button• Proven Sennheiser KE 10 micro-phone capsuleThe MEG 14-40-L-II features a made in Germany qualitygooseneck microphone on an attractive price. A lightringindicates the spokesperson that is allowed to take thefloor. It features a Sennheiser KE 10 microphone capsulewith cardioid directivity for universal miking. The flexibleelement of the streamlined 40 c m gooseneck ensuresprecise alignment of the microphone. An XLR 5M connec-tor delivers power for the green LED ring and connectsthe microphone signal.COMPATIBILE PRODUCTSProduct compatible withMEG 14-40 B MAT 133, MAT 133 S-B, SL Tablestand 133-S DW MEG 14-40-L B MAT 153, MAT 153-S und MAS 1MEG 14-40-L-II B SL Tablestand 153-S DW, MAT 153-S B。


CVM-WM300UHF Wireless Microphone USER MANUALForewordMain FeaturesThanks for purchasing COMICA WM300 UHF wireless microphone.WM300 is an all-metal wireless microphone with dual-transmitter triggered by one receiver, with built-in polymer lithium battery, it utilizes UHF wireless FM technology and LCD high-resolution lattice screen,16-level adjustable volume, and integrated into LCF (Low cut filter) , Auto-scanning, Auto IR Channel-match, stereo / mono switchable audio mode, RF signal strength adjustment, MIC/LINE IN input dual selection, power monitoring at receiver end, sound pickup dynamic display, backlight adjustment and other functions, at the same time with strong shielding anti-noise performance, it’s a high-quality microphone to broadcasting level;To ensure the smooth use and safety of the product, please carefully read this instruction before using and properly assemble and operate.. Dual Transmitters Triggered by One Receiver, A/B Double Group Options;. Used for Multiple Devices Working Together;. Working Distance is Up to 120m (120m in Open Area, 80m in Barrier Area);. LCF Low Cut Filtering Mode;. Auto-scanning for Quick Channel Selection;. Manual or Auto IR Sync;. Optional Language;. Adjustable RF Signal Strength;. Audio Dynamic Display Bar;. 16 Levels Volume Adjustment;. Transmitter Power Monitor;. Mono/Stereo Switchable Output Modes;. Built-in Rechargeable Lithium Battery, Slim Body;. Low-consumption, Super-long Standby Time;. Lattice LCD Display, High Resolution;. Full Metal Manufacturing, Excellent Shielding;1Noticedown the receiving of wireless signal, then audio may be intermittent, which isto keep the environment open without interference during usage, and close theaudio converting cable,and pay attention to set the mobile phone mode to 'Flight Mode' to avoid incoming call interference;(It does not support the original recording system of some android systems, thedanger of short circuit;WM300(A) = 2TX + RXWM300(B) = TX + HTX + RX WM300(C) = TX + RXWM300(D) = HTX + RX TX TX RX++TX HTXHTXRX++TX RX+RX+Multiple Selections:3WM300(A)=x2 + + + x2 + x3 + + x2 + + + 3.5mm Mic Audio Input Cable 3.5mm-3.5mm Audio Output Cable 3.5mm-XLR Audio Output Cable Micro USB Charging Cable Belt Clip Hot-shoe Mount Wind Muff Portable Box User Manual Warranty CardAccessories:1112223334445556667788991010The accessories of each combination include :4Components and InstructionAntenna IR Sensor Belt Clip 12345678910111213141561 2 3 4 5 6 7 8 9 10 11 12 13 14 1516Function Button InstructionIndicator Light InstructionTransmitterReceiverAUDIOA IR/RFB IR/RFA IR/RF : Group A Working Status IndicatorB IR/RF : Group B Working Status IndicatorIRGreen Light Keeps OnGreen Light Keeps OnGreen Light Keeps OnRed Light Keeps On Red Light Flicker Red Light FlickerRed Light Flicker Red light keeps onGreen Light Flicker Normal Recording Status (This state is only for thetransmitter, when the channel matches successfully, the receivercan pick up the sound )Muting Mode Low-power reminder Channel matches (No matter the channel matches or not )Channel in the match... (only for IR Sync )Normal working status after the channel matches Channel doesn’t match Channel in the match... (only for IR Sync ) Low-power reminder Channel closed9Installation and Usage1. Insert the 3.5mm audio input line into MIC socket2. Long press the power button to turn on the transmitter 104. Connect the belt clip to the connection hole5. After the channel matching with the receiver, it can be usedPlease refer to screen operation instruction for channel matching.11Receiver1. Connect the receiver to the video device through the hot-shoe132. Insert the3.5mm-3.5mm audio OUTPUT line into the OUTPUT port, and insert the headphone into the 3.5mm monitoring socket for real-time monitoring, then long press the power button to turn on the receiver1.2 Short press button to select the channel1.Manually Adjust the Channel of TransmitterScreen Display and Operation InstructionOperation InstructionLavalier TransmitterUnlocking )(Locking )Power IndicationChannel 152. Group A/B Selection2.1 Press button to ‘ Group Setting ’ display page2.3 Press button to select the group163.3 Press button to select ‘ Mic/ Line in ’ input mode3.1 Press button to ‘ Input Setting ’ display page3.MIC/LINE IN Input Mode Adjustment17Mic mode is for Microphone input;Line in mode is for external audio input, such as smart phone music player.Selecting the corresponding input mode will bring you a better audio effect.4. Low cut ‘ High/Low/OFF ’ Adjustment4.1 Press button to ‘ Low Cut Filter ’ display page184.3 Press button to select LCF ‘ Hight / Low / OFF ’low-cut function will filter out the low-frequency part of the audio source,such as the chirping and crowd noise, and the main audio source willbe more crisp. Low cut divided into low cut in low range and low cut inhigh range, low range is to filter out part of the noise, while high rangeof low cut filter out all noise. Turn off the low cut to restore the true, themain source will be more vigorous, but it can be adjusted accordingto actual needs.195.3 Press button to adjust the transmitting signal strength5.1 Press button to ‘ RF Power ’ display page5.Transmitting Signal Strength ‘ High/Low ’ Adjustment206.Muting Mode Enable/ Disable6.1 Press button to ‘ Muting ’ display page6.3 Press button to select Muting mode on/ off21227.3 Short press button to adjust the backlight lighting time or you can turn it off for power saving7.1 Short Press button to ‘ Backlight ’ display page7.Backlight ‘ Lighting Time/Turn Off ’ Adjustment238.System Language8.1 Short press button to ‘ Language ’ display page249.1 Press button to ‘ Reset ’ display page9. Reset to Defaults 9.3 Short press button to select whether to restore factory Settings 2510. Version10.1 Press button to ‘ Version ’ display page to check the version26Operation Instruction 1.Turn on and Muting Mode Switch Hand-held TransmitterGroup A/B Channel1.1 Long press switch button for 2 seconds to turn on or off1.2 When it’s turned on, short press the button to select muting mode272. Set the Channel Through Infrared SyncThe hand-held transmitter defaults to channel B, and youcan set the group and channel through the receiver (For example, If Group A of the receiver is used for the matching, after matching, it will be: Group A CHXX; If Group B of the receiver is used for the matching, after matching, it will be: Group B CHXX)When the hand-held transmitter and the lavalier transmitterare used together, you should set them to different channels2.12.229ReceiverScreen Display InstructionWhen Group A/B is on, the background color of the channel display icon is black;When Group A/B is off, the channel display icon is transparent and nobackground color.30Operation Instruction1.Manually Adjust the Channel of Group A/ Group B1.2 Short press button to select the channel312.3 Press button to select Mono/ Stereo Output Mode 2.Audio Output Mode ‘Stereo/Mono’ Adjustment2.1 Press button to ‘ Output Mode ’ display page323.Group A/B Function Setting3.1 Press button to ‘ Setting ’ display page3.3 Press button to select Group A/B to edit334.Group A/B ‘ On/ Off ’ Adjustment4.1 Short Press button to ‘ ’ display page Group A Setting Power ON34Group A Setting Volume5.Group A/B Volume Adjustment5.1 Short Press button to ‘ ’ display page 35Group A SettingAuto scan CH6.4 Scanning complete and choose the best suitable channel 6.Group A/B Automatic Channel Scan6.1 Short Press button to ‘ ’ display page 36Group A Setting Sync 7.Group A/B IR Sync7.3 Use the button to select whether to match, and short press to confirm7.1 Short Press button to ‘ ’ display page 7.4 Matching OK378.3 Short press button to adjust the backlight lighting time or you can turn it off for power saving8. Backlight ‘ Lighting Time/Turn Off ’ Adjustment389.System Language9.1 Short press button to ‘ Language ’ display page3910.1 Press button to ‘ Reset ’ display page10. Reset to DefaultsSettings 4011. Version11.1 Press button to ‘ Version ’ display page to check the version41Specification Lavalier Transmitter TXSignal / Noise AntennaStray Radiation Sound DelayAudio Distortion BatteryDimension Operating Temperature Storage Temperature >65dB1/4 Wavelength Wire Antenna<-60dBc<20ms<0.5%Polymer Lithium Battery 3.7V 1800mAh 84 x 63.5 x 23mm0℃ ~ 50℃-20℃ ~ 60℃42Hand-held Transmitter HTXSignal / Noise AntennaStray Radiation Sound DelayAudio Distortion BatteryDimension Operating Temperature Storage Temperature >65dBPCB Antenna<-60dBc<20ms<0.5%AA Batteries x 2pcsΦ53.5(MAX) x 253mm0℃ ~ 50℃-20℃ ~ 60℃43Receiver RXSignal / Noise AntennaReceiving Sensitivity Stray Radiation Sound DelayAudio Distortion BatteryDimension Operating Temperature Storage Temperature >65dB1/4 Wavelength Wire Antenna-95dBm<-60dBc<20ms<0.5%Polymer Lithium Battery 3.7V 1800mAh 84 x 63.5 x 23mm0℃ ~ 50℃-20℃ ~ 60℃44Email:************************。
用户手册UserManual无线麦克风Wireless Microphone目录Content目录--------------------------------------------------------------------------------01 Content---------------------------------------------------------------------------01前言--------------------------------------------------------------------------------02 Foreword-------------------------------------------------------------------------10产品特性---------------------------------------------------------------------------02 Features--------------------------------------------------------------------------10适用场合---------------------------------------------------------------------------02 Application-----------------------------------------------------------------------10技术参数---------------------------------------------------------------------------02 Specification--------------------------------------------------------------------10标准配置---------------------------------------------------------------------------03 Product content-----------------------------------------------------------------11接收机功能------------------------------------------------------------------------03 Receiver function---------------------------------------------------------------11接收机LCD显示面板操作方法---------------------------------------------------04 Receiver LCD display and operation-----------------------------------------12麦克风使用和操作方法-------------------------------------------------------05-06 Microphone operation-----------------------------------------------------13-14系统操作方法----------------------------------------------------------------------07 System operation---------------------------------------------------------------15注意事项---------------------------------------------------------------------------07 Note-------------------------------------------------------------------------------15安全警告---------------------------------------------------------------------------08 Caution---------------------------------------------------------------------------16故障及解决方法-------------------------------------------------------------------09 Trouble shooting----------------------------------------------------------------17尊敬的用户:感谢您选购TAKSTAR 无线麦克风,为了您能够更好的了解使用本产品,建议您在使用前仔细阅读本说明书。

IntroductionThank you and congratulations on your purchase ofthe Miktek PM5 , Performance Series handheld stage microphone. You work hard to give a better than average performance, so you demand a better than average microphone to reproduce the sound of your voice. Miktek Performance Series handheld microphones offer way above average sound and build quality impressing the most discriminating engineers and artists. Featuring cutting edge capsule designs that are perfectly matchedto Miktek’s proprietary output transformers; the Performance Series Microphones produce a modern, yet truly classic sound, well suited to today’s contemporary performers.In the following sections of this manual you will finda description of the PM5’s features, step-by-step set-up and operating instructions along with detailed specifications. In addition, we’ve also included some basic miking fundamentals for typical live sound and recording applications. To some of us these may seem quite basic. However, at Miktek we want to encourage young or new engineers to use our microphones, or at least to readour manuals and learn something about recording and live sound. We know you’re serous about your sound because you purchased an outstanding audio instrument, and at Miktek, we’re serous about providing superior products and service to our customers. We appreciate your patronage and hope you enjoying using your microphones as much as we enjoy making them.Sincerely,Michael Ketchell - Managing DirectorPM5 Features• Studio Quality Handheld Condenser• MK5a 0.5-inch Cardioid Capsule with 5-micron Mylar, Evaporated Gold Diaphragm• AMI T5 Transformer• Hand-selected Transistors• Packaged Protective Case and Mic ClipDescriptionThe Miktek PM5 cardioid, condenser microphone brings the sound of a high-end studio condenser to vocalistsfor live stage use. Sharing the capsule, electronics and output transformer of the Miktek PM5 small diaphragm condenser, the PM5 is a truly world-class mic that offers detail and nuance. The PM5’s frequency response is extremely linear, with rich lows, a present yet sweetmid-range, and airy highs that please artists and engineers alike. In fact, the PM5 is perfectly at home in the recording studio for miking acoustic guitar, piano and as drum overheads. The PM5 employs a multistage windscreen to help ensure a minimum amount ofp-popping. The steel grill and die cast body ensure durability and reliability night after night. An ultra sleek, black finish with stainless steel appointments make the PM5 an attractive complement to any stage setting. Understanding Polar PatternsPerhaps the most important aspect of using your PM5, or any other microphone, is to understand its polar pick up pattern. Every microphone has a characteristic polar pattern that determines how well it accepts or rejects signal coming from various areas around the microphone capsule. There are many types and variations of polar patterns but the three most common are omnidirectional, bidirectional or figure-eight and unidirectional or cardioid. Omnidirectional microphones pick up sound from everywhere, producing the same frequency response regardless of where the sound source originates (in front of the mic, behind it, to the side, etc.). A bidirectional or figure-eight microphone picks up sound directly from the front and back while rejecting the sound at the sides. In contrast, cardioid mics are specifically designed to accept the sound coming from directly in front, andto reject sound coming from behind or from the sides. The PM5’s capsule provides a super cardioid polar pattern with an even tighter response. While Omni and Bidirectional microphones are very useful for a varietyof applications, the majority of miking situations in live sound applications require unidirectional or cardioid microphones. When positioned correctly, the cardioid pattern allows you to pick up more of the sound you want and less of the sound you don’t want. In live sound situations, the polar pattern greatly determines how prone a particular microphone is to inducing feedback. Feedback is that nasty howling sound that occurs when a mic is placed too close to a loudspeaker—the signal from the loudspeaker is fed into the mic, then into the loudspeaker, then into the mic, over and over. The super cardioid pick-up pattern allows for better separation of instruments on stage and more control over feedback in live sound reinforcement.PM5 SpecificationsType.....................Condenser Polar Pattern: .............CardioidFrequency Response: .......20Hz - 20KHz Impedance: ...............200 Ohms Sensitivity . . . . . . . . . . . . . . . . -35dBV/Pa Low Cut Filter .............80 Hz Length: ..................7.1 inches Width: ...................2.0 inches Depth: ...................2.0 inches Net Weight:...............0.65 poundsStand Mounting the PM5The PM5 can be mounted to any standard microphone stand using the included mic stand holder. If you are using a US standard 5/8-inch mic stand, remove the Euro adapter by unscrewing it from the mic holder. Slide the microphone into the holder from the rear to the front with a downward motion until it snaps into place.Microphone PlacementTo help maximize the quality of your performance, you must pay careful attention to the placement of your PM5, and specifically, how it is positioned for the instrument or vocalist that you’re miking. As you become more experienced in miking techniques, you’ll quickly realize the microphone placement is critical to getting the sound you want while maximizing gain before feedback. When placing the mic around any instrument or sound source, take notice of the postion of the front of house and monitor loudspeakers. In general, it’s good practice to set the microphone behind the main or front of house PA speakers to avoid feedback from those speakers. Also, position the microphone in front of a monitor loudspeaker within a 110 degree arch a shown nin the diagram below. As you’re changing the microphone’s position, be sure to check that the mic input is still set toa good level without clipping, as described in the previous Powering the PM5Since the PM5 is a condenser microphone it needs to be operated by connecting it to a 48 volt Phantom power source. Most quality mixers, outboard mic pres and DAW mic channels have Phantom power available as a standard feature. You can also use an external phantom supply, if necessary. Since most mixers and outboard mic pres have a dedicated switch to engage the phantom power, be sure to check that the Phantom power is on. Once the Phantom power source is turned on, the PM5 receives the Phantom power directly from a mic cable. Note: Without Phantom power the PM5 will not pass audio.Setting Up the Signal LevelIn order to get a good signal, first be sure that the PM5 is connected to a mixer or recorder input that is microphone level. Most quality mixers, mic pre’s and recorders provide microphone inputs with a mic trim (“Trim” AKA Mic Gain or Level) control. The purpose of the mic trim control is to set a good signal level and minimize any noise associated with the mic inputs electronics. A good mic pre will also have a Clip or Peak LED to show you when the input is at overload;the level which distortion begins to occur. To set a good clean level, set the PM5 up in front of the desired sound source and slowly turn up the mic trim until you see the Clip LED light up. Then, turn the trim control down until the LED does not light any more. On most microphone inputs, the best setting is when the trim control is turned up as high as possible without lighting the PEAK LED. The Proximity EffectAll cardioid or uni-directional microphones exhibit aphenomenon known as “proximity effect”. The proximity effect is the increase in low frequency response amicrophone exhibits as it is moved closer to the sound source. Vocalist tend to love this effect since when they get really close to the mic they get the “FM radio”, big bass sound. A good vocalist with good mic technique will use the proximity effect to adjust their tonal response in real time. The key to developing the best mic technique is experimentation, along with awareness of the general principle that, the closer your PM5 is to a signal source, the greater the bass response. The proximity effect’s bass lift is caused by the amount of pressure present at the ports that are used to create the directional pattern. Since omnidirectional microphones do not have ports, they do not have proximity effect.Front of House SpeakerMonitor SpeakerFront of House Speaker110º。

Amazfit智能运动手表使用手册目 录外观和操作说明手表佩戴及充电方式运动功能介绍手表功能使用手表日常保养 010*******外观和操作说明以下使用说明内容基于WOS2.0系统,请升级到最新版本使用。
手表锁屏与操作状态手表在不进行操作一段时间后自动进入低功耗锁屏状态,并显示表盘界面。
可以通过按键短按来解锁手表,解锁后如果不进行操作,会再次自动进入低功耗锁屏状态。
系统状态符号说明系统状态符号会出现在解锁后的表盘上,每种符号会代表手表处于不同的状态。
触摸屏手势操作按键短按解锁手表返回表盘锁屏长按秒手表开机长按秒弹出手表重启、关机界面长按秒手表关机4610点击屏幕使用该功能、进入下一项或选中当前项左右滑动屏幕横向切换界面上下滑动屏幕上下滚动界面长按屏幕在表盘界面下长按激活表盘选择功能快捷设置菜单在表盘界面下滑,可以在该界面进行一些常用功能的开关和模式切换,以及进入更多设置界面。
语音控制功能说明见“语音助手”部分。
电池状态充电状态充满状态低电量保护状态当手表电量在5%及以下时会进入低电量保护模式,此时需要将手表充电超过5%之后才可以解除保护模式。
与手机连接断开当手表与手机距离过远断开了蓝牙连接或手机关闭了蓝牙广播,。
已开启勿扰模式已开启飞行模式已连接蓝牙耳机此时会增加系统功耗。
音乐播放中如果音乐播放已经结束,。
手表佩戴及充电方式日常佩戴建议将手表以适中的松紧度佩戴在离手腕两指距离的位置上,以确保光学心率监测器正常监测数据。
运动中佩戴进行跑步或者其他运动时,建议将手表以贴合、舒服且不会滑动的松紧度佩戴。
不要过于拉紧,也不要让手表自由晃动。
充电将手表与充电底座进行连接。
将另外一头的USB插头插入USB电源适配器,此时手表上会显示充电状态,安装时注意底座上充电触点的方向和手表上金属触点的方向一致,压紧后手表不会松脱出底座。
充电要求:建议使用电脑端USB充电或者品牌手机充电头进行充电,手机充电头额定输入电压必须是DC 5.0v,且输入电流大于500mA以上;运动功能介绍开启运动解锁后在表盘状态向右滑动可以快速打开运动列表。
产品使用简介(1)除说明书有特殊标示的操作方式以外,请勿尝试拆卸或更换产品内的任何零件。
(2)请勿将产品放入任何液体中,此产品非防水设计。
(3)如果有任何液体不小心进入产品内时,请立即断开连接并移开此产品。
(4)为避免触电,请在安装或卸载产品时,确保手上没有沾水。
(5)请勿将此产品放置于热源附近或直接暴露在火源附近。
(6)请勿将本产品放置在有强大电磁力的环境中,否则会导致产品故障。
产品概述非常感谢您使用本公司的全向麦克风产品!在使用本产品之前,请仔细阅读产品使用说明书。
本说明书介绍了全向麦克风产品的功能、安装和使用操作的一般方法。
本产品全向麦克风是一款蓝牙无线或USB有线连接的网络会议通话设备,全向麦克风设备之间蓝牙级联可扩展拾音和放音应用范围,具有回声抵消和环境降噪的最新一代语音处理算法,通话音质清晰自然,机身轻便,便于携带,安装操作方便,特别适用于手机、平板、电脑终端之间的网络会议通话等应用场景。
产品使用手册中图片为示意说明图,具体请以产品实物为准。
包装清单全向麦克风X1数据线X1使用说明书X1Product introduction(1)Do not try to disassemble or replace any parts in the product except for the operation methods marked in the manual.(2)Do not put the product into any liquid,this product is not waterproof.(3)If any liquid accidentally enters the product,please disconnect and remove the product immediately.(4)To avoid electric shock,please make sure that your hands are not wet when installing or uninstalling the product.(5)Do not place this product near a heat source or directly expose it to a fire source.(6)Do not place this product in an environment with strong electromagnetic force,otherwise it will cause product failure.product descriptionThank you very much for using the omnidirectional microphone product of our company!Before using this product,please read the product instruction manual carefully.This manual introduces the function,installation and operation of omnidirectional microphone products.This product omnidirectional microphone is a network conference call device with Bluetooth wireless or USB wired connection.Bluetooth cascading between omnidirectional microphone devices can expand the application range of sound pickup and playback.It has the latest generation of voice echo cancellation and environmental noise reduction.Processing algorithm,the sound quality of the call is clear and natural,the body is light,easy to carry,easy to install and operate,especially suitable for application scenarios such as network conference calls between mobile phones, tablets,and computer terminals.The pictures in the product manual are schematic illustrations, please refer to the actual product for details.Packing listOmnidirectional microphone X1Data cable X1Instruction manual X1产品介绍②麦克风②扬声器③蓝牙指示灯③蓝牙键⑤开关机键⑤组队级联键⑤音量“一”键⑧麦克风静音键⑧音量“+”键⑩级联指示灯⑩环形指示灯⑩充电指示灯⑩USB-C接口设备指示灯说明(1)开机:环形指示灯绿灯逐渐亮起,语音提示“开机,等待蓝牙连接”。

说明书示例其他说明works with mijiaworks with mijia支持小爱同学控制(根据产品实际情况贴标)产品专属二维码此二维码请访问 该产品的配置页面获取产品整体说明书需要与以上模板保持相似风格。
将以上模板置于产品整体说明书的适当位置;2、“Works with mijia”和“支持小爱控制”标识使用说明情况一:当产品支持小爱同学语音控制/查询时:需要体现两个标识,且两标识齐平、居中放置,说明如下。
情况二:当产品不支持小爱同学语音控制/查询时:仅体现“Works with mijia”标识,居中放置,说明调整如下。
情况三:米家品牌的产品(小米、米家、米兔)需删除以下文案:本产品已接入米家,可通过米家APP控制。
备注:“Works with mijia”和“支持小爱控制”标识的大小,颜色要求,以及AI图标原件,请见下方附件。
访问: >“控制台” > 该产品配置后台 > “产品申请上线”,下载带米家logo的二维码;在说明书上必须使用带米家logo的二维码,建议印刷尺寸为18mm—22mm (以可扫描识别为准)。
该部分为可选,按说明书实际排版情况,选择三条左右产品可实现的语音指令进行宣传;使用时,将模板中括号内容替换为实际文案。
该部分为可选,按说明书实际排版情况,选择两条左右产品可实现的智能场景进行宣传;需要添加产品的拟物图,虚线框内添加说明;该处的文案需要注意:模版中展示的是APP设置的逻辑,表明设备可以作为触发条件,也可以作为执行动作;文案需要根据自己的产品灵活处理,让用户易于理解,类似:吸顶灯说明书:门锁被打开时,吸顶灯打开;蓝牙温湿度计说明书:湿度低于40%时,加湿器打开;4、小爱同学控制/查询3、产品专属二维码的获取和使用5、智能场景联动每天10:00AM ,扫地机开始清扫10:00AM1、使用说明:12更多联动功能,可以点击APP “智能”页面右上角的“+”,,根据实际场景,选择设备作为触发条件、或者执行动作,自行创建智能联动场景。

MM-202 / MM-202B / MM-202C / MM-202S / MM-202P / MM-202JGooseneck MicrophoneMM-202AUltra Miniature Gooseneck MicrophoneUser GuideAll rights reserved. Do not copy or forward without prior approvals MIPRO.Specifications and design subject to change without notice.MN 014/062CE304CKey Features!Ultra slim profile design for podiums, pulpit and lectern applications.!Proprietary microphone mount design allows 110° up/down and 300° left/right angleadjustments. (MM-202/MM-202B/MM-202C/ MM-202A)!Shock isolation mount design minimizes surface vibration noise.!Multi-layered microphone grills ensures breath "POP" noise is minimized.!Wide dynamic range and frequency response for accurate sound reproduction across the audio spectrum.!Can be connected to MJ-53 Condenser Microphone Adaptor and runs on 48-volt phantom power and used as a gooseneck desktop microphone. (MM-202/MM-202B/ MM-202C/MM-202A/MM-202S)!3.5mm mini jack plug for MIPRO digital wireless tour guide system transmitters. (MM-202P)!MM-202J requires external 48-volt phantom power and used as a desktop gooseneck microphone.∮Gooseneck Diameter 10mm uni-directional condensermicrophone ∮MM-202/MM-202B/MM-202C/MM-202A/ MM-202S: TA4F 4-pin Connector MM-202P: 3.5mm mini jack MM-202J: Cannon PlugMM-202: 470mm / 18.5”MM-202B: 370mm / 14.5”MM-202C: 600mm / 23.6”MM-202A: 130mm / 5.1”MM-202S: 130mm / 5.1”MM-202P: 136mm / 5.3”MM-202J: 535mm (21.06”) /435mm (17.13")BlackRefer to actual product in the event of product discrepancyPlugGooseneck Length CoLor NoteSpecificationsCanReducesCanMicrophone Module: Microphone capsuleprotected by multi-layered grills and effectivelyprevents 'pop' noise.Rotation Hub: Can bend approx 110 degrees.Shock-mount Suspension: Reduces touchnoise.Rotation Hub: Can rotate approx. 300 degrees.Mini-4-pin TA4F (female): Connects to anyMIPRO bodypack transmitter for wireless audiotransmission or MIPRO MJ-53 condensermicrophone adaptor for wired (installed) audiotransmission.MM-202ACanCanGooseneck:angles.a desktopgooseneckmicrophone.MM-202SMicrophone Module: Microphone capsuleprotected by multi-layered grills and effectivelyprevents 'pop' noise.Gooseneck: Can be adjusted in multiple angles.Mini-TA4F (female): Connects to any optionalMIPRO bodypack transmitter or MIPRO MJ-53condenser microphone adaptor.Microphone Module: Microphone capsuleprotected by multi-layered grills and effectivelyprevents 'pop' noise.Gooseneck: Can be adjusted in multiple angles.3.5mm mini jack plugfor MIPRO digital wireless tour guide systemtransmitters.PHONE JACK PLUG:∮MM-202PMM-202/MM-202B/MM-202C/MM-202A Desktop Install InstructionsWireless Audio Transmission:Plug MM-202/MM-202B/MM-202C/MM-202A into an optional MIPRO bodypack transmitter and MD-101 desktop base holder . (see diagram 1)Wired Audio Transmission:Plug MM-202/MM-202B/MM-202C/MM-202A into an optional MIPRO MJ-53 condenser microphone adaptor and MJ-53 into any 48-volt phantompowered desktop base with balanced XLR female. (See diagram 2)Applications:Ideal for applications in lecterns, podiums, desks, and tabletops.!!!(Figure 1)Operating Instructions for external Gooseneck Microphone1.position.Remove protective cover . Ensure the Talk/Mutebutton is at Mute position (up) before gooseneck microphone is inserted into the connector as shown to avoid the undesired noises.2.MM-202/MM-202B/MM-202C/MM-202A gooseneck microphonesBC-100 Wireless Boundary MicrophoneMM-202J Install Instructions!!Two different lengths for different amplification applications.Requires external 48-volt phantom power and used as a desktop gooseneck microphone.(Figure 5)Install InstructionsMM-202A/MA-202S Wireless Audio Transmission:Plug MM-202A/MM-202S into an optional MIPRO bodypack transmitter and it can be used as a 'handheld' microphone for mobile application. (see diagram 3)Applications:Ideal for wireless 'handheld' or installed lecterns, podiums, desks, and tabletops applications.MM-202P Wireless Audio Transmission:!Mini-Gooseneck Microphone. (once plugged, it can be used as a handheld) !!Frequency ResponseDispose of any unusable devices or batteriesresponsibly and in accordance with any applicable regulations.Disposing of used batteries with domestic waste is to be avoided!Batteries / NiCad cells often contain heavymetals such as cadmium(Cd), mercury(Hg) and lead(Pb) that makes them unsuitable fordisposal with domestic waste. You may return spent batteries/ accumulators free of charge to recycling centres or anywhere else batteries/accumulators are sold.By doing so, you contribute to the conservationPolar PatternDisposal FCCTHIS DEVICE COMPLIES WITH PART 74 OF THE FCC RULES.OPERATION IS SUBJECT TO THE FOLLOWING TWO CONDITIONS:(1) This device may not cause interference.(2) This device must accept any interference, including interference that may cause undesired operation of the device.This equipment complies with FCC RF radiation exposure limits set forth for an uncontrolled environment.ICThis device complies with Industry Canada RSS-123ISSUE 2 standards. Operation is subject to the following two conditions:(1) this device may not cause interference, and (2) this device must accept any interference, including interference that may cause undesired operation of the device.Le présent appareil est conforme aux CNR d'IndustrieCanada applicables aux appareils radio exempts de licence. L'exploitation est autorisée aux deux conditions suivantes: (1) l'appareil ne doit pas produire de brouillage, et (2) l'utilisateur de l'appareil doit accepter tout brouillage radioélectrique subi, même si le brouillage est susceptible d'en compromettre le fonctionnement.Notes1.Refer to actual product in the event of product description discrepancy.。

mi jia k歌麦克风使用说明书
篇一
全民K歌麦克风底部有4个插口,具体使用步骤如下:
1、找到音频ph-120手机K歌麦的底部插口;
2、监听耳机插入标注带有耳机图案的接口;
3、麦克风带有一根3.5转3.5的接线,一头插在K歌麦克风底部带有OMTPPHONE的接口,另一头插在手机的耳机接入口;
4、手机K歌打开麦克风开关,打开手机软件全民K歌,戴上耳机,可以使用麦克风唱歌。
篇二
首先打开K歌宝话筒的电源,然后打开手机的蓝牙功能并搜索此设备,搜索到以后点击进行连接,连接成功以后可以听到叮咚”提示声,这样就能正常使用此款设备了,之后打开K歌App就能尽情唱歌了。
全民K歌使用技巧:1、开通VIP会员--在全民K歌App主页点击左上角的“三条横线”按钮,在弹出的对话框中点击“会员中心”选项,进入会员中心页面以后,我们点击页面中的“立即加入”按钮,然后我们需要选择开通的时间并进行支付即可。
2、加入合唱音效--在全民K歌App点击下方的“点歌”按钮,接着我们点击“一首歌曲录制”按钮,在进入录歌的时候,我们点
击录歌页面左下方的“麦克风”按钮,然后点击“合唱”按钮,这样我们录制的歌曲就有合唱的效果了。
3、查看访问记录--打开全民K歌App进入首页,然后点击页面下方的“消息”选项,在消息页面中点击右上角的“最近听众”选项,进入后就可以查看其他用户的访问记录了。
我们点击一个访客进入对方的个人信息主页,然后就可以看到对方的粉丝以及关注的人,但是并不能看到对方的访问记录,所以说用户在全民K歌的浏览记录是属于隐私,会被隐藏起来。

物品清单1产品外观2连接设备3服务地址: 深圳市南山区科技园中区园西工业区24栋南楼1层 客服部(收)技术支持热线:400-8810-500E-mail:******************.cn 邮 编: 518057未经深圳市美科星通信技术有限公司明确书面许可,任何单位或个人不得擅自仿制、复制、誊抄或转译本书部分或全部内容。
不得以任何形式或任何方式(电子、机械、影印、录制或其他可能的方式)进行商品传播或用于任何商业、赢利目的。
Copyright © 2021 深圳市美科星通信技术有限公司版权所有,保留所有权利。
声明:为深圳市美科星通信技术有限公司注册商标。
本文档提及的其他所有商标或注册商标,由各自的所有人拥有。
本手册所提到的产品规格和资讯仅供参考,如有内容更新,恕不另行通知。
除非有特殊约定,本手册仅作为使用指导,本手册中的所有陈述、信息等均不构成任何形式的担保。
深圳市美科星通信技术有限公司客户服务7108502514 REV1.0.0水星安防APP系统指示灯和白光报警灯支持Micro SD卡本地存储,插入SD卡,进入“水星安防”APP进行初始化后才能正常使用Micro SD卡槽长按RESET键5秒,设备将恢复出厂状态RESETRJ45端口,用以连接以太网设备,如路由器、交换机等。
LAN口DC电源接口通过此接口可接入DC9V的电源适配器麦克风指示灯闪烁规则红灯常亮红绿灯交替闪烁绿灯慢闪绿灯常亮绿灯快速闪烁红灯快速闪烁设备正在启动设备启动完成,等待配置Wi-Fi设备正在连接Wi-Fi设备已连接Wi-Fi设备正在升级设备正在恢复出厂设置用手机扫描二维码下载并安装“水星安防”APP,根据APP提示,完成用户注册。
将摄像头尽量靠近家中路由器并连接电源,再按照配置设备设置摄像头。
路由器手机将设备接通电源,指示灯亮起红灯时表示设备正在启动,持续时间约1分钟。
当指示灯不停地红绿交替闪烁时,表示设备启动完成,等待配置Wi-Fi。
米家麦克风说明书
一、产品概述:
二、产品特点:
1.高清晰度录音:米家麦克风采用了先进的噪声降低技术和高保真录
音芯片,能够清晰记录声音,并减少周围环境的杂音干扰。
2.灵敏度可调:麦克风的灵敏度可以根据需要进行调节,适应不同的
录音环境,保证录制的音频质量。
3.多功能接口:米家麦克风具有多功能接口,可以连接到电脑、手机、电视等设备,方便用户进行录音或直播。
4.耳机监听功能:麦克风具备耳机监听功能,用户可以实时监控自己
的声音,在录制过程中进行调整,提高录音效果。
5.便携轻巧:米家麦克风体积小巧,重量轻,方便携带,用户可以随
时随地进行录音。
三、使用方法:
1.连接设备麦克风的接口根据使用的设备而异,插入对应接口后,麦
克风即可正常工作。
2.调整灵敏度米家麦克风支持灵敏度的调节,根据录音环境的噪音情况,转动调节旋钮,选择合适的录音灵敏度。
3.监听录音使用耳机连接至麦克风的耳机接口,可以实时监听自己的
录音效果,调整录音的音量和音质。
4.录制声音按下麦克风上的录制键即可开始录音,录音期间可以进行
演唱、演讲等操作,录音结束后再次按下录制键停止录音。
四、注意事项:
1.保持清洁:使用前请确保麦克风和周围环境的清洁,避免灰尘和杂
质对录音效果的影响。
2.避免撞击:请避免麦克风的重物压力和剧烈撞击,以免损坏设备。
3.调节适度:录制期间请适度调整音量和音质,避免高音量使用对听
力产生不良影响。
4.避免水或潮湿:请避免将麦克风浸泡在水中,避免湿气进入设备,
可能损坏设备。
5.存储保护:保存录音文件时,请将麦克风放置在干燥通风处,避免
长时间反复插拔连接,以免损坏接口。
总结:
米家麦克风是一款高质量音频设备,具有高清晰度录音、灵敏度可调、便携轻巧等特点。
使用时,请正确连接设备,调节合适的录音灵敏度,通
过耳机监听录音效果,并注意保持清洁和防护,避免损坏设备。
希望本说
明书能帮助用户更好地了解和应用米家麦克风,为用户的录音和直播带来
更好的体验。