CMA7电动操作机构使用说明书
- 格式:pdf
- 大小:2.03 MB
- 文档页数:27

HM0.460.501上海华明电力设备制造有限公司CZ 型真空有载分接开关使用说明书HM 0.463.1101-01.08/2012HM0.460.1101目 录一、概述 ⋯⋯⋯⋯⋯⋯⋯⋯⋯⋯⋯⋯⋯⋯⋯⋯⋯⋯⋯⋯⋯⋯⋯⋯⋯⋯⋯⋯⋯⋯⋯⋯⋯⋯⋯⋯⋯⋯2二、开关结构 ⋯⋯⋯⋯⋯⋯⋯⋯⋯⋯⋯⋯⋯⋯⋯⋯⋯⋯⋯⋯⋯⋯⋯⋯⋯⋯⋯⋯⋯⋯⋯⋯⋯⋯⋯⋯4三、工作特性 ⋯⋯⋯⋯⋯⋯⋯⋯⋯⋯⋯⋯⋯⋯⋯⋯⋯⋯⋯⋯⋯⋯⋯⋯⋯⋯⋯⋯⋯⋯⋯⋯⋯⋯⋯⋯4四、技术参数 ⋯⋯⋯⋯⋯⋯⋯⋯⋯⋯⋯⋯⋯⋯⋯⋯⋯⋯⋯⋯⋯⋯⋯⋯⋯⋯⋯⋯⋯⋯⋯⋯⋯⋯⋯⋯6五、开关附件 ⋯⋯⋯⋯⋯⋯⋯⋯⋯⋯⋯⋯⋯⋯⋯⋯⋯⋯⋯⋯⋯⋯⋯⋯⋯⋯⋯⋯⋯⋯⋯⋯⋯⋯⋯⋯7六、安装使用事项 ⋯⋯⋯⋯⋯⋯⋯⋯⋯⋯⋯⋯⋯⋯⋯⋯⋯⋯⋯⋯⋯⋯⋯⋯⋯⋯⋯⋯⋯⋯⋯⋯⋯⋯7七、随机文件 ⋯⋯⋯⋯⋯⋯⋯⋯⋯⋯⋯⋯⋯⋯⋯⋯⋯⋯⋯⋯⋯⋯⋯⋯⋯⋯⋯⋯⋯⋯⋯⋯⋯⋯⋯10八、订货及使用须知⋯⋯⋯⋯⋯⋯⋯⋯⋯⋯⋯⋯⋯⋯⋯⋯⋯⋯⋯⋯⋯⋯⋯⋯⋯⋯⋯⋯⋯⋯⋯⋯⋯10九、附录⋯⋯⋯⋯⋯⋯⋯⋯⋯⋯⋯⋯⋯⋯⋯⋯⋯⋯⋯⋯⋯⋯⋯⋯⋯⋯⋯⋯⋯⋯⋯⋯⋯⋯⋯⋯⋯⋯1012一、概述CZ型真空有载分接开关是华明公司根据自己多年有载分接开关设计制造经验而推出的具有自主知识产权的高科技、高可靠性、无环境污染的产品。
该产品适用于户内安装的干式变压器,通过该有载分接开关,可以在变压器带负荷的情况下改变变压器的调压绕组的分接头,从而达到调整电压的目的。
分接开关设计为单相结构,可以满足变压器绕组的任意连接方式。
对于三相干式变压器,可使用三台单相CZ 型开关,采用机械连动的方式,由一台电动机构进行操作。
CZ型分接开关为组合式结构,采用快速电阻过渡的切换原理。
在分接变换过程中,先由分接选择器进行分接头选择,然后由切换开关部分进行负载切换。
1.1 开关主要特点★ 采用美国西屋公司专为满足分接开关的运行条件而生产的真空灭弧室,确保开关的运行质量及 使用寿命。
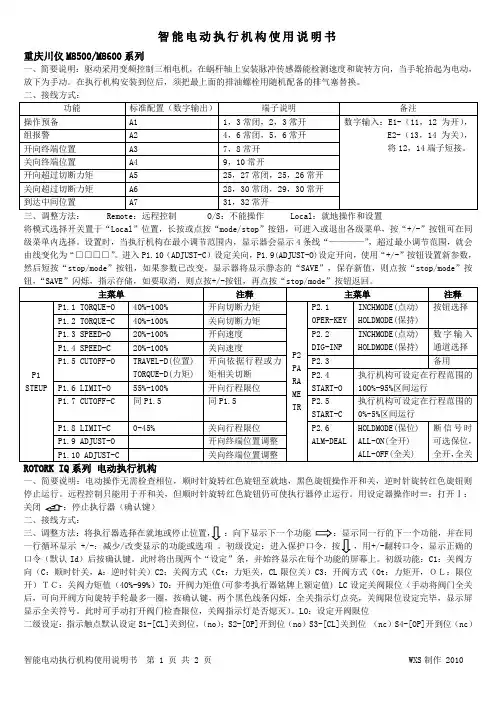
智能电动执行机构使用说明书重庆川仪M8500/M8600系列一、简要说明:驱动采用变频控制三相电机,在蜗杆轴上安装脉冲传感器能检测速度和旋转方向,当手轮抬起为电动,放下为手动。
在执行机构安装到位后,须把最上面的排油螺栓用随机配备的排气塞替换。
三、调整方法: Remote :远程控制 O/S :不能操作 Local :就地操作和设置将模式选择开关置于“Local ”位置,长按或点按“mode/stop ”按钮,可进入或退出各级菜单,按“+/-”按钮可在同级菜单内选择。
设置时,当执行机构在最小调节范围内,显示器会显示4条线“————”,超过最小调节范围,就会由线变化为“□□□□”。
进入P1.10(ADJUST-C )设定关向,P1.9(ADJUST-O)设定开向,使用“+/-”按钮设置新参数,然后短按“stop/mode ”按钮,如果参数已改变,显示器将显示静态的“SAVE ”,保存新值,则点按“stop/mode ”按钮,“SAVE ”闪烁,指示存储,如要取消,则点按+/-按钮,再点按“stop/mode ”按钮返回。
一、简要说明:电动操作无需检查相位,顺时针旋转红色旋钮至就地,黑色旋钮操作开和关,逆时针旋转红色旋钮则停止运行。
远程控制只能用于开和关,但顺时针旋转红色旋钮仍可使执行器停止运行。
用设定器操作时≡:打开Ⅰ:关闭 二、接线方式::向下显示下一个功能一行循环显示 +/-:减少/改变显示的功能或选项 。
初级设定:进入保护口令,按,用+/-翻转口令,显示正确的口令(默认Id )后按确认键。
此时将出现两个“设定”条,并始终显示在每个功能的屏幕上。
初级功能:C1:关阀方向(C :顺时针关,A :逆时针关)C2:关阀方式(Ct :力矩关,CL 限位关)C3:开阀方式(Ot :力矩开,OL:限位开)TC:关阀力矩值(40%-99%)TO :开阀力矩值(可参考执行器铭牌上额定值) LC 设定关阀限位(手动将阀门全关后,可向开阀方向旋转手轮最多一圈,按确认键,两个黑色线条闪烁,全关指示灯点亮,关阀限位设定完毕,显示屏显示全关符号。

Midas Rex® MR7NEXT GENERATION OF HIGH-SPEED PNEUMATIC MOTORSExceptional power.Surprisingly agile.Performance reinvented.P o w e r a n d P e r f o rMidas Rex ®MR7Power and Performance Reinvented.Forty years later, we still believe in continuous innovation and learning from experience. The Midas Rex® MR7 and new MR7 Touch High-Speed Pneumatic Motors deliver the dynamic power and performance you expect, and then some. With innovative proprietary technology throughout the system, every component is carefully engineered and manufactured for maximum power with increased durability.Dynamic Performance Technology.• Patented technology designed to deliver efficient performance• Precision-engineered and manufactured for quality and durability• Innovative lubrication system for consistent oil delivery in every caseExceptional Power.• Delivers more torque and power when you need it most• 72,000 rpm at 120 psi/8 barMidas Rex® has 40 years of leadership and innovation in high-speed pneumatic drills.*Compared to Midas Rex Legend Gold® System **Compared to Midas Rex Legend Gold® Touchuu 20% more power *uu 20% more torque *MR7m a n c e r e i n v e n t e d.User-Friendly Foot Control.• Open pedal design for easy access and repositioning • A utomatic port cover helps protect the motor port when not in use• Compatible with Midas Rex® Legend Gold®, Legend Gold Touch®, and Legend Platinum® motors• Easy to set up, service, and expandStandardized Platform.• U ses the Legend® dissecting tools and attachments • Comprehensive product line to meet your needsSurprising Agility.• S maller and lighter hose for easy maneuveringand handling in the OR• Ergonomic enhancements overall for more comfortable usePower and Performance You Can Depend On.uu 10% more power **uu 15% more torque **Control at Your Fingertips.• Additional convenience in the OR• Ergnomically designed adjustable extension lever • MR7 Touch onlyMR7 TouchMidas Rex ® MR7Ordering InformationQtyPM700 • Midas Rex® MR7 Motor1PM710 • M idas Rex® MR7 Touch Motor 1PA700 • Disposable Oiler/Diffuser 1PC700 • Foot Control 1PC710 • Regulator Hose 1PC720 • Triton® Adapter1PA600• Instrument Case 1Replacement PartsPA615 - Lid, PA620 - Tray, PA625 - Tray MatLegend® System AccessoriesPA120 • Legend Attachment Cleaning Nozzle PA130 • Legend Motor WrenchPA200 • Legend Regulator (DISS conn.)PA300 • Legend 1.2mm Cleaning Brush (1/32”)PA310 • Legend 2.4mm Cleaning Brush (3/32”)PA320 • Legend 3.2mm Cleaning Brush (1/8”)PA305 • Legend 1.2mm Cleaning Brush (5pk)PA315 • Legend 2.4mm Cleaning Brush (5pk)PA325 • Legend 3.2mm Cleaning Brush (5pk)PA115 • Legend Tool Storage Rack PC110 • Legend FN2-DISS to M-Schr PC120 • Legend FN2-DISS to MA-DISS PC130 • Legend WF4 Connector PC140•Legend FN2-DISS to F-SchrMedtronic Powered Surgical Solutions 4620 North Beach Street Fort Worth, TX 76137USAAUTHORIZED REPRESENTATIVE IN EU:Medtronic® B.V.Earl Bakkenstraat 10, 6422 PJ Heerlen The NetherlandsORDERS:Customer Service 1-800-433-7080FAX: 800-468-9713REPAIRS:Repair Department 1-800-335-9557FAX: 817-788-6441For more information, contact your Medtronic NT sales representative or refer to . Refer to instruction manual for instructions, warnings, precautions and contraindications.F e d e r a l L a w (U S A ) r e s t r i c t s t h i s d e v i c e f o r s a l e b y o r o n t h e o r d e r o f a p h y s i c i a n . P a t e n t s P e n d i n g . ©2009, M e d t r o n i c , I n c . A l l R i g h t s R e s e r v e d . M i d a s R e x ®, L e g e n d ®, L e g e n dG o l d ®, L e g e n d G o l d T o u c h ®, a n d T r i t o n ® a r e r e g i s t e r e d t r a d e m a r k s o f M e d t r o n i c , I n c .L I T 250023E N .R N E W 12.09International Telephone Numbers Adriatic Reg. Office 385-1-488-1120Australia 1800-668-670Baltic Reg. Office 37-1-67560226Belgium 32-2456-09-09Canada 1800-217-1617China 86-21-50800998Czech Republic 420-2-9657-9580France 33-155-381-700Germany 49-2159-8149-209Greece 30-210-67-79-099 Hong Kong 852-2919-1312Hungary 36-30-5052987India 91-22-26836733Israel 972-9-972-4400Italy 39-02-24137-324Japan 81-3-6430-2017Korea 82-2-3404-3600Lebanon 961-1-370-670Luxembourg 32-2456-09-09Netherlands 31-45-566-8800Poland 48-22-465-6942Russian Fed. 7-495-580-73 77Singapore 65-6776-6255South Africa 27-11-466-1820Spain 34-91-625-05-40UK 44-1923-205-166USA 1-904-296-9600。
版权声明本用户手册的版权归西安唐都科教仪器开发有限责任公司所有,保留一切权利。
非经本公司书面许可,任何单位和个人不得擅自摘抄、复制本用户手册的部分或全部,并以任何形式传播。
西安唐都科教仪器开发有限责任公司,1999-2008(C),All right reserved.TD-CMA实验系统用户手册©版权所有非经许可严禁复制技术支持邮箱:tangdukejiao@唐都公司网址:/目录第1章TD-CMA系统概述 (1)1.1 系统功能及特点 (1)1.2 系统构成 (3)1.3 系统主要实验项目 (4)第2章TD-CMA系统的配臵与安装 (5)2.1 系统配臵 (5)2.2 系统的安装 (6)第3章TD-CMA系统硬件环境 (7)3.1 系统硬件布局图 (7)3.2 系统电源 (7)3.3 系统实验单元电路 (8)3.4 注意事项 (21)第4章TD-CMA系统集成操作软件 (22)4.1 与PC联机说明 (22)4.2 软件操作说明 (22)第5章TD-CMA系统检测功能说明 (32)第6章TD-CMA系统常见故障的分析及处理 (34)附录1 微程序流图编程方法 (35)1第1章 TD-CMA 系统概述TD-CMA 教学实验系统是西安唐都科教仪器公司2008年推出的新一代计算机组成原理与系统结构教学的实验设备,该设备可使学生通过实验来更有效的理解并掌握计算机的构成,为进一步开展具有实用价值的计算机系统的设计打下良好的基础。
1.1 系统功能及特点1.先进丰富的课程内容使用实时动态图形调试实验方法,进行计算机组成原理的实验教学,比以往各种实验设备增加了并行运算器、Cache 高速缓存、CPU 设计、外总线接口设计、中断、DMA 等实验内容,并可开展CISC 、RISC 、重叠、流水等先进计算机系统结构的设计和实验研究。
2.先进设计方法和开发工具采用VHDL 语言、ALTREA 公司最新MAXII 系列CPLD 和先进设计开发工具QUARTUS II 来开展设计性的实验,具有更好的实用价值。
HM0.460.1301上海华明电力设备制造有限公司上海华明电力设备制造有限公司HM 0.460.1301-02.05/2014SHM-I 型 智能型电动操作机构使用说明书目 录1.概述⋯⋯⋯⋯⋯⋯⋯⋯⋯⋯⋯⋯⋯⋯⋯⋯⋯⋯⋯⋯⋯⋯⋯⋯⋯⋯⋯⋯⋯⋯⋯⋯⋯⋯⋯⋯12.功能介绍及使用条件⋯⋯⋯⋯⋯⋯⋯⋯⋯⋯⋯⋯⋯⋯⋯⋯⋯⋯⋯⋯⋯⋯⋯⋯⋯⋯⋯⋯⋯23.技术参数⋯⋯⋯⋯⋯⋯⋯⋯⋯⋯⋯⋯⋯⋯⋯⋯⋯⋯⋯⋯⋯⋯⋯⋯⋯⋯⋯⋯⋯⋯⋯⋯⋯⋯24.结构介绍 ⋯⋯⋯⋯⋯⋯⋯⋯⋯⋯⋯⋯⋯⋯⋯⋯⋯⋯⋯⋯⋯⋯⋯⋯⋯⋯⋯⋯⋯⋯⋯⋯⋯35.SHM-I SHM-II外形安装尺寸图⋯⋯⋯⋯⋯⋯⋯⋯⋯⋯⋯⋯⋯⋯⋯⋯⋯⋯⋯⋯⋯⋯⋯⋯46.HMK7外形图⋯⋯⋯⋯⋯⋯⋯⋯⋯⋯⋯⋯⋯⋯⋯⋯⋯⋯⋯⋯⋯⋯⋯⋯⋯⋯⋯⋯⋯⋯⋯⋯47.SHM电动机构与HMK7控制器外部连线示意图⋯⋯⋯⋯⋯⋯⋯⋯⋯⋯⋯⋯⋯⋯⋯⋯⋯⋯58.安装⋯⋯⋯⋯⋯⋯⋯⋯⋯⋯⋯⋯⋯⋯⋯⋯⋯⋯⋯⋯⋯⋯⋯⋯⋯⋯⋯⋯⋯⋯⋯⋯⋯⋯⋯⋯59.操作⋯⋯⋯⋯⋯⋯⋯⋯⋯⋯⋯⋯⋯⋯⋯⋯⋯⋯⋯⋯⋯⋯⋯⋯⋯⋯⋯⋯⋯⋯⋯⋯⋯⋯⋯⋯610.投入使用⋯⋯⋯⋯⋯⋯⋯⋯⋯⋯⋯⋯⋯⋯⋯⋯⋯⋯⋯⋯⋯⋯⋯⋯⋯⋯⋯⋯⋯⋯⋯⋯⋯711.维修及改造常见问题⋯⋯⋯⋯⋯⋯⋯⋯⋯⋯⋯⋯⋯⋯⋯⋯⋯⋯⋯⋯⋯⋯⋯⋯⋯⋯⋯812.附录:HMK7控制器和SHM电动机构的接线图⋯⋯⋯⋯⋯⋯⋯⋯⋯⋯⋯⋯⋯⋯⋯⋯⋯8HM0.460.1301 1.概述SHM智能型电动操作机构,是我公司技术人员自行设计研制的具有自主知识产权的智能型、全通用的有载分接开关操作机构。
其显著特点就是:用当今先进的信息技术、微电子元件、计算机技术替代传统的有触点、要靠机械动作来完成电器功能的电器元件。
目前国内外有载分接开关电动操作机构,均为有触点、机械式的电器元件;采用接触器、继电器、凸轮开关、行程开关,加上凸轮连杆、杠杆、弹簧等组成一个极其复杂的传动控制系统,这些复杂的传动控制系统直接影响了机构本身的机械寿命及运行质量。
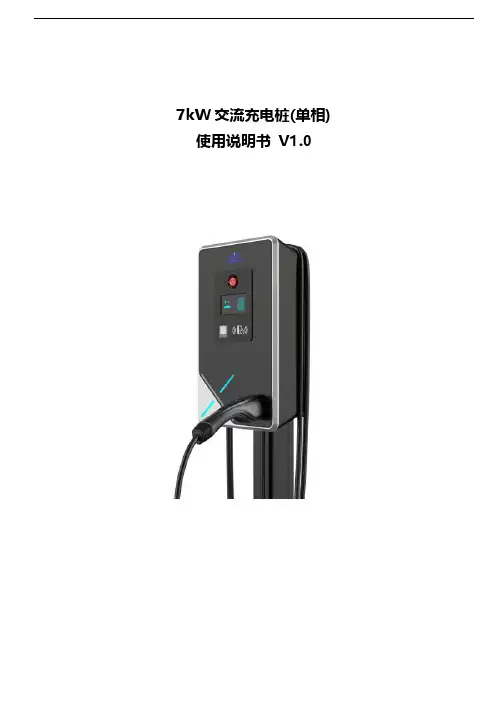
7kW交流充电桩(单相) 使用说明书V1.0目录目录...................................................................................................................... - 1 -安全注意事项 .............................................................................................................. - 2 -第1章产品介绍 ........................................................................................................... - 2 -1.1 产品简介 ........................................................................................................... - 2 -1.2 产品原理框图 ....................................................................................................... - 3 -1.3 主要参数说明 ....................................................................................................... - 3 -1.4 产品特点 ........................................................................................................... - 4 -1.5 产品设计规范 ....................................................................................................... - 4 -1.6 产品结构 ........................................................................................................... - 5 -1.6.1 整体外形图.................................................................................................... - 5 -1.6.2壁挂式安装说明................................................................................................ - 5 -1.6.3立柱式安装说明................................................................................................ - 6 -1.6.4接线说明...................................................................................................... - 6 -第2章操作说明 ............................................................................................................ - 7 -2.1设备上电检查、调试.................................................................................................. - 7 -2.2充电操作............................................................................................................ - 7 -2.2.1 充电连接 ..................................................................................................... - 7 -2.2.2 充电控制 ..................................................................................................... - 7 -2.2.3 充电停止 ..................................................................................................... - 8 -2.2.4 充电结算 ..................................................................................................... - 8 -第3章常见故障处理 ........................................................................................................ - 9 -安全注意事项1)请勿将易燃、易爆或可燃材料、化学物、可燃蒸汽等危险物品靠近充电桩;2)儿童请勿在充电过程中靠近、使用充电桩,以免造成伤害;3)如遇下雨打雷天气,请谨慎充电;4)严禁在充电枪或充电线缆存在缺陷、裂痕、磨损、破裂、充电线缆裸露等情况下使用充电桩,如有发现,请及时联系工作人员;5)请保持充电枪头清洁干燥,如有脏污,请用清洁的干布擦拭,严禁带电时用手触碰充电枪芯;6)请勿试图拆卸、维修、改装充电桩,如有维修、改装需求,请联系工作人员,不正当的操作可能会造成设备损坏、漏水、漏电等情况;7)使用过程中如有什么异常情况,可立即按下急停按钮,切断所有输入输出电源;8)在充电过程中,车辆禁止行驶,只有在静止时才能进行充电;9)混合动力电车请熄火后再进行充电。

文件制修订记录1目的为了保证检验检测设备正确、有效的使用和维护,以确保检验检测工作的质量。
2适用范围本程序适用于公司检验检测工作所用设备的使用、管理与维护。
3职责3.1检验检测设备的安装、使用,由相关检验检测部负责。
3.2检验检测设备日常的维护,主要由公司负责,市场部负责设备的检修、报废和各种资料的归档。
4工作程序4.1 检验检测设备的使用4.1.1相应部门具体负责检验检测设备的安装、调试等软硬件的建立工作,并指定检验检测设备的责任使用人。
在建立工作结束后,责任使用人应提交该检验检测设备的完整文件资料给综合部存档。
4.1.2检验检测设备由经培训考核合格的人员才能操作使用。
关键设备的操作人员,应经公司负责人授权。
4.1.3使用人员必须自觉爱护检验检测设备,经常保持检验检测设备的整齐、滑润、清洁和安全。
4.1.4使用人员应严格遵守检验检测设备的操作规程,做到用好、管好:会保养、会检查、会排除一般性故障,不允许精机粗用,严禁超负荷、超量程使用。
4.1.5对外来人员不论其水平高低,一律不得操作检验检测设备(计量、检修时除外),否则,发生事故由使用人员和部门领导负责。
4.1.6对使用的检验检测设备,应认真填写《检验检测用仪器设备经历簿》以记录其工作等各种情况。
4.2检验检测设备的管理4.2.1综合部编制《检验检测用仪器设备配置表》、《检验检测用设备表》,内容单位、最近校准/检定日期、校准/检定周期、使用部门等信息。
4.2.2工程检测部门制订检验检测设备的校准/检定计划并实施(参见《检验检测设备的校准/检定与计量溯源程序》)。
4.2.3经校准/检定后的检验检测设备,由设备管理员用明显的标识表明其校准/检定状态。
如采用标签的方式时,合格的用绿色,准用的(功能不完全合格,可限制在一定范围内使用,此范围由校准/检定部门标定)用黄色,禁用的(不合格或待检)用红色。
标签上应包括必要的信息,如最近校准/检定日期、下次校准/检定日期或校准/检定周期等。
电动车行业仪器器材使用方法说明书一、引言电动车作为一种环保、低碳的交通工具,已经得到了广泛的应用和推广。
为了保证电动车的正常运行和使用,合理、正确地使用仪器和器材是非常重要的。
本说明书旨在详细介绍电动车行业仪器器材的使用方法,帮助用户正确操作和维护。
二、安全注意事项1. 在使用仪器器材之前,请确保已经阅读并理解相关的安全操作手册和说明书。
2. 在操作仪器时,应戴上适当的防护装备,包括但不限于手套、护目镜等。
3. 请保持使用环境干燥,避免水分或其他液体进入仪器内部。
4. 请确保仪器器材与电源的连接正确可靠,避免电气短路或其他危险。
5. 如遇到操作困难或有疑问,请立即停止使用并向专业人士咨询。
三、电动车检测仪器1. 电池仪:用于检测电动车电池的电压、电流、电量等参数。
- 操作方法:将电池仪与电源正确连接,观察仪表显示的数值。
- 注意事项:请勿将电池仪湿水,禁止在高温或易燃环境中使用。
2. 车速仪:用于检测电动车行驶速度。
- 操作方法:将车速仪固定在车身上,保持仪器水平,观察仪表显示的车速数值。
- 注意事项:请在安全的道路上进行测试,并注意行车安全。
3. 电机测试仪:用于检测电动车电机的性能和效率。
- 操作方法:将电机测试仪与电动车电机正确连接,根据仪器显示的参数进行测试。
- 注意事项:请在停车状态下进行测试,避免发生意外。
四、电动车维修工具1. 螺丝刀:用于拧紧和松开电动车部件的螺丝。
- 使用方法:选择适合的螺丝刀头,顺时针或逆时针旋转进行拧紧或松开螺丝。
- 注意事项:请使用力度适中,避免损坏螺丝或其他部件。
2. 扳手:用于拆卸电动车部件。
- 使用方法:选择与螺母大小相匹配的扳手,逆时针旋转进行拆卸。
- 注意事项:请避免用力过猛,以免损坏部件或者自身受伤。
3. 防滑垫:用于增加电动车零部件的摩擦力,防止松动。
- 使用方法:根据需要,选择合适的防滑垫放置在零部件之间。
- 注意事项:请定期检查防滑垫磨损情况,并及时更换以保证其使用效果。

7 Amp SOLAR CHARGE CONTROLLERUser’s ManualCongratulations on your Coleman® solar product purchase. This product is designed to the highest technical specifications and standards. It will supply years of maintenance free use. Please read these instructions thoroughly prior to installation, then store in a safe place for future reference. SPECIFICATIONSCut-in Voltage: 13VoltsCut-Out Voltage: 14.2 VoltsMax. Load: 105 Watts/ 7 AmpsINSTALLATIONConnect to Battery:Attach the Solar Charge Controller positive (+) wire to the positive (+) battery terminal. Then connect the Solar Charge Controller negative (-) wire to the negative (-) battery terminal.WARNING: The alligator clips MUST be placed on to the battery in the aforementioned order—wrong connections may cause sparking or explosion.Connect to Solar Panel:Option 1Strip the solar panel wires. Connect positive (+) wire from the solar panel to the positive (+) of the charge controller and the negative (-) wire from the solar panel to the negative (-) of the charge controller. Ensure the connections are secure.Option 2Some panels may include a quick connect for use with the Solar Charge Controller. If included, connect positive to positive and negative to negative of charge controller. Ensure connections are secure. OPERATIONThe Green “Charged” light indicates a full-charged battery. When the battery reaches 14.2 V, the Solar Charge Controller will cut out voltage thereby ensuring no overcharging. The yellow “Charging” light indicates a battery that is being charged. When the battery reaches 13 V, the Battery Charge Controller will cut-in and begin charging.NOTES•The Solar Charge Controller should be placed within 5 feet of the battery in a dry, well ventilated area.•This Battery Charge Controller can support up to 105 W and up to 7 A of array current. It is not advisable to use with greater wattage.•All connections should be parallel to ensure 12 V system (positive to positive and negative to negative).FAQHow many panels can I connect to my 7 Amp Solar Charge Controller?You can connect up to 105 Watts of Solar Power to the 7 Amp Solar Charge Controller. Panels should be connected in parallel – positive to positive, negative to negative.When will the Charged Indication light (green) light up?The charged indication green light will light up when the battery voltage reaches 14.2 Volts and the SCC will prevent the solar panels from overcharging the battery. It is normal for the SCC LED to light on and off as the battery voltage cuts in and out.GENERAL TESTING PROTOCOLAlways test outdoors under optimal sunlight.Test Solar Panel for VoltageConnect Voltmeter to the panel separately from the charge controller and observe Open Voltage. Open Voltage can range from 16 Volts to 24 Volts.Test Connection to Charge Controller for Voltage.Reconnect solar panel, and connect to charge controller as per instructions. Measure the Open Circuit Voltage at the battery side of the charge controller. Open circuit voltage should read 5-10% lower than without charge controller. Open circuit measurement will read between 15 and 23.5.Connect Charge Controller to BatteryFirst, disconnect solar panels and connect charge controller to battery. Always connect charge controller to battery first and remove last. Observe polarity – positive to positive and negative to negative.Reconnect Solar Panels to Charge ControllerIf battery voltage is 14.2 or higher, the GREEN LED should be on. If battery voltage is between 13 and 14.2, the YELLOW LED should be on. If battery voltage is 13 or lower, the RED LED should be on.If all testing results within the above indicated ranges, solar system is in acceptable range. If Voltage readings indicate lower ranges, repeat above connections and retest. Finally, it is common to have 12V battery issues such as dead cells or non-rechargeable battery problems.。
电动工具操作手册注意事项:1. 安全第一:在操作电动工具之前,请务必了解并遵守以下安全注意事项,以确保自身和他人的安全。
2. 工具保养:正确的使用和保养电动工具,可以延长其寿命并保持其性能。
3. 操作步骤:详细说明电动工具的操作步骤,以便用户正确操作。
安全注意事项:1. 佩戴个人防护装备:在操作电动工具时,务必佩戴安全帽、防护眼镜、耳塞、手套和防滑鞋等个人防护装备。
2. 彻底了解工具功能:在使用新的电动工具之前,请先阅读说明书,了解工具的功能、特点和限制。
3. 检查工具完整性:在使用电动工具之前,仔细检查工具是否完好无损,是否有裂纹或损坏的零部件。
4. 检查电源和电池:确保电源插头和电源线处于良好状态,电池已充满电并无损坏。
5. 工作环境清洁整齐:操作电动工具时,工作区域应保持干净整齐,避免杂物干扰工作。
6. 禁止解除安全装置:不要解除电动工具上的任何安全装置,例如切断器、自锁开关和防护罩。
7. 防止触电:不要将电动工具接触到水或潮湿的地面上,以免触电危险。
8. 切勿超负荷使用:请确保使用适合工作负荷的电动工具,不要超负荷使用。
9. 熟悉紧急停止装置:在紧急情况下,立即使用电动工具上的紧急停止装置切断电源。
10. 妥善存放工具:使用完毕后,请将电动工具妥善存放在干燥、安全的地方,远离儿童。
工具保养:1. 清洁工具:在使用电动工具之前和之后,请务必清洁工具表面,确保无尘、无油渍和无杂物。
2. 定期检查电源线和插头:定期检查电源线和插头是否有损坏,确保其可靠性和安全性。
3. 保持工具锋利:根据工具类型和使用频率,定期检查并修复、更换刀片、磨头或链条等易损件。
4. 润滑工具:在使用一些特定类型的电动工具时,需要在规定的位置添加适量的润滑油,以保持工具的正常运行。
5. 存储要求:将电动工具存放在干燥、通风良好的地方,远离火源和易燃物。
电动工具操作步骤:1. 准备工具:确保电动工具处于关闭状态,并在无电源供应的情况下连接电源线或安装电池。
35KV油浸式变压器安装和运行维护一、部件的安装1、35KV 和10KV 套安装使用中注意的问题:(1)套管的受力应和密封平面垂直。
否则套管受到的力引起密封橡皮单边受力,很容易产生渗油。
检查办法:松掉所有坚固螺丝,母排接头要很自然地靠在套管接头边,不允许有大的距离。
(2)接线板和导电杆的连接,接线板开口处的锁紧螺丝要受力均匀、合适。
否则会出现发热和拉弧熔融现象。
但用力又不能太大,不然铜接头会开裂。
2、气体继电器与集气盒气体继电器是变压器上很重要的保护元件,设有手动试验跳闸杆(探针)和放气嘴。
德国EMB气体继电器,试验探针压到一半为轻瓦斯动作,全部压下为跳闸信号。
动作容积即轻瓦斯动作信号(单位㎝3),一般气体容积整定值围为250~300ml。
放气后应注意把油迹擦干净,接线时注意防止接线柱松动,引起渗油。
2.1 气体继电器运行前要把两边的观察窗盖打开,便于观察;另外要做好二次接线的绝缘、防潮工作,防止误发信号。
2.2 集气盒的主要作用:气体继电器和集气盒配套使用。
集气盒的目的是把气体继电器汇集到的气体转移到安装位置较低的地方,以便于观察和采集气体。
在气体继电器和集气盒之间有一根较细的导气管,起到连通作用。
因此我们可以在下面直接放气或采集气体。
具体办法是从集气盒下部的放气嘴放油,当看不到气体继电器里的气体,并且集气盒滴下的是油,则停止放油,打开上部放气嘴,用杯子倒置采气。
3、压力释放阀变压器运行时油箱需要承受一定的正压,此压力和变压器大小以及油位的高度有关;当变压器部发生电气事故时,可能会产生急剧拉弧和油的分解,因油的迅速分解会产生类似于“爆破”的冲击压力。
如无相应的保护装置,油箱承受极端压力的情况下会发生变形。
所以压力释放阀是保护变压器不受更严重损坏的安全装置,也可以实现定向喷油及远程监视。
3.1 压力释放阀的整定,要到指定部门。
3.2 引线接头要进入盒,防止受潮引起误动作。
3.1 根据DL/T572-95 电力行业标准,“电力变压器运行规程”中第5.4 条的规定:“变压器的压力释放器接点宜作用于信号”。
R*331064*9009315Rev.10(10-2019)China有关最新部件手册及其他语言操作员手册,请访问:/manuals引言每个新型号均配备本手册,以提供必需的操作与维护说明。
操作或维修机器前,请完整阅读本手册并了解机器。
该机器将提供卓越的服务。
然而,若在日常操作中注意以下事项,则能达到事半功倍的效果:S操作机器时非常小心。
S定期维护机器——根据每台机器提供的维护说明。
S维护机器时使用坦能提供的部件或同类部件。
保护环境请按照当地废物处理法规以环保的方式处理包装材料、旧的机器组件和液体。
始终记住尽量将物品回收利用。
用途T7是一款驾驶式工业/商业机器,可以擦洗粗糙和光滑的硬质表面,例如混凝土、瓷砖、石头和合成材料等。
典型的应用场合包括学校、医院/卫生保健设施、办公楼以及商场。
禁止在土地、草地、人造草皮或铺设地毯的地面上使用本机器。
本机器只能用于室内。
本机器不能用于公路上。
请勿进行本操作员手册说明以外的其他操作。
Tennant CompanyPO Box1452Minneapolis,MN55440Phone:(800)553-8033坦能清洁系统设备(上海)有限公司中国上海青浦漕盈路3777号1幢Tennant Cleaning Systems&Equipment Co.,LtdBuilding1,No.3777Caoying RoadQingpu Shanghai,China201712电话Phone:862169225333传真Fax:862169225151规格和部件可能更改,恕不另行通知。
原稿说明。
©2014-2019Tennant Company.保留所有权利。
页码重要安全说明2............................操作4 ....................................机器组件4.............................控制和仪表5...........................机器工作原理6.........................传统洗地方式6.........................泡沫洗地系统(FaST模式)6............ec‐H2O NanoClean擦洗系统(ec‐H2O型号)7......................刷子信息7.............................机器设定7.............................安装吸水扒组件7.......................安装刷子/垫布7.........................ec‐H2O NanoClean水处理筒(ec‐H2O NanoClean型号)8...........安装FaST-PAK硬纸箱(FaST型)8......注入清水至清水箱9.....................机器操作9.............................操作前检查9...........................操作之前9.............................设置洗地模式10.........................设置FaST按钮10........................设置ec-H2O按钮10......................设定刷子压力10.........................设置清水水量10.........................经济设定11.............................ec‐H2O NanoClean清水水量设置(标有ec‐H2O NanoClean的ec‐H2O型号)11.......................洗地11 .................................双重洗地13.............................回水效率模式(无刷洗)14...............操作机器期间14.........................紧急停止按钮15.........................计时器15 ...............................ec-H2O系统指示灯15....................清水箱清空指示灯16.....................污水箱饱和指示灯16.....................电瓶耗用指示灯16.......................故障指示灯17...........................电路断路器18...........................保险丝18 ...............................危险指示灯开关(选配件)18.............排干并清洗污水箱19.....................推进系统故障排除21.....................机器故障排除21.........................页码维护24 ....................................维护表25 ...............................电池26 .................................湿/铅酸电瓶26...........................检查电解液水平26.......................免维护电瓶26...........................检查连接/清洁26.........................锂电瓶26 ...............................电瓶充电27.............................机载电瓶充电器设定值27.................电瓶选择模式28.........................使用机载电瓶充电器28...................机载电瓶充电器错误代码29...............电动马达30.............................洗地刷30 ...............................更换盘刷或衬垫30.......................更换百洁垫32...........................FaST系统维护(FaST模式)32............FaST供液管接头33......................ec‐H2O系统(ec‐H2O模式)33..........ec‐H2O NanoClean水处理筒的更换33.....ec-H2O组件冲刷程序34..................吸水扒胶条35...........................更换(或旋转)后吸水扒胶条36...........更换后吸水扒胶条37.....................调整吸水扒引导滚筒37...................调整后吸水扒38.........................调整后吸水扒胶条挠度38.................裙边和密封圈39.........................洗地头地面裙边39.......................污水箱密封圈39.........................清水箱密封圈39.........................轮胎39 .................................推动,拖曳和运送机器40.................推动或拖曳机器40.......................运输机器40.............................顶起机器41.............................存放机器41.............................防冻保护41.............................从ec-H2O组件中冲掉防冻剂:42..........规格43 ....................................般机器尺寸/容量43.......................机器的一般性能43.......................功率类型44.............................轮胎44 .................................FaST系统44............................ec-H2O系统44..........................机器尺寸45.............................重要安全说明-妥善保存这些说明下列为本手册中使用的符号与相关说明:警告:用于警告会导致严重人员伤害或死亡的风险或不安全操作为安全起见:指出使用机器时所必须遵守的事项以保障安全。