Zimbra 邮件系统安装手册 V1.1(鸿华锐科技)
- 格式:pdf
- 大小:1.27 MB
- 文档页数:45
R e g i s t e ry o u rn e w d e v i c eo nM y B o s c h no w a n dg e t f r e e b en e f i t s:b o sc h-h o me.c o m/w e l c o m e Warming drawerBIC510N.0W BID510N.0W[en]User manual and installation instructions2 [zh]使用说明和安装说明11en Safety2Table of contentsINFORMATION FOR USE 1Safety.................................................................... 22Preventing material damage ............................... 33Environmental protection and saving en-ergy....................................................................... 34Familiarising yourself with your appliance........ 45Before using for the first time............................. 46Tableware............................................................. 47Basic operation.................................................... 58Preheating tableware........................................... 59Keeping food warm.............................................. 510Cleaning and servicing........................................ 611Troubleshooting................................................... 612How it works......................................................... 713Customer Service. (814)INSTALLATION INSTRUCTIONS (8)14.4Safe installation ...................................................91 SafetyObserve the following safety instructions.1.1 General information¡Read this instruction manual carefully.¡Keep the instruction manual and the product information safe for future refer-ence or for the next owner.¡Do not connect the appliance if it has been damaged in transit.1.2 Intended useThis appliance is designed only to be built into kitchen units. Read the special installation instructions.Only a licensed professional may connect ap-pliances without plugs. Damage caused by in-correct connection is not covered under the warranty.Only use this appliance:¡To keep food warm and to warm cookware.¡In private households and in enclosed spaces in a domestic environment.¡Up to an altitude of max. 4000 m abovesea level.Do not use the appliance:¡On boats or in vehicles.¡with an external timer or a remote control.1.3 Restriction on user groupThis appliance may be used by children aged 8 or over and by people who have reduced physical, sensory or mental abilities or inad-equate experience and/or knowledge,provided that they are supervised or have been instructed on how to use the appliance safely and have understood the resulting dangers.Do not let children play with the appliance.Children must not perform cleaning or user maintenance unless they are at least 15 years old and are being supervised.Keep children under the age of 8 years away from the appliance and power cable.1.4 Safe useWARNING ‒ Risk of fire!The inside of the appliance gets very hot and may cause flammable materials to ignite.▶Never place flammable objects or plasticcontainers in the appliance.WARNING ‒ Risk of burns!The accessories and cookware become very hot during operation.▶Always use oven gloves when removing hot accessories or cookware from the ap-pliance.The inside of the appliance becomes very hot during operation.▶Never touch the inside of the appliance while it is hot.▶Keep children away from the appliance.The appliance becomes hot during operation.▶Allow the appliance to cool down beforecleaning.WARNING ‒ Risk of electric shock!Incorrect repairs are dangerous.▶Repairs to the appliance should only be carried out by trained specialist staff.▶Only use genuine spare parts when repair-ing the appliance.▶If the power cord of this appliance is dam-aged, it must be replaced by trained spe-cialist staff.Preventing material damage en3If the insulation of the power cord is dam-aged, this is dangerous.▶Never let the power cord come into contact with hot appliance parts or heat sources.▶Never let the power cord come into contact with sharp points or edges.▶Never kink, crush or modify the power cord.An ingress of moisture can cause an electric shock.▶Do not use steam- or high-pressure clean-ers to clean the appliance.If the appliance or the power cord is dam-aged, this is dangerous.▶Never operate a damaged appliance.▶Never pull on the power cord to unplug the appliance. Always unplug the appliance at the mains.▶If the appliance or the power cord is dam-aged, immediately unplug the power cord or switch off the fuse in the fuse box.▶Call customer services. →Page 8WARNING ‒ Risk of suffocation!Children may put packaging material over their heads or wrap themselves up in it and suffocate.▶Keep packaging material away from chil-dren.▶Do not let children play with packaging ma-terial.Children may breathe in or swallow small parts, causing them to suffocate.▶Keep small parts away from children.▶Do not let children play with small parts.2 Preventing material damageATTENTION!Excessive weight may damage the appliance.▶The appliance has a maximum load capacity of 15 kg.Moisture may damage the appliance.▶Do not use the appliance to store food and drinks.The humidity of the food may cause corrosion dam-age.3 Environmental protection and saving energy3.1 Disposing of packagingThe packaging materials are environmentally compat-ible and can be recycled.▶Sort the individual components by type and dispose of them separately.en Familiarising yourself with your appliance44 Familiarising yourself with your appliance4.1 ApplianceYou can find an overview of the parts of your appliance here.4.2 ControlsYou can use the control panel to configure all functions of your appliance and to obtain information about the 5 Before using for the first timeConfigure the settings for initial start-up. Clean the ap-pliance and accessories.5.1 Cleaning and heating up the appliance before using it for the first time1.Clean the appliance.2.Remove the accessories.3.Heat up the appliance at 80 °C for one hour.a Smoke development and odour development arenormal.6 TablewareThese instructions help you to avoid damaging your tableware.6.1 Suitable tablewareThe warming drawer has a maximum load capacity of 15 kg. You can use it to preheat the place settings for 6 or 12 people, for example.Drawer – 14 cm Drawer – 29 cm 6 dinner plates 24 cm diameter 12 dinner plates 24 cm diameter 6 soup bowls 10 cm diameter 12 soup bowls 10 cm diameter 1 bowl 19 cm diameter 1 bowl 22 cm diameter 1 bowl17 cm diameter 1 bowl 19 cm diameter 1 meat platter32 cm1 bowl17 cm diameter 2 meat platters32 cmBasic operation en57 Basic operation7.1 Opening the appliance▶Press on the centre of the warming drawer.a The warming drawer pops open and can be pulledout.7.2 Closing the appliance▶Press on the centre of the warming drawer andpush it back in.7.3 Switching on the appliance▶Press .7.4 Switching off the appliance▶Press .7.5 Setting the temperature▶Set the temperature to any value between , and .8 Preheating tablewareFood does not cool down as quickly on preheated tableware. Drinks also remain warm for longer.8.1 Starting the "Preheat tableware"functionWARNING ‒ Risk of burns!Drinking vessels become very hot at high temperat-ures.▶For drinking vessels, set the settings to .1.Place an anti-slip mat at the bottom of the drawer toprevent the tableware scratching the interior surface of the drawer.2.Place the tableware in the warming drawer.‒Distribute the tableware across the entire bottom of the warming drawer to reduce the preheating time.Do not block the ventilation opening with tall items of tableware or stacks of plates. Keeping the ventila-tion opening clear ensures that hot air can circulate efficiently.3.Turn the temperature selector to set the required temperature.A setting of up to is suitable for tableware. For drinking vessels, the settings from to are suit-able.4.Switch on the appliance.a The operation indicator lights up, the applianceheats up and the fan runs.5.Close the warming drawer.Note: The preheating time depends on the material,thickness, quantity and distribution of the tableware.For place settings for 6 people, the preheating time is approx. 15-25 minutes.8.2 Ending the "Preheat cookware" functionWARNING ‒ Risk of burns!The accessories and/or cookware become very hot during operation.▶Always use oven gloves to remove accessories or cookware from the cooking compartment.1.Open the warming drawer.2.Switch off the appliance.3.Remove the cookware.9 Keeping food warmYou can use the warming drawer to keep food warm for a certain period of time.We advise against keeping food warm for longer than an hour. Suitable food includes meat, poultry, fish,sauces, vegetables, side dishes and soups.9.1 Starting the "Keep food warm" functionATTENTION!Hot cookware from the hob damages the anti-slip mat in the warming drawer.▶Never take hot pots and pans off the hob and place them directly on the anti-slip mat.1.Place an anti-slip mat at the bottom of the drawer toprevent the tableware scratching the interior surface of the drawer.The anti-slip mat is food-safe. Dry food can be heated directly on the anti-slip mat in the warming drawer. The anti-slip mat must then be cleaned.2.Place the tableware in the warming drawer.3.Turn the temperature selector to set the required temperature.4.Switch on the appliance.a The operation indicator lights up, the appliance heats up and the fan runs.5.Preheat the tableware for approx. 10 minutes.6.Place food into the preheated tableware.‒Do not completely fill the tableware with food to prevent any content from spilling out when you open and close the warming drawer.‒Cover food which dries out easily with a heat-res-istant lid or aluminium foil.7.Close the warming drawer.en Cleaning and servicing69.2 Ending the "Keep food warm" functionWARNING ‒ Risk of burns!The accessories and/or cookware become very hot during operation.▶Always use oven gloves to remove accessories or cookware from the cooking compartment.1.Open the warming drawer.2.Switch off the appliance.3.Remove the cookware.10 Cleaning and servicingTo keep your appliance working efficiently for a long time, it is important to clean and maintain it carefully.10.1 Cleaning productsYou can obtain suitable cleaning products from after-sales service or the online shop.ATTENTION!Unsuitable cleaning products may damage the sur-faces of the appliance.▶Do not use harsh or abrasive detergents.▶Do not use cleaning products with a high alcohol content.▶Do not use hard scouring pads or cleaning sponges.▶Only use glass cleaners, glass scrapers or stainless steel care products if recommended in the cleaning instructions for the relevant part.▶Wash sponge cloths thoroughly before use.10.2 Cleaning the applianceWARNING ‒ Risk of electric shock!An ingress of moisture can cause an electric shock.▶Do not use steam- or high-pressure cleaners toclean the appliance.WARNING ‒ Risk of burns!The appliance becomes hot during operation.▶Allow the appliance to cool down before cleaning.Requirement: The appliance is switched off.1.Clean the appliance with a damp cloth and a neutral cleaning agent, such as washing-up liquid and wa-ter.2.Dry with a soft cloth.10.3 Cleaning the stainless steel surfaces1.Always remove limescale, grease, starch or albuminstains immediately.Corrosion may form under such stains.2.Clean with water and some washing-up liquid.3.Dry with a soft cloth.10.4 Cleaning the glass front▶Clean the glass front using a glass cleaning productand a soft cloth.‒Do not use any abrasive sponges that may scratch or any glass scrapers.10.5 Cleaning the anti-slip mat1.Remove the anti-slip mat to clean it.2.Clean the anti-slip mat with washing-up liquid.11 TroubleshootingYou can rectify minor faults on your appliance yourself.Read the troubleshooting information before contactingafter-sales service. This will avoid unnecessary costs.WARNING ‒ Risk of injury!Improper repairs are dangerous.▶Repairs to the appliance should only be carried out by trained specialist staff.▶If the appliance is defective, call Customer Service.WARNING ‒ Risk of electric shock!Incorrect repairs are dangerous.▶Repairs to the appliance should only be carried out by trained specialist staff.▶Only use genuine spare parts when repairing the appliance.▶If the power cord of this appliance is damaged, it must be replaced by trained specialist staff.11.1 MalfunctionsFaultCause and troubleshooting The cookware or food is not heating up.There has been a power cut.▶Check whether the lighting in your kitchen or other appliances are working.The appliance is switched off.▶Switch the appliance on.The warming drawer is not completely closed.▶Close the warming drawer.How it works en7FaultCause and troubleshooting The appliance is not working.The circuit breaker is faulty.▶Check the circuit breaker in the fuse box.The cookware or food does not get warm enough.The cookware or food has not been heated for long enough.▶Heat the cookware or the food for a longer period of time.The warming drawer is not completely closed.▶Close the warming drawer.The warming drawer was open for a long time.▶Close the warming drawer.The warming drawer was not adequately preheated.▶Preheat the warming drawer sufficiently.The ventilation opening has been blocked by tableware.▶Remove tall tableware from the ventilation opening.The operation indic-ator light does not light up.The operation indicator light is defective.▶Call the after-sales service. → "Customer Service", Page 8The fuse in the fuse box has blown.The circuit breaker is faulty.▶Pull out the mains plug.▶Call the after-sales service. → "Customer Service", Page 812 How it worksHere, you can find the ideal settings for various dishes as well as the best accessories and cookware. We have tailored these recommendations to your appliance.12.1 Recommended settingsThe following settings have been specially tested for your appliance.Tableware and drinking vessels DishPreheating thePreheating tableware Level InformationDefrosting frozen foods DishPreheating the Preheating tableware LevelInformationen Customer Service 8Warming DishPreheating thePreheating tableware Level InformationmuffinsKeeping warm DishPreheating the Preheating tablewareLevel InformationMelting DishPreheating the Preheating tableware LevelInformationProving dough Dish Preheating thePreheating tableware Level Information trays13 Customer ServiceDetailed information on the warranty period and terms of warranty in your country is available from our after-sales service, your retailer or on our website.If you contact Customer Service, you will require the product number (E-Nr.) and the production number (FD) of your appliance.The contact details for Customer Service can be found in the enclosed Customer Service directory or on our website.13.1 Product number (E-Nr.) and production number (FD)You can find the product number (E-Nr.) and the pro-duction number (FD) on the appliance's rating plate.You can see the rating plate with these numbers when you open the drawer.Make a note of your appliance's details and the Cus-tomer Service telephone number to find them again quickly.14 Installation instructionsObserve this information when installing the appliance.Installation instructions en914.1 Included with the applianceAfter unpacking all parts, check for any transport dam-age and for completeness of delivery.14 cm29 cm14.2 Installation in the cabinetYou will find the dimensions of the appliance here14 cm29 cm14.3 Instructions for the electrical connectionIn order to safely connect the appliance to the elec-trical system, follow these instructions.¡The appliance must only be connected to a protect-ive contact socket that has been correctly installed.Only a qualified electrician may install a socket or replace the connecting cable, taking the appropriate regulations into account.¡The appliance must only be connected with the power cable provided. Connect the power cable to the back of the appliance.¡Connecting cables with various plug types are avail-able from after-sales service.¡No multi-plugs, multiple connectors or extension leads must be used. Overloading causes a risk of fire.¡If the plug can no longer be reached after the in-stallation, a partition must be provided in the phases in the permanent electrical installation in accord-ance with the installation regulations.Follow these safety instructions when in-stalling the appliance.WARNING ‒ Risk of suffocation!Children may put packaging material over their heads or wrap themselves up in it and suffocate.▶Keep packaging material away from chil-dren.▶Do not let children play with packaging ma-terial.WARNING ‒ Risk of electric shock!If the insulation of the power cord is dam-aged, this is dangerous.▶Never let the power cord come into contact with hot appliance parts or heat sources.▶Never let the power cord come into contact with sharp points or edges.▶Never kink, crush or modify the power cord.en Installation instructions10WARNING ‒ Risk of injury!Sharp-edged parts may be accessible during installation.▶Wear protective gloves.14.5 InstallationFitted unitsThis is where you can find information about safe in-stallation.ATTENTION!Covering the ventilation slots and air intake openings causes the appliance to overheat.▶Do not cover ventilation slots and air intake open-ings.If the appliance is installed behind a decorative panel,this may cause it to overheat.▶Do not install the appliance behind a decorative panel.The built-in unit must not have a rear panel behind the appliance.The minimum distance between the wall and the cab-inet base or back wall of the cabinet that is situated above must be complied with.Observe the installation instructions for the appliance installed above.If no intermediate floor is possible above the appliance or above the oven, install tilt protection for the appli-ance. Suitable tilt protection can be obtained from cus-tomer service, on our website or in the online shop.Installing the applianceWARNING ‒ Risk of electric shock!If the insulation of the power cord is damaged, this is dangerous.▶Never let the power cord come into contact with hot appliance parts or heat sources.▶Never let the power cord come into contact with sharp points or edges.▶Never kink, crush or modify the power cord.WARNING ‒ Risk of injury!After removing the transport lock, the drawer may open suddenly during transport.▶Transport the appliance in such a way that the drawer does not accidentally open.The high weight of the appliance may result in injury when lifted.▶Do not lift the appliance on your own.1.Insert the power cord into a protective contactsocket.The power cord must not touch the rear and base of the appliance after installation.2.Insert the appliance.3.Centre the appliance.4.5.Remove and dispose of the protective padding.安全性 zh 11目录使用说明书1安全性 (11)2避免财产损失 (12)3环境保护和节约 (12)4了解机器 (12)5首次使用前 (12)6餐具 (13)7操作基本知识 (13)8预热餐具 (13)9食物保温 (13)10清洁和保养 (14)11处理故障 (14)12工作原理 (15)13客户服务 (16)14安装说明书 (16)14.4安全安装..............................................................171 安全性请注意以下安全注意事项。
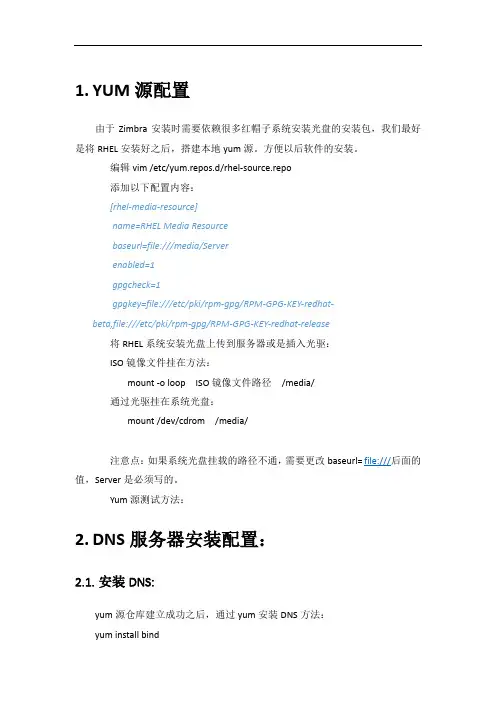
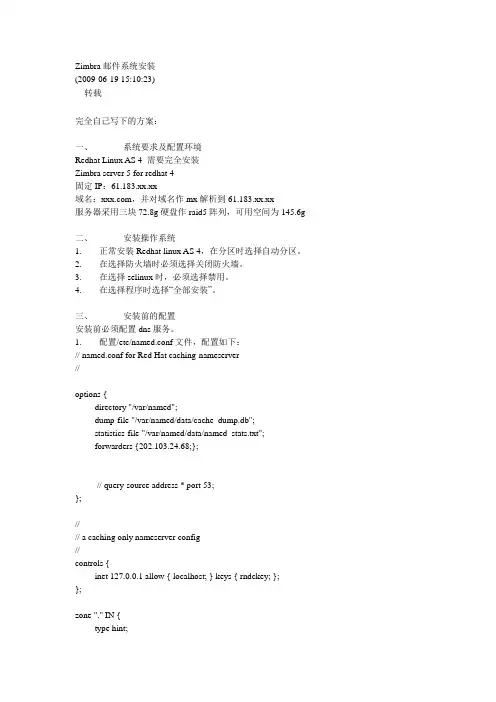
1.YUM源配置由于Zimbra安装时需要依赖很多红帽子系统安装光盘的安装包,我们最好是将RHEL安装好之后,搭建本地yum源。
方便以后软件的安装。
编辑vim /etc/yum.repos.d/rhel-source.repo添加以下配置内容:[rhel-media-resource]name=RHEL Media Resourcebaseurl=file:///media/Serverenabled=1gpgcheck=1gpgkey=file:///etc/pki/rpm-gpg/RPM-GPG-KEY-redhat-beta,file:///etc/pki/rpm-gpg/RPM-GPG-KEY-redhat-release将RHEL系统安装光盘上传到服务器或是插入光驱:ISO镜像文件挂在方法:mount -o loop ISO镜像文件路径/media/通过光驱挂在系统光盘:mount /dev/cdrom /media/注意点:如果系统光盘挂载的路径不通,需要更改baseurl= file:///后面的值,Server是必须写的。
Yum源测试方法:2.DNS服务器安装配置:2.1.安装DNS:yum源仓库建立成功之后,通过yum安装DNS方法:yum install bind根据提示输入Y,确定安装或证书验证。
2.2.配置DNS由于我们没有安装bind-chroot,Bind的所有配置文件都在/etc/下面,区域文件都在/var/named下面。
2.2.1.修改DNS配置文件编辑/etc/named.conf删除以下两行:listen-on port 53 { 127.0.0.1; };listen-on-v6 port 53 { ::1; };修改以下配置:allow-query { localhost; };修改成allow-query { any; };2.2.2.添加区域配置:添加区域配置:在/etc/named.rfc1912.zones添加域名的区域配置:内容如下:zone "" IN {type master;file ".zone";};将/var/named/下的named.localhost文件复制一份,文件名更改为.zone。

Yireo EmailTesterInstallation & User GuideThis document helps you to install the Magento extension EmailTester in your Magento 2 environment. If you need any help along the way, feel free to contact us via *****************. We are happy to help out to get you started quickly.InstallationWe are assuming here that the extension has already been purchased via the Magento Marketplace, which should have added the right permissions to install this extension via composer. First of all, the composer package should be installed via the following commands:$ composer require yireo/magento2-emailtester2After this command has succeeded, a new folder vendor/yireo/magento2-emailtester2 should be present with all module files. Now you can activate this module with the following commands:$ ./bin/magento module:enable Yireo_EmailTester2$ ./bin/magento setup:upgradeIf your site is running in Production Mode, make sure to recompile the DI files and also re-run static content deployment.Preparation for usageTo use this extension, you will need to have relevant data in your Magento store. Usually, this means that you are working with a live Magento site that already contains customers, products and orders.If you are using this extension with a demo installation of Magento, make sure to install the sample data before using this extension. This extension requires existing customers, products and orders to work.$ ./bin/magento sampledata:deployUsageOnce the extension is enabled, it adds a new page in the Magento Admin Panel under the menu Marketing > Communications > Yireo EmailTester.The menu brings you to the form page.On this page, you can enter details to preview a specific Magento transactional emails or send this email to a specific inbox of your choice.Step 1: Configure a Customer, Product and OrderMake sure to select a value for:• A Customer ID• A Product ID•An Order IDBy supplying details for these entities, the EmailTester extension is able to derive all other relevant information so that transactional emails will present actual data.For each entity, a text box on the left allows you to enter a numeric value. The preview box on the right fetches the relevant information on that ID. For instance, when entering a product ID 2, the name and SKU of that product will be shown in the preview box.To make things easier, you can also use the Search button, which opens up a new modal window that allows you to search for values in a more user-friendly way. Step 2: Pick your emailIn the form, you can pick an Email Template of your choice. Please note that only transactional emails that are using the Magento email system are shown. Within the form, you can also select the relevant Store View, for instance when your store is multilingual.Step 3: Send or previewNext, two buttons bring everything into action: The button Send will actually send an email via the Magento email system to the given email address (configured in the field Mail To).Alternatively, you can open up the email in a new browser tab by using the Preview button, so you can modify the email content as a developer and preview the results quickly.Advanced: Store ConfigurationSome of the values on the form page can be prefilled by using the Store Configuration. To access these configuration values, navigate in the backend menu to Stores > Configuration > Yireo > Yireo EmailTester.The following configuration values exist:•Default Email Sender: From which email address to send the transactional email when using the Send button on the EmailTester form page.•Default Email Target: To which email address when using the Send button on the EmailTester form page.•Default Transactional Email: Which mail should be shown by default on the EmailTester form page.•Default Product: The database ID of the product to be selected by default on the EmailTester form page.•Default Customer: The database ID of the customer to be selected by default on the EmailTester form page.•Default Sales Order: The database ID of the order to be selected by default on the EmailTester form page.•Debug: Enable debugging of various things. For support purpose only.Need help?If you need any help getting started, or if you have any suggestions (like feature improvements or bugfixes), you can reach out to us via email **************.。
在Ubuntu下基于zimbra轻松建立自己公司的邮件办公系统[日期:2009-06-23] 来源:/ericden 作者:ericden1、前提条件:Ubuntu系统已经安装完毕;并未安装邮件系统;2、安装需要的软件:sudo apt-get install libc6-i686 sudo libidn11 curl fetchmail libgMP3c2 libexpat1 libgetopt-mixed-perl libxml2 libstdc++6 libpcre3 libltdl3 ssh3、获取zimbra:wget/downloads/5.0.2_GA/zcs-5.0.2_GA_1975.DEBIAN4.0.20080130234700.t gztar xvfz zcs-5.0.2_GA_1975.DEBIAN4.0.20080130234700.tgz4、开始安装./install.sh -l要同意协议Install zimbra-ldap [Y] YInstall zimbra-logger [Y] YInstall zimbra-mta [Y] YInstall zimbra-snmp [Y] YInstall zimbra-store [Y] YInstall zimbra-apache [Y] YInstall zimbra-spell [Y] YInstall zimbra-proxy [N] NThe system will be modified. Continue? [N] Y主菜单:可以按项配置1) Common Configuration:2) zimbra-ldap: Enabled3) zimbra-store: Enabled+Create Admin User: yes+Admin user to create: admin@******* +Admin Password UNSET+Enable automated spam training: yes+Spam training user: spam.m0bqyoayc@+Non-spam(Ham) training user: ham.ygch0qyz1@+Global Documents Account: wiki@+SMTP host: +Web server HTTP port: 80+Web server HTTPS port: 443+Web server mode: http+IMAP server port: 143+IMAP server SSL port: 993+POP server port: 110+POP server SSL port: 995+Use spell check server: yes+Spell server URL: :7780/aspell.php4) zimbra-mta: Enabled5) zimbra-snmp: Enabled6) zimbra-logger: Enabled7) zimbra-spell: Enabled8) Default Class of Service Configuration:r) Start servers after configuration yess) Save config to filex) Expand menuq) QuitAddress unconfigured (**) items (? - help)5、启动:zmcontrol start6、查看状态:zmcontrol status7、其它:看zimbra相关文档安装非常简单,同时配置也非常丰富、完善。
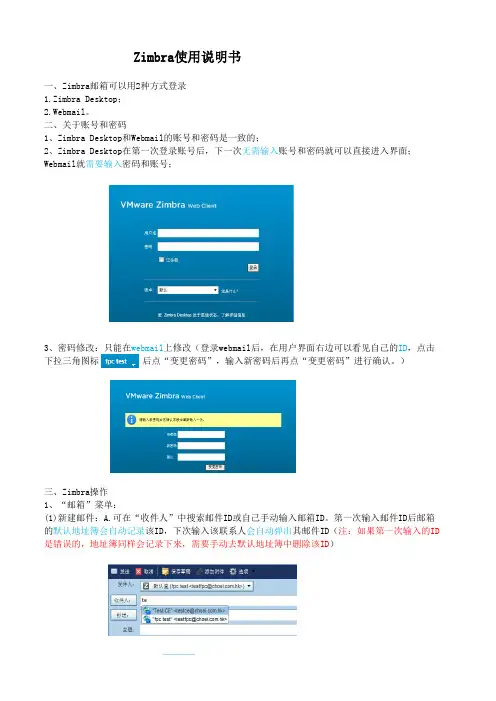
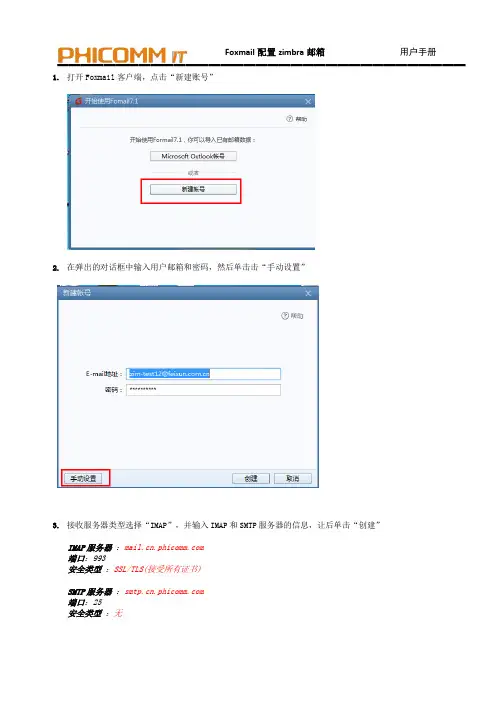
Zimbra使用说明书一、Zimbra邮箱可以用2种方式登录1.Zimbra Desktop;2.Webmail。
二、关于账号和密码1、Zimbra Desktop和Webmail的账号和密码是一致的;2、Zimbra Desktop在第一次登录账号后,下一次无需输入账号和密码就可以直接进入界面;Webmail就需要输入密码和账号;3、密码修改:只能在webmail上修改(登录webmail后,在用户界面右边可以看见自己的ID,点击下拉三角图标 后点“变更密码”,输入新密码后再点“变更密码”进行确认。
)三、Zimbra操作1、“邮箱”菜单:(1)新建邮件:A.可在“收件人”中搜索邮件ID或自己手动输入邮箱ID。
第一次输入邮件ID后邮箱的默认地址簿会自动记录该ID,下次输入该联系人会自动弹出其邮件ID(注:如果第一次输入的ID 是错误的,地址簿同样会记录下来,需要手动去默认地址簿中删除该ID)B.“抄送”:BCC功能(密抄) 该功能可以秘密抄送邮件给收件人,在邮件中不会显示密抄内收件人的名字C.“主题”:可以设置优先级D.“附加”:可以在附件中添加个人文件、联系人的通讯录和自己邮箱里面的邮件(注:附件总量最大为10M,超过10M会自动关闭附件或发送邮件时无法发送出去)E.“发送邮件”:a.直接发送b.以后发送:可以定时在某个时间段发送文件(注:该功能限制开启)F.“读信回条”:在“选项”中选择“要求提供读信回条”时,只要对方没关闭读信回条的选项,收件人收到邮件后会回发一封邮件给发件人(2)新建联系人:可以自定义邮箱联系人到邮箱地址簿中,同时可以将联系人规划到群组中(注:类似于建立一个个人名片)(3)新建联系人组:将现有的公司内部邮箱或者自己定义的外面的邮箱加入群组中(注:新建联系人组会存放在地址簿内,可以对这些组别进行不同地址簿的移动或对组别进行重新编辑或添加标签到组别上以方便搜索)内部邮箱外面邮箱(4)新建约会:可以将约会的行程(包括地址、时间、对象(必须参加与可选参加)和详细的会议内容)发送到相关人员;同时可以设置提醒时间,等到时间到了会自动提醒对方(5)新建任务:可设置私人工作任务的内容、时间、优先级及完成进度。

Dell EMC Systems Management T ools And Documentation Installation GuideVersion 9.1.2Notes, cautions, and warningsNOTE: A NOTE indicates important information that helps you make better use of your product.CAUTION: A CAUTION indicates either potential damage to hardware or loss of data and tells you how to avoid the problem.WARNING: A WARNING indicates a potential for property damage, personal injury, or death.© 2018 Dell Inc. or its subsidiaries. All rights reserved. Dell, EMC, and other trademarks are trademarks of Dell Inc. or its subsidiaries. Other trademarks may be trademarks of their respective owners.2018 - 09Rev. A001 About (4)Systems Management software (4)Managed system and management station (4)Systems Management Tools and Documentation software (5)Managed system software (5)Management station software (5)DTK Deprecation Message (7)2 Installing management station software on Microsoft Windows (8)Installing management station software on Microsoft Windows Server and Hyper-V Server (8)Installing management station software using the CLI mode (8)Uninstalling management station software using the CLI mode (9)3 Installing management station software on supported Red Hat Enterprise Linux, SUSE Linux Enterprise Server (10)Contents3About The Systems Management T ools and Documentation Installation Guide provides an overview of the management station software and installation instructions for the same. For information on installing Server Administrator, see the Dell EMC Server Administrator Installation Guide in the Dell EMC Systems Management T ools and Documentation software.Systems Management softwareThe systems management image comprises of the three software's mentioned below:•Systems Management T ools and Documentation•Server Updates•Management ConsoleYou can download the free ISO image of the software's from /support.NOTE: If you require the software DVD's, you must opt-in to purchase the software DVD's at the time of order or after point of sale.For information on systems that support systems management software, supported operating systems, and components, see Dell EMC OpenManage Systems Software Support Matrix at /openmanagemanuals.Topics:•Managed system and management station•Systems Management T ools and Documentation softwareManaged system and management stationDepending on the way you use the systems management tools, you can classify the systems as:•Managed SystemA managed system is any system that is monitored and managed using Server Administrator or Management Console. A ServerAdministrator is one of the systems management tools on the Systems Management T ools and Documentation software. You can manage systems running Server Administrator locally or remotely through a supported web browser. For more information on Server Administrator, see the Server Administrator User's Guide on the Systems Management T ools and Documentation software.•Management StationA management station is a laptop, desktop, or server that you use to remotely manage one or more managed systems from a centrallocation. You can use tools such as:–Intelligent Platform Management Interface (IPMI) Utilities–Remote Access Controller (RAC) tools–Dell OpenManage Essentials or Server Administrator Web Server1 4AboutSystems Management Tools and Documentation softwareThe Systems Management T ools and Documentation software contains the systems management software. The systems management software helps you to manage the systems by monitoring the system components, diagnosing issues, notifying through alerts, and troubleshooting remotely. Systems management software is classified into managed system software and management station software.Managed system softwareThe following applications include the managed system software:•Server AdministratorServer Administrator provides comprehensive one-to-one in-band server managements solutions to manage a server locally and remotely using a web browser-based Graphical User Interface (GUI) and Command Line Interface (CLI). Server Administrator installs server-specific Remote Access Card (RAC) and network interface management components.NOTE: When you perform a fresh installation on a system running a 64-bit operating system, a 64-bit version of the Server Administrator is used for the installation. If you want to upgrade Server Administrator, a 32-bit version of the ServerAdministrator is used for the upgrade.•Local Remote Access ControllerLocal Remote Access Controller enables the system to receive email alerts for warnings or errors related to voltage, temperature, and fan speed. Remote Access Controller also logs event data and the most recent crash screen (available only on systems running Microsoft Windows operating system) to help you diagnose the probable cause of a system crash.Management station softwareThe following applications include the management station software that you can install using the Systems Management T ools and Documentation software:•Active Directory Snap-InThe Active Directory (AD) Snap-In utility provides an extension snap-in to the Microsoft Active Directory to manage AD objects specific to products on this software.•BMC/IPMI UtilitiesBMC Management Utility (BMU) is a utility that provides remote management and configuration of systems equipped with a Baseboard Management Controller (BMC) or iDRAC using the IPMI protocol. IPMI utilities are CLI-based management station software.For more information on BMU, see the Baseboard Management Controller Utilities User's GuideNOTE: Only 32–bit installer is available.•RAC ToolsThe RAC console is a management station software designed to provide remote management capabilities for the systems. You can remotely connect to the RAC hardware and access the RAC features either by using a web browser or the RACADM Command Line Interface (CLI). RACADM CLI is the command-line user interface to the RAC.You can install RAC either on the managed system or on the management station.For information on installing RAC on the managed system, see the Server Administrator Installation Guide. For information on installing on the management station, see Installing Management Station Software on Windows. For more information on RAC, see the Remote Access Controller User's Guide.•Dell Lifecycle ControllerAbout5Dell recommends using the Embedded Management, Integrated Dell Remote Access Controller 8 (iDRAC8) with Lifecycle Controller instead of Dell Systems Build and Update Utility (SBUU). SBUU is replaced with Lifecycle Controller on Dell’s 13th generation of PowerEdge servers. iDRAC with Lifecycle Controller is an Embedded Systems Management application for operating systemdeployment and lifecycle management of PowerEdge servers. You can access Dell Lifecycle Controller by pressing <F10> during system boot up. The local GUI of iDRAC8 with Lifecycle Controller allows you to do the following in a pre-OS environment:–Hardware configuration–Operating system and hypervisor deployments–Hardware updates–Hardware diagnostics–Easy maintenance of PowerEdge serversThe Lifecycle Controller is embedded on all Dell’s 11th generation and later PowerEdge servers. No tools or downloads are required to use the capabilities of Lifecycle Controller.For more information, see the following documents available at /support/manuals:–Dell Lifecycle Controller Version <Version Number> User's Guide–Dell Lifecycle Controller Remote Services Version <Version Number> Quick Start Guide–Dell Lifecycle Controller Web Services Interface Guide–Lifecycle Controller Integration Best Practices•Dell OpenManage EssentialsDell recommends using Dell OpenManage Essentials as replacement for IT Assistant. Dell OpenManage Essentials (OME) provide improved capabilities such as:–Discovering and inventorying the systems.–Monitoring systems’ health.–Viewing and managing system alerts.–Performing system updates.–Viewing hardware inventory and compliance reports.For more information regarding Dell OpenManage Essentials, contact service provider.•iDRAC Service ModuleThe iDRAC Service Module is a lightweight optional software application that can be installed on a Dell’s 12th generation and later PowerEdge servers. Using the iDRAC Service Module you can configure the features on the supported operating system. The iDRAC Service Module provides additional Server Management data to iDRAC and presents one-to-many consoles with access to Systems Management data through OS interfaces.The iDRAC Service Module also complements the iDRAC interfaces such as the GUI, RACADM CLI, and WSMAN with additional monitoring features. For more information, see iDRAC Service Module <Version Number> Installation Guide available at / support/home.•Dell OpenManage Deployment T oolkit (DTK)The Dell OpenManage Deployment T oolkit (DTK) includes a set of utilities, sample scripts, and sample configuration files that you can use to deploy and configure the Dell systems. You can use DTK to build script-based and RPM-based installation for deploying large number of systems on a pre-operating system environment in a reliable way, without changing their current deployment processes.Using DTK you can install operating systems on Dell systems in BIOS or Unified Extensible Firmware Interface (UEFI) mode.In addition to the command-line utilities used to configure various system features, DTK also provides sample scripts and configuration files to perform common deployment tasks and documentation. These files and scripts describe the use of the DTK in Microsoft Windows Pre-installation Environment (Windows PE) and Linux environments. For more information, see the following documents available at /openmanagemanuals:–Dell OpenManage Deployment T oolkit Version <Version Number> User's Guide6About–Dell OpenManage Deployment T oolkit Version <Version Number> Command Line Interface Reference Guide–Dell OpenManage Deployment T oolkit Version <Version Number> Installation GuideDTK Deprecation MessageThe OpenManage Deployment T oolkit (DTK) along with the associated tools and capabilities will be deprecated for version 6.1 and later:•Redundant Array of Independent Disks Configuration (RAIDCFG) Utility•System Configuration (SYSCFG) Utility•ELI tool•Utility Partition (UPINIT)It is recommended to use the RACADM Command Line (CLI) as a replacement for the RAIDCFG and SYSCFG utilities. For more information on downloading RACADM, see .NOTE: DTK will continue to support any new hardware or operating system for the 14th generation of PowerEdge servers.However, support for later generations of PowerEdge servers will be deprecated. For more information about features supported by DTK, see the latest User's Guide available at /openmanagemanuals .About7Installing management station software onMicrosoft Windows1Log on with administrator privileges to the system on which you want to install the management station applications.2 Mount the Systems Management T ools and Documentation software onto the DVD drive or download the web installer.NOTE:You can download the web installer from /support/home.3 Run autorun.exe .NOTE: If you are using the DVD to install, select the management station application that you want to install, and then clickInstall.4 Follow the instructions in the Install Wizard.NOTE: You cannot install remote RAC (RAC installed on the management station) and local RAC (RAC installed on themanaged system) on the same system.Installing management station software on Microsoft Windows Server and Hyper-V ServerWindows Server or Hyper-V Server operating system does not support a graphical user interface (GUI) based installation of the softwarecomponents. Install the software in CLI mode on Server Core. For more information on Server Core, see the Microsoft website.NOTE: Log in as a built-in Administrator to install systems management software on Windows Server and Windows client operating system. For more information on built-in Administrator account, see the Windows Server Help.Installing management station software using the CLI modeNOTE: Run the Command Prompt as an administrator to successfully perform tasks using the CLI mode.To install the RAC T ools, launch the MSI file using the command:•msiexec /i RACTools_x64.msiNOTE: On the Systems Management Tools and Documentation software:•The RACT ools_x64.msi file is located at SYSMGMT\ManagementStation\windows\DRACx64•DRAC tools provide local and remote management capabilities for system equipped with iDRAC.NOTE:The DRAC tools upgrade fails when you try to upgrade to 9.1.2 from any previous versions. However, the DRAC tools upgrade to 9.1.3 is supported. Therefore, it is recommended to upgrade to 9.1.3 from any previous versions. You can also uninstall the previous version and can do a fresh install of DRAC tools 9.1.2.To install BMU, launch the MSI file using the command:msiexec /i BMC.msi28Installing management station software on Microsoft WindowsNOTE: Only 32–bit installer is available.NOTE: The BMC.msi file is located at SYSMGMT\ManagementStation\windows\BMC on the Systems Management Tools andDocumentation software.To install Active Directory Snap-In, launch the MSI file using the command:•msiexec /i ADSnapIn_x64.msiNOTE: On the Systems Management Tools and Documentation software:•The ADSnapIn_x64.msi file is located at SYSMGMT\ManagementStation\windows\ADSnapInx64To install the localized version of the management station software, at the command prompt type the following: msiexec / I<management_station_software>.msi TRANSFORMS= <languauge_transform>.mstNOTE: Replace <language_transform>.mst with the appropriate language file:•1031.mst (German)•1034.mst (Spanish)•1036.mst (French)•1041.mst (Japanese)•2052.mst (Simplified Chinese)Uninstalling management station software using the CLI mode T o uninstall management station software, run the commands as listed in the table below.T able 1. Commands to uninstall management station softwareInstalling management station software on Microsoft Windows9Installing management station software onsupported Red Hat Enterprise Linux, SUSE LinuxEnterprise ServerOnly RAC tools and BMU are supported on the Red Hat Enterprise Linux, SUSE Linux Enterprise Server, and VMware ESXi Server operating systems.On systems running Red Hat Enterprise Linux operating system, DVDs are auto-mounted with the -noexec mount option. This option does not allow you to run any executable from the DVD. You must mount the DVD-ROM manually and then run the executables.To install BMU, navigate to the SYSMGMT/ManagementStation/linux/bmc directory and install the BMU RPM specific to the operating system as follows:•For systems running Red Hat Enterprise Linux, type rpm -ivh osabmcutil*-RHEL-*.rpm •For systems running SUSE Linux Enterprise Server, type rpm -ivh osabmcutil*-SUSE-*.rpmTo install the latest version of RAC T ools:1Uninstall the existing IPMI tool:aQuery the existing IPMI tool: rpm -qa | grep ipmitool If the IPMI tool is already installed, the query returns ipmitool-x.x.xx-x.x.xx .b T o uninstall the IPMI tool:•On systems running SUSE Linux Enterprise Server and VMware ESXi Server, type rpm -e ipmitool-x.x.xx-x.x.xx •On systems running Red Hat Enterprise Linux 6.x, type rpm –e ipmitool •On systems running Red Hat Enterprise Linux 7.x, type rpm –e OpenIPMI-toolsNOTE:The settings made by the existing IPMITOOL is retained.2Browse to the SYSMGMT/ManagementStation/linux/rac/<OS> directory and then type rpm -ivh *.rpm310Installing management station software on supported Red Hat Enterprise Linux, SUSE Linux Enterprise Server。

Installation & Operations ManualMaster-Bilt Products908 Highway 15 NorthNew Albany, MS 38652Phone: (800) 684-8988PN 071-90000TABLE OF CONTENTSPage Numbers INTRODUCTION (4)STORE CONDITIONS / LOCATION (4)WARNING LABELS AND SAFETY INSTRUCTIONS (5)PRE-INSTALLATION INSTRUCTIONS (5)Inspection for ShippingDamage (5)INSTALLATION INSTRUCTIONS (6)General Instructions (6)Thermometer Installation (6)CondensateEvaporator (7)Power Toggle Switch (7)Electrical (7)STARTING PROCEDURE (7)FINAL CHECK LIST (7)LOADING (8)CLEANING (8)SERVICE INSTRUCTIONS (Trouble Shooting Guide) (8)MASTER-BILT PART NUMBERS (9)ACCESSORIES LIST (10)SERIES Options (11)SALE AND DISPOSAL (12)WIRING DIAGRAMS………….…………………………………………………………….…………………… 13-16INTRODUCTIONThank you for purchasing a Master-Bilt cabinet. This manual contains important instructions for installing, using and servicing a Master-Bilt MPM/QMPM series open air case. Read all these documents carefully before installing or servicing your equipment. This manual should be left in the care of the store owner or manager.STORE CONDITIONS / LOCATIONThe Master-Bilt MPM/QMPM cases are designed to operate in the controlled environment of an air conditioned store. The store temperature should be at or below 75°F and a relative humidity of 55% or less. At highertemperature or humidity conditions, the performance of these cases may be affected and the capacity diminished. It is not uncommon in a newly constructed store for the temperature and humidity to be above design conditions. These excessive conditions may produce sweating in the case until the store is operational and the ambient environment is more desirable.The Master-Bilt MPM/QMPM should not be positioned where it is directly exposed to rays of the sun or near a direct source of radiant heat or air flow. No HVAC return or supply air ducts may be located near case openings. This will adversely affect the case air flow and will result in poor performance. Do not open windows or doors that will affect the case air flow. The maximum air velocity near the case air return is 50 FPM. If this case is to be located against a wall there should be at least a 6” space between the wall and the back of the case. The cabinet also requires a clearance of 10” at the top. This space will allow for the circulation of air behind the case.These cases should always be loaded properly. This unit will operate differently when loaded or unloaded. Consult the section of this manual that specifies loading procedures on page 6.A P-trap is included with each case. It is important that each case has a P-trap installed. Check drain tubing to insure that it is traped and routed into the condensate pan.NOTICERead this manual before installing your cabinet. Keep the manual and refer to it before doing any service on the equipment. Failure to do so could result in personal injury or damage to the cabinet.DANGERImproper or faulty hook-up of electrical components of the refrigeration units can result in severe injury or death.All electrical wiring hook-ups must be done in accordance with all applicable local, regional or national standards.NOTICEInstallation and service of the refrigeration and electrical components of the cabinet must be performed by a refrigeration mechanic and/or a licensed electrician.The portion of this manual covering refrigeration and electrical components contain technical instructions intended only for persons qualified to perform refrigeration and electrical work.This manual cannot cover every installation, use or service situation. If you need additional information, call or write us:Customer Service Department Master-Bilt Products Highway 15 NorthNew Albany, MS 38652 Phone (800) 684-8988Fax (866) 882-7629WARNING LABELS AND SAFETY INSTRUCTIONSThis symbol is the safety-alert symbol. When you see this symbol on your cabinet or in this manual, be alert to the potential for personal injury or damage to your equipment.Be sure you understand all safety messages and always follow recommended precautionsand safe operating practices.NOTICE TO EMPLOYERSYou must make sure that everyone who installs, uses or services your cabinet is thoroughly familiar with all safety information and procedures.Important safety information is presented in this section and throughout this section and throughout the manual. The following signal words are used in the warnings and safety messages:DANGER: Severe injury or death will occur if you ignore the message.WARNING: Severe injury or death can occur if you ignore the message.CAUTION: Minor injury or damage to your cabinet can occur if you ignore the message.NOTICE: This is important installation, operation or service information. If you ignore the message, you may damage your cabinet.The warning and safety labels shown throughout this manual are placed on your Master-Bilt Productscabinet at the factory. Follow all warning label instructions. If any warning or safety labels become lost orPRE-INSTALLATION INSTRUCTIONSINSPECTION FOR SHIPPING DAMAGEYou are responsible for filing all freight claims with the delivering truck line. Inspect all cartons and crates fordamage as soon as they arrive. If damage is noted to shipping crates or cartons or if a shortage is found, note this on the bill of lading (all copies) prior to signing.If damage is discovered when the cabinet is uncrated, immediately call the delivering truck line and follow up the call with a written report indicating concealed damage to your shipment. Ask for an immediate inspection of your concealed damage item. Crating material must be retained to show the inspector from the truck line.INSTALLATION INSTRUCTIONSGENERAL INSTRUCTIONS1. Be sure the equipment is properly installed by competent service people.2. Keep the equipment clean and sanitary so it will meet your local sanitation codes. Wipe up all spills,clean with water and a mild detergent, then rinse with clean water. A reservoir is provided to contain interior spills. Peridocially inspect reservoir and clean as needed.3. Rotate your stock so that older stock does not accumulate. A "First-In, First-Out" rotation practice will keep the products in good salable condition.4. Product should not be put in the case for at least 6 hours after it is started.5. Stock cases as quickly as possible, exposing only small quantities to store temperatures for short periods of time.6. When replacing burned out fluorescent tubes, be sure that the electrical power to the lighting circuit is turned off. __________________________________________________________________________________To comply with N.S.F. requirements, this cabinet must be mounted on casters or the base must be sealed to the floor with NSF listed silicone sealant. Optional casters screw into the holes from which the shipping bolts were removed. Minimum clearance as follows: 10” air space at top, 6” at the rear, and 0” air space at each side required for compliance. This space will allow for the circulation of air behind the case which will prevent condensation on the exterior surfaces.Before moving cabinet into place, route cabinet plumbing with P-trap to store drain line or install optional condensateCONDENSATE EVAPORATORThe MPM/QMPM is designed to operate in an environment of 75° ambient and 55% relative humidity. When the conditions are applicable for condensation such as high temperature and high humidity, a large capacity condensate evaporator has been installed in the MPM/QMPM to ensure proper evaporation.POWER TOGGLE SWITCHThe toggle switch turns the power ON or OFF and is accessible through a slot at the back of the MPM/QMPM-36 and MPM/QMPM-48 cabinet.NOTICE TO STORE OWNERS / MANAGERSMoisture or liquid around or under the cabinet is a potential slip/fall hazard for persons walking by or working in the general area of the cabinet. Any cabinet malfunction or housekeeping problem that creates a slip/fall hazard around or under the cabinet should be corrected immediately.If moisture or liquid is observed around or under a Master-Bilt cabinet, an immediate investigation should be made by qualified personnel to determine the source of the moisture or liquid. The investigation made should determine if the cabinet is malfunctioning or if there is a drain pipe leaking.ELECTRICALWARNINGBefore servicing electrical components in the case make sure all power to case is off. Always use a qualified technician.STARTING PROCEDURE1. Start compressor and allow to run at least 6 hours before placing product into the MPM/QMPM.DURING THIS TESTING PERIOD YOU SHOULD:1. Check the temperature holding range against the the control setting.2. Check the defrost control system to see that all ice is removed from the coil during each defrost cycle.3. Check pressures.FINAL CHECK LISTA. Check setting of defrost timer:1. Verify setting of four 34 minutes defrostper 24 hours.B. Check operating pressures.C. Check electrical requirements of unit tosupply voltage.D. Set temperature control for desiredtemperature range.E. Check system for proper defrost operation.F. Check condensing unit for vibrating orrubbing tubing. Dampen and clamp asrequired.G. All valves should be completeley opencounter-clockwise.H. Check packing nuts on all service valves.I. Replace all service valve caps and latchunit coversLOADINGDo not place product in the case until 6 hours after it is started. Stock cases as quickly as possible, exposing only small quantities to store temperatures for short periods of time. It is important to keep stock rotated properly so that older stock does not accumulate. A “First-In, First-Out” rotation practice will keep the products in good salable condition. Avoid loading the case so that product sticks out beyond the shelves or blocking the return air grille at the bottom of the case. This will interfere with the air flow of the case and will result in diminished performance.To avoid electrical shock, turn the power off before cleaning.The QMVM series cabinets are designed so that spills will accumulate in a drain pan. The drain pan is located underneath the return air grill. Be sure to clean all areas with a mild detergent and water periodically. SERVICE INSTRUCTIONS (Trouble Shooting Guide)1. High head pressure and high back pressure:A. Condenser coil clogged or restricted.B. Condenser fan motor defective.2. Low back pressure and low head pressure:A. Restriction in system.B. Refrigerant undercharged.C. Leak in system.3. Pressures normal – cabinet warm:A. Coil blocked with frost or ice (see #4).B. Control set too warm.C. Air screen disturbance.4. Coil blocked with frost or ice:A. Defective temperature control. E. P-trap in drain not installed.B. Time clock not operating properly. F. Evaporator fan motor defective.C. Improper time clock setting. G. Air screen disturbance.D. Ambient conditions above 75 F/555. Compressor starts and runs – but cycles on overload:A. Low voltage.B. Dropped phase (3 phase).C. Overload protector defective.D. High head pressure (see#1).E. Relay or Capacitor defective.6. Compressor will not start – hums, but cycles on overload:A. Low voltage.B. Relay defective.C. Overload protector defective.D. Start capacitor defective.E. High head preasure (see #1)MASTER-BILT PART NUMBERSThe table below gives Master-Bilt part numbers. Use this chart when ordering replacement parts for your MPM/QMPM cases.All quantities are one each unless otherwise noted by parentheses.ACCESSORIES LISTSALE AND DISPOSALOWNER RESPONSIBILITYIf you sell or give away your Master-Bilt cabinet you must make sure that all safety labels and the Installation - Service Manual are included with it. If you need replacement labels or manuals, Master-Bilt will provide them free. Contact the customer service department at Master-Bilt at (800) 684-8988.The customer service department at Master-Bilt should be contacted at the time of sale or disposal of your cabinet so records may be kept of its new location.If you sell or give away your Master-Bilt cabinet and you evacuate the refrigerant charge before shipment, Master-Bilt recommends that the refrigerant charge be properly recovered in complience with section 608 of the Clean Air Act effective November 1995 and in accordance with all applicable local, regional, or national standards.。

Zimbra邮件系统安装(2009-06-19 15:10:23)转载完全自己写下的方案:一、系统要求及配置环境Redhat Linux AS 4 需要完全安装Zimbra server 5 for redhat 4固定IP:61.183.xx.xx域名:,并对域名作mx解析到61.183.xx.xx服务器采用三块72.8g硬盘作raid5阵列,可用空间为145.6g二、安装操作系统1. 正常安装Redhat linux AS 4,在分区时选择自动分区。
2. 在选择防火墙时必须选择关闭防火墙。
3. 在选择selinux时,必须选择禁用。
4. 在选择程序时选择“全部安装”。
三、安装前的配置安装前必须配置dns服务。
1. 配置/etc/named.conf文件,配置如下:// named.conf for Red Hat caching-nameserver//options {directory "/var/named";dump-file "/var/named/data/cache_dump.db";statistics-file "/var/named/data/named_stats.txt";forwarders {202.103.24.68;};// query-source address * port 53;};//// a caching only nameserver config//controls {inet 127.0.0.1 allow { localhost; } keys { rndckey; };};zone "." IN {type hint;file "named.ca";};zone "localdomain" IN {type master;file "localdomain.zone";allow-update { none; };};zone "localhost" IN {type master;file "localhost.zone";allow-update { none; };};zone "" IN {type master;file ".zone";allow-update { none; };};zone "xx.88.168.192.in-addr.arpa" IN {type master;file "xx.88.168.192.in-addr.arpa";allow-update { none; };};zone "0.0.127.in-addr.arpa" IN {type master;file "named.local";allow-update { none; };};zone "0.0.0.0.0.0.0.0.0.0.0.0.0.0.0.0.0.0.0.0.0.0.0.0.0.0.0.0.0.0.0.ip6.arpa" IN { type master;file "named.ip6.local";allow-update { none; };};zone "255.in-addr.arpa" IN {type master;file "named.broadcast";allow-update { none; };};zone "0.in-addr.arpa" IN {type master;file "named.zero";allow-update { none; };};2. 在/var/named/chroot/var/named创建文件68.88.168.192.in-addr.arpa,并作以下配置:TTL 86400@ IN SOA . . (1997022700 ; Serial28800 ; Refresh14400 ; Retry3600000 ; Expire86400 ) ; MinimumIN NS .1 IN PTR .3. 在/var/named/chroot/var/named创建文件.zone,并作以下配置:$TTL 86400@ IN SOA . . (42 ; serial (d. adams)3H ; refresh15M ; retry1W ; expiry1D ) ; minimumIN NS .IN MX 0 .localhost IN A 127.0.0.1mail IN A 192.168.88.xx4. 在/var/named/下创建链接,命令如下:[root@mail named]# ln -s /var/named/chroot/var/named/68.88.168.192.in-addr.arpa[root@mail named]# ln -s /var/named/chroot/var/named/.zone5. 启动dns服务,命令如下:[root@mail home]# service named restart6. 自动启动dns服务,命令如下:[root@mail home]# chkconfig named on四、安装zimbra server1. 关闭sendmai服务及停止sendmail服务[root@mail home]# chkconfig sendmail off[root@mail home]# service sendmail stop2. 编辑/etc/hosts文件。
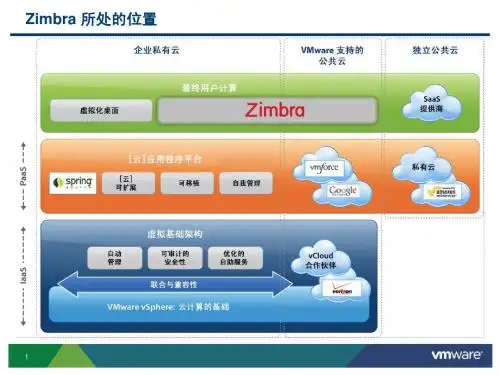
Zimbra技术说明文档文档版本号:V1.0(初稿)版本历史版本日期内容作者备注1.0 2011-11-28 初稿史明松目录1.ZIMBRA概述 (3)1.1.Zimbra是什么? (3)1.2.Zimbra的特点 (4)1.2.1.最终用户的界面预览 (4)1.2.2.后台管理的界面预览 (8)1.2.3.用户功能 (12)1.2.4.管理功能 (14)2.ZIMBRA技术概览 (16)2.1.内部总体架构 (16)2.2.系统组件说明 (16)2.3.组件之间协作关系 (18)2.4.Zimbra软件包说明 (18)2.5.Zimbra扩展性 (20)3.ZIMBRA接口说明 (20)3.1.Zimlet可插拔技术 (20)3.2.Preauth认证登录接口 (23)3.3.Zimbra REST 接口 (27)3.4.Zimbra SOAP 接口 (29)4.ZIMBRA组件和服务详细说明 (29)4.1.LDAP目录服务 (29)4.2.Zimbra源码组件分析 (30)5.ZIMBRA基于WIN32下的源码安装 (32)6.ZIMBRA更多参考说明 (34)1.Zimbra概述1.1.Zimbra是什么?Zimbra的核心产品是Zimbra协作套件(Zimbra Collaboration Suite,简称ZCS)。
它的核心功能是电子邮件和日程安排服务器,当然还包括许多其它的功能,就象是下一代的微软Exchange。
在电子邮件和日程安排之外,它还提供文档存储和编辑、即时消息以及一个利用获奖技术开发的全功能的管理控制台。
ZCS同时也提供移动设备的支持,以及与部署于Windows、Linux或苹果操作系统中的桌面程序的同步功能。
Zimbra公司的主要产品有两个,分别是Zimbra Collabration Suite和ZimbraDesktop。
Zimbra Collabration Suite,即“Zimbar协作套件”,简称ZCS。
目录目录 (1)Zimbra系统的安装过程 (2)前言、系统架构及DNS (2)一、安装环境 (4)1.1操作系统 (4)2.1 Zimbra版本 (5)3.1需要安装的软件包 (5)4.1修改文件 (5)二、安装Zimbra LDAP,实现主从复制 (5)1.1安装一个主的LDAP,两个从的LDAP (5)2.1安装第一个从的LDAP (11)3.1安装第二个从的LDAP (16)三、安装Zimbra MailStore (21)1.1安装 (21)2.1安装 (32)3.1安装其他邮箱服务器 (42)四、安装zimbra MTA (43)1.1安装mta01 (43)2.1安装mta02 (48)五、安装proxy (48)1.1安装 (48)六、归档组件及服务器的安装 (54)1.1安装zimbra-archiving组件 (54)2.1在其他服务器上安装zimbra-archiving组件 (58)3.1在上执行以下命令 (59)4.1在上执行以下命令 (59)5.1安装archive01服务器 (59)七、安装LVS (68)1.1安装ipvsadm (68)2.1负载服务器 (69)3.1 mta服务器 (70)4.1测试 (70)Zimbra系统的安装过程前言、系统架构及DNS1、系统架构vCPU vRAM vDISK OS IP1:DNS 1 512M 20G Centos 5.6 192.168.13.20 2:LVS 1 512M 20G Centos 5.6 192.168.13.21 3:ldap-master 2 1G 50G Centos 6.3 192.168.13.32 4:ldap-replica 2 1G 50G Centos 6.3 192.168.13.33 5:mail (jetty, mysql) 2 1G 50G Centos 6.3 192.168.13.30 6:mail-archive 2 1G 50G Centos 6.3 192.168.13.31 7:proxy (nginx),mta 2 1G 50G Centos 6.3 192.168.13.34 8:proxy (nginx),mta 2 1G 50G Centos 6.3 192.168.13.35 9:Zimbra-VIP 192.168.13.242、安装DNS# yum install bind3、配置DNS# vi /etc/named.conf输入以下内容:options {directory "/var/named";pid-file "/var/named/named.pid";forwarders { 202.101.224.67; 202.101.224.68; };allow-query { any; };};zone "." IN {type hint;file "named.root";};zone "0.0.127.in-addr-arpa" IN {type master;file "named.local";allow-update { none; };};zone "" IN {type master;file "";allow-update { none; };};zone "13.168.192.in-addr-arpa" IN {type master;file "named.13.168.192";allow-update { none; };};# cp /usr/share/doc/bind-9.3.6/sample/var/named/named.root /var/named/ # vi /var/named/named.local输入以下内容:$TTL 3h0.0.127.in-addr.arpa. IN SOA . admin@. (1 ; Serial3h ; Refresh after 3 hours1h ; Retry after 1 hours1w ; Expire after 1 week1h ) ; Negative caching TTL of 1 hour1.0.0.127.in-addr.arpa. IN PTR localhost.# vi /var/named/输入以下内容:$TTL 3h. IN SOA . admin@. (1 ; Serial3h ; Refresh after 3 hours1h ; Retry after 1 hours1w ; Expire after 1 week1h ) ; Negative caching TTL of 1 hour . IN NS .. IN MX 10 mail. IN A 192.168.13.20www IN A 192.168.13.24mail IN A 192.168.13.24zldapmaster IN A 192.168.13.32zldapreplica IN A 192.168.13.33zproxymta01 IN A 192.168.13.34zproxymta02 IN A 192.168.13.35zmailstore IN A 192.168.13.30zmailstore-archive IN A 192.168.13.31# vi /var/named/named.13.168.192输入以下内容:$TTL 3h13.168.192.in-addr.arpa. IN SOA . admin@. (1 ; Serial3h ; Refresh after 3 hours1h ; Retry after 1 hours1w ; Expire after 1 week1h ) ; Negative caching TTL of 1 hour 13.168.192.in-addr.arpa. IN NS .226.1.168.192.in-addr.arpa. IN PTR .4、启动DNS# /usr/sbin/named -g &注:-g显示启动时的日志,一边分析启动过程出现错误的原因。
Software Update InstructionsZClone® Xi (ZXi)Software Update Instructions (Includes Firmware Update)1.0 IntroductionThe latest ZXi software, manual, and readme file (which contains the software release notes) can always be found on the ZXi support page at: /knowledge/zclonexi . The ZXi v1.1 software release contains both a software and firmware update.2.0 RequirementsTo perform the software and firmware updates, the following are required:The ZXi:▪ Connected to a network with Internet access (for updating “FROM NETWORK), or▪ With a USB flash drive formatted NTFS or exFAT (for updating “FROM USB DRIVE ).3.0 Software UpdateThere are two methods available to update the ZXi software:A. FROM NETWORK – Via the Internet through a network connection.B. FROM USB DRIVE – Via software file download onto a USB drive flash.3.1 Software Update From Network – Via the InternetThe ZXi software can be installed/updated by connecting the ZXi to a network with Internetaccess.1.Connect the ZXi to a network with Internet access. Set the proxy settings (IP settings) ifnecessary. Attach a network cable to the back of the ZXi.2. From the main menu on the ZXi, tap the down arrow twice then tap the SoftwareUpdates icon. A screen will appear showing the current version of software installedtowards the top of the screen.3. Select From Network . The ZXi will check for a newer version on the web. If one is found,it will display the version on the screen and theUpdate icon will be selectable.4. Tap the Update icon to begin the update. A confirmation screen will appear. Tap Yes tocontinue the update.5.Do not interrupt the update process. It may take several minutes. Once completed, a‘Successful’ screen will appear.6. Reboot the ZXi by turning the unit off then back on using the Power button in front ofthe unit.7. Verify the software version at the top of the ‘Software Updates’ screen.8. When finished, go to section 4.0 Firmware Update and perform a firmware update.3.2 Software Update From USB Drive – Via software downloadThe latest software can also be downloaded from Logicube’s website and be placed onto a USB flash drive.Download the latest software from the ZXi product support page at:/knowledge/zclonexi1. Download the zip file from the download page.2. Extract the contents of the downloaded zip file to the root of the USB flash drive (thefile must not be in any folder). Do not connect the USB flash drive yet. The ZXi willdisplay a message when to connect the USB drive. If the computer being used to extract the contents of the downloaded zipfile has the software WinZip, or other third party zip software, pleasereview Section 6.1.2.1 of the ZXi User’s Manual before proceeding.3.From the main screen, tap the Software Updates icon. 4.Select From USB Drive. The ZXi will prompt for the USB drive to be connected to USB_1 (the front USB port). 5.Connect the USB drive to USB_1. ZXi will then check for the version of the software on the USB drive and will display that version on the box next to the selected location. 6. Tap the Update icon to begin the update. A confirmation screen will appear. Tap Yes tocontinue the update. Do not interrupt the update process. It may take several minutes.Once completed, a ‘Successful’ screen will appear.7. Reboot the ZXi by turning the unit off then back on using the Power button in front ofthe unit.8. Verify the software version at the top of the ‘Software Updates’ screen. 9.When finished, go to section 4.0 Firmware Update and perform a firmware update.4.0 Firmware UpdateZXi software releases may contain a firmware update. This section provides instructions on how to check if a firmware update is required, and how to perform the firmware update.1.After the software is updated on the ZXi, from the main menu, tap the down arrow twice then tap theSoftware Updates icon.2.Tap the “Firmware Update” tab. One of two screens will appear:a.FIRMWARE UPGRADE AVAILABE– Tap the Update icon. A message will appear: “FIRMWAREUPDATE COULD TAKE UP TO A FEW MINUTES TO COMPLETE; PLEASE DO NOT INTERRUPTPOWER DURING THIS TIME. ON COMPLETION THE UNIT WILL AUTO-RESTART AND CONFIRMTHE UPDATE.” Tap the OK icon to start the firmware update process.b.FIRMWARE UPGRADE NOT AVAILABLE –This message will appear if the device does not requirea firmware update. No further action is necessary if this message appears.。
BEETLE /iSCAN EASY eXpress+自助结账系统安装手册(2018年1月)本文件中提及的所有产品名称均为注册商标。
版权所有 © Diebold Nixdorf, 2018保留所有权利,包括以任何方式进行全部或部分翻译、重印和传输或复制的权利。
如有侵犯将承担赔偿责任。
保留所有权利,包括通过专利授予或实用新型或者外观设计注册而获得的权利。
请参阅保护声明ISO 16016目录1关于手册 (1)2保修 (2)3打开包装并检查系统 (3)3.1 序列号 (3)4ESD(静电敏感设备) (4)5重要事项 (5)5.1 连接外围设备 (6)6所需工具 (7)7客户要求 (8)8组件 (9)8.1 外视图 (9)8.2 内视图 (10)9打开设备 (11)10安装在工作台扩充板中 (12)10.1 要求 (12)10.2 钻孔图案尺寸(毫米) (12)10.3 安装 (12)11集成 (16)12安装BEETLE /iSCAN EASY eXpress+ (17)12.1 连接系统 (17)12.2 取下显示屏和前表面的安全膜 (20)13清洁说明 (21)13.1 一般信息 (21)13.2 维护和保养 (21)13.3 外壳 (21)13.4 批准的清洁材料 (22)14尺寸(毫米) (23)14.1 后视图 (23)14.2 15英寸版本 (24)14.3 19英寸版本 (25)14.4 允许的倾斜角度 (25)14.5 仰视图 (26)14.6 开门设备 (26)15方框图 (27)16技术数据 (28)16.1 系统 (28)17证书 (29)18 回收利用 (30)关于手册 BEETLE /iSCAN EASY eXpress + 安装 11 关于手册本手册仅供经过技术培训的人员使用。
它为现场安装设备提供了所有必要的现场准备信息。
注意此符号标注的说明。
小心!此符号表示需要谨慎操作。
Standalone Email Threat IsolationStandalone Email Threat Isolation Installation Guide Documentation version:1.0Legal NoticeCopyright2018Symantec Corporation.All rights reserved.Symantec,the Symantec Logo,the Checkmark Logo and are trademarks or registered trademarks ofSymantec Corporation or its affiliates in the U.S.and other countries.Other names may be trademarksof their respective owners.The product described in this document is distributed under licenses restricting its use,copying,distribution,and decompilation/reverse engineering.No part of this document may be reproduced in any form by anymeans without prior written authorization of Symantec Corporation and its licensors,if any.THE DOCUMENTATION IS PROVIDED"AS IS"AND ALL EXPRESS OR IMPLIED CONDITIONS,REPRESENTATIONS AND WARRANTIES,INCLUDING ANY IMPLIED WARRANTY OFMERCHANTABILITY,FITNESS FOR A PARTICULAR PURPOSE OR NON-INFRINGEMENT,AREDISCLAIMED,EXCEPT TO THE EXTENT THAT SUCH DISCLAIMERS ARE HELD TO BE LEGALLYINVALID.SYMANTEC CORPORATION SHALL NOT BE LIABLE FOR INCIDENTAL OR CONSEQUENTIALDAMAGES IN CONNECTION WITH THE FURNISHING,PERFORMANCE,OR USE OF THISDOCUMENTATION.THE INFORMATION CONTAINED IN THIS DOCUMENTATION IS SUBJECT TOCHANGE WITHOUT NOTICE.The Licensed Software and Documentation are deemed to be commercial computer software as definedin FAR12.212and subject to restricted rights as defined in FAR Section52.227-19"Commercial ComputerSoftware-Restricted Rights"and DFARS227.7202,et seq."Commercial Computer Software andCommercial Computer Software Documentation,"as applicable,and any successor regulations,whetherdelivered by Symantec as on premises or hosted services.Any use,modification,reproduction release,performance,display or disclosure of the Licensed Software and Documentation by the ernmentshall be solely in accordance with the terms of this Agreement.Symantec Corporation350Ellis StreetMountain View,CA94043Technical supportIf you need help on an aspect of the security services that is not covered by the Online Helpor administrator guides,contact your IT administrator or Support team.To find your Supportteam's contact details in the ClientNet portal,click Support>Contact us.How to Set Up Standalone Email Threat IsolationThis document includes the following topics:■Standalone Email Threat IsolationStandalone Email Threat IsolationEmail Security.cloud offers a new service named Standalone Email Threat Isolation.EmailThreat Isolation protects your users’email messages by isolating malicious content andpreventing it from being delivered to your network.The Standalone Email Threat Isolationservice is available to organizations that do not currently subscribe to any other EmailSecurity.cloud services.As a standalone customer,your existing email security vendor continuesto scan your email messages.However,the Email Threat Isolation service further protectsyour messages with two powerful features:Click-time URL Protection and URL Isolation.Thesetwo features combine to secure the URLs embedded in your organization’s email and,whennecessary,execute web sessions remotely on an isolation platform.Click-time URL Protection works every time a user clicks on a URL in an email,for the lifetimeof the URL.Click-time URL Protection“rewrites”URLs into secure URLs that cannot bemanipulated later on by changing the target websites or destinations.URL Isolation works bymaking a risk assessment of the target websites or destinations of the URLs that Click-timeURL Protection manages.If the risk level is deemed to be breached,the destination webpagesare displayed on an isolation platform with any links and dynamic content disabled.All external email that is inbound to your organization is routed as normal through your existingemail vendor,which means you don't need to change your existing MX records.Also note thatif your existing email vendor currently scans your outbound mail,that won't change either.After the inbound mail is scanned by your existing vendor,it is then routed to EmailSecurity.cloud where Click-time URL Protection and URL Isolation process all embedded URLsin a matter of seconds.After Click-time URL Protection and URL Isolation have processed themail,it is delivered to your mail server or cloud-based email service.Your users may notice that Click-time URL Protection has rewritten some URLs in their email.And,URL Isolation may display some webpages on the isolation platform to eliminate the potential risks of visiting the site.Here are the initial steps required to set up Standalone Email Threat Isolation:1Review the welcome email that Email Security.cloud sent to you.That email contains a link to the Email Security.cloud administration portal,and your logon account and password for the portal.2Remember that you don't need to change your MX records.However,you'll need to access your current email vendor's portal and replace your mail server address with the Email Security.cloud cluster address that was also provided in your welcome email.Your inbound mail is scanned by your current vendor and once it is processed it is delivered to the Email Security.cloud infrastructure and scanned by Email Threat Isolation.3You need to open up your firewall's SMTP port(usually port25)to allow Email Security.cloud sending IP addresses to deliver the mail that is scanned by the Email Threat Isolation service.After the mail is scanned and processed by Email Threat Isolation as detailed in the previous step,it needs to be delivered to your mail service or cloud-based email service.4You then need to log on to the Email Security.cloud portal using the credentials we gave you.There you can move to the Domains page and click on Add New Domain.This launches the domains wizard,which walks you through the steps of adding your domains.The wizard helps you to add your inbound routes,which are your mail server addresses.You may have already provided an inbound route to the Email Threat Isolation provisioning team,in which case the inbound route will already be pre-populated and you can choose to use the registered default.5You can set up a domains whitelist on the Click-time URL Protection screen,and toggle the feature on and off if necessary.6On the URL Isolation page you can turn that feature on or off,and take note of the default settings.You’ll notice that Click-time URL Protection must be enabled before you can use URL Isolation.7The Email Delivery Troubleshooting Tool can be used to fix most issues with emails getting through to your mail server.Note that it won’t validate your MX records,because your current vendor is still scanning your mail.Once your services have been up and running for a while,take some time to review the email security data that has been generated in the Click-time URL Protection incidents and URL Isolation reports pages.5How to Set Up Standalone Email Threat IsolationStandalone Email Threat Isolation。