HHP IT4710条码扫描器
- 格式:doc
- 大小:41.00 KB
- 文档页数:3
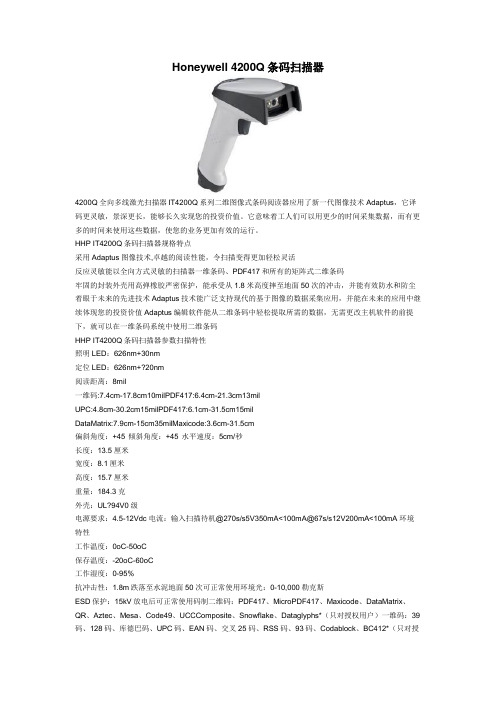
Honeywell 4200Q条码扫描器4200Q全向多线激光扫描器IT4200Q系列二维图像式条码阅读器应用了新一代图像技术Adaptus,它译码更灵敏,景深更长,能够长久实现您的投资价值。
它意味着工人们可以用更少的时间采集数据,而有更多的时间来使用这些数据,使您的业务更加有效的运行。
HHP IT4200Q条码扫描器规格特点采用Adaptus图像技术,卓越的阅读性能,令扫描变得更加轻松灵活反应灵敏能以全向方式灵敏的扫描器一维条码、PDF417和所有的矩阵式二维条码牢固的封装外壳用高弹橡胶严密保护,能承受从1.8米高度摔至地面50次的冲击,并能有效防水和防尘着眼于未来的先进技术Adaptus技术能广泛支持现代的基于图像的数据采集应用,并能在未来的应用中继续体现您的投资价值Adaptus编辑软件能从二维条码中轻松提取所需的数据,无需更改主机软件的前提下,就可以在一维条码系统中使用二维条码HHP IT4200Q条码扫描器参数扫描特性照明LED:626nm+30nm定位LED:626nm+?20nm阅读距离:8mil一维码:7.4cm-17.8cm10milPDF417:6.4cm-21.3cm13milUPC:4.8cm-30.2cm15milPDF417:6.1cm-31.5cm15milDataMatrix:7.9cm-15cm35milMaxicode:3.6cm-31.5cm偏斜角度:+45°倾斜角度:+45°水平速度:5cm/秒长度:13.5厘米宽度:8.1厘米高度:15.7厘米重量:184.3克外壳:UL?94V0级电源要求:4.5-12Vdc电流:输入扫描待机@270s/s5V350mA<100mA@67s/s12V200mA<100mA环境特性工作温度:0oC-50oC保存温度:-20oC-60oC工作湿度:0-95%抗冲击性:1.8m跌落至水泥地面50次可正常使用环境光:0-10,000勒克斯ESD保护:15kV放电后可正常使用码制二维码:PDF417、MicroPDF417、Maxicode、DataMatrix、QR、Aztec、Mesa、Code49、UCCComposite、Snowflake、Dataglyphs*(只对授权用户)一维码:39码、128码、库德巴码、UPC码、EAN码、交叉25码、RSS码、93码、Codablock、BC412*(只对授权用户)OCR字符:?OCR-A、OCR-B?接口方式:所有流行PC或终端的键盘口、Apple?ADB、USB、TTL?RS-232、光笔仿真、无译码输出激光仿真等等IT4600Q/4800Q是HHP一款针对中国国内机动车合格证项目而定制的平面图像式条码阅读器,它把平面图像阅读器丰富的功能带到了该项目的解决方案当中。


Thanks you for choosing our company’s product. To have a better operating experience, please read this manual carefully.Reading Angle1. Maintain a bevel between the scanner and the bar code to make a bestreading.2. Do not keep the scanner in 90° with the bar code, otherwise the scannercan’t read.3. The scanner must aim at the bar code and the beam must cover the wholebar code. If not, error may occur.correct way of reading correct way of readingincorrect way of reading incorrect way of readingPacking list:1*barcode scanner 1*cable (USB/KB/COM)1*user manual 1*Stand (optional)Product IntroductionThis barcode scanner has USB/KB/COM interface for user’s choice. With advantages of quick decoding speed and easy operation, it should be a good solution for bar code identification.If you have any questions about the functions and settings, please contact us for more details.Our company reserves all rights of modifying and final explanation for the manual.keyboardport of devicekeyboard cable123Connect the USB cable to the USB interface in the computer. Connecting the ScannerUSB:1. Shut off the power supply of the host.2. Pull out the keyboard of the host.3. Confirm the PS/2 cable is suitable for the connection of the host.4. Connect the scanner to the host.5. Connect the keyboard port to the PS/2 cable.6. Open the host.PS/2:1. Shut off the power supply of the host.2. Confirm the connection is correct from the RS232 to the host.3. Connect the AC adaptor to thepower port of the scanner or connect the keyboard port of the host to the keyboard port of the scanner.4. Open the host.5. Scan the setup barcode to set the output mode as RS232 (serial mode).RS232:Show Version Info (user-defined) Show Serial NO.(user-defined)Reset FactoryDefaultsDefault Interface PS2 Keyboard Wedge Serial USB Keyboard Wedge USB SerialDefault Mode Single Scan No Trigger MultiscanMultiscan No Trigger Continuous Scan PulseInterface Reading ModeBuzzer OFFONAdd Code IDNo Code ID Send Code ID as PrefixSend Code ID as SuffixAmerica English Canada French DutchSpanish Argentina(Latin)Brazil PortugueseDanish England English ItalianFrance French German NorwaySwedish, Finnish Slovak Portugal PortugueseCzech Belgium Dutch Turkish-FTurkish-Q Polish 214Switzerland German,FrenchCroatianHungarianLanguage Settings600bps 1200bps 2400bps4800bps9600bps19200bps38400bps57600bps115200bpsSerial Mode Parameter Settings (Baud Rate)Serial No Check DigitSerial XON/OFF Serial RTS/CTSSerial ACK/NA Hand Shake Timeout-2secs Hand Shake Timeout-5secsSerial Protocol78Data BitsStop Bits12Check DigitsNone ODD EvenSpace Check DigitMark Check DigitTransmit UPCA check code disableUPCA hide system character-disableImageRevise Image Disable Revise Image EnableCode39redundancy disableReplace “2” with “TWO” -disableReplace “2” with “TWO”-enableCovert code39 into code32 (DF)-disableCovert code39 into code32-enableCode39 TAB ModeUPC-A onUPC-A offUPCA ID as ‘e’Convert UPCA into EAN13 enableConvert UPCA into EAN13 disableTransmit UPCA check codeUPCA hide system character-enableUPC-EUPC-E on UPC-E off UPC-E ID as ‘f’Convert UPCE into UPCA -enableConvert UPCE into UPCA-disableCode 39 onCode 39 offCode 39 ID as ‘m’Code 39 Full ASCLL-onCode 39 Full ASCLL-offCode39 MOD43Verify OffCode39 MOD43Verify OnCode39 transmitverify-On Code39 transmit CHARS-OffCode39 transmit CHARS-OnCode39redundancy enableCode 39UPC-AHighestHigherLowerLowestBrazil bank barcodeOn OffRemark: It need customized before production for the function in the frameCode93Supplements disableCode93 /on Code93/ off Code 93 ID as ‘I’Code93redundancy enableCode93redundancy disableCode 93 MOD47/on Code 93 MOD47/offCode128Code128/on Code128/off Code 128 ID ‘a’Code128redundancy disableCode128redundancy enableCodabarCodabar/on Codabar/offCodabar ID as ‘v’Codabar Send start/stopCHARS-enableCodabar Send start/stopCHARS-disableCodabarredundancy enableCodabarredundancy disableSupplements-2&5 digitsSupplements-5 digitsSupplements-2 digitsEAN8 /on EAN8 /offEAN8 ID as ‘c’EAN13 on EAN13 off EAN13 ID as ‘d’Transmit EAN13check code-enableTransmit EAN13check code-disableConvert EAN13into ISBN-enableConvert EAN13into ISBN-disableConvert EAN13into ISSN-disableConvert EAN13into ISSN-enableEAN13redundancy enableEAN13redundancy disableEAN13EAN 8Supplements SettingsCode11Code11/on Code11/offCode 11 ID as ‘u’Code11redundancy disableCode11redundancy enableCode11 auto CK verifyCode11 C verify Code11 CK verifyMatrix 25Matrix 25/on Matrix 25/off Matrix 25 ID as ‘q’Postage Code 25/on Postage Code 25/offPostageCode 25 ID as ‘r’Aviation 25/onAviation 25/offAviation 25 ID as ‘p’Interleaved 25Interleaved/ITF25-on Interleaved/ITF25-off ITF25 ID as ‘n’ITF25redundancy disableITF25redundancy enableIndustrial 25/ on Industrial 25/ off Industrial 25 ID as ‘o’Industrial 25redundancy enableIndustrial 25redundancy disableIndustrial 25Code MSICode MSI/on Code MSI/off MSI ID as ‘s’Code MSIredundancy disableCode MSIredundancy enableCode PlesseyCode Plessey Code Plessey/off Code Plessey ID as ‘t’Code Plesseyredundancy disableCode Plesseyredundancy enableUSB UploadUSB quick upload/on USB quick upload/offIR Auto-sensingIR Auto-sensing/onIR Auto-sensing/offFront/Behind CHARS SettingsHide CHARS-disable Hide CHARS ‘-’Replace ‘0’with ‘A’-disableReplace ‘0’with ‘A’-enableReplace ‘1’with ‘ONE’-disableReplace ‘1’with ‘ONE’-enableDelete CHARSin front of ‘12345’-disableDelete CHARSin front of ‘12345’Replace ‘FUNC3’ with ‘3’GS1GS1 Omnidirectional/on GS1 Omnidirectional/offGS1 Omni ID as ‘j’GS1 Limited/onGS1 Limited/off GS1 Limited ID as ‘k’FUNCCancel FUNC Mapping Replace ‘FUNC1’ with ‘0’Replace ‘FUNC2’ with ‘2’Replace ‘FUNC4’ with ‘6’Kindly remind:High speed transmission can't be accepted by somedevice(computer),please try to scan the barcode (decrease speedtransmission) as following if some characters was missing.Prefix & Suffix SettingAll codes add suffix CRAll codes add suffix CR+CRLF all codes add suffix ETXAll codes add suffix format CHARS-disableAll codes add prefix STX All codes add prefix disableMultiscan Settings3 sec 5 secConversion of EAN, ISBN & ISSNConvert all EAN into ISBN-enableConvert all EAN into ISSN-enableEnter into checkingmode (used with caution)Convert all EAN into ISBN-disableConvert all EAN into ISSN-disable1 secHide CharactersHide the behindCHARS-disableHide the last N CHARHide the front CHARS-disableHide the first N CHARHide the middle characters-disableHide the middle N CHARHide from the Nth CHARAll codes add prefix F2All codes add suffix F2Set to add prefix Set to add suffixQuit out prefix and suffix adding modeClear all prefix CHARSClear all suffix CHARSETX ACK TABFFSI DC2SOH STX EOT ENQ BEL Backspace LF VT CR SO DLE DC1NAK DC3DC4CAN SYN ETB ESCEM SUB RSFS GS !US SPACE $“#‘%&*()-+,0./312645978<:;?=>B@A EC D HF GKI JNL MQO PTR SWU VZX Y][\`^_ca bfd eIg hljkmpsuy|DeleteF3F6onrqutxw{z~}F2F1F5F4F8F7F9F11F10F12HOMEINSERTPage up ENDDelete1920Left arrow21。

NLS-HR1000-70 手持式条码扫描器用户手册免责声明请您在使用本手册描述的产品前仔细阅读手册的所有内容,以保障产品的安全有效地使用。
阅读后请将本手册妥善保存以备下次使用时查询。
请勿自行拆卸终端或撕毁终端上的封标,否则福建新大陆自动识别技术有限公司不承担保修或更换终端的责任。
本手册中的图片仅供参考,如有个别图片与实际产品不符,请以实际产品为准。
对于本产品的改良更新,新大陆自动识别技术有限公司保留随时修改文档而不另行通知的权利。
本手册包含的所有信息受版权的保护,福建新大陆自动识别技术有限公司保留所有权利,未经书面许可,任何单位及个人不得以任何方式或理由对本文档全部或部分内容进行任何形式的摘抄、复制或与其它产品捆绑使用、销售。
本手册中描述的产品中可能包括福建新大陆自动识别技术有限公司或第三方享有版权的软件,除非获得相关权利人的许可,否则任何单位或者个人不能以任何形式对前述软件进行复制、分发、修改、摘录、反编译、反汇编、解密、反相工程、出租、转让、分许可以及其它侵犯软件版权的行为。
福建新大陆自动识别技术有限公司对本声明拥有最终解释权。
版本记录版本号版本描述发布日期V1.0 初始版本。
2014-09-03目录版本记录 ....................................................................................................................................................................... - 3 -前言 (1)简介 (1)章节纲要 (1)第一章认识HR1000扫描器 (2)简介 (2)打开包装 (2)HR1000扫描器外观 (2)数据接口 (2)连接HR1000至主机 (4)用USB数据线连接 (5)用RS-232数据线连接 (5)用PS/2数据线连接 (6)移除通讯数据线 (7)开机、休眠、关机、重启 (7)维护与保养 (7)HR1000扫描器外观尺寸(单位:mm) (8)左视图 (8)正视图 (8)俯视图 (8)读码 (8)第二章系统设置 (11)简介 (11)使用条码设置HR1000 (11)使用串口指令设置HR1000 (11)读寄存器指令 (12)写寄存器指令 (14)EEPROM写使能开启/关闭命令 (17)EEPROM进行写命令 (18)EEPROM进行读命令 (21)寄存器列表 (24)开启/关闭设置码 (41)发送设置码内容 (41)恢复出厂默认 (42)识读模式 (43)手动识读模式 (43)连续识读模式 (44)感应识读模式 (47)命令触发识读模式 (51)安全级别设置 (52)识读成功提示音 (53)提示音频率 (54)提示音持续时间 (54)解码状态提示符 (55)其他设置 (56)静音设置 (56)照明设置 (56)第三章通讯设置 (57)简介 (57)串口通讯设置 (57)波特率 (58)校验 (59)停止位 (59)数据位 (60)USB通讯设置 (62)USB HID-KBW (62)标准键盘输入模式 (63)键盘仿真输入字符模式 (63)键盘仿真输入控制字符模式 (64)键盘仿真输入控制字符对应表 (65)国家/语言键盘布局选择 (66)键间延时设定 (68)强制字母大小写转换 (70)模拟数字小键盘 (71)USB COM Port Emulation (72)USB DataPipe (73)HID-POS (74)软件编程访问设备的方法 (75)获取扫描数据 (75)VID/PID表 (75)PS/2通讯设置 (75)第四章数据编辑 (77)简介 (77)前缀顺序设置 (77)自定义前缀 (78)禁止或允许添加自定义前缀 (78)设置自定义前缀 (78)AIM ID前缀 (79)CODE ID前缀 (80)Code ID出厂默认值 (80)修改Code ID (80)自定义后缀 (84)禁止或允许添加自定义后缀 (84)设置自定义后缀 (85)结束符后缀 (86)禁止或允许添加结束符后缀 (86)设置结束符后缀 (87)第五章条码参数设置 (88)简介 (88)全局设置 (88)允许/禁止识读所有条码 (88)Code 128 (89)恢复出厂默认值 (89)允许/禁止识读Code 128 (89)设置读码长度限制 (90)UCC/EAN-128 (91)恢复出厂默认值 (91)允许/禁止识读UCC/EAN-128 (91)设置读码长度限制 (92)AIM 128 (93)恢复出厂默认值 (93)允许/禁止识读AIM 128 (93)设置读码长度限制 (94)EAN-8 (95)恢复出厂默认值 (95)允许/禁止识读EAN-8 (95)设置是否发送校验位 (95)设置是否允许识读附加码 (96)设置是否必须有附加码 (97)扩展设置 (97)EAN-13 (98)恢复出厂默认值 (98)允许/禁止识读EAN-13 (98)设置是否发送校验位 (98)设置是否允许识读附加码 (99)设置是否必须有附加码 (100)ISSN (101)恢复出厂默认值 (101)允许/禁止识读ISSN (101)ISBN (102)恢复出厂默认值 (102)允许/禁止识读ISBN (102)ISBN数据位设置 (103)UPC-E (104)恢复出厂默认值 (104)允许/禁止识读UPC-E (104)设置是否发送校验位 (104)设置是否允许识读附加码 (105)设置是否必须有附加码 (106)设置是否发送系统字符 (106)扩展设置 (107)UPC-A (108)恢复出厂默认值 (108)允许/禁止识读UPC-A (108)设置是否发送校验位 (109)前缀字符发送设置 (109)设置是否允许识读附加码 (110)设置是否必须有附加码 (111)Interleaved 2 of 5 (112)恢复出厂默认值 (112)允许/禁止识读Interleaved 2 of 5 (112)校验设置 (113)设置读码长度限制 (114)ITF-6 (115)恢复出厂默认值 (115)允许/禁止识读ITF-6 (115)ITF-14 (115)恢复出厂默认值 (115)允许/禁止识读ITF-14 (115)Deutsche 14 (116)恢复出厂默认值 (116)允许/禁止识读Deutsche 14 (116)Deutsche 12 (117)恢复出厂默认值 (117)允许/禁止识读Deutsche 12 (117)Matrix 2 of 5 (European Matrix 2 of 5) (117)恢复出厂默认值 (117)允许/禁止识读Matrix 2 of 5 (117)校验设置 (119)设置读码长度限制 (120)Industrial 25 (121)恢复出厂默认值 (121)允许/禁止识读Industrial 25 (121)校验设置 (122)设置读码长度限制 (123)Standard 25 (124)恢复出厂默认值 (124)允许/禁止识读Standard 25 (124)校验设置 (125)设置读码长度限制 (126)Code 39 (127)恢复出厂默认值 (127)允许/禁止识读Code 39 (127)校验设置 (128)设置是否发送起始符和终止符 (129)Full ASCII支持 (129)设置读码长度限制 (130)Codabar (131)恢复出厂默认值 (131)允许/禁止识读Codabar (131)校验设置 (132)起始符和终止符设置 (133)设置读码长度限制 (134)Code 93 (135)恢复出厂默认值 (135)允许/禁止识读Code 93 (135)校验设置 (136)设置读码长度限制 (137)Code 11 (138)恢复出厂默认值 (138)允许/禁止识读Code 11 (138)校验设置 (139)设置读码长度限制 (140)Plessey (141)恢复出厂默认值 (141)允许/禁止识读Plessey (141)校验设置 (142)设置读码长度限制 (143)MSI-Plessey (144)恢复出厂默认值 (144)允许/禁止识读MSI-Plessey (144)校验设置 (145)设置读码长度限制 (146)RSS-14 (147)恢复出厂默认值 (147)允许/禁止识读RSS-14 (147)设置是否发送AI字符 (147)RSS-Limited (148)恢复出厂默认值 (148)允许/禁止识读RSS-Limited (148)设置是否发送AI字符 (148)RSS-Expand (149)恢复出厂默认值 (149)允许/禁止识读RSS-Expand (149)附录 (150)默认设置表 (150)AIM ID列表 (156)Code ID列表 (158)ASCII码表 (159)数据码 (162)保存或取消 (165)F1~F12 (166)简介本手册主要向用户介绍NLS-HR1000-70手持式条码扫描器(以下简称“HR1000扫描器”或“扫描器”)的使用方法。

™ IT5600Retail/Commercial Handheld Linear ImagerIT5800 Industrial Handheld Linear ImagerUser’s GuideiChapter 1 - Getting StartedIT5600/5800.........................................................................1-1About This Manual...............................................................1-1Unpacking the Scanner.........................................................1-1IT5600 Models .....................................................................1-2IT5800 Models......................................................................1-2IT5600/5800 Scanner Identification.....................................1-3IT5800 Scanner (with aimer beam option) Identification....1-4Connecting the Scanner When Powered by Host(Keyboard Wedge) ............................................................1-5Reading Techniques .............................................................1-6Resetting the Standard Product Defaults..............................1-6Plug and Play........................................................................1-6Keyboard Wedge Connection...............................................1-7Laptop Direct Connect...................................................1-7RS-232............................................................................1-7Wand Emulation Plug & Play........................................1-8IBM 4683 Ports 5B, 9B, and 17 Interface......................1-8Connecting the Scanner with USB ....................................1-10IBM SurePos................................................................1-10USB PC or Macintosh Keyboard.................................1-11USB HID......................................................................1-11USB Com Port Emulation............................................1-12Connecting the Scanner with Serial Wedge.......................1-12Chapter 2 - Terminal InterfacesTerminal ID..........................................................................2-1Supported Terminals.............................................................2-2Keyboard Country................................................................2-4Keyboard Style.....................................................................2-5Keyboard Modifiers..............................................................2-6Table of ContentsConnecting the Scanner with RS-232 Serial Port ................2-8 RS-232 Baud Rate..........................................................2-9RS-232 Word Length: Data Bits, Stop Bits, and Parity2-10RS-232 Handshaking...................................................2-11Wand Emulation Connection.......................................2-11Wand Emulation Transmission Rate............................2-12Wand Emulation Polarity.............................................2-12Wand Emulation Idle...................................................2-13 Wand Emulation.................................................................2-13 Data Block Size............................................................2-13Delay Between Blocks.................................................2-14Overall Checksum........................................................2-14 Chapter 3 - OutputGood Read Indicators...........................................................3-1 Beeper – Good Read......................................................3-1Beeper Volume – Good Read........................................3-1Beeper Pitch – Good Read.............................................3-1Beeper Duration – Good Read.......................................3-2LED – Good Read..........................................................3-2Number of Beeps – Good Read.....................................3-2 Good Read Delay..................................................................3-3 User-Specified Good Read Delay..................................3-3 Trigger Modes......................................................................3-3 Manual/Serial Trigger....................................................3-3Automatic Trigger..........................................................3-4Presentation Mode..........................................................3-5 Hands Free Time-Out...........................................................3-5Reread Delay........................................................................3-5 User-Specified Reread Delay.........................................3-6 Aimer Beam Delay (Aimer Beam option only)....................3-7 User-Specified Aimer Beam Delay................................3-7 Aimer Mode (Aimer Beam option only)..............................3-7Aimer Beam Time-Out (Aimer Beam option only).............3-8Centering Window................................................................3-8 iiOutput Sequence Overview................................................3-10 Output Sequence Editor................................................3-11Require Output Sequence.............................................3-11 Multiple Symbols................................................................3-13No Read..............................................................................3-13Video Reverse.....................................................................3-14 Chapter 4 - Data EditingPrefix/Suffix Overview.........................................................4-1 To Add a Prefix or Suffix: 2To Clear One or All Prefixes or Suffixes:......................4-3To Add a Carriage Return Suffix to all Symbologies....4-3Prefix Selections.............................................................4-3Suffix Selections.............................................................4-4Function Code Transmit.................................................4-4 Intercharacter, Interfunction, and Intermessage Delays.......4-4 Intercharacter Delay.......................................................4-5User Specified Intercharacter Delay...............................4-5Interfunction Delay.........................................................4-6Intermessage Delay........................................................4-6 Chapter 5 - Data FormattingData Format Editor Introduction...........................................5-1 To Add a Data Format....................................................5-1Other Programming Selections......................................5-2Data Format Editor Commands......................................5-2Data Format Editor.........................................................5-4Data Formatter................................................................5-5Alternate Data Formats..................................................5-5 Chapter 6 - Secondary InterfaceIT5600 Models......................................................................6-1IT5800 Models......................................................................6-1Enabling the Secondary Interface.........................................6-1Secondary RS-232 Connection.............................................6-2iiiSecondary Code 39 Wand Emulation...................................6-2Secondary Laser Emulation..................................................6-3Laser Emulation Transmission Rate.....................................6-3Laser Emulation Polarity......................................................6-4Laser Emulation Idle.............................................................6-4Secondary Trigger Mode......................................................6-4Hands Free Time-Out...........................................................6-5 Chapter 7 - SymbologiesIntroduction...........................................................................7-1All Symbologies...................................................................7-1Message Length....................................................................7-2Codabar.................................................................................7-3 Codabar Start/Stop Characters......................................7-3Codabar Check Character..............................................7-3Codabar Concatenation..................................................7-4Codabar Message Length...............................................7-5 Code 39.................................................................................7-5 Code 39 Start/Stop Characters.......................................7-5Code 39 Check Character...............................................7-6Code 39 Message Length...............................................7-6Code 39 Append.............................................................7-7Code 32 Pharmaceutical (PARAF)................................7-7Full ASCII......................................................................7-8Code 39 Code Page........................................................7-9 Interleaved 2 of 5..................................................................7-9 Check Digit....................................................................7-9Interleaved 2 of 5 Message Length..............................7-10 Code 93...............................................................................7-11 Code 93 Message Length.............................................7-11Code 93 Code Page......................................................7-11 Code 2 of 5..........................................................................7-12 Code 2 of 5 Message Length........................................7-12IATA Code 2 of 5 Message Length.............................7-13 Matrix 2 of 5.......................................................................7-13 Matrix 2 of 5 Message Length.....................................7-14 ivCheck Digits Required.................................................7-14 Code 11 Message Length.............................................7-15 Code 128.............................................................................7-15 ISBT 128 Concatenation..............................................7-16 Code 128 Message Length...........................................7-16 Code 128 Code Page....................................................7-16 Code 128 Function Code Transmit..............................7-17 Telepen................................................................................7-17 Telepen Output.............................................................7-17 Telepen Message Length..............................................7-18 UPC A.................................................................................7-18 UPC A Check Digit......................................................7-18 UPC A Number System...............................................7-18 UPC A Addenda...........................................................7-20 UPC A Addenda Required...........................................7-20 UPC A Addenda Separator...........................................7-20 UPC-A/EAN-13 with Extended Coupon Code...................7-21 UPC E0 and UPC E1..........................................................7-21 UPC E0 and UPC E1 Expand.......................................7-22 UPC E0 and UPC E1 Addenda Required.....................7-22 UPC E0 and UPC E1 Addenda Separator....................7-22 UPC E0 Check Digit....................................................7-23 UPC E0 Number System..............................................7-23 UPC E0 Addenda.........................................................7-23 EAN/JAN 13.......................................................................7-24 EAN/JAN 13 Check Digit............................................7-24 EAN/JAN 13 Addenda.................................................7-24 EAN/JAN 13 Addenda Required.................................7-25 EAN/JAN 13 Addenda Separator.................................7-25 ISBN Translate.............................................................7-25 EAN/JAN 8.........................................................................7-26 EAN/JAN 8 Check Digit..............................................7-26 EAN/JAN 8 Addenda...................................................7-26 EAN/JAN 8 Addenda Required...................................7-27 EAN/JAN 8 Addenda Separator...................................7-27vMSI Check Character...................................................7-28MSI Message Length...................................................7-28 Plessey Code.......................................................................7-29 Plessey Message Length..............................................7-29 RSS Limited.......................................................................7-30RSS Expanded....................................................................7-31 RSS Expanded Message Length..................................7-31 EAN•UCC Emulation.........................................................7-31China Post Code.................................................................7-32Korea Post Code.................................................................7-33 Korea Post Message Length.........................................7-33 PosiCode A and B...............................................................7-34 PosiCode Message Length...........................................7-34 Codablock F........................................................................7-35 Codablock F Message Length......................................7-35 Code 16K............................................................................7-36 Code 16K Message Length..........................................7-36 Code 49...............................................................................7-37 Code 49 Message Length.............................................7-37 Chapter 8 - Interface KeysKeyboard Function Relationships.........................................8-1Supported Interface Keys ....................................................8-3 Chapter 9 - UtilitiesTo Add a Test Code I.D. Prefix to All Symbologies............9-1Show Software Revision.......................................................9-1Show Data Format................................................................9-1Resetting the Standard Product Defaults..............................9-1Temporary Visual Menu 2003 Configuration......................9-2 Chapter 10 - Visual Menu 2003Visual Menu 2003 Introduction..........................................10-1 Installing Visual Menu 2003 from the Web.................10-1 viChapter 11 - Serial Programming CommandsConventions........................................................................11-1Menu Command Syntax.....................................................11-1 Query Commands.........................................................11-2Concatenation of Multiple Commands.........................11-2Responses.....................................................................11-2Examples of Query Commands....................................11-3 Trigger Commands.............................................................11-4Resetting the Standard Product Defaults............................11-4Menu Commands................................................................11-5 Chapter 12 - Product SpecificationsIT5600 Product Specifications............................................12-1IT5600 Depth of Field........................................................12-2IT5800 Product Specifications ...........................................12-3IT5800 Depth of Field........................................................12-4Standard Cable Pinouts.......................................................12-5 Chapter 13 - MaintenanceRepairs................................................................................13-1Maintenance........................................................................13-1 Cleaning the Scanner’s Window..................................13-1Inspecting Cords and Connectors.................................13-1Replacing the Interface Cable......................................13-2 Troubleshooting..................................................................13-3 Chapter 14 - Customer SupportProduct Service and Repair.................................................14-1 Online Product Service and Repair Assistance............14-2 Technical Assistance...........................................................14-2 Online Technical Assistance........................................14-2 Limited Warranty................................................................14-2viiAppendix A - Appendix ASymbology Chart..................................................................A-1ASCII Conversion Chart (Code Page 1252).........................A-2Code Page Mapping of Printed Bar Codes...........................A-4 viiiThis is a “Table of Contents preview” for quality assuranceThe full manual can be found at /estore/catalog/ We also offer free downloads, a free keyboard layout designer, cable diagrams, free help andsupport. : the biggest supplier of cash register and scale manuals on the net。

条码扫描器安全操作及保养规程条码扫描器是一种用于读取和解码条形码和二维码的设备,它广泛应用于商业和物流领域。
但是,在使用条码扫描器的过程中,我们也需要注意相关的安全操作和保养规程,以确保设备的稳定性和使用寿命。
本文将介绍条码扫描器的安全操作和保养规程,帮助使用者更好地使用和维护设备。
安全操作规程1. 使用合适的电源和接口条码扫描器通常使用USB接口连接到电脑或移动设备上。
在接口选择方面,应根据条码扫描器的类型和电脑或移动设备的接口类型选择合适的连接方式。
同时,需要确保使用电脑或移动设备的电源适配器满足条码扫描器的供电要求。
2. 防止电信干扰在使用条码扫描器时,可能会遇到电信干扰的问题。
这种干扰会降低条码扫描器的解码能力,影响使用效果。
为了避免这种情况,建议将条码扫描器远离电磁干扰源,例如高频电磁场、无线电波等。
3. 遵守操作规程在使用条码扫描器时,需要根据具体的操作规程进行使用。
具体包括:•将条码扫描器对准条形码或二维码,保持适当的距离和角度。
•确认扫描器是否解码成功,避免重复扫描或未能正常扫描。
•确认扫描器是否工作正常,避免设备故障或使用不当造成损坏。
4. 避免损坏设备在使用条码扫描器时,需要避免以下操作:•将扫描头碰到物体或手指,避免损坏扫描头的光学元件。
•向设备内部注入水或其他液体,避免损坏电路。
•强行拆卸设备,避免损坏内部元件。
5. 妥善存储设备为了延长条码扫描器的使用寿命,需要注意以下存储方式:•将设备放置在干燥、清洁和通风良好的地方,避免灰尘和湿气对设备造成损坏。
•对于长期不使用的设备,需要拔掉电源线,并妥善存放在防尘、防潮的地方。
保养规程1. 定期清洁设备为了确保设备的读取准确度和使用寿命,需要定期清洁设备。
具体包括:•使用干净、柔软的布或海绵蘸取少量清水或清洗剂擦拭扫描头表面,避免使用含酒精或有腐蚀性的清洁剂。
•使用风扇或压缩空气吹除设备表面的灰尘和杂物。
2. 保持适当温度为了让设备正常工作和延长使用寿命,需要保持适当的温度环境。
使用说明书有线二维条码扫描器尊敬的用户,感谢您选用本公司产品。
我们将以优质的产品为您服务,为确保您更好的使用本产品,使用前请认真阅读本手册!简介说明通用型手持影像式2D条码扫描器,采用国际上先进的图像传输技术,配以双向通讯即时纠错反馈,完成各种常用一维码和二维码的识读。
配备辅助光照,可在不同光照的环境下使用,夜间也可以使用,适用性强。
360°任意方向识读条码,识读更快速,操作更高效,适用于商业POS系统、超市、仓储物流、图书、银行、交通运输、邮政、以及工业,制造业的生产流程管理等多个领域。
产品各项功能未全部在本手册中列出,请您与供应商联系以获得更多详细资料。
本产品所用权利,包括本说明手册最终解释权由本公司保留(本说明手册的内容修改,恕不另行通知)。
产品特点1.本产品采用CMOS摄像模组,能识别一、二维码和屏幕码。
2.阅读距离可高达20cm,能快速读出条码中的信息。
3.无需驱动,直接插上就能使用,安装简单。
技术参数一、打开/关闭配置码设置恢复出厂设置软件版本号允许识读所有条码二、接口设置USB HID模式虚拟串口模式TTL串口模式HID+TTL串口模式三、HID设备数据发送间隔**USB数据间隔-1ms USB数据间隔-2msUSB数据间隔-4ms USB数据间隔-8msUSB数据间隔-16ms四、识读模式设置手动识读模式感应模式五、常用结束符设置回车回车换行Tab禁止添加结束符六、开票模式为了便于在开票系统中使用本模块,用户可以通过识读设置码进行开票模式配置,实现发票码格式转换及输出。
**开票模式使能开票模式禁能七、数据输出编码格式用户可通过以下设置码对识读模块进行输出格式的设置,以便主机按照指定编码格式进行中文数据输出。
注:GBK格式用于记事本,UNICODE格式用于Word及常用聊天工具输入框。
**数据编码格式UTF-8数据编码格式Unicode数据编码格式GBK八、语言设置**美国比利时巴西加拿大克罗地亚捷克斯洛伐克丹麦芬兰法国德国匈牙利意大利拉丁美洲荷兰挪威波兰葡萄牙塞尔维亚斯洛文尼亚西班牙瑞典瑞士-法语瑞士-德语英国土耳其-F 土耳其-Q日语罗马尼亚九、虚拟键盘设置**标准键盘模式虚拟键盘模式十、反相识读摸式允许反色识别禁止反色识别十一、故障排除十二、简易保养方法:1.扫描窗上的污渍和灰尘有时会影响扫描器的工作。
条码检测仪的描述及如何选择条码检测仪条码检测仪描述条码检测仪使用手持式激光条码扫描设备,方便快捷。
它可以快速提供针对尺寸、格式参数质量合格与否的检测信息,如:平均条码偏差、宽窄比、ANSI/CEN/ISO可解码度等等。
通过外接鼠标或笔式条码扫描设备,QC800也可以提供诸如传统、ANSI/CEN/ISO尺寸、反差度和格式参数的检测结果。
如何选择条形码检测仪商业条形码检测仪常用的主要有:CCD扫描器,激光手持式扫描器和全角度激光扫描器二种。
一、HHP QC条形码检测仪是利用光电藕合(HHP)原理,对条形码印刷图案进行成像,然后再译码。
它的优势是:无转轴,马达,使用寿命长;价格便宜。
选择CCD扫描器时,最重要的是两个参数:景深由于CCD的成像原理类似于照相机,如果要加大景深,则相应的要加大透镜,从而使CCD体积过大,不便操作。
优秀的CCD应无须紧贴条形码即可识读,而且体积适中,操作舒适。
分辨率如果要提高HHP分辨率,必须增加成像处光敏元件的单位元素。
低价HHP一般是5口像素(pixel),识读EAN,UPC等商业码已经足够,对于别的码制识读就会困难一些。
中档CCD以1024pixel为多,有些甚至达到2048pixe1,能分辨最窄单位元素为0.1mm的条形码。
二、激光手持式扫描器是利用激光二极管作为光源的单线式扫描器,它主要有转镜式和颤镜式两种。
转镜式的代表品牌是QC890,它是采用高速马达带动一个棱镜组旋转,使二极管发出的单点激光变成一线。
颤镜式的制作成本低于转镜式,但这种原理的激光枪不易提高扫描速度,一般为33次/秒。
个别型号,如POTICON 可以达到100次/秒,其代表品牌为Symbol,PSC和POTICON。
商业企业在选择激光扫描器时,最重要的是注意扫描速度和分辨率,而景深并不是关键因素。
因为当景深加大时,分辨率会大大降低。
优秀的手持激光扫描器应当是高扫描速度,固定景深范围内很高的分辨率。
Magic Wand™ Portable ScannerPDS-ST470-VPUser ManualTable of ContentsFeatures (3)1. KeyParts (3)2. Functional3. Explanation of the Status Icons (5)4. Using the Scanner (5)4.1. Charging up the Battery (5)4.2. Inserting a microSD Memory Card (not included) (6)4.3. Turn on/off the Scanner (6)4.4. HowScan (7)to4.5. How to Playback Image (9)File (10)4.6. DeleteSingleMenu (10)4.7. SetupFormat (11)ScanScanQuality (11)Color (11)ScanLanguage (11)Date/Time (11)Preview (11)InstantAuto Off (Auto Power Off) (11)Delete All (Delete All Files) (11)Format the MicroSD Memory Card (11)Information (11)Device4.8. How to Calibrate the Scanner (12)5. Connecting to Computer (12)6. Specifications (13)7. Computer System Minimum Requirements (14)8. Troubleshooting (14)Getting to know your ST470 Portable Scanner1. Key Featuresy JPEG, PDF-A4 or PDF-Letter scan-format selection. y Color or Monochromatic (mono) scan selection.y 300 (LO) /600 (MI) /1050 (HI) DPI scan quality selection.yDirectly save JPG (JPEG)/PDF files to the microSD/microSDHC card. y Support the microSD/microSDHC memory card up to 32GB. y Color display to playback the scanned images yCompatible to Windows® XP, Windows® Vista™, Windows® 7, Windows® 8, and Mac OS® 10.5 or above (direct plug-in, driver installation not required)2. Functional Parts1Power On/ Off: Press and hold this key for 3 seconds to turn power on or off.When the scanner is powered on, press this button to start scanning, pressthis button again to stop.In Setup mode, press this button to confirm changes.In Playback mode, press this button to change the magnification between 4x,8x and normal zoom.2Press this button to enter Playback mode;Press this button to return to the previous screenIn Setup mode: Press this button to exit Setup mode.3Press this button to enter Setup MenuIn Playback mode: Press this button to enter single file delete option.When zooming in under Playback mode: press this button to shift thefunctions of and between UP/DOWN and LEFT/RIGHT.4 LCD screen Display scanning status, scanned image and scanner settings.5 Press this button to select JPG (JPEG), PDF-A (PDF-A4) or PDF-L(PDF-Letter) file format. The icon of the selected mode will be displayed onthe LCD screen.In Setup mode: Press this button to move up the selection bar.In Playback mode: Press this button to preview the pervious image.When zooming in under Playback mode: press it to move to the upper/leftportion of the image.6 Press this button to select LO (300dpi), MI (600dpi) or HI (1050dpi) scanquality in DPI. The icon of the selected quality will be displayed on the LCDscreen.In Setup mode: Press this button to move down the selection bar.In Playback mode: Press this button to preview the latter image.When zooming in under Playback mode: press it to move to the lower/rightportion of the image.7 USB interface Connect to a computer with the USB cable provided to view and transfer files.To charge the built-in battery with an optional AC/DC power adapter8 Reset Press to reset the scanner (Hardware reset)9 microSD card slot The microSD/microSDHC card storage location.3. Explanation of the Status IconsItem Function Description1 FileFormat JPG/PDF-A/PDF-L2 Scan Resolution LO: 300 DPI /MI: 600 DPI / HI: 1050 DPI3 Battery Power IndicatorFully chargedLow battery. Recharge needed4 ScanColor COLOR/MONO5 FileCounter Shows the number of scanned files in the microSD card 4. Using the Scanner4.1 Charging the BatteryCharge the built-in battery before using the scanner.Charge time (while scanner is off): Approx. 2.5 hours.Two charging methods:1. By connecting to an AC/DC power adapter via the USB interface (Not included).2. By connecting to a computer via USB cable (supplied).Note:Once the battery is fully charged while the scanner is off, battery indicator will display on LCD screen for ashort time and will turn off automatically.4.2 Inserting a microSD Memory Card (not included)To operate the scanner, you must insert a microSD Card (not supplied) to record and store your pictures. To insert the microSD memory card:1. Turn OFF the scanner.2. Insert the microSD card into the microSD card slot (with metal side facing upwards). Gently press in untilthe card is clicked in and latched.4.3 Turn on/off the ScannerTurn on/off the scanner by pressing and holding.Note:If the scanner is turned on for the first time, it will enter Date & Time/Language setup mode. Once the Date & Time/ Language setting is completed, scanner will enter into standby mode.By default, Auto-off feature is set to 3 minutes. If the Auto-off feature is set at "3 Min" (refer to section 4.7), the scanner will automatically turn off if scanning action is not detected within 3 minutes.To set Date & Time/Language: 1.Press to jump to next setting option: YEAR ÆMONTH ÆDATE ÆHOUR Æ MINUTE. When setting up the value for MINUTE, press to switch to the previous setting option until it reaches the YEAR option.2. Press or to set the figure corresponding to each setting.3. Press to confirm and move to next setting.4. After completing the setting for MINUTE, it will enter Language setup screen.5. Press or to select English, Spanish or French.6.Press to confirm and enter into standby status.4.4 How to ScanNote: To scan, make sure your scanner is not connected to the computer. 1. Turn on your scanner by pressing and holding for 3 seconds.2.Place the document on a flat surface and hold down the document with one hand.3.Place the scanner on the edge of the paper approximately 5/8 to 3/4 of an inch onto the edge of the paper to ensure the whole document can be scanned. Make sure to keep the scanning area within the scanning width indicators marked on the side of the scanner.4.Hold the scanner flat against the material and then pressonce to start the scanning process.5.Slide the scanner across the document slowly, keeping your hand stable to get the best picture quality. During scanning, the scanning status icon will be displayed on the LCD screen to indicate scanning is inprogress.Once the scanner has reached the end of the document, pressagain to stop scanningNotes: yIf the scan is done too quickly or when there is any abnormal operation, “Scan Error" icon will display on the LCD screen. The image will still be saved afterthe scanning stops.y If Instant Preview feature is set to "on", scan result will shortly be displayed on the LCD screen before the scanner returns to standby mode.yWhen the memory card is full, the scanner is unable to scan more images. If you press the scan button under such situation, “Full” will flash rapidly on the File Counter of the LCD screen for 2 seconds.4.5 How to Playback Image1. Press to enter Playback mode. The last scanned image will be displayed.2.Press or to select your desired image. Pressto zoom into the image.andnavigational indicators will appear on the screen.3.Press to change the magnification between 4x, 8x and normal zoom.4. Press to view the upper portion of the image; Press to view the lower portion of the image.5.Press to shiftand navigational functions toandPress or button toview the left or right portion of the image. Press to change directions anytime.OR6.Press to return to the previous Playback screen, press it again to return to standby mode.Note: Images that exceeds 9MB file size cannot be magnified.4.6 Delete Single File1. Press to enter Playback mode. 2 Press or to select the file you want to delete. 3.Pressto enter Delete File setting.4.Press or to select Yes or No.Select “Yes” to delete the current file in the microSD card. Select “No” to return to previous Playback screen.5.Pressto confirm your selection and return to the previous Playback screen.4.7 Setup Menu1. Press to enter Setup menu2.Press or to exit Setup menu.Follow the below three steps to enter setup screen for each Menu item: 1. Press to enter setup mode.2. Press or to select the Menu item you want to set.3.Press to enter the setup screen.Menu itemsDescriptionOptionsJPG/PDF Scan Format y JPGy PDF - A (A4)y PDF - L (Letter) QualityScan Quality (DPI)y Lo (300 DPI) y Mi (600 DPI) y Hi (1050 DPI)Color Scan Colory Colory Mono Language Menu language y Englishy Spanishy French Date/Time Date and Time y Year y Monthy Datey Hour y Minute Inst. PreviewInstant previewy On y Off Auto Off Auto Power Offy Off y 3 Min Delete All Delete All Filesy No y Yes Format Format the microSD Memory Card Note: All contents on microSD card will be erased during formatingy No y YesDevice InfoDevice Information/4.8 How to Calibrate the ScannerNote: If the scanned images are too dark or too bright, you may need to calibrate your scanner by adjusting the white balance. Follow the below steps to perform calibration: 1. Wipe off any dirt on the surface of the scanning lens with the clean dry cloth provided.2. Press turn on the scanner. Place the scanner on the white area of the White Balance Calibration paper provided.3.Press and hold button. While holding the button, press the button and then release both buttons to enter into auto-calibration mode. The message “1. Calibration starts. Do not move the device!” will appear on LCD screen.4.Do not move the scanner until “2. Scan the calibration sheet!” appears on the LCD screen. Start scanning the white area of the calibration paper by sliding the scanner across the paper (slide the scanner backwards if necessary).5. “3. Calibration completed!” message will appear on the LCD screen when calibration is completed.6.Press any button to power off the scanner.5.Connecting to ComputerView your scanned files on your comptuerYou may also connect your scanner to your computer and view pictures on the computer monitor 1. Press and hold to turn on your scanner, connect your scanner to your computer to enter into USB mode. “USB” icon will display on LCD screen. 2.Your computer will recognize the scanner as a “Removable Disk”. Click “Open folder to view files” to view, import, copy, move or to delete scanned files.Note: If the Removable Device window did not launch automatically, go to your “My Computer/Computer” (PC) and find the device under Removable Storage.6.SpecificationsImage sensor Color Contact Image SensorResolution Low resolution : 300x300 dpi Medium resolution: 600x600 dpi High resolution: 1050x1050 dpiMinimum scanning speed for Letter size document Color High resolutionMono High resolutionColor Medium resolutionMono Medium resolutionColor Low resolutionMono Low resolution12.0 Seconds10.0 Seconds8.0 Seconds6.0 Seconds3.0 Seconds2.0 SecondsCapacity (Based on 1GB microSD card. Scan Letter size file, the quantity of scans varies depending on the content complexity) Color High resolutionMono High resolutionColor Medium resolutionMono Medium resolutionColor Low resolutionMono Low resolution140 Scans (Min.)150 Scans (Min.)550 Scans (Min.)600 Scans (Min.)1580 Scans (Min.)1600 Scans (Min.)Scanner photo size A4、A5、5R、4R、3R and smallerScan width Approx. 8.5”Scan length 300DPI:125"(max);600DPI:60";(max);1050DPI:50"(max)File format JPEG/PDFLCD Approx 1.5” Class* TFT LCDZoom 4x,8xDimensions (L×H×W) mm 10.5”×1.1”×1.5”Auto power off 3 MinutesUSB port USB 2.0 high speed External memory microSD/microSDHC cardStandard battery Built-in 700mAH Lithium-PolymerBattery charge time Approx. 2.5 hours7. C omputer System Minimum RequirementsOperating System Windows® XP, Windows® Vista™, Windows® 7,Windows® 8, and Mac OS® 10.5 or above (direct plug-in, driver installation not required)CPU Pentium III or aboveRAM At least 256MBInterface USBport8.TroubleshootingProblem Cause Solution Cannot turn on thescannerLow battery power Recharge the batteryPictures cannot be saved while you are scanning them 1. The microSD card has not beeninstalled2. Memory is full3. The microSD card has not beenformatted properly1. Insert a microSD card2. Transfer the pictures from the scannerto the computer to create storagespace in the memory card3. Please refer to section4.7Computer does notrecognize your scanner when connected(You cannot find your device Connection failure1. Make sure all cable connectionsare secured2. Restart the computer if necessaryunder removable disk)Blurry images1. The lens of scanner is dirty2. Contact Image Sensor aged 1. Clean the lens with soft and dry cloth 2. Recalibrate the scanner. Refer to section 4.8 Black Images/Black or white vertical lines1. Scanner sensor's protective glass is dirty2. Calibration data is off-set1. Clean the sensor’s protective glass with clean and soft dry cloth.2. Recalibrate the scanner. Refer to section 4.8Note: Model Number and Serial Number (S/N) is located on the packaging, instruction manual, on the product or inside the battery compartment. Please have this information ready before contacting tech support.FCC (Federal Communications Commission)This device complies with Part 15 of the FCC Rules. Operation is subject to the following two conditions:(1) This device may not cause harmful interference, and(2) this device must accept any interference received, including interference that may cause undesiredoperation.*Measured diagonally. Actual size is 1.48”; viewable area is 1.44”Windows® XP, Windows® Vista™, Windows® 7, Windows® 8 are registered trademarks of Microsoft Corporation. Mac OS® 10.5 is a registered trademark of Apple Inc. microSD and microSDHC logo is a trademark of SD-3C, LLC. All trademarks are the property of their respective owner.PDS-ST470-VP_Manual_13-0308AM-N470-GB-VPS-1。
如何正确使用条码扫描器:1、条码扫描器和条码保持一定的倾角,以达到最佳效果。
2、条码扫描器和条码间的角度不能为 90 度,否则不能正常读码。
3、务必让条码被完整扫描,确定扫描器能正确扫读。
介绍说明:该条码扫读设备为计算机信息系统提供精确,易用和快速的数据录入和存入的完备的解决方案。
本产品提供完整的接口方式以适应各类主机的计算机系统包括:KeyboardWandRS-232Dual RS-232USB OTHERS所有译码器的参数设定都可通条码的扫描来完成,并保存在存储记忆体中,在关闭电源后仍保留设置。
产品各项功能未全部在本手册中列出,请您与供应商联系以获得更多详细资料。
所有权利,包括本说明手册最终解释权由本公司保留。
目录自动感应条码扫描器使用说明 (4)扫描功能 (5)输出模式 (5)蜂鸣器 (5)条码正反图像设定 (6)添加条码ID(条码辨别号) (6)条码读取触发模式 (6)键盘接口 (7)PC传输模式 (7)键盘传送速度 (7)世界各国键盘语言 (7)RS-232接口 (8)波特率 (8)握手协议 (8)数据位 (9)停止位 (9)校验位 (9)光笔接口 (10)传送速度 (10)条码正反图像设定 (10)条形码开启与关闭 (10)Code11 (10)Code39 (10)Code93 (11)Code128 (11)Code bar (11)交叉25码 (11)工业25码 (11)MSI/Plessey (12)UPC/EAN (12)条形码符号设定 (13)Code11 (13)Code39 (13)Code93 (14)Code128 (14)Code bar (14)交叉25码 (15)工业25码 (15)MSI/Plessey (16)UPC/EAN (16)编辑设定条形码 (19)条码字符一般/特别设定 (20)条形码末端字符设定 (21)使用高级设定模式设置条码阅读器 (22)设置种类 (23)编辑键值 (24)选项编号和描述 (25)F1-接口选项 (25)F2-Code39选项 (25)F2-UPC/EAN选项 (26)F2-UPC/EAN补充选项 (26)F2-Code93选项 (27)F2-Code128选项 (27)F2-CodeBar选项 (27)F2-交叉25码选项 (28)F2-工业25码选项 (28)F2-MSI选项 (28)F2-Code11选项 (29)F2-激光器/CCD选项 (29)F2-其它译码选项 (29)F2-定义蜂鸣器和LED选项 (29)F4-定义一般按键区表选项 (30)F3-条码编辑设定 (31)F4-格式组合设定码 (32)F5-字符串设定码 (33)附录-A 特殊字符和ALT组合键表格 (34)附录-B ALT组合键的表格 (35)附录-C 故障问题及解决方案 (36)自动感应条码扫描器使用说明:1、自动感应条码扫描器通电时默认为自动感应模式。
HHP IT4710条码扫描器
IT4710条码扫描器是一款高性能的二维条码阅读器,其优越性能的快速译码能力与快速取样
读取能力,都是市面上的二维条码扫描器所不
能比拟的。
举凡您的条码打印质量太差,或是
条码的模糊性降低了读取,这些都难不倒 HHP
IT4710
固定式 ——请
固定式 CCD
二维 270次/ mil mm
198 g 长 15.
14.2 6.4
0 度 C ~ 50度 C 0C -40 度度 C 0C
条码扫描器是一款高性能的二维条码阅读器,其优越性能的
都是市面上的二维条码扫描器
再加上 HHP 独家智能型单机数据编辑方程式架构, , 接上电源,取出手册设定本,即可马上执行复杂
HHP IT4710 系列二维条码阅读器,所具有
那就是 , 支持 CCD 拍摄影像功能之光学部份的技
I
进入拍摄模式为您拍摄一张灰阶型的影像,另外在读条码部
HHP 系列扫瞄器,即可设定成为 ( 自动感应 )
型的读取模式,使你即使不需要按下 ( 触发钮 ) ,也仍然可以
HHP 独家智能型的光学感测功能,当光学部份感应到一组条
便自动触发内部芯片开始运算及译码并将数
系列二维条码阅读器的功能优越性不仅于此,举凡您 HHP IT4710 的优越光学技术的运算及读取。
固定式
LED 660nm
像素 CCD
密尔
、 RS232 、 (HHLC) non decoded laser compatible o
最大 175mA)
度 C ~ 50 度 C
度 C ~ 70 度 C
15.4cm x 高 14.2 cm x 宽 6.4 cm
、 Aztec Mesa。