LKC220-10A充电模块说明书
- 格式:doc
- 大小:543.50 KB
- 文档页数:16
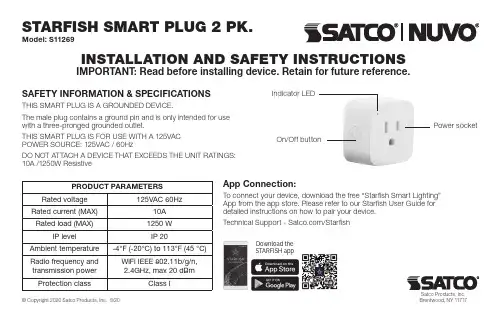
SAFETY INFORMATION & SPECIFICATIONSTHIS SMART PLUG IS A GROUNDED DEVICE.The male plug contains a ground pin and is only intended for use with a three-pronged grounded outlet.THIS SMART PLUG IS FOR USE WITH A 125VAC POWER SOURCE: 125VAC / 60HzDO NOT ATTACH A DEVICE THAT EXCEEDS THE UNIT RATINGS: 10A /1250W ResistiveApp Connection:To connect your device, download the free “Starfish Smart Lighting” App from the app store. Please refer to our Starfish User Guide for detailed instructions on how to pair your device.Technical Support - /StarfishSTARFISH SMART PLUG 2 PK.Model: S11269Satco Products, Inc.INSTALLATION AND SAFETY INSTRUCTIONSIMPORTANT: Read before installing device. Retain for future reference.PRODUCT PARAMETERSRated voltage 125VAC 60HzRated current (MAX)10A Rated load (MAX)1250 W IP levelIP 20Ambient temperature -4°F (-20°C) to 113°F (45 °C)Radio frequency and transmission power WiFi IEEE 802.11b/g/n, 2.4GHz, max 20 dBmProtection classClass IIndicator LEDPower socketOn/Off buttonDownload theSTARFISH appWARNINGDo not insert smart plug into another smart plug.The power is disconnected only when the smart plug is removedfrom an electrical outlet.The smart plug should be placed near the appliance and easily accessible to user.Do not open the product.Prior to using, ensure the smart plug is not damaged.Do not install the plug into a socket if the plug casing is damaged in any way. Please take the Technical Data (in particular the maximum permissible switching capacity of the relay and the type of load to be connected) into account before connecting a load!All load data relates to resistive loads! Do not exceed the capacity specified for the device. Exceeding this capacity could lead to the destruction of the device, to a fire or to an electrical accident, and, the reliable switching o of a controlled device may no longer be possible.Do not connect any appliances which could cause fire or otherdamage if switched on inadvertently (e.g. irons, power tools).Do not use plugs to disconnect appliances from the main power supply of the home. The load is not galvanically isolated from the main power supply. For indoor use only.Do not use this product near water for example near a bath tub wash bowl, kitchen sink or laundry tub, in a wet basement or near a swimming pool. MAINTENANCE AND CAREThe product is maintenance-free. Repairs should only be performed by qualified persons. Clean the product with a soft clean, dry and lint-free cloth after removing the plug from the electrical outlet . Do not use cleaning agents containing solvents.Incorrect handling or non-observance of safety warnings may compromise the protection afforded by the device.CAUTIONThis device complies with Part 15 0f the FCC Rules and Industry Canada license-exempt RSS standard(s). Operation is subject to the following two conditions: (1) this device may not cause harmful interference. and (2) this device must accept any interference received. including interference that may cause undesired operation.Changes or modifications not expressly approved by the party responsible for compliance could void the user’s authority to operate the equipment.This equipment has been tested and found to comply with the limits for a Class B digital device. pursuant to part 15 0f the FCC Rules. These limits are designed to provide reasonable protection against harmful interference in a residential installation. This equipment generates uses and can radiate radio frequency energy and. if not installed and used in accordance withthe instructions. may cause harmful interference to radio communications. However. there is no guarantee that interference will not occur in a particular installation. If this equipment does cause harmful interference to radio or television reception, which can be determined by turning the equipment o and on. the user is encouraged to try to correct the interference by one or more of the following measures:—Reorient or relocate the receiving antenna.—Increase the separation between the equipment and receiver.— C onnect the equipment into an outlet on a circuit different from thatto which the receiver is connected.—Consult the dealer or an experienced radio/TV technician for help.CAN ICES-3 (B)/NMB-3(B)To satisfy FCC / lC RF exposure requirements. a separation distance of 20 cm or more should be maintained between the antenna of this device and persons during device operation. To ensure compliance. operations at closer than this distance is not recommended.Satco Products, Inc.。
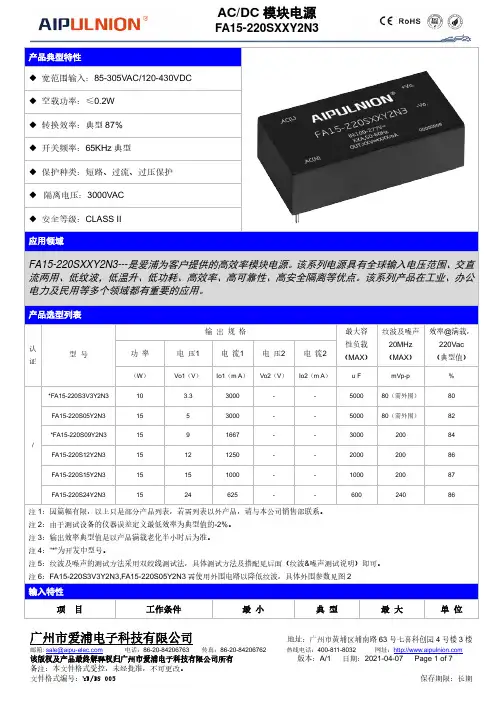
◆宽范围输入:85-305VAC/120-430VDC◆空载功率:≤0.2W◆转换效率:典型87%◆开关频率:65KHz典型◆保护种类:短路、过流、过压保护◆隔离电压:3000VAC◆安全等级:CLASS IIFA15-220SXXY2N3---是爱浦为客户提供的高效率模块电源。
该系列电源具有全球输入电压范围、交直流两用、低纹波,低温升、低功耗、高效率、高可靠性、高安全隔离等优点。
该系列产品在工业、办公电力及民用等多个领域都有重要的应用。
认证型号输出规格最大容性负载(MAX)纹波及噪声20MHz(MAX)效率@满载,220Vac(典型值)功率电压1 电流1 电压2 电流2(W)Vo1(V)Io1(m A)Vo2(V)Io2(m A)u F mVp-p %/ *FA15-220S3V3Y2N3 10 3.3 3000 - - 5000 80(需外围)80 FA15-220S05Y2N3 15 5 3000 - - 5000 80(需外围)82 *FA15-220S09Y2N3 15 9 1667 - - 3000 200 84 FA15-220S12Y2N3 15 12 1250 - - 2000 200 86 FA15-220S15Y2N3 15 15 1000 - - 1000 200 87 FA15-220S24Y2N3 15 24 625 - - 600 240 86注1:因篇幅有限,以上只是部分产品列表,若需列表以外产品,请与本公司销售部联系。
注2:由于测试设备的仪器误差定义最低效率为典型值的-2%。
注3:输出效率典型值是以产品满载老化半小时后为准。
注4:“*”为开发中型号。
注5:纹波及噪声的测试方法采用双绞线测试法,具体测试方法及搭配见后面(纹波&噪声测试说明)即可。
注6:FA15-220S3V3Y2N3,FA15-220S05Y2N3需使用外围电路以降低纹波,具体外围参数见图2项目工作条件最小典型最大单位输入电压范围交流输入85 220 305 VAC直流输入120 300 430 VDC 输入频率范围- 47 50 63 Hz 输入电流115VAC - - 0.3A230VAC - - 0.2浪涌电流115VAC - - 16220VAC - - 30空载功耗输入115VAC -- 0.2 W 输入230VAC -漏电流- 0.5mA TYP/230VAC/50Hz热插拔- 不支持遥控端- 无遥控端项目工作条件最小典型最大单位电压精度输入全电压范围任何负载Vo1 - ±2.0 ±3.0 %Vo2 - - - %线性调节率标称负载Vo1 - - ±0.5 %Vo2 - - - %负载调节率输入标称电压20%~100%负载Vo1 - - ±5.0 %Vo2 - - - %最小负载单路输出0 - - %正负双路共地输出- - -% 正负双路隔离输出- - -启动延迟时间输入220VAC(满载)- 1000 - mS 掉电保持时间输入220VAC(满载)- 100 - mS动态响应25%~50%~25% 50%~75%~50%过冲幅度(%):≤±5.0 % 恢复时间(mS ):≤5.0mS 输出过冲输入全电压范围≤10%Vo%短路保护 可长期短路,自恢复打隔式 漂移系数 - -±0.03%-%/℃ 过流保护输入220VAC ≥130% Io 可自恢复打隔式 过压保护输出3.3VDC ≤7.5 VDC输出5VDC ≤7.5 输出9VDC≤15输出12VDC ≤18 输出15VDC ≤20 输出24VDC≤30项 目工作条件最 小典 型最 大单 位开关频率- 61 65 73 KHz工作温度--40-+75℃需在温度降额曲线的基础上进行温度降额使用,降额曲线图见后面(产品特性曲线)即可储存温度- -40-+85焊接温度波峰焊焊接260±4℃,时间5-10S手工焊接360±8℃,时间4-7S相对湿度 - 10 - 90 %RH 隔离电压 输入-输出测试1分钟,漏电流≤5mA 3000 - - VAC 绝缘电阻 输入-输出@施加DC500V100--MΩ振 动- 10-55Hz,10G,30Min,alongX,Y ,Z 平均无故障时间(MTBF )-MIL-HDBK-217F@25℃>300,000HEMC 特性EMI传导骚扰CISPR22/EN55022,CLASS B (推荐电路见图1) 辐射骚扰CISPR22/EN55022,CLASS B (推荐电路见图1) EMC 静电放电IEC/EN61000-4-2 ±6KV/8KV Perf.Criteria B辐射抗扰度IEC/EN61000-4-3 10V/m Perf.Criteria A脉冲群抗扰度IEC/EN61000-4-4 ±1KV Perf.Criteria BIEC/EN61000-4-4 ±2KV(推荐电路见图1) Perf.Criteria B浪涌抗扰度IEC/EN61000-4-5 ±1KV Perf.Criteria BIEC/EN61000-4-5 ±2KV (推荐电路见图1) Perf.Criteria B传导骚扰抗扰度IEC/EN61000-4-6 10Vr.m.s Perf.Criteria A工频磁场抗扰度IEC/EN61000-4-8 10A/m Perf.Criteria A 电压暂降、跌落和短时中断抗扰度IEC/EN61000-4-11 0%-70% Perf.Criteria B封装代号L x W x HY2 50.8X25.4X15.6 mm 2.000X1.000X0.597inch管脚说明1 2 3 4 AC(N)AC(L)+Vo -Vo 输入零线输入火线输出正极输出负极注意:电源模块的各管脚定义如与选型手册不符,应以实物标签上的标注为准。
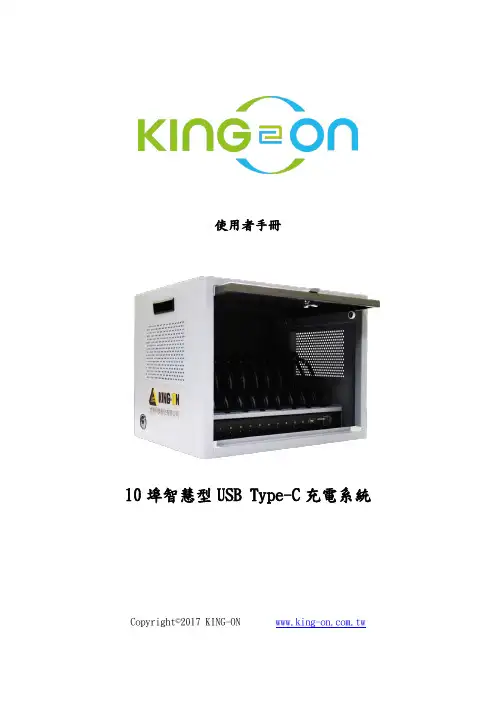
使用者手冊10埠智慧型USB Type-C充電系統Copyright©2017 KING-ON 目錄1.產品介紹 (1)2.安全訊息 (1)3.安裝說明 (2)4.面板訊息 (3)5.基本操作 (4)6.規格 (5)7.技術支援 (6)8.充電車故障排除 (7)1.產品介紹多埠智慧型USB Type-C充電系統,是一款為可攜式電腦型設備提供電池充電和管理的系統。
可從公司或學校等大型組織的公用網絡上監控管理多個可攜式電腦型設備(筆記電腦/Chromebook/平板電腦)被充電的設備狀態。
在無此系統之前,這些智慧型設備必須單獨地連接到插座上,十分占據空間且較難整理! 然而,有了多埠智慧型USB TYPE-C 充電系統,您可以輕鬆地為這些設備的電池充電,並有效地管理系統設備,大幅度節省人力成本。
每個多埠智慧型USB TYPE-C充電系統 SCMF10可以同時充電10個可攜式電腦型設備。
您也可以將2個或3個多埠智慧型USB TYPE-C充電系統串接為一組,使您可以同時管理多達30台可攜式電腦型設備,而根據您需要管理的數量不同,您可以自行選擇如何搭配可容納10個的系統設為一組,達成管理10/20/30台可攜式電腦型設備的目的。
智慧型USB TYPE-C充電系統 SCMF10提供了一個節省空間和安全充電的方法。
對於同種單一系列的可攜式電腦型設備,設備的電池充電可以有效的完成,使企業或商業管理可攜式電腦型設備更加輕鬆、簡單。
2.安全訊息在使用我們的產品之前,請仔細閱讀、理解並遵守本指南中的所有安全訊息。
✧ 2.1 室內使用本產品適用於室內使用,請插入100~240VAC,50/60Hz的電源插座。
任何不當使用都可能會損壞產品和/或造成不安全的運作條件。
✧ 2.2 使用地點♦選擇氣流方向不受阻礙的位置。
♦將產品放在平坦的水平表面上,並離任何熱源(如暖爐)至少60公分遠。
♦將產品遠離任何液體。
✧ 2.3 電氣♦將產品插入接地、極化的電源插座。

N K G-u c时控插座说明书宏工电气有限公司NKG-UC时控插座使用说明书1 用途及适用范围NKG-UC带USB时控插座(以下简称时控插座),主要用于交流50Hz,额定控制电源电压250v至85v的电路中作为时间控制元件,按预定的程序接通或断开电路之用,例如:作为热水器、楼梯灯、电瓶充电等电器的定时接通和断开控制之用,本产品尤其适用于家用电器的控制。
本产品已申请专利,专利号:20130362369.8,模仿必究!本产品符合GB 14048.5、IEC 60947-5-1标准的要求。
2 主要技术参数2.1 额定控制电源电压:50Hz 85V-250V AC/DC。
2.2 插座约定发热电流:10A(阻性负载10A)。
2.3 插座额定工作电流(Ie):AC-1.220v 10A。
2.4 USB插口额定工作电流(Ie):DC5V 1A。
2.5 USB插口恒压精度5%,恒流精度10%,负载>1A为恒流模式,充电电流=1A,负载≤1A时转为恒压模式,充电电压=5V。
2.6 计时误差:≤1秒/天。
2.7 产品待机功耗:≤0.8W(相比同类时控类插座3-5W的待机功耗每年可省电约20元)。
2.8 设置组数:16开16关。
2.9 设定方式:旋钮设定。
2.10 电寿命:≥1万次。
2.11 电池:可充电电池。
3 外形及安装尺寸和接线方式3.1 外形尺寸及安装尺寸:见图1。
图1 NKG-UC 外形及安装尺寸4 设置与使用4.1 时控开关参数设定流程图(见图2)。
图2 时控开关设定流程图4.1.1 当前工作状态及时钟调整4.1.1.1 在锁定状态双击旋钮解锁,解锁后液晶屏幕及旋钮蓝灯点亮,此时按下旋钮进入手动/自动状态设定,屏幕上对应内容闪烁,左/右旋转旋钮调整参数,将手动自动状态设置成需要的状态,(默认为AUTO OFF自动关状态,如用户需要自动控制,AUTO标志需要点亮,同时根据现在的状态选择ON开/OFF关),设置好手动/自动状态后连续按下旋钮分别进入秒、分、小时、星期的设定,旋转旋钮进行加减操作(右旋为加,左旋为减),将产品显示时间调整为当前时钟,星期设置完成后再次按下旋钮进入时钟状态,或在设定过程中双击旋钮可以快速退出至时钟状态,此时屏幕不闪烁,如图3所示。

DCB1104English (original instructions) 2简体中文 11Copyright D E WALTFig. A12ENGLISHCongratulations!You have chosen a D e WALT tool. Years of experience, thorough product development and innovation make D e WALT one of the most reliable partners for professional power tool users.a WARNING: To reduce the risk of injury, read the instruction manual.Definitions: Safety GuidelinesThe definitions below describe the level of severity for each signal word. Please read the manual and pay attention to these symbols.DANGER: Indicates an imminently hazardous situation which, if not avoided, will result in death or serious injury .WARNING: Indicates a potentially hazardous situation which, if not avoided, could result in death or serious injury .CAUTION: Indicates a potentially hazardous situation which, if not avoided, may result in minor or moderate injury .NOTICE: Indicates a practice not related to personal injury which, if not avoided, may result in property damage .Denotes risk of electric shock.Denotes risk of fire.BATTERY CHARGER DCB1104ENGLISH*Date code 201811475B or laterSAVE ALL WARNINGS AND INSTRUCTIONS FORFUTURE REFERENCEImportant Safety Instructions for AllBattery Chargers• Before using charger, read all instructions and cautionary markings on charger, battery pack, and product using battery pack.3ENGLISHWARNING: Shock hazard. Do not allow any liquid to get inside charger. Electric shock may result.CAUTION: Burn hazard. To reduce the risk of injury, charge only D e WALT rechargeable batteries. Othertypes of batteries may burst causing personal injuryand damage.NOTICE: Under certain conditions, with the chargerplugged into the power supply, the exposed chargingcontacts inside the charger can be shorted by foreignmaterial. Foreign materials of a conductive nature suchas, but not limited to, steel wool, aluminum foil or anybuildup of metallic particles should be kept away fromcharger cavities. Always unplug the charger from thepower supply when there is no battery pack in the cavity.Unplug charger before attempting to clean.• Children are not allowed to use or play with this charger. This charger can be used by persons with reduced physical, sensory or mental capabilities or lack of experience and knowledge if they have been given supervision or instruction concerning use of the appliance in a safe way and understand the hazards involved. Otherwise, there is a risk of injuries.• Children shall be supervised during cleaning to ensure that they do not play with the appliance.4ENGLISH • To reduce the risk of injury, charge only D e WALT rechargeable batteries. Other types of batteries may burst causing personal injury and damage.• DO NOT attempt to charge the battery pack withany chargers other than the ones in this manual.The charger and battery pack are specifically designed to work together.• These chargers are not intended for any uses other than charging D e WALT rechargeable batteries.Any other uses may result in risk of fire, electrical shockor electrocution.• Do not expose charger to rain or snow.• Pull by plug rather than cord when disconnecting charger. This will reduce risk of damage to electric plug and cord• Make sure that cord is located so that it will not be stepped on, tripped over, or otherwise subjected to damage or stress.• Do not use an extension cord unless it is absolutely necessary. Use of improper extension cord could result in risk of fire, electric shock, or electrocution.• Do not place any object on top of charger or place the charger on a soft surface that might block the ventilation slots and result in excessive internal heat. Place the charger in a position away from any heat source.5ENGLISHThe charger is ventilated through slots in the top and the bottom of the housing.• Do not operate charger with damaged cord or plug — have them replaced immediately.• Do not operate charger if it has received a sharp blow, been dropped, or otherwise damaged in any way. Take it to an authorised service centre.• Do not disassemble charger; take it to an authorised service centre when service or repair is required. Incorrect reassembly may result in a risk of electrical shock, electrocution or fire.• In case of damaged power supply cord, the supply cord must be replaced immediately by the manufacturer, its service agent or similar qualified person to prevent any hazard.• Disconnect the charger from the outlet before attempting any cleaning. This will reduce the risk of electric shock. Removing the battery pack will not reduce this risk.• NEVER attempt to connect 2 chargers together.• The charger is designed to operate on standard 220-240V household electrical power. Do not attempt to use it on any other voltage. This does not apply to the vehicular charger.6ENGLISH • Take care to ensure that the charger is standing in a steady, secure position. A falling battery or charger may present a risk of injury to yourself and/or others.• The location in which the charger is used should be clean and dry. Use of a charger in a dirty or wet area could result in risk of fire, electric shock, or electrocution.SAVE THESE INSTRUCTIONSDate Code Position (Fig. A)The date code 1 the year of manufacture, is printed into the housing. Example:2022 XX XXYear and Week of ManufactureDescription (Fig. A)WARNING: Never modify the power tool or any part of it. Damage or personal injury could result.1 Battery2 Battery release button3 ChargerIntended UseThe DCB1104 charger is designed for charging 10.8V(12V Max) and18V(20V Max) D E WALT Li-Ion XR and XR FLEXVOLT battery packs: DCB122, DCB124, DCB125, DCB126, DCB127, DCB181, DCB182, DCB183, DCB184, DCB203, DCB204, DCB205, DCB185,DCB186, DCB187, DCB189, DCB240,DCBP034, DCB546, DCB547, DCB548, DCB549,DCB606,DCB609,DCB612, DCB615.DO NOT use under wet conditions or in the presence of flammable liquids or gases. These battery chargers and battery packs are professional power tools.7ENGLISHCharging a BatteryNOTE: To ensure maximum performance and life of lithium-ion battery packs, charge the battery pack fully before first use.1. Plug the charger into an appropriate outlet before inserting battery pack.2. Connect the charger and battery pack, making sure the battery is fully seated. The(charging) light will blink continuously indicating that the charging process has started.3. The Stage 1 Charging blink indicator represents the first charge cycle that chargesthe majority of the battery's capacity. Stage 2 Charging blink indicator represents the remainder, or top off charge process, for the battery to reach full capacity.4. The completion of charge will be indicated by the light remaining ON continuously. Thebattery pack is fully charged and may be removed and used at this time or left in the charger.NOTE: To remove the battery pack, some chargers require the battery pack release button to be pressed.* T he red light will continue to blink, but a yellow indicator light will be illuminated during this operation. Once the battery pack has reached an appropriate temperature, the yellow light will turn off and the charger will resume the charging procedure.The compatible charger(s) will not charge a faulty battery pack. The charger will indicate faulty battery by refusing to light.NOTE: This could also mean a problem with a charger.8ENGLISH If the charger indicates a problem, take the charger and battery pack to be tested at an authorised service centre.Hot/Cold Pack DelayWhen the charger detects a battery pack that is too hot or too cold, it automatically starts a Hot/Cold Pack Delay, suspending charging until the battery pack has reached an appropriate temperature. The charger then automatically switches to the pack charging mode. This feature ensures maximum battery pack life.A cold battery pack will charge at a slower rate than a warm battery pack.Electronic Protection SystemXR Li-Ion tools are designed with an Electronic Protection System that will protect the battery pack against overloading, overheating or deep discharge.The tool will automatically turn off if the Electronic Protection System engages. If this occurs, place the lithium-ion battery pack on the charger until it is fully charged.Wall MountingThese chargers are designed to be wall mountable or to sit upright on a table or work surface. If wall mounting, locate the charger within reach of an electrical outlet, and away from a corner or other obstructions which may impede air flow. Use the back of the charger as a template for the location of the mounting screws on the wall. Mount the charger securely using drywall screws (purchased separately) at least 25.4 mm long with a screw head diameter of 7–9 mm, screwed into wood to an optimal depth leaving approximately 5.5 mm of the screw exposed. Align the slots on the back of the charger with the exposed screws and fully engage them in the slots.MAINTENANCEYour power tool has been designed to operate over a long period of time with a minimum of maintenance. Continuous satisfactory operation depends upon proper tool care and regular cleaning.WARNING:To reduce the risk of serious personal injury, turn tool off and disconnect battery pack before making any adjustments or removing/installing attachments or accessories. An accidental start‑up can cause injury. The charger and battery pack are not serviceable.ENGLISHCLubricationYour power tool requires no additional lubrication.WARNING: Blow dirt and dust out of the main housing with dry air as often as dirt is seen collecting in and around the air vents. Wear approved eye protection andapproved dust mask when performing this procedure.Charger Cleaning InstructionsWARNING: Dirt and grease may be removed from the exterior of the charger using a cloth or soft non‑metallic brush. Do not use water or any cleaning solutions. Never letany liquid get inside the tool; never immerse any part of the tool into a liquid. Optional AccessoriesWARNING: Since accessories, other than those offered by D e WALT, have not been tested with this product, use of such accessories with this tool could be hazardous. Toreduce the risk of injury, only D e WALT recommended accessories should be used withthis product.Consult your dealer for further information on the appropriate accessories. Protecting the Environmentw Separate collection. Products and batteries marked with this symbol must not be disposed of with normal household waste.Products and batteries contain materials that can be recovered or recycledreducing the demand for raw materials. Please recycle electrical productsand batteries according to local provisions. Further information is available at.Rechargeable Battery PackThis long life battery pack must be recharged when it fails to produce sufficient power on jobs which were easily done before. At the end of its technical life, discard it with due care for our environment:• Run the battery pack down completely, then remove it from the tool.• Li-Ion cells are recyclable. Take them to your dealer or a local recycling station. The collected battery packs will be recycled or disposed of properly.简体中文图A简体中文恭喜!感谢您选购 D E WALT 工具。
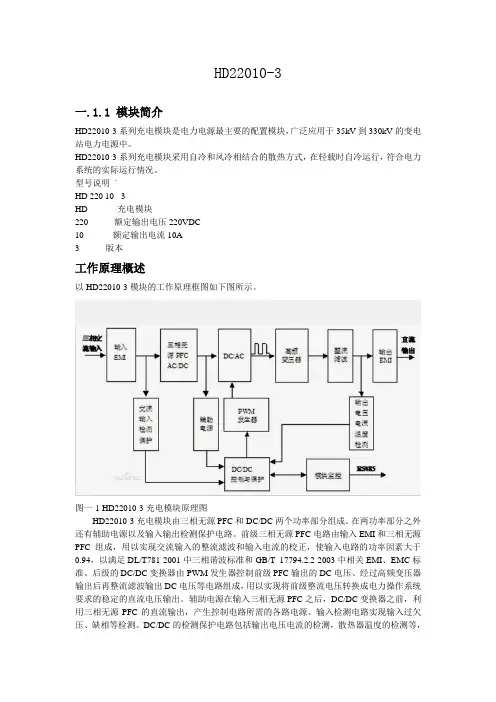
HD22010-3一.1.1 模块简介HD22010-3系列充电模块是电力电源最主要的配置模块,广泛应用于35kV到330kV的变电站电力电源中。
HD22010-3系列充电模块采用自冷和风冷相结合的散热方式,在轻载时自冷运行,符合电力系统的实际运行情况。
型号说明`HD 220 10 - 3HD -------- 充电模块220---------额定输出电压220VDC10----------额定输出电流10A3---------版本工作原理概述以HD22010-3模块的工作原理框图如下图所示。
图一-1 HD22010-3充电模块原理图HD22010-3充电模块由三相无源PFC和DC/DC两个功率部分组成。
在两功率部分之外还有辅助电源以及输入输出检测保护电路。
前级三相无源PFC电路由输入EMI和三相无源PFC组成,用以实现交流输入的整流滤波和输入电流的校正,使输入电路的功率因素大于0.94,以满足DL/T781-2001中三相谐波标准和GB/T 17794.2.2-2003中相关EMI、EMC标准。
后级的DC/DC变换器由PWM发生器控制前级PFC输出的DC电压、经过高频变压器输出后再整流滤波输出DC电压等电路组成,用以实现将前级整流电压转换成电力操作系统要求的稳定的直流电压输出。
辅助电源在输入三相无源PFC之后,DC/DC变换器之前,利用三相无源PFC的直流输出,产生控制电路所需的各路电源。
输入检测电路实现输入过欠压、缺相等检测。
DC/DC的检测保护电路包括输出电压电流的检测,散热器温度的检测等,所有这些信号用以DC/DC的控制和保护。
结构及接口1.模块外观HD22010-3充电模块的外观如下图所示。
图一-2 HD22010-3充电模块外观2.前面板HD22010-3充电模块前面板如下图所示。
图一-3 充电模块前面板1)LED显示面板显示模块的电压、电流或告警信息。
由显示切换按钮进行输出电压和电流的显示切换。
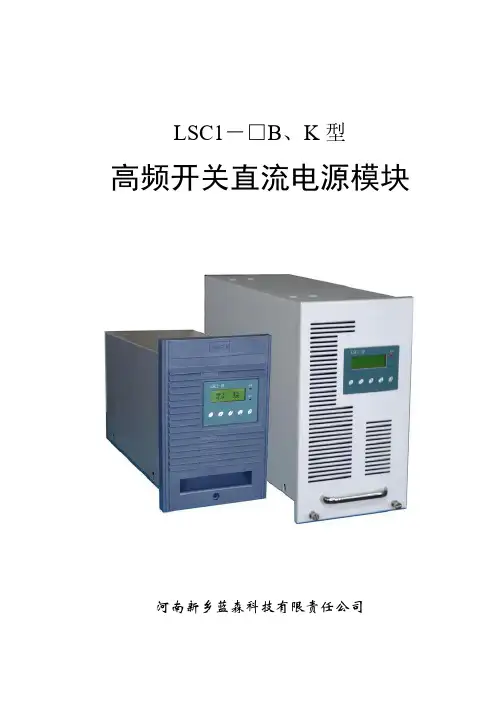
LSC1-□B、K型高频开关直流电源模块河南新乡蓝森科技有限责任公司LSC1-□B、K型高频开关直流电源模块1 综述1.1 概述LSC1-□B、K型高频开关直流电源模块,适用于对镉镍及铅酸蓄电池进行充电,或对于一些电流一般不大于给定值的负载高质量供电。
特别是在以直流作为开关柜的合闸、控制、保护和信号电源的变配电系统中,与相应直流监控系统配合使用,对蓄电池进行智能充电和对直流系统进行监控管理,具有独特的优势。
采用世界先进的高频开关边缘谐振软开关技术,转换效率高;摒弃电位器调整方式,测量和控制数据软件校准,避免了由器件温度系数和机械特性所引起的参数漂移,精度高,可靠性高;液晶汉字显示,自带设置键盘,内置CPU和E2PROM,功能强大,自主性强,使用方便,运行数据掉电后不丢失;设计合理,体积小,重量轻,可带电热拔插,安装维护更方便迅速;自主均流,输出隔离,可以方便地实现N+1冗余;开机软启动电路,可以有效地抑制开机涌流的产生对系统造成的电磁干扰和大电流冲击;“四遥”通讯口为通用RS-485,本机地址软件设置,机动灵活,兼容性强;K型产品内置监控,可独立完成智能充电。
1.2 型号说明LS□□-□/□□同类扩展方案:S-塑料面板B-改进型,液晶汉显K-内置监控直流标称电压(伏)额定直流电流(安)08:8A 10:10A 20:20A设计序号功能代号 C-充电模块K-监控公司标识1.3 使用条件海拔1000m及以下。
用于户内,周围空气温度不高于+40℃,不低于-5℃。
空气最大相对湿度不超过95%(相对于空气温度+20℃时)。
运行地点无强烈振动和冲击,无腐蚀金属和破坏绝缘的有害气体,无严重尘埃、无导电微粒和爆炸危险介质,无强电磁场干扰。
使用条件与上述不符时,由用户与制造厂协商解决。
2 安装使用说明2.1 工作原理2.2 主要技术参数2.3 模块外形说明及开孔尺寸模块机架安装见附图。
2.4 功能说明2.4.1 按键及显示菜单说明A. 按键对设置值、校准值作增大或减小调节向前或向后移动菜单光标,或查询故障内容进行菜单操作B. 加电初始信息(K 型内置监控模块标志)公司标识版本号 C. 基本显示信息模块在基本运行状态时,一般显示如下信息:输出电压、电流、运行/关机、均充/浮充/控母。
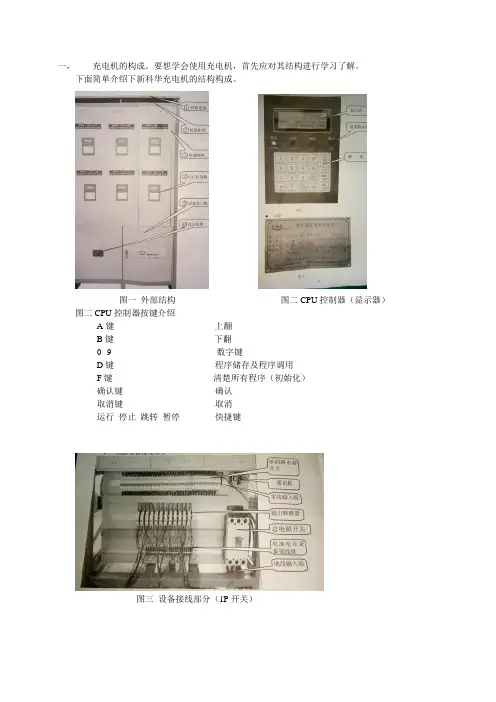
一,充电机的构成。
要想学会使用充电机,首先应对其结构进行学习了解。
下面简单介绍下新科华充电机的结构构成。
图一外部结构图二CPU控制器(显示器)图二CPU控制器按键介绍A键上翻B键下翻0--9 数字键D键程序储存及程序调用F键清楚所有程序(初始化)确认键确认取消键取消运行停止跳转暂停快捷键图三设备接线部分(1P开关)图四设备接线部分(刀型断路器)下面再介绍下充电机指令.1.待机指令。
在待机下,不断按动A键或B键,在设备显示器(图二示)显示处,将循环出现VIEW START EDIT PROG JUMP DA TA 控制指令,下面逐一介绍上述控制指令。
VIEW:查看指令。
按该键后再按确认键即可进入程序查看功能,就是说此时可以查看我们运行的工艺程序情况,比如可以查看到阶段,电流,设置运行时间等。
在查看后,可按C 键退出该功能。
START:启动(运行)指令。
在待机情况下按A或B键选中该指令(或按快捷键运行键)后按确认键即可启动充电机当前设置的充放电工艺程序。
※EDIT PROG: 手动设置工艺。
具体方法为用A或B 键上下翻选中该指令,按确认键进入充放电工艺编制。
下面以图五为例简单说明。
图五下面以CA为例进入编程。
图六A.步骤数:显示当前编辑步数,不用设置,程序最多可设30步。
B .ID号。
可以简单理解为充电机号,但有些是和充电机号不同的。
C.工艺指令:控制指令不同界面也不同,控制指令主要包括:END,CA,LV,HOLD(常用的)。
按A向后,B键向前选择,选择后按确认键。
这些指令的作用分别为:END:程序结束指令。
手设工艺时,确认该指令后退出编辑状态,充电机正常运行时,按该指令后,充电机立即退出运行程序,进入待机状态。
CA:恒流充放电指令。
也就是在我们设置工艺时间同一阶段的这段时间内,电流是保持不变的。
其中恒流充电指令为CHA,恒流放电指令为DIS.LV:恒压充电指令。
这一指令在胶体工艺中基本都能用到。
安裝說明5069 Compact I/O 數位 8 點式 24V 直流輸出模組型號 5069-OB85069-OB8 數位 8 點式高電流拉出型輸出模組變頻器輸出裝置。
從控制器傳送給模組的資料與某些輸入模組的狀態決定 5069-OB8 模組行為。
較高電流輸出能夠直接驅動較高電流負載。
5069 Compact I/O™ 模組使用生產者-消費者通訊模型。
生產者/消費者通訊模型是模組與其他系統裝置之間的一種智慧型資料交換,其中的每一個模組都不用先被輪詢即產生資料。
5069 Compact I/O 系統做為 CompactLogix™ 5380 控制器系統的本機 I/O 模組,或做為 CompactLogix 5380 控制器和其他一些 Logix5000™ 控制器的遠端 I/O 模組。
這些模組是以 Studio 5000 Logix Designer®應用程式設定的。
關於 Logix5000 控制器與 Logix Designer 應用程式版本如何與 5069 Compact I/O 模組相容的詳細資訊,請參閱其他資源 (第 13 頁)所列的出版物。
主題頁次關於模組6安裝 CompactLogix 5380 控制器系統或 5069Compact I/O 系統6必備元件6安裝拆卸式端子座7安裝模組8安裝端蓋9拆卸式端子座配線9從拆卸式端子座中斷電線9配線圖105069 Compact I/O 系統供電11移除模組11更換模組11規格12其他資源135069 Compact I/O 數位 8 點式 24V 直流輸出模組ATTENTION:Read this document and the documents listed in the Additional Resources section about installation, configuration and operation of this equipment before you install, configure, operate ormaintain this product. Users are required to familiarize themselves with installation and wiring instructions in addition to requirements of all applicable codes, laws, and standards.Activities including installation, adjustments, putting into service, use, assembly, disassembly, and maintenance are required to be carried out by suitably trained personnel in accordance with applicable code of practice.If this equipment is used in a manner not specified by the manufacturer, the protection provided by the equipment may be impaired.注意:在安装、配置、操作和维护本产品前,请阅读本文档以及“其他资源”部分列出的有关设备安装、配置和操作的相应文档。
第1篇充电模块是用于给蓄电池充电的设备,为确保操作人员的人身安全和设备的正常运行,特制定本操作规程。
二、操作前的准备工作1. 操作人员必须经过专业培训,取得相关操作资格证书。
2. 充电模块周围环境应保持通风良好,无易燃、易爆物品。
3. 检查充电模块各部件是否完好,包括充电机、连接线、电池等。
4. 检查电源电压是否符合设备要求。
5. 确保充电模块处于关闭状态。
三、充电操作步骤1. 将充电模块的充电机“+”极接至蓄电池“+”极,充电机“-”极接至蓄电池“-”极,注意防止负载短路。
2. 选择合适的充电电压。
若充电电池为12V,则电压选择档应旋转到12V档;若充电电池为24V,则电压选择档应旋转到24V档。
3. 根据蓄电池的容量和充电需求,设置合适的充电电流。
一般采用0.1C20A(如60Ah蓄电池用6A)。
4. 打开充电模块,启动充电程序。
5. 充电过程中,注意观察充电电流、电压、温度等参数,确保充电过程正常。
6. 充电时间根据蓄电池容量和充电需求确定,一般为3~5小时。
7. 充电结束时,关闭充电模块,拔掉充电线。
四、操作注意事项1. 充电过程中,禁止触摸充电模块的带电部分。
2. 如遇充电过程中出现异常情况,立即停止充电,检查设备故障原因。
3. 避免在潮湿、高温、强磁场等环境下进行充电操作。
4. 定期检查充电模块的各部件,确保设备正常运行。
5. 充电结束后,将蓄电池放置在通风良好、干燥的地方。
五、操作后的工作1. 关闭充电模块,拔掉充电线。
2. 清理充电模块周围环境,确保无杂物。
3. 填写充电记录,包括充电时间、电流、电压、温度等参数。
4. 定期对充电模块进行维护保养,确保设备正常运行。
六、附则1. 本规程适用于所有充电模块的操作。
2. 本规程由相关部门负责解释。
3. 本规程自发布之日起实施。
第2篇一、概述本规程旨在确保充电模块的安全、有效运行,规范操作流程,保障操作人员的人身安全和设备完好。
本规程适用于所有使用本充电模块的场合。