中性红外高清球型摄像机使用说明书
- 格式:pdf
- 大小:696.47 KB
- 文档页数:18

智能智能 高速高速 红外红外 球形摄像机使用说明智能高速红外球智能高速红外球形形摄像机摄像机使用说明使用说明一、产品概述产品概述1.1.高性能日夜转换功能高性能日夜转换功能高性能日夜转换功能摄像机摄像机摄像机机芯机芯机芯::本机采用的低照度摄像机具有日夜转换功能,摄像机实时监测被摄象景物照度,摄像机在低照度时自动转换为夜间红外模式,提高夜间感光监视能力;到白天自动转换为彩色模式。
2.2.采用最新的采用最新的DSP 优化算法优化算法::使用精密步进电机驱动,,使起动、制动快速平顺。
反应灵敏、定位准确、运转平稳、操控自如。
3.3.高效率高效率高效率红外红外LED 辅助光源辅助光源::本机装配了两组高效率红外LED 光源,采用隔离的光源仓和摄像机仓结构,保证了摄像机不被光源串扰。
内部集成自动调光电路, 平均功耗比非调光产品降低25%,平均寿命比非调光产品延长25%。
采用最新的调光软件,摄像机自动适应环境明暗和目标远近的变化,在低照度时自动转为夜间红外模式,同时开启红外LED 辅助光源。
自动调光:摄像机根据景物照度自适应调整红外LED 发光强弱,在0LUX 环境照度下,摄像机能清晰观察2米-100米范围内的景物。
手动调光:操作者可以手动调整红外LED 发光强弱,满足对特殊场景的摄象要求。
预置位记忆调光:操作者可以手动调整红外LED 发光强弱,通过保存预置位将此参数记忆在存储器中,用户可以保存227个这样的场景,已备随时调出清晰的图象。
4.4.具有掉电记忆功能具有掉电记忆功能具有掉电记忆功能::本产品可任意设置227个预置位和8个巡视组。
5.5.具有具有4防区自动报警定位追踪能力防区自动报警定位追踪能力::实现了真正意义上的全方位、全天候、高清晰、智能化监视。
6.6.便捷拨码便捷拨码便捷拨码::采用方便独特的外置拨码设置。
7.7.低功耗低功耗低功耗::满负载(含全方位云台、SONY 摄像机,大功率红外LED 光源)峰值电流3A。
Security Made SmarterSuper HD BulletEN INSTRUCTION MANUALCongratulations on the purchase of your Swann Su-per HD Camera.• Enjoy day & night security & have a bird’s eye view of your premises in crystal clear super HDwith this impressive 5 Megapixel camera• See what’s happening in any light with infrared cut filter & powerful night vision up to 130ft/40m& a wide 70° viewing angle• With sleek bullet styling & sturdy aluminium construction, the camera suits indoor & out-door applications with an IP66 rating for anyweather conditions• This camera is the perfect addition if you al-ready have a recording solution (NVR) & needextra surveillance. It can only be used in combi-nation with Swann’s Platinum Digital HD NVRsincluding the 7450 series Important instructions1. Make sure the camera is fixed correctly and stable if fastened in place.2. Never place strain of any kind on the network ca-ble connection. It’s designed to clip into the Ethernet port, but it won’t support weight and can be broken.3. Do not operate if wires and terminals are exposed. Important note: All jurisdictions have specific laws and regulations relating to the use of cameras. Be-fore using any camera for any purpose, it is the buy-er’s responsibility to be aware of all applicable laws and regulations that limit the use of cameras.If you own a 8 or 16 channel 8000 series NVR, con-figuration is required for successful connection, go toSearch for - NHD 855 Connection Guide.To connect the camera to your NVR, simply connect the supplied Ethernet cable to the LAN connection on the camera then plug the other end of the cable into one of the IP camera inputs on the back of your NVR.Ethernet CablePlease note: The power connector is provided as an alternative power option if required. Your NVR will provide power over the Ethernet cable when connected and a separate power adapter is not required.The camera can be mounted onto a flat surface using the screws and wall plugs provided. The surface musthave sufficient strength to hold the camera.→Position the camera in the location you want to mount it, and mark the screw holes on the surface toposition the screws (a mounting template has been included). Then, using the appropriate screws for thesurface you’re fixing the camera to, secure the camera in place.→If you’re mounting to a wooden surface, then screw the camera directly to the surface.→If you’re mounting to a masonry surface (bricks, concrete or similar), then you’ll need to use wall plugs. Aiming the camera Array 1. Loosen both screws (use an Allen key) to adjust the camera’s orientation.This enables you to rotate the camera so no matter what direction it is facing,your images will be the right way up. Tighten each screw to secure in place.2. Loosen the screw to tilt the camera up or down. Tighten the screw tosecure in place.3. To pan the camera left or right, loosen the screw and position accordingly.Tighten the screw to secure in place.1. Take into consideration what you want to monitor and where you’ll get the best view of it.2. How you’re going to connect the camera to your monitoring system; remember that cables and connections should be kept out of the weather.3. How to keep the camera out of harm’s way. It’s recommended to mount your camera at an elevated position.4. Place your camera as close to the area of interest as practicable. The best position is from about 13ft/4m above looking slightly down, keeping in mind the details you are looking for.5. Although the sky looks nice when you look at the live view from your camera, it is an unlikely direction for an offender to approach. Make sure your camera has minimal sky in it as the light in daylight can make the foreground of the image darker.6. Think about the most likely way a potential offender may approach your home, use your camera to give you the best coverage of these areas.7. The camera’s casing is resistant to different weather conditions and tampering. It would take an overwhelming event to damage the housing.8. Even though the camera is weather and water-resistant, prolonged exposure to adverse weather conditions such as sunlight or excessive moisture, may eventually damage the internal components of the camera and adversely affect its performance. 9. Run cables inside a wall cavity or other protected enclosure, and ensure that all wiring and connectors are insulated and protected from moisture.10. Don’t put your cable near live electrical wiring. AC electricity generates radio “noise” which can interfere with the signal from your camera.Swann Communications warrants this product against defects in workmanship and material for a period of one (1) year from its original purchase date. You must present your receipt as proof of purchase for warranty validation. Any unit which proves defective during the stated period will be repaired without charge for parts or labour or replaced at the sole discretion of Swann. The end user is responsible for all freight charges incurred to send the product to Swann’s repair centres. The end user is responsible for all shipping costs incurred when shipping from and to any country other than the country of origin.The warranty does not cover any incidental, accidental or consequential damages arising from the use of or the inability to use this product. Any costs associated with the fitting or removal of this product by a tradesman or other person or any other costs associated with its use are the responsibility of the end user. This warranty applies to the original purchaser of the product only and is not transferable to any third party. Unauthorized end user or third party modifications to any component will render all warranties void. By law some countries do not allow limitations on certain exclusions in this warranty. Where applicable by local laws, regulations and legal rights will take precedence.For Australia: Our goods come with guarantees which cannot be excluded under Australian Consumer Law. You are entitled to a replacement or refund for a major failure and for compensation for any other reasonably foreseeable loss or damage. You are also entitled to have the goods repaired or replaced if the goods fail to be of acceptable quality.This equipment has been tested and found to comply with the limits for Class A digital device, pursuant to part 15 of the FCC Rules. These limits are designed to provide reasonable protection against harmful interference in a residential installation. This equipment generates, uses and can radiate radio frequency energy and, if not installed and used in accordance with the instructions, may cause harmful interference to radio or television reception, which can be determined by turning the equipment off and on, the user is encouraged to try to correct the interference by one or more of the following measures:• Reorient or relocate the receiving antenna• Increase the separation between the equipment and the receiver• Connect the equipment into an outlet on a circuit different from that to which the receiver is connected • Consult the dealer or an experienced radio/TV technician for helpThese devices comply with part 15 of the FCC Rules. Operation is subject to the following two conditions:(1) These devices may not cause harmful interference.(2) These devices must accept any interference received, including interference that may cause undesired op-eration.**************1800 788 2100800 479 266***********。

8002红外智能球形摄像机说明书第一章:产品概述本红外智能球形摄像机是综合了多项高科技成果于一身的新一代监控产品。
本产品外观设计新颖精美;摄像机与红外灯采用分仓设计,彻底解决红外灯长时间开启产生的高温对摄像机的损坏,确保摄像机远距离监视的可靠性;红外灯仓及灯板采用全金属(铝),可靠的散发红外灯产生的热量;本产品采用全数码控制,编程灵活,使用精密电机,快速灵敏,定位准确,运行平稳,可设置摄像机自动适应环境明暗和目标远近的变化;大容量的预置位存储,可以设置多个巡视组;具有掉电记忆功能,自动恢复掉电前的工作状态,实现了真正意义上的全方位、全天候、高可靠、高清晰、智能化监视。
为了适合各种环境的安装使用,还有壁装、吊装等多种安装方式可供选择。
本产品适用于各行各业大面积、远距离的活动目标监视,如旅游景点、机场、电力部门、智能大厦、银行保安、学校监考、城市道路、车站监控等。
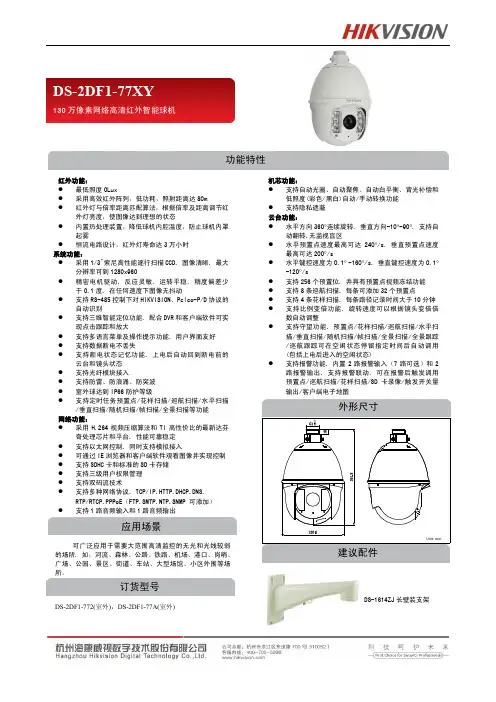
1.1产品认识①法兰连接柱②遮阳罩③装饰圈④灯仓前盖⑤灯仓⑥光敏电阻1.2产品外形尺寸1.3外出引线定义Q座:视频接线头电源插座:DC24V(内正外负)RS485:黄线 RS485 A+白线RS485 B-8、通电测试2、取出球机遮阳罩内部保护垫2.1安装流程注:如果订货时配有摄像机,可以省略灯仓前盖的拆卸。
请注意本说明书封底页上球机出厂配置。
2.2准备安装 2.2.1基本要求所有的电气工作都必须遵守使用最新的电气法规,防火法规以及其他相关法规。
检验随机物品是否齐全,确定该红外智能球形摄像机的应用场所和安装方式是否与所要求的吻合,若不吻合请与经销商联系。
2.2.2核查安装空间及安装地点构造的强度确认安装地点有容纳本产品及其安装结构件的足够空间。
确认安装球机的天花板、墙壁、支架的承载能力可支撑球机及其安装结构件的总重量。
要求具有4倍的安全系数。
1、打开包装,取出球机第二章:安装指南(检查产品在运输途中是否有损坏。
(否则影响球机通电时的正常运转)(详见第4页2.3摄像机机芯安装、拨码设置)(参照第7页e 安装灯仓前盖和装饰圈)(详见第8页2.4球机安装)2.3 摄像机机芯安装、拨码设置 2.3.1摄像机机芯安装a 、从包装箱中取出红外智能球形摄像机,将遮阳罩内部的球机保护垫(4块)取出,旋松装饰圈上的4颗自攻螺钉,取下装饰圈,再将灯仓前盖上的四个螺钉旋松,取下灯仓前盖。
V2.3 2021.05前言Kedacom™、TrueSens™、、为苏州科达科技股份有限公司的商标,不得擅自使用。
苏州科达科技股份有限公司版权所有,保留所有权利。
本手册可能包含技术上不准确的地方、或与产品功能及操作不相符的地方、或印刷错误。
我司将根据产品功能的增强而更新本手册的内容,并将定期改进或更新本手册中描述的产品或程序。
更新的内容将会在本手册的新版本中加入,恕不另行通知。
通过互联网访问说明将本产品接入互联网需自担风险,包括但不限于产品可能遭受的网络攻击、黑客攻击、病毒感染等,本公司不对因此造成的产品工作异常、信息泄露等问题承担责任,本公司将及时为您提供产品相关技术支持。
注意为了提高产品网络使用的安全性,建议您设置高强度密码,密码必须包含8-16 个字符,且至少由数字、字母或特殊字符中的两种或两种以上类型组合而成。
请您定期更改用户名的密码,建议每3 个月更新一次。
如果设备在较高安全风险的环境中使用,建议每月或每周更新一次。
请妥善保管好您的用户名与密码。
环保声明请遵守有关设备包装材料、耗尽电池和废旧设备处理的本地法规,并支持回收行动。
读者对象监控产品管理员、操作人员。
适用软件版本7.2.3关于本手册本手册用于指导用户操作,手册中的界面截图、图表等仅用于解释和说明的目的,与具体产品可能存在差异,请以实际为准。
本书约定“”苏州科达科技股份有限公司地址:江苏省苏州市高新区金山路131号邮编:215011 网址:电话:*************传真:*************客户咨询热线:400-828-2866此内容的目的是确保用户正确使用本产品,以避免危险或财产损失。
在使用此产品之前,请认真阅读此手册并妥善保存以备日后参考。
如果因为没有按照本手册说明的正确操作,而产生的事故,本公司概不负责,亦不承担任何相关法律责任。
设备安装前,请确保符合安装要求。
注意事项1) 请使用满足安全电压要求的电源。
2) 如果设备工作不正常,请联系购买设备的商店或最近的服务中心,不要以任何方式随意拆卸或修改设备(未经许可的修改或维修所导致的问题,责任自负)。
目录第一章产品说明 (2)1.产品简介 (2)2.产品参数 (2)3.功能特性 (3)4.注意事项 (4)第二章安装操作 (5)1.安装网络摄像机所在网络环境 (5)2..监控系统连接摄像机 (6)第三章远程连接 (7)1客户端分类 (7)1.1中维云视通网络监控系统 (7)1.2 浏览器访问 (7)1.3 手机访问 (7)2远程连接方式 (7)2.1 云视通号码 (7)2.2 IP地址 (7)3中维云视通网络监控系统 (8)3.1 监控系统安装 (8)3.2 连接参数设置 (9)3.3 连接主控 (10)3.4 通道录像 (11)3.5 录像回放 (11)3.6 现场拍照 (11)3.7远程管理 (11)3.9更多功能 (21)4.W EB CC (22)4.1安装 (22)4.2连接主控 (22)4.3云视通号登陆 (23)4.4cc账号登陆 (24)4.5录像 (25)4.6 录像回放 (25)4.7抓图 (26)第一章产品说明1. 产品简介JVS-N71B(C或D)红外高清网络摄像机是中维公司精耕细作的又一款产品,它由高品质的视频采集模块、高性能的视频编码模块、稳定的夜视模块和精密的防水机壳四部分组成,软件以嵌入式Linux操作系统为基础,内嵌了中维云视通服务。
此产品除了具备中维产品共有的:设置简单、操作方便、连通率高等特点外,还具备:画质清晰,宽动态、夜视效果好、图像延迟短、功耗低等特点。
2. 产品参数3. 功能特性•预览、压缩分辨率均支持1280×720•网络远程监控内嵌云视通功能,无需复杂设置,轻松网传•支持双码流,用户可选择码流并调节分辨率、帧率、视频质量•支持红外灯、双滤光片自动切换,真正实现昼夜监控•支持移动侦测,移动侦测报警自动发送邮件提醒•支持软件升级,可用网站升级/本地升级•支持网络参数的静态配置/DHCP/ADSL•支持手机监控,图像质量/帧率可调,无需复杂设置•支持画面移动侦测/画面遮挡,可设置4个不同区域•支持断电/意外故障后自动重启功能•支持系统时间及OSD的内容修改•支持远程实时监看/远程开启主控录像/远程录像回放/远程下载•支持网络用户管理、网络时间同步、CC、WebCC•客户端可选择监控系统软件/浏览器/手机进行远程监控,实现方式多样,远程连通率高•可通过公司自主研发的云视通网络监控系统(CV)进行集中管理、观看和录像等4. 注意事项中维JVS-N71B(C或D)摄像机为专业的安防监控设备,在安装使用时注意以下事项:1.网络摄像机在易遭雨淋场所要加防水罩。
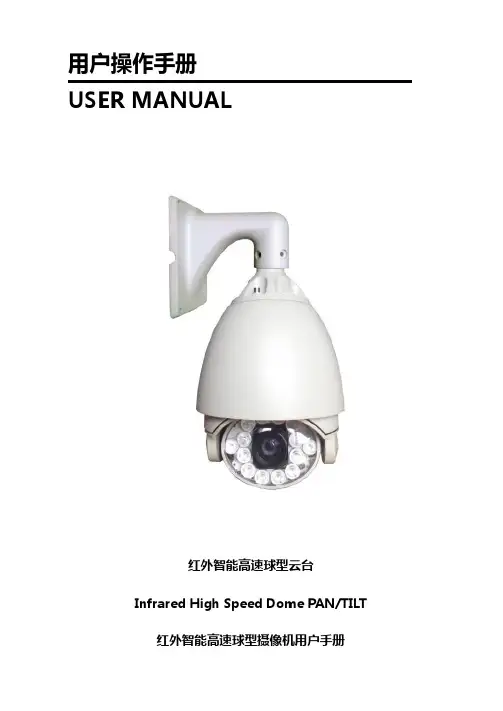
用户操作手册USER MANUAL红外智能高速球型云台Infrared High Speed Dome PAN/TILT红外智能高速球型摄像机用户手册目录第1章产品概述 (4)1.1 产品简介 (4)1.2 性能特点 (4)1.3 功能说明 (5)第2章安装 (7)2.1 球机拨码开关设置 (7)2.2 进入拨码开关设置 (8)第3章球机的基本操作 (10)3.1通电自检与控制摄像机 (11)3.2预置点的设置 (11)3.3调用预置点 (11)3.4特写镜头和广角镜头 (12)3.5镜头聚焦控制 (13)3.6手动光圈功能 (13)第4章菜单的设置 (13)4.1主菜单 (14)4.2 System Parameter 系统信息菜单 (15)4.3 Dome Setting 球机扫描设置菜单 (16)4.3.1 Frame Scan Setting 边界扫描设置菜单 (17)4.3.2 <Cruise Setting>花样扫描设置菜单 (18)4.3.3 Power Up上电设置菜单 (20)4.3.4 Gaurd Setting 守望位设置菜单 (20)4.4 Camera Setting 镜头设置菜单 (21)4.5 IR setting 红外模式设置菜单 (21)第5章简易故障排除及维修 (22)5.1 简易故障排除表 (22)5.2 注意事项 (23)第1章产品概述1.1 产品简介红外一体化智能高速球形摄像机是采用当今最新的科技成果、最精尖的制造工艺;综合多年的宝贵经验研制成功的,配置了自动变焦镜头的高性能数字信号处理(DSP)摄像机;集内置云台和数字解码器于一体,代表新一代高技术监控产品的发展潮流。
它采用全数码控制,机械设计精巧简单,可任意迅速定位及连续追踪扫描,实现真正意义上的全方位、无盲点的智能监视;可以自动适应环境明暗和目标远近的变化;可靠性高,可长期稳定运行,无须维护。
夜视高速智能球型摄像机安装手册YH5904感谢您选用本公司的产品,请您在使用本产品前仔细阅读用户手册,本用户手册将为您提供正确的安装和使用说明。
版权声明:本用户手册版权归天津市亚安科技电子有限公司所有,未经本公司许可,任何机构和个人不得抄录,转载其中全部或部分内容。
天津市亚安科技电子有限公司保留因产品性能改进而对本用户手册修改和更新的权利,更新内容恕不一一通知用户。
您在使用过程中如遇到本手册未能述及的问题,请与本公司或本公司的合法经销商联系。
您可以随时登录本公司的网站,了解相关产品的最新消息。
目录1安全注意事项 (1)1.1警告 (1)1.2注意 (2)2 术语 (2)3 产品应用 (4)4 产品特性 (4)5技术参数 (5)5.1产品技术参数 (5)5.2引用标准 (6)6安装 (6)6.1安装前确认 (6)6.2安装人员要求 (6)6.3核查安装空间及安装地点的结构 (7)6.4安装工具 (8)6.5线缆准备 (8)6.6产品安装 (10)附录一日常维护 (15)附录二简易故障维修 (16)1安全注意事项1.1 警告◆激光辐射,勿直视或通过光学仪器直接观看光束。
◆安装和使用本产品之前,请仔细阅读用户手册,并妥善保管,以便日后使用。
◆应遵守用户手册上的所有警告事项,遵守全部指示操作和使用说明。
◆在擦拭前,先断开电源,勿用液体或喷雾式清洁剂,请用湿布擦拭。
◆应使用经销商或本公司推荐的配件,否则可能导致本产品故障。
◆本产品应使用用户手册规定的电源种类和电压,如安装地点的电源和电压不明确,请与经销商或本公司联系。
◆应妥善保护电源线,接插件和摄像机线缆。
◆为防止雷击,请安装避雷器。
◆避免造成火灾或触电,请不要让本产品的安装线过长以致产生过载。
◆应防止异物进入本产品内并勿让腐蚀性液体浸入机内,以防出现危险。
◆请不要安装在不牢固的支架或墙体上,否则会导致人机受损。
◆请不要在易燃、易爆的危险区域存储、安装和使用本产品。
室内智能球型一体化摄像机安装和使用手册V1.0在使用智能化球型摄像机之前,敬请您仔细阅读本使用手册安全提示:在正三角形中闪烁的箭头符号,用以提醒用户在本产品中附近出现较大的“非绝缘危险电压”,足以对人体产生危险。
在正三角形中的注意号,用以提醒用户参考有关该机的重要操作与维护的文字说明。
目录一、注意事项 (1)二、功能介绍 (2)三、球机设定 (3)1.球机地址的设定 (3)2.球机协议的选择 (4)3.通信波特率的设定 (5)4.球机端接电阻选择 (5)5.特殊控制功能 (5)四、安装步骤 (6)五、技术参数 (9)1.球机技术参数 (9)2.摄像机参数 (9)六、常见故障分析 (11)附录Ⅰ:透明球罩的清洁 (12)附录Ⅱ:RS485总线常识 (12)附录Ⅳ:24VAC线径和传输距离关系表 (14)附录Ⅴ:国内外线规对照表 (16)一、注意事项1.在安装使用全方位智能化球型摄像机之前,请首先仔细阅读本说明书。
2.室内低速球机使用DC12V/2.0A供电;室内中速球使用使用球机使用DC15V/1.5A供电(电源与球机的最大距离不得超过5米)。
3.球机内部为精密光学及电子器件,在运输保管及安装过程中要防止重压、剧烈震动等,不正确的操作方法,可能对产品造成损坏。
4.请不要自行拆卸球机内部器件,以免影响使用,里面没有用户自行维修的零件。
5.使用中必须遵守各项电气安全标准,配用本机自带的专用电源。
RS-485及视频信号在传输过程中应与高压设备或电缆保持足够的距离,必要时还要做好防雷击、防浪涌等防护措施。
6.不要用强烈的或磨损性洗涤剂清洗球机主体。
清理污垢时,应以干布清理,污垢不易清除时,可用中性清洗剂轻拭干净。
7.应小心使用球机,避免受撞或震动。
若使用不当,将受损害。
8.安装球机时,请安装于具有足够承受力的位置。
9.镜头上如果粘有尘灰,请使用专用镜头纸擦拭。
10.不要在超出限定的温度、湿度或电源规格的状态下使用本产品。
红外智能球型摄像机安装指导书V1.1.4浙江大华技术股份有限公司隐私保护提醒您安装了我们的产品,您可能会采集人脸、指纹、车牌、邮箱、电话、GPS等个人信息。
在使用产品过程中,您需要遵守所在地区或国家的隐私保护法律法规要求,保障他人的合法权益。
如,提供清晰、可见的标牌,告知相关权利人视频监控区域的存在,并提供相应的联系方式。
重要安全须知此手册内容的目的是确保用户正确使用该产品,请在使用本产品时候仔细阅读相关内容,并妥善保管以备日后参考。
1安全措施1.1对安装或维修人员的素质要求具有从事CCTV 系统安装或维修的资格证书。
具有从事高空作业的资格证书。
具有低压布线和低压电子线路接线的基础知识和操作技能。
仔细阅读本手册并理解全部内容。
1.2对升降设备的要求使用适合安装地点和球机安装方式的安全升降设备。
升降设备具有到达安装位置的足够的举升高度。
升降设备具有良好的安全性能。
2注意事项●小心运输运输及保管过程中要防止重压、剧烈振动和浸泡等对产品造成的损坏。
本产品必须采用分体包装形式运输,无论工程商发货还是返回工厂维修,若因采用装配后整体运输方式而造成的任何产品损坏,不属保修范围。
●发生故障时如果本机出现冒烟、异常气味或功能不正常,应立即关闭电源并断开电源线,停止使用本机,然后与本公司联系。
●切勿拆开或改装切勿打开壳体,否则可能会导致危险或引起本机损坏。
如果进行内部设定或维修,请与本公司联系。
●切勿把别的物品放入本机确认摄像机内应没有金属物或易燃物。
如果机内有异物,可能会引起着火、短路或损伤。
如果水或液体流入摄像机,请立即关闭电源并断开电源线,并联系本公司客服。
小心地保护摄像机,避免雨水、海水侵蚀。
●小心提放本机为了避免损伤,切勿使摄像机掉落或遭受强烈的冲击或震动。
●设置在远离电场和磁场的场所如果设置在电视机、无线电发射机、电磁装置、电机、变压器、扬声器附近,它们产生的电磁场将会干扰图像。
● 避免湿气和灰尘为了避免摄像机损坏,切勿把摄像机设置在有油烟或水蒸气、温度过高或有很多灰尘的场所。
产品功能
●支持最大1920×1080@30fps高清画面输出
●支持H.265高效压缩算法,可较大节省存储空间
●支持4倍光学变倍,16倍数字变倍
●采用高效红外阵列,低功耗,照射距离达30m
●支持区域入侵侦测、越界侦测、移动侦测等智能侦测功能
●支持断网续传功能保证录像不丢失,配合Smart NVR实现事件录像的
二次智能检索、分析和浓缩播放
●支持宽动态、3D数字降噪、Smart IR等功能
●支持镜像、一键恢复功能
●支持350°水平旋转,垂直方向0°-90°
●支持300个预置位,8条巡航扫描
●支持3D定位功能,可通过鼠标框选目标以实现目标的快速定位与捕
捉
●支持定时任务、守望、一键巡航功能
●内置麦克风、扬声器,可实现双向语音对讲,同时支持1路音频输入
和1路音频输出
●内置1路报警输入和1路报警输出,支持报警联动功能
●支持Wi-Fi功能,可支持WPS一键配置
●支持最大128G的Micro SD/SDHC/SDXC卡存储
●支持E家协议和萤石云服务
应用场景
网络高清mini PTZ 摄像机,可广泛应用于室内的远程、隐蔽监控, 如: 监狱、图书馆、商场、酒店、政府、博物馆、银行等场所。
订货型号
DS-2DC2204IW-D3/W 尺寸接口图
建议配件
DS-1294ZJ 壁装支架
技术参数。
· 4MP, 1/3” CMOS image sensor, low illuminance, high image definition· Outputs 4MP (2560 × 1440)@25/30 fps, Max. supports 4MP (2688 ×1520)@20 fps· H.265 codec, high compression rate, ultra-low bit rate· Built-in IR LED, max IR distance: 40 m· ROI, SMART H.264/H.265, flexible coding, applicable to variousbandwidth and storage environments· Rotation mode, WDR, 3D DNR, HLC, BLC, digital watermarking,applicable to various monitoring scenes· Intelligent detection: Intrusion, tripwire· Abnormality detection: Motion detection, video tampering, no SD card,SD card full, SD card error, network disconnected, IP conflict, illegal ac-cess, voltage detection· Alarm: 1 in, 1 out; audio: 1 in, 1 out; supports max. 256 GB Micro SDcard· 12V DC/PoE power support· IP67, IK10 protection gradeSystem OverviewWith updraded H.265 encoding technology, Dahua Lite series camerahas efficient video encoding capacity, which saves bandwidth andstorage space. This camera adopts the latest starlight technology anddisplays better colorful image in the environment of low illumination. Itsupports SD card storage, waterproof function, dust-proof function andtamper-proof function, complying to the standards of IP67 and IK10.FunctionsSmart(H.265+ & H.264+)Adopting advanced algorithm of auto stream control according to theenvironment, Dahua smart encoding technology realizes the higherefficiency than (H.265 & H.264 ), providing high-quality video, andreducing the cost of storage and transmission.Wide dynamic range (WDR)Dahua adopts advanced Wide Dynamic Range (WDR) technology. Youcan get clear details in the environment of strong brightness contrast.In high brightness and back- light environment, bright region and darkregion with strong light source, you can also get clear images.4Mp H.265+Vandal-proofStarlight IVSStarlightDahua Starlight technology mainly applies to the environment oflow illumination, and it can provide clear colorful video. Even in theenvironment of min. illumination, the technology can guarantee thegood image effect.Intelligent Video Analysis (IVS)With advanced video algorithm, Dahua camera supports intelligentdetection, such as tripwire and intrusion and so on.Protection (IP67, IK10, wide voltage)IP67: The camera passes a series of strict test on dust and soak. It hasdust-proof function, and the enclosure can works normal after soakingin 1 m deep water for 30 minutes.IK10: The enclosure can stand the punch more than 5 times from a 5 kghammer falling from a height of 40 m (Impact energy is 20J).Wide voltage: The camera allows ±30% input voltage tolerance (widevoltage range), and it is widely applied to outdoor environment withinstable voltage.Rev 001.001© 2019 Dahua . All rights reserved. Design and specifications are subject to change without notice.Pictures in the document are for reference only, and the actual product shall prevail.PFM114TLC SD CardPFM900-E Integrated MountTesterAccessories Optional:PFA137Junction Box PFB203W Wall Mount PFA152-E Pole MountPFA200W Rain Shade PFA106Mount Adapter PFB220C Celling MountPFB200C In-Celling MountPFM321D DC12V1A PowerAdapterLR1002-1ET/1EC Single-port Long Reach Ethernet over Coax Extender。