海康威视网络摄像机操作手册 V5.0.3
- 格式:pdf
- 大小:3.78 MB
- 文档页数:66

网络摄像机快速操作手册V5.0.0杭州海康威视数字技术股份有限公司技术热线:400-700-5998非常感谢您购买我公司的产品,如果您有什么疑问或需要请随时联系我们。
本手册适用于以下型号的的网络摄像机:枪型Ⅰ:DS-2CD883F-E(W)、DS-2CD855F-E、DS-2CD854F-E(W)、DS-2CD854FWD-E、DS-2CD853F-E(W)、DS-2CD864FWD-E(W)、DS-2CD864F-E(W)、iDS-2CD864FWD-E/F、iDS-2CD864FWD-E/B、iDS-2CD855F-E/D、iDS-2CD864F-E/D、DS-2CD863PF(NF)-E(W)、iDS-2CD893PF(NF)-E、DS-2CD893PF(NF)-E (W)、DS-2CD893PFWD(NFWD)-E(W)、DS-2CD833F-E(W) 枪型Ⅱ:DS-2CD6213F、DS-2CD6223F、DS-2CD6233F、DS-2CD6233F-SDI、DS-2CD6233F-FCB、DS-2CD6253F枪型Ⅲ:DS-2CD4012F-(A)(P)、DS-2CD4024F-(A)(P)、DS-2CD4032F-(A)(P)、DS-2CD4012FWD-(A)(P)、DS-2CD4052F-(A)(P)、DS-2CD4032FWD-(A)(P)半球型Ⅰ:DS-2CD783F-E(I) (Z)、DS-2CD783F-EP、DS-2CD764FWD-E(I)(Z)、DS-2CD764F-E(I)(Z)、DS-2CD755F-E(I)(Z)、DS-2CD754F-E(I)(Z)、DS-2CD754FWD-E(I) (Z)、DS-2CD753F-E(I) (Z)、DS-2CD763PF(NF)-E(I)(Z)、DS-2CD793PF(NF)-E(I)(Z)、DS-2CD793PFWD(NFWD)-E(I)(Z)、DS-2CD733F-E(I)(Z)、DS-2CD4112F-I(Z)、DS-2CD4124F-I(Z)、DS-2CD4132FWD-I(Z) 半球型Ⅱ:DS-2CD7233F-E(I)Z(H)(S)、DS-2CD7253F-E(I)Z(H)(S)、DS-2CD7254F-E(I)Z(H)(S)、DS-2CD7254FWD-E(I)Z(H)(S)、DS-2CD7255F-E(I)Z(H)(S)、DS-2CD7263PF(NF)-E(I)Z(H)(S)、DS-2CD7264FWD-E(I)Z(H)(S)、DS-2CD7264F-E(I)Z(H)(S)、DS-2CD7283F-E(I)Z(H)(S)、DS-2CD7293PF(NF)-E(I)Z(H)(S)、DS-2CD7293PFWD(NFWD)-E(I)Z(H)(S)半球型Ⅲ:DS-2CD2112(D)-(I)、DS-2CD2132(D)-(I)半球型IV:DS-2CD7353F-E(I)(S)、DS-2CD7393PF/NF-E(I)(S)、DS-2CD7393PF/NFWD-E(I)(S)半球型V:DS-2CD2712F(D)-I(S)、DS-2CD2732F(D)-I(S)筒型Ⅰ:DS-2CD8283F-E(I)(Z)(S)、DS-2CD8264FWD-E(I)(Z)(S)、DS-2CD8264F-E(I)(Z)(S)、DS-2CD8254F-E(I)(Z)(S)、DS-2CD8254FWD-E(I)(Z)(S)、DS-2CD8255F-E(I)(Z)(S)、DS-2CD8253F-E(I)(Z)(S)、DS-2CD8233F-E(I)(Z)(S) DS-2CD4212F-(I)(Z)(H)(S)、DS-2CD4212FWD-(I)(Z)(H)(S)、DS-2CD4224F-(I)(Z)(H)(S) 、DS-2CD4232F-(I)(Z)(H)(S)、DS-2CD4232FWD-(I)(Z)(H)(S) 筒型Ⅱ:DS-2CD864-EI3、DS-2CD864-EI5、DS-2CD855-EI3、DS-2CD855-EI5筒型Ⅲ:DS-2CD2012(D)-I、DS-2CD2032(D)-I筒型IV:DS-2CD2212(D)-I3、DS-2CD2212(D)-I5、DS-2CD2232(D)-I3、DS-2CD2232(D)-I5筒型V:DS-2CD2612F(D)-I(S)、DS-2CD2632F(D)-I(S)卡片型Ⅰ:DS-2CD8153F-E(I)(W)、DS-2CD8133F-E(I)(W)卡片型Ⅱ:DS-2CD8433F-EI(W)、DS-2CD8464F-EI(W))、DS-2CD8464F-EIGW/EIGE/EIGS、DS-2CD8433F-EIGW/EIGE/EIGS迷你半球型:DS-2CD7164-E、DS-2CD7153-E、DS-2CD7133-E海螺型:DS-2CD2312(D)-I、DS-2CD2332(D)-I本手册可能包含技术上不准确的地方、或与产品功能及操作不相符的地方、或印刷错误。
目录1 产品介绍 (5)1.1 产品概述 (5)1.2 产品主要功能 (5)2安装说明 (8)2.1 清点设备及其附件 (8)2.2 安装硬盘 (8)2.3 后面板物理接口说明 (9)2.3.1 HC、HT、HF后面板说明 (9)2.3.2 1/2/3/4路HC及2路HT设备的后面板说明 (10)2.3.3 HS设备的后面板说明 (11)2.4 报警线连接说明 (14)3 操作必读 (15)3.1 前面板说明 (15)3.2 遥控器说明 (19)3.3 菜单项说明 (21)3.3.1 菜单导航 (21)3.3.2 菜单操作方法 (22)3.4 输入法说明 (23)4 基本操作指南 (24)4.1 开机 (24)4.2 预览 (24)4.3 登录及修改用户名密码 (25)4.4 云台控制 (27)4.5 手动录像 (28)4.6 回放 (29)4.7 录像资料备份 (32)4.8 语音对讲 (34)4.9 辅口输出控制 (34)4.10 关机 (35)5参数设置操作指南 (36)5.1 管理员及其密码 (36)5.2 创建与删除用户 (37)5.3 修改设备名称与设备号 (40)5.4 视频输出制式与VGA设置 (40)5.5 OSD设置 (41)5.6 视频输入参数设置 (43)5.7 区域遮盖设置 (44)5.8 遮挡报警处理 (45)5.9 视频丢失处理 (46)5.10 移动侦测处理 (48)5.11 本地预览属性设置 (51)5.12 录像参数及录像计划表 (53)5.13 报警输入输出设置 (57)5.14 网络参数 (60)5.15 解码器 (61)5.16 串口参数设置 (64)5.17 异常处理 (68)5.18 交易信息 (69)6 管理工具 (71)6.1 保存设置 (71)6.2 恢复出厂设置 (72)6.3 升级 (72)6.4 硬盘管理 (72)6.5 清除报警 (72)6.6 重新启动 (72)6.7 关机 (73)6.8 日志 (73)6.8.1 按类型查询 (73)6.8.2 按时间查询 (74)6.8.3 按类型&时间查询 (74)6.9 查看系统信息 (74)7 网络硬盘录像机软件升级 (75)7.1 配置FTP服务 (75)7.2 升级方式 (76)附录1 安装硬盘总容量的参考计算方法 (77)附录2 设备连接线的制作方法 (78)1 RS-485连接线制作方法 (78)2 UTP网络连接线制作方法 (78)3 RS-232连接线制作方法 (79)附录3 技术指标 (82)附录4 常用功能速查表 (83)附录5 常见故障解答 (85)1 产品介绍1.1 产品概述本设备是专为安防领域设计的一款优秀的数字监控产品。


网络摄像机操作手册V2.0.0 杭州海康威视数字技术股份有限公司技术热线:400-700-59982011-3安全须知此内容的目的是确保用户正确使用本产品,以避免危险或财产损失。
在使用此产品之前,请认真阅读此说明手册并妥善保存以备日后参考。
如下所示,预防措施分为“警告”和“注意”两部分:警告:无视警告事项,可能会导致死亡或严重伤害。
注意:无视注意事项,可能会导致伤害或财产损失。
警告事项提醒用户防范潜在的死亡或严重伤害危险。
注意事项提醒用户防范潜在的伤害或财产损失危险。
警告:1.请使用满足SELV(安全超低电压)要求的电源,并按照IEC60950-1符合LimitedPowerSource(有限电源)的额定电压为12V直流或24V交流电源(根据具体型号而定)供应。
2.如果设备工作不正常,请联系购买设备的商店或最近的服务中心,不要以任何方式拆卸或修改设备(未经许可的修改或维修所导致的问题,责任自负)。
3.为减少火灾或电击危险,请勿让本产品受到雨淋或受潮。
4.本安装应该由专业的服务人员进行,并符合当地法规规定。
5.应该在建筑物安装配线中组入易于使用的断电设备。
有关在天花板上安装设备的指示:安装后,请确保该连接至少可承受向下50牛顿(N)的拉力。
注意:1.在让摄像机运行之前,请检查供电电源是否正确。
2.请勿将此产品摔落地下或受强烈敲击。
3.请勿直接碰触到图像传感器光学元件,若有必要清洁,请将干净布用酒精稍微湿润,轻轻拭去尘污;当摄像机不使用时,请将防尘盖加上,以保护图像传感器。
4.避免对准强光(如灯光照明、太阳光等处)聚焦,否则容易引起过亮或拉光现象(这并非摄像机故障),也将影响图像传感其寿命。
5.激光束可能烧毁图像传感器,在激光装置被使用的情况下,请您一定注意不要让图像传感器的表面暴露于激光束之下。
6.避免置于潮湿,多尘,极热,极冷(正常工作温度:-10℃~+60℃),强电磁辐射等场所。
7.避免热量积蓄,请不要阻挡摄像机附近的通风。

网络摄像机操作手册V2.0.0杭州海康威视数字技术股份有限公司技术热线:400-700-59982011-3安全须知此内容的目的是确保用户正确使用本产品,以避免危险或财产损失。
在使用此产品之前,请认真阅读此说明手册并妥善保存以备日后参考。
如下所示,预防措施分为“警告”和“注意”两部分:警告:无视警告事项,可能会导致死亡或严重伤害。
注意:无视注意事项,可能会导致伤害或财产损失。
警告事项提醒用户防范潜在的死亡或严重伤害危险。
注意事项提醒用户防范潜在的伤害或财产损失危险。
警告:1.请使用满足SELV(安全超低电压)要求的电源,并按照IEC60950-1符合Limited Power Source(有限电源)的额定电压为12V直流或24V交流电源(根据具体型号而定)供应。
2.如果设备工作不正常,请联系购买设备的商店或最近的服务中心,不要以任何方式拆卸或修改设备(未经许可的修改或维修所导致的问题,责任自负)。
3.为减少火灾或电击危险,请勿让本产品受到雨淋或受潮。
4.本安装应该由专业的服务人员进行,并符合当地法规规定。
5.应该在建筑物安装配线中组入易于使用的断电设备。
有关在天花板上安装设备的指示:安装后,请确保该连接至少可承受向下50牛顿(N)的拉力。
注意:1.在让摄像机运行之前,请检查供电电源是否正确。
2.请勿将此产品摔落地下或受强烈敲击。
3.请勿直接碰触到图像传感器光学元件,若有必要清洁,请将干净布用酒精稍微湿润,轻轻拭去尘污;当摄像机不使用时,请将防尘盖加上,以保护图像传感器。
4.避免对准强光(如灯光照明、太阳光等处)聚焦,否则容易引起过亮或拉光现象(这并非摄像机故障),也将影响图像传感其寿命。
5.激光束可能烧毁图像传感器,在激光装置被使用的情况下,请您一定注意不要让图像传感器的表面暴露于激光束之下。
6.避免置于潮湿,多尘,极热,极冷(正常工作温度:-10℃~+60℃),强电磁辐射等场所。
7.避免热量积蓄,请不要阻挡摄像机附近的通风。
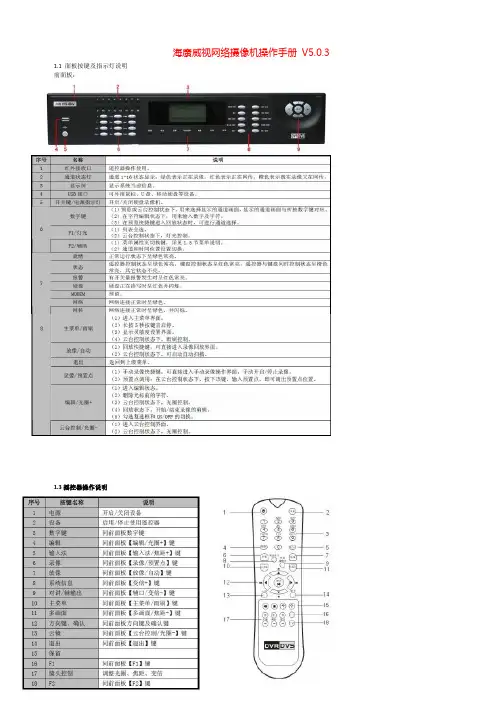
海康威视网络摄像机操作手册V5.0.3 1.1 面板按键及指示灯说明前面板:1.3摇控器操作说明正确使用遥控器方法为:使用遥控器之前,请确认已经正确安装了电池。
在使用遥控器时,请把遥控器的红外发射端对准硬盘录像机的红外接收口,然后进行操作。
若无法操作,请进入“配置管理”→“通用配置”→“更多配置”查看该设备的设备编号(默认为255,若设备编号非255,请继续下面操作),然后在遥控器上按【设备】键,接着输入要操作的该硬盘录像机的设备编号,再按遥控器上的【确认】键,这时,如果硬盘录像机完全接收到遥控器命令,状态灯变为绿色(若设备号为255,则状态灯呈不亮状态),则可以使用遥控器对该硬盘录像机进行操作了。
在整个操作过程中,硬盘录像机面板及监视器上不会有任何提示信息。
若遥控器无法控制,请再次尝试:按【设备】键→输入设备编号→按【确认】键,若尝试多次还无法控制,请检查是否如下原因:1、检查电池的正负极性;2、检查电池电量是否用完;3、检查遥控传感器是否被遮挡;4、附近是否有荧光灯在使用。
排除以上情况后若不能正常工作,请更换遥控器;若还是不能正常工作,请联系供货商。
1.4 输入法说明1.5 菜单说明说明:在菜单中有4 个常用功能按钮,定义如下:1.6 开机和关机说明开机提醒:请确认接入的电压与硬盘录像机的要求相匹配,并保证硬盘录像机接地端接地良好。
在开机前请确保有一台显示器与后面板上的VGA 接口相连接,或在不连接VGA 接口的情况下有一台监视器与后面板上的VIDEO OUT 接口相连接,否则开机后将无法看到人机交互的任何提示,也无法操作菜单。
若前面板电源【开关键】指示灯不亮,请插上电源,打开电源开关,设备开始启动。
若前面板电源【开关键】指示灯呈红色,请轻按前面板电源【开关键】,设备开始启动。
设备启动后,电源【开关键】指示灯呈绿色。
监视器或显示器屏幕上将会出现开机画面。
关机正常关机通过菜单步骤:进入设备关机界面路径:主菜单→设备关机选择[设备关机],弹出提示框。

海康威视网络硬盘录像机设备操作手册部分机型有不符合时,请予以实际机型功能为主1. 遥控器说明(部分机型没有)序号中文名称作用1 电源开启/关闭设备2 设备启用/停止使用遥控器3 数字键同前面板数字键4 编辑同前面板【编辑/光圈+】键5 输入法同前面板【输入法/焦距+】键6 录像同前面板【录像/预置点】键7 放像同前面板【放像】键8 系统信息同前面板【变倍+】键9 主口/辅口同前面板【主口/辅口】键,用于切换主辅口输出10 主菜单同前面板【主菜单/雨刷】键11 多画面同前面板【多画面/焦距-】键12 方向键、确认同前面板方向键及确认键13 云镜同前面板【云台控制/光圈-】键14 退出同前面板【退出】键15 保留16 F1 同前面板【F1】键17 镜头控制调整光圈、焦距、变倍18 F2 同前面板【F2】键在使用遥控器时,请把遥控器的红外发射端对准硬盘录像机的红外接收口,然后在遥控器上按【设备】键,接着输入要操作的那台硬盘录像机的设备号(默认的设备号为“88”,可在“本地设置”进行修改),再按遥控器上的【确认】键。
正确使用遥控器方法为:使用遥控器之前,请确认已经正确安装了电池。
在使用遥控器时,请把遥控器的红外发射端对准硬盘录像机的红外接收口,然后在遥控器上按【设备/DEV】键,接着输入要操作的那台硬盘录像机的设备号(默认的设备号为“88”,可在“本地设置”进行修改),再按遥控器上的【】键,这时,如果硬盘录像机完全接收到遥控器命令,则可以使用遥控器对该硬盘录像机进行操作了。
在整个操作过程中,硬盘录像机面板及监视器上不会有任何提示信息。
设备共有16路通道可供切换,需要切换时可用遥控器直接输入通道号。
例:在遥控器上按【0】【1】键可将画面切换至1号通道;在遥控器上按【0】【2】键可将画面切换至2号通道。
2. 输入法规则说明在菜单操作界面中,如进入编辑框(如“图像设置”内“名称”的编辑框)的编辑状态,则屏幕下方会出现如图所示的状态,按前面板的【数字键】可以在编辑框内输入数字。

Pneumatics Fluid & Gas Handling Hydraulics Process Control Sealing & Shielding Key Products Accumulators Cartridge valves Electrohydraulic actuators Human machine interfaces Hybrid drives Hydraulic cylindersHydraulic motors & pumps Hydraulic systems Hydraulic valves & controls Hydrostatic steering Integrated hydraulic circuits Power take-offs Power units Key Markets Aerospace Conveyor & material handling Factory automation Life science & medical Machine tools Packaging machinery T ransportation & automotive Key Products Air preparation Brass fittings & valves Manifolds Pneumatic accessories Pneumatic actuators & grippers Pneumatic valves & controls Quick disconnects Rotary actuators Rubber & thermoplastic hose & couplings Structural extrusions Thermoplastic tubing & fittings Vacuum generators,cups & sensors Key Markets Aerial lift Agriculture Bulk chemical handling Construction machinery Food & beverage Fuel & gas delivery Industrial machinery Life sciences Marine Mining Mobile Oil & gas Renewable energy T ransportation Key Products Check valves Connectors for low pressure fluid conveyance Deep sea umbilicals Diagnostic equipment Hose couplings Industrial hose Mooring systems &power cables PTFE hose & tubing Quick couplings Rubber & thermoplastic hose T ube fittings & adapters Key Markets Aerial lift Agriculture Alternative energy Construction machinery Forestry Industrial machinery Machine tools Marine Material handling Mining Oil & gas Power generation Refuse vehicles Renewable energy T ruck hydraulics T urf equipmentKey Markets Alternative fuels Biopharmaceuticals Chemical & refining Food & beverage Marine & shipbuilding Medical & dental Microelectronics Nuclear Power Offshore oil exploration Oil & gas Pharmaceuticals Power generation Pulp & paper Steel Water/wastewater Key Products Analytical Instruments Analytical sample conditioning products & systems Chemical injection fittings & valves Fluoropolymer chemical delivery fittings,valves & pumps High purity gas delivery fittings,valves,regulators & digital flow controllers Industrial mass flow meters/controllers Permanent no-weld tube fittings Precision industrial regulators Key Markets Aerospace Chemical processing Consumer Fluid power General industrial Information technology Life sciences Microelectronics Military Oil & gas Power generation Renewable energy T elecommunications T ransportation Key Products Dynamic seals Elastomeric o-rings Electro-medical instrument design & assembly EMI shielding Extruded & precision-cut,fabricated elastomeric seals High temperature metal seals Homogeneous & inserted elastomeric shapes Medical device fabrication & assembly Metal & plastic retainedAerospace Key Markets Aftermarket services Commercial transports Engines General & business aviation Helicopters Launch vehicles Military aircraft Missiles Power generation Regional transports Unmanned aerial vehicles Key Products Control systems & actuation products Engine systems & components Fluid conveyance systems & components Fluid metering, delivery & atomization devices Fuel systems & components Fuel tank inserting systems Hydraulic systems & components Thermal management Wheels & brakes Electromechanical Key Markets Aerospace Factory automation Life science & medical Machine tools Packaging machinery Paper machinery Plastics machinery & converting Primary metals Semiconductor & electronics T extile Wire & cable Key Products AC/DC drives & systems Electric actuators, gantry robots & slides Electrohydrostatic actuation systems Electromechanical actuation systems Human machine interface Linear motors Stepper motors,servo motors,drives & controlsStructural extrusions Parker’s Motion & Control TechnologiesAt Parker, we’re guidedby a relentless drive tohelp our customersbecome moreproductive and achievehigher levels ofprofitability byengineering thebest systems for theirrequirements. It meanslooking at customerapplications frommany angles to findnew ways to createvalue. What ever themotion and controltechnology need,Parker has theexperience, breadthof product and global reach to consistentlydeliver. No companyknows more about motionand control technologythan Parker. For further infocall 1 800 C-Parker(180****7537)Climate Control Key Markets Agriculture Air conditioning Construction Machinery Food & beverage Industrial machinery Life sciences Oil & gas Precision cooling Process Refrigeration T ransportation Key Products Accumulators Advanced actuators Co controls Electronic controllers Filter driers Hand shut-off valves Heat exchangers Hose & fittings Pressure regulating valves Refrigerant distributors Safety relief valves Smart pumps Solenoid valves Thermostatic expansion valves Filtration Key Markets Aerospace Food & beverage Industrial plant & equipment Life sciences Marine Mobile equipment Oil & gas Power generation & renewable energy Process T ransportation Water Purification Key Products Analytical gas generators Compressed air filters & dryers Engine air, coollant, fuel & oil filtration system Fluid condition monitoring systems Hydraulic & lubrication filters Hydrogen,nitrogen & zero air generators Instrumentation filters Membrane & fiber filters Micro filtration Sterile air filtration Water desalination & purification filters & systemsViking LiteDirectional control valves The Viking Lite valve range is robust, versatile and combines high performance with compact installation dimensions. Large flow capacity, short change-over times and low change-over pressure are important characteristics of this valve range.Designed to operate with pressures up to 10 bar intemperatures -10C to + 50C.Zinc plated Viking Lite ...cover screwsrobust, versatile high performance with long service lifeViking Lite rangeP2LAZ, G1/8 - Cv = 0,6P2LBZ, G1/4 - Cv = 1,5P2LCZ, G3/8 - Cv = 2,5Solenoid operatedWear compensating systemThe Viking Lite valve range is robust, versatile and combines high performance with compact installation dimensions. The choice of G1/8, G14 or G3/8 port sizes provide large flow capacity, short change-over times. Low change-over pressure is also an important characteristic of this valve range.Viking Lite valves are fitted with dynamic bi-directional spool seals suitable for pressures up to 10 bar, inO O ambient temperatures -10C to + 50C. Under pressure radial expansion of the seal occurs to maintain sealing contact with the valve bore.This sealing method reduces friction gives lower pilotpressures, providing fast response and less wear. Valves do not require lubrication in operation but they can also be installed in systems that are lubricated.IP65 and RoHSPort sizes & port types (BSP , NPT , 1/8, 1/4, 3/8)Directional control valvesSolenoid operated directional control valvesInternal supply to solenoid valve(s) via port 1.5/2 valves, internal air, standard temperature3/2 valves, internal air, standard temperature(bar) actua./return 5/3 valves, internal air, standard temperatureSymb ol Size ActuationMinChangeover Weight Order code Order code Operating time (ms) Kg Without coil With 24V DC Pressure at 6 bar @20C (22mm coil)Symb olSizeActuationReturnMinChangeover Weight Order code Order code Operating time (ms) Kg Without coil With 24V DC Pressure at 6 bar @20C (22mm coil)(bar) actua./returnSymb ol Size ActuationReturnMinChangeover Weight Order code Order codeOperating time (ms) Kg Without coil With 24V DC Pressure at 6 bar @20C (22mm coil)(bar) actua./return Viking LiteMPS-V32N-PGMPS-V32N-PCCatalog 0802-5FeaturesMounting Bracket MPS-ACCK1 Included withSensors.Pressure SensorsMPS-322-Color Panel MountMPS-32RedFeaturesVacuum Pressure...............0to -30inHg Positive Pressure.................0to 145PSI2 NPNor PNP Open CollectorTransistor Output, 30VDC, 125mA Optional Analog Output, 4 to 20mA Optional Analog Output, 1 to5VDCMode(mmHg, -bar, -kPa, inHg)(kgf/cm 2,PSI,bar,kPa)MillisecondsOrdering Information,SpecificationsPressure SensorsMPS-322-Color Panel Mount SpecificationsPressure RangeVacuum(V)Positive(P)Units of Measure Display Resolution (with unit-switching function)bar:kPa:mmHg:inHg:0.0010.110.1bar:MPa:kgf/cm 2:PSI:0.010.0010.011ProofPressure-101 to 0kPa0 to 1MPaMediaAir & Non-Corrosive Gases PressurePort (N) 1/8" NPSF OperatingTemperature 32 to 122°F (0 to 50°C)StorageTemperature 14 to140°F (-10 to60°C)Humidity35 to 85% RHElectrical Connection (C) 4-Pin, M8 Connector, (G) Grommet Open LeadPowerSupply12 to 24VDC +10% or less, Ripple(Vp-p) 10% orless Display 3 + 1/2 Digit, 2 Color, 7-SegmentLED DisplayRefresh.1 to3.0 Seconds, Variable (Factoryset at0.1)Control Output NPN (Sinking), PNP (Sourcing),OpenCollector, max 125mA, 2Output Switch OutputOutput Signal, NPN or PNP , NormallyOpen orClosed,LEDIndicatorOutput Modes Hysteresis or WindowComparator Response Time2ms or less,(Variable 32, 128, 1024ms)Repeatability± 0.2% of F .S.± 1digit or less± 03% of F .S. ± 1 digit or lessAnalogOutputVoltageOutput 1 to 5VDC (1 + 0.04V , 5 + 0.04V); Outout Impedance 1kΩ; Linearity 0.5% of F .S.;Response Time 2ms or lessCurrent Output4 to 20mA; Linearity ±0.5% of F .S. or less; Maximum Load Impedance 300Ωwith Power Supply Voltage of 12V; 600Ω with Power Supply Voltage of 12V;Minimum Load Impedance50ΩThermal Error32 to 122°F (0 to 50°C) 25°C (77°C) + 2% of F .S. or less at range of 32 to 122°F (0 to50°C)GeneralProtection IP50, CE Marked, EMC-EN61000-6-2: 2001CurrentConsumption <80mA Vibration Resistance 10to 150Hz,Double Amplitude 1.5mm,XYZ,2hrs.Shock Resistance 10G,XYZMaterialHousing:ABS (gray),Pressure Port:Zinc Die-cast,Diaphragm:Silicone Mass1.7oz.(45g)(Not including cable)MPS-32Ordering NumbersPressure RangePort SizeOutputCircuit Electrical ConnectorPartNumber 0to -30inHg1/8 NPSF*PNPSourcing4 Pin,M8MPS-V32N-PC 2M LeadWire MPS-V32N-PG NPN Sinking4Pin, M8MPS-V32N-NC 2MLead Wire MPS-V32N-NG 0to 145PSI1/8NPSF*PNPSourcing4 Pin, M8MPS-P32N-PC 2M Lead Wire MPS-P32N-PG NPNSinking4Pin, M8MPS-P32N-NC 2MLeadWire MPS-P32N-NG PNP Sourcing with4-20ma4 Pin,M8MPS-P32N-PCI*Mounting BracketIncluded(Bold Items are Most Popular)Products for Automotive IndustryNBH/PBH/LE2 - Introduction• N BH allows for increased power similar to that achieved using hydraulics • Convert air pressure to high oil pressure using a booster• Patent Pending• High output from 0.15 4.5tons• Adjust air pressure using air regulator• Accurate force using oil pressure• Typical flow – manual ~ pneumatic ~ hydraulic or electric• NBH – Uses direct air pressure – high output and speed, uses consitent air pressure, used for short stroke.• PBH – Uses an accumulator – for long strokeHigh Power SystemsPneumerlock Clamping Element• P ressure booster combined with clamp cylindersenables high output of 1.5 to 44.1kN.• E ither direct-pressure or preload-pressureboosters can be selected to provide a wide range ofmotions of actuator from short to long.SpecificationOutput oil pressure : 10.8~17.5 MPaOperating air pressure: 0.2~1 MPaOutput oil capacity : 77~304 cm3Direct Pressure Type BoosterNBH seriesDirect pressure type booster configurationSuitable for operations requiring highoutput throughout the stroke.SpecificationPre-Pressure Type Booster PBH, PBE SeriesExample of circuit for referenceSuitable for operations requiring highoutput throughout the stroke.Locating pin cylinderRigid mounting blocks and tight rod tolerance give the accurate position of locating pins on welding jigs.Wide variety of actuator shapes on customer’srequests.Pin clamp cylinderLocating pins are equipped to cylinders.Both vertical and horizontal shape with many different diameters/ shapes of locating pins oncustomer’s requests. Clamp UnclampVertical typeHorizontal typeJig lifting cylinderRigid lift cylinder which gives theaccurate clamping positions to the clamp units.On lift & carry conveyance or multi product lines, usuallyinstalled on the base welding machines.10F-1/2Flat shape cylinder with thin width bodies 20mm for bore 25mm 25mm for bore 32mm 39mm for bore 50mmNon rotating with oval pistonSpecificationPressure: 0.1 to 1MPa O Temperature: -10 to +60 C Bore: 25/ 32/ 50mm Standard stroke: 50-200mm 10F-1 5-50mm 10F-2FlangeDescription Type Order code P1C-4NMBFlangeMF1/MF2Water retract actuator (WRA-series)Note: For reliable operation of WRA, air pressure has to exceed water pressure, pressure difference recommended 1 barFoot bracketDescription Type Order code P1C-4NMFFoot bracketMS1Water retract actuator (WRA-series)Water retract actuator designed to reduce water pressure during automatic tip change operation• Based on standard components, utilizing Parker P1P global actuator series, VikingLite valve technology, sealing, hose and fitting technologies • Reduces downtime• Protection of expensive weld equipment, automatic tip changer • Easy installation, easily integrated into existing water system • Corrosive protection against cooling water medium • Cost effective design• Optimized design to fit car manufacturer specifications,new program or retooling programWater retract actuator (Order code)Pneumatic Actuator Air Motor- TAM4 : Compact, economical air motor with grease mounted system <Specifications>Nominal output : 9.81-19.6 kNOperating pressure range : 0.15-0.7MPaRadial Piston Type Air MotorTAM4 seriesPneumatic ActuatorHigh-Power System- All in one construction combining pressure booster and clamp cylinder - Compact, Lightweight design<Specifications>Port size : G1/8, G1/4Operating air pressure range : 0.15-0.9MPa at air pressure as 0.6 MPaClamping Element LE2 seriesPneumatic Actuator High-Power System- Space-saving pneumatic press- 1/10 The volume of conventional presses<Specifications>Rated pressure : 0.5MPaMaximum output : 73.5-228W Torque : 0.64-2.91 NmPneumatic Toggle PressTPH series。

网络视频录像机用户手册V3.01目录关于本文档 (1)1 操作必读 (2)1.1 本地操作必读 (2)1.2 本地界面操作方法 (2)2 初始配置 (5)2.1 开机准备 (5)2.2 自动添加 (5)2.3 设备登录 (6)2.4 开机向导 (9)3 预览 (11)3.1 预览界面状态 (12)3.2 窗格工具栏 (12)3.3 底部工具栏 (13)3.4 右键菜单栏 (17)4 通道配置 (20)4.1 通道管理 (20)4.1.1 IPC配置 (20)4.1.2 鱼眼配置 (27)4.1.3 高级配置 (29)4.2 编码参数 (30)4.3 音频配置 (32)4.4 抓图参数 (33)4.5 OSD配置 (34)4.6 图像参数 (35)4.7 隐私遮盖 (39)4.8 云台配置 (41)5 智能分析 (46)5.1 智能功能配置 (46)5.1.1 联动方式 (47)5.1.2 布防计划 (54)5.1.3 人脸检测 (55)5.1.4 人脸比对 (57)5.1.5 越界检测 (60)5.1.6 区域入侵 (63)5.1.7 进入区域 (65)5.1.8 离开区域 (67)5.1.9 智能运动检测 (69)5.1.11 高空抛物 (71)5.1.12 虚焦检测 (73)5.1.13 场景变更 (73)5.1.14 物品搬移 (74)5.1.15 物品遗留 (75)5.1.16 自动跟踪 (76)5.1.17 人流量统计 (77)5.1.18 人员密度检测 (78)5.2 分析器配置 (80)5.3 名单库管理 (80)5.3.1 人脸名单 (80)5.4 车辆管控 (83)5.4.1 车牌名单 (83)5.4.2 车辆报警布控 (85)5.5 智能检索 (86)5.5.1 人脸抓拍检索 (86)5.5.2 人脸比对检索 (87)5.5.3 以图搜图 (90)5.5.4 车辆检索 (93)5.5.5 行为检索 (95)5.5.6 人数统计报表 (98)5.6 智能预览 (99)6 网络配置 (104)6.1 常规配置 (104)6.1.1 网络配置 (104)6.1.2 宇视云 (105)6.1.3 DDNS (109)6.1.4 邮件 (110)6.2 平台配置 (111)6.2.1 国标服务器配置 (111)6.2.2 国标本地配置 (114)6.2.3 UNP (114)6.2.4 监管平台 (116)6.2.5 SNMP (117)6.2.6 报警上报 (119)6.2.7 视图库GA/T1400本地配置 (120)6.2.8 视图库GA/T1400服务器配置 (121)6.2.9 CDN(流分发)管理 (122)6.2.10 TMS配置 (123)6.3 高级配置 (124)6.3.1 拨号上网 (124)6.3.2 端口 (125)6.3.3 端口映射 (126)6.3.4 组播 (127)6.3.5 FTP (128)6.4 无线局域网 (130)7 系统配置 (130)7.1 基本配置 (130)7.2 预览配置 (131)7.2.1 预览配置 (131)7.2.2 高级配置 (134)7.3 时间配置 (134)7.3.1 时间配置 (134)7.3.2 时间同步 (135)7.3.3 假日配置 (135)7.4 POS配置 (137)7.4.1 POS显示配置 (137)7.4.2 POS配置 (138)7.5 串口配置 (140)7.6 用户配置 (141)7.7 安全配置 (142)7.7.1 IP地址过滤 (142)7.7.2 ONVIF认证 (143)7.7.3 802.1x (143)7.7.4 ARP防攻击 (144)7.7.5 视频水印 (144)7.7.6 安全密码 (144)7.8 热备配置 (145)8 备份 (147)8.1 录像备份 (147)8.2 图片备份 (150)9 存储配置 (153)9.1 录像计划 (153)9.2 抓图计划 (156)9.3 阵列配置 (157)9.4 硬盘管理 (161)9.5 盘组配置 (163)9.6 容量配置 (164)9.7 高级配置 (165)10 报警配置 (166)10.1 运动检测 (166)10.2 遮挡检测 (167)10.3 人形检测 (167)10.4 视频丢失 (168)10.5 输入输出 (169)10.5.1 报警输入 (169)10.5.2 报警输出 (171)10.6 热成像检测 (173)10.7 温度异常 (175)10.8 异常配置 (176)10.9 声音检测 (177)10.10 蜂鸣器 (178)10.11 门铃呼叫 (179)10.12 滞留人数告警 (179)10.13 一键撤防 (181)10.14 手动报警 (183)11 系统维护 (184)11.1 系统信息 (184)11.1.1 基本信息 (184)11.1.2 通道状态 (184)11.1.3 录像状态 (185)11.1.4 在线用户 (185)11.1.5 硬盘状态 (186)11.1.6 解码卡状态 (186)11.2 网络信息 (187)11.2.1 网络流量 (187)11.2.2 网络抓包 (187)11.2.3 网络检测 (189)11.2.4 网络状态 (191)11.2.5 网络资源统计 (191)11.2.6 PoE/交换网口状态 (192)11.3 日志查询 (192)11.4 系统备份 (194)11.4.1 系统备份 (194)11.4.2 诊断信息 (194)11.5 系统恢复 (196)11.6 自动维护 (196)11.7 系统升级 (196)11.7.1 NVR升级 (197)11.7.2 IPC升级 (198)11.8 硬盘检测 (199)11.8.1 S.M.A.R.T.检测 (199)11.8.2 磁盘检测 (200)11.9 关于我们 (200)11.10 一键收集 (201)12 回放 (201)12.1 即时回放 (202)12.2 普通回放 (202)12.3 智能回放 (204)12.4 走廊回放 (206)12.5 外部文件回放 (206)12.6 标签回放 (206)12.7 检索回放 (208)12.8 文件管理 (209)13 关机 (210)14 Web操作 (210)14.1 登录前准备 (210)14.2 登录 (211)14.3 实况 (211)14.4 回放 (212)14.5 配置 (213)14.6 智能 (214)15 附录:常见问题解答 (214)关于本文档版权声明©2022浙江宇视科技有限公司。
版权所有©杭州海康威视数字技术股份有限公司2019。
保留一切权利。
本手册的任何部分,包括文字、图片、图形等均归属于杭州海康威视数字技术股份有限公司或其子公司(以下简称“本公司”或“海康威视”)。
未经书面许可,任何单位和个人不得以任何方式摘录、复制、翻译、修改本手册的全部或部分。
除非另有约定,本公司不对本手册提供任何明示或默示的声明或保证。
关于本手册本手册描述的产品仅供中国大陆地区销售和使用。
本手册作为指导使用。
手册中所提供照片、图形、图表和插图等,仅用于解释和说明目的,与具体产品可能存在差异,请以实物为准。
因产品版本升级或其他需要,本公司可能对本手册进行更新,如您需要最新版手册,请您登录公司官网查阅()。
海康威视建议您在专业人员的指导下使用本手册。
访问本公司官网()获取说明书、应用工具和开发资料。
商标声明为海康威视的商标。
本手册涉及的其他商标由其所有人各自拥有。
免责声明·在法律允许的最大范围内,本手册所描述的产品(含其硬件、软件、固件等)均 “按照现状”提供,可能存在瑕疵、错误或故障,本公司不提供任何形式的明示或 默示保证,包括但不限于适销性、质量满意度、适合特定目的、不侵犯第三方权 利等保证;亦不对使用本手册或使用本公司产品导致的任何特殊、附带、偶然或 间接的损害进行赔偿,包括但不限于商业利润损失、数据或文档丢失产生的损失。
·若您将产品接入互联网需自担风险,包括但不限于产品可能遭受网络攻击、黑客 攻击、病毒感染等,本公司不对因此造成的产品工作异常、信息泄露等问题承担 责任,但本公司将及时为您提供产品相关技术支持。
·使用本产品时,请您严格遵循适用的法律。
若本产品被用于侵犯第三方权利或其 他不当用途,本公司概不承担任何责任。
·如上述内容与适用的法律相冲突,则以法律规定为准。
. 3456外观介绍描述说明2安装 micro SD卡设备底部有micro SD卡槽,拧松卡盖螺丝,按照标识插入micro SD卡,拧紧卡盖螺丝,完成micro SD卡安装。
网络摄像机操作手册规范使用视频产品的倡议感谢您选择海康威视的产品。
随着科技进步,技术应用的影响涉及到我们生活的方方面面。
作为一家高科技公司,我们日益深刻地认识到科技在提升效率、改善生活品质方面的贡献,同时也认识到科技被不当使用也会带来伤害。
例如视频监控产品,因其能够录制真实、完整、清晰的影像,在回溯和还原事实方面具有突出的价值,然而对影像记录的不当传播、不当使用和不当加工等也可能产生侵犯他人合法权益的问题。
为了不断推进科技向善,海康威视倡议每一位用户善用科技、善用视频产品,不仅遵循法律法规等规范要求,也遵循道德风俗的约束,共同建立和维护我们良好的社会环境和氛围。
请您仔细阅读如下倡议:●每个人都拥有合理的隐私期待,视频类产品的安装不应违背一个正常人的合理隐私期待。
在公共场所安装视频监控类产品时,应当以合理有效的方式做出提示,明确监控区域;在非公共场所安装视频类产品时,不应当侵犯他人的权利和利益,包括但不限于不应当在未经利害关系人同意的情况下安装视频监控类产品、安装高隐蔽性的视频监控类产品。
●视频类产品使用期间,将在特定的条件下,对特定的时间和空间范围内真实活动进行记录,用户应当对自身在该特定范围内享有的权利进行合理界定,避免侵犯他人肖像、隐私或其他合法权利。
●视频类产品使用期间,将持续产生源于真实场景的视频影像数据,包括产生大量生物数据(如人脸数据),数据可被应用或再加工应用等。
视频类产品本身并不能对数据使用做出好坏善恶的识别和区分,数据使用的结果取决于数据控制者的使用方式、使用目的,数据控制者不仅应当遵循法律法规等规范性要求,也应当尊重国际惯例及本地常规、社会道德、公序良俗等非强制性要求,尊重个人的隐私、肖像及其他权利。
●鉴于视频类产品持续产生的视频影像数据承担有各利益相关方的权利保护要求、价值主张或其他诉求,保护产品不受侵入、保护数据的安全是至关重要的。
产品使用者、数据控制者应当采取合理必要的举措,从而保证数据安全,避免数据泄露、不当披露和使用,包括但不限于合理分配产品的使用与管理权限,结合产品的使用场景建立并不断优化产品所接入的互联网、局域网等各类网络的安全体系等。
网络摄像机操作手册V2.0.0杭州海康威视数字技术股份有限公司技术热线:400-700-59982011-3安全须知此内容的目的是确保用户正确使用本产品,以避免危险或财产损失。
在使用此产品之前,请认真阅读此说明手册并妥善保存以备日后参考。
如下所示,预防措施分为“警告”和“注意”两部分:警告:无视警告事项,可能会导致死亡或严重伤害。
警告事项提醒用户防范潜在的死亡或严重伤害危险。
注意事项提醒用户防范潜在的伤害或财产损失危险。
警告:1.请使用满足SELV(安全超低电压)要求的电源,并按照IEC60950-1符合Limited Power Source(有限电源)的额定电压为12V直流或24V交流电源(根据具体型号而定)供应。
2.如果设备工作不正常,请联系购买设备的商店或最近的服务中心,不要以任何方式拆卸或修改设备(未经许可的修改或维修所导致的问题,责任自负)。
3.为减少火灾或电击危险,请勿让本产品受到雨淋或受潮。
4.本安装应该由专业的服务人员进行,并符合当地法规规定。
5.应该在建筑物安装配线中组入易于使用的断电设备。
有关在天花板上安装设备的指示:安装后,请确保该连接至少可承受向下50牛顿(N)的拉力。
注意:1.在让摄像机运行之前,请检查供电电源是否正确。
2.请勿将此产品摔落地下或受强烈敲击。
3.请勿直接碰触到图像传感器光学元件,若有必要清洁,请将干净布用酒精稍微湿润,轻轻拭去尘污;当摄像机不使用时,请将防尘盖加上,以保护图像传感器。
4.避免对准强光(如灯光照明、太阳光等处)聚焦,否则容易引起过亮或拉光现象(这并非摄像机故障),也将影响图像传感其寿命。
5.激光束可能烧毁图像传感器,在激光装置被使用的情况下,请您一定注意不要让图像传感器的表面暴露于激光束之下。
6.避免置于潮湿,多尘,极热,极冷(正常工作温度:-10℃~+60℃),强电磁辐射等场所。
7.避免热量积蓄,请不要阻挡摄像机附近的通风。
8.使用时不可让水及任何液体流入摄像机。
海康威视网络摄像机操作手册V5.0.31.1 面板按键及指示灯说明前面板:1.3摇控器操作说明正确使用遥控器方法为:使用遥控器之前,请确认已经正确安装了电池。
在使用遥控器时,请把遥控器的红外发射端对准硬盘录像机的红外接收口,然后进行操作。
若无法操作,请进入“配置管理”→“通用配置”→“更多配置”查看该设备的设备编号(默认为255,若设备编号非255,请继续下面操作),然后在遥控器上按【设备】键,接着输入要操作的该硬盘录像机的设备编号,再按遥控器上的【确认】键,这时,如果硬盘录像机完全接收到遥控器命令,状态灯变为绿色(若设备号为255,则状态灯呈不亮状态),则可以使用遥控器对该硬盘录像机进行操作了。
在整个操作过程中,硬盘录像机面板及监视器上不会有任何提示信息。
若遥控器无法控制,请再次尝试:按【设备】键→输入设备编号→按【确认】键,若尝试多次还无法控制,请检查是否如下原因:1、检查电池的正负极性;2、检查电池电量是否用完;3、检查遥控传感器是否被遮挡;4、附近是否有荧光灯在使用。
排除以上情况后若不能正常工作,请更换遥控器;若还是不能正常工作,请联系供货商。
1.4 输入法说明1.5 菜单说明说明:在菜单中有4 个常用功能按钮,定义如下:1.6 开机和关机说明开机提醒:请确认接入的电压与硬盘录像机的要求相匹配,并保证硬盘录像机接地端接地良好。
在开机前请确保有一台显示器与后面板上的VGA 接口相连接,或在不连接VGA 接口的情况下有一台监视器与后面板上的VIDEO OUT 接口相连接,否则开机后将无法看到人机交互的任何提示,也无法操作菜单。
若前面板电源【开关键】指示灯不亮,请插上电源,打开电源开关,设备开始启动。
若前面板电源【开关键】指示灯呈红色,请轻按前面板电源【开关键】,设备开始启动。
设备启动后,电源【开关键】指示灯呈绿色。
监视器或显示器屏幕上将会出现开机画面。
关机正常关机通过菜单步骤:进入设备关机界面路径:主菜单→设备关机选择[设备关机],弹出提示框。
Network Video RecorderQuick Start GuideTABLE OF CONTENTSChapter1 Panels Description (8)1.1 Front Panel (8)1.2 Rear Panel (9)NVR-100H-D and NVR-100MH-D Series (9)NVR-100H-D/P and NVR-100MH-D/P Series (10)Chapter 2 Installation and Connections (11)2.1 NVR Installation (11)2.2 Hard Disk Installation (11)2.3 HDD Storage Calculation Chart (13)Chapter 3 Menu Operation (14)3.1 Startup and Shutdown (14)3.2 Activate Your Device (14)3.3 Set the Unlock Pattern for Login (15)3.4 User Login (16)3.5 Network Settings (16)3.6 Add IP Cameras (17)3.7 Live View (18)3.8 Recording Settings (18)3.9 Playback (19)Chapter 4 Accessing by Web Browser (21)Quick Start GuideCOPYRIGHT ©2019 Hangzhou Hikvision Digital Technology Co., Ltd.ALL RIGHTS RESERVED.Any and all information, including, among others, wordings, pictures, graphs are the properties of Hangzhou Hikvision Digital Technology Co., Ltd. or its subsidiaries (hereinafter referred to be “Hikvision”). This user manual (hereinafter referred to be “the Manual”) cannot be reproduced, changed, translated, or distributed, partially or wholly, by any means, without the prior written permission of Hikvision. Unless otherwise stipulated, Hikvision does not make any warranties, guarantees or representations, express or implied, regarding to the Manual.About this ManualThis Manual is applicable to Network Video Recorder (NVR).The Manual includes instructions for using and managing the product. Pictures, charts, images and all other information hereinafter are for description and explanation only. The information contained in the Manual is subject to change, without notice, due to firmware updates or other reasons. Please find the latest version in the company website (/en/).Please use this user manual under the guidance of professionals.Trademarks Acknowledgementand other Hikvision’s trademarks and logos are the properties of Hikvision in various jurisdictions. Other trademarks and logos mentioned below are the properties of their respective owners.The terms HDMI and HDMI High-Definition Multimedia Interface, and the HDMI Logoare trademarks or registered trademarks of HDMI Licensing Administrator, Inc. in the United States and other countries.Legal DisclaimerTO THE MAXIMUM EXTENT PERMITTED BY APPLICABLE LAW, THE PRODUCT DESCRIBED, WITH ITS HARDWARE, SOFTWARE AND FIRMWARE, IS PROVIDED “AS IS”, WITH ALL FAULTS AND ERRORS, AND HIKVISION MAKES NO WARRANTIES, EXPRESS OR IMPLIED, INCLUDING WITHOUT LIMITATION, MERCHANTABILITY, SATISFACTORY QUALITY, FITNESS FOR A PARTICULAR PURPOSE, AND NON-INFRINGEMENT OF THIRD PARTY. IN NO EVENT WILL HIKVISION, ITS DIRECTORS, OFFICERS, EMPLOYEES, OR AGENTS BE LIABLE TO YOU FOR ANY SPECIAL, CONSEQUENTIAL, INCIDENTAL, OR INDIRECT DAMAGES, INCLUDING, AMONG OTHERS, DAMAGES FOR LOSS OF BUSINESS PROFITS, BUSINESS INTERRUPTION, OR LOSS OF DATA OR DOCUMENTATION, IN CONNECTION WITH THE USE OF THIS PRODUCT, EVEN IF HIKVISION HAS BEEN ADVISED OF THE POSSIBILITY OF SUCH DAMAGES.REGARDING TO THE PRODUCT WITH INTERNET ACCESS, THE USE OF PRODUCT SHALL BE WHOLLY AT YOUR OWN RISKS. HIKVISION SHALL NOT TAKE ANY RESPONSIBILITES FOR ABNORMAL OPERATION, PRIVACY LEAKAGE OR OTHER DAMAGES RESULTING FROM CYBER ATTACK, HACKER ATTACK, VIRUS INSPECTION, OR OTHER INTERNET SECURITY RISKS; HOWEVER, HIKVISION WILL PROVIDE TIMELY TECHNICAL SUPPORT IF REQUIRED.SURVEILLANCE LAWS VARY BY JURISDICTION. PLEASE CHECK ALL RELEVANT LAWS IN YOUR JURISDICTION BEFORE USING THIS PRODUCT IN ORDER TO ENSURE THAT YOUR USE CONFORMSTHE APPLICABLE LAW. HIKVISION SHALL NOT BE LIABLE IN THE EVENT THAT THIS PRODUCT IS USED WITH ILLEGITIMATE PURPOSES.IN THE EVENT OF ANY CONFLICTS BETWEEN THIS MANUAL AND THE APPLICABLE LAW, THE LATER PREVAILS.Regulatory InformationFCC InformationPlease take attention that changes or modification not expressly approved by the party responsible for compliance could void the user’s authority to operate the equipment.FCC compliance: This equipment has been tested and found to comply with the limits for a Class A digital device, pursuant to part 15 of the FCC Rules. These limits are designed to provide reasonable protection against harmful interference when the equipment is operated in a commercial environment. This equipment generates, uses, and can radiate radio frequency energy and, if not installed and used in accordance with the instruction manual, may cause harmful interference to radio communications. Operation of this equipment in a residential area is likely to cause harmful interference in which case the user will be required to correct the interference at his own expense.FCC ConditionsThis device complies with part 15 of the FCC Rules. Operation is subject to the following two conditions:1. This device may not cause harmful interference.2. This device must accept any interference received, including interference that may cause undesired operation.EU Conformity StatementThis product and - if applicable - the supplied accessories too are marked with "CE" and comply therefore with the applicable harmonized European standards listed under the EMC Directive 2014/30/EU, the LVD Directive 2014/35/EU, the RoHS Directive 2011/65/EU.2012/19/EU (WEEE directive): Products marked with this symbol cannot be disposed of as unsorted municipal waste in the European Union. For proper recycling, return this product to your local supplier upon the purchase of equivalent new equipment, or dispose of it at designated collection points. For more information see: 2006/66/EC (battery directive): This product contains a battery that cannot be disposed of as unsorted municipal waste in the European Union. See the product documentation for specific battery information. The battery is marked with this symbol, which may include lettering to indicate cadmium (Cd), lead (Pb), or mercury (Hg). For proper recycling, return the battery to your supplier or to a designated collection point. For more information see: Industry Canada ICES-003 ComplianceThis device meets the CAN ICES-3 (A)/NMB-3(A) standards requirements.Applicable ModelsThis manual is applicable to the models listed in the following table.Series ModelNVR-100H-D NVR-104H-D NVR-108H-DNVR-100H-D/P NVR-104H-D/4P NVR-108H-D/8PNVR-100MH-D NVR-104MH-D NVR-108MH-DNVR-100MH-D/P NVR-104MH-D/4P NVR-108MH-D/8PSymbol ConventionsThe symbols that may be found in this document are defined as follows.Symbol DescriptionProvides additional information to emphasize or supplementimportant points of the main text.Indicates a potentially hazardous situation, which if not avoided,could result in equipment damage, data loss, performancedegradation, or unexpected results.Indicates a hazard with a high level of risk, which if not avoided, willresult in death or serious injury.Safety Instructions●Proper configuration of all passwords and other security settings is the responsibility of theinstaller and/or end-user.●In the use of the product, you must be in strict compliance with the electrical safetyregulations of the nation and region. Please refer to technical specifications for detailedinformation.●Input voltage should meet both the SELV (Safety Extra Low Voltage) and the Limited PowerSource with 100~240 VAC, 48 VDC or 12 VDC according to the IEC60950-1 standard. Please refer to technical specifications for detailed information.●Do not connect several devices to one power adapter as adapter overload may causeover-heating or a fire hazard.●Please make sure that the plug is firmly connected to the power socket.●If smoke, odor or noise rise from the device, turn off the power at once and unplug the powercable, and then please contact the service center.●If the POE ports of device do not comply with Limited Power Source, the additional equipmentconnected to POE ports shall have fire enclosure.●The USB interface of the /P devices can be connected with the mouse and U-flash disk storagedevice only.Preventive and Cautionary TipsBefore connecting and operating your device, please be advised of the following tips:●Ensure unit is installed in a well-ventilated, dust-free environment.●Unit is designed for indoor use only.●Keep all liquids away from the device.●Ensure environmental conditions meet factory specifications.●Ensure unit is properly secured to a rack or shelf. Major shocks or jolts to the unit as a result ofdropping it may cause damage to the sensitive electronics within the unit.●Use the device in conjunction with an UPS if possible.●Power down the unit before connecting and disconnecting accessories and peripherals.● A factory recommended HDD should be used for this device.●Improper use or replacement of the battery may result in hazard of explosion. Replace withthe same or equivalent type only. Dispose of used batteries according to the instructionsprovided by the battery manufacturer.Power Supply InstructionsUse only power supplies listed in the user instructions.NVR Models Standard Power Supply Models ManufacturerNVR-104H-D NVR-108H-D NVR-104MH-D NVR-108MH-D EuropeanMSA-C1500IC12.0-18P-DE MOSO Power Supply Technology Co., LtdADS-26FSG-12 12018EPG Shenzhen HONOR Electronic Co., LtdKL-AD3060VA Xiamen Keli Electronics Co., LtdKPD-018-VI Channel Well Technology Co., Ltd BritishADS-25FSG-12 12018GPB Shenzhen HONOR Electronic Co., LtdMSA-C1500IC12.0-18P-GB MOSO Power Supply Technology Co., LtdADS-26FSG-12 12018EPB Shenzhen HONOR Electronic Co., LtdNVR-104H-D/4PNVR-108H-D/8P NVR-104MH-D/4P NVR-108MH-D/8P UniversalMSP-Z1360IC48.0-65W MOSO Power Supply Technology Co., LtdMSA-Z1040IS48.0-65W-Q MOSO Power Supply Technology Co., LtdMSA-Z1360IS48.0-65W-QMOSO Power Supply Technology Co., Ltd●The power supplies list above is for EU countries only.●The power supplies list is subject to change without prior notice.Chapter1 Panels Description 1.1 Front PanelFigure 1-1NVR-100H-D (/P) SeriesFigure 1-2NVR-100MH-D (/P) SeriesTable 1-1Description of Front Panel No. Icon Description1 Indicator turns red when NVR is powered up.2 Indicator lights in red when data is being read from or written to HDD.3 Indicator blinks blue when network connection is functioning properly.1.2 Rear PanelNVR-100H-D and NVR-100MH-D SeriesFigure 1-3NVR-100H-D Rear PanelFigure 1-4NVR-100MH-D Rear PanelNo. Item Description1 Power Supply 12 VDC power supply.2 VGA Interface DB9 connector for VGA output. Display local videooutput and menu.3 HDMI Interface HDMI video output connector.4 USB Interface Universal Serial Bus (USB) ports for additional devicessuch as USB mouse and USB Hard Disk Drive (HDD).5 LAN Network Interface 10/100 Mbps self-adaptive Ethernet interface.6 Ground Ground (needs to be connected when NVR starts up).NVR-100H-D/P and NVR-100MH-D/P SeriesFigure 1-5NVR-100H-D/P Rear PanelFigure 1-6NVR-100MH-D/P Rear PanelTable 1-3Description of Rear Panel No. Item Description1 Power Supply 12 VDC power supply.2 VGA Interface DB9 connector for VGA output. Display local videooutput and menu.3 HDMI Interface HDMI video output connector.4 USB Interface Universal Serial Bus (USB) ports for additional devicessuch as USB mouse and USB Hard Disk Drive (HDD).5 LAN Network Interface 10/100 Mbps self-adaptive Ethernet interface.6 Ground Ground (needs to be connected when NVR starts up).7 Network Interfaces withPoE functionNetwork interfaces for the cameras and to providepower over Ethernet.4 interfaces for /4P models and 8 interfaces for /8Pmodels.Chapter 2 Installation and Connections2.1 NVR InstallationDuring installation of the NVR:●Use brackets for rack mounting.●Ensure ample room for audio and video cables.●When routing cables, ensure that the bend radius of the cables are no less than five times thanits diameter.●Connect the alarm cable.●Allow at least 2cm (≈0.75-inch) of space between racks mounted devices.●Ensure the NVR is grounded.●Environmental temperature should be within the range of -10 to +55º C, +14 to +131º F.●Environmental humidity should be within the range of 10% to 90%.2.2 Hard Disk InstallationBefore you start:Disconnect the power from the NVR before installing a hard disk drive (HDD). A factory recommended HDD should be used for this installation.Tools Required: Screwdriver.Step 1Remove the cover from the device by unfastening the screws on the bottom.Figure 2-1Remove the CoverStep 2Place the HDD on the bottom of the device and then fasten the screws on the bottom to fix the HDD.Figure 2-2Fix the HDDStep 3Connect one end of the data cable to the motherboard of NVR and the other end to the HDD.Step 4Connect the power cable to the HDD.Figure 2-3Connect CablesStep 5Re-install the cover of the NVR and fasten screws.2.3 HDD Storage Calculation ChartThe following chart shows an estimation of storage space used based on recording at one channel for an hour at a fixed bit rate.Bit Rate Storage Used96K42M128K56M160K70M192K84M224K98M256K112M320K140M384K168M448K196M512K225M640K281M768K337M896K393M1024K450M1280K562M1536K675M1792K787M2048K900M4096K 1.8G8192K 3.6G16384K 7.2GPlease note that supplied values for storage space used is just for reference. The storage values in the chart are estimated by formulas and may have some deviation from actual value.Chapter 3 Menu Operation3.1 Startup and ShutdownProper startup and shutdown procedures are crucial to expanding the life of the NVR.To start your NVR:Step 1Check the power supply is plugged into an electrical outlet. It is HIGHLY recommended that an Uninterruptible Power Supply (UPS) be used in conjunction with the device. The Powerbutton) on the front panel should be red, indicating the device is receiving the power.Step 2Press the power switch on the panel. The Power LED should turn blue. The unit will begin to start.After the device starts up, the wizard will guide you through the initial settings, including modifying password, date and time settings, network settings, HDD initializing, and recording.To shut down the NVR:Step 1Go to Menu > Shutdown.Figure 3-1ShutdownStep 2Select Shutdown.Step 3Click Yes.3.2 Activate Your DevicePurpose:For the first-time access, you need to activate the device by setting an admin password. No operation is allowed before activation. You can also activate the device via Web Browser, SADP or client software.Step 1Input the same password in Create New Password and Confirm New Password.Step 2(Optional) Use customized password to activate and add network camera(s) connected to the device.1)Uncheck Use Channel Default Password.2)Enter a password in IP Camera Activation.Figure 3-2Set Admin PasswordSTRONG PASSWORD RECOMMENDED–We highly recommend you create a strong password of your own choosing (Using a minimum of 8 characters, including at least three of the following categories: upper case letters, lower case letters, numbers, and special characters.) in order to increase the security of your product. And we recommend you reset your password regularly, especially in the high security system, resetting the password monthly or weekly can better protect your product.Step 3Click OK.3.3 Set the Unlock Pattern for LoginAdmin can use the unlock pattern for device login.For devices with PoE function, you can draw the device unlock pattern after activation. For other devices, the unlock pattern interface will show after the first-time login.Step 1Use the mouse to draw a pattern among the 9 dots on the screen. Release the mouse when the pattern is done.Figure 3-3Draw the Pattern●Connect at least 4 dots to draw the pattern.●Each dot can be connected for once only.Step 2Draw the same pattern again to confirm it. When the two patterns match, the pattern is configured successfully.3.4 User LoginPurpose:If NVR has logged out, you must login the device before operating the menu and other functions. Step 1Select the User Name in the dropdown list.Figure 3-4LoginStep 2Input Password.Step 3Click OK.In the Login dialog box, if you enter the wrong password 7 times, the current user account will be locked for 60 seconds.3.5 Network SettingsPurpose:Network settings must be properly configured before you operate NVR over network.Step 1Enter the general network settings interface.Menu > Configuration > Network > GeneralFigure 3-5Network SettingsStep 2Configure the following settings: NIC Type, IPv4 Address, IPv4 Gateway, MTU and DNS Server.Step 3If the DHCP server is available, you can check the checkbox of DHCP to automatically obtain an IP address and other network settings from that server.Step 4Click Apply.3.6 Add IP CamerasPurpose:Before you can get live video or record the video files, you should add the network cameras to the connection list of the device.Before you start:Ensure the network connection is valid and correct, and the IP camera to add has already been activated. Please refer to the User Manual for activating the inactive IP camera.You can select one of the following three options to add the IP camera.OPTION 1:Step 1Click to select an idle window in the live view mode.Step 2Click in the center of the window to pop up the Add IP Camera interface.Figure 3-6Add IP CameraStep 3Select the detected IP camera and click Add to add it directly, and you can click Search to refresh the online IP camera manually.Or you can choose to custom add the IP camera by editing the parameters in thecorresponding text field and then click Add to add it.3.7 Live ViewIcons are provided on screen in Live View mode to indicate camera status. These icons include: Live View IconsIn the live view mode, there are icons at the upper-right corner of the screen for each channel, showing the status of the record and alarm in the channel for quick reference.Alarm (video loss, tampering, motion detection, VCA or sensor alarm)Record (manual record, continuous record, motion detection, VCA or alarm triggered record)Alarm and RecordEvent/Exception (event and exception information, appears at the lower-left corner of the screen.)3.8 Recording SettingsBefore you start:Make sure that the disk has already been installed. If not, please install a disk and initialize it. You may refer to the user manual for detailed information.Purpose:Two kinds of record types are introduced in the following section, including Instant Record andAll-day Record. And for other record types, you may refer to the user manual for detailed information.After rebooting all the manual records enabled are canceled.Step 1On the live view window, right lick the window and move the cursor to the Start Recording option, and select Continuous Record or Motion Detection Record on your demand.Figure 3-7Start Recording from Right-click MenuStep 2Click Yes in the pop-up Attention message box to confirm the settings. All the channels will start to record in the selected mode.3.9 PlaybackThe recorded video files on the hard disk can be played back in the following modes: instant playback, all-day playback for the specified channel, and playback bynormal/event/smart/tag/sub-periods/external file search.Step 1Enter playback interface.Click Menu > Playback or from the right-click menuStep 2Check the checkbox of channel(s) in the channel list and then double-click to select a date on the calendar.Step 3You can use the toolbar in the bottom part of Playback interface to control playing progress.Figure 3-8 Playback InterfaceStep 4 Select the channel(s) to or execute simultaneous playback of multiple channels.Chapter 4 Accessing by Web BrowserYou shall acknowledge that the use of the product with Internet access might be under network security risks. For avoidance of any network attacks and information leakage, please strengthen your own protection. If the product does not work properly, please contact with your dealer or the nearest service center.Purpose:You can get access to the device via web browser. You may use one of the following listed web browsers: Internet Explorer 6.0, Internet Explorer 7.0, Internet Explorer 8.0, Internet Explorer 9.0, Internet Explorer 10.0, Internet Explorer 11.0, Apple Safari, Mozilla Firefox, and Google Chrome. The supported resolutions include 1024*768 and above.Step 1Open web browser, input the IP address of the device and then press Enter.Step 2Login to the device.If the device has not been activated, you need to activate the device first before login.Figure 4-1Set Admin Password1)Set the password for the admin user account.2)Click OK.STRONG PASSWORD RECOMMENDED–We highly recommend you create a strong password of your own choosing (using a minimum of 8 characters, including upper case letters, lower case letters, numbers, and special characters) in order to increase the security of your product. And we recommend you reset your password regularly, especially in the high security system, resetting the password monthly or weekly can better protect your product.If the device is already activated, enter the user name and password in the login interface, and click Login.Figure 4-2LoginStep 3Install the plug-in before viewing the live video and managing the camera. Please follow the installation prompts to install the plug-in.You may have to close the web browser to finish the installation of the plug-in.After login, you can perform the operation and configuration of the device, including the live view, playback, log search, configuration, etc.03041041090702。
网络摄像机操作手册V2.0.0 杭州海康威视数字技术股份有限公司技术热线:400-700-59982011-3安全须知此内容的目的是确保用户正确使用本产品,以避免危险或财产损失。
在使用此产品之前,请认真阅读此说明手册并妥善保存以备日后参考。
如下所示,预防措施分为“警告”和“注意”两部分:警告:无视警告事项,可能会导致死亡或严重伤害。
注意:无视注意事项,可能会导致伤害或财产损失。
警告事项提醒用户防范潜在的死亡或严重伤害危险。
注意事项提醒用户防范潜在的伤害或财产损失危险。
警告:1.请使用满足SELV(安全超低电压)要求的电源,并按照IEC60950-1符合LimitedPowerSource(有限电源)的额定电压为12V直流或24V交流电源(根据具体型号而定)供应。
2.如果设备工作不正常,请联系购买设备的商店或最近的服务中心,不要以任何方式拆卸或修改设备(未经许可的修改或维修所导致的问题,责任自负)。
3.为减少火灾或电击危险,请勿让本产品受到雨淋或受潮。
4.本安装应该由专业的服务人员进行,并符合当地法规规定。
5.应该在建筑物安装配线中组入易于使用的断电设备。
有关在天花板上安装设备的指示:安装后,请确保该连接至少可承受向下50牛顿(N)的拉力。
注意:1.在让摄像机运行之前,请检查供电电源是否正确。
2.请勿将此产品摔落地下或受强烈敲击。
3.请勿直接碰触到图像传感器光学元件,若有必要清洁,请将干净布用酒精稍微湿润,轻轻拭去尘污;当摄像机不使用时,请将防尘盖加上,以保护图像传感器。
4.避免对准强光(如灯光照明、太阳光等处)聚焦,否则容易引起过亮或拉光现象(这并非摄像机故障),也将影响图像传感其寿命。
5.激光束可能烧毁图像传感器,在激光装置被使用的情况下,请您一定注意不要让图像传感器的表面暴露于激光束之下。
6.避免置于潮湿,多尘,极热,极冷(正常工作温度:-10℃~+60℃),强电磁辐射等场所。
7.避免热量积蓄,请不要阻挡摄像机附近的通风。