联想-S6000-用户手册
- 格式:pdf
- 大小:22.29 MB
- 文档页数:16
Corporate MarketsBefore you beginEnsure your browser is compatible. Check your current browser by going to the website: Supported browsers are:To attend and vote you must have your securityholder number and postcode.Appointed Proxy: Your proxy number will be provided by Link before the meeting.Please make sure you have this information before proceeding.Virtual Meeting Online Guide•Chrome – Version 44 & 45 and after •Firefox – 40.0.2 and after•Safari – OS X v10.9 & OS X v10.10 and after •Internet Explorer – 11 and up •Microsoft Edge – 92.0 and afterVirtual Meeting Online GuideStep 1Open your web browser and go to https://meetings.link Step 2Log in to the portal using your full name, mobile number, email address, and participant type.Please read and accept the terms and conditions clicking on the blue ‘Register and Watch button.On the left – a live webcast of the MeetingFull VotesTo submit a full vote on a resolution ensure you are in the‘Full Vote’ tab. Place your vote by clicking on the ‘For’, ‘Against’,or ‘Abstain’ voting buttons.Partial VotesTo submit a partial vote on a resolution ensure you are in the‘Partial Vote’ tab. You can enter the number of votes (for any or all)resolution/s. The total amount of votes that you are entitled to vote forwill be listed under each resolution. When you enter the numberof votes it will automatically tally how many votes you have left.Note: If you are submitting a partial vote and do not use all of your entitled votes, theun-voted portion will be submitted as No Instruction and therefore will not be counted.Once you have finished voting on the resolutions scroll down tothe bottom of the box and click on the ‘Submit Vote’ or‘Submit Partial Vote’ button.Note: You can close your voting card without submitting your vote at any time while voting remains open. Any votes you have already made will be saved for the next time you open up the voting card. The voting card will appear on the bottom left corner of the webpage. The message ‘Not yet submitted’ will appear at the bottom of the page.You can edit your voting card at any point while voting is open by clicking on ‘Edit Card’. This will reopen the voting card with any previous votes made.At the conclusion of the Meeting a red bar with a countdown timer will appear at the top of the Webcast and Slide windows advising the remaining voting time. Please make any changes and submit your voting cards.Once voting has been closed all submitted voting cards cannot be changed.2.How to ask a questionNote: Only verified S ecurityholders , Proxyholders and Company Representatives are eligible to ask questions.If you have yet to obtain a voting card, you will prompted to enter your securityholder number or proxy details before you can ask a question. To ask a question, click on the ‘Ask a Question’ button either at the top or bottom of the webpage.The ‘Ask a Question’ box will then pop up withtwo sections for completion.In the ‘Regarding’ section click on the drop down arrow and select the category/resolution for your question.Click in the ‘Question’ section and type your question and click on ‘Submit’.A ‘View Questions’ box will appear where you can view your questions at any point. Only you can see the questions you have asked.The Chairman will provide shareholders with areasonable opportunity to ask relevant questions or make relevant comments as each item of business is considered. Please note that where similarquestions are received from different shareholders, the Chairman will provide a single response, in orderto streamline the conduct of the AGM.3.DownloadsView relevant documentation in the Downloads section.4.Voting closingVoting will end 5 minutes after the close of the Meeting.At the conclusion of the Meeting a red bar with acountdown timer will appear at the top of the Webcast and Slide screens advising the remaining voting time. If you have not submitted your vote, you should do so now.Virtual Meeting Online Guidecontinued5. Optional questions and comments phone linea)Land line or mobile phoneb)The name and securityholder number of your holding/s c) T o obtain your unique PIN , please contact Link Market Services on 1800 990 363 (inside Australia) or +61 1800 990 363 (outsideAustralia) by Wednesday , 21 September 2022Joining the Meeting via PhoneStep 1From your land line or mobile device, call 1800 941 125 (inside Australia) or +61 2 9189 8865 (outside Australia)Step 2You will be greeted with a welcome message and provided with instructions on how to participate in the Meeting. Please listen to the instructions carefully.At the end of the welcome message you will be asked to provide your PIN by the moderator. This will verify you as a securityholder and allow you to ask a question or make a comment on the resolutions at the Meeting. Step 3Once the moderator has verified your details you will be placed into a waiting room where you will hear music playing.Step 4At the commencement of the Meeting, you will beadmitted to the Meeting where you will be able to listen to proceedings.Contact usAustraliaT +61 1800 990 363Asking a q uestion or making a commentStep 1When the Chairman calls for questions or comments on each item of business , press *1 on your keypad for the item of business that your questions or comments relates to. I f at any time you no longer wish to ask a question or make a comment, you can lower your hand by pressing *2 on your keypad.Step 2When it is time to ask your question or make your comment, the moderator will introduce you to the meeting. Your line will be unmuted and you will beprompted to speak. If you have also joined the Meeting online, please mute your laptop, desktop, tablet or mobile device before you speak to avoid technical difficulties for you and other shareholders .Step 3Your line will be muted once your question or comment has been asked / responded toWhat you will needFor shareholders or proxyholders who wish to ask their question or make their comment orally rather than via the online AGM platform, a questions and comments phone line will be available during the AGM。
目录 i目录重要安全信息 (1)需要立即采取措施的情况 (1)安全通则 (2)选择工作环境 (12)附录A 有限保证/保修 (15)附录B 声明 (17)免责声明 (17)商标和版权 (17)附录C 有毒有害物质或元素声明................................................18ii 目录标志解释欢迎您使用联想产品。
本手册的用途在于帮助您正确地使用本产品,在第一次安装和使用本产品之前,请您务必先仔细阅读随机配送的所有资料,特别是本手册中安全信息及其他条款所提及的注意事项。
这会有助于您更好地使用本产品。
重要安全信息 1重要安全信息这些信息可以帮助您安全地使用台式计算机或笔记本电脑。
请遵循并保留计算机附带的所有信息。
本文档中的信息并不改变购买协议或 Lenovo™有限保证声明的条款。
客户的安全至关重要。
我们开发产品的目标是既安全又有效。
但个人计算机是电子设备。
电源线、电源适配器以及其他功能部件会引起潜在的安全危险,造成人身伤害或财产损失,在使用不当的情况下更是如此。
为减少这些危险,请按照产品随附的说明操作,遵守产品和操作说明中的所有警告并仔细阅读本文档中包含的信息。
严格按照本文档中包含的和随产品提供的信息操作有助于规避危险,建立一个更安全的计算机工作环境。
需要立即采取措施的情况因使用不当或疏忽可能会损坏产品。
有些产品的损坏情况相当严重,必须先由经过授权的维修人员检查(如有必要,则进行维修)才能重新使用。
与其他任何电子设备一样,开启产品时要特别小心。
在极少数情况下,可能会发现机器中散发出异味或者冒出烟雾或火花。
或者可能会听到类似爆裂、破裂或嘶嘶的声音。
这些情况可能只表示内部电子元件已经不安全或失控。
也可能表示存在安全隐患。
但是,请勿自行贸然采取措施或尝试诊2重要安全信息断这些情况。
请联系客户支持中心寻求进一步的指导。
请经常检查计算机及其组件是否有受损、磨损或危险迹象。

联想家用电脑用户手册天骄S系列V2.0联想(北京)有限公司本手册提及的其他产品的注册商标归其相应公司所有。
版权所有,翻版必究。
本手册受到著作权法的保护,其任何部分未经联想(北京)有限公司书面许可,不准以任何方式对本手册的任何部分进行复制或抄袭。
是英特尔公司注册商标是微软公司注册商标。
通告通告是微软公司Windows XP 注册商标。
声明欢迎您使用联想电脑。
在第一次安装和使用电脑之前,请务必仔细阅读随机配送的所有资料,这会有助于您更好地使用电脑。
如果您未按本手册的要求操作电脑而由此引起的任何损失(包括对本手册误读而引起的误操作),联想(北京)有限公司将不承担责任。
但由联想专业维修人员进行安装或操作的除外。
所购电脑配备的随机软硬件以该电脑实际配备为准。
用户手册中的内容,如有变动,恕不另行通知。
如果您对本手册未提出书面异议,则表明您接受了上述条件。
使用电脑过程中,如遇什么问题,请拨阳光咨询电话:************阳光报修电话:800-810-888824小时E-mail技术支持:通过发送电子邮件,工程师会在24小时内予以回复。
声明警告:对中度危险要警惕注意:对轻微危险要关注建议:有益的提示标志解释危险:对高度危险要警惕禁止:危险的操作目录-1目录注意事项1第1章 功能列表1-1第2章 部件概览与连接2-1 2.1 部件概览2-2 2.1.1 主机2-2 2.1.2 显示器 2-8 2.1.3 键盘和遥控器 2-9 2.1.4 音箱 2-10 2.2 部件连接 2-11 2.2.1 显示器连接 2-11 2.2.2 音箱连接 2-12 2.2.3 键盘、鼠标连接 2-13 2.2.4 电话线、上网线、电源线连接 2-14第3章 基础使用3-1 3.1 电脑的开启和关闭3-1 3.1.1 数码家电开启和关闭3-1 3.1.2 Windows XP 的开启和关闭3-2 3.2 输入工具的使用3-3 3.2.1 鼠标使用3-3 3.2.2 键盘使用3-5 3.3 汉字输入3-8 3.4 Windows XP 基本使用3-9 3.4.1 Windows XP 桌面3-9 3.4.2 窗口操作3-12 3.4.3 文件与文件夹3-14-2 3.4.4 Windows XP 帮助获取3-173.5 遥控器的使用3-18第4章幸福之家4-1 4.1 幸福之家简介4-1 4.2 幸福导航4-2 4.3 幸福飞梭4-3 4.4 幸福之家的安装与卸载4-5第5章数码家电5-1 5.1 遥控器的使用5-1 5.2 影碟播放5-2 5.2.1 功能简介5-2 5.2.2 操作步骤5-35.3 音乐播放5-7 5.3.1 功能介绍5-7 5.3.2 操作步骤5-75.4 照片浏览5-9 5.4.1 功能介绍5-9 5.4.2 操作步骤5-95.5 电视播放5-12 5.5.1 常用功能操作方法5-12 5.5.2 菜单说明5-14第6章幸福梦工厂6-1 6.1 数码平台6-1 6.2 幸福相册6-2 6.2.1 界面简介6-3 6.2.2 使用方法6-46.3 幸福音乐6-10 6.3.1 界面简介6-11 6.3.2 使用方法6-12目录目录-36.4 幸福影视6-17 6.4.1 界面简介6-17 6.4.2 使用方法6-19 6.5 幸福电视6-24 6.5.1 收看电视6-24 6.5.2 频道设置6-25 6.5.3 设置6-28 6.5.4 效果调整6-29 6.5.5 拍照6-30 6.5.6 手动录制6-30 6.5.7 延时播放6-31 6.5.8 定时录制6-32 6.5.9 我的电影6-34 6.5.10 遥控器的使用6-35第7章 上网部分7-1 7.1 连接与拨号7-1 7.1.1 连接的初始配置7-1 7.1.2 拨号上网7-4 7.2 网页浏览7-5 7.2.1 IE 浏览器的设置7-5 7.2.2 IE 浏览器介绍7-6 7.3 幸福网吧7-10 7.3.1 浏览网页7-10 7.3.2 收发邮件7-12 7.3.3 文件下载7-14第8章 其他软件的使用8-1 8.1 WinDVD/WinVCD 播放器8-1 8.1.1 安装与卸载8-1 8.1.2 使用方法8-3-4 8.2 刻录软件8-6 8.2.1 安装与卸载8-6 8.2.2 NERO Express的刻录功能8-7 8.2.3 NERO Express的复制功能8-10 8.2.4 NERO的刻录功能8-11 8.2.5 NERO的复制功能8-14 8.2.6 NERO Express与NERO之间的切换8-17 8.2.7 关于联机帮助8-178.3 杀毒软件8-18 8.3.1 安装与卸载8-18 8.3.2 诺顿的使用8-19 8.3.3 在线更新病毒特征库8-21 8.3.4 关于联机帮助8-228.4 办公软件WPS Office8-23 8.4.1 启动WPS Office8-23 8.4.2 界面简介8-23 8.4.3 WPS Office的简单操作8-25第9章外接设备9-1 9.1 打印机9-1 9.2 扫描仪9-1 9.3 联想魔盘9-2第10章自助维护10-1 10.1 智能修复10-1 10.1.1 驱动恢复10-2 10.1.2 应用修复10-3 10.1.3 一键恢复10-410.2 日常维护10-11 10.2.1 部件维护10-11 10.2.2 性能维护10-11 10.2.3 电脑病毒及预防10-13目录目录-5第11章 操作系统的恢复11-1第12章 常见问题解答12-112.1 显示12-112.2 声音12-212.3 鼠标和遥控器12-312.4 光驱和软驱12-312.5 上网12-412.6 Windows XP 操作系统12-712.7 病毒问题12-912.8 幸福之家12-912.9 其他12-9第13章 词汇表13-1阳光服务1请勿与其他大功率家电共用电源插座电脑与其他大功率的家用电器共用一个电源插座,造成的电压不稳会损坏电脑或破坏数据文件。

服务分区特殊说明联想教育应用方案注意事项第1章联想教育应用方案功能简介总体安装说明第2章联想教育应用的首次部署安装前的准备第一次布署的简要步骤硬盘保护系统的安装与部署网络同传的使用第3章联想教育应用的日常维护与使用硬盘保护的管理员菜单网络同传的使用第4章网络控制工具的使用概述功能特性安装与使用保护与同传图标显示列表资产管理网络管理应用设置本机操作常用操作第5章常见的问题与解答服务分区特殊说明硬盘保护,网络同传等教育应用所需的文件和相关数据保存在服务分区中,请不要删除此分区,否则将造成硬盘保护系统无法正常使用。
注意1. 您在安装Windows操作系统过程中,如果看到有已经存在的分区(即服务分区),请不要删除此分区。
2. 硬盘保护,网络同传等教育应用所需的文件和相关数据保存在服务分区中,如果服务分区被非联想维修人员所进行的操作删除或损坏,联想(北京)有限公司将不对由此而导致的任何损失承担责任,联想的服务及责任以联想产品随机文件所做出的服务承诺为准。
联想教育应用方案注意事项1. 每个系统不能超过8个分区:在硬盘保护分区设置过程中,每个系统包含的分区数不能超过8个(包括系统分区,共享数据区和专属数据区),否则可能影响网络同传的使用。
2. 硬盘每个分区的划分,请将容量控制在500MB到200GB之间。
3. 请您安装完操作系统、硬件驱动程序后立即安装“EDU驱动安装包”并重新启动计算机,然后再进行软件的安装,所有安装请在开放模式下进行。
第1章联想教育应用方案功能简介联想教育应用方案是专门为电子教室、网吧等公共机房环境设计开发的,包括硬盘分区管理、硬盘数据保护、CMOS参数保护、网络唤醒、IP分配、网络分组同传、智能同传、智能排程、断电同传以及机房网络管理控制等一系列重要功能,重点解决机房管理员如何快速方便地给机房中的所有计算机安装操作系统、驱动程序和应用软件的问题,以及解决如何快速清除计算机的前一个用户的操作,实现下一个用户使用同一台计算机初始用户环境的问题。

联想笔记本BIOS设置手册联想IBMThinkPad笔记本BIOS设置手册(设置BIOS里面的参数按F2设置开机启动项直接F12)一、Config——根本设置选项work(1)WakeOnLAN当以太网控制器接收到远程唤醒数据包时,让系统开机。
注:假如设置有硬盘密码,WakeOnLAN功能将不起作用。
(建议关闭)[Enabled](2)FlashOverLAN(Enabled)-----使计算机的BIOS能够通过活动的网络联接进行更新(刷新)。
(建议关闭)[Enabled](3)EthernetLANOptionROM----装入EthernetLANOptionROM可以从集成的网络设备启动。
(以太网卡的一个特殊功能,默认即可)[Enabled](4)HarddriveDirectMemoryAccess(DMA)-----磁盘高速缓存。
假如您要使用以前版本的IBM远程部署管理器(RDM)请禁用该功能。
假如禁用了它,在网络疏导中,硬盘驱动器的性能可能会降低。
[Enabled](5)WirelessLANRadioFrequency-----无线网卡广播同。
选择“On”,开启内部无线通信。
选择“Off”,关闭内部无线通信。
[On]2.SerialPort-----假如要启动串口,请选择Enabled。
BaseI/Oaddress和Interrupt 使用默认设置就可以使用。
假如以其他硬件有冲突,可以自行更改。
Disabled则禁止这项功能。
[Disabled][BaseI/Oaddress:3F8][Interrupt:4]3.Paralletport-----启动并口(打印口)。
假如启用该功能,那么可以选择方式、根本I/O地址、IRQ和DMA。
只有在选择了ECP后才可以选择DMA。
假如根本I/O 地址为3BC,那么无法使用EPP方式。
[Enabled][Mode:Bi-directional][BaseI/Oaddress:3BC][Interrupt:IRQ7][DMA:D MA]4.PCI[AutoSelect11]这项中可以设置PCI的中断地址。

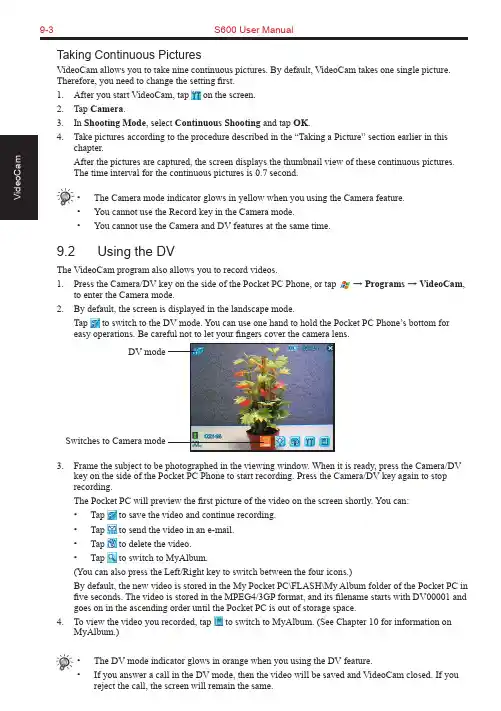
9-3S600 User ManualTaking Continuous PicturesVideoCam allows you to take nine continuous pictures. By default, VideoCam takes one single picture. Therefore, you need to change the setting first.1. After you start VideoCam, tap on the screen.2. Tap Camera.3. In Shooting Mode, select Continuous Shooting and tap OK.4. Take pictures according to the procedure described in the “Taking a Picture” section earlier in thischapter.After the pictures are captured, the screen displays the thumbnail view of these continuous pictures.The time interval for the continuous pictures is 0.7 second.• The Camera mode indicator glows in yellow when you using the Camera feature.• You cannot use the Record key in the Camera mode.• You cannot use the Camera and DV features at the same time.9.2 Using the DVThe VideoCam program also allows you to record videos.1. Press the Camera/DV key on the side of the Pocket PC Phone, or tap → Programs → VideoCam,to enter the Camera mode.2. By default, the screen is displayed in the landscape mode.Tap to switch to the DV mode. You can use one hand to hold the Pocket PC Phone’s bottom foreasy operations. Be careful not to let your fingers cover the camera lens.3. Frame the subject to be photographed in the viewing window. When it is ready, press the Camera/DVkey on the side of the Pocket PC Phone to start recording. Press the Camera/DV key again to stop recording.The Pocket PC will preview the first picture of the video on the screen shortly. You can:• Tap to save the video and continue recording.• Tap to send the video in an e-mail.• Tap to delete the video.• Tap to switch to MyAlbum.(You can also press the Left/Right key to switch between the four icons.)By default, the new video is stored in the My Pocket PC\FLASH\My Album folder of the Pocket PC in five seconds. The video is stored in the MPEG4/3GP format, and its filename starts with DV00001 and goes on in the ascending order until the Pocket PC is out of storage space.4. To view the video you recorded, tap to switch to MyAlbum. (See Chapter 10 for information onMyAlbum.)• The DV mode indicator glows in orange when you using the DV feature.• If you answer a call in the DV mode, then the video will be saved and VideoCam closed. If youreject the call, the screen will remain the same.DV modeSwitches to Camera modeS600 User Manual 9-49.3 Changing VideoCam Settings In the Camera/DV mode, you can tap on the screen to access the setting items.Standard SettingsOn the Setting screen, tap Standard .ItemDescription Backlight for PreviewSets whether to turn on the backlight for picture/video preview.Preview Image or VideoSets whether to keep the preview for five seconds before the next shooting.Glitter Frequency While using VideoCam, please setup Glitter Frequency according to your environment for improving the preview quality of the VideoCam.Camera SettingsOn the Setting screen, tap Camera .ItemDescription Scene ModeSelects the desired scene mode: Standard, Nightshot, Portrait, Grayscale, Sepia, or Document.ResolutionSelects the desired image resolution: 1280*1024 (High), 640*480 (Normal), 320*240 (Basic), or 176*144 (Compact).Self-TimerSets the time lag between releasing the shutter and shooting the picture. The options are 5 sec, 10 sec or 15 sec.FlashTurns on or off the flash.White BalanceChanges the setting for white balance.Shooting ModeSelects the single or continuous shooting.Filename recountResets the filename counter, starting from DSC00001.FolderSelects the storage location for the picture.9-5S600 User ManualDigital Video SettingsOn the Setting screen, tap Digital Video.Item DescriptionScene Mode Selects the desired scene mode: Standard, Nightshot, Grayscale or Sepia. Resolution Selects the desired image resolution: Large, High Quality; Large, Long Time;Small, High Quality; Small, Long Time.Self-Timer Sets the time lag between releasing the shutter and shooting the picture. Theoptions are 5 sec, 10 sec or 15 sec.Format Selects the desired video format: MP4:MPEG4+ACC, MP4:MPEG4+AMR,3GP:MPEG4+AMR, or 3GP:H.263+AMR.Silent Shooting Allows you to record only images without sounds.Filename recount Resets the filename counter, starting from DV00001.Image size setting Allows you to set the size limit for recorded videos.FolderSelects the storage location for the videos.Chapter 10Using MyAlbum10.1 Starting MyAlbum10.2 Opening a Picture or Video10.3 Editing Pictures10.4 Using the FaceMagic Feature10.5 Using Effects10.6 Tools Options10.7 View Modes10-2S600 User Manual10.1 Starting MyAlbumThe MyAlbum program is very useful for viewing picture and video files. The supported formats include: .bmp, .png, .wpng, .jpeg, .gif, .3gp and .mpeg4.To start MyAlbum, you can:⏹ Tap → Programs → MyAlbum .⏹ Tap in the Camera/DV mode.The startup screen of MyAlbum displays the file list.The top of the screen displays the name of the current folder (the default setting is the My Pocket PC\FLASH\My Album folder) and the sorting method (the default setting is Name ). The middle of the screen displays the information about the picture: the preview of the pictures on the left; the filename, resolution, saving time, file format and file size on the right.In this mode, you can tap on the command bar to switch to the Camera/DV mode.• You can tap the options on the command bar for advanced features. See the later sections in the chapter.10.2 Opening a Picture or VideoTo have a closer view of a picture or video, tap the specific thumbnail view in the Report mode of MyAlbum.Below is the screen of an opened picture:Total number of filesNumber of current fileS600 User Manual10-3In this mode, you can:⏹ Press the Left/Right key to browse for the previous/next file of the current folder, press the Up/Down key to zoom in/out of the image.⏹ Tap to zoom in on the picture.⏹ Tap to zoom out on the picture.⏹ Tap to zoom the picture to best fit the screen.⏹ Tap to rotate the picture at 90 degrees.⏹ Tap to switch to full screen.⏹ Tap to return to the Report mode.• You can tap the options on the command bar for advanced features. See the later sections in the chapter.10.3 Editing PicturesTap Edit on the command bar to cut, copy, paste, rename or deletethe selected or opened file.10.4 Using the FaceMagic FeatureTap Face → FaceMagic on the command bar allows you to createspecial changes on the person’s expression. On the positioning screen, tap Reset , and follow the screen tips to perform positioningon the person’s face.After positioning, tap FaceMagic → Morph (as an example). Thescreen displays the expression items and the adjustment bar for you to customize and create special effects.You can also tap FaceMagic → Comic or Avatar for more specialexpression effects.10-4S600 User Manual10.5 Using EffectsTap Effect on the command bar to create special effects on the selected or opened picture. The picture with effects will be saved as a new file with “-1” added to the filename.Painting1. Tap Effect → Painting.2. You can paint on the picture.Or, tap A to add text on the picture. Tap the screen, and a editing cursor will appear. You can start to enter the texts and change the text’s font, font size and color.3. Press the OK key or tap OK to save the changes as a new file.Effect1. Tap Effect → Effect.2. Tap the desired effect: Normal, Black/White, Sepia, Emboss,Blue or Mosaic.3. Press the OK key or tap OK to save the changes as a new file.Selecting Normal will not save the picture as a new file.Frame1. Tap Effect → Frame.2. Tap the desired picture frame from the option bar at the bottomof the screen. The screen will display the applied picture forviewing immediately. You can tap the arrows on both sides ofthe option bar for more frame options.3. Press the OK key or tap OKto save the changes as a new file.S600 User Manual10-5Stamp1. Tap Effect → Stamp .2. Tap the desired stamp from the option bar at the bottom of the screen. The screen will display the applied picture for viewing immediately. You can tap the arrows on both sides of the option bar for more stamp options.3. Press the OK key or tap OK to save the changes as a new file.Adjustment1. Tap Effect → Adjustment .2. Tap the list to select the item for adjustment: Brightness, Contrast, Saturation, Smart Color, Portrait, Landscape and Document.3. Adjust the value by tapping and draging on the adjustment bar. Tap Edit → Apply to apply the change.Tap Default restores the default values.4. Tap OK to save the changes.Note1. Tap Effect → Note .2. You can enter note text in the box, or tap the recording button to create a recording as a note. The added text or recording will be saved as a stand-alone file.3. Tap OK to save the note.4. The in the list mode indicates that a note has been added tothe picture.10-6S600 User Manual10.6 Tools OptionsTap Tools on the command bar to:⏹MMSSend an MMS message including the selected picture.⏹E-MailSend an email message including the selected picture.⏹IRUses the infrared to beam information.⏹WallpaperSets the selected picture as the theme picture on the Today screen.10.7 View ModesMyAlbum provides four view modes for viewing picture and video files.⏹Large mode⏹Middle mode⏹Small mode⏹Report mode (default mode)Chapter 11 Media Content11.1 Starting Media Content11.2 Media Content Items11-2S600 User Manual11.1 Starting Media ContentA Media hot key is located on your Pocket PC Phone. Press this key to access Media Content for games, music, Album, Windows Media Player, Java program and wallpaper setting function.The main page of Media Content is shown to the right.11.2 Media Content ItemsGAMEOn the main page of Media Content, tap GAME to quickly access the game list.Tap the desired item to start playing the game.For information on games, see Section 12.12.MUSICOn the main page of Media Content, tap MUSIC to quickly access the contents in the My Pocket PC\FLASH\My Music folder.Tap the desired item for playback. Your Pocket PC Phone will use Windows Media Player to play the selected item.For information on Windows Media Player, see Section 12.5.S600 User Manual11-3ALBUMOn the main page of Media Content, tap ALBUM to quickly startMyAlbum.For information on MyAlbum, see Chapter 10.MEDIA PLAYEROn the main page of Media Content, tap MEDIA PLAYER toquickly start Windows Media Player.For information on Windows Media Player, see Section 12.5.JAVAOn the main page of Media Content, tap JA V A to quickly start theJava program.For information on Java, see Section 12.7.11-4S600 User ManualWALLPAPEROn the main page of Media Content, tap WALLPAPER to quickly access the setting items of the Today screen.⏹Tap Appearance to change the theme picture of the Todayscreen.⏹Tap Items to set the items to be diaplayed on the Todayscreen. You can also set the time for the Pocket PC Phone to automatically return to the Today screen after a period of inactivity (3 hours by default).For information on Settings, see Chapter 6.Chapter 12 More Programs12.1 Microsoft ActiveSync12.2 Pocket Word12.3 Pocket Excel12.4 MSN Messenger12.5 Windows Media Player12.6 Pictures12.7 JA V A12.8 File Explorer12.9 Calculator12.10 Pocket MSN12.11 IE Favorites12.12 Games12-2S600 User Manual12.1 Microsoft ActiveSyncWith Microsoft ActiveSync on both your desktop computer and Pocket PC Phone, you can exchange information between a desktop computer or server and your Pocket PC Phone. To synchronize your Pocket PC Phone with your desktop computer, you must install ActiveSync on the desktop computer. Using ActiveSync, you can:⏹ Synchronize information between your Pocket PC Phone and desktop computer or server so that you have the latest information in all locations.⏹ Change synchronization settings and synchronization schedule.⏹ Copy files between your Pocket PC Phone and desktop computer.⏹ Back up and restore device information.⏹ Add/remove programs to/from your Pocket PC Phone.Installing Microsoft ActiveSyncAn Microsoft Companion CD is supplied with your Pocket PC Phone. You need to use the CD to install ActiveSync on the desktop computer before perfoming synchronization.Follow this procedure:1. Turn on the desktop computer.2. Insert the Companion CD into the CD-ROM drive of the desktop computer.3. On the first screen, click the arrow to enter the main screen and click Start Here .4. On the next screen, click Install ActiveSync 3.x on the left column.5. On the next screen, click Install to start installation.6. When prompted, connect one end of the USB cable to the converter, and then connect the converter to the USB port on the bottom of your Pocket PC Phone.7. Connect the other end of the USB cable to the USB port of the desktop computer.8. The Add New Hardware Wizard should automatically install the USB driver. (If you need to specify the location of the driver, click Browse and select the CD-ROM drive containing the Companion CD.)9. Follow the on-screen instructions to establish a partnership between your Pocket PC Phone and your desktop computer. Select the types of information for synchronization. After your first synchroniza-tion, the data you have stored on your desktop computer such as Calendar, Contacts and Tasks arecopied to your Pocket PC Phone. → → →→ → • If you do not establish a standard partnership with the desktop computer, then you cannot perform synchronization between two devices, and you will need to select a desired partnershipevery time you connect to the desktop computer.S600 User Manual12-3Connecting to Your Desktop ComputerYou can connect your Pocket PC Phone to a desktop computer in several ways:⏹ Use the USB cable or an optional cradle.⏹ Use the IR port in place of using a cable. (For complete instructions on connecting to your desktop computer by infrared, see the ActiveSync Help on your desktop computer.)⏹ Use a network or dial-up connection.Synchronizing with Your Desktop Computer1. Connect your Pocket PC Phone to your desktop computer.2. On your Pocket PC Phone, tap → ActiveSync .3. Tap to start synchronization.Setting up Remote SynchronizationSynchronizing Remotely with a Desktop Computer1. Make sure that the desktop computer is powered on.2. Connect to the corporate network. (See Chapter 13 for more information.)3. On the Pocket PC Phone, tap → ActiveSync .4. Tap Tools → Options → PC .5. In When syncing remotely with a PC , select your computername in the Use this PC list.6. Select one or both of the items: Use mobile schedule to sync with this PC and Sync with this PC during manual sync .7. Tap OK.12-4S600 User ManualSynchronizing Remotely with a Server1. Make sure that the server is powered on.2. Connect to the Internet. (See Chapter 13 for more information.)3. On the Pocket PC Phone, tap → ActiveSync .4. Tap Tools → Options → Server .5. Select the types of information, such as Calendar, Contacts, or Inbox, that you want to synchronize with the server.6. To change synchronization settings, such as the amount synchronized, select the type of information and tap Settings . Note that there are no synchronization settings for Contacts.7. In Sync with this server , enter the name of the Microsoft Exchange server to which you want to connect.8. Tap Options → Connection .9. Enter your user name, password, and domain name. If you want to perform automatic synchronization, select Save password .10. Tap OK .Synchronizing AutomaticallyWith ActiveSync, you can schedule automatic synchronization between your Pocket PC Phone and a server every time when an item arrives or is changed at the server. Your Pocket PC Phone is informed of that event and synchronizes automatically to retrieve those items, making your device always ing ActiveSync, you can schedule synchronization of your device on two separate schedules.⏹ Use the peak times schedule to synchronize during working hours or other times when you have higher mail volumes.⏹ Use the off-peak schedule to synchronize during times when you have lower mail volumes.⏹ When you are roaming, you can synchronize manually to reduce roaming charges, or you can synchronize using the mobile schedules.To set up the schedule for automatic synchronization:1. Make sure not to connect your Pocket PC Phone to the desktop computer.2. On the Pocket PC Phone, tap → ActiveSync .3. Tap Tools → Options → Mobile Schedule .4. To synchronize periodically during peak times, select the frequency of synchronization in the Peak times list.To synchronize periodically during off-peak times, select the frequency of synchronization in the Off-peak times list. To synchronize while roaming, select a frequency in the Roaming list.5. To set the days and hours for peak times, tap Peak Times .6. Tap OK.。
SLIM机型第十一章联想昭阳S600系列第十一章 联想昭阳S600系列联想昭阳S600系列是联想笔记本电脑家族的新成员,是全功能的多媒体笔记本电脑。
采用Intel公司的高性能PIII处理器,配合12.1英寸TFT显示屏,色彩鲜艳、图象清晰、画面逼真; PCI音效卡、麦克风以及内置24速光驱,使您尽享多彩的多媒体世界,并采用智能锂电池,是未来办公的新趋势。
一.联想昭阳S600系列产品概述联想昭阳S600产品主要特点1、联想昭阳S600为Slim机型(超薄机型),属中档偏高机型。
造型优雅时尚,仅有B5纸张大小,银白色镁铝合金外壳,重量仅为1.69kg,快捷功能键的设置,使用更加轻松方便。
2、 产品特色:光驱内置的超薄机型;光驱 / 备用电池 / 盖板互换。
采用独特的屏幕反转功能设置和180度的屏幕展开,不仅视角大,而且特别是在进行演示时,可以在不必将笔记本电脑机身掉转,就可以实现让在对面的用户能够看到屏幕的正向画面。
特制鼠标板,可在触控板上实现滚屏功能,简单到用手在触控板的右边侧和下边侧上进行滑动,就可以让屏幕上的画面实现横向和竖向的滚动。
联想昭阳S600同时在底部机壳上采用了一层柔性的皮质薄膜,当笔记本电脑放在倾斜面上起到防滑的作用;并且具有较好隔热功效,而且当用户在较长时间膝上使用时,不用担心由于底部温度高而产生不适的感觉。
二.联想昭阳S600系列产品硬件配置联想昭阳S600系列产品硬件配置机型名称 联想昭阳S600机型 联想昭阳S601机型项目 内容 说明主机 HITACHI 83CA0L NBBIOS版本 1.04UA Phoneix BIOS4.0 Release6.0CPU系统处理器 Intel Mobile PIII450 MHz Intel Mobile PIII450 MHzCPU封装 μBGA2芯片组 Intel 440BX第十一章 联想昭阳S600系列一级高速缓存32KB二级高速缓存256KB L2 Cache On Die内存内存/最大内存64M SDRAM/MAX 256M SDRAM 底板加装内存类型 PC-100 SDRAM内存插槽数 2个图形系统显示芯片 Trident Cyber 9525 DVD最大支持分辨率显示内存 2.5MB SDRAM显存类型显示屏 12.1” TFT LCD 1024×768×64k XGA声音系统声音芯片 Yamaha YMF744B扬声器 内置(1个)麦克风 内置(1个)调制解调器 XIRCOM WINSWIFT 56K FAX/MODEM 内置PCMCIAPCMCIA控制器TI PCI 1410 PCMCIA控制器驱动器硬盘容量/最大容量 6G 10G 2.5” / 9.5mm(薄型)笔记本专用光盘驱动器 MATSHITA CR-271 24速光驱 内置/ 可拆换为备用电池或盖板软盘驱动器 外置 通过连线与主机连接,并口连线与软驱共用一个端口第十一章 联想昭阳S600系列外部接口PCMCIA插槽 1×TYPE II串行口 无并行口 1个 外接电线键盘接口 PS/2接口鼠标键盘共用 鼠标接口PS/2接口显示器接口 1个USB接口 2个扩展坞 无红外端口 无音频接口 麦克风、线路输入和音频输出视频输出 无其他接口 1个 连接软驱或并口连线(无法同时使用) ,不建议热插拔电池类型 PCX-AB5900 锂电池容量 1700 mAh电压输出范11.1 V围标准电池供电1小时左右 / 备用电池可供电1小时电池使用时间AC适配器适配器类型 DELTA ADP-45LH(16V,2.8A)100--240V电压输入范围工作频率 50--60Hz16v电压输出范围电流输出范2.8A围第十一章 联想昭阳S600系列 键盘 83键WIN95/98键盘触控板 鼠标触控板机型尺寸 270 x 222 x 25 mm机型重量 1.69 Kg 包括标准电池和光驱随机附件 光驱槽盖板 / 软驱连线 / 并口连线操作系统 中文Windows 98SE随机软件WINDOWS 98 SE 安装引导软盘昭阳拨号程序安装软盘S600系列屏幕翻转功能 驱动程序 V1.0Microsoft Windows98中文版第二版(包括光盘和Windows98 中文版入门)昭阳驱动V5.0光盘随机资料 S600 NB说明书 V1.1联想昭阳笔记本电脑用户档案卡联想电脑保修证书(NB V1.0)联想电脑装箱单163帐号套件(信封/帐号)其他特性 该机型随机带一个手包(无背带)及一个资料包备用电池需要单独购买该机型无红外通讯设备和串行通讯端口注意事项第十一章 联想昭阳S600系列三.产品结构示意图1. 右侧示意图1. 键盘 9. 外接麦克风插孔2. 快捷键 10. 软驱接口/并口接口3. 光驱 11. PCMCIA插槽4. 触控板按键 12. MODEM接口5. 触控板 13. USB接口6. 休眠键 14. PS/2接口7. 指示灯 15. 内置麦克风8. 耳机插孔 16. LCD显示器 17.面板锁闩12 345678910 1112 13 14151617第十一章 联想昭阳S600系列2.各部件视图图2-3 各部件视图四.系统操作1. 使用触控鼠标板(Touch Pad)Touch Pad (触控鼠标板)是一种触摸敏感的指示设备, 它可以实现一般鼠标的所有功能。
本章中所有图形界面仅供参考,请以实际界面为准。
扬天智汇中心概述扬天智汇中心整合本地应用及云平台在线应用、服务于一体,为中小企业的通用需求提供服务,并为用户带来友好多样的桌面体验,为中小企业提供全面的解决方案,如图1-1所示。
图1-1 扬天智汇中心主界面插件化集成在线服务及预装应用;统一的服务入口,简单高效的用户体验。
在线顾问、一键恢复、远程唤醒等解决方案。
∙趋势杀毒、文件粉碎机、私密文件柜等安全方案软件。
∙任意门、远程桌面、远程唤醒等远程控制软件。
∙在线会计、客户关系管理、在线进销存等企业账户产品。
注意:扬天智汇中心所提供的服务跟出厂编号相关,因此不允许多个Windows用户同时使用,即在Windows上从用户A切换为用户B之后,如果用户A没有关闭扬天智汇中心,那么用户B将无法启动扬天智汇中心。
平台功能∙注册、登录。
∙个人消息:联想推送给用户的关于智汇中心及服务产品相关的信息。
∙软件设置:开机自启动、自动登录以及背景图设置。
∙编辑功能:本地预装应用和本机常用软件工具的添加、删除、移位。
∙产品超市:在线支付购买服务产品,已购买的产品添加到扬天智汇中心中。
注册及登录点击“登录”或者未登录状态打开在线应用或者“任意门”,则弹出登录界面,如图1-2所示。
图1-2 登录注册界面图1-3 注册注册成功后将弹出“注册成功”提示界面。
已联网状态下,填写正确的注册信息,提交后,提示注册成功并需要激活后才能登录。
已联网状态下,填写已激活过的正确的联想帐号和密码,登录成功后,扬天智汇中心刷新加载并显示当前系统用户头像及联想帐号。
已联网状态下,填写未激活过的正确的联想帐号和密码,弹出提示框,提示当前用户未激活。
个人消息启动扬天智汇中心软件,如果服务器端有消息,则在界面顶部中间位置“冒泡”显示新消息。
如果无人查看,一段时间后自动消失。
点击“”打开个人消息。
消息面板中消息是未读消息,用户查看过的消息将不再显示。
软件设置点击“”按钮,将弹出如图1-4所示的设置对话框。
联想S6000产品规格书联想S6000(4GB/WiFi精英版)详细参数操作系统:Android4.2CPU/GPU处理器架构:ARM架构处理器型号:MTK8125 ARM Cortex-A7处理器主频:1.2GHz处理器核心:四核心显卡核心:四核心存储设备系统内存:1GB存储容量:4GB存储介质:Flash 闪盘存储扩展:支持Micro SD(TF)卡,最大支持32GB 显示屏屏幕尺寸:10.1英寸屏幕分辨率:1280x800屏幕描述:电容式触摸屏,多点式触摸屏指取设备:触摸屏屏幕特性:十点式触摸屏,IPS屏幕支持语言:支持多国语言网络连接WiFi功能:支持802.11b/g/n无线协议网络模式:不支持3G网络蓝牙功能:支持,蓝牙4.0模块多媒体功能声音系统:立体声扬声器,内置麦克风视频播放:支持播放1080P视频摄像头:单摄像头(30万像素)视频录制:支持录制720P视频Flash功能:支持Flash格式支持音频格式:支持MP3等格式视频格式:支持MP4等格式图片格式:支持JPEG,GIF,BMP格式文本格式:支持TXT等格式按键/接口数据接口:Micro-USB音频接口:3.5mm耳机接口视频接口:Micro-HDMI接口其他接口:电源接口,存储卡接口功能按键:开关按键,音量按键电源参数电池类型:聚合物锂电池,6350毫安续航时间:8小时左右,具体时间视使用环境而定电源适配器:100V-240V 自适应交流电源供应器功能参数内置感应:智能重力感应,环境光线感应预装应用:乐商店外观参数产品尺寸:260×180×8.6mm产品重量:550g机壳材质:复合材质机壳颜色:黑色平板电脑附件包装清单:平板电脑主机 x1数据线 x1充电器 x1保修卡 x1说明书 x1可选配件:专用蓝牙键盘保修信息保修政策:全国联保,享受三包服务质保时间:1年。
Lenovo - "⭞产品编号LS2334A65C6-HCT*-CT第二版(2016年9月)© 版权所有 Lenovo 2016。
LENOVO 产品、数据、计算机软件、及服务基于专项资金开发,作为48 C.F.R. 2.101定义的商品销售给政府机构,并授予政府机构有限的受限制的使用、复制和公开权利。
受限制的有限权利声明:如果产品、数据、计算机软件、或服务按照总务管理器“GSA”合约交付,则其使用、复制、或公开须遵循在合约号GS-35F-05925中制定的限制。
目录安全事项 (iii)一般安全原则 (iii)第1章开始使用..............................................................1-1物品清单............................................................................................................................................................................................... 1-1使用注意事项....................................................................................................................................................................................... 1-2产品概述............................................................................................................................................................................................... 1-3调整类型......................................................................................................................................................................................... 1-3倾斜................................................................................................................................................................................................. 1-3显示器控制..................................................................................................................................................................................... 1-4线缆锁槽......................................................................................................................................................................................... 1-4设置显示器........................................................................................................................................................................................... 1-5连接和打开显示器电源................................................................................................................................................................. 1-5第2章调整和使用显示器......................................................2-1舒适和辅助功能................................................................................................................................................................................... 2-1安排您的工作区域......................................................................................................................................................................... 2-1放置显示器..................................................................................................................................................................................... 2-1关于健康工作习惯的小技巧......................................................................................................................................................... 2-2调整显示器图像 ...................................................................................................................................................................................2-3使用直接访问控件......................................................................................................................................................................... 2-3使用On-Screen Display (OSD,屏幕显示)控件........................................................................................................................ 2-4选择受支持的显示模式................................................................................................................................................................. 2-8了解电源管理 .......................................................................................................................................................................................2-9保养显示器 .........................................................................................................................................................................................2-10卸下显示器底座和支撑臂................................................................................................................................................................. 2-10第3章参考信息..............................................................3-1显示器规格........................................................................................................................................................................................... 3-1故障排除............................................................................................................................................................................................... 3-3手动图像设置................................................................................................................................................................................. 3-4手动安装显示器驱动程序............................................................................................................................................................. 3-5在Windows 7系统中安装显示器驱动程序.............................................................. 3-5在Windows 10系统中安装显示器驱动程序............................................................. 3-6获得进一步帮助.................................................................................... 3-6附录A. 服务和支持...................................................................................................................... A-1在线技术支持...................................................................................................................................................................................... A-1附录B. 声明................................................................................................................................... B-1商标...................................................................................................................................................................................................... B-2《废弃电器电子产品回收处理管理条例》提示性说明.................................................................................................................. B-2中国环境标志产品认证提示性说明.................................................................................................................................................. B-2中国能源效率标识.............................................................................................................................................................................. B-2有害物质.............................................................................................................................................................................................. B-3安全事项一般安全原则有关安全使用计算机方面的提示,请转到:/safety在安装本产品之前,请阅读“安全事项”。
联想平板A6000使用说明书平板Lenovo标志上的三个图标及右上角,右下角的小图标的作用:第一个为返回键,第二个为主页(主桌面)键,方便任何时间直接返回到主桌面,第三个键为查看当前系统运行的应用程序键,在这里可以清除一些暂时不用的应用程序,只在系统的RAM里清除,不影响程序的下一次运行。
右上角六个小点的图标能找到系统所有的应用程序及窗口小部件,右下角三个小点的图标可以访问桌面设置、管理应用程序、系统设置、批量添加桌面图标、一键清屏。
如何开机和关机(包含强制关机)关机状态时长按电源键可开机。
开机状态时长按电源键,弹出窗口,点击关机。
松开后盖,用顶针顶一下复位键可强制关机如何进行桌面解锁1、按住屏幕带锁的图标;2、往右滑动,进行解锁桌面介绍桌面底部为状态栏,屏幕中间有快捷图标,可左右滑动切换桌面,右上角六点小正方形图标可进入应用程序界面桌面的切换、新增、删除和修改操作1、用手指轻触桌面,往左或者往右滑动2、不支持屏幕的新增,删除和修改操作桌面图标的新增、删除和修改操作新增:选择具有空余空间的桌面,点击菜单键-批量添加,勾选要添加的图标后点击“确定”即完成桌面图标的新增。
删除:长按需要删除的图标,出现红色打叉标记后松手,点击打叉即完成删除:修改:不支持桌面图标的修改。
如何添加和删除窗口小部件添加:主菜单中,点击屏幕上方的窗口小部件界面(可左右滑动),长按要新增的小部件,添加到主屏幕后松开手指(需确保主屏幕存在空间)删除:长按要删除的小部件,出现红色打叉标志后松开,点击红色打叉即可删除小部件如何更换桌面墙纸(静态墙纸、动态墙纸、锁屏墙纸)1、在桌面点击菜单键-桌面设置-设置壁纸-点击壁纸/动态壁纸/视频壁纸/图库/ES文件浏览器-选择合适的壁纸后点击“设置壁纸”;2、在桌面点击菜单键-桌面设置-设置壁纸-点击壁纸或者图库,可设置静态壁纸;3、锁屏壁纸即桌面壁纸;或:长按桌面空闲处,在弹出的壁纸来源中选择壁纸/动态壁纸/视频壁纸/图库/ES文件浏览器,选择合适的壁纸后点击“设置壁纸”如何通过数据线连接电脑实现U盘功能平板电脑开机状态下,通过数据线与电脑连接,下拉状态栏,点击“已连接USB”,再点击“打开USB存储设备”,即可实现U盘功能如何调出主菜单在屏幕的右上角(显示时间的地方)用手指从上往下拉,出来一个菜单,这就是主菜单如何装载U盘先将OTG数据线大头连接上U盘,然后将OTG数据线的另一小头连接到平板(在平板的左侧,lenovo在平板的正下方)如何卸载U盘调出主菜单,点击设置,点击存储,在右边出现的界面用手指从下往上拉,找到卸载USB存储设备,点击一下,弹出提示,点确定,就可安全卸载U盘了(安全卸载U盘不会破坏U盘的数据)。