米切尔-手动变速器差速器调整
- 格式:ppt
- 大小:1.98 MB
- 文档页数:27
改变传动装置的转差率可以通过多种方式实现,具体方法取决于所使用的传动系统类型。
以下是一些常见的调速方法:
1. 机械传动系统:
-换档:对于手动变速箱或某些自动变速箱,可以通过更换不同的齿轮组合来改变转差率,实现不同的速度比。
-差速锁:某些车辆配备了可锁定的差速器,通过手动或自动控制差速锁,改变传动系统的转差率,提高通过性能。
-曲轴偏心轮:在某些机械传动系统中,可以通过调整曲轴偏心轮的位置来改变转差率。
2. 液压传动系统:
-液力变矩器:通过调节液力变矩器的液压阀门或其他控制元件,可以改变液力传动系统的转差率。
-液压变速箱:某些工程机械和车辆采用液压变速箱,可以通过调节液压系统的工作压力和流量来改变转差率。
3. 电子传动系统:
-电子控制单元(ECU):对于现代车辆,传动系统通常由电子控制单元管理。
通过重新编程ECU,可以改变传动系统的工作参数,包括转差率。
-电子差速器:某些高端车辆配备了电子控制的差速器,可以通过车
辆内部的控制系统来精确地调节差速器的工作状态,以改变转差率。
除了上述方法,还有一些其他专门针对特定传动系统的调速方法,例如调整齿轮比、改变液体黏度等。
在实际操作时,应当根据具体的传动系统类型和车辆/设备的技术要求,选择合适的调速方法,并在专业人士的指导下进行调整。
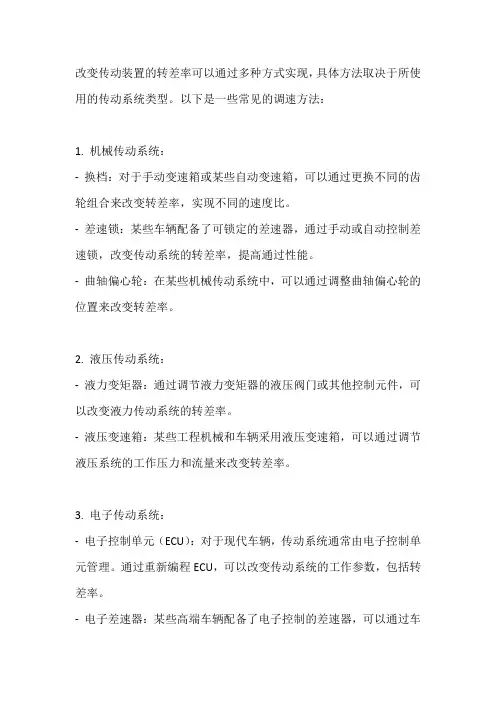
变速器调整图解全攻略变速器调整图解全攻略(图文)变速器之调整可以避免落链、异音、并使变速顺畅,对骑乘很重要,其操作其实不难。
变速器的调整分成三大部分,配合图形,大家慢慢看下去吧,也欢迎朋友们一起讨论。
以下是以前3后7,21速的车子为例,开始之前先介绍3个调整机构:1.前间距调整钮(1)链条和脱轨器的距离叫间距(2)由两颗螺丝组成,旁边有标示HIGH和LOW,H调整大齿间距,L调整小齿间距(3)顺时针转变小(4)前2时,调整H/L是没用的,也就是说它是针对前1和前3,其原理大家弯腰探一下就知道了,靠两颗螺丝顶住脱轨器2.后间距调整钮(1)H调整小齿(外侧),L调整大齿(内侧)(2)顺时针转变小(3)其他档位没用,只针对后1和后73.变速调整钮(1)前左把变速调整钮,调整前变(2)前右把变速调整钮,调整后变,这台没有这台转把式的有,黑色那个钮(3)后脱轨器上调整钮,调整后变注:(2)和(3)的作用一样,原则上维修时以调整(3)为主,但在行驶中可调整(2)以求便利(4)以上调整钮每次以调整1/4圈为原则,逆时钟旋出时变速线会拉紧a.以前变而言,会使脱轨器向外移动b.以后变而言,会使脱轨器向内移动记住分三大项就对了,下面3图是概念图,先有个轮廓,再看后面的细部说明。
1、切至前3后7,调前后H钮→可防止落链和解决外侧齿轮变速不易(1)调整前HIGH钮至间距最小但不会磨到,若太大则前3后2或1时会磨到。
(2)调整后H钮,使无异音,可稍为偏内,以免落链时掉到外侧去2.切到前1后1,调前后L钮→可防止落链和解决内侧齿轮变速不易(1)调整前LOW钮至间距最小但不会磨到,若太大则前1后7或6时会磨到。
(2)调整后L钮,使无异音,可稍为偏外,以免落链时掉进内侧去3.前2后1-7,调前后手动调整钮→使脱轨器移动至正确位置的调整(1)前2后7和前2后1时,调整前左把变速调整钮,使不磨到,若两者不能兼顾,择一即可。
(2)后1变到2,调整后脱轨器上调整钮,使变速顺畅,且没有磨擦声,依序变至7并调整。

The TREMEC TR-4050 5-speed manual transmission is designed for longitudinal engine vehicles and is particularly suited for light and medium duty trucks. It includes a single overdrive and a light-weight aluminum housingAll forward gears are fully synchronized and use a carbon friction material for improved shift quality. Tapered roller bearings are used to minimize noise, vibration and harshness (NVH) and improve efficiency.A standard six-bolt Power Take-Off (PTO) located on the right side of the transmission offers users the ability to run a variety of hydraulic accessories.TR-4050 Features at a Glance:• High-contact constant mesh helical gears for maximum strengt • Die-cast aluminum alloy housing saves weight while offeringconsiderable rigidity• Standard right-hand six-bolt PTO offers ability to run hydraulic pumps • Multiple shifter locations provide design and installation flexibility • The multiple rail internal shifter provides excellent shift feel andperformance• Tapered bearing on input, main and counter shafts provideexcellent internal stability• Needle bearings under gears reduce friction and noise output • All forward gears and reverse gear synchronized• Advanced synchronizer technology promotes smoother shifting andreduced shift effort• Counter shaft mounted 5th gear synchronizer improves NVH inoverdriveShift Pattern14700 Helm Ct. | Plymouth, MI 48170 U.S.A. | (734) 456-3700 | Copyright © 2013 TREMEC. All Rights Reserved. TRMC-0813_v1Torque Transfer Solutions ™Torque Transfer Solutions™14700 Helm Ct. | Plymouth, MI 48170 U.S.A. | (734) 456-3700 | Copyright © 2013 TREMEC. All Rights Reserved. Subject to design and/or appearance modifications that are production standards at the time of shipment. TRMC-0813_v1。
差速调节方法
差速调节是指在多个驱动轮的情况下,通过调整每个驱动轮的转速来实现差速调节。
差速调节的目的是使每个驱动轮产生不同的驱动力,从而改变车辆的行驶轨迹。
差速调节方法主要有以下几种:
1. 机械差速器调节:通过机械装置将动力源传递给每个驱动轮,通过调节各驱动轮的差速器来实现差速调节。
常见的机械差速器调节方法有扭矩矢量控制、机械齿轮差速器等。
2. 液压差速器调节:液压差速器通过调节液体的流动来实现差速调节。
通过调节差速器内的液压阻尼器来调整驱动轮的差速,从而达到差速调节的目的。
3. 电子差速器调节:利用电子系统来调节每个驱动轮的转速,实现差速调节。
通过电子控制单元(ECU)对驱动轮进行控制,调节每个驱动轮的速度,从而改变差速。
4. 动力分配控制(AWD系统):通过控制动力的输出,将动
力分配给不同的驱动轮,实现差速调节。
常见的AWD系统有
前后轮驱动系统、四轮驱动系统等。
以上是几种常见的差速调节方法,不同的方法适用于不同的车辆和驾驶条件,可以根据实际情况选择合适的差速调节方法。
3311E差速器安装及调整差速器有三种功能:1。
它可增加传动轴传递的扭矩。
2.将扭矩传递给驱动半轴。
3.使驱动轮在不同的速度下转动。
一、分解差速器:1.分解前在壳体和轴承座及轴承调节器作出识别记号。
2.拆除锁紧钢丝拆下螺栓和卡锁。
3.拆下轴承座圈螺栓、轴承座圈和轴承调节器。
拆下齿圈总成。
4.在拆除固定法兰座时作出识别记号。
拆下齿圈固定法兰座的八个螺栓,使固定法兰座和壳体分开。
5.将十字轴和十字轴行星齿轮从固定法兰座提出,并取出侧齿轮及止推垫圈。
6.在拆轴承座圈和差速器壳体前作出识别记号。
7.拆除螺栓、压板和密封圈拿下叉头总成。
8.拆除轴承座圈螺栓,拆下轴承座圈及调隙片。
9.用吊具提出小齿轮组件。
二、清洗检查差速器:1.清洗差速器的零件,检查零件的磨损,对磨损过量的零件及时更换。
2.检查轴承座圈座毂的外机加表面与轴承座孔的同轴度应在0.05㎜(0.002英寸)之内。
3.检查轴承座圈的外机加表面与油封的同轴度应在0.05㎜(0.002 英寸)之内。
4.检查轴承座圈和壳体上的螺纹与孔的同轴度应在0.27㎜(0.005英寸)之内,并与小齿轮轴孔相垂直,并从小齿轮轴的孔中心线254㎜处检查,垂直度应在0.08㎜(0.003英寸)之内。
5.壳体和法兰座的机加配合表面与轴线相垂直,其垂直度应在0.08㎜(0.003英寸)之内,二者组装后配合孔的同心度应在0.08㎜(0.003英寸)之内。
三、轴承间隙测量:1.确定轴承座的调隙片厚度。
a.在壳体内的小齿轮轴承孔内安装一组约厚1.5㎜(0.06英寸)的调隙片,作为尺寸“X”。
b.将小齿轮总成与轴承座圈装入壳体,并用八个螺栓等距离将轴承座圈紧固。
c.转动小齿轮并紧螺栓直到小齿轮不能用手转动为止。
d.将一个大约450㎜(18英寸)长的平板放在壳体内的两个轴承座安装平面上。
e.测量从小齿轮轴端的中心位置到平板下表面的距离,作为尺寸“A”。
f.记录刻在小齿轮端部尺寸,作为尺寸“B”。
变速器调整方法随着汽车的普及和发展,变速器作为汽车传动系统的重要组成部分,发挥着关键的作用。
对于车辆驾驶者来说,合理的变速器调整可以提升汽车的性能和驾驶的舒适度。
本文将介绍一些常见的变速器调整方法,帮助读者更好地理解和掌握如何进行变速器的调整。
一、变速器油液的更换和检查变速器油液是保证变速器正常工作的关键因素之一,定期的更换和检查能够确保油液的质量和性能。
首先,需要确认车辆的保养手册上关于变速器油液更换的建议周期,并严格按照要求进行更换。
在更换时,需要将废弃的油液安全处理。
此外,在车辆正常使用过程中,应定期检查变速器油液的油位和质量。
如果发现油液变色、异味或者有杂质等异常情况,应及时更换油液或进行系统的清洗。
二、离合器的调整离合器是变速器的核心组件之一,调整离合器能够提高换档的平顺性和可靠性。
通常情况下,离合器的调整主要涉及离合器的自由行程和操作力,具体操作如下:1. 自由行程的调整:自由行程即离合器踏板从离合片接触位置到完全断开位置的距离,它的大小会影响离合器操作的灵敏度和舒适度。
一般来说,自由行程应控制在15-20mm之间,通过调整踏板螺栓来实现。
但需注意不要调整得太小或太大,以免影响离合器的正常工作。
2. 操作力的调整:操作力是指离合器踏板需要施加的力量,合理的操作力可以减轻驾驶者的疲劳感。
一般来说,操作力应控制在20-30N之间,在操作力过大或过小时,都需要进行相应的调整。
具体的调整方法需要根据车型和车辆的具体情况来确定,建议咨询专业的汽车维修技师。
三、换档机构的调整换档机构是变速器的核心部件之一,合理的调整可以确保换档的准确性和顺畅性。
换档机构主要包括选择杆和换档杆,其调整方法如下:1. 选择杆的调整:选择杆是用于选择不同挡位的控制杆,调整选择杆的位置可以确保换档杆准确地进入相应的挡位。
通常情况下,选择杆可通过调整选择杆的连杆和弹簧来实现。
具体的调整方法需要参考相关车型的技术资料或咨询专业的汽车技师。
差速器间隙调整口诀1. 为什么需要调整差速器间隙差速器是汽车传动系统中的重要部件,它通过控制左右驱动轮的旋转速度差,使车辆能够更好地适应转弯和悬挂路面。
差速器间隙的调整直接影响到车辆的操控性能和稳定性。
如果差速器间隙过大或过小,都会导致车辆行驶时出现异响、抖动、转向不灵活等问题。
因此,及时调整差速器间隙对于保证车辆的正常运行非常重要。
2. 如何调整差速器间隙调整差速器间隙需要一定的技术和经验,下面是一些常用的调整口诀:2.1 准备工作在进行差速器间隙调整之前,需要准备一些工具和材料,包括扳手、调节螺栓、托盘、润滑剂、清洁剂等。
同时,确保车辆处于平稳停放状态,以确保安全操作。
2.2 解除连接首先,需要将差速器与驱动轮进行解除连接,具体操作如下: 1. 将汽车抬升至适当的高度,使用托盘固定车辆,保证稳定性。
2. 找到差速器的连接螺栓,使用扳手逆时针松开螺栓。
3. 将驱动轮从差速器上滑出。
2.3 调整间隙调整差速器间隙的具体步骤如下: 1. 使用清洁剂清洁差速器的连接螺栓和孔口,确保无杂质和沉积物。
2. 计算出差速器的标准间隙,可以参考汽车制造商的技术手册或咨询专业人员。
3. 使用调节螺栓逐步调整差速器的间隙,注意每次调整后需紧固连接螺栓以固定差速器位置。
4. 不断测试车辆的操控性能和稳定性,根据实际情况微调差速器间隙,确保最佳的驱动效果。
2.4 润滑和固定调整完差速器间隙后,还需要进行润滑和固定操作: 1. 使用适量的润滑剂涂抹在差速器连接螺栓和孔口上,以减少摩擦力和磨损。
2. 进一步紧固连接螺栓,确保差速器稳固固定在驱动轮上。
3. 差速器间隙调整的注意事项在进行差速器间隙调整时,需要注意以下几点:3.1 安全第一准备工作时,务必确保车辆处于固定和平稳的状态,避免意外事故发生。
在操作过程中,要注意切勿将手指或其他身体部分靠近旋转部件,防止受伤。
3.2 手动与自动差速器不同类型的车辆可能采用不同类型的差速器,有手动差速器和自动差速器之分。

超实用汽车指南-手动变速
器操作
复杂但灵活、技术先进
变速器负责通过齿轮改变发动机的运转速度并传递能量。
它分几个档,比如马力较强的低速档、转动快的高速档等,手动切换不同的档叫手动(MT)。
手动内部有两三个传动轴、几个齿轮。
成套的齿轮相互啮合,单只的齿轮围绕传动轴空转,同时选择并更替和传动轴一起旋转的齿轮。
但是齿轮一直在转,而齿轮在转动中无法顺利更换,所以必须通过离合器将动力阻断。
当然,在此之前有一个问题就是没有离合器车就没法前进。
离合器的两个旋转的圆盘啮合时传递动力,分离时阻断动力。
实际上这一过程是弹簧挤压与变速器相连的汽车离合器摩擦片,从而将动力传递到和发动机的曲柄轴相连的飞轮。
因此当踩下离合器踏板时,离合器摩擦片和飞轮分离,动力传递便会被阻断。
半离合器指的是离合器摩擦片分离过程中滑离的状态。
手动的操作很复杂,但从驾驶者能根据自己的意思选档这点来看,手动变速器可以说很灵活好用。
而且这种方式损耗较小,效率高,从技术角度看,手动也值得圈点。

变速器调校
好久都没发贴了。
上一个贴子给加精了。
给了我很大的动力,感谢骑友们的支持。
今天就来浅谈一下变速器的调校。
变速器是一款可以变速的车子的灵魂所在。
变速器流畅了,心情也会流畅一些。
好了,废话不多说了。
就说说不灵的时候该怎么调校吧!
先从前拨说起。
前拨有两个螺丝一个L一个H如图(借用的)这两个螺丝就是调变速器的左右定位的存在,大家要是稍稍研究过变速器就知道是怎样一个工作原理的。
L螺丝是调低速档的定位,也就是最小号牙盘的定位。
逆时针旋出的时候是靠近座管,常用于前二档下一档下不来的时候用;顺时针旋入的时候,前拨远离座管,常用于一档上二档上不去的时候用。
H螺丝是用来调高速档定位,也就是最大号牙盘,常说的三档。
旋出的时候远离座管,常用于二档上三档上不去的问题。
旋入靠近座管,常用于三档下二档下不来的时候用。
该后拨了,就不说那么详细了。
螺丝H用来调整链条在最小飞时的定位。
逆时针旋出:后拨臂远离轮组;顺时针旋进:后拨臂靠近轮组。
注意:逆时针旋出或顺时针旋进要掌握好尺度,确保最小飞与后拨导轮在同一平面。
螺丝L用来调整链条在最大飞时的定位。
逆时针旋出:后拨臂靠近轮组;顺时针旋进:后拨臂远离轮组。
注意:逆时针旋出时,要掌握好尺度,太过,会导致链条脱飞,夹在辐条与飞轮之间,很危险。
差速器间隙调整这是要看具体情况而调了!下面告诉你方法!当啮合印记偏向大端时,将从动齿轮向主动齿轮靠近,若侧隙过小将主动齿轮向外移开;当啮合印记偏向小端时,将从动齿轮远离主动齿轮,此时若侧隙过大,将主动齿轮内移近;当啮合印记偏向齿顶时,主动齿轮向从动齿轮移近,若此时间隙过小,则将从动齿轮向外移开;当啮合印记偏向齿根时,主动齿轮向从动齿轮移开,若此时间隙过大,则将从动吃乱向内移近。
归纳了一句顺口溜,齿轮移动方向:大进从,根出主;小出从,顶进主;顶进主,小出从;根出主,大进从。
图上印泥看就行了,主要就是看从动齿轮与主动齿轮的接触面来调整的,调整不好的话磨损得会很厉害的。
轴承调间隙不了,都是靠主动齿轮和从动齿轮来回纵向移动来调整差速器的。
这在修车里面也是一项重要的技术哦!呵呵!~~首先要先调整好轴承预紧度,就是你所说的轴承间隙。
调整到转动灵活,无卡滞现象,无间隙感。
主动锥齿轮轴承间隙用两轴承之间的垫片调整,加垫片轴承间隙大,反之间隙减小。
从动锥齿轮(盆齿)用调整螺母调整。
用印泥是调整齿轮的接触面积是否正确,齿轮间隙是否合适。
当啮合印记偏向大端时,将从动齿轮向主动齿轮靠近,若侧隙过小将主动齿轮向外移动当啮合印记偏向小端时,将从动齿轮远离主动齿轮,此时若侧隙过大,将主动齿轮内移近;移动从动齿轮时,当一边的调整螺母退出多少,另一边要相应拧紧多少,以保证轴承的预紧度和间隙保持不变。
当啮合印记偏向齿顶时,主动齿轮向从动齿轮移动若此时间隙过小,则将从动齿轮向外移动当啮合印记偏向齿根时,主动齿轮向从动齿轮移动,若此时间隙过大,则将从动齿轮向内移动这个是靠主动锥齿轮和轴承之间的垫片来调整。
或减速器壳体和主动锥齿轮壳体之间的垫片调整。
答:差速器轴承属圆锥止推轴承,左右两只轴承止推面相对设置,轴承锥面(即滚棒锥面)朝外,设置在减速器壳上的差速器轴承外套以两侧相对朝向中间与轴承配套,其间隙由轴承座孔上的差速器轴承调整螺母调整。
差速器轴承预紧力调整方法
用大的螺旋测微器的方法
1. 手动扭紧调整螺母紧靠到差速器轴承上.
2. 用一个大的螺旋测微器测量轴承盖上两个对应面的距离 X 和 Y,记下测量结果.
转动调整螺母时,应始终使用至少有两个或多个孔与调整螺母配合上的工具.可以用丁字板手.如果工具与槽不正确匹配,会损伤调整螺母的凸起.
3. 用丁字扳手扭紧调整螺母.
4. 再次测量 X 和 Y . 比较在第2步中测量的结果.两个距离的差就是轴承盖被扩张的量.
例如:
扭紧螺母前距离 X 和 Y = 15.315-inches (389 mm)
扭紧螺母后距离 X 和 Y = 15.324-inches (389.230 mm)
15.324-inches – 15.315-inches = 0.009-inch 差值
389.230 mm – 389.000 mm = 0.230 mm 差值
5. 如果这个差值接近或在规定值之内,继续检查被齿的背面跳动. 如果这个差值在规定值以外,重复以上操作.
轴承盖的扩张量在0.002-0.009-inch (0.05-0.23 mm)之间.。
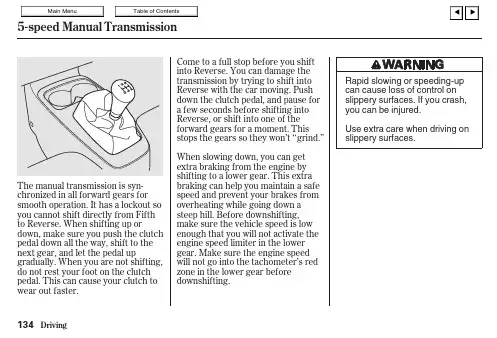
Shifting the 5 SpeedThe fully synchronized manualtransmission is very easy to shiftup or down. When you slow downfor traffic, steep hills, or corners,shift to a lower gear before theengine starts to labor. When de-scending steep grades, select alower gear to help maintain a safespeed and to prevent the brakesfrom overheating.When shifting, depress the clutchpedal fully, shift gears and then release the clutch gradually. Do not speed-shift; allow time for the gears to synchronize.To prevent grinding the gears when shifting into reverse, hold the clutch pedal depressed briefly before shifting, or shift the lever into one of the forward gears before selecting reverse.A safety lockout prevents accidental shifting straight from 5th to Reverse.Avoid rapid acceleration or sudden deceleration when either or both driving wheels are on a slippery surface. Decreased traction could cause loss of directional control.CAUTION:Do not drive with your foot on the clutch pedal as this will causepremature wear of clutch components.Do not shift into reverse while the car is moving.(cont'd)Shifting the 5 Speed (cont'd)Maximum Allowable SpeedsThe speeds shown below are the maximum at which the car can be driven or downshifted in each gear without over-revving the engine.Recommended Shift SpeedsFor best fuel economy, and effective emission control, shift at the speeds shown:Shifting the AutomaticThe automatic transmission shift lever has a locking mechanism to prevent accidental shifting into Reverse (R), Park (P) or 2nd (2). Also,an Automatic Shift Lock prevents you from shifting out of Park unless the brake pedal is already depressed and the ignition switch is in the II position.Push the button on the shift handle to shift into 2nd, Reverse or Park; depress the brake pedal and then push the button on the shifthandle to shift out of Park.: Depress the brake pedal firstand push the button, then shift.: Push the button, then shift.: Shift as desired.If you cannot shift out of Park with the brake pedal depressed and the ignition switch in the II position:1.Turn the ignition switch off and remove the key.2. Insert the key in the Shift Lock Release located to the right of the shift lever.3. Press and hold the key down,then press the button on the shift handle and move the shift lever to Neutral.4. Return the key to the ignition switch, depress the brake pedal and restart the engine.NOTE:If you encounter any problem shifting out of Park, have your authorized Honda dealer check the system as soon as possible.Depress buttonInsertSHIFT LOCK RELEASEKEY(cont'd)Operating TipsFor smoother operation, apply the brakes when shifting from Neutral or Park to a forward or reverse gear.When parking: bring the car to a stop with the foot brake, hold the brake on and shift into Park, set the hand brake and then turn off the engine.NOTE:Your 4 speed automatic transmission is equipped with a torque converter lock-up clutch. Because of this, you may notice what feels like an extra shift as the clutch engages.CAUTION:Shift into P only after the car has come to a complete stop.Shift into or out of R only after the car has come to a complete stop.Do not "rev-up" the engine when the brake is on and the shiftlever is in D, S, 2 or R.When stopped on a hill, use the brakes to hold your position, not the accelerator pedal.Do not shift from N or P into D, S, 2 or R when the engine is above idle speed. Before shifting into gear, make sure your footis firmly on the brake pedal.Do not rest your hand on the shift lever or push the shift button while driving.Driving TechniqueD-4thUse the D range for normal in-town and highway driving. The car will start off in 1st and shift automatically to 2nd, 3rd, and 4th. The further down you push the accelerator, the later the transmission will shift and the faster the car will accelerate.S 3 / S 4The "S " shift selector range changes the shift points under part throttle acceleration, allowing the transmission to stay in each lower gear for a longer period before automatically upshifting. With the shift selector in the "S " range, the "S 3" indicator light in the instrument panel will come on and the transmission will shift from 1st to 2nd and 3rd but not 4th. This is especially useful when climbing or descending grades. While driving in the "S " range, the car's performance is improved but fuel economy is reduced.Shifting the Automatic (cont'd)While driving in the "S " range, you can select 4th gear by pushing th e "S 4" switch. Depending upon vehicle speed and throttle pedal position, the transmission will shift to 4th gear when the switch is pressed ; the "S 4" indicator light in the instrument panel will come on . Pushing the "S 4" switch again will cause the transmission to downshift to 3rd gear in the "S 3" mode. The "S 4" indicator light in th e instrument panel will go out, and the "S 3" light in the instrument panel will come on I f the shift lever is moved to any other driving range, the "S 4".switch will be cancelled automatically.NOTE:In both the D and S modes, the transmission holds in 2nd while you are stopped in gear. When you start moving again, thetransmission shifts to 1st, then 2nd and so on.If rapid acceleration is necessary, depress the accelerator to the floor; the transmission will automatically shift down according to load and engine speed. This applies to both D and S ranges.(cont'd)S 4SWITCH2-2ndUse 2nd gear for increased engine braking when driving downhill,and increased power when driving uphill; also for driving on slippery roads, and freeing the car from mud or sand, where 1st gear could provide too much power and cause skidding or wheelspin. The maximum recommended speed in 2nd gear is:60 mph (97 km/h)R-Reverse CAUTION:Shift into or out of reverse only after the car has come to a complete stop; the transmission may be damaged if you shift while the car is moving.P-ParkCAUTION:Use this position when starting the engine, or when parking. Shift into Park only when the car is COMPLETELY stopped.N-NeutralUse when starting the engine or during prolonged idling in traffic.Shiftin gthe Automatic (cont'd)Towing a TrailerYour car is designed primarily to carry passengers and a normal amount of luggage. Although your car is capable of towing a trailer, there will be an effect on handling, performance, braking, general vehicle and tire durability and fuel economy.The weight of the trailer plus its cargo must not exceed a totalof 1,000 Ibs. (450 kg).The gross vehicle weight must not exceed the Gross VehicleWeight Rating (GVWR) indicated on the Certification label (see page 131 ). The gross vehicle weight is the total weight of the car, driver, passengers, luggage, hitch and trailer tongue load.The total weight supported by each axle must not exceed theGross Axle Weight Rating (GAWR). The front and rear GAWR's are shown on the Certification label (page 131 ). The distribution of luggage and passengers in the car, as well as the tongue load and hitch weight should also be considered in terms of the GAWR, which is the maximum amount of weight that should be supported over the front and the rear axles. You should have your car and trailer weighed at a commercial weighing station to check both the GVWR and GAWR's to confirm that the total weight and weight distribution are within safe driving limits.The maximum trailer tongue load must not exceed 100 Ibs. (45kg). Cargo should be distributed so that the tongue load is approximately 10% of the total weight of the trailer and its cargo. This is done by distributing approximately 60% of cargo weight toward the front of the trailer and 40% toward the rear.TRAILER WEIGHT TONGUE LOADMaximum: 1,000 Ibs (450 kg)Maximum: 100 Ibs (45 kg)Never load the trailer so that the back is heavier than the front.This will seriously affect vehicle handling. Be sure the cargo is secured so that it will not move during driving.(cont'd)Towing a Trailer (cont'd)HitchesUse only a hitch recommended by your Honda dealer. The hitch should be bolted securely to the car and installed by a qualified technician. Do not use a hitch designed for temporary installation and never use one that attaches only to the bumper.Trailer Brakes and Safety ChainsThe Honda Automobile Division recommends that trailers equipped with brakes should conform to any applicable federal and state regulations. When using a trailer equipped with electric brakes, a trailer brake controller that connects to the car's electrical system is recommended. Installing a brake controller that connects to the car's brake hydraulic system could result in brake fluid contamination or leaks. A safety chain must always be used between the car and the trailer. Leave sufficient slack in the chain so that it does not bind in sharp turns. The chain should cross under the trailer tongue to prevent the tongue from dropping to the ground.TiresMake sure your car's tires are properly inflated. Adjust tire pressure to the recommended tire pressure indicated on the label attached to the edge of the driver's door. The trailer tires should be of the proper size, load rating and inflated to the pressure recommended by the trailer manufacturer.Trailer LightsTrailer lights must comply with federal, state and local regulations. See your local recreational vehicle dealer or rental agency for the correct type of lighting and wiring for your trailer. Check for correct operation of the turn signals and stop lights each time you hitch up.CAUTION:Connections to your car's electrical system should be made by your Honda dealer or a qualified electrician. Improper installation may damage your vehicle's electrical system and cause a malfunction of the lights.Break-in ScheduleDo not tow a trailer during the 600 miles (1,000 km) break-in period: see page 2 .MaintenanceIf you tow a trailer, your vehicle will require more frequent maintenance due to the additional load. Refer to the "Maintenance schedule under severe driving conditions" on page 82 for specific information.Before TowingWith the car and trailer completely loaded and parked on a level surface, confirm that the tongue loading is correct. If the car has an abnormal nose-up or nose-down attitude, check for improper cargo distribution. Check also for excessive cargo weight, worn suspension or other causes and correct the problem before driving. Be sure the cargo is secured so it will not shift while driving. Check that your rearview mirrors conform to any federal, state or local regulations. If not, install rearview mirrors designed for towing. Before towing a trailer, practice turning, stopping and reversing with a trailer in an area away from traffic until you learn the technique.(cont'd)Towing a Trailer (cont'd)Towing SafetyStopping distance will be increased when towing a trailer. Foreach 10 mph (16 km/h) of speed, allow at least two car lengths between you and the vehicle ahead. Avoid sudden braking which may cause trailer jackknifing and loss of control.Avoid jerky starts and sudden acceleration. If your car has amanual transmission, always start out in first gear and release the clutch at moderate engine rpm.Avoid rapid lane changing and sharp turns. The trailer could hityour car in a tight turn. Slow down before making a turn. Remember, the total length of your car plus trailer will require a wider turning circle.Crosswinds may adversely affect handling of your car andtrailer. Use the rearview mirrors frequently to warn you of approaching large vehicles that may pass you causing your car and trailer to sway. When being passed, firmly grip the steering wheel and be prepared to reduce speed immediately but gradually. Never increase speed. Steer straight ahead.Towing a trailer in bad weather will magnify any difficulty incontrolling the car caused by the weather itself. Avoid sudden maneuvers: slow down and use extra caution.Be careful when passing other vehicles. Passing requiresconsiderable distance because of the added weight and length of your trailer.CAUTION:Before starting out, check the operation of the lights and all car/trailer connections. After driving a short distance, stop and recheck the lights and connections.Reversing is difficult and requires practice. While backing-up,the trailer may pivot off-course. To correct for this, grip the bottom of the steering wheel and move your hand to the left to move the trailer to the left; or to the right to move the trailer to the right. Turn the steering wheel a little at a time, and keep thespeed very low. Have someone guide you when backing.To help prevent overheating of the brakes, shift into a lower gear to make use of engine braking before descending steep orlong grades. Do not make sudden downshifts.Pay strict attention to the coolant temperature gauge when going up hills. Because of the added load of the trailer, your car's engine may overheat on hot days. Turning off the air conditionerwill reduce the load on the cooling system.On cars equipped with automatic transmission. '— Do not hold the car stationary on an incline by using the accelerator pedal; this can cause the transmission fluid to overheat. Instead, use the handbrake or foot brake.— When towing trailers, avoid high transmission fluid temperatures (caused by the transmission frequently shifting between 3rd and 4th gears) by driving in S 3.NOTE:Be sure to check state and local laws concerning maximum speed or other driving restrictions for cars towing trailers. If you are driving across several states, check each state's requirements before leaving home, because restrictions may vary,Parking with a Trailer Whenever parking your car on an incline with a trailer attached,place and seat chocks at each wheel of the car and trailer. This is in addition to the normal parking preparations of firmly applying the parking brake and placing the transmission in first or reverse (manual transmission) or P (automatic transmission).CAUTION:Parking on an incline is not recommended and should be done only if it cannot be avoided. Follow all precautions mentioned above and turn the wheels to point towards a curb if facing downhill,away from a curb if facing uphill. When leaving an inclined parking place, move the car slightly to unseat the chocks. Then while keeping the foot brakes firmly applied, have an assistant removethe chocks.。
调节变速器的方法:一:拿到车子以后先看看变速器是一个什么情况,什么毛病,接下来开始进行调整:二:有的车在后面加了一个保护器【就是变速器外面的小铁架】这个东西是保护变速器的有的车子有,有的没有,顾客回家后如果看见这个东西变形了,可以把他拆掉,就同前面【前叉上面的轴】一样都是保护的。
三:现在调整,变速器的定位一定要放在最小的飞轮上面然后开始定位,首先呢先把前面的拨链器放在最大的齿盘的位置,看看拨链器和轮盘塑料罩的高度,正常的1-3毫米,你看看你的那个,如果高度可以的看看有没有左面或是右面歪的现象。
有的顾客说我上不到3挡,那么您首先看看是不是前面的变速器上面的H螺丝太紧了导致变速器上不去,如果是这样的话就把H螺丝送一下,H螺丝是高速的负责器,L螺丝是低速的负责器。
如果上去3挡以后看着距离差不多,平行度也差不多的话,这样的话就开始定位。
四:前后都在最小的齿盘上面,前面一定要让链条贴在前拨的外侧,有个1毫米的空隙就可以,只要不碰就是可以的。
【如果前面的链条在中间的话您可以通过松L螺丝拨链器往里面移动,相反的如果是拨链器在右面的时候和链条有摩擦,您可以紧L螺丝把变速器往外面移动】。
后面的一定是要挂在最小飞轮的中间,链条一定要剧中在最小的中间。
如果不是在飞轮的中间,假如这个东西有点往上面走的话您可以吧H螺丝松一点,意思就是说往下面给他放松一点,如果在最小的齿盘上的话他有点往下偏移,您就可以吧H螺丝进一下,后面和前面的为一个道理,L。
低速。
H。
高速。
如果大片上不去的话您看看L螺丝是不是顶住了,如果是的话也是吧L螺丝送一下,如果一下上过去了,就把L螺丝紧一下。
现在在说说变速线的紧的松紧度,变速线的松紧度让他不送不紧的感觉最好,像弹吉他的感觉为最好的。
前面和后面的各有一个微调的螺丝,前面的在把手上面,后面的在后面的变速器上面,【在线管和变速器的结合处,回家后一定要仔细的找找看看,这个东西是逆时针拧的话就是把变速线进一下,顺时针的话就是把变速线放松一点。