WiTown路由使用手册
- 格式:pdf
- 大小:3.70 MB
- 文档页数:96

无线路由器安装及使用指导手册一、前言随着互联网的普及,无线路由器已经成为了现代家庭必备的设备之一。
无线路由器可以将宽带信号无线传输,方便我们在家中的各个角落都能享受到高速网络的便利。
本手册将为您提供无线路由器的安装及使用指导,帮助您正确、便捷地使用这一设备。
二、无线路由器安装步骤1.准备工作在安装无线路由器之前,您需要确保已经正确接入了宽带。
同时,您还需要找到一个稳定的电源插座,以供无线路由器使用。
2.连接a)首先,将宽带调制解调器的电源线连接到电源插座,并将宽带信号线连接到调制解调器的WAN口。
b)然后,将无线路由器的电源线连接到电源插座,并将路由器的WAN口与调制解调器的LAN口连接。
请确保连接稳固。
3.开机和设置a)当完成连接后,打开无线路由器的电源开关,等待其启动。
b)使用电脑或移动设备连接到无线路由器的无线网络,打开浏览器,在地址栏输入默认网关地址,按回车键。
c)根据无线路由器背面或说明书中的默认用户名和密码,登录路由器管理界面。
d)按照引导,进行基本设置,包括无线网络名称(SSID)、密码以及其他网络配置。
4.连接其他设备在设置完成后,您可以使用该无线网络连接其他设备,如电脑、手机、平板等。
只需搜索无线网络名称(SSID),输入密码即可成功连接。
三、无线路由器使用技巧1.网络安全为了保护您的无线网络安全,建议您设置一个强密码,并定期更换密码。
另外,您还可以开启WPA2-PSK加密,限制无线网络的接入者。
2.信号覆盖若您希望无线网络信号覆盖更广的范围,可以选择适当的位置放置无线路由器。
通常情况下,将无线路由器放置在距离常用设备较近的地方,避免信号被墙壁等物体阻挡。
3.固件更新定期检查无线路由器是否有新的固件版本发布,并及时进行升级。
固件更新通常能够修复一些已知问题,并提升设备性能。
4.访客网络如有需要,您可以启用访客网络功能,提供给访客一个独立的网络接入,以保护您的主要网络安全。
5.定期重启建议您定期重启无线路由器,以保持网络的稳定性和性能。
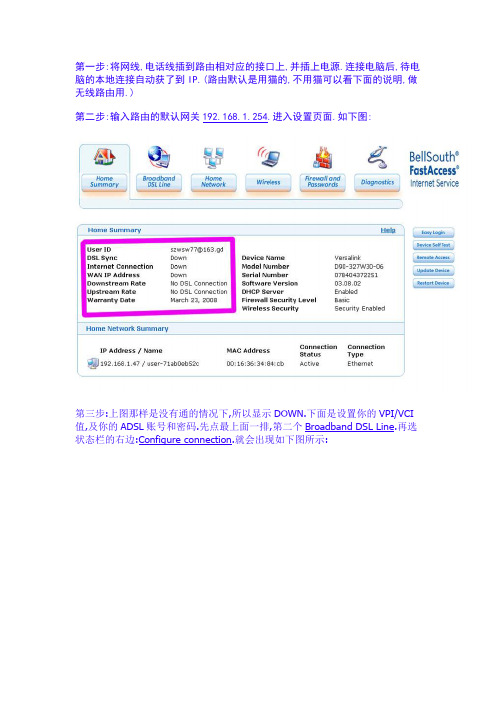
第一步:将网线,电话线插到路由相对应的接口上,并插上电源.连接电脑后,待电脑的本地连接自动获了到IP.(路由默认是用猫的,不用猫可以看下面的说明,做无线路由用.)第二步:输入路由的默认网关192.168.1.254.进入设置页面.如下图:第三步:上图那样是没有通的情况下,所以显示DOWN.下面是设置你的VPI/VCI 值,及你的ADSL账号和密码.先点最上面一排,第二个Broadband DSL Line.再选状态栏的右边:Configure connection.就会出现如下图所示:第四步,并分别按照上图所示,输入相对应的信息.VPI/VCI值请咨询当地网络营运商,切记不要复位路由哦,不然这两个值默认是8/35.有些地区是没办法使用的.下面是保存路由设置后,路由需要重启.如下图,需要等待一下.要时间吧.等一下,或刷新一下.看看.如像下图所示,说明你的网络已经通了:第六步,点第一排Wireless.再点状态栏右边的Configure Wireless进行无线设置.如下图;看看下面的设置图:到这里.你的路由已经设置完成了.拉掉你的网线(尾巴),畅享无线带来的方便.下面是将LAN口1改成WAN口,做无线路由使用,并关闭猫功能.首先输入路由的默认网关192.168.1.254.进入路由设置页面.点Broadband DSLLine.再点状态栏右边WAN.并选ETHERNET PORT 1出现如下图示:选择保存后,路由将重启.等路由重启完后.刷新一下页面,或重新打开路由设置页面.先点最上面一排,第二个Broadband DSL Line.再选状态栏的右边:Configure connection.就会出现如下图所示:输入相对应的信息后,保存,路由将重启.现次进入路由后,再等待一会,或刷新页面.或进行无线设置先.具体无线方面设置,我们上面有说明.都是一样的.可以照着设置.复位以后的设置说明:复位以后出现以后的界面:这界面并不是要你设置ADSL账户我密码,你按那个NEXT按钮是没有作用的。

N750 WiFi Router1. Attach the router stand tothe router.Orient the router vertically.Insert the tabs of the stand into the slots on the bottom of your router.2. Prepare and connect yourmodem.Unplug your modem’s power. If your modem uses a battery backup, remove the battery.Plug in your modem. If your modem uses a battery backup, put the battery back in. Then4. Connect a device.Use an Ethernet cable to connect your computer to a LAN port on the router.You can also use WiFi to connect your WiFi device to the router. To connect with WiFi, use the WiFi network 5. Log in to the router.Launch a web browser.NETGEAR genie displays.If you do not see genie, enter in the address field of the web browser. When prompted, enter admin for the user name and password for the password.Follow the genie steps to connect to the Internet.6. Get the genie app.Download the free genie app from /genie.Easily share media, files, and printers on the network from your smartphone, tablet, or laptop.3. Power on the router .Wait for the Power LEDto light solid green. If the Power LED does not light, press the Power On/Off button.Wait for the 2.4 GHz LEDto light solid green.Modem(varies by region)RouterPower adapterRouter standOctober 2014NETGEAR, Inc.350 East Plumeria Drive San Jose, CA 95134, USANETGEAR, the NETGEAR logo, and Connect with Innovation are trademarks and/or registered trademarks of NETGEAR, Inc. and/or its subsidiaries in the United States and/or other countries.Information is subject to change without notice. © NETGEAR, Inc. All rights reserved.WiFi Network Name and PasswordThe preset WiFi network name (SSID) and password (network key) are unique to your router, like a serial number. Because the router automatically uses WiFi security, you don’t need to set it up. The WiFi settings are on theproduct label.NETGEAR recommends that you use the preset WiFi settings because you can check the label if you forget them. NETGEAR genie lets you change these settings. If you do so, write down the new WiFi settings and store them in a safe place.Find the preset WiFi settings on your router and record them here:WiFi network name (SSID)Network key (password)If you change the WiFi settings, write the new settings here for easy reference and store this booklet in a safe place.WiFi network name (SSID)Network key (password)Join the WiFi NetworkTo connect your computer or WiFi device (such as a smartphone or gaming device) to your router’s WiFi network, you can use either the manual method or the Wi-Fi Protected Setup (WPS) method.Manual Method1. Open the software utility that manages your WiFi connections on thecomputer or WiFi device that you want to connect to your router.This utility scans for all wireless networks in your area.2. Find and select your router’s WiFi network name (SSID).The SSID is on the product label.3. Enter the router’s password (or your custom password if you changedit) and click the Connect button.The password is on the product label.4. Repeat Step 1 through Step 3 to add other computers or WiFi devices.WPS MethodIf your computer or WiFi device supports WPS, you can use WPS to join the modem router’s WiFi network. For help with the WPS button on your computer or WiFi device, check the instructions or online help that came with that computer or WiFi device. Some older equipment cannot use WPS.Note: WPS does not support WEP security. If you are using WEP security, use the manual method.1. Press the WPS button2. Within two minutes, on your computer or WiFi device, press its WPSbutton or click its onscreen WPS button.The computer or WiFi device connects to your router’s WiFi network.3. Repeat this process to add other computers or WiFi devices to thenetwork.SupportThank you for purchasing this NETGEAR product.After installing your device, locate the serial number on the label of your product and use it to register your product at https:// . You must register your product before you can use NETGEAR telephonesupport. NETGEAR recommends registering your product through the NETGEAR website. For product updates and web support, visit .NETGEAR recommends that you use only the official NETGEAR support resources.You can get the user manual online at or through a link in the product’s user interface.For the current EU Declaration of Conformity, visit/app/answers/detail/a_id/11621/.For regulatory compliance information, visit /about/regulatory/.See the regulatory compliance document before connecting the power supply.。


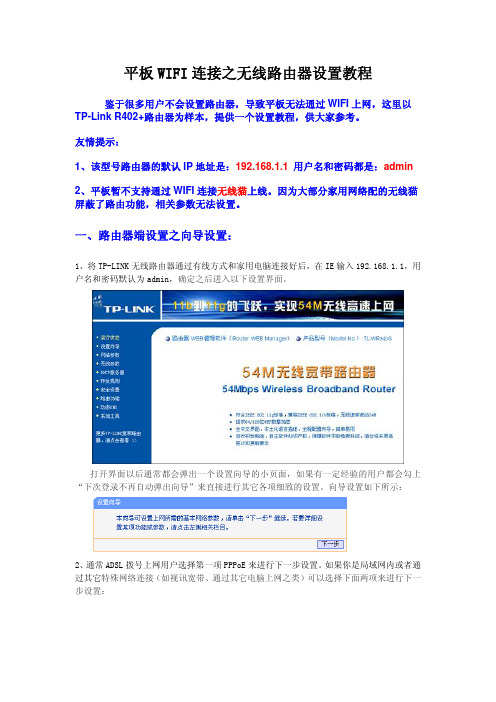
平板WIFI连接之无线路由器设置教程鉴于很多用户不会设置路由器,导致平板无法通过WIFI上网,这里以TP-Link R402+路由器为样本,提供一个设置教程,供大家参考。
友情提示:1、该型号路由器的默认IP地址是:192.168.1.1用户名和密码都是:admin2、平板暂不支持通过WIFI连接无线猫上线。
因为大部分家用网络配的无线猫屏蔽了路由功能,相关参数无法设置。
一、路由器端设置之向导设置:1、将TP-LINK无线路由器通过有线方式和家用电脑连接好后,在IE输入192.168.1.1,用户名和密码默认为admin,确定之后进入以下设置界面。
打开界面以后通常都会弹出一个设置向导的小页面,如果有一定经验的用户都会勾上“下次登录不再自动弹出向导”来直接进行其它各项细致的设置。
向导设置如下所示:2、通常ADSL拨号上网用户选择第一项PPPoE来进行下一步设置。
如果你是局域网内或者通过其它特殊网络连接(如视讯宽带、通过其它电脑上网之类)可以选择下面两项来进行下一步设置:这里先说明一下ADSL拨号上网设置,到ADSL拨号上网的帐号和口令输入界面,按照字面的提示输入用户在网络服务提供商所提供的上网帐号和密码然后直接按下一步。
3、接下来进入无线设置界面,可以看到有无线状态、SSID、频段、模式这四项参数。
检测不到无线信号的用户留意一下:无线状态:这一项必须选“开启”,否则路由器的无线功能不会工作;SSID:这一项用户就是给自己无线路由器起个名字,在使用WIFI搜索时,可以根据这个名字来识别路由器。
一般不要使用中文命名,否则可能搜索不到;频段:这一项我们拉下来可以看到有13个数字选择,这里的设置只是你路由的无线信号频段,为了避免与其它的无线信号在连接上发生冲突,我们建议指定一个具体的数字。
大家长用的是6;模式:这一选项拉下来我们可以看到TP-LINK无线路由的几个基本无线连接工作模式,我们建议选最后面一项,包含802.11b/g/n,这样可以向下兼容802.11b和802.11g。
NetHammer系列路由器软件配置手册第6部份安全管理目录第1章 AAA和RADIUS协议配置......................................................................................1-1 1.1 AAA和RADIUS简介.....................................................................................................1-11.1.1 AAA概述...........................................................................................................................1-11.1.2 RADIUS概述.....................................................................................................................1-1 1.2 AAA和RADIUS的配置..................................................................................................1-21.2.1 AAA和RADIUS的配置任务列表...................................................................................1-21.2.2 激活AAA..........................................................................................................................1-21.2.3 配置对PPP和Login用户的认证方法表........................................................................1-21.2.4 配置PPP的计费方法表...................................................................................................1-41.2.5 配置PPP的实时计费功能...............................................................................................1-51.2.6 配置本地用户数据库........................................................................................................1-51.2.7 IP地址分配........................................................................................................................1-71.2.8 配置RADIUS服务器.......................................................................................................1-8 1.3 AAA和RADIUS的监控与维护.....................................................................................1-10 1.4 AAA和RADIUS配置实例............................................................................................1-12 1.5 RADIUS常见故障.........................................................................................................1-13第2章终端访问安全...........................................................................................................2-1 2.1 终端访问用户的分类......................................................................................................2-1 2.2 终端访问安全特性..........................................................................................................2-1 2.3 终端访问安全配置任务...................................................................................................2-2第3章防火墙配置指导.......................................................................................................3-1 3.1 防火墙简介.....................................................................................................................3-1 3.2 HOS提供的防火墙特性..................................................................................................3-3 3.3 防火墙配置.....................................................................................................................3-33.3.1 配置任务列表:................................................................................................................3-33.3.2 配置过滤模式:................................................................................................................3-33.3.3 配置进行连接状态统计的网络:....................................................................................3-43.3.4 配置访问控制列表:........................................................................................................3-43.3.5 配置缺省过滤策略:........................................................................................................3-73.3.6 配置连接会话超时时间:................................................................................................3-83.3.7 配置连接会话数限制:....................................................................................................3-83.3.8 在接口上应用访问控制列表:........................................................................................3-93.3.9 使能包过滤功能:............................................................................................................3-9 3.4 防火墙监控和维护........................................................................................................3-10 3.5 典型示例......................................................................................................................3-12第4章 IPSec配置...............................................................................................................4-14.1 IPSec简介......................................................................................................................4-14.1.1 IPSec概述...........................................................................................................................4-14.1.2 加密卡................................................................................................................................4-14.1.3 术语说明............................................................................................................................4-1 4.2 HOS提供的IPSEC特性................................................................................................4-24.3 IPSEC的配置.................................................................................................................4-24.3.1 配置任务列表....................................................................................................................4-24.3.2 设置安全联盟存活期的全局缺省值................................................................................4-34.3.3 创建加密访问控制列表....................................................................................................4-34.3.4 定义安全转换集................................................................................................................4-34.3.5 定义安全策略....................................................................................................................4-54.3.6 在接口上应用安全策略组..............................................................................................4-104.3.7 指定安全策略组的本地地址..........................................................................................4-104.3.8 启用IPSec功能...............................................................................................................4-11 4.4 IPSEC的监控和维护....................................................................................................4-11 4.5 VPN加密卡的监控和维护.............................................................................................4-144.5.1 复位加密卡......................................................................................................................4-144.5.2 使能/关闭,允许/禁用加密卡........................................................................................4-154.5.3 显示加密卡状态及统计信息..........................................................................................4-15 4.6 典型示例......................................................................................................................4-164.6.1 示例一:..........................................................................................................................4-164.6.2 示例二:..........................................................................................................................4-214.6.3 示例三:..........................................................................................................................4-26 第5章 IKE配置..................................................................................................................5-15.1 IKE简介.........................................................................................................................5-15.1.1 IKE概述.............................................................................................................................5-15.1.2 术语说明............................................................................................................................5-2 5.2 HOS提供的IKE特性.....................................................................................................5-25.2.1 穿越NAT的IKE协商......................................................................................................5-2 5.3 IKE的配置......................................................................................................................5-35.3.1 配置任务列表....................................................................................................................5-35.3.2 配置IPSec和加密访问控制列表.....................................................................................5-35.3.3 产生IKE策略...................................................................................................................5-45.3.4 使能或禁止IKE................................................................................................................5-65.3.5 RSA加密nonces身份验证...............................................................................................5-65.3.6 预共享密钥身份验证........................................................................................................5-95.3.7 配置keepalive报文发送时间间隔.................................................................................5-10 5.4 IKE的监控和维护.........................................................................................................5-10 5.5 典型示例......................................................................................................................5-13第1章AAA和RADIUS协议配置1.1 AAA和RADIUS简介1.1.1 AAA概述AAA是Authentication,Authorization and Accounting(认证、授权和计费)的简称,它把认证、授权和计费这三种安全功能集中起来,作为一个可剪裁的模块,并提供了一个统一的配置框架来进行管理。
Wait approximately 2 minutesuntil your modem turns on.If your modem has a battery backup,first remove and reinsert the batterybefore connecting yourmodem to power.N150 WirelessRouterN150 Wireless RouterPackage Contents:N150 Wireless RouterWNR1000v2h2Installation GuideEthernet cable(not included)Ethernet cable ( ) to your modem,and the other end to the Internet port.Step 6:Step 4:Connect the power adapter to therouter, then plug it into an outlet.If none of the LEDs turn on, make sure thatthe Power On/Off button is in the ON position(pushed in).Wait until the wireless LED turnssolid green.Step 5:Connect the routerto your computer.Use another Ethernet cable to establisha wired connection as shown in this diagram.Optionally, connect wirelessly by using thepreset wireless security settingslocated on the bottom label.Open a browser.If the Web page does not display,close and re-open the browserand enter inthe address bar, or check the“Troubleshooting” section onthe back of this installation guide.© 2011 by NETGEAR, Inc. All rights reserved. NETGEAR and the NETGEAR logo are registeredtrademarks of NETGEAR, Inc. in the United States and/or other countries. Other brand and product names are trademarks or registered trademarks of their respective holders. Information is subject to change withoutnotice.March 2011Find the preset Wireless Settings on your router and record them here:Wi-Fi Network Name (SSID) _______________________________Connect Wireless Devices to Your RouterChoose either the manual or Wi-Fi Protected Setup (WPS) method to add wireless computers, and other devices to your wireless network.Manual Method1. Open the software utility that manages your wireless connections on thewireless device that you want to connect to your router (iPhone, laptop,computer, gaming device). This utility scans for all wireless networks in your area.2. Look for the preset NETGEAR wireless network name (SSID), and select it.The preset Wi-Fi network name (SSID) is located on the product label on the bottom of the router.Note: If you changed the name of your network during the setup process, look for that network name.3. Enter the preset password (or your custom password if you changed it), andclick Connect .4. Repeat steps 1–3 to add other wireless devices.WPS MethodIf your wireless device supports WPS (Wi-Fi Protected Setup)—NETGEAR calls this method Push 'N' Connect—you might be prompted to press the WPS button on the router instead of entering a password. If this happens:1. Press the WPS buttonon the router.2. Within 2 minutes, press the WPS button on the client device, or follow theWPS instructions that came with your wireless device to complete the WPS process. The device will then be connected to your router. 3. Repeat this process to add other WPS wireless devices.Note: WPS does not support WEP security. If you try to connect a WEP client to your network using WPS, it will not work.TroubleshootingThe browser cannot display the Web page.• Make sure that the PC is connected to one of the four LAN Ethernet ports, orwirelessly to the router.• Make sure that the router is fully up and running. Its wireless LED should turnon.• Close and re-open the browser to make sure that the browser does not cachethe previous page.• Browse to .• If the PC is set to a static or fixed IP address (this is uncommon), change it toobtain an IP address automatically from the router.Other FeaturesFor complete DoC please visit the NETGEAR EU Declarations of Conformity website at: /app/answers/detail/a_id/11621.For GNU General Public License (GPL) related information, please visit /kb_web_files/open_src.asp .For additional features, including Live Parental Controls, Traffic Metering, Guest Access, and others, please log into your router at .Download the free NETGEAR Genie Automatically fix common network problems and easily manage your home network connections./genie。
QUICK INSTALL GUIDEDual-Band AC1200 Gigabit Router XWR-1200Includes:④Dual-Band Wireless AC1200 Gigabit Router④Dual Band Antennas (2)④Ethernet Cable④Power AdapterROUTER SETUP AND CONFIGURATION1 Physical InstallationThe XWR-1200 Wireless Router is designed for simple and e cient installation. For horizontal installation, install the rubber feet and position the XWR-1200 on a desk or other horizontal surface with adequate room around the device for ventilation. For wall or ceiling mounting, simply follow the directions on the included mounting pattern and use the mounting keyholes on the XWR-1200.2 Connecting Antennas, Ethernet and Power④Antennas: Ensure all dual-band antennas are installed on the router.④INTERNET Connection: Connect the Ethernet cable from the modem/ router equipment provided by your Internet Service Provider (ISP) to the black INTERNET port of the XWR-1200.④AC Power: Connect the included AC Adapter to the XWR-1200 fi rst and then to the AC outlet.3 Preparing for AccessIP AddressingThe XWR-1200 default LAN IP address is 192.168.0.1. The DHCP server on the XWR-1200 is confi gured by default to create a 192.168.0.x network.Both the default LAN IP address and subnet scheme can be changed. However for hassle-free plug-and-play installation of other Luxul hardware, we recom-mend you use the default IP address if possible.If your client device is set to obtain an address automatically, no further confi g-uration is required and you can skip to the next step, Access and Setup.5 Advanced ConfigurationConfiguring the XWR-1200 as a Wireless ControllerThe XWR-1200 can manage up to two additional access points to enable wireless client roaming and simple confi guration. To enable this feature, ensure one or two compatible access points are connected to the same network as the XWR-1200, then select Wireless Controller from the XWR-1200 web confi guration interface. Follow the online help to add the access point(s) to the profi le.c Caution: Do not manually confi gure access points you intend tomanage with the XWR-1200 for seamless roaming. Doing so willresult in standalone AP that the XWR-1200 will not fi nd/manage.XWR-1200 as a ControllerOther Advanced ConfigurationFor more information on confi guring advanced features such as DDNS, VPN, etc., refer to the support resources at .6 Hardware OperationXWR-1200 Front Panel LED IndicatorsFront PanelXWR-1200 Front Panel View Rear PanelXWR-1200 Rear Panel View④Antenna Ports: 4 RPSMA female antenna ports to connect the included antennas.n NOTE:B oth antennas should be installed prior to powering up the XWR-1200 and are required for optimal performance.④Power Input: Power adapter included.n NOTE:T o reboot the router, disconnect the power adapter,wait 10 seconds and reconnect the power adapter.④WAN Port: (1) black RJ-45 Ethernet Port for Internet connection.④LAN 1 - 4 Ports: (4) green RJ-45 Ethernet ports for connecting to the local network.n NOTE: A Luxul switch is recommended in conjunction with the XWR-1200 to increase the number of local ports available.④Reset Button: Used to restore factory default settings.c CAUTION:H olding the Reset button longer than 10 seconds willresult in a factory reset.To restore factory defaults, press and hold the Reset button until the System LED stops fl ashing (approximately 20 seconds). A factory reset will take one minute or more to complete. A successful factory reset is indicated when all of the Port LEDs fl ash once. When the System LED starts fl ashing again, the unit is ready.c CAUTION:R esetting the XWR-1200 to factory defaults will removeall custom settings.SalesP: 801-822-5450E:***************Technical Support P: 801-822-5450 Option 3E:*****************LUX-QIG-XWR-1200-v6 0311707Copyright and Trademark NoticesNo part of this document may be modifiregistered trademarks are property of their respective holders.。
WiTown智能Wi-Fi营销系统使用手册欢迎和树熊网络一起,重新认识Wi-Fi杭州树熊网络有限公司目录设备的安装: (4)基本上网设置 (5)一、设置向导 (8)1.1 配置向导 (8)二、系统状态 (11)2.1 网络状态 (11)2.2 流量分析 (12)2.3 运行状态 (13)2.4 主机监控 (14)2.4.1 主机监控 (14)2.4.2 WEB用户 (15)2.4.3 DHCP用户 (16)2.4.4 聊天账号 (16)2.5DNS缓存 (16)2.6 登陆记录 (17)2.7 日志 (17)三、网络配置 (19)3.1 局域网 (19)3.2 广域网 (20)3.3 DHCP配置 (24)3.4 动态域名 (25)3.5 路由名称 (26)四、智能流控 (27)4.1优先级设置 (27)4.2 宽带限制 (29)4.3 宽带保证 (30)4.4 控制例外 (31)五、无线配置 (32)5.1 基本设置 (32)5.2 无线安全 (33)5.3 WDS设置 (34)5.4 WPS设置 (36)5.5 用户列表 (37)六、行为管理 (38)6.1行为识别 (38)6.2聊天软件管理 (38)6.2.1 QQ黑白名单 (38)6.2.2淘宝旺旺黑白名单 (39)6.2.3飞信黑白名单 (39)6.2.4 MSN黑白名单 (40)6.3高级管理 (40)6.3.1 WEB关键字过滤 (40)6.3.2禁止WEB提交 (42)6.3.3后缀名过滤 (42)1杭州树熊网络有限公司6.4邮件监控 (43)6.4.1邮件监控 (43)6.4.2邮箱白名单 (44)6.4.3 WEB邮箱过滤 (44)6.4.4 WEB邮箱白名单 (45)6.5网址管理 (46)6.5.1网址分类组 (46)6.5.2网址数据库 (46)6.5.3网址防火墙 (47)6.5.4日志 (47)6.6域名管理 (48)6.6.1域名解析 (48)6.6.2域名过滤 (48)6.6.3域名重定向 (49)6.7 URL重定向 (49)6.7.1 URL重定向 (49)6.7.2 URL日志 (50)6.8特征库更新 (51)6.9行为管理日志 (51)七、WiTown设置 (52)7.1 基本设置 (52)八、VPN应用 (53)8.1 VPN管理 (53)8.1.1 PPTP 服务 (53)8.1.2 PPTP 用户 (53)8.1.3 PPTP用户状态 (54)8.1.4 VPN借线 (55)8.1.5 VPN状态 (56)8.2 IPSec配置 (56)8.2.1 IPSec网对网 (56)8.2.2 IPSec点对网 (57)8.2.3 L2TP IPSec (58)8.2.4 L2TP用户 (59)8.2.5 L2TP状态 (59)8.3 OVPN管理 (60)8.3.1 OVPN设置 (60)8.3.2 OVPN状态 (63)8.3.3 OVPN证书 (64)8.3.4 OVPN日志 (65)九、防御配置 (66)9.1 ARP管理 (66)9.1.1 ARP列表 (66)9.1.2 ARP绑定 (67)9.1.3 ARP防御 (67)9.1.4 ARP日志 (68)2杭州树熊网络有限公司9.2 访问控制 (69)9.2.1 访问控制 (69)9.2.2 日志 (72)9.3 MAC过滤 (72)9.4 连接限制 (73)9.5 DDOS防御 (74)9.6 Ping W AN口 (74)9.7 连接数设置 (75)9.8防御二级路由 (75)十、USB存储 (76)10.1 设置状态 (76)10.2 共享服务 (76)10.3 USB日志 (77)10.4 3G上网设置 (77)10.4.1 3G上网设置 (78)10.4.2 接口状态 (78)十一、高级配置 (79)11.1 策略路由 (79)11.1.1 负载均衡 (79)11.1.2 地址范围 (81)11.1.3 策略路由 (81)11.1.4线路状态 (83)11.1.5 日志 (83)11.2 通告系统 (84)11.3 端口映射 (84)11.3.1 端口映射 (84)11.3.2 DMZ设置 (85)11.3.3 端口触发 (85)11.3.4 UPNP设置 (86)11.4 端口设置 (86)11.5 W AN口数 (87)11.6 路由表 (87)11.6.1 当前路由表 (88)11.6.2 静态路由表 (88)11.7 DNS代理 (89)11.7.1 DNS代理 (89)11.7.2 DNS缓存 (89)11.8 访问设置 (89)11.9 端口镜像 (90)十二、系统维护 (92)12.1 Ping检测 (92)12.2 网络唤醒 (92)12.3 系统控制 (93)12.4 固件升级 (94)3杭州树熊网络有限公司设备的安装:设备接口说明:LAN口:用来连接局域网的交换机或者PC电脑的网卡。
WAN口:用以ADSL、光纤或者以太网的接入。
Reset:复位按钮,用来将设备参数恢复到出厂预设值。
指示灯说明:Power:电源指示灯。
灯亮表示设备通电正常。
System:系统指示灯。
系统正常运行时此灯会亮。
WAN:WAN口工作指示灯。
灯亮表示该WAN口线路已连通。
LAN:LAN口工作指示灯。
灯亮表示LAN口线路接通。
4杭州树熊网络有限公司 5基本上网设置主要介绍在路由器连接好以后,通过登陆路由的Web 管理页面,进行路由器的基本信息配置,达到快速上网的目的。
首先需要将您的电脑与路由器的LAN 口用网线连接起来,并将本机的IP 地址设置为192.168.18.X 段。
我们以192.168.18.2为例来介绍其设置方法: 鼠标右键点击桌面“网上邻居”图标,选择属性,打开‘网络连接’菜单,如图1所示,(或者点击“开始-设置-网络连接”也可以打开,如图2所示)。
(图1) (图2)在打开的窗口中找到“本地连接”图标,鼠标右键点击此图标,并选择‘属性’选项,然后在接下来的窗口中选择“Internet 协议(TCP/IP)”并双击(如图3所示),进入IP 地址修改窗口。
(图3)将本机IP 地址修改为192.168.18.2,子网掩码为255.255.255.0,网关为192.168.18.254,DNS 服务器地址填上网络供应商提供给您的DNS 地址,若不清楚,可以直接填网关IP ,如图4所示:杭州树熊网络有限公司6(图4)然后我们打开开始菜单,选择“运行”,并输入‘ping 192.168.18.254 -t’看看线路是否通畅。
如图5所示:(图5)若显示图6所示的结果,则表明网络连接正常;若显示图7所示的结果,则表明网络连接有问题,请检查网络连接状况。
(图6)杭州树熊网络有限公司7(图7)当您与路由器正常连接以后,您就可以通过IE ,在地址栏输入192.168.18.254(路由器的默认IP )进入路由器WEB 设置界面。
会出现图8所示的登陆画面:(图8)路由器默认的用户名是“witown ”密码为“witown ”,您可以在‘高级配置-访问设置’里自定义更改登陆的用户名及密码。
温馨提示:为了安全起见,我们强烈建议您在登陆以后更改管理员密码,并牢记此密码。
若密码忘记,将无法再登陆到路由器的Web 管理界面,必须reset 恢复出厂设定值才能重新登陆。
杭州树熊网络有限公司 8一、设置向导设置向导可以协助您快速的配置好您的网络,只要按照步骤操作完成,就可以设置好您的WiTown 智能Wi-Fi 营销系统。
1.1 配置向导进入系统首页点击“配置向导”图标,出现配置向导欢迎界面,如图所示:点击下一步就开始步骤1设置。
步骤1:路由器局域网口参数,可以修改路由器的LAN 口IP 地址,子网掩码及MAC 地址,默认地址如图所示:如果需要更改局域网口MAC 地址,可以点击“随机”按钮进行更改;如果想恢复默认MAC 地址点击“默认”按钮即可。
点击“下一步”按钮进行步骤2设置。
步骤2:路由器WAN 口数量设置,此处用于对广域网数量进行设置。
如图所示:注意:如果不需要用到这么多WAN 口的用户可以把WAN 口变为LAN 口来使用,而当用户需要用到WAN 口的时候,直接把LAN 口又设置为WAN 口,就可以了。
步骤3:广域网设置,此处用于对广域网接口参数进行配置。
如图所示:杭州树熊网络有限公司 9选择您要设置的广域网:可以选择对应的广域网接口来进行设置。
连接类型:即广域网的接入类型选择,有:DHCP 动态获取、PPPOE 拨号、static 静态接入等多种接入方式,一般我们常用的有DHCP 、PPPOE 跟static 这3种。
静态DNS :填入网络服务商提供给您的DNS 服务器IP 地址。
(如果是PPPOE 接入,可以不用设置DNS 服务器地址,线路会自动获取到)DNS 解析优先级:对于多WAN 口接入时,此值的优先级别决定了DNS 解析的出口。
MAC 地址:此选择可以修改路由器对应的广域网的MAC 地址,可以手动修改,也可以随机选择。
点击“克隆”按钮即可将该广域网的MAC 设置为当前局域网登录的管理员的电脑的MAC 地址。
参照值:设置广域网出口带宽时的参考数值,可以参考此数值来设置。
选择一个参照值之后,下面外网带宽的数值会自动填写上去。
外网带宽:广域网的上下行带宽值,若您不清楚带宽值的换算,可以使用参照值来帮您自动填写。
如果您的带宽不在参考值的范围之内,请手动设置出口带宽值大小。
运营商:您的广域网线路的运营商,例如网通或者电信。
如果选择“不设置”,则该线路需与策略路由功能配合使用。
单WAN 口接入环境可以不设置运营商。
步骤4:路由时间更新的设置。
您可以自定义修改路由器的时间更新服务器及时区选择。
如图所示:一般建议保持默认设置,如果想手动设置路由器时间,可将模式选择为“手动设置”步骤5:配置路由器访问设置。
配置路由器的管理员密码,本地及远程访问端口。
如图所示:HTTP访问端口:局域网访问端口。
修改此端口之后访问格式为(http://路由器IP:HTTP访问端口),如http://192.168.18.254:80。
远程访问:是否开启路由器远程访问功能。
远程访问端口:远程访问路由器的端口。
远程访问路由器格式为(http://广域网IP/动态域名:远程访问端口),如:8080。
注:访问格式中的冒号为英文状态下输入的符号。
设置好之后,点击完成,路由会显示‘正在操作中,请等待…’等待约十几秒,完成之后,会自动返回到路由向导主界面。
设置好这些之后,您就可以正常连接互联网了。
二、系统状态系统运行时的一些相关信息,从这些基本信息,我们可以了解到路由器的工作情况。