智能显示器使用说明
- 格式:doc
- 大小:2.28 MB
- 文档页数:15

M14t平板显示器用户指南机型:62A3产品编号ThinkVision M14t62A3-UAR1-WWA20140FX0第一版(2020年3月)© 版权所有 Lenovo 2020。
LENOVO产品、数据、计算机软件、及服务基于专项资金开发,作为48 C.F.R. 2.101定义的商品销售给政府机构,并授予政府机构有限的受限制的使用、复制和公开权利。
受限制的有限权利声明。
受限制的有限权利声明:如果产品、数据、计算机软件、或服务按照总务管理器“GSA”合约交付,则其使用、复制、或公开须遵循在合约号GS-35F-05925中制定的限制。
目录安全事项 (iv)一般安全原则 (iv)安全和维护指南 (v)重要安全信息 (v)第1章开始使用 ...............................................................................................1-1物品清单 .........................................................................................................................1-1产品概述 .........................................................................................................................1-2设置显示器......................................................................................................................1-5注册您的选件 ..................................................................................................................1-8第2章调整和使用显示器.................................................................................2-1舒适和辅助功能...............................................................................................................2-1安排您的工作区域 ...........................................................................................................2-1放置和观看显示器 ...........................................................................................................2-1关于健康工作习惯的小技巧.............................................................................................2-2眼睛疲劳 .........................................................................................................................2-2 Low Blue Light(低蓝光) ........................................................................................2-3与显示器互动 ..................................................................................................................2-4触摸屏 .............................................................................................................................2-6联想触控笔....................................................................................................................2-10连接多个显示器时的触控设置 .......................................................................................2-12调整显示器图像.............................................................................................................2-13选择支持的显示模式 .....................................................................................................2-16了解电源管理 ................................................................................................................2-17保养显示器....................................................................................................................2-19壁挂(可选) ................................................................................................................2-19第3章参考信息 ...............................................................................................3-1显示器规格......................................................................................................................3-1故障排除 .........................................................................................................................3-3手动安装显示器驱动程序 ................................................................................................3-5服务信息 .........................................................................................................................3-7附录A. 服务和支持.........................................................................................A-1注册您的选件 .................................................................................................................A-1在线技术支持 .................................................................................................................A-1电话技术支持 ................................................................................................................A-1附录B.声明.....................................................................................................B-1回收信息 ........................................................................................................................B-2商标................................................................................................................................B-2土耳其合规声明..............................................................................................................B-3乌克兰RoHS ..................................................................................................................B-3印度RoHS ......................................................................................................................B-3电源线和电源适配器 ......................................................................................................B-3废弃电器电子产品回收处理管理条例》提示性说明.......................................................B-3中国环境标志产品认证提示性说明.................................................................................B-3中国能源效率标识 ..........................................................................................................B-3有害物质 ........................................................................................................................B-4 China RoHS 合格评定制度标识 ....................................................................................B-4安全事项一般安全原则有关安全使用计算机方面的提示,请转到:/safetyBefore installing this product, read the Safety Information.适用于在特殊控制的室内照明环境中进行娱乐,以避免干扰屏幕的反射。
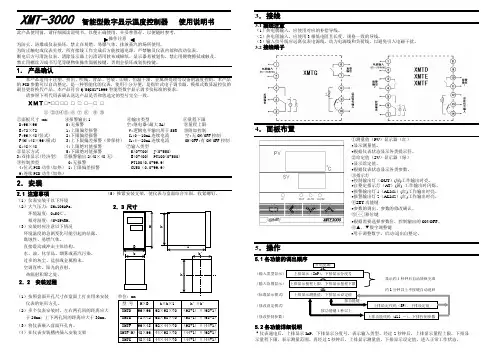
XMT-3000 智能型数字显示温度控制器使用说明书此产品使用前,请仔细阅读说明书,以便正确使用,并妥善保存,以便随时参考。
操作注意为防火、防爆或仪表损坏,禁止在易燃、易爆气体,排放蒸汽的场所使用。
为防止触电或仪表失效,所有接线工作完成后方能接通电源,严禁触及仪表内部和改动仪表。
断电后方可清洗仪表,清除显示器上污渍请用软布或棉纸。
显示器易被划伤,禁止用硬物擦拭或触及。
禁止用螺丝刀或书写笔等硬物体操作面板按键,否则会损坏或划伤按键。
1.产品确认本产品适用于注塑、挤出、吹瓶、食品、包装、印刷、恒温干澡、金属热处理等设备的温度控制。
本产品的PID参数可以自动整定,是一种智能化的仪表,使用十分方便,是指针式电子调节器、模拟式数显温控仪的最佳更新换代产品。
本产品符合Q/SQG01-1999智能型数字显示调节仪标准的要求。
请参照下列代码表确认送达产品是否和您选定的型号完全一致。
XMT□-□□□□□□□—□□①②③④⑤⑥⑦⑧⑨⑩①面板尺寸(mm)④报警输出1 ⑥输出类型⑧量程下限D:96×96 0:无报警空:继电器(最大3A) ⑨量程上限E:72×72 1:上限偏差报警 V:逻辑电平输出用于SSR ⑩附加控制F:96×48(竖式) 2:下限偏差报警 I1:0~10mA连续电流空:无ON/OFF控制F(H):48×96(横式) 3:上下限偏差报警(带保持) I2:4~20mA连续电流 ON/OFF:有ON/OFF控制G:48×48 4:上限绝对值报警⑦输入类型②显示方式 5:下限绝对值报警 K(0-700) J(0-550)3:双排显示(经济型) ⑤报警输出2(48×48无) E(0-400) PT100(0-500)③控制类型 0:无报警 PT100(0.0-99.9)4:位式PID动作(加热) 1:上限偏差报警 CU50(0.0-99.9)9:连续PID动作(加热)2.安装2.1 注意事项(5)推紧安装支架,使仪表与盘面结合牢固,收紧螺钉。
VX2780-4K-hd 显示器使用手册型号:VS17672P/N:VX2780-4K-HD-2感谢您选择ViewSonic作为世界领先显示解决方案提供商,ViewSonic 一直专注在技术发展、创新和简单化方面超过世界的预期。
在ViewSonic,我们相信我们的产品能够对世界产生积极的影响,并且我们深信您选择的 View-Sonic 产品会很好地为您服务。
再次感谢选择 ViewSonic!目录1.注意事项与警告 (1)2.准备使用 (3)2-1. 包装物品 (4)2-2. 显示器外观 (5)2-3. 硬件安装 (6)2-4. 快速安装 (9)2-5. 电源开启 (11)3.调整屏幕图像 (12)3-1. 设置时序模式 (12)3-2. 使用控制面板 (13)4.OSD菜单介绍 (15)4-1. OSD菜单树 (15)4-2. OSD菜单说明 (21)4-3. 显示器设置管理 (25)5.技术规格 (26)6.故障诊断 (28)7.清洁和维护 (29)如何清洁显示器 (29)8.电磁相容信息 (31)8-1. FCC 符合性声明 (31)8-2. 加拿大工业部声明 (31)8-3. 针对欧盟国家的 CE 符合性 (32)8-4. 电子电气产品有害物质限制使用标识要求 (33)8-5. 产品达到使用寿命后废弃产品 (34)9.版权信息 (35)10.服务信息 (36)客户支持 (36)有限保修 (39)1.注意事项与警告1.在使用设备之前,仔细阅读这些指导说明。
2.妥善保管这些指导说明。
3.注意所有警告并遵照所有指示。
4.使用显示器时,请保持离屏幕约 40-50 公分的距离。
5.在移动时务必小心搬动显示器。
6.切勿拆下后盖。
显示器内有高压零件。
如果您触碰这些零件,可能会受到严重伤害。
7.请勿在靠近水的地方使用本设备。
警告: 为减低火灾或电击的危险,请勿将此产品暴露在雨或潮湿的环境中。
8.避免将显示器直接暴露在阳光或其它热源中。
VX3258-C-PRO 显示器User Guide型号:VS17483P/N:VX3258-C-PRO感谢您选择ViewSonic作为世界领先显示解决方案提供商,ViewSonic 一直专注在技术发展、创新和简单化方面超过世界的预期。
在ViewSonic,我们相信我们的产品能够对世界产生积极的影响,并且我们深信您选择的View-Sonic 产品会很好地为您服务。
再次感谢选择ViewSonic!目录1.注意事项与警告 (1)2.准备使用 (3)2-1. 包装物品 (4)2-2. 显示器外观 (5)2-3. 硬件安装 (6)2-4. 快速安装 (9)2-5. 电源开启 (11)3.调整屏幕图像 (12)3-1. 设置时序模式 (12)3-1. 使用控制面板 (13)4.OSD菜单介绍 (15)4-1. OSD菜单树 (15)4-2. OSD菜单说明 (21)4-3. 显示器设置管理 (25)5.技术规格 (26)6.故障诊断 (28)7.清洁和维护 (29)如何清洁显示器 (29)8.电磁相容信息 (31)8-1. FCC 符合性声明 (31)8-2. 加拿大工业部声明 (31)8-3. 针对欧盟国家的CE 符合性 (32)8-4. 电子电气产品有害物质限制使用标识要求 (33)8-5. 产品达到使用寿命后废弃产品 (34)9.版权信息 (35)10.服务信息 (36)产品注册 (36)客户支持 (37)有限保修 (40)1.注意事项与警告1.在使用设备之前,仔细阅读这些指导说明。
2.妥善保管这些指导说明。
3.注意所有警告并遵照所有指示。
4.使用显示器时,请保持离屏幕约40-50 公分的距离。
5.在移动时务必小心搬动显示器。
6.切勿拆下后盖。
显示器内有高压零件。
如果您触碰这些零件,可能会受到严重伤害。
7.请勿在靠近水的地方使用本设备。
警告: 为减低火灾或电击的危险,请勿将此产品暴露在雨或潮湿的环境中。

YD-1011ARM 彩色液晶智能显示器使用说明书欢迎您购买彩色液晶智能显示器本说明书适用于友利华(河南)高科技开发有限公司制造生产的YD-1011ARM智能系列显示器。
!注意∶为防止火灾或电击危险,勿将本机放置在淋雨或潮湿的地方。
使用本机推荐的开关电源。
避免安装不良。
不要在温度太低或太高的地方存贮或使用,严禁阳光长期直射或紫外线照射液晶屏幕!因为本装置是精密装备,所以请不要自行打开,拆开或改装。
避免强烈振动和跌落地上。
用完或发生故障时,请关掉本机。
每次开关机后重新开机的时间应大于5秒钟。
请不要按压本机屏幕。
不可用汽油、酒精或其它化学药剂擦拭,用湿润软布抹净即可。
本机为液晶显示,如果屏幕破损,液晶遗漏在手上、身上或衣服上时,请用肥皂和清水洗净即可。
内有高压,请勿随意拆卸!如有故障请直接同本公司或代理商联系。
敬告:1、日本液晶生产厂家明文告知:彩色液晶屏是采用高新技术通过精密设备制造出来的产品,允许有0.01%(万分之一)的像素有缺陷或出现亮点。
敬请予以理解。
2、本产品自购买之日起免费保修期为一年。
但因使用不当等人为操作失误或不可抗拒力所造成的损坏和故障不在此保修范围之内。
3、为改善性能,本机与说明书可能会进一步改进和补充,恕不另行通知。
○R为友利华(河南)高科技开发有限公司彩色液晶产品的注册商标目录第一章概述 (3)第一节简介 (3)第二节原理框图 (3)第二章性能与接口 (4)第一节性能指标 (4)第二节外部接口 (5)第三节拨码开关设置 (5)第四节通讯接口连线图 (6)第三章安装与通讯 (6)第一节安装准备 (6)第二节串行通讯 (6)第三节并行通讯 (7)第四章命令格式 (7)第一节命令详解 (7)第二节命令总汇 (15)第五章软件升级 (16)第六章外型尺寸 (17)第七章应用举例 (18)附录 (18)附录一:汉字内码查询 (19)附录二:51汇编举例(串口) (19)附录三:51汇编举例(并口) (20)附录四:选配件触摸屏 (22)附录五:A S C I I码表 (23)第一章概述第一节简介彩色液晶显示器作为当代高新技术的结晶产品,它不仅具有超薄平面、色彩逼真的特点,而且还具有体积小、耗电省、寿命长、无射线、抗震、防爆等CRT所无法比拟的优点。
aoc250lm00002显示器说明书AOC液晶显示器型号:G2490VX/G2490VXA安全用品全国大会以下小节描述了本文档中使用的符号约定。
注意、注意和警告在本指南中,文本块可能带有图标并以粗体或斜体打印。
这些块是注意、注意和警告,它们的用法如下:注意: “注”表示可帮助您更好地使用计算机系统的重要息。
注意:小心表示可能损坏硬件或丢失数据,并告诉您如何避免该问题。
警告:警告表示可能对身体造成伤害,并告诉您如何避免该问题。
某些警告可能会以替代格式出现,并且可能不带有图标。
在这种情况下,警告的具体呈现由监管机构授权电源显示器配备了一个三相接地插头,一个带有第三个(接地)针脚的插头。
作为安全功能,此插头只能插入接地的电源插座。
如果您的插座不适合三线插头,请让电工安装正确的插座,或使用适配器将设备安全接地。
不要破坏接地插头的安全目的。
在雷雨天气或长时间不使用设备时,请拔下设备插头。
这将保护显示器免受电涌损坏。
不要使配电盘和延长线过载。
过载会导致火灾或触电。
为确保令人满意的操作,显示器只能与 UL 列出的计算机一起使用,这些计算机具有适当配置的插座,标记为 100-240V AC, Min。
5A。
壁式插座应安装在设备附近且易于使用。
装置切勿将任何物体推入显示器机箱上的插槽中。
它可能会损坏电路部件,导致火灾或触电。
切勿将液体洒在显示器上。
请勿将产品正面放在地板上。
如果您将显示器安装在墙壁或架子上,请使用制造商认可的安装套件并按照套件说明进行操作。
如所示,在显示器周围留出一些空间。
否则,空气流通可能不足,因此过热可能会导致火灾或显示器损坏。
带支架安装清洁用品定期用布清洁机柜。
您可以使用柔软的清洁剂擦去污渍,而不是使用会烧灼产品柜的强力清洁剂。
清洁时,请确保没有清洁剂泄漏到产品中。
清洁布不能太粗糙,因为它会划伤屏幕表面。
清洁产品前请断开电源线。
其他如果产品发出奇怪的气味、声音或烟雾,请立即拔下电源插头并联系服务中心。

M15 平板显示器用户指南机型: 62CA产品编号ThinkVision M1562CA-UAR1-WWA21156FX0第一版(2021年2月)© 版权所有 Lenovo 2021。
LENOVO产品、数据、计算机软件、及服务基于专项资金开发,作为48 C.F.R. 2.101定义的商品销售给政府机构,并授予政府机构有限的受限制的使用、复制和公开权利。
受限制的有限权利声明。
受限制的有限权利声明:如果产品、数据、计算机软件、或服务按照总务管理器“GSA”合约交付,则其使用、复制、或公开须遵循在合约号GS-35F-05925中制定的限制。
目录安全事项 (iv)一般安全原则 (iv)安全和维护指南 (v)重要安全信息 (v)第1章. 开始使用 ..............................................................................................1-1物品清单 .........................................................................................................................1-1产品概述 .........................................................................................................................1-2设置显�器......................................................................................................................1-6注册您的选件 ..................................................................................................................1-9第2章. 调整和使用显�器................................................................................2-1舒适和辅助功能...............................................................................................................2-1安排您的工作区域 ...........................................................................................................2-1放置和观看显示器 ...........................................................................................................2-1关于健康工作习惯的小技巧.............................................................................................2-2眼睛疲劳 .........................................................................................................................2-2低蓝光 .............................................................................................................................2-3调整显示器图像...............................................................................................................2-4选择受支持的显示模式....................................................................................................2-5了解电源管理 ..................................................................................................................2-6保养显示器......................................................................................................................2-8壁挂(可选)......................................................................................................................2-8第3章. 参考信息 ..............................................................................................3-1显�器规格......................................................................................................................3-1故障排除 .........................................................................................................................3-3手动安装显示器驱动程序 ................................................................................................3-5服务信息 .........................................................................................................................3-7附录A. 服务和支持.........................................................................................A-1注册您的选件 .................................................................................................................A-1在线技术支持 .................................................................................................................A-1电话技术支持 ................................................................................................................A-1附录B. 声明....................................................................................................B-1回收信息 ........................................................................................................................B-2商标................................................................................................................................B-2土耳其合规声明..............................................................................................................B-3乌克兰RoHS ..................................................................................................................B-3印度RoHS ......................................................................................................................B-3电源线和电源适配器 ......................................................................................................B-3安全事项一般安全原则有关安全使用计算机方面的提示,请转到:/safety在安装本产品之前,请阅读“安全事项”适用于在特殊控制的室内照明环境中进行娱乐,以避免干扰屏幕的反射。
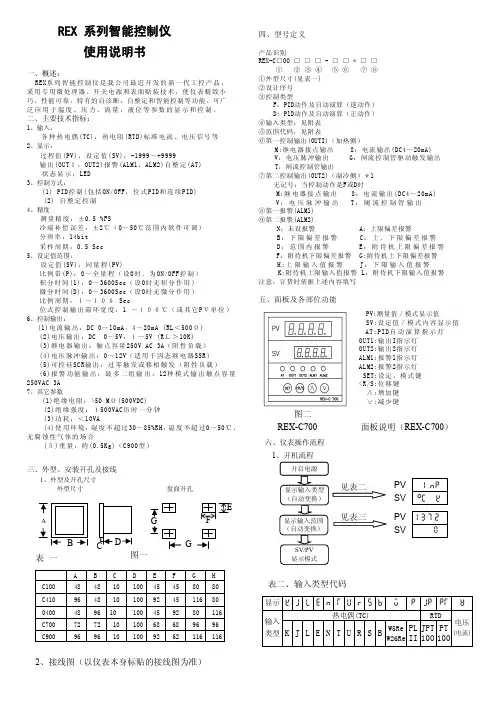
表一表二、输入类型代码2、接线图(以仪表本身标贴的接线图为准)四、型号定义产品识别REX-C□00 □ □ □ - □ □ * □ □① ② ③ ④ ⑤ ⑥ ⑦ ⑧①外型尺寸(见表一)②设计序号③控制类型F:PID动作及自动演算(逆动作)D: PlD动作及自动演算(正动作)④输入类型:见附表⑤范围代码:见附表⑥第一控制输出(OUTI)(加热侧)M:继电器接点输出 8:电流输出(DC4~20mA)V:电压脉冲输出 G:闸流控制管驱动触发输出T:闸流控制管输出⑦第二控制输出(OUT2)(制冷侧)*1无记号:当控制动作是F或D时M:继电器接点输出8:电流输出(DC4~20mA)V:电压脉冲输出T:阑流控制管输出⑧第一报警(ALMl)⑨第二报警(ALM2)N:未设报警 A:上限偏差报警B:下限偏差报警C:上.下限偏差报警D:范围内报警E:附待机上限偏差报警F:附待机下限偏差报警 G:附待机上下限偏差报警H:上限输入值报警J:下限输入值报警K:附待机上限输入值报警 L:附待机下限输入值报警注意:订货时依据上述内容填写五、面板及各部位功能PV:测量值/模式显示值SV:设定值/模式内容显示值AT:PID自动演算指示灯OUT1:输出I指示灯OUT2:输出2指示灯ALM1:报警l指示灯ALM2:报警2指示灯SET:设定,模式键<R/S:位移键∧:增加键∨:减少键一、概述:REX系列智能控制仪是我公司最近开发的新一代工控产品,采用专用微处理器、开关电源和表面贴装技术,使仪表精致小巧,性能可靠,特有的自诊断,自整定和智能控制等功能。
可广泛应用于温度、压力、流量,液位等参数的显示和控制。
二、主要技术指标:1、输入:各种热电偶(TC),热电阻(RTD)标准电流、电压信号等2、显示:过程值(PV),设定值(SV):-1999~+9999输出(OUT1,OUT2)报警(ALM1,ALM2)自整定(AT)状态显示:LED3、控制方式:(1) PID控制(包括ON/OFF,位式PID和连续PID)(2) 自整定控制4、精度测量精度:±0.5 %FS冷端补偿误差:±2℃(0~50℃范围内软件可调)分辨率:14bit采样周期:0.5 Sec5、设定值范围:设定值(SV):同量程(PV)比例带(P):0~全量程(设0时.为ON/OFF控制)积分时间(1):0~3600Sec(设O时无积分作用)微分时间(D):0~3600Sec(设O时无微分作用)比例周期:1~100Sec位式控制输出滞环宽度:1 ~100℃(或其它PV单位)6、控制输出:(1)电流输出:DC 0~lOmA,4~20mA (RL<500Ω)(2)电压输出:DC 0~5V,1~5V (RL>10K)(3)继电器输出:触点容量250V AC 3A(阻性负载)(4)电压脉冲输出:0~12V(适用于因态继电器SSR)(5)可控硅SCR输出:过零触发或移相触发(阻性负载)(6)报警功能输出:最多二组输出,12种模式输出触点容量250VAC 3A7、其它参数(1)绝缘电阻:>50 MΩ(500VDC)(2)绝缘强度:1500VAC历时一分钟(3)功耗:<10VA(4)使用环境:湿度不超过30~85%RH,温度不超过0~50℃,无腐蚀性气体的场合(5)重量:约(0.5Kg)(C900型)三、外型、安装开孔及接线1、外型及开孔尺寸外型尺寸盘面开孔A B C D E F G HC1OO 48 48 10 100 45 45 80 80C410 96 48 10 100 92 45 116 800400 48 96 10 100 45 92 80 116C700 72 72 10 100 68 68 96 96C900 96 96 10 100 92 62 116 116显示 K j L E N T U R S B w P jP PT W热电偶(TC) RTD输入类型 K J L E N T U R S BW5ReW26RePLIIJPT100PT100电压(电流) REX 系列智能控制仪使用说明书AGREX-C700 面板说明(REX-C700)六、仪表操作流程1、开机流程开启电源显示输入类型(自动变换)显示输入范围(自动变换)SV/PV显示模式PV I NPOC KSVPV1372SV见表二见表三图一图二表三、输入类型及范围代码表传感器类型 代码输入范围代码输入范围代码 输入范围 K01 0-200℃ K02 0-400℃ K03 0-600℃ K04 0-800℃ K05 0-1000℃ K06 0-1200℃ KK07 0-137.2℃ K13 0-100℃ K14 0-300℃ J01 0-200℃ J02 0-400℃ J03 0-600℃ JJ04 0-800℃J05 0-1000℃ J06 0-1200℃ R *1 R01 0-1600℃ R02 0-1769℃ R03 0-1350℃ S *1 S01 0-1600℃ S02 0-1769℃ B *1 B01 100-1800℃ B02 0-1769℃ E E01 0-800℃ E02 0-1000℃ N N01 0-1200℃ N02 0-1300℃ T01 0-350℃ T02 -199.9-100℃ T03 -199.9-200℃ 热电偶T *2T04 -199.9-400℃D01 -199.9-649.0D02 -199.9-200.0℃D03 -199.9-50.0℃D04 -100.0-100.0D05 -100.0-200.0℃D06 -100.0-50.0℃D07 0.0-100.0℃ D08 0.0-200.0℃ D09 0.0-300.0℃ PT100D10 0.0-500.0℃P01 -199.9-649.0P02 -199.9-200.0℃P03 -199.9-50.0℃P04 -100.0-100.0P05 -100.0-200.0℃P06 -100.0-50.0℃P07 0.0-100.0℃ P08 0.0-200.0℃ P09 0.0-300.0℃ 热电阻 JPT100P10 0.0-500.0℃0-5V 401 0.0-100.0℃ 电压 0-1V 601 0.0-100.0℃ 0-20mA 701 0.0-100.0℃ 电流 4-20mA 801 0.0-100.0℃注: *1、0-399℃范围内不能保证精度*2、-199.9-100℃范围内不能保证精度2、SV 设定模式在SV/PV 正常显示状态下,按一下“SET ”键,使SV 显示处于闪烁状态,通过按“<R/S”键,找到所需设定温度的位数,再按上升或下降键,设定到所需温度值,设定完毕后,在按一下“SET ”键,使仪表转到SV/PV 正常显示状态。
ThinkVision T24t-20用户指南机型:62C5产品编号A21238FT062C5-GAR1-WW第一版(2021年3月)©版权所有 Lenovo 2021。
LENOVO产品、数据、计算机软件、及服务基于专项资金开发,作为48 C.F.R. 2.101定义的商品销售给政府机构,并授予政府机构有限的受限制的使用、复制和公开权利。
受限制的有限权利声明:如果产品、数据、计算机软件、或服务按照总务管理器“GSA”合约交付,则其使用、复制、或公开须遵循在合约号GS-35F-05925中制定的限制。
目录安全事项 (iv)一般安全原则 (iv)第1章.新手入门 ...............................................................................................1-1物品清单 .........................................................................................................................1-1使用注意事项 ..................................................................................................................1-2产品概述 .........................................................................................................................1-2设置监视器......................................................................................................................1-5注册您的选件 ................................................................................................................1-11第2章.调整和使用监视器.................................................................................2-1舒适和辅助功能...............................................................................................................2-1安排您的工作区域 ...........................................................................................................2-1放置和观看显示器 ...........................................................................................................2-1关于健康工作习惯的小技巧.............................................................................................2-2调整显示器图像...............................................................................................................2-3触摸屏 .............................................................................................................................2-7使用触摸唤醒功能 ...........................................................................................................2-7连接多台显示器时的触摸设置 .........................................................................................2-8选择支持的显示模式 .......................................................................................................2-9了解电源管理 ................................................................................................................2-10保养显示器....................................................................................................................2-11卸下监视器底座和支撑臂 ..............................................................................................2-11壁挂(可选) ................................................................................................................2-11第3章.参考信息 ...............................................................................................3-1监视器规格......................................................................................................................3-1故障排除 .........................................................................................................................3-3手动安装显示器驱动程序 ................................................................................................3-4服务信息 .........................................................................................................................3-6附录A.服务和支持..........................................................................................A-1注册您的选件 .................................................................................................................A-1在线技术支持 .................................................................................................................A-1电话技术支持 .................................................................................................................A-1附录B.声明.....................................................................................................B-1回收信息 ........................................................................................................................B-1商标B-1.............................................................................................................................电源线和电源适配器 ......................................................................................................B-3安全事项一般安全原则有关安全使用计算机方面的提示,请转到:/safety在安装本产品之前,请阅读“安全事项”第1章.新手入门本用户指南为用户提供详细的操作说明。
XMT-系列智能数显温控仪使用说明书XMT-7000系列智能数显温控仪使用说明书操作注意·断电后方可清洁仪器。
1.11.21.31.4采样周期:3次/sec,按需可达到8次/sec1.5报警功能:上限,下限,上偏差,下偏差上下限,上下偏差,范围内及待机状态报警1.6报警输出:继电器触点AC250V3A(阻性负载)1.7控制方式:模糊PID控制、位式控制1.8控制输出:继电器触点(容量:220VAC3A)SSR驱动电平输出(DC0/5V)过零触发脉冲:光偶可控硅输出1A600V移相触发脉冲:光偶可控硅输出1A600V1.91.101.11XMTS:160×80E:96×48F:48×96A:96×96G:48×48D:72×72空:80×160 ②主控控制方式0二位式2三位式3位式PID4PID继电器输出5PID固态继电器输出6PID移相可控硅触发7PID89PID12367过零触发脉冲输出,PID调节8逻辑电平输出,PID调节,驱动SSR ④输入信号:1热电偶输入2热电阻输入⑤⑥~⑦传感器分度号和测量范围例:XMTE-7431K0~400℃为PID位式控制,继电器输出,配用K分度号热电偶,量程0~400℃,带上限报警和下限报警,面板尺寸为96×96mm的经济性智能仪表。
(1(2②设定值(SV)显示器(橙色)·显示设定值(SV)·显示参数内容·测量回路异常表示③指示灯·自整定指示灯(AT)(绿)工作输出时闪烁。
·控制输出指示灯(OUT1OUT2)(绿)OUT1:控制工作输出时亮·报警输出指示灯(ALM1ALM2)(红)ALM1:第一报警输出时点亮。
ALM2:第二报警输出时点亮·SV·3秒。
A/M)·在参数设定状态下,作减数键⑦加数键(▼)·在参数设定状态下,作加数键五各模式详细功能AH上限报警设定范围-1999~+9999上限报警设定值出厂值10AL下限报警设定范围-1999~+9999下限报警设定值出厂值10I积分时间设定范围0~999秒设定为0时成PD控制设定积分时间,以解除比例控制DT制冷PIDdPuHY P=0)出厂值Pu-b接线注意⑴热电偶输入,应使用对应的补偿导线。
TC1940 Wide联想云终端智能显示器© 版权所有Lenovo 2010 © ii目录安全信息. . . . . . . . . . . . . . . . . . . . . . . . . . . . . . . . . . . . . . . . . . . . . . . . . . . . . . . . . . . . . . . . . . . . . . . . . . . . . 第 1 章. 入门 . . . . . . . . . . . . . . . . . . . . . . . . . . . . . . . . . . . . . . . . . . . . . . . . . . . . . . . . . . . . . . . . . . . . . . . .1-1装运内容 . . . . . . . . . . . . . . . . . . . . . . . . . . . . . . . . . . . . . . . . . . . . . . . . . . . . . . . . . . . . . . . . . . . . . . . . . . . . . . . . . . . . . . . . . . . . . . . 1-1连接底座和操作显示器 . . . . . . . . . . . . . . . . . . . . . . . . . . . . . . . . . . . . . . . . . . . . . . . . . . . . . . . . . . . . . . . . . . . . . . . . . . . . . . . . . . . 1-1产品概述 . . . . . . . . . . . . . . . . . . . . . . . . . . . . . . . . . . . . . . . . . . . . . . . . . . . . . . . . . . . . . . . . . . . . . . . . . . . . . . . . . . . . . . . . . . . . . . . 1-2调整类型 . . . . . . . . . . . . . . . . . . . . . . . . . . . . . . . . . . . . . . . . . . . . . . . . . . . . . . . . . . . . . . . . . . . . . . . . . . . . . . . . . . . . . . . . . . . . .1-2用户控制 . . . . . . . . . . . . . . . . . . . . . . . . . . . . . . . . . . . . . . . . . . . . . . . . . . . . . . . . . . . . . . . . . . . . . . . . . . . . . . . . . . . . . . . . . . . . 1-2线缆锁槽 . . . . . . . . . . . . . . . . . . . . . . . . . . . . . . . . . . . . . . . . . . . . . . . . . . . . . . . . . . . . . . . . . . . . . . . . . . . . . . . . . . . . . . . . . . . . .1-3安装显示器 . . . . . . . . . . . . . . . . . . . . . . . . . . . . . . . . . . . . . . . . . . . . . . . . . . . . . . . . . . . . . . . . . . . . . . . . . . . . . . . . . . . . . . . . . . . . . 1-3连接和打开显示器 . . . . . . . . . . . . . . . . . . . . . . . . . . . . . . . . . . . . . . . . . . . . . . . . . . . . . . . . . . . . . . . . . . . . . . . . . . . . . . . . . . . . 1-3第 2 章. 调整和使用显示器 . . . . . . . . . . . . . . . . . . . . . . . . . . . . . . . . . . . . . . . . . . . . . . . . . . . . . . . . . . . . .2-1舒适和易使用性 . . . . . . . . . . . . . . . . . . . . . . . . . . . . . . . . . . . . . . . . . . . . . . . . . . . . . . . . . . . . . . . . . . . . . . . . . . . . . . . . . . . . . . . . . 2-1安排您的工作区 . . . . . . . . . . . . . . . . . . . . . . . . . . . . . . . . . . . . . . . . . . . . . . . . . . . . . . . . . . . . . . . . . . . . . . . . . . . . . . . . . . . . . . 2-1摆放与观看显示器. . . . . . . . . . . . . . . . . . . . . . . . . . . . . . . . . . . . . . . . . . . . . . . . . . . . . . . . . . . . . . . . . . . . . . . . . . . . . . . . . . 2-1良好工作习惯的快速技巧 . . . . . . . . . . . . . . . . . . . . . . . . . . . . . . . . . . . . . . . . . . . . . . . . . . . . . . . . . . . . . . . . . . . . . . . . . . . . . . 2-2调整显示器的图像 . . . . . . . . . . . . . . . . . . . . . . . . . . . . . . . . . . . . . . . . . . . . . . . . . . . . . . . . . . . . . . . . . . . . . . . . . . . . . . . . . . . . . . . .2-3使用直接操作控件 . . . . . . . . . . . . . . . . . . . . . . . . . . . . . . . . . . . . . . . . . . . . . . . . . . . . . . . . . . . . . . . . . . . . . . . . . . . . . . . . . . . . 2-3使用屏幕显示 (OSD) 控制 . . . . . . . . . . . . . . . . . . . . . . . . . . . . . . . . . . . . . . . . . . . . . . . . . . . . . . . . . . . . . . . . . . . . . . . . . . . . . . 2-3选择受支持的显示方式 . . . . . . . . . . . . . . . . . . . . . . . . . . . . . . . . . . . . . . . . . . . . . . . . . . . . . . . . . . . . . . . . . . . . . . . . . . . . . . . . . . . .2-6了解电源管理 . . . . . . . . . . . . . . . . . . . . . . . . . . . . . . . . . . . . . . . . . . . . . . . . . . . . . . . . . . . . . . . . . . . . . . . . . . . . . . . . . . . . . . . . . . . .2-7保养显示器 . . . . . . . . . . . . . . . . . . . . . . . . . . . . . . . . . . . . . . . . . . . . . . . . . . . . . . . . . . . . . . . . . . . . . . . . . . . . . . . . . . . . . . . . . . . . . .2-8拆离显示器支架 . . . . . . . . . . . . . . . . . . . . . . . . . . . . . . . . . . . . . . . . . . . . . . . . . . . . . . . . . . . . . . . . . . . . . . . . . . . . . . . . . . . . . . . . . 2-8第 3 章. 显示器参考信息 . . . . . . . . . . . . . . . . . . . . . . . . . . . . . . . . . . . . . . . . . . . . . . . . . . . . . . . . . . . . . . . 3-1显示器规格 . . . . . . . . . . . . . . . . . . . . . . . . . . . . . . . . . . . . . . . . . . . . . . . . . . . . . . . . . . . . . . . . . . . . . . . . . . . . . . . . . . . . . . . . . . . . . 3-1故障诊断 . . . . . . . . . . . . . . . . . . . . . . . . . . . . . . . . . . . . . . . . . . . . . . . . . . . . . . . . . . . . . . . . . . . . . . . . . . . . . . . . . . . . . . . . . . . . . . . 3-3手动图像设置 . . . . . . . . . . . . . . . . . . . . . . . . . . . . . . . . . . . . . . . . . . . . . . . . . . . . . . . . . . . . . . . . . . . . . . . . . . . . . . . . . . . . . . . . 3-4手动安装显示器驱动程序 . . . . . . . . . . . . . . . . . . . . . . . . . . . . . . . . . . . . . . . . . . . . . . . . . . . . . . . . . . . . . . . . . . . . . . . . . . . . . . 3-5在 Windows XP 中安装显示器驱动程序 . . . . . . . . . . . . . . . . . . . . . . . . . . . . . . . . . . . . . . . . . . . . . . . . . . . . . . . . . . . . . . . . 在 Windows 7 中安装显示器驱动程序. . . . . . . . . . . . . . . . . . . . . . . . . . . . . . . . . . . . . . . . . . . . . . . . . . . . . . . . . . . . . . . 附录 A. 服务与支持. . . . . . . . . . . . . . . . . . . . . . . . . . . . . . . . . . . . . . . . . . . . . . . . . . . . . . . . . . . . . . . . . . . A-1B. 声明. . . . . . . . . . . . . . . . . . . . . . . . . . . . . . . . . . . . . . . . . . . . . . . . . . . . . . . . . . . . . . . . . . . . . . . . . B-1 . . . . . . . . . . . . . . . . . . . . . . . . . . . . . . . . . . . . . . . . . . . . . . . . . . . . . . . . . . . . . . . . . . . . . . . . . . . . . . . . . . . . . . . . . . . . . . . . . . . B-1在 Windows Vista 中安装显示器驱动程序 . . . . . . . . . . . . . . . . . . . . . . . . . . . . . . . . . . . . . . . . . . . . . . . . . . . . . . . . . . . . . . 3-5 3-6 3-7第 4 章. . . . . . . . . . . . . . . . . . . . . . . . . . . . . . . . . . . . . . . . . . . . . . . 4-1. . . . . . . . . . . . . . . . . . . . . . . . . . . . . . . . . . . . . . . . . . . . . . . . . . . . . . . . . . . . . . . . . . . . . . . . . . . . . . . . . . . . . . . . . . . . . 4-1. . . . . . . . . . . . . . . . . . . . . . . . . . . . . . . . . . . . . . . . . . . . . . . .. . . . . . . . . . . . . . . . . . . . . . . . . . . . . . 4-2 . . . . . . . . . . . . . . . . . . . . . . . . . . . . . . . . . . . . . . . . . . . . . . . . . . . . . . . . . . . . . . . . . . . . . . . . . . . . . . . . . . . . . . . . . . . . . 4-14 . . . . . . . . . . . . . . . . . . . . . . . . . . . . . . . . . . . . . . . . . . . . . . . . . . . . . . . . . . . . . . . . . . . . . . . . . . . . . . . . . . . . . . . . . . . . . 系统介绍典型配置和快速安装指引 . . . . . . . . . . . . . . . . . . . . . . . . . . . . . . . . . . . . . . . . . . . . . . . . . . . . . . . . . . . . . . . . . . . . . . . . . . . . . . . . . . . . . . . . . . 4-2 . . . . . . . . . . . . . . . . . . . . . . . . . . . . . . . . . . . . . . . . . . . . . . . . . . . . . . . . . . . . . . . . . . . . . . . . . . . 4-2 . . . . . . . . . . . . . . . . . . . . . . . . . . . . . . . . . . . . . . . . . . . . . . . . . . . . . . . . . . . . . . . . .. . . . . . . . . . . . . . . . . . . . . . . . . . 4-3 . . . . . . . . . . . . . . . . . . . . . . . . . . . . . . . . . . . . . . . . . . . . . . . . . . . . . . . . . . . . . . . . . . . . . . . . . . . . . . . . . . . . . . . . . 4-4 . . . . . . . . . . . . . . . . . . . . . . . . . . . . . . . . . . . . . . . . . . . . . . . . . . . . . . . . . . . . . . .. . . . . . . . . . . . . . . . . . . . . . . . . 4-11 . . . . . . . . . . . . . . . . . . . . . . . . . . . . . . . . . . . . . . . . . . . . . . . . . . . . . . . . . . . . . . . . . . . . . . . . . . . . . . . 4-11 . . . . . . . . . . . . . . . . . . . . . . . . . . . . . . . . . . . . . . . . . . . . . . . . . . . . . . . . . . . . . . . . . . . . . . . . . . . . . . . . . . . . . . . . . 4-12 . . . . . . . . . . . . . . . . . . . . . . . . . . . . . . . . . . . . . . . . . . . . . . . . . . . . . . . . . . . . . . . . . . . . . . . . . . .. . . . . . . . . . . . . . . . 4-13单服务器方案集中式部署方式拓扑结构 .配置清单快速安装指引多服务器方案分布式部署方式拓扑结构配置清单 .快速安装指引常见问题附录 . . . . . . . . . 4-22联想云终端智能显示器快速安装指南iii . . .. . . 了解电源指示灯 . . . . . . . . . . . . . . . . . . . . . . . . . . . . . . . . . . . . . . . . . . . . . . . . . . . . . . . . . . . . . . . . . . . . . . . . . . . . . . . . . . . . . . . . . .2-7 . . . . . . . . . . . . . . . . . . . . . . . . . . . . . . . . . . . . . . . . . . . . . . . . . . . . . . . . . . . . . . . . . . . . . . . . . . . . . . . . . . . . . . . . . . . . . . . . . . . . . . . . . . . . . . . . . . . . . . . . . . . . . . . . . . . . . . . . . . . . . . . . . . . .. . . . . . . . . . . . . . . . . . . . . . . . . . . . . . . . 商标有毒有害物质或元素能效等级 B-2B-3附录 . . . . . . . . . . . . . . . . . . . . . . . . . . . . . . . . . . . . . . . . . . . . . . . . . . . . . . . . . . . . . . .. . . . . . . . . . . . . . . . . . . . . . . . . . . . 电话技术支持A -1i ii安全信息使用VESA Mount 安装时需确保电源线插孔朝下。
e-mail:**************For latest product manuals: OM-SGD-24-M-IP SERIESShop online at®User’s GuideFEATURES• 2.4” color TFT screen • IP-67 and NEMA 6 rated• Rugged and scratch resistant Corning® Gorilla® Glass window•display. Compatible with Windows XP, Vista 7 and 8• Download meter applications from the ever expanding online library • Programmable with the USB interface • Simple and easy panel mounting solution • IP-67 12-way connection• Wide operating voltage of 4V – 30V d.c.• 0 – 40V d.c. measurement range • 2 analog inputs & 2 alarm outputs • SPI and I²C• 4-20mA version available (OM-SGD-24-M-IP420)The OM-SGD-24-M-IP is a smart IP-67 graphics display with a 320 x 240 pixel (QVGA) color display and USB programming interface.Using the PanelPilot software (available for Windows XP, 2000, Vista and Windows 7), users are able to choose from an ever-increasing number of configurations which can then be customized to their needs. The additional voltmeter types and other functions are available through .Colors, text labels, splash screen and input voltage scaling can all be customized by the user through the software and then uploaded to the OM-SGD-24-M-IP through the USB connection. When setup is complete, the settings can be saved and then uploaded to the meter using the supplied USB cable. Panel or enclosure installation of the finished module is simple, using the 32mm nut and the IP67 connector supplied with the unit.OM-SGD-24-M-IPWaterproof Smart Graphics Display* Depending on user calibration settings** The OM-SGD-24-M-IP uses a programmable gain amplifier. There are 8 different voltage ranges, to optimise the resolution. See page 2 for details.*** Voltage dependent. See graph on Page 2.IP67 CONNECTIONConnector Pin Functions 1 ESPI-CS2 -SPI chip select2 ESPI-MISO - SPI master input, slave output3 ESPI-CLK - SPI serial clock4 ESPI-MOSI - SPI master output, slave input5 SDA - Serial data6 SCL - Serial clock7 ALM2 - Alarm output 28 ALM1 - Alarm output 19 IN1 - Analog voltage input 1 (maximum of 40V d.c. w.r.t 0v)10 IN2 - Analog voltage input 2 (maximum of 40V d.c. w.r.t 0v)11 0V - 0V power supply input12V+- Positive power supply input (4V – 30V d.c.)Connector plug optionsTwist lock, field installable connector with solder bucket pins.Seals for Cable OD=4.5mm~7.0mmTwist lock connector with right angle overmoulded strain relief.Cable length 2m.VOLTAGE INPUT10020041730C u r r e n t (m A )Voltage (V)Typical Supply CurrentUSB ConnectionDisplayThe OM-SGD-24-M-IP features 2 voltage inputs, which use a Programmable Gain Amplifier (PGA) to make the best use of available resolution (the smallest voltage range offers the highest resolution)*. Each channel can be programmed independently, with the option of eight different input voltage ranges:A ‘Type A to Mini-B’ USB cable is required to program and customize the OM-SGD-24-M-IP by unscrewing the 4xM3 screws and removing the back cover. The packing tray supplied can be used as a jig to hold the module and to avoid disconnecting the 12 way connector from the PCB inside.The device will be powered for programming via USB.It typically takes between 10 and 30 seconds to send a configuration, with an additional 5 seconds needed for the hardware to reset.The display is a 2.4” TFT panel, with a resolution of 320 x 240 pixels and a 16-bit color depth. Any graphics that are uploaded to the meterare automatically converted to this specification.The input voltage range is decided using the two voltages that the user enters in the scaling section of the Panel Pilot software. The software uses the smallest range available, which can accommodate both of the voltages entered by the user. The absolute maximum voltage input is 40V d.c.For example:Entering a voltage scale of 0 – 30V in the software will use the 0 – 40V range.Entering a voltage scale of 0 – 3V in the software will use the 0 – 4V range.Entering a voltage scale of 5 – 15V in the software will use the 0 – 20V range.Note: V+, IN1 and IN2 share a common ground (i.e. not floating or isolated from each other).*For the 4-20mA model, the 0-2.5 range is used.PANEL MOUNTING Array The OM-SGD-24-M-IP can be fitted into panels of up to 10.5mm deep. Arubber seal is included to seal the mounting hole when the 32mm nut isfully tightened. Panel mounting hole cut-out is DIA 33mm.DIMENSIONSAll dimensions in mm [inches]MEASURING A VOLTAGE SOURCEMEASURING 0-2 AMPS CURRENT RANGEUse a 1 Ω resistor, with a 4W rating.Setup scaling in software: 0V = 0.00 and 2V = 2.00MEASURING 0-100V (d.c. only)Input a known voltage of between 0 and 100V (V1)Measure the voltage between IN1 and 0V (V2)Setup scaling in software: 0V = 0.0V2 = V1 (Enter with the same number of decimal points, i.e 50.0)VARIOUS OPERATING MODESVARIOUS OPERATING MODES (4-20mA version)MEASURING 4-20mAPower supply to meter must be fully floating (isolated from the 4-20mA current loop)Each OM-SGD must be powered from a seperate, fullyfloating, power supplyUSING TWO OM-SGD DISPLAYS IN SAME INSTALLATION4 - 20mAPSU 1PSU 2PANELPILOT SOFTWAREOmega’s PanelPilot software is available for download free of charge from . Easy to install and use, the control software runs under Windows XP, Vista and 7 and 8. The software is used to setup the appearance and operation of the meter and then upload these settings to the meter.Multiple types of voltmeter are supplied with the software. See for details of available meters.The software allows the following parameters to be configured:• Meter type• Text labels (including units and graph labels)• Background, graph segment and text colors • Input scaling / calibration (at two points)• Decimal points (entered during scaling)• Splashscreen image selection (to display auser image, such as a logo, when the meter is powered up)MEASURING 4-20mA USING A USB POWER SUPPLYDIGITAL HOLD DIGI1 will hold the displayALARM OUTPUTApplications that feature an alarm can be connected as above.ALM1 must not sink more than 10mA maximum each. If supplyvoltage varies, use an appropriate voltage regulator.4 - 30V 4 - 30V0VV+0VIN1I+I-V Loop4 - 20mARV V IOMEGA’s policy is to make running changes, not model changes, whenever an improvement is possible. This affords our customers the latest in technology and engineering.OMEGA is a registered trademark of OMEGA ENGINEERING, INC.© Copyright 2014 OMEGA ENGINEERING, INC. All rights reserved. T his document may not be copied, photocopied, FOR WARRANTY RETURNS, please have the following information available BEFORE contacting OMEGA:1. P urchase Order number under which the product was PURCHASED,2. M odel and serial number of the product under warranty, and3. Repair instructions and/or specific problems relative to the product.FOR NON-WARRANTY REPAIRS, consult OMEGA for current repair charges. Have the followinginformation available BEFORE contacting OMEGA:1. Purchase Order number to cover the COST of the repair,2. Model and serial number of the product, and3. Repair instructions and/or specific problems relative to the product.RETURN REQUESTS/INQUIRIESDirect all warranty and repair requests/inquiries to the OMEGA Customer Service Department. BEFORE RET URNING ANY PRODUCT (S) T O OMEGA, PURCHASER MUST OBT AIN AN AUT HORIZED RET URN (AR) NUMBER FROM OMEGA’S CUST OMER SERVICE DEPART MENT (IN ORDER T O AVOID PROCESSING DELAYS). The assigned AR number should then be marked on the outside of the return package and on any correspondence.The purchaser is responsible for shipping charges, freight, insurance and proper packaging to prevent breakage in transit.WARRANTY/DISCLAIMEROMEGA ENGINEERING, INC. warrants this unit to be free of defects in materials and workmanship for a period of 13 months from date of purchase. OMEGA’s WARRANTY adds an additional one (1) month grace period to the normal one (1) year product warranty to cover handling and shipping time. This ensures that OMEGA’s customers receive maximum coverage on each product.If the unit malfunctions, it must be returned to the factory for evaluation. OMEGA’s Customer Service Department will issue an Authorized Return (AR) number immediately upon phone or written request. Upon examination by OMEGA, if the unit is found to be defective, it will be repaired or replaced at no charge. OMEGA’s WARRANT Y does not apply to defects resulting from any action of the purchaser, including but not limited to mishandling, improper interfacing, operation outside of design limits, improper repair, or unauthorized modification. T his WARRANT Y is VOID if the unit shows evidence of having been tampered with or shows evidence of having been damaged as a result of excessive corrosion; or current, heat, moisture or vibration; improper specification; misapplication; misuse or other operating conditions outside of OMEGA’s control. Components in which wear is not warranted, include but are not limited to contact points, fuses, and triacs.OMEGA is pleased to offer suggestions on the use of its various products. However, OMEGA neither assumes responsibility for any omissions or errors nor assumes liability for any damages that result from the use of its products in accordance with information provided by OMEGA, either verbal or written. OMEGA warrants only that the parts manufactured by the company will be as specified and free of defects. OMEGA MAKES NO OTHER WARRANTIES OR REPRESENTATIONS OF ANY KIND WHATSOEVER, EXPRESSED OR IMPLIED, EXCEPT THAT OF TITLE, AND ALL IMPLIED W ARRANTIES INCLUDING ANY W ARRANTY OF MERCHANTABILITY AND FITNESS FOR A PARTICULAR PURPOSE ARE HEREBY DISCLAIMED. LIMITATION OF LIABILITY: The remedies of purchaser set forth herein are exclusive, and the total liability of OMEGA with respect to this order, whether based on contract, warranty, negligence, indemnification, strict liability or otherwise, shall not exceed the purchase price of the component upon which liability is based. In no event shall OMEGA be liable for consequential, incidental or special damages.CONDITIONS: Equipment sold by OMEGA is not intended to be used, nor shall it be used: (1) as a “Basic Component” under 10 CFR 21 (NRC), used in or with any nuclear installation or activity; or (2) in medical applications or used on humans. Should any Product(s) be used in or with any nuclear installation or activity, medical application, used on humans, or misused in any way, OMEGA assumes no responsibility as set forth in our basic WARRANTY /DISCLAIMER language, and, additionally, purchaser will indemnify OMEGA and hold OMEGA harmless from any liability or damage whatsoever arising out of the use of theProduct(s) in such a manner.Where Do I Find Everything I Need for Process Measurement and Control?OMEGA…Of Course!Shop online at SMTEMPERATUREM U Thermocouple, RTD & Thermistor Probes, Connectors, Panels & AssembliesM U Wire: Thermocouple, RTD & ThermistorM U Calibrators & Ice Point ReferencesM U Recorders, Controllers & Process MonitorsM U Infrared PyrometersPRESSURE, STRAIN AND FORCEM U Transducers & Strain GagesM U Load Cells & Pressure GagesM U Displacement TransducersM U Instrumentation & AccessoriesFLOW/LEVELM U Rotameters, Gas Mass Flowmeters & Flow ComputersM U Air Velocity IndicatorsM U Turbine/Paddlewheel SystemsM U Totalizers & Batch ControllerspH/CONDUCTIVITYM U pH Electrodes, Testers & AccessoriesM U Benchtop/Laboratory MetersM U Controllers, Calibrators, Simulators & PumpsM U Industrial pH & Conductivity EquipmentDATA ACQUISITIONM U Data Acquisition & Engineering SoftwareM U Communications-Based Acquisition SystemsM U Plug-in Cards for Apple, IBM & CompatiblesM U Data Logging SystemsM U Recorders, Printers & PlottersHEATERSM U Heating CableM U Cartridge & Strip HeatersM U Immersion & Band HeatersM U Flexible HeatersM U Laboratory HeatersENVIRONMENTALMONITORING AND CONTROLM U Metering & Control InstrumentationM U RefractometersM U Pumps & TubingM U Air, Soil & Water MonitorsM U Industrial Water & Wastewater TreatmentM U pH, Conductivity & Dissolved Oxygen Instruments。
TD800系列大屏幕显示器使用说明书常州思捷光电科技有限公司地址:江苏省常州市天宁区青洋北路143号 E-mail:****************TEL**************FAX**************目录1.1概述..................................................................................................................................................32.1技术参数..........................................................................................................................................33.1安装调试..........................................................................................................................................43.1.1安装............................................................................................................................................43.1.2调试............................................................................................................................................44.1键盘功能释义..................................................................................................................................44.1.1按键功能描述............................................................................................................................44.1.2按键流程图................................................................................................................................55.1按键操作说明..................................................................................................................................55.1.1仪表量程下限值对应显示温度(AL)...................................................................................55.1.2仪表量程上限值对应显示温度(AH)..................................................................................65.1.3检测模式(SO).......................................................................................................................65.1.4检测模式时间设定(SE)........................................................................................................65.1.5各种检测模式说明....................................................................................................................65.1.6触发功能开关(ANF)............................................................................................................85.1.7触发上限温度(ACH)............................................................................................................85.1.8触发下限温度(ACL).............................................................................................................85.1.9满度修正系数(A DJ)..............................................................................................................95.1.10LED测试(CHEC)...............................................................................................................95.1.11上限报警阈值(AUP,TD800-2有此功能).......................................................................95.1.12下限报警阈值(ALO,TD800-2有此功能).......................................................................96.1模拟量输入与温度显示的对应关系.........................................................................................107.1接线说明......................................................................................................................................107.1.1信号输入、输出接线表........................................................................................................107.1.2电源输入接线表..................................................................................................................108.1大屏幕显示器外形图.................................................................................................................10TD800系列大屏幕显示器使用说明书1.1概述TD800系列大屏幕温度显示器是一种智能型温度显示器,是红外测温仪或其它检测器仪器的显示配套仪表。