《花键配合研究》报告解析
- 格式:ppt
- 大小:1.07 MB
- 文档页数:31
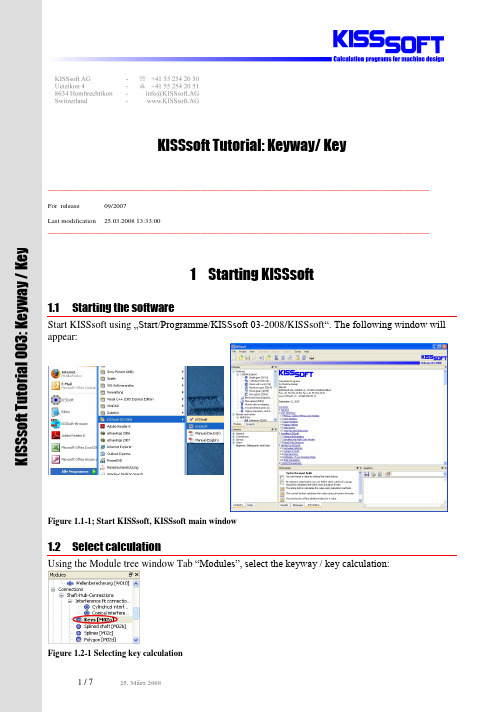
KISSsoft Tutorial: Keyway/ Key__________________________________________________________________________________________For release 09/2007Last modification 25.03.2008 13:33:00__________________________________________________________________________________________1Starting KISSsoft1.1Starting the softwareStart KISSsoft using …Start/Programme/KISSsoft 03-2008/KISSsoft“. The following window will appear:Figure 1.1-1; Start KISSsoft, KISSsoft main window1.2Select calculationUsing the Module tree window Tab “Modules”, select the keyway / key calculation:Figure 1.2-1 Selecting key calculationKISSsoftTutorial3:Keyway/Key2 Analysis of a key2.1 TaskA key is to be analysed with the following key / load data (see DIN 6892, example 1):Shaft diameter 120mm Outer diameter hub D1 200mm* Outer diameter D2 270mm Width for diameter D2 within the carrying length, c 17mm Distance a0 96mm Key DIN 6885.1 A32x18x125 No. of keys 1 Chamfer shaft None Chamfer hub 0.8mmNominal torque4’000NmMaximal torque 15’000Nm Application factor 1.50 Frequency of peak load 10’000 Frequency of change in sense of rotation 250’000 Slowly alternating torque, Material hub GG25 Material key C45 Material shaft C60Carrying length ltr125-32=93mm* Since ther are 10 holes in part 1 (64mm diameter) to accommodate the elastic elements of the coupling, the hub is less stiff under torsion. Hence, for the calculation, the pitch diameter is used and not the outer diameter of the hub.There are two analysis methods available in KISSsoft for keys:- DIN 6892, Method C - DIN 6892, Method BMethod C according to the DIN standard is a simplified method and will not be considered here. Hence, DIN 6892, method B should be selected under the “Module spesific settings ” after startingthe module:Figure 2.1-1; Selecting, DIN 6892, method B as analysis methodThe following material properties are to be used:Yield strength Re [MPa] Ultimate strength Rm [MPa] GG25 (brittle)130 200 C45 K (cold drawn) 430 680 1C60 N (normalised)310600Figure 2.1-2; Assembly of the connection, with the left half of the connection to be analysedFigure 2.1-3 Definition of D2, D1, a0 and c2.2 Entering the dataThis data is to be entered as follows:Selection ofcalculation methodKey form to beselected, details ofgeometry aredefinedautomatically withthe shaft diameter,see Figure 2.2-3.Choose …OwnInput“ for thematerials, see alsoFigure 2.2-4 Figure 2.2-1; Input window - Definition of loads and main dimensionsThe detailed geometry as shown in Figure 2.1-2 is to be entered as follows:Figure 2.2-2; Input window, group: ‘geometry’- Definition of geometry of hub with different outer diametersThe value for width of outer diameter D2 over in the carrying length c, can be specified by the setting the flag in the “Checkbox” for this.The geometry of the key is shown using the “Plus button”, see marking in Figure 2.1-2:type of key selected and the shaft diameter. It is alsopossible to define own key geometry.Figure 2.2-3 Information on the key selectedThe material data has to be defined using the “Plus button ” to the right of the selection list (Select “Own In put ” first).Definition of key material. Define ultimate and yield strength. The value for the permissible pressure is only relevant for the calculation method according toNiemann.Material type is to be chosen correctly. Since this is a brittle material, the permissible stresses will be calculated based on the ultimate strength of thematerial and not on the yield strength.Definition of shaft materialFigure 2.2-4; Defining the materials2.3 Execution of analysis and protocolPressing in the Tool bar the icon “Ó” (or the button F5) in the main window starts the calculation and some results are shown in the lower section of the main window (such as resulting pressures and safety factors). Note the status bar showas “Results are consistent ”. This shows that the input data and the results shown correspond.The analysis of the key is according to DIN 6892. The calculation is especially suitable for static loads, but also for pulsating and alternating loads. However, usually the shaft is the critical element of the connection. The shaft has to be checked in the shaft analysis, see section 3.Using KISSsoft, the load carrying length of the key is always used as the load carrying length(ltr=93 mm). The frictional torque has to be calculated in another module (e.g. in the interference fit module). If it is not known, it should be set to zero. The safety factors shown are the minimal safety due to nominal torque (fatigue strength) and peak torque (static strength). Note that the application factor is used only for the nominal load.Using in the Tool bar the icon to the right of “Ó” (or F6) a report containing all input data, analysis parameters, and results is written. This report inlcudes all input data, analysis parameters (see also section 2.5) and results. It can easily be included in a formal strength report.2.4 Calculation of maximum permissible torqueIn a second step, the permissible nominal torque is to be calculated such that a minimal safety factor of 1.20 is reached. For this, the required safety factor of 1.20 is defined in the module specific settings, (see Figure 2.4-1). Then, the “Sizing button ” to the right of the nominal torque field is to be pressed and the maximum permissible nominal torque is calculated to be 3305Nm. If then “Ó” is pressed again, the resulting minimal safety factor will be 1.20, see marking in Figure 2.4-2.Figure 2.4-1; Set the required safety factor in the module specific settingsPressing the dimensioning button results in maximum permissible nominal torque, re-calculation results in safety factor being equal to the required safety factor.Figure 2.4-2; Calculation of maximum permissible nominal torque2.5 Remarks on the reportSome remarks on the parameters listed in the report- Equivalent torque: T eq =K A *T nenn , K A according to DIN3990 - Circumferential force from torque: F eq =T eq /r , F max =T max /r213-Definition of load carrying length, l tr and depth, t tr-Pressure from circumferential force, contact area and load factor K v: depending on number of keys used, maximum of two keys accepted in analysis, K v=0.75 (higher for pressureunder peak load (deformation of key assumed), K v=0.9)-Load distribution coefficient K l, uneven load distribution over the length of the key-Friction factor K R: Accounts for torque transmitted by means of interference fit (for peak torque only)-Do not use brittle materials for hubs if using interference fit-Load direction changes coefficient f W: Considers the frequency of changes in load direction -Different for abrupt or slow changes-Frequency of peak load factor f L: factor considering the frequency of peak loads, different for brittle or ductile materials-Support factor f S: Higher strength of materials loaded under pressure, depending on material -Hardness influence coefficient f H: for hardened surfaces-Permissible contact stress calculated from ultimate (brittle materials) or yield strength (ductile materials) and above factors-For temperature range of –40°C to 150°C3Shaft analysis3.1GeneralFrom the research conducted on keys, it is known that usually it is the shaft which is the critical part of the connection. Shearing of the key is uncommon and happens only under peak loads. The corrosion effects shown in a number of fatigue tests due to alternating bending action (and resulting micro movement between the members of the connection) is known to be the prime damaging mechanism in the connection. The complete proof of strength of the connection not only includes the proof against permissible contact stresses as shown above, but also the proof of strength of the shaft and the hub. However, the latter rarely is a problem except for very thin-walled hubs. In the KISSsoft key analysis, proof is only carried out for contact stresses. The proof against fatigue failure of the shaft should be obtained using the KISSsoft shaft analysis.3.2Notch factors for shaft analysisSince the damaging mechanism (especially for the shaft) is a combination of notch stresses and corrosion, it is not sufficient to use a notched shaft for the determination of notch factors. Hence, for the determination of notch factors for a key connection, experiments using the complete connection are necessary. In these experiments, a wide range of parameter has to be investigated. Therefore, the notch factors given in the literature differ and are usually defined only in a range.It remains the responsibility of the engineer to carefully review the notch factors used in the shaft analysis.See for example-DIN 6892, Passfedern, Berechnung und Gestaltung-U. Oldendorf, Lebensdauer von Passfederverbindungen, VDI Bericht 1790- E. Leidich, Einfluss des Schwingungsverschleisses auf die Tragfähigkeit von Welle-Nabe-Verbindungen, VDI Bericht 1790-DIN 743, Tragfähigkeit von Wellen und Achsen。


花键链接实验体会与心得花键链接实验是一项日益受到关注的研究领域,在我进行的实验中,我深刻体会到了花键链接的重要性以及其在化学和生物学研究方面的巨大潜力。
通过实验,我不仅学到了许多新知识,还意识到了自己在实验设计和操作上的不足。
花键链接是一种强大而灵活的化学反应。
在实验中,我使用了花键链接反应来连接两个分子,并形成一个新的化合物。
通过调整反应条件和反应物的选择,我可以有效地控制反应的效率和选择性。
这种灵活性使得花键链接成为一种重要的工具,可以用来合成具有特定功能的化合物,从而有助于药物开发和材料科学等研究领域的发展。
花键链接反应在生物学研究中的应用也非常广泛。
生物学家们可以利用花键链接来连接蛋白质、核酸或其他生物大分子,并构建具有特定功能的生物分子。
这种方法不仅可以帮助我们理解生物分子之间的相互作用和功能,还可以用于设计新的药物靶点或生物传感器。
在实验中,我成功地利用花键链接反应将荧光染料与蛋白质结合起来,从而实现了对蛋白质的可视化检测。
我在实验中也遇到了一些困难和挑战。
首先,花键链接反应需要精确的实验操作和条件控制。
我发现,在反应物的选择、反应时间和温度等方面的微小变化,都会对反应的结果产生重要影响。
因此,在实验过程中,我需要细心地调整实验参数,确保反应的成功进行。
此外,花键链接反应的速度通常较慢,需要较长的时间才能达到理想的产率。
这就需要我有耐心和细心地观察和控制反应的过程。
通过花键链接实验,我不仅学到了新的实验技术,还培养了实验设计和问题解决的能力。
我开始更加注重实验操作的细节,提高了实验的准确性和可靠性。
同时,我也意识到了科学研究中的风险和不确定性。
在实验中,我遇到了一些意想不到的结果和困难,但这也使我更加深入地思考和探索。
我学会了与实验结果积极对话,分析问题的可能性,并寻找解决方案。
总的来说,花键链接实验给我带来了丰富的实验经验和科学思维。
通过这个实验,我不仅学到了化学和生物学方面的知识,还提高了解决问题和面对困难的能力。


键和花键配合的精度设计键和花键配合是一种机械连接的方法,常用于传动装置和机械部件之间。
它的设计是为了提高连接的精度和可靠性,确保传动系统的顺畅运转。
键和花键配合的精度设计主要涉及到键和花键孔的尺寸、公差、材料选择以及安装等方面。
本文将从这几个方面来详细介绍键和花键配合的精度设计。
首先,键和花键孔的尺寸是配合设计的重要参数之一、键的尺寸包括长度、宽度和高度等,它应该与花键孔的尺寸相匹配。
一般来说,键的长度应与花键孔的深度相等或略高于花键孔的深度,以确保键能够完全嵌入花键孔中。
键的宽度应与花键孔的宽度相匹配,以保证键和花键孔之间有适当的间隙。
键的高度应与花键孔的高度相匹配,以确保键能够牢固地安装在花键孔中,同时又能够顺利地插入和拆卸。
其次,键和花键孔的公差也是配合设计中需要考虑的重要因素。
合适的公差能够保证键和花键孔之间的插装间隙,以便于安装和拆卸。
一般来说,键和花键孔的公差应控制在合理的范围内,以确保插装时的配合精度。
公差的控制需要考虑到键和花键孔的制造精度和装配误差等因素,通过合理的公差设计可以提高键和花键配合的精度。
再次,键和花键孔的材料选择也是影响配合精度的重要因素之一、一般来说,键和花键孔的材料应具有足够的硬度和强度,以确保连接的可靠性和耐久性。
键和花键孔的材料应根据工作条件和要求进行选择,常见的材料有碳素钢、合金钢、不锈钢等。
同时,键和花键孔的表面光洁度也需要注意,以减小因表面粗糙度带来的配合误差。
最后,键和花键的安装也对配合精度有一定的影响。
在安装时应注意键的安装方向和位置,确保其与花键孔的对应位置相匹配。
同时,键和花键孔在安装时需要适当地加入润滑剂,以减小摩擦力和磨损,提高连接的精度和可靠性。
安装时还需要注意力的均匀施加,避免因过度力的应用而造成连接配合的损坏。
综上所述,键和花键配合的精度设计涉及到键和花键孔的尺寸、公差、材料选择以及安装等方面。
通过合理的设计和制造,能够提高配合精度,确保连接的可靠性和耐久性。
《花键配合研究》报告花键这玩意儿,在机械领域那可是相当重要!咱今天就来好好研究研究它。
先来说说我为啥对花键配合这么感兴趣。
前段时间,我去一家工厂参观,正巧碰上师傅们在组装一台大型机器。
其中有个部件的连接就用到了花键,那场景让我印象深刻。
师傅们小心翼翼地将两个带有花键的零件对接,反复调试,脸上的表情那叫一个专注。
我凑过去看,发现花键的齿与槽之间的配合真是精妙无比。
花键配合,简单来说,就是通过花键的齿和槽的相互作用,实现轴和轮毂的连接和传递动力。
这其中的学问可大了去了。
从类型上看,花键有矩形花键、渐开线花键等。
矩形花键加工方便,但对定心精度要求较高;渐开线花键的承载能力强,定心精度也不错。
就好比两个人合作完成一项任务,矩形花键就像是那种要求彼此配合得天衣无缝的搭档,一个小失误都可能影响大局;而渐开线花键则像那种实力相当、相互支持又有一定容错空间的伙伴。
花键配合的精度等级也有讲究。
精度高的花键配合,就像精密仪器中的零部件,一丝一毫的偏差都不允许;精度低的呢,则能在一些对精度要求没那么苛刻的场合发挥作用。
比如说,汽车的变速箱里,关键部位的花键配合精度那是相当高,得确保动力传递平稳、准确;而一些不太重要的辅助部件,花键配合的精度要求就相对低一些。
再来说说花键配合的优点。
它能传递较大的扭矩,比普通的平键可厉害多了。
而且花键配合还能让轴和轮毂在工作时受力更均匀,减少磨损,延长使用寿命。
想象一下,要是一辆车的传动轴一直受力不均,那不得开着开着就出问题啦?在实际应用中,选择合适的花键配合至关重要。
这得考虑好多因素,像传递的扭矩大小、工作环境、安装和拆卸的方便程度等等。
有一次,我看到一个工程师在为一款新设备选择花键配合,他拿着图纸,一会儿计算,一会儿皱眉思考,那认真劲儿就像是在解一道超级难题。
另外,花键配合的加工也是个技术活。
加工过程中,得保证花键的齿形、尺寸、表面粗糙度都符合要求。
要是加工得不好,花键配合就会出问题,影响整个机器的性能。