惠而浦D6576CBP说明书
- 格式:pdf
- 大小:737.73 KB
- 文档页数:8

型號:BL-169調理機使用操作說明書承蒙惠顧購買調理機,為求您正確使用,請詳細閱讀本使用說明書,並請妥善保存它,以備必要時查詢。
目錄安全注意事項 (2)產品示意圖 (3)操作面板示意圖 (4)使用操作說明……………………………………………………………4-6杯蓋, 量杯,密封圈 (6)清潔保養及維護…………………………………………………………6-7使用注意事項 (7)產品規格 (7)製造廠商聯繫方式 (7)安全注意事項在使用本產品前,確認產品所標明的使用電壓,是否於家用的接地插座電壓一致.請勿將機體座泡在水中或對機體座澆水,以免引起短路或觸電,機體座主體內如有浸水,請洽經銷商或服務處.機體座的電源線和插頭不可用水或其他液體清洗或浸泡,插頭不可用濕布擦拭,手部潮濕時請勿插、拔插頭,以免引起觸電.本機在使用時,電源插頭務必要插到底,不插到底易造成觸電或由於發熱引起火災;請勿使用殘缺或鬆動的插座.請勿損傷電線及電源插頭;使用受損的電線易引起觸電,短路或火災; 如電源線損壞或發生其他故障,切勿自行拆卸本機,必須由製造廠商或其服務處或具有類似資格的專業人員更換和維修.本機在使用時,切勿無人看管.果汁杯在主體上時,切勿將手或任何用具,金屬,異物放入果汁杯中,以免傷到人或損毀攪拌部份.切勿將本機在無水情況下進行空轉.使用本產品時,果汁杯中的水或其他液體不能超過杯子上的最大刻度線.請勿將本機靠近熱源,請勿在機器下方放置抹布,以免造成散熱不良.本產品只適用於室內使用, 請勿置於室外使用或用作商業用途.操作時一定要蓋緊杯蓋,裝上量杯,在製作熱飲時請務必蓋好杯蓋,並確定先使用低速運轉,以免高速會噴出熱液體,造成傷害.本產品不預備給體能弱、反應遲鈍或有精神障礙的人(包括兒童)使用,除非在對其負有安全責任的人員的指導或幫助下安全使用.兒童應該被監督,請勿讓兒童使用或觸摸本機,以保證他們不玩耍器具.先關掉電器電源,拔下電源插頭,然後才可更換配件或碰觸任何運轉的部份.產品刀片非常鋒利,清空果汁杯和清洗時請務必特別小心,勿自行拆除刀片,請勿觸碰任何在運轉的部份當不使用機器或拆除或裝設配件或清洗時,請先拔掉插頭.馬達如超過負荷時,馬達將自動停止運轉,此為馬達內的溫度偵測保護系統啟動,並非馬達故障,用戶需拔掉插頭大約45分鐘後,馬達內的溫度偵測保護系統才能重定,此時便可重新使用.本產品有任何問題請勿自行拆卸,修理,改造,以免造成自身傷害,欲修理本器具請洽經銷商或售後 服務處.產品示意圖BL-169數碼管為黑底,可視角度:全視角,白色字體及圖案.先將機體座電源插頭插入與機體銘牌標示一致電壓的電源座.ON/OFF鍵(用紅白雙色燈)此鍵為功能啟動開關機鍵,選擇任何功能只有再按後才能啟動,在各種模式的工作中只要按鍵就可停止工作。

Front Loader Washing Machine前置式洗衣機WSR-1712Please read these instructions and warranty information carefully before use and keep them handy for future reference.在使用之前請詳細閱讀「使用說明書」及「保用條款」,並妥為保存。
即時網上登記保用Online Warranty Registration使 用 說 明 書U S E R M A N U A L請即進行保用登記﹗有關保用條款細則,請看本說明書最後一頁。
Please register your warranty information now!For Warranty Terms & Conditions,please refer to the last page of this user manual.簡介注意:本機僅供家居使用。
您的供應商或當地相關機構會為您提供廢品處理的詳細資訊。
注意:拔出舊電器的插頭,並與其電源線一起處理。
- 為求您正確使用洗衣機,請詳細閱讀本使用說明書。
- 請妥善保存所有材料,以備必要時查詢。
注意:在清潔和維修工作上皆適用。
注意:洗衣過程中,水溫可高達90°C 。
安全注意事項廢品處理須知產品運輸須知所有包裝材料均為環保可再循環材料,請通過環保的方法處理包裝材料。
A) 清潔和維修前必須拔出電源插頭。
B) 每次洗衣後都關上水龍頭。
C) 本機必須有效接地。
請確保交流電源接地,否則,請聯繫合資格技術人員維修。
D) 請勿用濕的手或腳接觸本機。
請勿赤腳使用本機。
E) 請勿使用接頭,延長電線或多用途插座。
F) 打開洗衣機門後,確保洗衣桶內沒有水。
G) 本產品不預備給體能弱、反應遲鈍或有精神障礙的人(包括兒童)使用,除非在對其負有安全責任的人員的指導或幫助下安全使用。
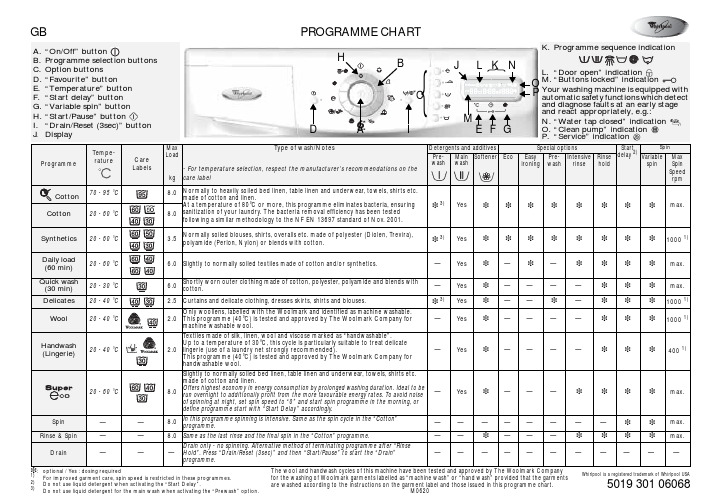
GBPROGRAMME CHART5019 301 06068Whirlpool is a registered trademark of Whirlpool USA❉:optional / Yes : dosing required1)For improved garment care, spin speed is restricted in these programmes.2)Do not use liquid detergent when activating the “Start Delay”.3)Do not use liquid detergent for the main wash when activating the “Prewash” option.The wool and handwash cycles of this machine have been tested and approved by The Woolmark Company for the washing of Woolmark garments labelled as “machine wash” or “hand wash” provided that the garments are washed according to the instructions on the garment label and those issued in this programme chart.M0620ProgrammeT empe-ratureCare LabelsMax Loadkg T ype of wash/Notes- For temperature selection, respect the manufacturer’s recommendations on the care labelDetergents and additives Special options Startdelay 2)Spin Pre-wash Main washSoftener EcoEasy ironing Pre-wash Intensive rinse Rinse hold Variable spin MaxSpinSpeed rpmCotton 70 - 95 °C 8.0Normally to heavily soiled bed linen, table linen and underwear, towels, shirts etc.made of cotton and linen.At a temperature of 80°C or more, this programme eliminates bacteria, ensuring sanitization of your laundry. The bacteria removal efficiency has been testedfollowing a similar methodology to the NF EN 13697 standard of Nov. 2001.❉3)Yes ❉❉❉❉❉❉❉❉max.Cotton 20 - 60 °C 8.0Synthetics 20 - 60 °C3.5Normally soiled blouses, shirts, overalls etc. made of polyester (Diolen, T revira),polyamide (Perlon, Nylon) or blends with cotton.❉3)Yes ❉❉❉❉❉❉❉❉10001)Daily load(60 min)20 - 60 °C6.0Slightly to normally soiled textiles made of cotton and/or synthetics.—Yes ❉—❉—❉❉❉❉max.Quick wash (30 min)20 - 30 °C 6.0Shortly worn outer clothing made of cotton, polyester, polyamide and blends with cotton.—Yes ❉————❉❉❉max.Delicates 20 - 40 °C2.5Curtains and delicate clothing, dresses skirts, shirts and blouses.❉3)Yes ❉——❉—❉❉❉10001)Wool 20 - 40 °C2.0Only woollens, labelled with the Woolmark and identified as machine washable. This programme (40°C) is tested and approved by The Woolmark Company formachine washable wool.—Yes❉————❉❉❉10001)Handwash (Lingerie)20 - 40 °C 2.0T extiles made of silk, linen, wool and viscose marked as “handwashable”.Up to a temperature of 30°C, this cycle is particularly suitable to treat delicate lingerie (use of a laundry net strongly recommended).This programme (40°C) is tested and approved by The Woolmark Company for handwashable wool.—Yes ❉————❉❉❉4001)20 - 60 °C8.0Slightly to normally soiled bed linen, table linen and underwear, towels, shirts etc. made of cotton and linen.Offers highest economy in energy consumption by prolonged washing duration. Ideal to be run overnight to additionally profit from the more favourable energy rates. T o avoid noise of spinning at night, set spin speed to “0” and start spin programme in the morning, or define programme start with “Start Delay” accordingly.—Yes ❉———❉❉❉❉max.Spin ——8.0In this programme spinning is intensive. Same as the spin cycle in the “Cotton” programme.————————❉❉max.Rinse & Spin ——8.0Same as the last rinse and the final spin in the “Cotton” programme.——❉———❉❉❉❉max.Drain———Drain only - no spinning. Alternative method of terminating programme after “Rinse Hold”. Press “Drain/Reset (3sec)” and then “Start/Pause” to start the “Drain” programme.———————————A.“On/Off” buttonB.Programme selection buttonsC.Option buttonsD.“Favourite” buttonE.“Temperature” buttonF.“Start delay” buttonG.“Variable spin” buttonH.“Start/Pause” buttonI.“Drain/Reset (3sec)” button J.DisplayK.Programme sequence indicationL.“Door open” indication M.“Buttons locked” indication Your washing machine is equipped with automatic safety functions which detect and diagnose faults at an early stage and react appropriately, e.g.:N.“Water tap closed” indication O.“Clean pump” indication P.“Service” indicationHIA P O J B}CDE F GK L N}M5019 301 06068Whirlpool is a registered trademark of Whirlpool USAAdd detergent as indicated on the front page and as described in the chapter “Detergent and Additives” in your Instructions for Use.1.Push the “On/Off” button . The blue light circlesignals that the washer is switched on.2.Select the desired programme by pushing thecorresponding programme button; it is marked by a blue light.3.The temperature and spin speed indicated on thedisplay can be altered by pressing the “Temperature” button or the “Variable spin” button.When the combination of programme and additional option(s) is not possible, the indication lights switch off automatically. Unsuitable combinations of options are deselected automatically.“Eco” button•With a modified temperature profile and a slightly prolonged washing duration, the optimumcombination of excellent washing result and even lower energy consumption is achieved.“Easy ironing” button•Can be used together with “Cotton”, “Synthetics” and “Daily load” programmes to make ironing easier.•Increases the water quantity and the clothes are spun very gently.“Prewash” button•Only for heavily soiled loads (for example sand, granular dirt) sensible. Increases the cycle time by approximately 15 min.•Do not use liquid detergent for the main wash when activating the Prewash option.“Intensive rinse” button•More water is added and rinse cycle is prolonged.•This option is particularly suitable for areas with very soft water or for washing baby linen, and helps people with allergies.“Rinse hold” button•The laundry remains in the last rinse water without progressing to the final spin cycle to avoid creasing and prevent colours from changing.•This option is particularly recommended for the programmes “Synthetics”, “Daily load (60 min)” and “Delicates”.•It is particularly useful if you want to postpone spinning to a later time, or if you want to drain only.•If you select “Rinse hold”, do not leave the laundry to soak for too long.Note: The programme stops to “Rinse hold” at the time the “Rinse hold” symbol on the display lights up. The blue light under the “Start/Pause” button flashes.T erminate the “Rinse hold” option:•Press the “Start/Pause” button ; the programme will terminate automatically with the final spin cycle for the present wash programme.•If you do not wish to spin the clothes, push the “Drain/Reset (3sec)” button and then the “Start/Pause” buttonto start the Drain programme.“Variable spin” button•Every programme has a predefined spin speed.•Press the button to set another spin speed.•If spin speed “0” is selected, the final spinning is cancelled but intermediate spin peaks remain during rinse. The water is drained out only.If there is a programme setting which you use frequently, the appliance offers the possibility to save one setting for each programme so that it can be used again by just pushing one button.CONSUMPTION DATAProgramme T emperature(°C)Load (kg)Water (l)Energy (kWh)Approx. Programme Duration(hours :minutes)*Cotton 958.082** 2.402:10Cotton608.077 1.522:10Cotton with “Eco”***608.069 1.362:20Cotton 408.0770.852:05Synthetics 60 3.548**0.951:35Synthetics 40 3.5440.551:20Daily load (60 min)40 6.0790.701:00Quick wash (30 min)30 6.0720.350:30Delicates 30 2.5600.450:50Wool 40 2.0600.650:45Handwash40 2.0450.650:40Handwash (Lingerie)30 2.0450.350:36608.0750.954:00Consumption values were measured in normalized conditions in compliance with Standard IEC/EN 60456. Consumption data in the home may vary with respect to the values in the table in relation to the water supply pressure and temperature, the load and the type of wash.*The time indicated on the display can deviate from the values in the table, because it takes into account the householdconditions applicable at that time.**T o reduce the water temperature, some cold water is added at the end of the main wash cycle, before the pump drains the water out.***Reference Programme for Energy Label.ADD DETERGENTS, CLOSE THE DOOR AND SELECT THE PROGRAMMESELECT ANY DESIRED OPTIONSAVE YOUR FAVOURITE PROGRAMMES•Select the desired programme, temperature, spin speed and option(s), push and hold the “Favourites” button for at least 3 seconds. The lamp next to“Favourites” shortly flashes and then lights up - the programme setting is saved.Next time you want to use your individual programme setting, select the programme, push the “Favourites” button and start by pushing “Start/Pause” .If you want to replace the saved programme setting by another one:•Push the programme button, select temperature, spin speed and options as desired and then press and hold the “Favourites” button for at least 3 seconds. The previously saved programme setting will be replaced by the new one.The “Start Delay” allows to run the machine at the consumer’s convenience, for example at night when electricity is cheaper.•Select programme, temperature, spin speed and options.•Press the “Start Delay” button to select the delay time up to 23 hours.•Press the “Start/Pause” button .The countdown of the delay time begins; the clock symbol next to the delay time and the dot between hours and minutes flash.•The time delay indication disappears when theprogramme starts and it is replaced by the remaining programme time.•Once having pressed the “Start/Pause” button , the number of hours preselected can be reduced by pressing and holding the “Start Delay” button. From 1 hour on, the delay time can also be reduced by minutes.T o cancel the “Start Delay”..before you press the “Start/Pause” button:•Select another programme or press the “Drain/Reset (3sec)” button...after having pressed the “Start/Pause” button:•Press the “Drain/Reset (3sec)” button for at least 3 seconds - the start delay time disappears from the display.Open the tap and press the “Start/Pause” button . The blue light under the “Start/Pause” button is on. The programme sequence indicator shows the current programme phase, running from left to right through Wash, Rinse, Spin/Drain.Before starting and after end of a programme, the symbol lights to show that the door can be opened. As long as a wash programme is running, the door remains locked and must on no account be forced open. In case you have an urgent need to open it during a running programme, refer to “Cancel (Reset) a running programme before the end”.You can lock the buttons of the control panel against improper use (e.g. by children).•Press the temperature and the spin speed button simultaneously and hold them for at least 3 seconds. The key symbol on the display lights up.•T o unlock the buttons again: proceed in the same way.“Water tap closed”The appliance has no or insufficient water supply. Open the water tap; if the indication still lights up, refer to the “Troubleshooting Guide” in the Instructions for Use.“Clean pump”Waste water is not pumped out. Check whether the drain hose is kinked or the filter must be cleaned; in the latter case refer to the Instructions for Use (“Removing the Filter”).“Service”Lighting up of the “Service” indication can be caused by a fault in an electrical component. Refer to the“Troubleshooting Guide” in your Instructions for Use; if the fault persists, contact our After Sales Service.•The symbols of the programme sequence indicator are dark, and the “Door open” symbol lights up.1.Switch the machine off by pushing “On/Off”.2.Close the water tap.3.Open the door and unload the machine.4.Leave the door ajar to allow the drum to dry.1.Press the “Start/Pause” button to pause the programme. The light flashes.2.Select the new programme, temperature, any options and another spin speed if you want.3.Press the “Start/Pause” button again. The new programme continues at the same position where the previous programme was interrupted. Do not add detergent for this programme.The “Drain/Reset (3sec)” button cancels a programme before the end.•Press the “Drain/Reset (3sec)” button for at least 3seconds. Any existing water is drained out before the door can be opened.START DELAYPROGRAMME START“DOOR OPEN” INDICATIONLOCK BUTTONSRED INDICATIONS ON THE DISPLAYPROGRAMME ENDCHANGE PROGRAMME AND/OR OPTIONS AFTER PROGRAMME STARTCANCEL (RESET) A RUNNING PROGRAMME BEFORE THE END。

抽濕淨化機使用說明書Household Dehumidpurifier Operating Instructions 產品型號Model:DS201HB/DS201HW/DS241HB/DS241HW·感謝您購買惠而浦抽濕淨化機·使用前請仔細閱讀本使用說明書·請妥善保管,以備查閱·熟練使用,有利節約•Thank you for choosing our products •Please read this instruction carefully before use •Please keep this instruction for future reference •Proficient use to save electricity產品特點 1產品簡圖(正面) 2產品簡圖(背面) 3控制面板4-5安全標誌 6-7注意事項8-10包裝卸除 11安裝過濾網 11檢查水箱 12安裝位置 12操作條件12抽濕模式 13乾衣模式141415第 6 感智能模式 夜間模式空氣淨化模式(自動) 空氣淨化模式(手動)負離子淨化裝置 兒童安全鎖 排水提示 導風板設定 連續排水16 17 17 17 1818過濾網 19負離子淨化裝置 20空氣質量指示燈2021-2223-2425產品概述安全注意事項使用準備操作方法空氣淨化系統保養及維修故障與排除規格表尊敬的用戶 :感謝您購買惠而浦抽濕淨化機,我們將竭誠為您提供無憂服務。
方便您的居家生活。
請仔細閱讀本使用說明書,並妥善保管,以備日後查閱、維修。
因公司產品不斷改進,如有更改,恕不另行通知。
目錄15產品特點+121.導風板左右擺動調節鈕 5.水箱防漏蓋2.導風板 6.水箱3.控制面板7.水位顯示位置4.隱藏式把手產品概述抽濕淨化機簡圖 ( 正面 )31.連續排水端蓋2.電源線座3. All-in-one多重過濾網4.背板 (* 前置濾網 )5.電源插頭抽濕淨化機簡圖 ( 背面 )型號 : DS201HB/DS201HW/DS241HB/DS241HW*20L 及24L 前置濾網: 納米銀離子濾網產品概述4控制面板1.開 / 關鍵啟動 / 停止操作2.模式鍵選擇 6 種不同模式包括第 6 感智能模式 ( 頁 .14)(頁.13) (頁.14) (頁.15)抽濕模式乾衣模式(頁.15)3.LED 顯示屏(頁.13)4.時間鍵(頁.13)設定所需抽濕時間(小時)。
Lavadoras WWI13BB WWI13BS WWI16BB WWI16BS“ADVERTENCIAPELIGROADVERTENCIATodos los mensajes de seguridad le dirán el peligro potencial, le dirán cómo reducir las posibilidades de sufrir una lesión y lo que puede suceder si no se siguen las instrucciones.Con la ayuda de una persona, retire la base de espuma, levantando la Lavadora de las manijas laterales. Nunca utilice la Lavadora con la base de Espuma Inyectada, pues eso podrá deteriorar su buen funcionamiento y vida útil.PORTANTE – Son necesarias dos o más personas para mover o instalar su Lavadora. ADVERTENCIA Riesgo de Lesiones por Exceso de Peso Son necesarias dos o más personas para mover o instalar su Lavadora.no sigue columna o sufrir lesiones en sus cuerpo.IMPORTANTEEn caso de que sea necesario, el cable de alimentación debe ser sustituido por otro exactamente igual y el cambio del mismo debe realizarlo el Técnico Autorizado ADVERTENCIAConéctelo a un enchufe de tres clavijas con polo a tierra.No retire el terminal de la conexión a tierra.No use adaptadores.No use una extensión.No tenga las manos húmedas al conectar o desconectar el enchufe.No vierta agua sobre el panel.Si no se siguen estas instrucciones, se puede causar muerte, incendioo choque eléctrico.La Lavadora está provista de dos mangueras para el suministro de agua, una con acople de color rosa para agua caliente y otra con acople de color verde para agua fría.máx. 1,20 m mín. 0,85 m10 cm 10 cmMulti-dispenser con2 compartimentosTapa de vidriotempladoPanel ElectrónicoManijas lateralesPatas de nivelación Las imágenes contenidas en este manual pueden ser diferentes al producto original y su único objetivo es ayudar a mejorar la comprensión del contenido escrito del mismo.Están disponibles tres temperaturas del agua, para unmejor lavado y cuidado de tus prendas. Fría para ropasdelicadas, de colores fuertes o poco sucias, Tibia pararopas de colores claros y suciedad mediana y Calientepara el mejor lavado de las prendas blancas y muy sucias.Con rotación de 750 rpm y tiempos de centrifugado diferentes para cada ciclo de lavado, su Lavadora garantiza el desempeño de extracción de agua con ahorro de energía. Entrega sus prendas casi secas, facilitando el proceso de secado. Para la Lavadora con ciclo de lavado de Edredón y ciclo de lavado Plancha Fácil, la rotación del centrifugar es de 500 rpm con1.Presione la tecla Encendido/Apagado para encender el panel de la Lavadora.2.Presione la tecla Selección de Ciclo para escoger el ciclo al tipo de prenda quedesea lavar. El número del ciclo seleccionado será exhibido en el visor digital. Vea en la página 20 las opciones disponibles para cada Ciclo de lavado.3.Presione la tecla Nivel de Suciedad para seleccionar una de las opciones de nivelmás adecuado a la suciedad de la ropa.4.Ajuste el nivel de agua al volumen de ropa colocado en el cesto de la Lavadora,presionando el botón Niveles de Carga.El Ciclo Fácil Uso ya viene programado en el nivel de agua automático, por eso, ninguna opción de los 4 niveles resulta seleccionada, pero usted puede optar por la selección manual de los niveles de aguaCICLOS MANUALES INDICACIÓNRemojar La Lavadora llena de agua y hace agitaciones cortas para asegurar la disolución del detergente y lavado de las prendas.Lavar La Lavadora llena de agua y hace movimientos con pausas cortas para una mayor acción mecánica.Retire el enchufe del tomacorriente antes de efectuar cualquiermantenimiento en el producto.Recoloque todos los componentes antes de conectar el producto.Si no se siguen estas instrucciones, puede provocar riesgo de vida ochoque eléctrico.Para no dañar y aumentar la vida útil de su Lavadora:• Limpie el vidrio de la tapa semanalmente, evitando que se acumulen residuos. Nunca utilice limpiavidrios para no dañar el material de la tapa.• Use jabón neutro, aplicadoremovedores o sustancias abrasivas, principalmente en la tapa, pues podrá haber reacción química, dañando la Lavadora.• No utilice chorros de agua al limpiar su Lavadora, para no dañar los componentes eléctricos, lo cual puede provocar cortocircuito o incendio.IMPORTANTEPor favor limpie el filtro de pelusas según las instrucciones una vez por mes.5.5 Limpieza filtro manguera。
WUI75X15H/ WUI95X15H– D 24" x W 145⁄8" x H 3349⁄64" (depth without handle)PRODUCT DIMENSIONS .MODEL #WUI75X15H, WUI95X15Hin cmA Width145/837.15B Width of grille1425/3237.55C Height of door2955/6475.85D Height of grille329/329.95E Width of recessed icemachine1429/3237.81 FWidth from side of icemachine to door fullyopen57/814.94G Depth without door2121/3255.02H Depth with door2313/3259.46I Depth with handle249/1662.42FRONT VIEW TOP VIEWWUI75X15H/ WUI95X15H– D 24" x W 145⁄8" x H 3349⁄64" (depth without handle)MODEL #WUI75X15H, WUI95X15Hincm A*Height to top of door (min.)337/886.03B*Height to top of grille (min.)329/329.95C*Height of recessed ice machine (min.)3329/6485.38D Depth with door open 90° (min.)373/894.92E Depth with door (min.)2313/3259.46FDepth without door (min.)219/1654.76G Depth of grille (min.)1963/6450.76* Add 1" (2.5 cm) to the height dimension when leveling legs are fully extended.FloorWUI75X15H/ WUI95X15H– D 24" x W 145⁄8" x H 3349⁄64" (depth without handle)OPENING/CLEARANCE DIMENSIONSBACK VIEWSIDE VIEWMODEL #WUI75X15H, WUI95X15Hincm A*Width (min.)1538.1Width without hinge side spacer option (min.)1538.1Width with hinge side spacer option (min.)153⁄440.0*B*Width of outlet location615.0C*Outlet location – distance from side 1 2.5D*Width of water connection location 31⁄28.9EMinimum width from hinged side of ice machine to fixed wall – door open 90°2 5.1Minimum width from hinged side of ice machineto fixed wall – door fully open 180°131⁄433.7Minimum width from hinged side of ice machineto fixed wall – door fully open 118°67⁄817.4F Height (min.)3486.4G Height of outlet location820.3H Height of water connection location 922.9I Outlet location – distance from bottom 1230.5J Depth of cabinet (min.)2461.0K Water line location – distance from side 239/64 6.64L Power supply – distance from side 349/649.57MDrain hose – distance from side 75/1618.57N Power supply – distance from bottom 11/4 3.17O Drain hose – distance from bottom 243/64 6.79P Water line location – distance from bottom 147/3236.12eRecommended electrical connection locationw Recommended water connection location* Install 3⁄4" (1.9 cm) front hinge-side spacer flush with face of adjacent cabinet and 3⁄4" (1.9 cm) back hinge-side spacer 6" (15.2 cm) from back wall.ELECTRICAL REQUIREMENTS115 V , 60 Hz, AC only, 15 or 20 A fused, grounded circuit isrequired. A dedicated circuit is recommended. Use an outlet that cannot be turned off by a switch. Do not use an extension cord.WATER PRESSURE REQUIREMENTSA cold water supply with water pressure between30 and 120 psi (207 and 827 kPa) is required to operate the ice maker. Call a licensed, qualified plumber with any questions about the water pressure.Reverse Osmosis Water SupplyIMPORTANT: The use of a reverse osmosis system with this product is not recommended. However if you do use reverse osmosis, follow these instructions.IMPORTANT: The pressure of the water coming out of a reverse osmosis system going to the water inlet valve of the ice machine needs to be between 30 and 120 psi (207 and 827 kPa). If a reverse osmosis water filtration system is connected to the cold water supply, the water pressure to the reverse osmosis system needs to be a minimum of 40 to 60 psi (276 to 414 kPa).。