VTS安装&使用说明
- 格式:pdf
- 大小:141.16 KB
- 文档页数:17
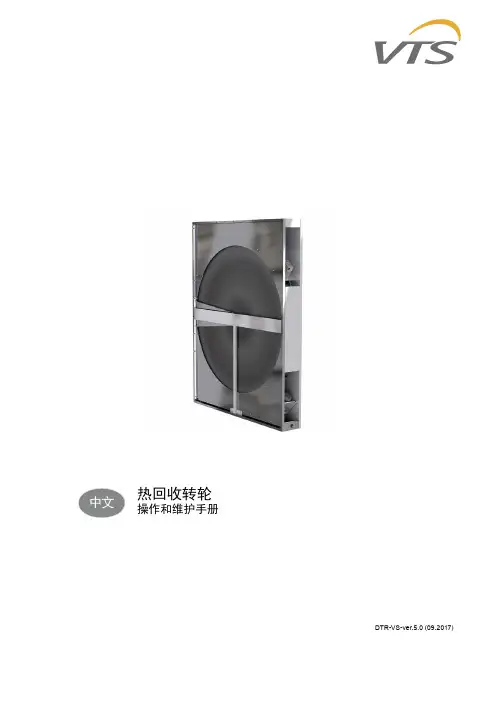
热回收转轮操作和维护手册DTR-VS-ver.5.0 (09.2017)IEC/EN 60439-1 +AC Low voltage switchgears and controllersVTS 保留非预先通知而修改的权利目录1. 介绍 (2)2. 技术数据 (3)2.1. 驱动单元基本参数 (3)2.1.1. 结构 (3)2.1.2. 驱动器操作 (3)2.2. 技术规范 (4)2.2.1. 结构 (4)2.2.2. 操作参数 (4)2.2.3. 元器件的额定参数 (4)2.3. 驱动单元的安装和配置 (5)2.4. 含变频器和VTS自控的驱动单元安装和配置 (5)2.4.1. 热回收转轮驱动回路的接线图 (5)2.4.2. 驱动单元的安装和配置 (6)2.4.3. 电机防护 (7)2.5. 自控系统的驱动单元安装和配置 (7)2.5.1. 热回收转轮驱动回路的接线图 (7)2.5.2. 热回收转轮驱动单元的控制 (8)2.5.3. 变频器配置例子 (8)2.5.4. 电机保护 (9)2.6. 系统中带有EC调速器的驱动单元安装和配置 (10)2.6.1. EC调节器的ModBus RTU/RS485参数 (11)2.6.2. 通过MODBUS设置旋转速度 (12)2.7. 安装建议 (13)3. 保存和运输 (14)4. 启动 (14)5. 维护 (15)5.1. 热回收转轮和驱动皮带 (15)5.2. 转轮密封 (16)1. 介绍本文档描述了关于热回收转轮的参数、运输、保管和服务内容。
●在进行任何动作前,务必详细阅读本文档。
2. 技术数据2.1. 驱动单元基本参数2.1.1. 结构本驱动单元是每个热回收转轮的完整部件。
基本构成如下:●变频器/EC电机控制器(取决于不同的版本或区域)●热回收轮芯●轮芯驱动皮带传动装置●电机减速器-马达带有减速齿轮2.1.2. 驱动器操作驱动单元用于启动并平缓地控制热回收转轮,使得速度在3-10rpm范围内。

博视平台安装文档一、相关应用安装(在C盘下,将压缩包解压到当前文件夹)Vts文件夹下有如下文件:(还要将PHPnow-1.5.6解压,然后将Package解压,否则找不到htdocs文件)1.解压PHPnow-1.5.6.zip,获得PHPnow-1.5.6文件夹目录,目录内容如下:2.安装Setup.cmd(如果这一步安装不成功可能要先将7z.exe,7z.dll,Package7z这三个文件复制到windows下的system32文件夹下)3.设置root用户密码为‘mysql’4.自动跳转http://127.0.0.15.MySQL连接测试:用户密码为‘mysql’,点连接并获得测试结果6.点击phpmyadmin输入用户名:root,密码:mysql,点击执行。
7.然后导入数据库文件:vts\db_info\videotosip.sql,然后点击运行。
执行后二、监控融合服务器配置1.复制vts\web_config下的文件index.html和vts目录复制到vts\PHPnow-1.5.6\htdocs,并修改index.php重命名为‘任意名.php’2.修改IP地址,关闭浏览器重新登陆http://127.0.0.1/,登录账号:admin 密码:admin3. 修改本地地址为服务器地址,其余的根据需要填写,填好后点修改打开vts\PHPnow-1.5.6\php-5.2.14-Win32目录下php-apache2handler.ini文件找到相应的段落,删除参数exec并保存退出,如图:打开vts\PHPnow-1.5.6目录下的PnCP.cmd文件,输入“23”并按回车。
三、安装服务1.安装vts-srvd.exe“运行”→“cmd”,通过cmd进入vts\bin目录下并安装vts-srvd.exe“运行”→输入“compmgmt.msc”→回车更改vts-srvd属性中的恢复标签中的失败反应项为“重新启动服务”设置完一定要关闭防火墙,否则在别的机器上ping不通。

0前言现有的通信导航设备存在着一定的局限性。
雷达及ARPA虽具有避碰功能,但不能识别船舶,且受气象、海况及地形的影响;甚高频(VHF)无线电话虽可进行船舶间和船岸间对话,了解他船的信息和运动状态,但由于船舶操作者或岸基人员存在语言表达和沟通中的歧义和误解,信息交换速度慢且不规范,往往延误时间等问题。
AIS设备的使用,明显弥补了这些方面的缺陷和不足,为船舶间和船舶交通服务提供了新的识别手段与船舶动态监测。
随着2008年7月1日的临近,除了300总吨以上的国际航行船舶已经在2004年12月31日前强制安装AIS设备,中国沿海航行的所有客船﹑500总吨以上的油船﹑危险化学品船﹑集装箱船已于2006年4月30日之前强制安装AIS设备外,其余的500总吨以上的非国际航行船舶也将在2008年7月1日前强制安装AIS设备。
目前,部分300总吨以下的国际航行船舶已安装了该设备,不少500总吨以上的非国际航行船舶也提前安装了该设备,港作拖轮和游艇等也安装了该设备,绝大多数船舶安装AIS设备的时代已经来临。
但是,就目前AIS的使用情况看,由于AIS设备多产自国外,用的是英文操作界面,对部分中国籍船舶操作人员存在语言障碍,尤其是小型的非国际航行船舶上的操作人员;因强制安装AIS设备的进程快,船舶管理人员和船舶操作人员对AIS设备的认识和了解还不够,培训也没有跟上;国际和国内的相关管理机关还没有制定﹑颁布关于AIS设备安装、设置和使用规则,使得AIS设备在安装时随意性很大,设置时不够规范,船舶操作人员在使用时不够正确;部分船公司尽管制定了相关规则,但有其局限性,不够全面;相关管理机关或船舶管理人员在检查时无规则可依等等。
部分船舶在AIS设备安装、设置和使用中存在的问题已严重影响AIS设备应有性能的正常发挥,甚至引起误解或导致事故的发生。
为此建议国际海事组织和国内主管机关尽早制定“AIS设备安装、设置和使用规则”,并加强培训,以规范AIS设备的安装、设置和使用。
安装指南(原版:de)80313891401NH[8031395]†‡带阀岛 VTSA 的 CPX 终端CPX、CPX-M、VTSA、VTSA-F Festo SE & Co. KG Postfach73726 Esslingen 德国+49 711 347-0 1. 安全注意事项和安装提示 (1)2. 部件列表 (2)3. 术语解释 (2)4. 按规定使用 (2)5. 墙面安装 (3)5a. 检查安装件的位置 (3)5b. 安装安装件 (3)5c. 安装点概览 (4)5d. 安装固定 VTSA/VTSA-F 模块 (65 mm) (5)6. 支架系统安装 (6)6a. 检查安装件的位置 (6)6b. 安装安装件 (6)6c. 将 CPX 终端安装到支架系统上 (6)7. 高帽式导轨安装 (7)7a. 安装高帽式导轨 (7)7b. 将 CPX 终端安装到高帽式导轨上 (7)1)SG1 = 强度等级 1SG2 = 强度等级 22)带 1 … 3 个 VTSA/VTSA-F 模块的 CPX 终端 1→每个 VTSA/VTSA-F 模块最多一个垂直堆叠部件。
带 4 … 5 个 VTSA/VTSA-F 模块的 CPX 终端 1→VTSA/VTSA-F- 阀岛上最多一个垂直堆叠部件。
带超过 5 个 VTSA/VTSA-F 模块和 VTSA/VTSA-F- 阀岛上至少有一个垂直堆栈的 CPX终端 1 →不允许采用支架系统安装。
安装墙面支架系统高帽式导轨CPX-模块(塑料)√−√CPX-模块(金属)和VTSA/VTSA-F-模块(18 … 52 mm)√√√VTSA/VTSA-F-模块 (65 mm) √−−抗振性/抗冲击性符合IEC 60068墙面支架系统高帽式导轨振动第 2-6部分 SG21)SG1 SG22)−冲击第 2-27部分 SG2 SG1 SG22)−持续冲击第 2-27部分 SG1 SG1 SG22)−振动负载频率范围[Hz]加速度[m/s2] 偏移量[mm] SG1SG2SG1SG2SG1SG22 … 8 2 … 8 −−±3.5±78 … 27 8 … 27 10 10 −−27 … 58 27 … 60 −−±0.15±0.758 … 160 60 … 160 20 50 −−160 … 200 160 … 200 10 10 −−冲击负载加速度[m/s2]持续时间[ms] 每个方向的冲击SG1SG2SG1SG2SG1SG2±150±300111155持续冲击负载加速度[m/s2]持续时间[ms] 每个方向的冲击±150610002. 部件列表1CPX终端(1 个)带阀岛VTSA/VTSA-F墙面安装用于 CPX-模块(塑料)的安装件:2 安装件 CPX-BG-RW-... 用于 CPX-模块(金属)的安装件:3 安装支架CPX-M-BG-RW-... 4 螺丝 M3(螺纹型) 用于 VTSA/VTSA-F-模块的安装件: 5 安装支架VAME-S6-W-M466 螺丝 M5支架系统安装用于 CPX-模块(金属)的安装件:7 安装支架CPX-M-BG-VT-2X 8 螺丝 M3(螺纹型)高帽式导轨安装不在供货范围内:9 高帽式导轨(EN 60715 - 35x7.5 或 35x15)(1 个)安装件CPX-CPA-BG-NRH : aJ 紧固件 aA 螺丝(3 个)(3 个)3. 术语解释1. 带 VTSA/VTSA-F-阀岛的 CPX -终端 1 在本安装指南中将用 CPX- 终端 1 表示。
![基于VTS的BACnet通讯协议调试[2]](https://uimg.taocdn.com/125b2af4112de2bd960590c69ec3d5bbfd0adad7.webp)
基于VTS的BACnet通讯协议调试一、BACnet协议简介BACnet标准是1995年由美国采暖制冷空调学会(ASHRAE)正式公布的楼宇自控数据通信协议标准。
该标准的基本目标有两个,一是在技术上定义一个开放的楼宇自控系统结构,实现不同系统间的互连(interconnect)和互操作(interoperability),二是在应用上可以使用户(业主)可以自由选择自控厂商和系统集成商,寻求具有最优竞争力的产品和服务,使系统维护和升级不局限于特定的厂商,从而保护用户的投资。
从BACnet标准实现的目标来看,BACnet标准就是定义了一个开放的技术平台或环境,所有楼宇自控厂商不需要得到授权或委托,均可以直接进入这个开放的平台或环境,并参与竞争。
在BACnet标准定义的平台或环境中,竞争是完全公平的,没有其他专有(proprietary)标准的限制,从而使促进楼宇自控产业有序地健康发展。
BACnet标准从正式诞生到成为ISO标准,用了不到10年的时间。
这充分说明了BACnet 标准符合楼宇自控领域发展的规律,代表着楼宇自控领域的发展方向。
归纳起来,BACnet 标准具有如下基本特点。
1)专用于楼宇自控网络,具有高效的特点。
BACnet标准是专门为楼宇自控网络定制的标准,定义了许多楼宇自控系统所特有的特性和功能。
与其他标准相比,BACnet标准具有高效的优点。
2)完全开放,技术先进。
BACnet标准是由非盈利学会制定的标准,具有完全的开放性和广泛的参与性,从而使BACnet标准可以博采众长,不断注入新技术,始终代表楼宇自控领域的最高技术水平。
3)具有良好的互连特性和扩展性。
BACnet标准虽然从体系结构上定义了不同的局域网络,但BACnet标准可以扩展到其他任意通信网络。
例如,BACnet/IP标准可以实现与Internet 的无缝互连。
4)具有良好的伸缩性。
BACnet标准没有限制BACnet系统中设备节点的数量,BACnet 集成系统可以由几个设备节点构成一个极小的自控系统,也可以形成一个规模极大的超级大系统。

.L i v e P r o f e s s o r(汉化版)V S T宿主软件。
LiveProfessor是一个适合现场演出的VST插件宿主,就是一个简单的Rack机架,可以在音频接口的每一个输入通道加载VST效果器,然后把处理后结果输出出去,现场演出专用。
带MIDI输入功能,可用MIDI控制器控制效果参数变化。
使用指南:插件全部汉化,建议重新下载,首先使用数字音频提供的KXDSP->KX调音台右下选择预置机架效果->打开机架->设置ASIO->选择VST插件->导入效果->微调->保存;如果没有DSP和调音台预置文件,可以向我们索取。
bbe插件低音最小化,高音5左右,输出音量微调;电音插件“基调”里要针对每首歌选择适合的基调,否则有跑调的感觉,如何找准基调?首先播放歌曲,听出这首歌的1音在哪里?找出键盘的1音在哪个位置?比如在键盘G的位置,基调里选择G,或者自己反复试听选择即可,也可以到百度里搜索一下歌曲的简谱(比如访问搜谱网:);混音插件里混音不要大,干湿声适当;机架上头“选项”里选择“启动时打开最后所保存的项目”。
其他插件可以默认也可以微调,不用的插件可以选择旁路。
新浪UC[数字音频]房间(合作专区—VIP网上学院—网络大学堂—数字音频)定期每晚为大家免费音频调试,关于电音更多使用方法可以在线咨询房间管理。
a.下载机架放入D盘或者F盘都可以,最好不要放在桌面:b.解压后双击这个LiveProfessor(机架)内的LiveProfessor.exe文件,出现这个控制台:c.打开options(选项)菜单下的ASIOsetup(ASIO设置),在ASIOdevice(ASIO设备)下拉框里选择声卡,再点controlpanel(控制面板)选择ASIO缓存,延迟时间为10秒,如果你的电脑配置高,可以选择5秒或更快~Format 选择10KX16bit/48kHZ[16+16]或10KX24bit/48kHZ[8+8],为什么?别问我!琢磨~d.选择options(选项)菜单下的Pluginmanager(插件安装管理器),出现选项窗口,点Adddirectory(添加新的目录)按钮,选择KX插件安装目录FreeVST,再点select(选择),机架开始安装VST插件:e.点Addunit(添加插件),安装需要的VST插件,下载里提供了部分VST插件(激励器、降噪器、胆管、爆音效果、电话音效果、变声效果、电音效果、混响效果、环绕效果、回声效果、压限器、EQ及音量条),网络K歌喊麦基本够用了:f.打开第一个插件的Audiorouting(音频路由端口)下拉菜单,在Inputs下点左键,选择ASIO输入,比如我的信号接到了ASIO第5、6端子上(Input5/Input6),所以这里01选择kxIn04,02选择kxIn05;在outputs下点左键,选择下一个音频插件,如下一个插件为:PultronicEQ110P,两个选择都选上:PultronicEQ110Pin01、PultronicEQ110Pin02。

DFF.PRESS.TRDC6kPa/24VDC/010V/Mod1Introduction (3)1.1Device functions (3)1.2Characteristics of the device (3)2Worth knowing (3)3Technical data (4)3.1General parameters of the transducer (4)3.2Differential pressure measurement parameters (4)3.3Parameters of the analog output (4)3.4Parameters of the serial interface (5)4Installation (5)4.1Security (5)4.2The construction of the device (5)4.3Description of leads (6)4.4Configuration of the analog output (7)4.5Address configuration (7)4.6Resetting the offset (8)4.7Restoring factory settings (8)4.8Guidelines (9)5MODBUS protocol (10)5.1Map of registers (10)5.2Protocol functions (12)5.2.1Reading the contents of output registers (0x03) (12)5.2.2Writing to the group of output registers (0x10) (13)5.3Data format (14)5.4CRC checksum (14)5.4.1Bitwise CRC calculation algorithm: (14)5.4.2Table-based CRC calculation algorithm: (15)1IntroductionThe subject of this study is the characteristics of the differential pressure transmitter based on the Honeywell ABP series pressure sensor, with the RS-485 interface with the built-in MODBUS RTU protocol, and the analogue 0-10V output. ATTENTION: Before starting the module, please read the text contained in this document.1.1Device functions• differential pressure measurement (range depending on the sensor used)• analog voltage output 0-10 [V] (proportional to the pressure difference value) • configuration of the output range• configuration of the time constant of the measurement• sensor offset zeroing function• LED signaling device operation• serial RS-485 interface (readout of measured values, configuration of work parameters)- MODBUS RTU protocol-for communication in HALF DUPLEX mode-for a hardware configurable address (1-31)1.2Characteristics of the deviceThe basic function of the transducer is to measure the value of the pressure difference. The values measured by the integrated Honeywell sensor of the ABP series, then converted and averaged in the microcontroller, are available in its memory (in the HOLDING REGISTERS) according to the MODBUS standard. The registers are read using the MODBUS protocol functions sent over the RS-485 serial interface. The registers also provide information on the currently set (configurable) measuring range, the time constant (also configurable) and the percentage of the pressure referenced to the range. The signaling of the lack of a sensor, the states of measuring range overrun, the occupancy of the transducer in the case of offset calibration is also carried out via status registers.2Worth knowing1 hPa = 100 Pa = 1 mbar1 inH2O = 249.089 Pa3Technical data3.1General parameters of the transducerPower- constant voltage DC 24V ( 20 ... 30V ) - alternating voltage AC 24V (21.5 ... 26.5V) Power consumption- minimum1)9.0 mA - typical2)11.0 mA - maximum3)22.0 mA LED signaling0.2 Hz Installation connector screw in 5.00mm pitch ( ≤ 2.5mm 2 ) dimensions112 x 84 x 31 (L x H x W) Weight approx. 100 g Assembly4)wall Level of security IP65 Working environment dust-free, air, neutral gases Working temperature-20 ° C ÷ 50 ° C The storage conditions- temperature-40 ° C ÷ 85 ° C - relative humidity20 ÷ 60% RH 1)Average device current consumption in the following conditions: no transmission; analogue outputunloaded; 24V DC power supply;2)Average power consumption of the device in conditions: transmission 10 queries per second; transmissionspeed 9600 b / s; simultaneous reading of 20 registers; bus terminating resistors 2 x 120 Ω; analogoutput set to 10V and loaded with a 10kΩ resistance; 24V DC power supply;3)Maximum instantaneous current consumption in conditions: analog output loaded with 1kΩresistance; signaling diode constantly on; other conditions as in point 2);4)The device should be installed by qualified personnel;3.2 Differential pressure measurement parametersSensor type ABP Measurement range Up to 7,000 Pa Resolution12 bits Accuracy:- in the range of 0 ÷ 50°C± 0.25% of range - in the range -20 ÷ 85°C unspecified Sampling frequency100 Hz Response time1)0.8s / 4s 2)1) the given response time is equal to one time constant corresponding to 63% of the set value;2) the default value is shorter response time;3.3Parameters of the analog outputOutput type voltage Output range0 - 10 V Resolution12 bits (5 mV) Load capacity R L > 1 kΩ Refresh rate100 Hz3.4Parameters of the serial interfacePhysical layer RS-485 Communication protocol MODBUS RTU Connection configurations1)HALF DUPLEX Transmission speeds9600/19200/57600/115200 b / s 1) HALF DUPLEX - two-way communication with one pair of wires;4Installation4.1Security• The device should be installed by qualified personnel!• All connections must be made in accordance with the wiring diagrams set out in this specification!• Check all electrical connections before commissioning!4.2The construction of the deviceFigure 1. View of the printed circuit.4.3Description of leadsFigure 2. Description of the transmitter's leads.H1 – main terminalS1- function buttonS2- address buttonD1- status LED diodeFigure 3. Connection diagram of the transducer.4.4Configuration of the analog outputThe device is equipped with an analogue output: voltage range from 0 to 10V. Depending on the selected range, the device outputs a value proportional to the measured pressure difference. The measurement results are averaged and refreshed at the outputs according to the set time constant.4.5Address configurationThe device is equipped with a 5-position switch for hardware address setting (from "1" to "31"). Setting the address "0" on the switch will use the address stored in the device via the MODBUS protocol ("1" by default).Figure 4. Transducer addressing.“0”- off“1”- on4.6Resetting the offsetResetting with the command:Before proceeding to reset (reset) the offset, you must first set the output range and place both connectors in the same pressure (you can disconnect both hoses). The zeroing process takes place after sending the offset calibration command. The calibration duration is about 7s. After correct calibration, the device should show zero pressure value.Resetting with the button:Before proceeding to reset (reset) the offset, both ports should be placed in the same pressure (both hoses can be disconnected). To trigger the zeroing process, press and hold button S1 for about 3 seconds until the diode D1 blinks. The duration of the calibration is counted from the moment the button is released and is about 7 seconds. The calibration process is signaled by the blinking of the diode D1. After correct calibration, the device should show zero pressure value.4.7Restoring factory settingsThe function of restoring factory settings applies only to parameters of RS-485 interface transmission (including address). To restore the settings, press and hold the S1 button for about 10 seconds (the first 3 seconds after pressing the LED D1 is on, the next 7 seconds are blinking). When the D1 LED is permanently on again, release the button. The device will work with new settings automatically.4.8Guidelines• In case of work in the vicinity of high interference, shielded cables should be used.• Wire screen should be connected to the nearest PE point from the power supply side.Figure 5. Connection of the transmitter to the RS-485 bus operating in HALFDUPLEX mode.5MODBUS protocol5.1Map of registersRegistrynumberThe values Description1 -999 - 9999 Pressure difference (limited by measuring range) [Pa] (1 = 1 Pa) with a sign2 0 - 1000 Pressure difference related to the range (1 = 0.1%; 1000 = 100%)3 0/1/2/3 Status register (0: "SENSOR OK", 1: "UNDERLOAD",2: "OVERLOAD", 3: "NO SENSOR") (*)4 1234 Password register5 1/2/3 Command register6according tothe commandtableParameter register7 0/1 Time constant TAU (0: 0.8s; 1: 4.0s)8 0/1/2/3/4/5/6 Measurement range(according to the measurement range table)9 -999 - 9999 Transmitter offset (informative) [Pa] (1 = 1 Pa) with a sign10 -999 - 9999 Lower value of the measuring range (informative) [Pa] (1 = 1 Pa) with a sign11 -999 - 9999 Upper value of the measuring range (information) [Pa] (1 = 1 Pa) with a sign12 0/1 The status of resetting (resetting) the offset (0: not active; 1: pending)13 0-65535 Counter of valid frames14 0-65535 Exception counter15 0-65535 Counter of incorrect CRC16 0-65535 Counter of erroneous bytes17 0-65535 Counter of wrong addresses(*) "SENSOR OK" - correct sensor operation; "UNDERLOAD" - exceeding the range from the bottom;"OVERLOAD" - exceeding the range from the top; "NO SENSOR" - no sensor;Table of commands:CommandnoFunction parameters1 Set thedeviceaddress1 - 247 (1-default value)2 Set the speedtransmission96 - 9600 bps (default)192 - 19200 b / s576 - 57600 bps1152 - 115200 b / s3 Set the paritybits0 - NO PARITY; no parity bit (default value)1 - EVEN PARITY;2 - ODD PARITY,4 Set the bitsstop1 - 1 x STOP; 1 stop bit (default value)2 - 2 x STOP; 2 stop bits5Set aconstanttime0 - 0.8s;1 - 4.0s;6 Set the rangemeasuringID according to the measurement range table0 - 0 ... 6000 Pa (default value)7Startcalibrationprocess1 - start of resetting (resetting) the offset8resetdevices1 - software reset of the deviceTable of measuring ranges:Range Pressure values voltage outputID 0 - 6000[Pa]0V5V10V00: 6000 0 Pa = 0V 3000 Pa = 5V 6000 Pa = 10V10: 4000 0 Pa = 0V 2000 Pa = 5V 4000 Pa = 10V20: 2500 0 Pa = 0V 1250 Pa = 5V 2500 Pa = 10V30: 2000 0 Pa = 0V 1000 Pa = 5V 2000 Pa = 10V40: 1500 0 Pa = 0V 750 Pa = 5V 1500 Pa = 10V50: 1000 0 Pa = 0V 500 Pa = 5V 1000 Pa = 10V60: 500 0 Pa = 0V 250 Pa = 5V 500 Pa = 10V Comments:•Specifying an incorrect or out of range value of the parameter results in entering the value of 0xEEEE in the register of commands.•Each time a command is called, it must be accompanied by entering the password (1234 decimal).•Calling a command by individual entries to registers must be completed with entering the password.5.2Protocol functionsThe following functions of the MODBUS standard have been implemented in the DIFFPRESS v2 converter:CODE IMPORTANCE03 (0x03)Reading N x 16-bit registers16 (0x10)Write of N x 16-bit registers5.2.1Reading the contents of output registers (0x03)The format of the request:Description Size The valuesDevice address 1 byte 1 - 247 (0xF7)Function code 1 byte0x03Address of the datablock2 bytes0x0000 - 0xFFFFNumber of registers(N)2 bytes 1 - 125 (0x7D)CRC checksum 2 bytes according to calculationsResponse format:Description Size The valuesDevice address 1 byte 1 - 247 (0xF7)Function code 1 byte0x03Bytes counter 1 bytes 2 x NValues of registers N x 2bytes according to the map of registersCRC checksum 2 bytes according to calculations The format of the error:Description Size The values Device address 1 byte 1 - 247 (0xF7)Function code 1 byte0x83Error code 1 byte0x01 / 0x02 / 0x03 /0x04CRC checksum 2 bytes according to calculations5.2.2Writing to the group of output registers (0x10) The format of the request:Description Size The valuesDevice address 1 byte 1 - 247 (0xF7)Function code 1 byte0x102 bytes0x0000 - 0xFFFFAddress of thedata block2 bytes 1 - 123 (0x7B)Number ofregisters (N)Bytes counter 1 byte 2 x NuserThe values N x 2bytesCRC checksum 2 bytes according to calculationsResponse format:Description Size The valuesDevice address 1 byte 1 - 247 (0xF7)Function code 1 byte0x10Address of the2 bytes0x0000 - 0xFFFFdata block2 bytes 1 - 123 (0x7B)Number ofregisters (N)CRC checksum 2 bytes according to calculationsThe format of the error:Description Size The valuesDevice address 1 byte 1 - 247 (0xF7)Function code 1 byte0x90Error code 1 byte0x01 / 0x02 / 0x03 /0x04CRC checksum 2 bytes according to calculations5.3Data formatFigure 6. Data transfer in the MODBUS RTU standard implemented in thetransducer.Figure 7. Character format in the MODBUS RTU standard used in the transducer.Figure 8. Format of data fields and CRC in the MODBUS RTU standard used in thetransducer.5.4CRC checksumAccording to the MODBUS standard, a polynomial was used to calculate the CRC checksum:X16 + X15 + X2 + 1.5.4.1Bitwise CRC calculation algorithm:Procedure for determining the CRC checksum using the bit method:a) loading the value of 0xFFFF into the 16-bit CRC register;b) taking the first byte from the data block and performing the EX-OR operation with the younger byte of the CRC register, placing the result in the register;c) shifting the CRC register content to the right one bit in the direction of least significant bit (LSB), resetting the most significant bit (MSB);d) checking the status of the youngest bit (LSB) in the CRC register, if its status equals 0, then the return to point c takes place, if 1, then the EX-OR operation of the CRC register with the constant 0xA001 is performed;e) repetition of points c and d to eight times, which corresponds to the processing of the entire byte;f) repeating the sequence b, c, d, e for the next byte of the message, continue this process until all bytes of the message are processed;g) the contents of the CRC register after the operations mentioned are the sought-after value of the CRC check sum;h) adding a CRC checksum to the MODBUS RTU frame must be preceded by swapping of the older and younger bytes of the CRC register.5.4.2Table-based CRC calculation algorithm:An example of the implementation of the procedure for determining the CRC checksum using the array method:/* The function returns the CRC as a unsigned short type */unsigned short CRC16 ( puchMsg, usDataLen )/* message to calculate CRC upon */unsigned char *puchMsg ;/* quantity of bytes in message */unsigned short usDataLen ;{/* high byte of CRC initialized */unsigned char uchCRCHi = 0xFF ;/* low byte of CRC initialized */unsigned char uchCRCLo = 0xFF ;/* will index into CRC lookup table */unsigned uIndex ;/* pass through message buffer */while (usDataLen--){/* calculate the CRC */uIndex = uchCRCLo ^ *puchMsg++ ;uchCRCLo = uchCRCHi ^ auchCRCHi[uIndex] ;uchCRCHi = auchCRCLo[uIndex] ;}return (uchCRCHi << 8 | uchCRCLo) ;}/* Table of CRC values for high–order byte */static unsigned char auchCRCHi[] = {0x00, 0xC1, 0x81, 0x40, 0x01, 0xC0, 0x80, 0x41, 0x01, 0xC0, 0x80, 0x41, 0x00, 0xC1, 0x81, 0x40, 0x01, 0xC0, 0x80, 0x41, 0x00, 0xC1, 0x81, 0x40, 0x00, 0xC1, 0x81, 0x40, 0x01, 0xC0, 0x80, 0x41, 0x01, 0xC0, 0x80, 0x41, 0x00, 0xC1, 0x81, 0x40, 0x00, 0xC1, 0x81, 0x40, 0x01, 0xC0, 0x80, 0x41, 0x00, 0xC1, 0x81, 0x40, 0x01, 0xC0, 0x80, 0x41, 0x01, 0xC0, 0x80, 0x41, 0x00, 0xC1, 0x81, 0x40, 0x01, 0xC0, 0x80, 0x41, 0x00, 0xC1, 0x81, 0x40, 0x00, 0xC1, 0x81, 0x40, 0x01, 0xC0, 0x80, 0x41, 0x00, 0xC1, 0x81, 0x40, 0x01, 0xC0, 0x80, 0x41, 0x01, 0xC0, 0x80, 0x41, 0x00, 0xC1, 0x81, 0x40, 0x00, 0xC1, 0x81, 0x40, 0x01, 0xC0, 0x80, 0x41, 0x01, 0xC0, 0x80, 0x41, 0x00, 0xC1, 0x81, 0x40, 0x01, 0xC0, 0x80, 0x41, 0x00, 0xC1, 0x81, 0x40, 0x00, 0xC1, 0x81, 0x40, 0x01, 0xC0, 0x80, 0x41, 0x01, 0xC0, 0x80, 0x41, 0x00, 0xC1, 0x81, 0x40, 0x00, 0xC1, 0x81, 0x40, 0x01, 0xC0, 0x80, 0x41, 0x00, 0xC1, 0x81, 0x40, 0x01, 0xC0, 0x80, 0x41, 0x01, 0xC0, 0x80, 0x41, 0x00, 0xC1, 0x81, 0x40, 0x00, 0xC1, 0x81, 0x40, 0x01, 0xC0, 0x80, 0x41, 0x01, 0xC0, 0x80, 0x41, 0x00, 0xC1, 0x81, 0x40, 0x01, 0xC0, 0x80, 0x41, 0x00, 0xC1, 0x81, 0x40, 0x00, 0xC1, 0x81, 0x40, 0x01, 0xC0, 0x80, 0x41, 0x00, 0xC1, 0x81, 0x40, 0x01, 0xC0, 0x80, 0x41, 0x01, 0xC0, 0x80, 0x41, 0x00, 0xC1, 0x81, 0x40, 0x01, 0xC0, 0x80, 0x41, 0x00, 0xC1, 0x81, 0x40, 0x00, 0xC1, 0x81, 0x40, 0x01, 0xC0, 0x80, 0x41, 0x01, 0xC0, 0x80, 0x41, 0x00, 0xC1, 0x81, 0x40, 0x00, 0xC1, 0x81, 0x40, 0x01, 0xC0, 0x80, 0x41, 0x00, 0xC1, 0x81, 0x40, 0x01, 0xC0, 0x80, 0x41, 0x01, 0xC0, 0x80, 0x41, 0x00, 0xC1, 0x81, 0x40} ;/* Table of CRC values for low–order byte */static char auchCRCLo[] = {0x00, 0xC0, 0xC1, 0x01, 0xC3, 0x03, 0x02, 0xC2, 0xC6, 0x06, 0x07, 0xC7, 0x05, 0xC5, 0xC4, 0x04, 0xCC, 0x0C, 0x0D, 0xCD, 0x0F, 0xCF, 0xCE, 0x0E, 0x0A, 0xCA, 0xCB, 0x0B, 0xC9, 0x09, 0x08, 0xC8, 0xD8, 0x18, 0x19, 0xD9, 0x1B, 0xDB, 0xDA, 0x1A, 0x1E, 0xDE, 0xDF, 0x1F, 0xDD, 0x1D, 0x1C, 0xDC, 0x14, 0xD4, 0xD5, 0x15, 0xD7, 0x17, 0x16, 0xD6, 0xD2, 0x12, 0x13, 0xD3, 0x11, 0xD1, 0xD0, 0x10, 0xF0, 0x30, 0x31, 0xF1, 0x33, 0xF3, 0xF2, 0x32, 0x36, 0xF6, 0xF7,0x37, 0xF5, 0x35, 0x34, 0xF4, 0x3C, 0xFC, 0xFD, 0x3D, 0xFF, 0x3F, 0x3E, 0xFE, 0xFA, 0x3A,0x3B, 0xFB, 0x39, 0xF9, 0xF8, 0x38, 0x28, 0xE8, 0xE9, 0x29, 0xEB, 0x2B, 0x2A, 0xEA, 0xEE,0x2E, 0x2F, 0xEF, 0x2D, 0xED, 0xEC, 0x2C, 0xE4, 0x24, 0x25, 0xE5, 0x27, 0xE7, 0xE6, 0x26, 0x22, 0xE2, 0xE3, 0x23, 0xE1, 0x21, 0x20, 0xE0, 0xA0, 0x60, 0x61, 0xA1, 0x63, 0xA3, 0xA2, 0x62, 0x66, 0xA6, 0xA7, 0x67, 0xA5, 0x65, 0x64, 0xA4, 0x6C, 0xAC, 0xAD, 0x6D, 0xAF, 0x6F, 0x6E, 0xAE, 0xAA, 0x6A, 0x6B, 0xAB, 0x69, 0xA9, 0xA8, 0x68, 0x78, 0xB8, 0xB9, 0x79, 0xBB, 0x7B, 0x7A, 0xBA, 0xBE, 0x7E, 0x7F, 0xBF, 0x7D, 0xBD, 0xBC, 0x7C, 0xB4, 0x74, 0x75, 0xB5,0x77, 0xB7, 0xB6, 0x76, 0x72, 0xB2, 0xB3, 0x73, 0xB1, 0x71, 0x70, 0xB0, 0x50, 0x90, 0x91, 0x51, 0x93, 0x53, 0x52, 0x92, 0x96, 0x56, 0x57, 0x97, 0x55, 0x95, 0x94, 0x54, 0x9C, 0x5C, 0x5D, 0x9D, 0x5F, 0x9F, 0x9E, 0x5E, 0x5A, 0x9A, 0x9B, 0x5B, 0x99, 0x59, 0x58, 0x98, 0x88, 0x48, 0x49, 0x89, 0x4B, 0x8B, 0x8A, 0x4A, 0x4E, 0x8E, 0x8F, 0x4F, 0x8D, 0x4D, 0x4C, 0x8C, 0x44, 0x84, 0x85, 0x45, 0x87, 0x47, 0x46, 0x86, 0x82, 0x42, 0x43, 0x83, 0x41, 0x81, 0x80, 0x40};。
关于长江海事局VTS系统运行维护管理的浅析作者:洪旭锋来源:《科教导刊·电子版》2019年第22期摘要基于长江海事局VTS系统运行维护的实践出发,本文主要介绍了长江海事局VTS 系统的现状,以及如何做好VTS系统的运行维护保障工作。
关键词 VTS系统运行维护中图分类号:U675.7 文献标识码:AVTS(vessel traffic service)意为船舶交通服务,是为保障船舶交通安全,提高船舶交通效率,保护水域环境,由主管机关设置的对船舶实施交通管制并提供咨询服务的系统。
长江海事局VTS系统是由雷达子系统、VHF通信子系统、信息传输网络子系统、数据处理子系统、交通显示及控制子系统、管理信息子系统、记录重放子系统、数据交换和信息共享子系统、UPS电源子系统等设备组成。
经统计目前长江海事局局辖区内VTS雷达站建设现状为:已建雷达站58座,在建中的雷达站9座,共计67座。
长江海事局VTS系统在经过十几年的建设后取得了一定的成果,提高了长江干线船舶航行的安全、保障了水域清洁。
随着长江黄金水道建设上升为国家战略,沿江经济带发展加速,干线船舶大型化、专业化趋势凸显,新建桥梁等跨河建筑物不断增多,为了保障长江黄金水道的航运,VTS系统运行维护的工作越来越重要。
如何管好用好VTS系统,保证VTS设备长期正常运行,提高VTS系统的完整性,已经摆在VTS维护人员面前。
通过近几年针对VTS系统运维的经验和维护后的总结,要做好VTS系统的运行维护需要做到以下几方面:首先,要规范VTS系统的设备维护管理。
交通运输部海事局于2003年颁布了“中华人民共和国VTS系统设备维护管理”,规定了设备正常工作条件下的岗位工作职责和正常工作条件;雷电,意外停电,火灾和地震程序的紧急情况;设备故障处理程序;日常检查和检查系统和维护系统程序。
长江海事局也于2011年发布了VTS相关管理文件,规定了VTS设备运行维护保养、设备安全管理、系统故障处理、备件管理、运行维护队伍管理等工作须知。
VTS中雷达与AIS基本功能的比较初立辉[摘要]由于雷达是工作于微波波段的目标探测定位设备,而AIS是工作于超短波波段的数据通信设备,两者的工作机理和功能存在差异。
在VTS的应用中,它们各有特点并存在不足,不能以一个取代另一个。
了解并在VTS中充分发挥该两技术手段的特点,相互弥补其存在的不足,对正确、有效使用该两技术手段,进一步扩展VTS功能,更好发挥它对船舶的服务管理功能有着重要意义。
[ Abstract ] Since the radar is operating in the microwave band target detection pointing device and the AIS is operating in the VHF -band data communication device , there is a difference between the two working mechanism and function . In the VTS applications, they have their own characteristics and shortcomings , can not be replaced by another one . Understand and give full play to the characteristics of the VTS of the two techniques , the presence of each other to make up for its lack of proper and effective use of the two techniques, the further expansion of VTS functions , better play its service management capabilities of the ship is of great significance .1雷达与AIS的异同点1.1 雷达与AIS的工作原理雷达是利用电磁波的二次辐射、转发或固有辐射来探测目标,获取目标空间坐标、速度、特征等信息的一种无线电装置。
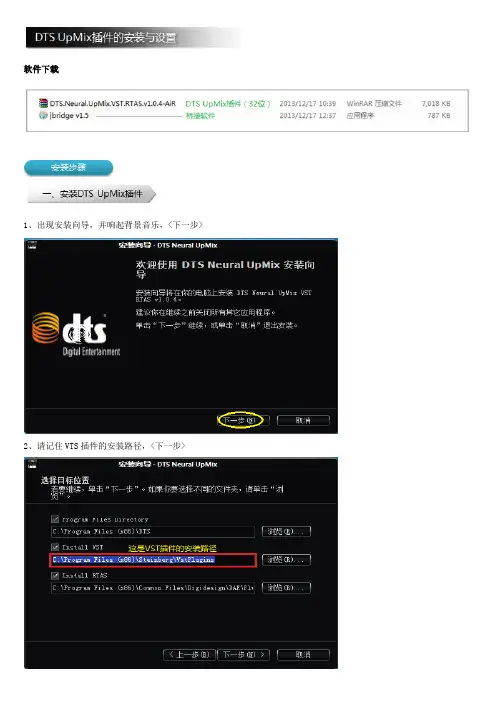
软件下载1、出现安装向导,并响起背景音乐,<下一步>2、请记住VTS插件的安装路径,<下一步>3、<安装>4、点<完成>,稍候片刻,等背景音乐停止后,说明安装结束。
1、jbridge软件的安装,只需三步,用默认方式安装即可,此处省略。
2、安装完后,先打开资源管理器,进入目录,新建一个文件夹,用来存放64位插件的桥接文件,跟原来的32位插件分开来存放。
3、在所有程序里,找到软件,运行它,进行必要的设置。
4、如果您的操作系统和Adobe Audition都是64位,应该选第二个选项。
5、按6、选择下面的文件夹进行扫描;7、选择下面新建的文件夹,作为桥接文件的存放目录。
8、<确定>,设置完毕。
附:和文件夹分别存放了哪些东西?1、运行Audition CC x64软件,将VST插件加载到Au里。
2、“效果”->“音频增效工具管理器”3、点击<添加...>4、找到文件夹,按<选择文件夹>5、按<扫描增效工具>出现这个警告提示,可以忽略,<确定>6、3个VST插件已添加进去,状态为“工作正常”,<确定>。
1、本文的安装环境为Windows 7 x64系统,Adobe Audition CC x64版本。
2、如果您是Windows XP x86/Windows 7 x86系统,Adobe Audition x86版本,只需要安装DTS UpMix插件(32位),不需要安装桥接软件jbridge。
在Audition x86版本里加载DTS UpMix插件时,可以直接加载。
①“效果”->“音频增效工具管理器”②点击<添加>,找到目录,按<选择文件夹>,然后按<扫描增效工具>即可。
nginx vts用法Nginx VTS(Virtual Host Traffic Status)模块是一个用于监控Nginx 虚拟主机流量的模块。
它提供了一种方法来查看每个虚拟主机的请求和响应统计信息,帮助管理员更好地了解Nginx服务器的性能和流量情况。
以下是关于Nginx VTS模块的用法说明:1、安装VTS模块:首先,需要确保你的Nginx服务器已经安装了VTS模块。
可以通过编译Nginx源代码来包含VTS模块,或者在安装Nginx时选择带有VTS 的发行版。
2、配置VTS模块:在Nginx的配置文件中,需要启用VTS模块并配置相关参数。
通常,可以在http或server块中添加以下配置:http {enable_vts_uri "vts";enable_vts_stats;...}上述配置启用了VTS模块,并指定了用于访问VTS统计信息的URI为“vts”。
3、访问VTS统计信息:通过浏览器或使用命令行工具访问Nginx服务器的“/vts”路径,你将能够看到每个虚拟主机的请求和响应统计信息。
这些统计信息包括:(1)总请求数:自服务器启动以来的总请求数量。
(2)总响应字节:自服务器启动以来的总响应字节数。
(3)当前连接数:当前打开的连接数。
(4)请求处理时间:处理每个请求所需的时间。
(5)错误请求数:发生错误的请求数量。
通过查看这些统计信息,你可以了解每个虚拟主机的性能和流量情况,从而做出相应的调整或优化。
4,、VTS模块的其他配置选项:除了上述基本配置外,VTS模块还提供了一些其他配置选项,例如限制访问权限、自定义统计信息的显示方式等。
你可以根据实际需求进行相应的配置调整。
需要注意的是,VTS模块是Nginx的一个可选模块,并非所有Nginx发行版都包含该模块。
如果你无法找到VTS模块的配置选项,可能是你的Nginx版本不包含该模块。
在这种情况下,你可以尝试使用其他第三方工具或模块来实现类似的功能。
AIS和VTS在交管系统的应用区别与联系[摘要] AIS系统是整合了卫星定位和罗经计程仪、通过VHF无线电数据通信、在雷达和电子海图上的显示等技术的航海、导航、信息通信的新型航行设备和系统。
VTS是由海事主管当局实施的,旨在改善船舶交通安全和效率以及保护环境的一种服务系统。
该系统具备与交通相互作用和对VTS水域交通状况做出反应的能力。
因此,提高和改善船舶的交通安全性将是AIS和VTS的主要功能。
[关键词] AIS VTS 雷达跟踪一、引言船舶自动识别系统(Automatic Identification System 简称AIS)是诞生在20世纪国际新经济崛起的90年代,由发达国际率先发起,以信息技术为先导,是多门类高科技为支柱的新型航海设备和系统。
从1995.7 IMO 航行安全分委会(NA V)41次会上瑞典、芬兰联合首次提出将自组织时分地(STDMA)技术用于船舶间和船岸间海上转发器系统的建议以来, 国际海事组织(IMO)、国际航标协会(IALA)、国际电信联盟(ITU)、国际电工委员会(IEC)等十分重视AIS 的进展,及时制订了一系列国际法规、技术标准,促使AIS在技术、标准、产品等方面迅速发展。
尤其是2001.12 IMO 海委会(MSC)73次会议通过各类船舶限期安装AIS设备的决定,更是推动了AIS的产品化进程与全面应用时代的到来。
目前我国已经建成AIS基站70多座、AIS地区级网络10多个,建成了长江口、珠江口、渤海湾及琼州海峡等四个AIS岸基网络系统,我国已有90%的远洋船舶装配了AIS设备。
根据交通部海事局“十一五”规划要求,我国将在“十一五”期间建成覆盖中国沿海的AIS网络系统,为此,将分期建设AIS岸基122个、地区级网络22个、海区级给ASM3个、国家级中心及ASM1个,增设公用干级网络9个,并相应增加该层面的ASM 9个,建设目标是建成基于AIS岸基的中国海事网络信息系统。
国内船舶安装AIS的要求1. AIS安装要求:1.1. AIS 的MKD(最小键盘和显示) 应安装在驾驶台,同时该位置应便于航行值班人员在通常操作位置进行操作及观察(通常为主雷达附近)。
除非AIS在驾驶室内具有外接显示单元(雷达、电子海图),否则必须安装在驾驶台内。
AIS设备应由主电源、应急电源的导航分配电板供电。
曾经有的船在安装时图方便,直接将其接到无线电设备的电源上,或直接在驾驶台插座中取电,这都是不允许的。
(如果船舶较小(吨位/船长)则按其应急电源配备要求)其它配件电缆:电源电缆应采用成束滞燃型(应持有CCS证书);设备电缆应有金属防护套(电磁屏蔽);对外接GPS的信号电缆应为RG-214型(IEC牌号,而日本牌号为RY-10型,在FURUNO产品说明书中有明确要求。
);RG-214为双层屏蔽线且每层均镀银(为防止信号衰减)。
室外电缆连接处应有适当的水密措施(如利用电缆热缩管)稳压电源:应采用12A以上稳压电源(应持有CCS证书),且建议不要使用开关电源(滤波效果很差,干扰通/导设备)。
GPS:应持有CCS证书,且该设备有WGS-84坐标系。
(否则会与内部GPS不符,且给岸上VTS中心造成干扰。
引水员接口及其附近的电源插头:此要求在国内不是强制要求的,目前只有航行于美国或巴拿马运河的船只强制要求。
(船旗国政府的强制要求)天线安装:AIS 的VHF天线应尽可能在水平360o内无障碍物。
AIS 的VHF天线在水平方向应距离导体结构2m以上,离雷达、高功率源天线(如INMARSAT系统)应距离发射波束3m以外。
AIS 的VHF天线与船舶VHF天线不应在同一水平面上,并且在垂直方向上间隔至少2m以上,若必须在同一水平面上,则在水平方向上至少相距10m。
GNSS(即GPS)天线(指内部),应在水平360o、仰角5o---90o内无连续障碍物。
远离S波段雷达及INMARSAT系统等高功率天线发射波束3m以外。
Installation GuideGo to Help Center onlinehttps:///vugen/Virtual User Generator (VuGen)Software version: 2023-2023R1Document release date: August2023Send Us FeedbackLet us know how we can improve your experience with theInstallation Guide.Send your email to: **********************Legal Notices©Copyright2023Open Text.The only warranties for products and services of Open Text and its affiliates and licensors (“Open Text”)are as may be set forth in the express warranty statements accompanying such products and services.Nothing herein should be construed as constituting an additional warranty.Open Text shall not be liable for technical or editorial errors or omissions contained herein.The information contained herein is subject to change without notice.DisclaimerCertain versions of software accessible here may contain branding from Hewlett-Packard Company(now HP Inc.)and Hewlett Packard Enterprise Company.This software was acquired on September1,2017by Micro Focus and is now offered by Open Text,a separately owned and operated company.Any reference to the HP and Hewlett Packard Enterprise/HPE marks is historical in nature,and the HP and Hewlett Packard Enterprise/HPE marks are the property of their respective owners.ContentsWelcome to VuGen4 VuGen Help Center4 VuGen components5 Download installation packages5System requirements and prerequisites6 System requirements6 Before you install6Installing VuGen9 Installation workflow9 Upgrade VuGen10 Install VuGen using the Setup wizardInstall VuGen silently12 Installation command line options13 Install a VuGen language pack15Welcome to VuGenWelcome to the OpenText™VuGen Installation Guide.VuGen is a tool for creating virtual user(Vuser)scripts,primarily through recording. Vuser scripts emulate users without a graphical user interface by using direct function calls.This guide describes how to install and set up VuGen.VuGen Help CenterFor context sensitive help within VuGen,press F1within a dialog box or use the Help menu.You can access the LoadRunner Professional and VuGen Help Centers on the web. l https:///lr/l https:///vugen/When you open a link to a Help Center,make sure that the relevant product version is selected.You can also download and install local versions of the help from the Download Help Centers page.To switch between online and local modes,select Help> Help Center Options> Open Online or Open Locally.VuGen componentsThis installation guide describes the installation of VuGen.VuGen is a tool for creating virtual user(Vuser)scripts,primarily through recording.Vuser scripts emulate users without a graphical user interface by using direct function calls.Additional componentsAdditional components(such as the Citrix agent)can be found in the installation package's Additional Components folder.For details and installation instructions, see Additional components and applications in the VuGen Help Center.Download installation packagesYou can access the installation packages from the free trial page or by selecting your account on the Software Licenses and Downloads page.You can also download VuGen,LoadRunner Developer,VTS,LoadRunner Data Hub,and more,for free from AppDelivery Marketplace.System requirements and prerequisitesThis chapter includes:•System requirements6•Before you install6System requirementsThe following information can be found in the Support Matrix:l System requirements for running VuGen on a Windows systeml A full list of components that can be installed on the same physical machine at the same timeFor system requirements and installation instructions for Network Virtualization, see the Network Virtualization for LoadRunner Help.You can install Network Virtualization during the VuGen installation,or at a later time.Before you installBefore you install VuGen,review the information below.For additional notes and limitations,see Known issues in the VuGen Help Center.Security review We strongly recommend that you install VuGen components on dedicated machines that do not contain,or provide access to, sensitive information;and that you do a thorough security review of the network topology and access levels in your testing environment.Permission requirements The installation process for VuGen requires a full administrator account for all operating systems.You can install VuGen components with UAC and DEP enabled, but we recommend to keep them disabled during installation(or enable DEP for essential Windows programs and services only). After installation,VuGen can run under a standard user account (an administrator account is not required),with UAC and DEP enabled.Antivirus applications It is recommended that you close all antivirus applications before installing VuGen.Running Java Vusers on Windows OpenJDK32-bit is no longer automatically installed with LoadRunner.To work with Java protocols,you need to manually install a supported version of the JDK.VuGen uses internal logic to automatically detect your JRE version.For details,see Set up the environment for Java protocols.VuGen and UFT coexistence If you install VuGen and UFT on the same machine,and then uninstall one of them,the remaining software program may not function correctly.Resolution:Run a Repair of the software program you want to use on the machine.Custom certificates When upgrading from version12.55or earlier,if you used custom certificates in your previous installation of LoadRunner, install them again when prompted for certificates during setup. Otherwise,the setup program will overwrite them using the defaults.Network Virtualization If you choose to install NV automatically(as part of VuGen installation),you must disable Windows SmartScreen before proceeding with the NV installation:Open HKEY_LOCAL_MACHINE\SOFTWARE\Microsoft\Windows\CurrentVersion\Expl orer in the Registry Editor,and change the Value data for SmartScreenEnabled to Off.Note:You do not need to disable SmartScreen when installing NV manually.Virtual environments The architectures provided by virtualization vendors are rapidly evolving.VuGen is expected to function as designed in these changing environments,as long as the third-party vendor guarantees full compatibility of the virtualized environment with theVuGen-approved hardware requirements.If you follow the system requirements and support matrix to create the virtual machine,VuGen will work correctly.Working on top of a virtual machine may require access to the virtualization server hardware/monitoring environment,to ensure the virtualization server is not saturated;otherwise,this might obscure the virtual machine's measurements and lead to false results.Installing VuGenThis chapter describes how to install VuGen on a Windows platform.This chapter includes:•Installation workflow9•Upgrade VuGen10•Install VuGen using the Setup wizard10•Install VuGen silently12•Installation command line options13•Install a VuGen language pack15Installation workflowThe VuGen installation package includes the Setup wizard that guides you through the process of installing VuGen.Installing VuGen on a Windows system involves the steps shown below:1.Prerequisitesl Make sure that your system meets the hardware and software requirements.For details,see"System requirements"on page 6.l Review the information here:"Before you install"on page 6.l Installation must be performed at the destination machine.VuGen does not support installation via terminal service.Installation GuideInstalling VuGen2.Run the setupl Wizard installation:To run the installation using the Setup wizard,see"Install VuGen using the Setup wizard"below.l Silent installation:To perform a silent installation,see"Install VuGensilently"on page 12.After you run the setup,run any patch installations if necessary.3.Install a language pack(optional)After you complete the VuGen installation,you can install a localized version to view the VuGen user interface in your local language.For details,see"Install a VuGen language pack"on page 15.Upgrade VuGenVuGen is a full installation that can be installed over any VuGen installation(version 12.5x and later).To upgrade all components in your Windows installation using the Setup wizard, follow the installation process as described in"Install VuGen using the Setup wizard"below.The installation process detects the older version and gives you the option to upgrade.For silent upgrade,see"Install VuGen silently"on page 12.Install VuGen using the Setup wizardThis section describes how to install VuGen using the Setup wizard.To install VuGen or an additional component:1.Make sure the Windows Update process is not running on your machine.2.Run the setup.exe file in the root folder of the installation package.The VuGen installation program begins and displays the installation options. 3.Select the required installation option.For details on each of the availablecomponents,see"VuGen components"on page 5.4.Specific software needs to be installed on Windows before you can installVuGen(see the Support Matrix).If the prerequisite software is not already installed on your computer,a dialog box opens displaying the list ofprerequisite programs that are required.Click OK to install the listed software before continuing with the VuGeninstallation.If you click Cancel,the VuGen Setup wizard exits because VuGen cannot be installed without the prerequisite software.After installing prerequisite software,VuGen may restart the machine.If that occurs,rerun setup.exe.5.Perform the installation.The Setup wizard opens,displaying the Welcome page.Follow the instructions in the wizard to complete the installation.6.After the installation is complete,you can choose to install NetworkVirtualization(NV).In the Setup wizard,select:l Typical mode for an automatic installation of the NV for Load Generator and VuGen component.l Custom mode to change the installation folder,data folder,and the port.For more details,see the installation section of the Network Virtualization for LoadRunner Help.7.If there is a patch available for the installed version:a.Run the patch installation file provided with the installation package.b.Follow the on-screen instructions.Install VuGen silentlyA silent installation is an installation that is performed without the need for user interaction.You use the command line to run the setup files.For details,see "Installation command line options"on the next page.To perform a silent installation of VuGen:1.Run one of the following commands from the command line:l To install VuGen:l To install additional components:2.If you are installing an upgrade,run the following command:The msp files are located in the installation package.For details,see"Upgrade VuGen"on page 10.Installation command line optionsYou can install VuGen or one of the additional components via the Package for the web(PFTW)files that are included with the LoadRunner Professional installation media.The installation files are located under the Standalone Applications or Additional Components folders on the installation media.Double-click on the packaged file,or run it from the command line using the following options:ExamplesThe following commands silently run setup,and install the application in the specified folder.Where relevant,they also start the agent after installation:l Examples for SetupVuGen.exe and SetupOneLG.exe:l Examples for other standalone applications:Install a VuGen language packThe language packs enable you to view the VuGen user interface in your local language.You install the language pack from the LoadRunner Professional installation package.For a list of supported languages,see the Support Matrix.The language packs are supported for native non-English operating systems only.To install a language pack:1.Make sure that VuGen in English is already installed.2.In the root folder of the LoadRunner Professional installation package,runsetup.exe.The VuGen installation program begins and displays the installation options.3.Click Language Packs.The Language Packs folder in the installation packageopens.4.Navigate to the folder for the language and component you want to install andrun the installation file.For example,to install the French language pack on a VuGen standalone machine,the path is..\LanguagePacks\French\VugenSA\Vugen_FRA.msp.Follow the online instructions.。
软件下载1、出现安装向导,并响起背景音乐,<下一步>2、请记住VTS插件的安装路径,<下一步>3、<安装>4、点<完成>,稍候片刻,等背景音乐停止后,说明安装结束。
1、jbridge软件的安装,只需三步,用默认方式安装即可,此处省略。
2、安装完后,先打开资源管理器,进入目录,新建一个文件夹,用来存放64位插件的桥接文件,跟原来的32位插件分开来存放。
3、在所有程序里,找到软件,运行它,进行必要的设置。
4、如果您的操作系统和Adobe Audition都是64位,应该选第二个选项。
5、按6、选择下面的文件夹进行扫描;7、选择下面新建的文件夹,作为桥接文件的存放目录。
8、<确定>,设置完毕。
附:和文件夹分别存放了哪些东西?1、运行Audition CC x64软件,将VST插件加载到Au里。
2、“效果”->“音频增效工具管理器”3、点击<添加...>4、找到文件夹,按<选择文件夹>5、按<扫描增效工具>出现这个警告提示,可以忽略,<确定>6、3个VST插件已添加进去,状态为“工作正常”,<确定>。
1、本文的安装环境为Windows 7 x64系统,Adobe Audition CC x64版本。
2、如果您是Windows XP x86/Windows 7 x86系统,Adobe Audition x86版本,只需要安装DTS UpMix插件(32位),不需要安装桥接软件jbridge。
在Audition x86版本里加载DTS UpMix插件时,可以直接加载。
①“效果”->“音频增效工具管理器”②点击<添加>,找到目录,按<选择文件夹>,然后按<扫描增效工具>即可。
SUNvts的安装和使用1.概述1.1什么是SUNvts Sunvts是sun Validation Test Suite的缩写。
它是sun的一个全面的硬件测试工具,SUNvts通过校验sun平台上的设备和硬件控制器的连通性和功能性来检测硬件是否正常。
1.2SUNvts支持的测试※CD DVD Test(cddvdtest)※CPU Test(cputest)※Disk and Floppy Drives Test(disktest)※Data Translation Look-aside Buffer(dtlbtest)※Floating Point Unit Test(fputest)※Network Hardware Test(nettest)※Ethernet Loopback Test(netlbtest)※Physical Memory Test(pmemtest)※Serial Port Test(serialtest)※System Test(systest)※Universal Serial Board Test(usbtest)※Virtual Memory Test(vmemtest)注:SUNvts提供了GUI和tty两种模式来进行状态配置和环境的监测,具体会在后面的介绍中进行详细的描述。
2.安装SUNvts及补丁2.1安装SUNvts SUNvts包及相关文档的下载地址:[url]/oem/products/vts/index.html[/url]。
将下载的包ftp到主机中。
本例中将SUNvts传到了/opt/sun下。
(本例是以5.1版为例)root@nz86#cd/opt root@nz86#cd sun root@nz86#ls SUNVTS binroot@nz86#cd SUNVTS root@nz86#ls 5.1root@nz86#cd 5.1 root@nz86#ls README SUNVTS_5.TGZ root@nz86#gunzip*.TGZ root@nz86#ls README SUNVTS_5.tar root@nz86#tar xf*.tar root@nz86#ls README SUNVTS_5.tar SunVTS-5.1 root@nz86#cd SunVTS* root@nz86#ls8SUNWvts SUNWvtsmn SUNWvtsx sunvts5.1_new.html root@nz86#cd8root@nz86#lsSUNWlxml SUNWlxmlx install-s8xmlpkgs.sh root@nz86#./in*Installing Solaris8XML pkgs...处理软件包范例<SUNWlxml>来自</opt/sun/SUNVTS/5.1/SunVTS-5.1/8>The XML library(sparc)11.8.0,REV=2002.05.10.00.32 XML parser for GnomeFull documentation is available on-line at [url]/[/url] This code is released under the LGPL or the W3C IPR,pick the one you prefer.A mailing-list is available,to subscribe: echo"subscribe xml"|mail[email]majordomo@[/email] The list archive is at:[url]/messages/[/url] [email]Daniel.Veillard@[/email]使用</>作为包的基本目录##正在处理软件包信息.##正在处理系统信息.4软件包路径名已经正确地安装##检查软件包的从属性##检查磁盘空间需求##检查同已经安装的软件包之间的冲突. ##检查setuid/setgid程序。
安装The XML library成为<SUNWlxml>##正在安装1部分- 1./usr/bin/xml2-config/usr/bin/xmlcatalog/usr/bin/xmllint/usr/include/libxml2/libxml/DOCBparser.h /usr/include/libxml2/libxml/HTMLparser.h /usr/include/libxml2/libxml/HTMLtree.h /usr/include/libxml2/libxml/SAX.h /usr/include/libxml2/libxml/catalog.h /usr/include/libxml2/libxml/debugXML.h /usr/include/libxml2/libxml/encoding.h /usr/include/libxml2/libxml/entities.h /usr/include/libxml2/libxml/globals.h /usr/include/libxml2/libxml/hash.h/usr/include/libxml2/libxml/list.h /usr/include/libxml2/libxml/nanoftp.h /usr/include/libxml2/libxml/nanohttp.h /usr/include/libxml2/libxml/parser.h /usr/include/libxml2/libxml/parserInternals.h /usr/include/libxml2/libxml/threads.h /usr/include/libxml2/libxml/tree.h /usr/include/libxml2/libxml/uri.h /usr/include/libxml2/libxml/valid.h /usr/include/libxml2/libxml/xinclude.h /usr/include/libxml2/libxml/xlink.h /usr/include/libxml2/libxml/xmlIO.h /usr/include/libxml2/libxml/xmlerror.h /usr/include/libxml2/libxml/xmlmemory.h /usr/include/libxml2/libxml/xmlversion.h /usr/include/libxml2/libxml/xpath.h /usr/include/libxml2/libxml/xpathInternals.h /usr/include/libxml2/libxml/xpointer.h /usr/lib/libxml2.so<符号链接> /usr/lib/libxml2.so.2[确认类别<none>]安装<SUNWlxml>成功处理软件包范例<SUNWlxmlx>来自</opt/sun/SUNVTS/5.1/SunVTS-5.1/8>The XML library(64-bit) (sparc)11.8.0,REV=2002.05.10.00.32 XML parser for GnomeFull documentation is available on-line at [url]/[/url] This code is released under the LGPL or the W3C IPR,pick the one you prefer.A mailing-list is available,to subscribe: echo"subscribe xml"|mail[email]majordomo@[/email]The list archive is at: [url]/messages/[/url][email]Daniel.Veillard@[/email]使用</>作为包的基本目录##正在处理软件包信息.##正在处理系统信息.3软件包路径名已经正确地安装##检查软件包的从属性##检查磁盘空间需求##检查同已经安装的软件包之间的冲突. ##检查setuid/setgid程序。
安装The XML library(64-bit)成为<SUNWlxmlx>##正在安装1部分- 1./usr/lib/sparcv9/libxml2.so<符号链接> /usr/lib/sparcv9/libxml2.so.2 [确认类别<none>]安装<SUNWlxmlx>成功root@nz86#cd..root@nz86#ls8SUNWvts SUNWvtsmn SUNWvtsx sunvts5.1_new.html root@nz86#pkgadd-d.下列软件包是可以使用的: 1SUNWvts SunVTS(sparc)5.1,REV=08.02.07.25,OE=5.8,5.9 2SUNWvtsmn SunVTS Man Pages (sparc)5.1,REV=08.02.07.25,OE=5.8,5.9 3SUNWvtsx64-bit SunVTS (sparc)5.1,REV=08.02.07.25,OE=5.8,5.9选择你要执行的软件包(或选择'全部'执行所有的软件包).(default:all)[?,??,q]:处理软件包范例<SUNWvts>来自</opt/sun/SUNVTS/5.1/SunVTS-5.1> SunVTS(sparc) 5.1,REV=08.02.07.25,OE=5.8,5.9 Copyright2002Sun Microsystems,Inc.All rights reserved. Use is subject to license terms.SunVTS supports Kerberos V5network authentication protocol,included in SEAM(Sun Enterprise Authentication Mechanism).This protocol is designed to provide strong authentication for client/server applications by using secret-key cryptography. In order to use this feature,a SEAM-based Security enabled network must be present.Do you want to enable the Kerberos V5based security?##执行检查安装正文.使用</opt>作为包的基本目录##正在处理软件包信息.##正在处理系统信息.##检查软件包的从属性##检查磁盘空间需求##检查同已经安装的软件包之间的冲突. ##检查setuid/setgid程序。